30BRC3 - Microwaves IFB - Free user manual and instructions
Find the device manual for free 30BRC3 IFB in PDF.


| Product Type | Microwave Oven |
| Brand | IFB |
| Model | 30BRC3 |
| Power Supply | 230V ~ 50Hz |
| Power Consumption (Microwave) | 1400W |
| Power Consumption (Grill) | 1250W |
| Power Consumption (Convection) | 2200W |
| Rated Microwave Output | 900W |
| Operation Frequency | 2450 MHz |
| Outside Dimensions (H x W x D) | 300 mm x 539 mm x 440 mm |
| Oven Capacity | 30 Liters |
| Net Weight | Approx. 19.17 kg |
| Cooking Uniformity | Turntable System |
| Control Panel | Digital with LED Display, Touch Buttons |
| Cooking Modes | Microwave, Grill, Convection, Microwave + Grill, Microwave + Convection, Turn Grill, Convection + Turn Grill, Convection + Turn Grill + Microwave |
| Auto Menus | Quick Beverage, Healthy Snacks, One Pot Meal, Cake Expert, Pizzaiolo, Cookie Master, Kebabs & Tikkas, Food Refresh, Intelligent Defrost |
| Grill Type | Dual Grill (Upper and Lower) |
| Child Lock | Yes (Press STOP/RESET for 3 seconds) |
| Express Cook | Yes (Start at 100% power, adds 30 seconds per press) |
| Sanitize Function | Yes (Microwave 5 min with 200ml water) |
| Deodorize Function | Yes (Empty oven, two presses of Sanitize) |
| Power Save Mode | Yes (Press Power Save to blank display) |
| Clock | 12/24 hour selectable |
| Kitchen Timer | Up to 99 minutes 99 seconds |
| Interior Light | Yes |
| Accessories Included | Glass Turntable, Roller Ring, Baking Plate, Low Metal Rack, High Metal Rack, Rotisserie Rack |
| Cleaning | Wipe with damp cloth; glass tray dishwasher safe; roller ring washable |
| Safety | Door safety lock system, grounding required, automatic overheat protection |
| Warranty | 12 months on parts, 36 months on magnetron & cavity |
Frequently Asked Questions - 30BRC3 IFB
User questions about 30BRC3 IFB
0 question about this device. Answer the ones you know or ask your own.
Ask a new question about this device
Download the instructions for your Microwaves in PDF format for free! Find your manual 30BRC3 - IFB and take your electronic device back in hand. On this page are published all the documents necessary for the use of your device. 30BRC3 by IFB.
USER MANUAL 30BRC3 IFB
natural_image
Simple line drawing of a rectangular cabinet or enclosure with a vertical door and side panel (no text or symbols)Microwave Oven Owner's Manual
PLEASE READ THESE OWNERS'S MANUAL INSTRUCTION CAREFULLY BEFORE OPERATION AND KEEP IT FOR FUTURE REFERENCE.
Please record the details of your microwave oven below for future reference:
Serial no: ....
Purchase Date: ....
CONTENTS
SPECIFICATIONS....2
BEFORE YOUCALL FOR SERVICE....2
INSTALLATION 2
GROUNDING INSTRUCTIONS ....3
RADIO INTERFERENCE 3
IMPORTANT SAFETY INSTRUCTIONS .... 4
MICROWAVE COOKING PRINCIPLES 6
UTENSILS GUIDE......6
PARTNAMES....7
CONTROL PANEL 8
HOW TO SET THE OVENCONTROLS 9
SETTING THE CLOCK....9
KITCHEN TIMER 9
MICROWAVE COOKING....9
GRILL/MICROWAVE +GRILL 10
TURN GRILL/MICRO+TURN GRILL 11
CONVECTION....11
MICROWAVE +CONVECTION 12
CONVECTION+TURN GRILL....12
CONVECTION+TURN GRILL+MICRO 13
INTELLIGENT DEFREEZE 13
MENU COOK....14
RECIPES....15-36
OTHER CONVENIENT FEATURES....37
CLEANING AND CARE....39
SPECIFICATIONS
| Power Supply | 230V~50Hz |
| Power Consumption (Microwave) | 1400W |
| Power Consumption (Grill) | 1250W |
| Power Consumption (Convection) | 2200W |
| Rated Microwave Output | 900W |
| Operation Frequency | 2450MHz |
| Outside Dimensions | 300mm(H)×539mm(W)×440mm(D) |
| Oven Capacity | 30Litres |
| Cooking Uniformity | Turntable System |
| Net Weight | Approx. 19.17kg |
BEFORE YOU CALL FOR SERVICE
If the oven fails to operate:
- Check to ensure that the oven is plugged in securely. If it is not, remove the plug from the outlet, wait 10 seconds, and plug it in again securely.
- Check for a blown circuit fuse or a tripped main circuit breaker. If these seem to be operating properly, test the outlet with another appliance.
- Check to ensure that the control panel is programmed correctly and the timer is set.
- Check to ensure that the door is securely closed engaging the door safety lock system. Otherwise, the microwave energy will not flow into the oven.
IF NONE OF THE ABOVE RECTIFY THE SITUATION, THEN CONTACT A QUALIFIED TECHNICIAN.
DO NOT TRY TO ADJUST OR REPAIR THE OVEN YOURSELF.
INSTALLATION
- Make sure that all the packing materials are removed from the inside of the door.
- WARNING: Check the oven for any damage, such as misaligned or bent door, damaged door seals and sealing surface, broken or loose door hinges and latches and dents inside the cavity or on the door. If there is any damage, do not operate the oven and contact qualified service personnel.
- This microwave oven must be placed on a flat, stable surface to hold its weight and the heaviest
food likely to be cooked in the oven.
- Do not place the oven where heat, moisture, or high humidity are generated, or near combustible materials.
- For correct operation, the oven must have sufficient airflow. Allow 20cm of space above the oven, 10cm at back and 5cm at both sides. Do not cover or block any openings on the appliance. Do not remove feet.
- Do not operate the oven without glass tray, roller support, and shaft in their proper positions.
- Make sure that the power supply cord is undamaged and does not run under the oven or over any hot or sharp surface.
- The socket must be readily accessible so that it can be easily unplugged in an emergency.
- Do not use the oven outdoors.
GROUNDING INSTRUCTIONS
This appliance must be grounded. This oven is equipped with a cord having a grounding wire with a grounding plug. It must be plugged into a wall receptacle that is properly installed and grounded. In the event of an electrical short circuit, grounding reduces risk of electric shock by providing an escape wire for the electric current. It is recommended that a separate circuit serving only the oven be provided. Using a high voltage is dangerous and may result in a fire or other accident causing oven damage.
WARNING: Improper use of the grounding plug can result in a risk of electric shock.
Note
- If you have any questions about the grounding or electrical instructions, consult a qualified electrician or service person.
- Neither the manufacturer nor the dealer can accept any liability for damage to the oven or personal injury resulting from failure to observe the electrical connection procedures.
The wires in this cable main are colored in accordance with the following code:
Green and Yellow = EARTH
Blue = NEUTRAL
Brown = LIVE
RADIO INTERFERENCE
Operation of the microwave oven can cause interference to your radio, TV, or similar equipment. When there is interference, it may be reduced or eliminated by taking the following measures:
- Clean door and sealing surface of the oven.
- Reorient the receiving antenna of radio or television.
- Relocate the microwave oven with respect to the receiver.
- Move the microwave oven away from the receiver.
- Plug the microwave oven into a different outlet so that microwave oven and receiver are on different branch circuits.
IMPORTANT SAFETY INSTRUCTIONS
When using electrical appliance basic safety precautions should be followed, including the following:
WARNING: To reduce the risk of burns, electric shock, fire, injury to persons or exposure to excessive microwave energy:
- Read all instructions before using the appliance.
-
Use this appliance only for its intended use as described in this manual. Do not use corrosive chemicals or vapors in this appliance. This type of oven is specifically designed to heat, cook or dry food. It is not designed for industrial or laboratory use. drying of food or clothing and heating warming pads, slippers, sponges, damp cloth and similar may lead to risk of injury, ignition or fire. The microwave oven is intended for defrosting, cooking and steaming of food only.
-
Do not operate the oven when empty.
-
Do not operate this appliance if it has a damaged cord or plug, if it is not working properly or if it has been damaged or dropped. If the supply cord is damaged, it must be replaced by the manufacturer or its service agent or a similarly qualified person in order to avoid a hazard
-
WARNING: Only allow children to use the oven without supervision when adequate instructions have been given so that the child is able to use the oven in a safe way and understands the hazards of improper use.
-
Warning: When the appliance is operated in the combination mode, children should only use the oven under adult supervision due to the temperatures generated.
-
To reduce the risk of fire in the oven cavity:
a. When heating food in plastic or paper container, keep an eye on the oven due to the possibility of ignition;
b. Remove wire twist-ties from paper or plastic bags before placing bag in oven.
c. If smoke is observed, switch off or unplug the appliance and keep the door closed in order to stifle any flames.
d. Do not use the cavity for storage purposes. Do not leave paper products, cooking utensils or food in the cavity when not in use.
-
WARNING: Liquid or other food must not be heated in sealed containers since they are liable to explode.
-
Microwave heating of beverage can result in delayed eruptive boiling, therefore care has to be taken when handling the container.
-
Do not fry food in the oven. Hot oil can damage oven parts and utensils and even result in skin burns.
-
Eggs in their shell and whole hard-boiled eggs should not be heated in microwave ovens since they may explode even after microwave heating has ended.
-
Pierce foods with heavy skins such as potatoes, whole squashes, apples and chestnuts before cooking.
-
The contents of feeding bottles and baby jars should be stirred or shaken and the temperature should be checked before serving in order to avoid burns.
-
Cooking utensils may become hot because of heat transferred from the heated food. Potholders may be needed to handle the utensil.
-
Utensils should be checked to ensure that they are suitable for use in microwave oven.
- WARNING: It is hazardous for anyone other than a trained person to carry out any service or repair operation which involves the removal of any cover which gives protection against exposure to microwave energy.
- This product is a Group 2 Class B ISM equipment. The definition of Group 2 which contains all ISM (Industrial, Scientific and Medical) equipment in which radio-frequency energy is intentionally generated and/or used in the form of electromagnetic radiation for the treatment of material, and spark erosion equipment. For Class B equipment is equipment suitable for use in domestic establishments and in establishments directly connected to a low voltage power supply network which supplies buildings used for domestic purpose.
- This appliance is not intended for use by persons (including children) with reduced physical, sensory or mental capabilities, or lack of experience and knowledge, unless they have been given supervision or instruction concerning use of the appliance by a person responsible for their safety.
- Children should be supervised to ensure that they do not play with the appliance.
- The microwave oven is only used in freestanding.
- WARNING: Do not install oven over a range cooktop or other heat-producing appliance. if installed could be damaged and the warranty would be avoid.
- The accessible surface may be hot during operation.
- The microwave oven shall not be placed in a cabinet.
- The door or the outer surface may get hot when the appliance is operating.
- The temperature of accessible surfaces may be high when the appliance is operating.
- The appliance shall be placed against a wall.
- Appliance is not to be used by children or persons with reduced physical, sensory or mental capabilities, or lack of experience and knowledge, unless they have been given supervision or instruction
- Children being supervised not to play with appliance
- WARNING: If the door or door seals are damaged, the oven must not be operated until it has been repaired by a competent person
- The instructions shall state that appliances are not intended to be operated by means of an external timer or separate remote-control system.
- The microwave oven is for household use only and not for commercial use.
- Never remove the distance holder in the back or on the sides, as it ensures a minimum distance from the wall for air circulation.
- Please secure the turn table before you move the appliance to avoid damages.
- Caution: It is dangerous to repair or maintain the appliance by no other than a specialist because under these circumstances the cover have to be removed which assures protection against microwave radiation. This applies to changing the power cord or the lighting as well. Send the appliance in these cases to our service centre.
- The microwave oven is intended for defrosting, cooking and steaming of food only.
- Use gloves if you remove any heated food.
- Caution! Steam will escape, when opening lids or wrapping foil.
- This appliance can be used by children aged from 8 years and above and persons with reduced
physical, sensory or mental capabilities or lack of experience and knowledge if they have been given supervision or instruction concerning use of the appliance in a safe way and understand the hazards involved. Children shall not play with the appliance. Cleaning and user maintenance shall not be made by children unless they are aged from 8 years and above and supervised.
- If smoke is emitted, switch off or unplug the appliance and keep the door closed in order to stifle.
MICROWAVE COOKING PRINCIPLES
- Arrange food carefully. Place thickest areas towards outside of dish.
- Watch cooking time. Cook for the shortest amount of time indicated and add more as needed. Food severely overcooked can smoke or ignite.
- Cover foods while cooking. Covers prevent spattering and help foods to cook evenly.
- Turn foods over once during microwaving to speed cooking of such foods as chicken and hamburgers. Large items like roasts must be turned over at least once.
- Rearrange foods such as meatballs halfway through cooking both from top to bottom and from the center of the dish to the outside.
UTENSILS GUIDE
- The ideal material for a microwave utensil is transparent to microwave, it allows energy to pass through the container and heat the food.
- Microwave cannot penetrate metal, so metal utensils or dishes with metallic trim should not be used.
- Do not use recycled paper products when microwave cooking, as they may contain small metal fragments which may cause sparks and/or fires.
- Round /oval dishes rather than square/oblong ones are recommend, as food in corners tends to overcook.
- Narrow strips of aluminum foil may be used to prevent overcooking of exposed areas. But be careful don't use too much and keep a distance of 1 inch (2.54cm) between foil and cavity.
The list below is a general guide to help you select the correct utensils.
| Cookware | Microwave | Grill / Convection / Turn Grill | Combination* |
| Heat-Resistant Glass | Yes | Yes | Yes |
| Non Heat-Resistant Glass | No | No | No |
| Heat-Resistant Ceramics | Yes | Yes | Yes |
| Microwave-Safe Plastic Dish | Yes | No | No |
| Kitchen Paper | Yes | No | No |
| Metal Tray | No | Yes | No |
| Metal Rack | No | Yes | No |
| Aluminum Foil & Foil Container | No | Yes | No |
* Combination: applicable for both "microwave + grill", "microwave + convection", "microwave + turn grill" and "convection + microwave + turn grill" cooking.
PART NAMES
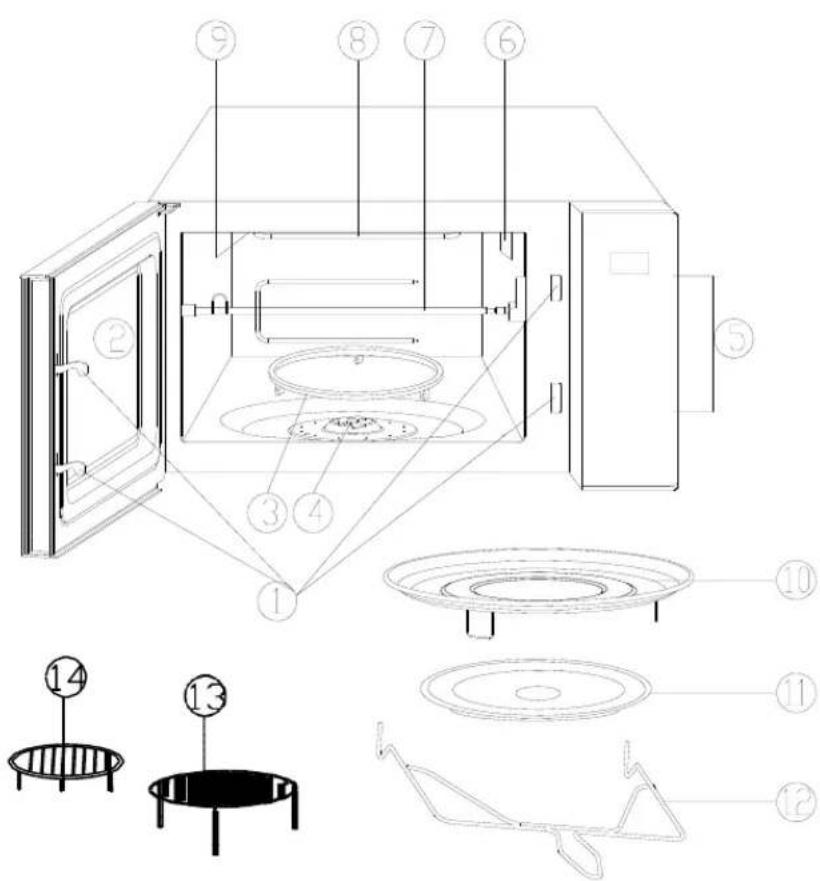
- Door Safety Lock System
- Oven Window
- Roller Ring
- Shaft
- Control Panel
- Wave guide (Please do not remove the mica plate covering the wave guide)
- Rotisserie Rack
- Grill Heater 1
- Grill Heater 2
- Baking Plate
- Glass Turntable
- Handle
- High metal Rack
- Low metal Rack
CONTROL PANEL
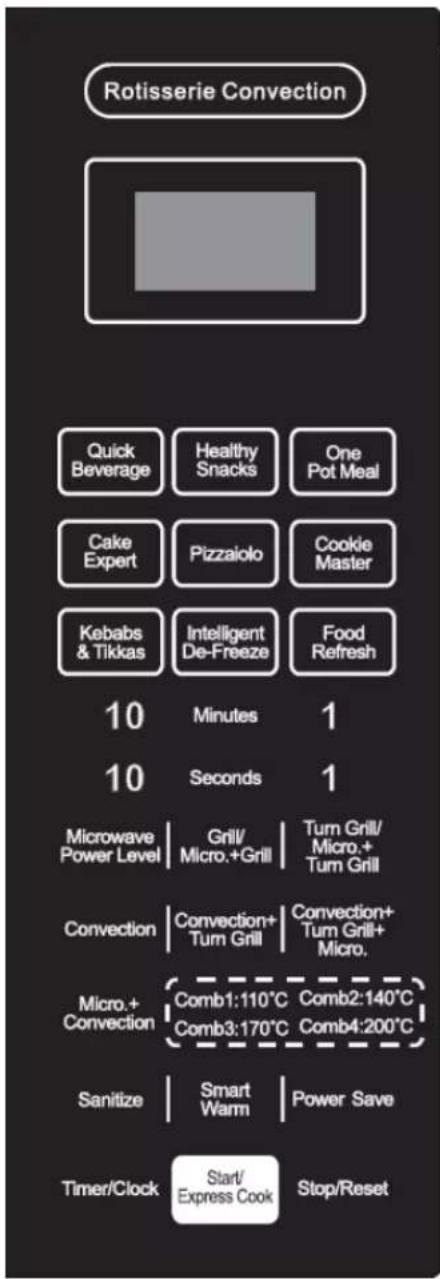
flowchart
graph TD
    A["Rotisserie Convection"] --> B["Quick Beverage"]
    A --> C["Healthy Snacks"]
    A --> D["One Pot Meal"]
    A --> E["Cake Expert"]
    A --> F["Pizzaiolo"]
    A --> G["Cookie Master"]
    A --> H["Kebabs & Tikkas"]
    A --> I["Intelligent De-Freeze"]
    A --> J["Food Refresh"]
    B --> K["10 Minutes"]
    C --> L["10 Seconds"]
    D --> M["1 Minute"]
    E --> N["10 Minutes"]
    F --> O["10 Minutes"]
    G --> P["10 Minutes"]
    H --> Q["10 Minutes"]
    I --> R["10 Minutes"]
    J --> S["10 Minutes"]
    K --> T["Microwave Power Level"]
    L --> U["Convection"]
    M --> V["Micro.+ Convection"]
    N --> W["Sanitize"]
    O --> X["Timer/Clock"]
    P --> Y["Start/Express Cook"]
    Q --> Z["Comb1:110°C Comb2:140°C Comb3:170°C Comb4:200°C"]
    R --> AA["Smart Warm"]
    S --> AB["Power Save"]
    T --> AC["Stop/Reset"]
DISPLAY WINDOW
Used to indicate clock, cooking time, power, etc.
AUTO MENU
Instant settings to cook popular foods.
INTELLIGENT DE-FREEZE
Touch to defrost food by weight.
NUMBER PADS
Used to enter clock, cooking time, temperature, etc.
Press to select microwave power level.
GRILL/MICRO.+ GRILL
Press to set a grill or combination cooking program.
TURN GRILL/MICRO.+TURN GRILL
Press to set turn grill or micro.+ turn grill cooking program.
CONVECTION
Press to program convection cooking.
CONVECTION+TURN GRILL
Press to set a program combing convection and turn grill features.
CONVECTION+TURN GRILL+MICRO.
Press to set a triple-feature cooking program.
MICRO.+CONVECTION
Press to select one of four combination cooking settings.
SANTIZE
Press to set STEAM CLEAN/ DEODORIZE/ DISINFECT function.
SMART WARM
Press to set KEEP WARM/ FERMENT program.
POWER SAVE
Press to set POWER SAVE program.
TIMER/CLOCK
Used to set the clock and the oven timer.
START/ EXPRESS COOK
Press to start cooking program or to start the oven quickly at full power.
STOP/RESET
Touch to stop cooking program or clear all previous settings before cooking starts.
HOW TO SET THE OVEN CONTROLS
- During cooking, if press STOP/RESET pad once or open the door, the program will be paused, then press START/EXPRESS COOK pad to resume, but if press STOP/RESET pad twice, the program will be canceled.
- After ending cooking, the system will sound beeps to remind user every two minute until user press any pad or open the door.
SETTING THE CLOCK
This is a clock with both 12 hour cycle and 24 hour cycle.
-
In waiting mode, press TIMER/CLOCK pad for 3 seconds it will work by 12 hour cycle. (If you want to select 24 hour cycle, press this pad again.)
-
Use the number pads “10、1MINUTES”、“10、1SECONDS” to enter the correct time.
-
Press TIMER/CLOCK pad to confirm.
KITCHEN TIMER
Your microwave oven can be used as a kitchen timer. Use the minute timer for timing up to 99 minutes 99 seconds.
- Press TIMER/CLOCK pad once.
- Use number pads to enter the time to be counted down.
- Press START/EXPRESS COOK pad to confirm.
Note: You can check the timer by pressing TIMER/CLOCK pad, time countdown can be seen on the display for 5 seconds before clock or cooking time returns to exhibit; you can cancel the timer by pressing STOP/RESET pad during the 5 seconds.
MICROWAVE COOKING
The longest cooking time is 99 minutes and 99 seconds. Microwave cooking allows you to customize cooking power and time. First, you select a power level by pressing the MICROWAVE POWER LEVEL pad a number of times (see the table below). Then you set the cooking time using the number pads before pressing the START/EXPRESS COOK pad.
Suppose you want to cook for 5 minute at 60% power level.
- In waiting mode, place food into oven, and close it.
- Press MICROWAVE POWER LEVEL pad a number of times to set power.
| Press POWER Pad | Power (Display) | Press POWER Pad | Power (Display) |
| Once | 100%(P100) | 7 times | 40%(P-40) |
| Twice | 90%(P-90) | 8 times | 30%(P-30) |
| 3 times | 80%(P-80) | 9 times | 20%(P-20) |
| 4 times | 70%(P-70) | 10 times | 10%(P-10) |
| 5 times | 60%(P-60) | 11 times | 0% (P-00) |
| 6 times | 50%(P-50) |
- Press number pads to enter cooking time until the correct cooking time (5:00) is displayed.
- Press START/EXPRESS COOK pad to confirm.
Note:
- You can press MICROWAVE POWER LEVEL pad to check present power during running process.
- You also can only input cooking time without pressing MICROWAVE POWER LEVEL pad, system will work at full power level automatically after you press START/EXPRESS COOK pad.
GRILL/ MICROWAVE +GRILL
The longest cooking time is 99 minutes and 99 seconds.
- In waiting mode, place food into oven, and close it.
- Press GRILL / MICRO + GRILL pad a number of times.
| Press GRILL /MICRO+GRILL | FUNCTION | Indicators On Display | Cooking time | |
| Microwave | Grill | |||
| Once | GRILL | / | 100% | |
| Twice | COMBINATION 1 | C-1 🐎🐎 📋 | 30% | 70% |
| Thrice | COMBINATION 2 | C-2 🐎🐎 📋 | 55% | 45% |
- Press the number pads to enter the cooking time.
- Press START/EXPRESS COOK pad to confirm.
Note: During combination cooking, you can see the programmed setting by pressing the pad GRILL/MICRO+GRILL once.
TURN GRILL/MICRO+TURN GRILL
The longest cooking time is 99 minutes and 99 seconds.
- In waiting mode, place food into oven, and close it.
- Press TURN GRILL/MICRO+TURN GRILL pad a number of times.
| Press TURNGRILL/MICRO+TURNGRILL Pad | FUNCTION | Indicators On Display | Cooking time | |
| Microwave | Grill | |||
| Once | TURN GRILL |  | / | 100% |
| Twice | COMBINATION 1 | C-1 🎨 🎨 🎨 | 30% | 70% |
| Thrice | COMBINATION 2 | C-2 🎨 🎨 🎨 | 55% | 45% |
- Press the number pads to enter the cooking time.
- Press START/EXPRESS COOK to confirm.
Note: During combination cooking, you can see the programmed setting by pressing the pad TURN GRILL/MICRO+TURN GRILL once.
CONVECTION
The longest cooking time is 99 minutes and 99 seconds. During CONVECTION cooking, hot air is circulated throughout the oven cavity to brown and make crisp foods quickly and evenly. This oven can be programmed for ten different cooking temperatures: 110°C\~200°C.
To Cook with Convection
To cook with convection, press CONVECTION pad repeatedly to enter the desired convection temperature.
Suppose you want to cook at 180^ C for 25 minutes.

- In waiting mode, place food into oven, and close it.
- Press CONVECTION pad repeatedly until the displayer shows 180C and
- Press number pads to enter cooking time.
- Press START/EXPRESS COOK pad to confirm.
To Preheat and Cook with Convection
Your oven can be programmed to combine preheating and convection cooking operations.
Suppose you want to preheat at 170^ C and then cook for 35 minutes.
- Press CONVECTION pad repeatedly until the displayer shows 170C and
- Press START/EXPRESS COOK pad. Beeps will be sounded when the designated temperature is reached.
- Open the door and place container of food at the center of the turntable.
- Press number pads to enter cooking time.
- Press START/EXPRESS COOK pad to confirm.

Note: The longest time for preheat is 30 minutes (can't be set). Temperature can be checked by pressing CONVECTION pad during the running.
MICROWAVE +CONVECTION
The longest cooking time is 99 minutes and 99 seconds. Press MICRO+ CONVECTION pad repeatedly to select program convection temperature (110°C→140°C→170°C→200°C).
Suppose you want to bake a cake for 24 minutes on 170°C.
- In waiting mode, place food into oven, and close it.
- Press MICRO +CONVECTION pad repeatedly until the displayer shows 170C、 and
- Press number pads to enter cooking time.
- Press START/EXPRESS COOK pad to confirm.
Note: Temperature can be checked by pressing MICRO+CONVECTION pad during the running.
CONVECTION+TURN GRILL
The longest cooking time is 99 minutes and 99 seconds. During CONVECTION+TURN GRILL cooking, hot air is circulated throughout the oven cavity to brown and make crisp foods quickly and evenly. This oven can be programmed for ten different cooking temperatures: 110°C\~200°C.
To Cook with Convection
To cook with convection, press CONVECTION + TURN GRILL pad repeatedly to enter the desired convection temperature.
Suppose you want to cook at 180^ C for 25 minutes.
- In waiting mode, place food into oven, and close it.
- Press CONVECTION+TURN GRILL pad repeatedly until the displayer shows 180C、and
- Press number pads to enter cooking time.
- Press START/EXPRESS COOK pad to confirm.
To Preheat and Cook with Convection
Your oven can be programmed to combine preheating and convection cooking operations.
Suppose you want to preheat at 170^ C and then cook for 35 minutes.
- Press CONVECTION+TURN GRILL pad repeatedly until the displayer shows 170C、
- Press START/EXPRESS COOK pad. Beeps will be sounded when the designated temperature is reached.
- Open the door and place container of food at the center of the turntable.
- Press number pads to enter cooking time.
- Press START/EXPRESS COOK pad to confirm.


Note: The longest time for preheat is 30 minutes (can't be set). Temperature can be checked by pressing CONVECTION+TURN GRILL pad during the running.
CONVECTION+TURN GRILL+MICRO
The longest cooking time is 99 minutes and 99 seconds. Press CONVECTION+TURN GRILL+MICRO pad repeatedly to select program convection temperature (110°C→140°C→170°C→200°C).
Suppose you want to bake a cake for 30 minutes on 140°C.
- In waiting mode, place food into oven, and close it.
- Press CONVECTION+TURN GRILL+MICRO pad repeatedly until the displayer shows 140C, and

-
Press number pads to enter cooking time.
-
Press START/EXPRESS COOK pad to confirm.
Note: Temperature can be checked by pressing CONVECTION+TURN GRILL+MICRO pad during the running.
INTELLIGENT DE-FREEZE
Suppose you want to defrost frozen meat.
- In waiting mode, place food into oven, and close it.
- Press INTELLIGENT DE-FREEZE pad repeatedly to select food weight (100g\~1800g).
- Press START/EXPRESS COOK pad to confirm.
Note: During defrosting program, the system will pause and sound beeps to remind user to turn food over for uniform defrost, and then press START/EXPRESS COOK pad to resume the defrosting.
MENU COOK
For food or the following cooking mode, it is not necessary to program the duration and the cooking power. It is sufficient to indicate the type of food that you wish to cook as well as the weight of this food.
- In standby mode, press the individual icon pad once and then press repeatedly to select the weight or amount of food.
- Press START/EXPRESS COOK pad to start.
Auto Cook Menu
| Food Icons | Weight Range(press the icon pad) | Remarks | |||
| Once | Twice | Thrice | 4times | ||
| Cake Expert | 475g | Only one choice. | 1. For Quick Beverage, parameters on the display are not food weight but number of servings.2. For COOKIE MASTER, you need to preheat at 160°C and cook with convection | ||
| Food Refresh | 7 choices (200g ~ 800g) | ||||
| Quick Beverage | 1 | 2 | 3 | 200ml/cup | |
| One pot Meal | 150g | 300g | 450g | 600g | |
| Healthy Snacks | 100g | Only one choice. | |||
| Pizzaiolo | 150g | 300g | 450g | ||
| Kebabs&Tikkas | 5 choices (100g ~ 500g) | ||||
| Cookie Master | Press once, only one choice. | ||||
Notes: The weight range quoted above is for reference only. Please always take the weight and cooking time actually shown on the screen of your oven as the correct settings.
Voltage fluctuation may cause food not done well, in such case, adjust the cooking time manually.
| Sr.no | QUICK BEVERAGE | COOKWARE | INGREDIENTS | METHOD |
| 1 | Plain milk tea | Microwave proof tea cup/microwave safe kettle Microwave proof cup/ | Water- 34 cup; Milk- 14 cup Tea leaves- 1 tsp Sugar-1 tsp | Mix all the ingredients and keep it in the microwave and then select the menu to select the weight and press start.NOTE: Amount of ingredients may differ as per individual preferences. |
| 2 | Ginger tea | Water-1/2 cup; Milk-1/2 cup; Tea leaves- 1 tsp; 34 inch crushed ginger Sugar-1 tsp | ||
| 3 | Masala tea | Water-1/2 cup, Whole Milk-1/2 cup Sugar-1 tsp; Tea leaves- 1 tsp Masala (crush with mortar and pestle or coffee/spice grinder): 1 pod cardamom, 2 pea size fresh ginger (mulched), 1-2 big size whole black pepper, 1/8 to 1/6 cinnamon stick | ||
| 4 | Non Fat Masala tea | Water-1/2 cup, Skimmed Milk-1/2 cup Sugar-1 tsp; Tea leaves- 1 tsp Masala (crush with mortar and pestle or coffee/spice grinder): 1 pod cardomon, 2 pea size fresh ginger (mulched), 1-2 big size whole black pepper, 1/8 to 1/6 cinnamon stick | ||
| 5 | Cardamom tea | Water- 34 cup; Milk- 14 cup Crush two pieces of cardamon, add to it little Saffron Sugar-1 tsp; Tea leaves- 1 tsp | ||
| 6 | Rose Tea | Water-1/2 cup; Milk-1/2 cup Tea leaves- 1 tsp Sugar-1 tsp | ||
| 7 | Tulsi Tea | Water-1 cup Tulsi leaves-1 tsp | ||
| 8 | Chocolate flavour tea | Water-1/2 cup,Milk-1/2 cup Chocolate flavorTea leaves- 1 tsp Sugar-1 tsp | ||
| 9 | Lemon tea | Water-1 cup ;Tea leaves-1 tsp Fresh lemon juice-1 tsp Sugar-1 tsp | ||
| 10 | Coffee | Water- 34 cup; Milk- 14 cup; Coffee-1 tsp Sugar -1 tsp | ||
| 11 | Jeera Water | Water- 34 cup, Jeera - 1 tsp | ||
| 12 | Herbal Water | Water -200ml, Saunf –a pinch, Ajwain –a pinch, Cardamom15l, Tulsi leaves---2-3, Mint leaves-2 to 3 |
| 13 | Sole Kadhi /Cocum Saar | Microwave proof tea cup/microwave safe kettle | Water-200ml Cocum-5 Salt- To taste Ginger (grated)- 1/4 tsp Green chillies (slit)- 2 Coriander (chopped fine) - 1 tbsp | Mix water and cocum in a microwave proof cookware, keep it in the microwave and then select the beverage option for selecting the serving size and press start. Strain and add ginger and chillies and allow it to cool. Add coriander and refrigerate until serving time.NOTE: Amount of ingredients may differ as per individual preferences but the volume of water will remain the same.It is an excellent appetizer. |
| 14 | Bel ka Sherbet | microwave safe kettle | Stone Apple (belfal), halved and seeded-1 Sugar1/3 cup Lemon juice2 1/2 teaspoons | Scoop out the flesh of the stone apple with a spoon and put into a Microwave safe kettle.Add 2 cups water and cook by selecting the menu. Add sugar and mix well.Add lemon juice and mix and cook till sugar dissolves. Remove from heat and strain. Set aside to cool then keep in a refrigerator to chill.Pour into glasses and serve chilled. |
| 15 | Aam Ka Panna | Microwave safe kettle | Raw mango 1 large Cumin powder 1 teaspoon Black peppercorns, crushed 4-5 Black salt (kala namak) to taste Asafoetida a pinch Sugar 1/2 cup | Wash and cut raw mango white portion and pour 1 cup water. Cook by selecting the programme . Let it cool. Mash and strain the pulp.Add cumin powder, crushed peppercorns, black salt, asafeotida and sugar. Mix well till sugar is dissolved. Divide the mixture into four tall glasses; fill it up with chilled water. Stir well and serve. |
| 16 | Cocoa Drink | Microwave proof cookware | 3 tbsp sugar 1 tbsp cocoa powder 5 cubes chocolate cubes a pinch of salt 2 cups milk | Combine sugar, cocoa, salt ,chocolate cubes and microwave for 30 seconds. Add milk and boil the contents by selecting Beverage programme. |
| 17 | Hot Chocolate Drink | Microwave proof cookware | 250 ml whole milk 113 gms milk chocolate 1/2 tsp. cornstarch | Combine all the ingredients , cook using beverage programme.Stirr in-between .Serve hot. |
| Sr.no | HEALTHY SNACKS | COOKWARE | INGREDIENTS | METHOD |
| 18 | Plain Popcorn | Borosil with a lid, covered loosely or ready to cook popcorn in microwave proof bag. | Popcorn and salt | Pop the popcorn with olive oil, and mix the grated cheese/dry fruits/ grated chocolate or sugar caramel as per desired choice for flavor. |
| 19 | Cheese popcorn | Popcorn and grated cheese | ||
| 20 | Nutty Popcorn | Dry fruit roasted and popcorn | ||
| 21 | Chocolate Popcorn | Grated chocolate and popcorn | ||
| 22 | Buttery popcorn | Popcorn and butter | ||
| 23 | Caramel popcorn | Popcorn and sugar caramel. |
| Sr.no | ONE POT MEAL | INGREDIENTS | METHOD |
| Cookware : Microwave Safe Glass bowl | |||
| 24 | Plain rice | Rice 1 cupWater 2 cups | Wash and soak the rice for about half an hour. Drain water from the rice and add 2 cups or 134 cup water, cover and cook, selecting the menu. Allow it to stand for 5 to 10 minutes and then serve hot. |
| 25 | Prawn Biryani | Uncooked rice (Soaked for 30 minutes)-1 cup, peeled and deveined tiger prawns-100gms,ginger garlic paste-1 tbsp, Garam masala-1 tbsp, black pepper -1 tbsp,cloves-4,cardamom seeds-4,cinnamon stick, salt-to taste, plain yogurt- 12 cup, vegetable oil- 14 cup, water 2 cup, Chicken bouillon cube-5 | Stir together the prawns, ginger garlic paste, garam masala, black pepper, cloves, cardamom seeds, cinnamon sticks, salt, yogurt, and oil in a microwave safe bowl until well mixed. Stir the rice, water, and chicken bouillon cubes and mix well. Add water and cook by selection the menu Rice.Discard cinnamon stick, cloves, and cardamom seeds before serving. |
| 26 | Rajasthan i Pulao | 114 cup long grain rice1 tablespoons ghee or oil, 2 medium onions- finely sliced ,2 sticks cinnamon, 3 cardamom pods, bruised, 5 whole cloves,8 whole black pepper, 212 cups hot stock or water ,Salt to | If the rice needs washing, wash well in several changes of cold water and leave to soak for 1 hour. Then drain in a colander for at least 30 minutes.Mix all the ingredients, add water or stock and cook by selecting the menu Rice.Serve hot with curry. |
| 27 | Rice with Peas | 1 1/2 cups long grain rice,1 tablespoon ghee,4 wholecloves,1 small cinnamon stick,3 or 4 cardamom pods, bruised,1 teaspoon cumin seeds,1/2 teaspoon ground turmeric ,1 1/2cups shelled green peas and diced carrots ,2 1/2 teaspoons salt,3 1/4 cups hot water | Wash the rice well and leave to soak in cold water for30 minutes, then drain well.Mix all the ingredients, add water or stock and cook by selecting the menu.Remove whole spices, fork rice grains lightly and serve hot with meat or vegetable curries. |
| 28 | Rice in coconut milk | Coconut milk-2 cupRice -1 cupCarrot-50 gmsBeans-50 GmsGhee-1 tbspBay leafCloves-4Salt to tastePoppy seeds-1/4 tsp | Wash and soak rice for 10 minutes. Mix all the ingredients, and cook by selecting the menu. |
| 29 | Namkin Chawal | 1 cup long grain rice ,2 cups hot water, 2 teaspoons ghee ,2 1/2 teaspoons salt | Wash rice well and soak 1 hour in cold water. Mix all the ingredients, and cook by selecting the menu.Lift lid to allow steam to escape for about 5 minutes, and then lightly fluff up rice with fork, taking care not to mash the grains, which will be firm, separate and perfectly cooked. Dish up using a slotted metal spoon rather than a wooden spoon, which will crush the grains. Serve with curries or other spiced dishes. |
| 30 | Veg Pulao | 1 cup Rice ,2 cups Water, 1/4 cup chopped Vegetables,1/2" Cinnamon stick,2 Cloves,2 Cardamom, Salt as per taste,1/4 teaspoon turmeric powder,1 teaspoon coriander powder ,2 Chillies ,4 tomatoes, 1⁄2 cup Coconut (grated),1 bunch Coriander leaves,2 pieces Garlic,1/2" piece Ginger (made into a paste),2 tablespoons Butter,1 onion cut lengthwise | Mix all the ingredients, and cook by selecting the menu.Serve Hot with Raitha. |
| 31 | Spiced Rice | 1 cup Rice, 2 cups Water, Cinnamom, Cloves.Salt to taste. | Mix all the ingredients, and cook by selecting the menu. |
| 32 | Pongal | Rice (soaked for 30 minutes) -1 cup, green gram dal-4tbsp,ginger (finelychopped)- 1 tbsp,curry leaves-few, broken cashewnuts-4 tbsp,black pepper-1 1⁄2 tsp, cumin seeds-1 tsp,ghee-3 -4tbsp,water 3 1⁄2 cup, salt as per taste. | Drain soaked rice and dal, add ginger and cook by selecting the menu.Tip to serve: Microwave cashew nuts, pepper and cumin seeds in ghee for 2 1⁄2 minutes and add it to rice-dal mixture. Mix well and serve steaming hot with ghee on top. |
| 33 | Khichdi | Rice -1 cup, tur dal (arhar dal-1/2 cup, Ghee or oil-1 tbsp, Hing powder-1/4 tsp, Laung-3-4 , Dalchini (cinnamon)-2 inch stick, Jeera-1/2 tsp, Dry red chillies (broken to 2-3 pieces) -2 no ,groundnuts roasted-25 gms , Turmeric powder- 1⁄4 tsp, salt as per taste, water 3 cups. | Wash and soak dal and rice for 30 minutes.Mix all the ingredients, and cook by selecting the menu.Serve hot with ghee and kadhi. |
| 34 | Indian Sticky Rice | Sticky Rice-1 cupMilk-2 cupWater-1 cupSugar-1/2 cupCoconut Grated-1/4 cupCashewnuts-1/4 cupGhee-2 tbsp | Wash and soak dal and rice for 30 minutes.Mix all the ingredients, and cook by selecting the menu.Serve hot with ghee . |
| 35 | Jeera Rice | 1 cup basmati rice ,1 tsp shahjeera or caraway seeds ,1 black cardamom ,1 green cardamom ,2-3 black peppercorns ,2 cloves ,1 inch cinnamon ,2 tsp ghee ,2 cups water . | Wash and soak dal and rice for 30 minutes.Mix all the ingredients, and cook by selecting the menu.Once done, remove the microwave safe rice cooker and let it stand for 5 minutes. |
| 36 | Methi Rice | Methi ( Fenugreek leaves) 1 cup chopped ( you can use the frozen one)1 cup Basmati rice ,2 to 4 black Peper ( Kali Mirch), 2 Cloves1 Cinnamon stick, 2 Green Elaichi ( Cardamom), 1 Medium sized sliced Onion, 1/2 Cup sweet corn kernels 1/4 Teaspoon turmeric powder (haldi) ,1 Tablespoon butter 1 Tablespoon oil ,Water 2cupsSalt to taste | Wash the rice well and leave to soak in cold water for 30 minutes, then drain well.Mix all the ingredients, and cook by selecting the menu. |
| 37 | Carrot rice | 1cup Basmati Rice2 medium onions chopped2 cups water3 carrots grated2 tsp fried groundnuts cinnamon sticks 1/4 tsp clovesOil -1 tbspSalt as per taste | Wash the rice well and leave to soak in cold water for 30 minutes, then drain well.Mix all the ingredients, and cook by selecting the menu. |
| 38 | Mint Rice | 1 Thinly sliced Onions1 chopped Tomatoes1/4 Bunch of Mint Leaves1 Cups of Basmati 1/2 tsp Red Chili Powder 1/4 tsp Turmeric Powder 1/4 tsp Fresh Ginger Paste 1/4 tsp Fresh Garlic Paste1Green Chilies slit into half2 Bay leaves1 inch cinnamon stick 1/4 tsp clovesFried Cashews -2tbspGhee 1tbspSalt (As required) | Wash the rice well and leave to soak in cold water for 30 minutes, then drain well.Mix all the ingredients, and cook by selecting the menu. |
| 39 | Sweet Corn Rice | 1 Cup Basmati Rice 1/2 cup Fresh corn1 finely chopped Onion 1/2 tsp Grated ginger2 cloves 1/4 tsp Black Pepper PowderChopped Coriander leavesOil -1tbspSalt to taste | Wash the rice well and leave to soak in cold water for 30 minutes, then drain well.Mix all the ingredients, and cook by selecting the menu. |
| 40 | Paushtik Khichdi | 1/2 cup rice1 tablespoon moog dal1 tbsp tur dal1 tomatoes1 onion1 cups leafy greens(plus you could include any other vegetable that you fancy)salt1 teaspoon ghee/ oil1/2 teaspoon turmeric1/2 teaspoon red chili powder1/2 teaspoon garam masala powdertadka/ seasoning1 teaspoon oil1/2 teaspoon mustard seeds1 pinch asafoetida4-5 curry leaves | In a microwave safe rice cooker put together the rice and the two dals. Wash thoroughly. Add the chopped onion, tomatoes, greens and vegetables. Add all the spice powders. Pour about 1 glasses of water and a teaspoon of oil or ghee.After cooking , add salt and then prepare the tadka and pour on the khichdi.Serve hot is a bowl . |
| 41 | Palak Pulao | 1 cup Rice , 1⁄2 bunch palak ( washed & chopped) ,2 cups Water, 1/4 cup chopped Vegetables,1/2" Cinnamon stick,2 Cloves,2 Cardamom, Salt as per taste,1/4 teaspoon turmeric powder,1 teaspoon coriander powder ,2 Chillies ,4 tomatoes, 1⁄2 cup Coconut (grated),1 bunch Coriander leaves,2 pieces Garlic,1/ 2" piece Ginger (made into a paste),2 tablespoons Butter,1 onion cut lengthwise | Mix all the ingredients, and cook by selecting the menu.Serve Hot with Raitha. |
| Sr.no | CAKE EXPERT | INGREDIENTS | METHOD |
| Cookware : Cake tin , greased with butter and maida . | |||
| 42 | Vanilla Sponge Cake | 100gms Maida, 50gms cornflour150gms sugarBaking powder -1/2 tsp, 4eggsVanilla essence -1tsp | Separate egg white and yoke. Whisk egg whites until peak stage.Gradually add sugar powder and mix well , fold in flour + baking powder (Sieved ).Add essence /additional ingredients based on the type of flavor sponge cake you are preparing.Bake by selecting the menu CAKE. |
| 43 | Whole Wheat Sponge Cake | 50gms Maida, 50gms Whole wheat flour, 50gms cornflour150gms sugar, 4eggsVanilla essence -1tsp | |
| 44 | Chocolate Sponge Cake | 100gms Maida, 50gms cornflour150gms sugar, 20gms cocoa powder 4eggs | |
| 45 | Coffee Sponge Cake | 100gms Maida, 50gms cornflour150gms sugar, 4eggsInstant Coffee -2tsp | |
| 46 | Dark Chocolate Sponge Cake | 100gms Maida, 50gms cornflour150gms sugar20gms dark chocolate grated, 4eggs | |
| 47 | Spice Mix Sponge Cake | 100gms Maida, 50gms cornflour150gms sugar, 4eggsSpice mix powder (laung/cinnamon)-1tsp | |
| 48 | Strawberry Sponge Cake | 100gms Maida, 50gms cornflour150gms sugar, 4eggsStrawberry essence -1tsp | |
| 49 | Cinnamon Sponge Cake | 100gms Maida, 50gms cornflour150gms sugar, 4eggscinnamon powder -1tsp | |
| 50 | Chocó chips Sponge Cake | 100gms Maida, 50gms cornflour150gms sugar20gms Choco Chips, 4eggs,Vanilla essence -1tsp | |
| 51 | Coconut and Lime Sponge Cake | 100gms Maida, 50gms cornflour150gms sugar20gms Dedicated Coconut, 4eggsLime Zest of 1/4th lime.Vanilla essence -1tsp | |
| 52 | Orange Sponge Cake | 100gms Maida, 50gms cornflour150gms sugar, 4eggsOrange essence -1tsp | |
| Sr.no | PIZZAIOLO | INGREDIENTS | METHOD |
| Cookware : Baking plate | |||
| 53 | Mix Veg. Pizza | Pizza base, thinly sliced mix veg, cream cheese, mozzarella cheese and pizza sauce, cream cheese. | Spread pizza sauce over pizza, spread cream cheese, arrange mix veg and then sprinkle with mozzarella cheese and cook by selecting the menu Pizza. |
| 54 | Pickled Ginger Pizza | Pizza base, toppings of your choice, Pickled ginger minced mozzarella cheese and pizza sauce. | Apply Pizza sauce on Pizza base, arrange Precooked toppings, Grate mozzarella cheese, Sprinkle pickled ginger and cook by selecting the menu. |
| 55 | Capsicum Pizza | Pizza base, Sliced capsicum, mozzarella cheese and pizza sauce. | Apply Pizza sauce on pizza base, place the sliced capsicum slices , grate mozzarella cheese and cook by selecting the menu. |
| 56 | Paneer Pizza | Pizza base, cut pieces of paneer (Tikka) , mozzarella cheese and pizza sauce. | Apply Pizza sauce on pizza base, arranged paneer pieces, grate mozzarella cheese and cook by selecting the menu. |
| 57 | Savoury onion pizza | Pizza base, fried slices of onion with olive oil, Pizza cheese and pizza sauce. | Brush the base with olive oil, Spread the onion slices, grate Pizza cheese and cook by selecting the menu. |
| 58 | Corn & Mushroom Pizza | Pizza base-1,tomato sauce/pizza sauce-1tbsp,onion sliced-1 small, red bell pepper-1 sliced,Mushroom -1/2 cup, baby corn-8 no., grated mozzarella cheese-1 cup, oregano/pizza seasoning-2tsp,chilly flakes-1/2 tsp,olive oil-1/2 tsp | Spread the tomato or pizza sauce evenly over the pizza base. Sprinkle 1⁄2 cup of cheese over it, now spread onion, mushroom and bell pepper, Place 6 baby corn pointing to the center.Dizzle olive oil .Sprinkle oregano or pizza seasoning over it. At the end sprinkle remaining cheese and cook by selecting pizza menu. Serve hot sprinkling chilly flakes as required. |
| 59 | Veg. cheese Pizza | Pizza base, Indian style dry veg preparation, Pizza cheese and pizza sauce, cream cheese. | Spread pizza sauce over pizza, spread cream cheese, arrange dry veg.(cooked veg of your choice ) and then sprinkle with cheese and cook by selecting the menu. |
| 60 | Cheese pizza | 2 teaspoons olive oil1 cup fat-free bottled pizza sauce2 cups shredded part-skim mozzarella cheese1/2 cup grated fresh Parmesan cheese | Brush the base with olive oil, Spread sauce in an even layer over crust, leaving a 1/4-inch border. Top with mozzarella and Parmesan cheeses. Cook by selecting the menu. |
| 61 | Indian Spiced Pizza | Pizza BaseTomato- 2 medium size(chopped finely)Onion - 2 Medium size(chopped finely)Green chilly 6-8 (chopped finely)Cilantro - 2 tbsp. (chopped finely)Carrots - 2 (grated finely)Fresh lime juice - 1 tbsp.Red chilly powder - 1 tsp.(Optional)Olive oil - 3 tbsp.Turmeric - 1 tsp.Mozzarella Cheese | Heat 2 tbsp olive oil in a pan. Add turmeric, onion and green chillies and cook. Add tomato and let it cook. Add salt, red chilly powder (for extra spicy) and stir for 2 minutes.Place the tomato preparation on the pizza base and spread it. Sprinkle grated carrots and grated pizza Cheese. Cook using the, menu Pizza. Sprinkle cilantro, and serve hot. |
| 62 | Roasted Garlic and Pepper Pizza | 1 large head garlic, unpeeled2 tablespoons olive oil1 large red onion, cut into1/2-inch-thick rings1 prepared pizza crust2 cups grated mozzarella cheese 1/2 cup roasted red bell peppers, cut into 1/2-inch-thick strips2/3 cup -crumbled feta cheese4 tablespoons chopped fresh basil or 1 tablespoon dried2 tablespoons chopped fresh parsley | Slice top off garlic head, Drizzle with 1 tablespoon olive oil. Roast on tawa .Add onion slices and brush onion with 1/2 tablespoon olive oil. Cook garlic and onion until garlic cloves are light brown and soft and onion is tender.Using on/off turns, grind onion and garlic into smooth paste, adding enough reserved oil. (Onions and garlic mixture can be prepared 1 day ahead. Cover separately and refrigerate.)Place Pizza crust on baking sheet or pizza pan. Spread garlic paste evenly over crust. Top with mozzarella cheese, onion, pepper strips and feta cheese. Sprinkle with 2 tablespoons basil and 1 tablespoon parsley. Cook using the, menu Pizza. |
| 63 | Shrimp Pizza | 1 tablespoon sugar1 tablespoon water1 cup peeled shrimp1 shallot, sliced1 clove garlic, sliced1 thai chili, sliced1/2 tablespoon fish sauce1 prepared pizza crust1/2 cup shredded mozzarella1/4 cup parmesan chopped cilantro24 | In a non-stick pan, combine the sugar and water over medium to medium-high heat. It will take a little while, but be patient, the water will boil down and will be come golden brown. When it's super bubbly and just slightly caramel coloured, add the shrimp, shallot, garlic, chili, and fish sauce. Turn the heat down to medium. Stir to coat and cook shrimp until firm and cooked through. By the time the shrimp are done cooking, the sauce will have cooked down into a sticky, sweet, spicy sauce that will cling to each shrimp. Remove the pan from the heat and let rest.Spread on the shredded mozzarella and sprinkle on the parmesan on pizza crust. Top with the caramelized shrimp. Cook using the, menu Pizza. |
| 64 | Barbecue Chicken Pizza | 1 pizza base1/3 cup + 2 Tablespoons your favorite BBQ sauce1 cup cooked, sliced chicken breast2/3 cup shredded mozzarella cheese2/3 cup shredded smoked gouda cheese*1/2 small red onion, thinly slicedfresh cilantro, for topping | Toss 2 Tablespoons of BBQ sauce with the cooked, chopped chicken to coat it. Set aside.Top the pizza crust with the BBQ sauce.Add more or less BBQ sauce depending on your taste. Then layer on the shredded mozzarella, then the BBQ-coated chicken, shredded gouda, then the onion slices.Cook using the, menu Pizza. |
| 65 | Chicken Tikka Pizza | 1 pizza baseChicken tikka Chunks -1cup Sliced onion -1Capsicum Sliced-1Tomato Sliced-11 cup shredded mozzarella cheeseRed chillies -1 (Crushed)Olive oil to brushPizza Sauce -3 tbsp. | Brush pizza base with olive oil. Top the pizza crust with the Pizza sauce. .Then layer on the shredded mozzarella, then the chicken tikka Chunks, arrange sliced tomato, onion and capsicum., sprinkle red chilli on top . Cook using the, menu Pizza. |
| 66 | Fruit Pizza | 1 pizza baseButter-1tspCondense Milk -3tbspCashew nuts-1/4cup Almonds-1/4 cupRaisins -1/4 cupWhite chocolate bar | Apply butter on top of pizza base and bake .Spread condense milk on Pizza Crust.Arrange dry fruits. Cook using the, menu Pizza.Top up with grated white chocolate and serve. |
| 67 | Spinach and Cheese Pizza | 3 tablespoons extra virgin olive oil1 leek, thinly sliced2 garlic cloves, minced1/4 teaspoon salt1/4 teaspoon cracked black pepper5 ounces fresh spinach leaves1/2 Basic Pizza base1/2 cup ricotta cheese1/3 cup crumbled feta cheese1/2 cup (2 ounces) shredded Kasseri or provolone cheese2 tablespoons crushed cashew nuts | Heat 2 tablespoons oil in a skillet over medium-high heat. Add leek and garlic;sauté 5 minutes or until tender. Stir in salt and pepper. Add spinach, in batches; cook 2 minutes or just until wilted.Brush pizza crust with remaining 1 tablespoon olive oil. Spread spinach mixture to edges of crust; top with cheeses and cashewnuts. Cook using the menu Pizza. |
| 68 | Spicy Lamb mince Pizza | Pizza BaseOlive oil spray1 red onion thinly sliced1 red capsicum thinly sliced100gms lamb mince 12 tsp cumin seeds 12 tsp ground paprika1 tsp ground corianderPizza Sauce -3 tbsp1 cup shredded mozzarella cheese | Meanwhile, heat a large non-stick frying pan over medium heat. Spray with olive oil spray. Add the onion and capsicum. Cook, stirring occasionally, for 4-5 minutes or until soft. Increase heat to high. Add the mince. Cook, stirring with a wooden spoon to break up any lumps, for 4-5 minutes or until the mince changes colour. Add the cumin, paprika and coriander. Cook, stirring, for 1-2 minutes or until aromatic. Remove from heat. Stir in the currants and parsley.Spread Pizza sauce on pizza base.Spread Lamb mince Over it. Top it up with mozzarella Cheese and Cook selecting the menu Pizza. |
| 69 | Corn and Chicken Pizza | Pizza base-1,tomato sauce/pizza sauce-1tbsp,onion sliced-1 small, red bell pepper-1 sliced, Boiled and Shredded Chicken -1/2 cup, baby corn-8 no., grated mozzarella cheese-1 cup, oregano/pizza seasoning-2tsp,chilly flakes-1/2 tsp,olive oil-1/2 tsp | Spread the tomato or pizza sauce evenly over the pizza base. Sprinkle 12 cup of cheese over it, now spread onion, Chicken and bell pepper, Place 6 baby corn pointing to the center.Dizzle olive oil .Sprinkle oregano or pizza seasoning over it. At the end sprinkle remaining cheese and cook by selecting pizza menu. Serve hot sprinkling chilly flakes as required. |
| Sr.no | COOKIE MASTER | INGREDIENTS | METHOD |
| Cookware : Baking plate + Butter paper | |||
| 70 | Chocochip Cookies | 110 grams- unsalted butter (room temperature), 75 granulated white sugar, 80 gms firmly packed -light brown sugar , 1 large eggs , 1 teaspoons pure vanilla extract , 150gms maida, 12 teaspoon baking soda , 12 teaspoon salt , 140 gms semisweet chocolate chips , 100 grams-walnuts or pecans, coarsely chopped (optional) | In the bowl , beat the butter until smooth and creamy with a electric beater. Add the white and brown sugars and beat until fluffy (about 2 minutes). Beat in eggs, one tbsp at a time, making sure to beat well after each addition. Add the vanilla and beat until incorporated. Scrape down the sides of the bowl as needed.In a separate bowl, combine flour, baking soda, and salt. Add the dry ingredients to the egg mixture and beat until incorporated, adding the chocolate chips and nuts (if using) about half way through mixing. If you find the dough very soft, cover and refrigerate until firm (from 30 minutes to two hours). For large cookies, use about a 2 tablespoon ice cream scoop or with two spoons, drop about 2 tablespoons of dough (35 grams) onto the prepared baking sheets. Bake using the menu . Cool completely on wire rack. |
| 71 | Peanut butter Cookies | 170 grams unsalted butter (room temperature),105 grams light brown sugar,100 grams-granulated white sugar,1 large egg, 1 teaspoon pure vanilla extract,185 grams-peanut butter (smooth or crunchy),260 grams-all purpose flour,1/2 teaspoon baking soda, 1/4 teaspoon salt, 1/2 cup chopped peanuts | Beat the butter with a electric mixer. Add the peanut butter and sugars and beat until light and fluffy (about 2 - 3 minutes). Add the egg and vanilla extract and beat to combine. Beat in the milk. In a separate bowl whisk together the flour, baking soda, and salt. Add to the peanut butter mixture and beat until incorporated. Cover and chill the batter for about an hour, or until firm enough to roll into balls.Roll the batter into 1 inch (2.54 cm) round balls. Place the granulated white sugar in a shallow bowl and roll each ball in the sugar. Place on the prepared baking sheet, spacing about 2 inches (5 cm) apart.Bake the cookies by selecting the menu.Cool completely on a wire rack. |
| 72 | Oatmeal Cookies | 110 grams- walnuts or pecans, toasted and chopped (optional), 170 grams unsalted butter ( room temperature), 210 grams packed light brown sugar,1 large egg, 1 teaspoon pure vanilla extract,105 grams- Maida,1/2 teaspoon baking soda,1/2 teaspoon salt,1/2 teaspoon ground cinnamon,260 grams rolled oats,1 cup dried cranberries, or raisins.To toast nuts: Place nuts on a baking sheet and bake for 8-10 minutes or until lightly browned and fragrant. Let cool and then chop into pieces. | In the bowl ,beat the butter and sugar until creamy and smooth (about 2 - 3 minutes). Add the egg and vanilla extract and beat to combine. In a separate bowl, whisk together the flour, baking soda, salt, and ground cinnamon. Add the flour mixture to the creamed mixture and beat until incorporated. Stir in the nuts, oats, and dried cranberries or raisins.Make small balls of batter and and space thecookies about 2 inches (5 cm) apart on the baking sheet. Then wet your hand and flatten the cookies slightly with your fingers so they are about 1/2 inch (1.25 cm) thick. Bake the by selecting the menu. Remove from oven and let the cookies cool a few minutes on the baking sheet before transferring them to a wire rack to cool. |
| 73 | Sugar Cookies | 12 cup butter (softened), 12 cup sugar , 12 large eggs ,1 tsp. milk ,1 12 cup maida , 12 tsp. baking powder ,1/4 tsp. salt | Using electric mixer, mix up the butter and sugar properly. Mix in egg and milk. Mix flour, salt and baking powder in a bowl. Mix together butter mixture and flour mixture with the electric mixer. Roll into 14 inch thick , Cover in plastic wrap and store at a low temperature for 2 to 24 hours. Using cookies cutter cut down cookies about 14 inch in various shapes. Put cookies on sheet and bake by selecting the menu.Take out cookies from cookies sheet and keep in cool place for 10 minutes |
| 74 | Butter Cookies | 1 cup butter ,1 cup white sugar ,1 egg , 2 2/3 cups maida , 1/4 teaspoon salt , 2 teaspoons vanilla extract | In a large bowl, cream together the butter and white sugar until light and fluffy. Beat in the egg, then stir in vanilla extract. Combine the flour and salt; stir into the sugar mixture. Cover dough, and chill for at least one hour. Chill cookie sheets. Press dough out onto ungreased, chilled cookie sheets. Bake using the menu . Remove from cookie sheets to cool on wire racks. |
| 75 | Wheat Bran Cookies | 100 gms salted butter ,125 gms cup sugar , 12 egg ,100 gms wheat bran ,275 gms cups flour | Stir butter and sugar until creamy, add the egg and mix well. Add the wheat bran and the flour and work it into dough. Make small balls, put them on a baking sheet and flatten them with for example a fork. Bake by selecting the menu. |
| 76 | Short Bread | 226 grams- unsalted butter ( room temperature), 1 teaspoon pure vanilla extract 120 grams-powdered or icing sugar ,325 grams Maida,1/2 teaspoon salt ,260 grams- dark raisinsGlaze:1 large egg, lightly beaten | In the bowl of your electric mixer (or with a hand mixer), beat the butter and vanilla extract until smooth and creamy (about one minute). Add the sugar and beat until light and fluffy. In a separate bowl whisk the flour with the salt and then add the flour mixture to the butter mixture and beat until the dough just comes together.Divide the dough into two halves, making one half slightly larger than the other half. Spread the smaller half of dough over the bottom of the prepared pan and gently press thedough, with your fingertips or the back of a spoon, to form an even layer. Sprinkle the raisins evenly over the dough and gently press the raisins into the dough. Take the other half of dough and using your fingers, crumble it over the top of the raisins. Then lightly press the dough into an even layer. Take the lightly beaten egg and, using a pastry brush, coat the top of the shortbread with the egg wash. Then, with the tines of a fork, slowly drag the fork back and forth across the shortbread to make a decorative pattern.Cut the shortbread into about 1 x 3 inch (2.5 x 7.5 cm) rectangular bars.Bake by selecting the menu. |
| 77 | Thumbprint cookies | 113 grams- unsalted butter (room temperature),50 grams- granulated white sugar,1 large egg (separated),1/2 teaspoon pure vanilla extract,130 grams- maida,1/8 teaspoon salt,100 grams- hazelnuts, almonds, walnuts, toasted - finely chopped 1/2 cup jam | In the bowl of your electric mixer (or with a hand mixer), beat the butter and sugar until light and fluffy (2-3 minutes). Add the egg yolk and vanilla extract and beat until combined.In a separate bowl, whisk together the flour and salt. Add the flour mixture to the batter and beat just until combined. If the batter is too soft to roll into balls, refrigerate for about 30 minutes.In a small bowl, whisk the egg white until frothy. Place the chopped nuts on a plate. Roll the dough into 1 inch (2.5 cm) balls. Taking one ball of dough at a time, dip first into the egg white and then lightly roll in the nuts. Place on the prepared baking sheet spacing about 1 inch (2.5 cm) apart. Using your thumb or end of a wooden spoon, make a indentation into the center of each cookie and fill with about 1/2 teaspoon of jam.Bake by selecting the menu. Remove from oven and place on wire rack to cool. |
| Sr.no | COOKIE MASTER | INGREDIENTS | METHOD |
| 78 | Garam MasalaCookies | 2 1/4 cups all-purpose flour1 teaspoon baking soda1 heaping teaspoon salt2 tablespoons garam masala1 teaspoon cinnamon1 cup (2 sticks) butter, one softened1/2 cup granulated sugar1 cup packed light brown sugar1 teaspoon vanilla extract2 large eggs | Mix flour, baking soda, salt, garam masala, and cinnamon in a medium bowl. Set aside.In a sauce pan, heat 1 stick of butter over medium high heat until completely melted.Keep cooking the butter until it turns a rich golden brown color and begins to take on a warm, nutty smell. This may take up to 6 or 7 minutes. Be careful not to burn your butter!Pour into a heat resistant bowl and set aside for 10-15 minutes.In another bowl mix brown sugar, granulated sugar, and softened stick of butter with an electric mixer, adding cooled browned butter gradually until completely combined. Add vanilla. Add eggs one at a time, blend until creamy. Slowly add flour mixture and mix, scraping the sides of the bowl to ensure even distribution throughout the dough.Drop rounded teaspoons of dough on to an ungreased cookie sheet 2 inches apart and bake by selecting the menu. Don't overbake these cookies – they should look almost underdone when you take them out of the oven. Set on wire racks to cool for 5 minutes, then remove from cookie sheet to cool completely. |
| 79 | Cashew Cookies | Ingredients A:210g butter80g icing sugar1 egg yolk1/2 tsp vanilla essenceIngredients B:250g plain flour60g corn flour1/4 tsp baking soda1/8 tsp cinnamon powderIngredients C:300g cashew nuts (100 gms roasted - chopped and 200gms unroasted)2 egg yolks (beaten for eggwash) | Cream butter and icing sugar lightly at speed 1 using k beater. Add in egg yolk and vanilla essence. Mix well.Stir in Ingredients B and chopped cashew nuts. Mix well. Chill dough in fridge for 40 minutes. Remove dough and roll into small balls. Arrange on a lined baking tray. Brush with beaten egg yolk and place a whole (or half) cashew nuts on top of cookies and press slightly to flatten it. Bake by selecting the menu. Cool and keep in airtight container. |
| Sr.no | COOKIE MASKER | INGREDIENTS | METHOD |
| 80 | Melting Moments | 100 gm (3/4 cup) plain flour30 gm (2 tbsp) cornflour60 gm (1/2 cup) icing sugar100 gm (1/2 cup) butter2 tbsp egg1 tsp vanilla extract | Sieve the flour and the cornflour together into a bowl.In another bowl mix in the butter and the sugar with a hand blender or a wire whisk or put in the stand mixer with the paddle attachment and blend until smooth and creamy.Put in the flour mixture and vanilla extract and mix until smooth and there are no lumps.Add egg and mix well.Empty the contents in piping bag and pipe it onto a parchment paper as per desired shape . |
| 81 | Coconut Snowball Melting Moments | Maida (All Purpose Flour) – 100gmsCorn flour - 30 gmsSalt –a pinchPowdered or icing sugar -20Unsalted Butter - 1 cup (200 gms)Vanilla essence - 1 tspChopped nuts - 2 to 3 tbsp(walnuts & cashewnuts)For the topping:Powdered or icing sugar – to coat cookies | In a bowl add butter, icing sugar and vanilla essence - beat well until creamy. Now add the chopped nuts and give a quick stir. Mix in maida and cornflour.Add salt and mix well.Pinch equal sized balls and roll them with your palms and place it in prepared baking sheets, spacing about 1 inch apart. Bake using the programme cookies.Once done , coat the cookies in powdered sugar while they are still warm |
| 82 | Strawberry Melting moments | 125g unsalted butter, softened 12 teaspoon vanilla extract 12 teaspoon strawberry essence 14 cup confectioners’ sugar (icing), sifted, plus more for dusting 34 cup Maida 14 cup strawberry custard powder, sifted | Use an electric mixer to combine the butter, vanilla extract, strawberry essence and sifted confectioners’ sugar in a large bowl until pale and fluffy.Sift together the plain flour and strawberry custard powder into a separate bowl. Add the flour mixture to the butter mixture, and beat on low speed until just combined, making sure to scrape down the bowl.Roll teaspoonfuls of dough into balls.Place on the lined tray about 1” apart—cookies will expand slightly in the oven. Use the end of a fork to press down lightly on top of each ball.Bake using the programme cookies. Remove from oven and stand 5 minutes in tray before transferring to a wire rack to cool completely. |
| Sr.no | COOKIE MASTER | INGREDIENTS | METHOD |
| 83 | Eggless melting moments | 100 gm (3/4 cup) plain flour 30 gm (2 tbsp) cornflour 60 gm (1/2 cup) icing sugar 100 gm (1/2 cup) butter 2 tbsp milk (optional) 1 tsp vanilla extract | Sieve the flour and the cornflour together into a bowl. In another bowl mix in the butter and the sugar with a hand blender or a wire whisk or put in the stand mixer with the paddle attachment and blend until smooth and creamy. Put in the flour mixture and vanilla extract and mix until smooth and there are no lumps. Add egg and mix well. Empty the contents in piping bag and pipe it onto a parchment paper as per desired shape. Bake using the programme cookies. |
| 84 | Red velvet melting moments | 125g unsalted butter 80gmsicing sugar 40gms cornflour 1⁄4 cup cocoa powder 140gms Maida 1 tbsp red food colouring | Beat butter and sifted icing sugar with an electric mixer in a small bowl for 3 minutes, or until mixture is light and fluffy. Gradually add remaining dry ingredients, continuously beating on medium speed until all is combined. Mix in the food colouring. Spoon mixture into a piping bag fitted with a 1cm fluted tube. Pipe rosettes onto baking trays. Alternatively, roll teaspoons of dough and press down onto baking trays with a fork. Bake using the programme cookies. Cool on tray for 5 minutes, then turn onto a wire rack to cool completely. |
| 85 | Spicy Melting moments | 125g butter 60g icing sugar 2 teaspoons mixed spice 110g Maida 30g cornflour | Sift in the other ingredients and stir to combine. At this stage, the mixture can be wrapped in plastic wrap and kept in the fridge for up to a week. Make balls by rolling between floured palms, place on baking tray, then press down with a fork until 1cm thick. Bake using the programme cookies. Cool on tray for 5 minutes, then turn onto a wire rack to cool completely. |
| 86 | Melting moments cornflakes Coated | 100 g butter 75 g caster sugar 1 egg yolk few drops of vanilla flavouring 150 g Self raising flour crushed cornflakes | Cream the butter and sugar together until pale and fluffy. Beat in the egg yolk. Add the vanilla flavouring, stir in the flour to give a smooth dough and divide into about 24 portions. Form each piece into a ball and roll in crushed cornflakes. Bake using the programme cookies. Cool on tray for 5 minutes, then turn onto a wire rack to cool completely. |
| Sr.no | KEBABS&TIKKAS | INGREDIENTS | METHOD |
| Cookware : Baking plate | |||
| 87 | Chicken Satay | 8 skinless chicken thighs, cut into thin strips1 package wooden skewersSATAY MARINADE:1/4 cup minced lemongrass , fresh or frozen1 small onion, sliced3 cloves garlic2 fresh red chilies, sliced,1 thumb-size piece of ginger-thinly sliced1/2 tsp. dried turmeric2 Tbsp. ground coriander2 tsp. cumin3 Tbsp. dark soy sauce4 Tbsp. fish sauce5Tbsp. brown sugar2 Tbsp. vegetable oil | Use wooden skewers, soak them in water (to prevent burning).Cut chicken into thin strips and place in a bowl.Place all marinade ingredients in a food processor or chopper. Process well.Mix in chicken pieces in marinade.Allow at least 1 hour for marinating, or longer (up to 24 hours).When ready to cook, thread meat onto the skewers.Grill the satay selecting barbecue option |
| 88 | Boneless Chicken Tikka | Chicken cubes Crushed Ginger-1 tsp Crushed garlic-2 cloves Lemon juice, Turmeric -1/2 tspChilli powder-1 tsp Curry powder-1/4 tsp Hung curd-2/3rd cup Garam masala -1/4 tsp Coriander -1/4 tsp Corn starch-1/4 tsp Oil ,Salt-as per taste | Mix all the ingredients together and let the chicken marinate for 3-4 hours.Put the chicken onto the baking plate and use the menu barbecue to cook.Turn over the chicken tikka inbetween the programme. |
| 89 | Chicken Sausage | Defrost -Frozen chicken sausage | Spread chicken sausages on baking tray and cook by using barbecue programme.Brush oil halfway during the programme. |
| 90 | Chicken Nuggets | Defrost -Frozen chicken Nuggets | Spread chicken nuggets on baking tray, and cook by using barbecue programme.Brush oil halfway during the programme. |
| 91 | Chicken Keema Kebab | 500 gms Boiled chicken keema (marinated with ginger garlic /turmeric/lemon juice of 1 lime)1/2 cup besan,Ingredients to be ground to paste:1/2 teaspoon poppy seeds-roasted,4 cloves garlic,1 teaspoon garam masala,1 teaspoon black cumin seeds roasted1 tablespoon coriander seeds roasted,1 teaspoon grated green ginger ; salt to taste;2 green chilies (chopped),1 large onion-finely chopped,2 large eggs,3 tablespoons chopped green coriander,3 tablespoons bread crumbs. | Mix boiled keema along with 12 cup besan, poppy seeds, garlic cloves, garam masala, black cumin, coriander seeds.Add the chillies and onion and mix well.Add one egg over the mince and add the chopped coriander and mix thoroughly.Divide the mixture into 16 portions.First roll each one into a ball and then flatten into a fat round disc.Dip each kabab in the beaten egg and then roll it over the bread crumbs.place the kebab on baking plate .Cook kebab by selecting the menu barbecue .Serve with garnishing and chutney of your choice. |
| 92 | Prawn Satay | 12 raw king prawns,Vegetable oil - for fryingFor the marinade5 tablespoons soy sauce2 tablespoons lemon juice2 cloves garlic, crushed1 tablespoon fresh coriander-chopped,pinch red chilli powder | In a bowl, combine the soy sauce, lemon juice, garlic, coriander and chilli. Add the peeled prawns, stir well and refrigerate 1 hour.Meanwhile soak wooden TURN GRILLS, in water (to prevent burning). Thread prawns onto the skewers and barbecue by placing them on baking plate.Turn over midway during the programme.Serve with satay Sauce |
| 93 | Minced Fish Satay | 2-3 shallots5 cloves garlic1 oz fresh ginger2 Tbs. turmeric 1-2 stalks lemon grass1/2 tsp red chili powder3 bay leaves (kaffir leaves if available)4 mackerel, steamed and minced with fork.3 Tbsp. fried onion1 tbsp lemon juice1 Tbs. palm sugar (or dark brown sugar) 341 Tbs shrimp paste2 Tbs. thick coconut milk | Blend the shallots, garlic, fresh ginger, turmeric, lemon grass, red chili, and bay leaves paste.Mix together with fish, fried shallots, lemon leaves, palm sugar, and shrimp paste.Add coconut milk a little at time to make a mixture that will hold together on the skewer.Shape mixture on skewers and barbecue |
| 94 | Chicken Popcorn | Defrost -Frozen chicken popcorns | Spread chicken popcorns on baking tray and cook by using barbecue programme. Brush oil halfway during the programme. |
| 95 | Chicken Patty For Burgers | Defrost -Frozen chicken patty for burgers | Spread chicken patty on baking tray, and cook by using barbecue programme. Brush oil halfway during the programme. |
| 96 | Hara Chicken Kebab | 200 gm boneless chicken breast1 1/2 tablespoon thick curd2 teaspoon lemon juice1 cup coriander leaves1/4 cup mint leaves1-1/2 inch ginger piece6-8 cloves garlic4-5 green chilies thinly chopped1/2 teaspoon red chilli powder1/4 teaspoon turmeric powder2 teaspoon coriander powder1-1/2 teaspoon garam masala powder1 teaspoon butter2 tablespoon cooking oilSalt to tasteBamboo skewer stick/sathey sticks to grill | Wash the chicken breast and cut into medium size chunks. Apply salt, butter, lemon juice and red chilli powder on the chicken pieces and keep aside for 10-15 minutes.In the meantime, coriander-mint leaves, ginger, garlic and green chilies. Grind into a smooth paste.Now add curd and spices in ground paste of leaves and coat the chicken pieces very well in it. Cover the marinated chicken and keep it aside at least for 20 minutes, so that chicken gets the aroma and flavors of green paste and spices.Soak the wooden skewers in normal water for about 4-5 minutes. Apply some oil on the skewers and arrange the pieces of chicken onto the skewers.Spread some more oil on top of the chicken pieces. cook by selecting barbecue programme. |
| 97 | Lamb Koftas | 500gms lamb mince1 small onion chopped2 garlic cloves crushed 12 tsp red chilli powder1tbsp chopped mint leaves 12 tsp ground ginger1tsp ground jeera 12 tsp ground coriander | Place mince, onion, garlic, chilli powder, , ginger, cumin and coriander in a bowl.Mix to combine. Shape 1/4 cup lamb mixture at a time into sixteen 8cm-long sausages.Thread 1 sausage onto each skewer. Place on a large baking tray. Cover. Refrigerate for 20 minutes or until firm. Place the koftas on baking plate and cook by selecting barbecue programme. |
| 98 | Pineapple Chicken Satay | 1/4 cup lower-sodium soy sauce1/4 cup sweet chili sauce1/4 cup natural-style, crunchy peanut butter2 teaspoons peanut oil1/2 teaspoon curry powder1 pound chicken breast tenders, cut lengthwise into 8 piecesCooking spray1 1/2 cups diced pineapple1/3 cup vertically sliced red onion2 tablespoons chopped fresh cilantro2 tablespoons fresh lime juice1/8 teaspoon ground red pepper | Place peanut oil, curry powder, and chicken in a bowl; toss to coat. Thread chicken onto 8 (6-inch) skewers. Place on baking plate.Cook by selecting barbecue programme.While chicken cooks, combine 1 1/2 cups pineapple, 1/3 cup red onion, 2 tablespoons cilantro, 2 tablespoons lime juice, and 1/8 teaspoon ground red pepper. Serve chicken with soy sauce mixture and pineapple mixture. |
| 99 | Grilled Garlic & Herb Chicken Satay | 1 bottle Garlic & Herb Marinade3 tablespoons chunky peanut butter1 tablespoon brown sugar1 tablespoon water1/8 teaspoon ground cumin1/8 teaspoon ground red pepper500gms boneless, skinless chicken, cut into strips | Combine 1/3 cup marinade with peanut butter, brown sugar, water and spices; whisk together and reserve.Combine chicken strips with remaining marinade;marinate for 30 minutes or up to 1 hour. Remove meat from marinade and thread onto 8 skewers. Place on baking plate. Cook by selecting the programme Barbecue. |
| 100 | Mango & Coconut Chicken Skewers | 500 gboneless, skinless chicken breasts (about 4)125 mL- mango chutney1 tbsp freshly squeezed lime juice1 tsp curry paste or powder250 mL-unsweetened shredded coconut125 mL- plain yogurt1 tbsp mango chutney | Cut each chicken breast lengthwise into – in. (1 cm) thick slices. Thread onto skewers. In large shallow dish, combine chutney, lime juice and curry paste. Place skewers in dish, spread to coat with chutney mixture. (Can be covered and refrigerated for up to 1 day).Spread coconut in a separate shallow dish. Lightly roll chicken in coconut, shaking off excess coconut , place chicken on baking plate and cook by selecting the programme Barbecue.Yogurt Dip: In a small dish, stir together yogurt and chutney. Cover and refrigerate until serving, for up to one day. Bring just to room temperature before serving. |
| 101 | Marinated Chicken Brochette | 500 g of boneless chicken breasts cut in strips or beef (I use sirloin) cut in 1 inch (2.5 cm) cubes1/2 cup (120 ml) of vegetable oil1/2 cup (120 ml) of soy sauce2tbsp crushed mustard1/4 cup (60 ml) of lemon juice362 tbsp of Worcestershire sauce1 large garlic clove, finely chopped1 tsp of freshly ground black pepper | Use wooden skewers, soak them in water (to prevent burning).Place the soy sauce, lemon juice, mustard, Worcestershire sauce, garlic and pepper in a blender and mix well slowly adding the oil;Pour the marinade over the chicken and let sit for 4 hours, turning occasionally.When you are ready to cook, Thread the chicken on wooden skewers and cook by selecting barbecue programme. |
OTHER CONVENIENT FEATURES
CHILD PROOF LOCK
The child proof lock prevents unsupervised operation by little children.
To set the child proof lock: Press STOP/RESET pad for 3 seconds, then a beep will sound and the indicator light will come on. In the lock state, all pads are disabled.
To cancel the child proof lock: Press STOP/RESET pad for 3 seconds, then a beep will sound and the indicator light will turn off.
EXPRESS COOK
Use this feature to program the oven to microwave food at 100% power conveniently.
Press START/EXPRESS COOK pad in quick succession to set the cooking time (up to 10 minutes).
During cooking, you can press the pad to add cooking time. (each press to add 30 seconds)
SANITIZE
It helps you to clean the oven easily. The default setting is microwave working for 5 minutes at full power level.
- Place a microwave container with 200ml water into the oven.
- Press SANITIZE pad once.
- Press START/EXPRESS COOK pad.
Note: After program ending, move the microwave container and glass tray away. Use a soft and dry cloth to clean the oven cavity and door.
DEODORIZE
This function can flash the air in the oven. Empty the oven before using it.
- Make sure the oven is empty, and then close the door.
- Touch SANITIZE pad twice.
- Touch START/EXPRESS COOK pad.
POWER SAVE
When the oven isn't used, you can set power save mode.
In standby state, press POWER SAVE pad, then the display will be black. The system enters into power save mode until you press any pad or open the door.
AUTOMATIC PROTECTION MECHANISM
- When the system enters into super high temperature protection status, the digital display shows "E01" and continues to beep till the system comes back to normal condition and then press "STOP/RESET".
- When the system enters into super low temperature protection status, the digital display shows "E02" and continues to beep till the system comes back to normal condition and then press "STOP/RESET".
- The system enters into protection mode when the system sensor is Short Circuited. The display shows "E03" and continues to beep until pressing "STOP/RESET" button. Call consumer service to check and replace the faulty sensor.
COOLING FEATURE
This system of the microwave oven has the feature of cooling. As for any cooking mode which cooking time above 2 minutes, after finishing cooking, the oven fan will work about 3 minutes automatically to cool the oven for prolonging the life of the oven.
Standardized Vanilla Sponge Cake Recipe
For 1kg cake tin (9 to 11 inch round cake tin)
Ingredients:
08 eggs (yolks and whites separated)
220 gms powdered sugar
280 gms plain refined flour
40 ml milk
60 gms oil
1 tspBaking soda
1 tsp Baking powder
1tbp vanilla essence
Apparatus needed:
02 mixing bowl glass
01 rubber spatula
01 sheet of butter paper
01 electric whisk
01 weighing scale
01 tooth pick
Instruction:
- Separate the egg yolks and egg whites in separate glass bowls. Ensure no egg yolk falls in white.
- Beat oil and powdered sugar with an electric whisk till it forms a crumbly mixture. Now separately beat egg whites with an electric whisk till the egg white are stiffly beaten. Add the sugar and oil mixture to the beaten egg white in 05 parts and whisk it.
- Slowly add the 4 egg yolks and give it a light mix (fold in). Sieve refined flour with baking powder and baking soda, and gradually add this in 3 parts till all the flour is mixed (use rubber spatula to cut and fold mixture).
- Pre-heat the oven on convection mode at 170C. Add the milk, and vanilla essence to the cake batter. Line the cake tin with butter paper (ensure the edge for side butter paper lining are 2 cm above the rim of cake tin to give more space for the cake to rise. Now grease the lined butter paper mildly with oil.
- After the oven pre-heats, Transfer the batter in the lined cake tin, tap the cake tin and swirl with tooth pick to release trapped air-pockets. Place the cake tin on the glass turn table directly.
- Bake on convection mode for 170C for 45 mins. Fold a foil paper to make it double layer and place it above the cake after first 10 mins ensuring the foil paper is not touching the cavity sides. De-mould once cooled on metal rack.
- Decorate the cake as required.
(Tip : While baking use "Low rack" for evenly cooked cake bottom and spongy cake).
Standard operation procedure (SOP) for baking 500 gms Vanilla sponge cake (with egg).
Ingredients:
- 04 eggs (yolks and whites separated)
- 120 gms castor sugar or powdered sugar
- 120 gms plain refined flour
- 40 gms milk
- 30 gms oil
- 1 tsp synthetic vinegar
- 1/2 tsp vanilla essence
Apparatus needed:
01 mixing bowl glass
01 rubber spatula
01 sheet of butter paper
01 electric whisk
Instruction:
- Beat the egg whites with an electronic whisk till the egg whites become stiff peaks. Add the vinegar to the egg white and whisk it. Add the castor sugar in 5 separate parts and whisk till all the sugar is dissolved in the egg whites.
- Slowly add the 4 egg yolks and give it a light mix (fold in). Add the refined flour in 3 parts till all the flour is mixed (use cut and fold method).
- Pre-heat the oven on convection mode for 10 minutes at 170C. Add the oil, milk, and vanilla essence to the cake batter.
- Coat the cake tin with butter and flour or butter paper and butter. After the oven pre-heat, set the oven on convection mode for 150C for 35 mins.
- Transfer the batter in the lined cake tin, tap the cake tin and swirl with tooth pick to release trapped air-pockets.
- Bake on convection mode for 150C for 35 mins. De-mould once cooled on metal rack.
- Decorate the cake as required.
Special Note :
- De-mould the cake only after cake is 100% cooled and on room temperature.
- Always carry a pre-baked sponge cake to explain cake textures and even demonstrated icing.
CLEANING AND CARE
- Turn off the oven and remove the power plug from the wall socket before cleaning.
- Keep the inside of the oven clean. When food splatters or spilled liquids adhere to oven walls, wipe with a damp cloth. Mild detergent may be used if the oven gets very dirty. Avoid the use of spray and other harsh cleaners as they may stain, streak or dull the door surface.
- The outside surfaces should be cleaned with a damp cloth. To prevent damage to the operating parts inside the oven, water should not be allowed to seep into the ventilation openings.
- Wipe the door and window on both sides, the door seals and adjacent parts frequently with a damp cloth to remove any spills or spatters. Do not use abrasive cleaner.
- Do not allow the control panel to become wet. Clean with a soft, damp cloth. When cleaning the control panel, leave oven door open to prevent oven from accidentally turning on.
- If steam accumulates inside or around the outside of the oven door, wipe with a soft cloth. This may occur when the microwave oven is operated under high humidity condition. And it is normal.
- It is occasionally necessary to remove the glass tray for cleaning. Wash the tray in warm sudsy water or in a dishwasher.
- The roller ring and oven floor should be cleaned regularly to avoid excessive noise. Simply wipe the bottom surface of the oven with mild detergent. The roller ring may be washed in mild sudsy water or dishwasher. When removing the roller ring from cavity floor for cleaning, be sure to replace in the proper position.
- Remove odors from your oven by combining a cup of water with the juice and skin of one lemon in a deep microwaveable bowl, microwave for 5 minutes. Wipe thoroughly and dry with a soft cloth.
- When it becomes necessary to replace the oven light, please consult a dealer to have it replaced.
- The oven should be cleaned regularly and any food deposits removed. Failure to maintain the oven in a clean condition could lead to deterioration of the surface that could adversely affect the life of the appliance and possibly result in a hazardous situation.
- Please do not dispose this appliance into the domestic rubbish bin, it should be disposed to the particular disposal center provided by the municipalities.
- When the microwave oven with grill function is first used, it may produce slight smoke and smell. This is a normal phenomenon because the oven is made of a steel plate coated with lubricating oil, and the new oven will produce fumes and odor generated by burning the lubricating oil. This phenomenon will disappear after a period of using.
WARRANTY
IFB Industries Limned. ("The Company") warrants to the original domestic purchase of this microwave oven
("Appliances") that it is free from defects in workmanship & materials. During 12 months from the date of purchase of the new microwave oven model, all the parts of the microwave oven and 36 months on Magnetron & Cavity, shall be replaced or repaired free of charge, on intimation to the Company I Company's authorized service centre nearest to the place where the appliance is installed This warranty is subject to Limitations of Warranty :
- This warranty is not valid in case of the following events.
a) If the warranty card is not fully and properly filled in and signed at the time of purchase I installation by the company's authorised dealer I service engineer.
b) If the completed warranty card is not presented to the authorised personnel at the time of service I repair.
c) If the appliance is not used in accordance with manufacturer's instructions given in the Operating Manual.
d) If the appliance has been serviced, repaired, opened or tampered by any unauthorized personnel.
e) If defects arise I caused by accidents, alteration, misuse, neglect, abuse, substitution of original components with spurious I non-genuine components, attack by household pests I rodents, fire, flood, earth-quake, lightning and I or any other acts of God I natural calamities.
f) If damages occur by improper electrical, circuit outside the appliance or by any defective electrical supply thereof.
g) If the machine serial number on the appliance is defaced, missing or altered.
h) If the appliance is taken out of India.
-
This warranty does not cover any type of painting, plating including rusting etc or defects thereof.
-
This warranty does not cover normal wear and tear of parts.
-
Liability for consequential damages is neither accepted nor implied.
-
Parts replaced or repaired under this warranty are warranted throughout the remaining of the original warranty period.
-
Company is not liable for any delay in servicing due to reasons beyond the control of the company or any of its authorised service center.
-
This warranty is not applicable, if the microwave oven is used for commercial purpose of at places like Institutions, Hotels, Hostels, Hospitals, Community Halls and other similar applications.
-
For any service under this warranty beyond city I town I municipal limits from the Company I authorized service centre, a fixed charge of Rs. 250 /- will be collected from the customer in addition to the actual to and fro charges by the shortest route. Alternatively the customer can bring the appliance to the nearest service centre for carrying out the neccassary repairs, at customer's own cost.
-
During the warranty period whenever the appliance is shifted from the original city of purchase to another cny I town where service is provided by the company's authorized service agent, a warranty transfer charge of Rs. 300 /- will be collected from the customer by the company's authorized service agent. The above charges also include the reinstallation of the appliance. However in case of transfer to a city where the company provides direct service, a nominal charge of Rs. 250 /- only will be collected from the customer towards reinstallation. The Company, however, shall not undertake the responsibility of shifting I transferring the appliance from the location where the appliance was originally installed.
-
This warranty is issued subject to the jurisdiction of Kolkata courts, and I or other judicial/ quasi judicial forums having jurisdiction over the registered office of the Company.
Note: For all types of repairs I maintenance under warranty, the appliance shall be brought to the nearest
CUSTOMER COPY
Mr./Mrs./Ms
Address
Telephone No.:
Model Name:
Serial No.:
Date of Purchase:
Cash Memo No.:
Dealer Name and:
Address stamp:
Service Station Copy
Mr./Mrs./Ms
Address -
Pin
code :
Telephone No.: (R) - - - - - - - - - - (0) - - - - - - - - -
Model Name:
Serial No.:
Date of Purchase:
Cash Memo No.:
Products Owned by the customer:(Please tick in the appropriate box.)
□ Washing Machine
Refrigerator
□ ColorTV
100% Clothes Dryer
□ Dishwasher
□ Car
Air Conditioner
IFB Industries Limited
Regd.off.: 14 Taratala Road
Kolkata - 700088
- Microwave Oven Owner's Manual
- CONTENTS
- SPECIFICATIONS
- BEFORE YOU CALL FOR SERVICE
- INSTALLATION
- GROUNDING INSTRUCTIONS
- Note
- RADIO INTERFERENCE
- IMPORTANT SAFETY INSTRUCTIONS
- MICROWAVE COOKING PRINCIPLES
- UTENSILS GUIDE
- PART NAMES
- CONTROL PANEL
- DISPLAY WINDOW
- AUTO MENU
- INTELLIGENT DE-FREEZE
- NUMBER PADS
- GRILL/MICRO.+ GRILL
- TURN GRILL/MICRO.+TURN GRILL
- CONVECTION
- CONVECTION+TURN GRILL
- CONVECTION+TURN GRILL+MICRO.
- MICRO.+CONVECTION
- SANTIZE
- SMART WARM
- POWER SAVE
- TIMER/CLOCK
- START/ EXPRESS COOK
- STOP/RESET
- HOW TO SET THE OVEN CONTROLS
- SETTING THE CLOCK
- KITCHEN TIMER
- MICROWAVE COOKING
- Note:
- GRILL/ MICROWAVE +GRILL
- TURN GRILL/MICRO+TURN GRILL
- To Cook with Convection
- To Preheat and Cook with Convection
- MICROWAVE +CONVECTION
- CONVECTION+TURN GRILL+MICRO
- MENU COOK
- OTHER CONVENIENT FEATURES
- CHILD PROOF LOCK
- EXPRESS COOK
- SANITIZE
- DEODORIZE
- AUTOMATIC PROTECTION MECHANISM
- COOLING FEATURE
- Standardized Vanilla Sponge Cake Recipe
- Ingredients:
- Apparatus needed:
- Instruction:
- Special Note :
- CLEANING AND CARE
- WARRANTY
- CUSTOMER COPY
- Service Station Copy
Brand : IFB
Model : 30BRC3
Category : Microwaves