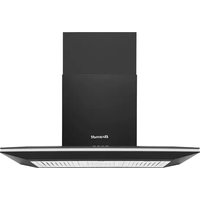
AD9905B - Range hood BRANDT - Free user manual and instructions
Find the device manual for free AD9905B BRANDT in PDF.


| Product Type | Range hood |
| Brand | Brandt |
| Model | AD9905B |
| Width | 90 cm (900 mm) |
| Depth | 50 cm (500 mm) |
| Height (min-max) | 150-200 mm |
| Weight | Approximately 15 kg |
| Power Supply | 220-240 V ~ 50 Hz |
| Maximum Extraction Rate | 600 m³/h |
| Number of Speeds | 3 |
| Noise Level (max) | 65 dB(A) |
| Lighting | LED, 2 x 1.5 W |
| Grease Filter | Aluminum, washable |
| Charcoal Filter (optional) | For recirculation mode |
| Control Type | Electronic push buttons |
| Mounting Type | Wall-mounted |
| Ducting Options | Extraction (duct) or recirculation (ductless) |
| Energy Class | A |
| Warranty | 2 years |
| Maintenance | Clean grease filters monthly; replace charcoal filters every 3-6 months; wipe surfaces with mild detergent. |
| Safety Notes | Maintain minimum distance of 65 cm above gas hob; ensure adequate ventilation when used simultaneously with gas appliances. |
| Spare Parts Availability | Contact Brandt authorized service centers for genuine parts. |
Frequently Asked Questions - AD9905B BRANDT
User questions about AD9905B BRANDT
0 question about this device. Answer the ones you know or ask your own.
Ask a new question about this device
Download the instructions for your Range hood in PDF format for free! Find your manual AD9905B - BRANDT and take your electronic device back in hand. On this page are published all the documents necessary for the use of your device. AD9905B by BRANDT.
USER MANUAL AD9905B BRANDT
To avoid the risk of accidents or damage to the appliance
it is essential to read these instructions before
it is installed or used for the first time.
TableofContents
● FromtheManufacturer 1
- Specifications 1
● SAFETY:ReadthisFirst! 2
- VentSystemRequirements 3
- DescriptionofParts 4
● Ductingvs.Re-circulatingmode 5
● Re-circulatingmodeairoutlet 6
- Installation 7
ElectricalConnection 12
● Operation 13
● AutoLinkageSystem 14
● Cleaning&Maintenance 15
● Troubleshooting 17
● SchematicDiagram 18
- DimensionDrawing 18
■ From the Manufacturer
- This appliance and its packaging are produced by processes that minimize waste and respect the environment.
- Please help us to continue the protection of the environment by disposing of the packaging in a correct manner.
Safety!
- Cling film, polystyrene and plastic wrappings must be kept out of reach of babies and young children, to avoid the danger of suffocation.
- Electrical and electronic appliances often contain materials which, if handled or disposed incorrectly, could be potentially hazardous to human health and environment. Please do not dispose of your old appliance with your household waste.

- Please dispose it at your local community waste collection / recycling centre and ensure that it presents no danger to children while being stored for disposal.
- It should be unplugged or disconnected from the mains electricity supply by a competent person. If connected by a plug, the plug must be rendered useless and the cable cut off directly behind the appliance to prevent misuse.
■ Specifications
| Symptoms | Possible Cause | Action |
| Does not function | No electrical supply | Check that the plug is connected. |
| Check that the main switch is turned on. | ||
| Poor airflow | Aluminium grease filters clogged | Clean the filters and replace when dry |
| Charcoal grease filters clogged | Replace charcoal filters with new sets | |
| Motor running but no airflow | Butterfly valve jammed | Contact technician |
| Motor cuts after a few minutes | High temperature safety device activated | The kitchen is not sufficiently ventilated |
| Thehood is installed too near the cooking stove | The hood must be at least 65cm from stove | |
| Strong cooking smell | Charcoal filters not installed/ are not operating optimally | In recirculation mode, charcoal filters must be installed. Otherwise, if charcoal filter is clogged, replace the charcoal filter |
| Oil dripping onto stove | Aluminium grease filter saturated | Wash the aluminium grease filters |
| Whirring sound | Foreign object in contact with fan blade | Contact technician |
■ SAFETY : Read this First !
- Check the appliance for damage before and after unpacking it.
- Do not connect the appliance if it has been damaged.
- Read this user manual thoroughly before attempting to use this appliance.
- This appliance may be used safely if it is correctly installed according to the provided safety instruction by a qualified installer. The installer is responsible for ensuring that the appliance works correctly at its installation location. Brandt Asie Pte Ltd is not liable for damage caused by incorrect installation or connection, and such damages are not covered under warranty.
- It is dangerous to modify any part of this appliance.
- Brandt Asie Pte Ltd is not liable for damages in case of failure to adopt proper safety measures.
- Ensure the location in which this appliance is installed is well ventilated.
● This appliance should not be used to ventilate a room. - The distance between the bench top to the lower part of the hood is recommended to be between 650mm – 750mm.
- Use an electrical connector with earth that is suitable for your location.
- Check that the voltage in your location is suitable for supply to this product.
- The electrical connection of this appliance must be connected to earth.
Green & Yellow = EARTH
Blue = NEUTRAL
Brown = LIVE
- Multiple plugs and extension cables should not be used in conjunction at a time. Overload is dangerous and may cause a fire.
- Ensure that the power supply cord is away from any heat source or sharp objects.
- The product should be switched off and the electrical supply disconnected before any cleaning or maintenance work is carried out, or if the appliance is unused for extended periods.
- Remove all plastic covers or wrappings on the product and its attachments
(e.g. charcoal filters) before use.
- This product is intended for domestic use and the household environment only. The product is not intended for an outside use or in a commercial setting.
- Do not leave the product unattended during operation. Brandt Asie Pte is not liable for damage caused by improper use or incorrect operation.
■ Vent System
Determine which venting method is best for your application. Vented (non-recirculating) system terminates on the outside. Ductwork may be extended either through the wall or the roof. Do not terminate the vent system in an attic or other enclosed area.
Cleaning & Maintenance
SURFACES: Wash with warm soapy water and a soft sponge. Never use harsh or abrasive cleaning agents, cleaning agents with high alcohol content, hard scouring pads or cleaning sponges or high-pressure cleaners or steam cleaners on any part of this appliance as this will cause irreparable damage.
The length of the ductwork and the number of elbows should be kept to a minimum to optimise performance. The size of the ductwork should be uni-form. Do not install two elbows together. Ensure all joints in the ductwork system are sealed well. Use caulking to seal exterior wall or floor opening around the cap.
CHARCOAL FILTER REPLACEMENT
Remove the charcoal filter from the blower as shown. Fit in the new charcoal filter.

natural_image
Interior view of a microwave oven with a mesh vent and a red arrow pointing to the vent (no visible text or symbols)LED LIGHT REPLACEMENT
Before attempting to replace the light bulb, make sure that the light switch is turned off. Remove the grease filter to access the lamp area. Remove the damaged LED light and replace with a LED light maximum 5 W.
■ Cleaning & Maintenance
Decorative Steel Aluminum Filter

natural_image
Simple line drawing of a cabinet or rack with a handle and internal compartments (no text or symbols)SURFACES:
Wash with warm soapy water and a soft sponge. Never use abrasive detergent, scouring pads, steel wool or solvents on any part of this appliance as this will cause irreparable damage.
Decorative Steel Aluminum Filter: Decorative Steel Aluminum Filter should be cleaned frequently in hot detergent solution or washed in the dishwasher. Clean exterior surfaces with a commercially available aluminum cleaner.
Abrasives and scouring agents can scratch stainless steel finishes and should not be used to clean finished surfaces.
CHARCOAL FILTERS (only in recirculating model)
Charcoal filters cannot be reused. They must be replaced with the appropriate types once a year or depending on the frequency of appliance usage. For this appliance to function effectively, regular maintenance is a must. Clogged filters restrict airflow and may cause the motor to overheat.
■ Description of Parts
AD9905B
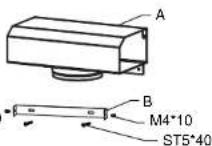
A. Metal Air Outlet (For recirculating mode)
B. Chimney Mouting Bracket (For ducting mode)
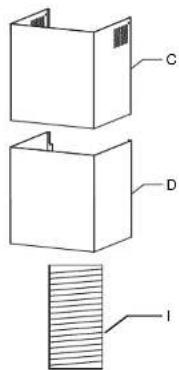
C. Upper Chimney Cover
D. Lower Chimney Cover
E.Motor Housing
F.Body
G. Aluminum Charcoal Filter
H.Stainless Steel Aluminum Filters
I. Aluminum Pipe

■ DUCTING VS. RECIRCULATING MODE
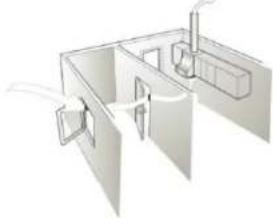
You can choose to install the hood as a ducting or recirculating mode:
- Ducting mode (Vented mode)
In the ducting mode, air is drawn into the hood, fat are trapped by aluminum filters.
Odors, fumes and condensation are then expelled to the outside. In this mode, only the aluminum filters are installed.

natural_image
Pure mechanical diagram showing a lever and spring assembly without any text, numbers, or symbols- Recirculating mode
In the recirculating mode, air is drawn into the hood, fats are trapped by the filters, the air then passes through charcoal filters to remove cooking odors, the purified air is then passed back into the kitchen. In this mode, both the aluminium filters and the charcoal filters must be installed.

natural_image
Simple line drawing of a rectangular object with arrows indicating direction, mounted on a flat base (no text or symbols)5
■ Auto Linkage system

Set-up the hood and hob linkage via the Low Speed Button on your hood.
● The hood is factory set to non-linked mode.
- If the hood and hob are not linked, operate the hood manually.
1 - Connect the hood to power source, it will beep once.
2 - Press and hold the "low speed" button for approximatively 8 seconds until you hear 3 beeps.
3 - When the hood beeps 3 times, the low button light will keep shining, the pairing mode is activated.
4 - Restart hood, by turning off and on the power source. The hood will beep 3 times.
5 - Within 8 seconds, press and hold any of the knobs of the Auto Linked gas hob, you will hear 5 successive beeps.
6 - Connection success
7 - Once the pairing is done, the hood and the lights will turn on automatically
8 - In order to disable to Auto Linkage System, press and hold the "low speed" button for 8 seconds. When the hood beeps once, the Auto Linkage has been closed.
**If you do not hear 5 successive beeps, you will need to restart steps 1-5 again.
For additional assistance, please call Brandt Asie Pte Ltd for support.
Operation

[NO TEXT]


The hood is equipped with 3 speed control. Electronic control buttons are located on the front edge of the cooker hood canopy.

Light: Press to turn the light on/off.

Decorative light:
Hold for 3-5s to turn the decorative light On / Off
Speed Controls

Press once to select Low Suction speed
**If using Auto Linkage mode, press and hold until you hear 3 beeps to link otherwise select low speed as normal usage.

Press once to select Medium Suction speed

Press once to select High Suction speed

Press once to select Booster

Delay timer
Press and hold this button for 3\~5s to activate the delay timer. The cooker hood will operate for 15 minutes and then switch off automatically. The hood will "beep" once and the light will turn blue flashing when activated.
■RECIRCULATING MODE AIR OUTLET
- Insert the connection extension pieces laterally in air outlet connection.
• Make sure that the outlet of the extension pieces is horizontally and vertically aligned with the chimney outlets. - Connect the air outlet connection to the hood body outlet using either a flexible or rigid pipe with 150mm.*
- Ensure that the activated charcoal filters have been inserted.

■ Installation
Safetyprecautions:
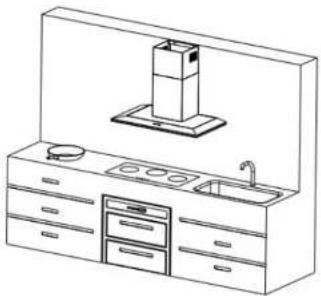
Do not install the cooker hood where there are many doors or windows in order to avoid affecting the exhaust efficiency of the hood caused by air flow. Install the cooker hood right above the hob. The recommended distance between the hob and the lower edge of the cooker hood is minimum 650mm and maximum 750mm.
In order to get the optimum performance, do not elongate the exhaust pipe too long, and try to make the bend of exhaust pipe less. Ensure the connection is airproof.
After hanging the unit on the wall, ensure the hood is level and vertical.
The air outlet must not be connected to chimney flues or combustion gas ducts.
The air outlet must under no circumstances be connected to ventilation ducts for room in which fuel-burning appliances are installed.
Installationdiagram
natural_image
Line drawing of a modern kitchen appliance with built-in cabinets, sink, and stainless steel rack (no text or symbols)■ Electrical Connection
Before completing any connection, make sure the house voltage corresponds with the voltage indicated on the label affixed inside the hood.
Only a licensed professional may connect and install appliances. Damage caused by improper installation is not covered under warranty.
• Appliancefittedwithplug
Connect it to a socket which conforms with current regulations. If you intend to connect it directly to the electric mains, remove the plug and fit an approved bipolar switch with a minimum contact opening of not less than 3mm.
- Appliancewithoutplug
Fit an approved plug or a bipolar switch with a minimum contact opening of no less than 3mm.
Direct connection installations must be handled by licensed professionals.
Brandt Asie Pte Ltd is not liable for damages caused by improper handling and installation of the appliance.
- Try to open the Windows when used the cooker hood so air can flow.
natural_image
Architectural line drawing of a multi-level office or kitchen space layout (no text or symbols)Mounting the hood body
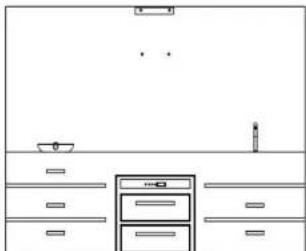
- Before attaching the hood body, tighten the two screws Vr located on the hood body mounting points.
- Hook the hood body onto the support screws.
• Fully tighten the support screws. - Adjust screws Vr to level the hood body.

Fig.1
DUCTING MODE
- Wall drilling and bracket fixing: Secure the sides of the brackets using 4 screws (ST5X40) and screws wall plug (8x40) supplied.
natural_image
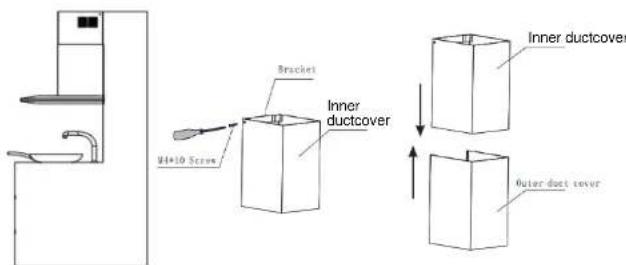
Line drawing of a kitchen sink with drawers and appliances (no text or symbols)- Fix the cooker hood and Upper & Bottom chimney in the wall with screws: Secure the sides of the brackets using the 2screws (M4X10) supplied.
RECIRCULATING MODE
Wall drilling and metal air outlet fixing: secure the sides of the brackets using the 4 screws (ST5 X 40) and the wall plug screws (8x40) supplied).

natural_image
Line drawing of a kitchen sink with drawers, oven, and appliances (no text or symbols)- Hook the hood body onto the support screws, adjust the height and then connect the aluminum foil flue. Pls refer to picture Fig.1.

natural_image
Line drawing of a kitchen interior with oven, drawer, and sink (no text or symbols)- Fix the upper chimney to the metal outlet with 2 screws (M4X 10).

natural_image
Line drawing of a kitchen interior with oven, drawer, sink, and stainless steel rack (no text or symbols)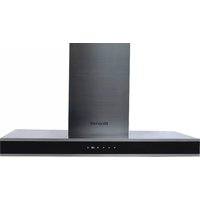
- TableofContents
- ■ From the Manufacturer
- Safety!
- ■ Specifications
- ■ SAFETY : Read this First !
- ■ Vent System
- Cleaning & Maintenance
- CHARCOAL FILTER REPLACEMENT
- LED LIGHT REPLACEMENT
- ■ Cleaning & Maintenance
- SURFACES:
- CHARCOAL FILTERS (only in recirculating model)
- ■ Description of Parts
- AD9905B
- ■ DUCTING VS. RECIRCULATING MODE
- ■ Auto Linkage system
- Operation
- ■RECIRCULATING MODE AIR OUTLET
- ■ Installation
- Safetyprecautions:
- ■ Electrical Connection
- • Appliancefittedwithplug
- - Appliancewithoutplug
- Mounting the hood body
- DUCTING MODE
- RECIRCULATING MODE
Brand : BRANDT
Model : AD9905B
Category : Range hood