
7G-5H - Desktop computer HAIER - Free user manual and instructions
Find the device manual for free 7G-5H HAIER in PDF.


| Product Type | Desktop Computer |
| Dimensions (Approx.) | 180 x 400 x 350 mm (7.1 x 15.7 x 13.8 in) |
| Weight (Approx.) | 8 kg (17.6 lbs) |
| Power Supply | AC Adapter, 300W |
| Processor | Intel Core i5 (typical configuration) |
| Memory | Up to 8 GB DDR3 SDRAM (DIMM) |
| Storage | Hard Disk Drive (HDD) – Capacity varies by model |
| Optical Drive | DVD±RW (select models) |
| Display Outputs | HDMI, VGA (if applicable) |
| USB Ports | 2x USB 3.0, 2x USB 2.0 |
| Network | 10/100/1000 Gigabit Ethernet (RJ-45) |
| Audio | Audio Combo Jack (headphone/microphone) |
| Card Reader | Memory Card Reader (SD, MMC, etc.) |
| Cooling | Fan with ventilation openings – Do not block |
| Security | Kensington Lock Slot |
| Operating System | Windows 10 (pre-installed typical) |
| Cleaning Instructions | Use a dry soft cloth; do not spray liquids directly on the device |
| Spare Parts / Repairability | Memory upgrades possible; battery (if internal) replaceable; contact support for other parts |
| Environmental Conditions | Temperature: 0°C to 35°C (operating); avoid humidity, dust, and direct sunlight |
| Warranty | Standard manufacturer warranty (check with seller) |
Frequently Asked Questions - 7G-5H HAIER
User questions about 7G-5H HAIER
0 question about this device. Answer the ones you know or ask your own.
Ask a new question about this device
Download the instructions for your Desktop computer in PDF format for free! Find your manual 7G-5H - HAIER and take your electronic device back in hand. On this page are published all the documents necessary for the use of your device. 7G-5H by HAIER.
USER MANUAL 7G-5H HAIER
Make sure you have everything 5
Familiarize yourself with the computer 6
OPENING THE DISPLAY PANEL 6
FRONT OVERVIEW 7
Identifying the Problem 22
TAKING CARE OF YOUR NOTEBOOK PC
natural_image
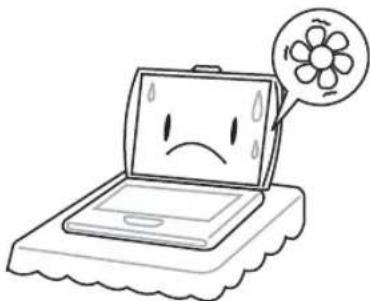
Cartoon illustration of a sad laptop with a flower icon speech bubble (no text or symbols)To prevent possible overheating of the computer's processor, make sure you don't block the openings provided for ventilation.

natural_image
Line drawing of a hand pressing down on a laptop screen with abstract motion lines (no text or symbols)DO NOT press or touch the display panel.

natural_image
Simple line drawing of a closed open box with a smiling face and motion lines, placed on a base (no text or symbols)DO NOT place on uneven or unstable work surfaces.
natural_image
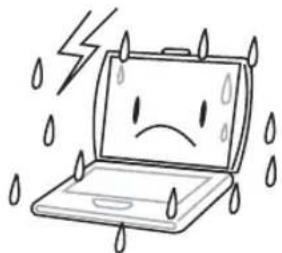
Cartoon illustration of a sad laptop with falling raindrops and lightning (no text or symbols)DO NOT use your notebook computer under harsh conditions.
natural_image
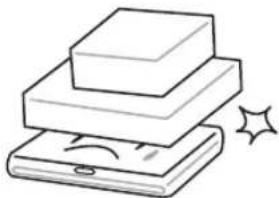
Illustration of stacked books with a smartphone and sparkles (no text or symbols)DO NOT place or drop objects on the computer and DO NOT apply heavy pressure on it.

natural_image
Simple line drawing of a laptop with a sad face and a lightning bolt connected to its right (no text or symbols)DO NOT subject the computer to magnetic fields.
natural_image
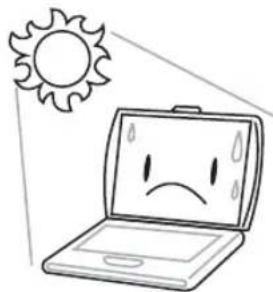
Cartoon illustration of a laptop with a sad face and sun symbol above it (no text or symbols)DO NOT expose to direct sunlight.

natural_image
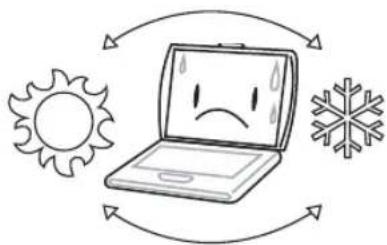
Illustration of a sad laptop with sun and snowflakes above it (no text or symbols)DO NOT use or store in extreme temperatures.
natural_image
Illustration of a laptop with sad face, surrounded by sun and snow symbols (no text or labels)Avoid sudden changes in temperature or humidity by keeping it away from A/C and heating vents.

natural_image
Cartoon illustration of a sad laptop with falling raindrops (no text or symbols)DO NOT expose the computer to rain or moisture.

natural_image
Illustration of a laptop with a sad face and flames next to it (no text or symbols)DO NOT place near fire or other sources of heat.

natural_image
Simple line drawing of a smartphone with a smiling face, battery, and hand holding a circle (no text or symbols)DO NOT tamper with the batteries. Keep them away from children.

natural_image
Cartoon illustration of a smiling computer monitor with sweat drops, surrounded by clouds (no text or symbols)DO NOT expose to dust and/or corrosive chemicals.

natural_image
Illustration of two laptops with expressive faces and a hand holding the screen, showing motion changes (no text or symbols)DO NOT slam your notebook shut and never pick up or hold your notebook by the display.

natural_image
Simple line drawing of a laptop with a spray bottle and a screen showing a cartoon face (no text or symbols)DO NOT spray water or any other cleaning fluids directly on the display.
natural_image
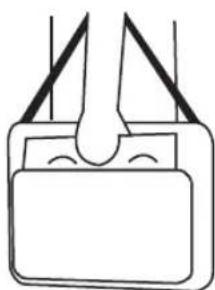
Simple line drawing of a mechanical component or bracket with no text or symbolsIf you are traveling with your computer, remember to carry it as hand luggage. Do not check it in as baggage.
BEFORE YOU START
Make sure you have everything
When you receive your notebook PC, unpack it carefully, and check to make sure you have all the items listed below. For a pre-configured model you should have the following:
- Notebook Computer
- Lithium-Ion battery
• AC adapter with power cord - Driver and Applications CD
- Quick Start Guide or User Guide
Depending upon the configuration of your notebook, you may also need the following items:
• Dual DVD+/-RW Application CD
• Super Multi DVD RW Application CD
- Blu-ray/DVD RW Application Disc
Once you have checked and confirmed that your notebook system is complete, read through the following pages to learn about all of your notebook components.
Depending on the model you purchased, the actual appearance of your notebook may vary from that shown in this manual.
Familiarize yourself with the computer OPENING THE DISPLAY PANEL
To open the display panel, simply lift the lid up.
When closing it, be sure not to slam it shut.

natural_image
Line drawing of a foldable device with a label 'Holder' and an arrow indicating rotation (no text or symbols beyond the label)FRONT OVERVIEW
The following is an overview of the front of the notebook.
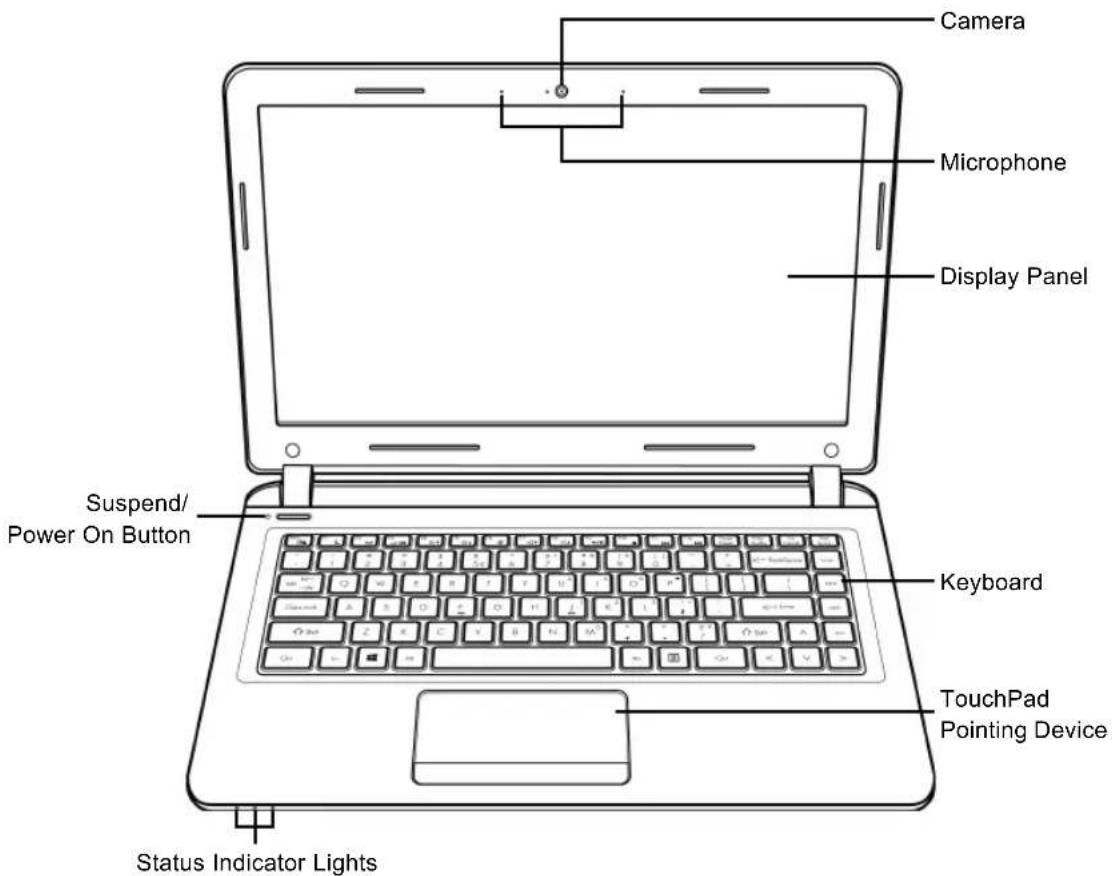
Camera
The built-in HD/VGA camera allows you to snap a photo or create a video chat or video conference with just a click.
Microphone
The built-in microphone allows for the reception and transmission of voice and/or other audio data to any program capable of accepting such input.
Display Panel
The display panel is a color LCD panel with back lighting for the display of text and graphics. Select models may feature a touchscreen display panel, which allows you to operate software on your notebook using touch gestures.
Keyboard
A full-size keyboard with the numeric keys and the dedicated Windows ^® keys.
TouchPad Pointing Device
The TouchPad pointing device is a mouse-like cursor control with a single rocker bar and a touch sensitive movement pad.
Status Indicator Lights
The Status indicator lights correspond to specific operating modes. These modes are: Suspend/Power On status, battery/AC adapter status, and hard disk drive (HDD) activity.
Suspend/Power On Button
This button turns your notebook on and off or puts it to sleep. (See Suspend/Power On Button in the Power On section for more information.)
LEFT SIDE OVERVIEW
The following is a brief description of the left side of the notebook.
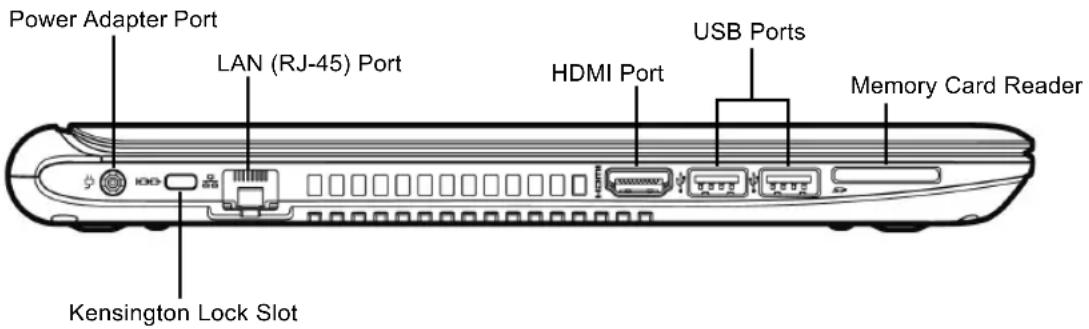
Power Adapter Port
The power adapter port allows you to plug in the AC adapter to power your notebook and charge the internal Lithium-Ion battery.
LAN (RJ-45) Port
The LAN port is designed to support a 10/100/1000 Base-T standard RJ-45 plug.
HDMI Port
The HDMI port allows you to connect a video device such as a television, a projector, or a VCR to your computer.
USB Ports
The USB ports allow you to connect Universal Serial Bus devices. They support v3.0 of the USB standard, which allows data exchange rates as high as 4.8 Gb/s. The USB ports support sleep-and-charge functionality. USB 3.0 is backwards compatible with USB 2.0.
Memory Card Reader
The memory card reader offers the fastest and most convenient method to transfer pictures, music and data between your notebook and flash compatible devices such as digital cameras, MP3 players, mobile phones, and PDAs.
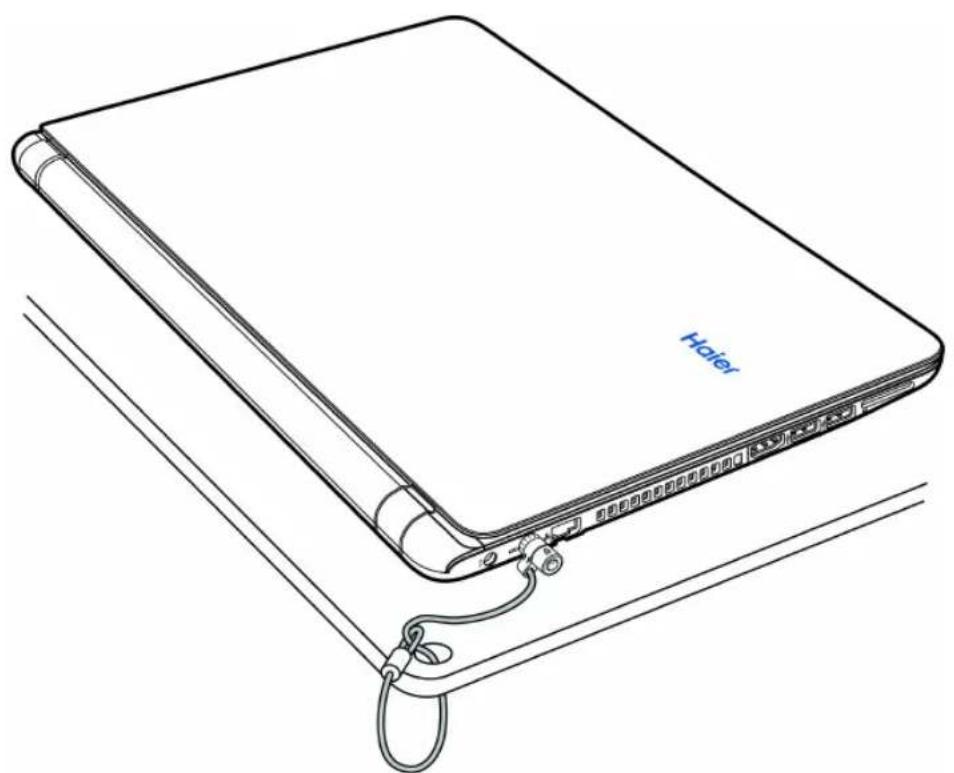
Kensington Lock Slot
The Kensington lock slot allows you to secure your notebook to an immovable object with an optional security cable.
natural_image
Line drawing of a Huawei device with attached cable and port (no text or symbols)RIGHT SIDE OVERVIEW
The following is a brief description of the right side of the notebook.

Audio Combo Jack (Headphone & Microphone)
The audio combo jack allows you to connect headphones, external speakers, amplifiers or an external mono microphone.
USB Port
The USB port allows you to connect Universal Serial Bus devices. It supports v2.0 of the USB standard, which allows data exchange rates as high as 480 Mb/s.
Optical Drive\*
The optical drive allows you to play back media discs such as CDs and DVDs. Depending on the configuration of your notebook, it may also allow you to burn CDs and DVDs.
Optical Drive Eject Button\*
The optical drive eject Button allows you to open the optical drive tray to remove or insert a DVD or CD.
Emergency Tray Release\*
The emergency tray release allows you to open the optical drive tray without powering on your notebook.
*Select models only.
BEFORE YOU START
BACK OVERVIEW
The following is an overview of the back of the notebook.

natural_image
Top-down line drawing of a car with two wheels and a long horizontal body (no text or symbols)BOTTOM OVERVIEW
The following is an overview of the bottom of the notebook.

Battery Lock
The battery lock holds the battery in place. It can be unlocked to remove the battery.
Lithium-Ion Battery Compartment
The battery compartment contains the internal Lithium-Ion battery. It can be unlocked for the removal of the battery when stored over a long period of time or for swapping a discharged battery with a charged Lithium-Ion battery.
Battery Release Latch
The battery release latch holds the battery in place. It can be released to remove the battery.
Fan Outlets
These are open ports for the fan to dissipate heat from the computer's internal components. Do not block or place the computer in such a position that you inadvertently allow the outlet to become blocked.
Compartment Covers
The main compartment contains the Wireless LAN card (Not available in all configurations), memory modules and HDD. The hard disk drive compartment contains the option internal hard disk drive.
Rating Label
The label shows the model number and other information about your notebook.
GETTING STARTED
Power Sources
Your computer has two types of power source: a Lithium-Ion battery or an AC adapter.
CONNECTING THE POWER ADAPTERS
The AC adapter provides power for operating your notebook PC and charging the battery.
Connecting the AC Adapter
- Plug the DC output cable into the DC power jack of your notebook PC.
- Plug the AC adapter into an AC electrical outlet.
Switching from AC Adapter Power to Battery Power
- Be sure that you have at least one charged battery installed.
- Remove the AC adapter. Your notebook will automatically switch to battery power.

The Lithium-Ion battery is not charged upon purchase. Initially, you will need to connect the AC adapter to use your notebook PC.
RECHARGING THE BATTERY
The Lithium-Ion battery is recharged internally using the AC adapter. To recharge the battery, make sure the battery is installed and the computer is connected to the AC.
There is no "memory effect" in Lithium-Ion batteries; therefore you do not need to discharge the battery completely before recharging. The charge times will be significantly longer if your notebook PC is in use while the battery is charging. If you want to charge the battery more quickly, put your computer into Suspend mode, or turn it off while the adapter is charging the battery.
Low Battery State
When the battery charge is low, a notification message appears. If you do not respond to the low battery message, the battery continues to discharge until it is too low to operate. When this happens, your notebook PC goes into Suspend mode. There is no guarantee your data will be saved once the notebook reaches this point.

To protect your computer from damage, use only the power adapter that came with it because each power adapter has its own power output rating.
Battery Replacement
There is danger of explosion of an incorrect battery type is used for replacement. For computers equipped with a replaceable lithium-ion battery pack, the following applies:
- if the battery is placed in an OPERATOR ACCESS AREA, there shall be a marking close to the battery, or a statement in both the operating and the servicing instructions;
- if the battery is placed elsewhere in the computer, there shall be a marking close the battery or a statement in the servicing instructions.
The marking or statement shall include the following or similar text:

Risk of explosion if battery is replaced with an incorrect type. Dispose of used batteries according to the instructions.
Once your note computer goes into Suspend mode as a result of a dead battery you will be unable to resume operation until you provide a source of power either from an adapter, or a charged battery. Once you have provided power, you can press the Suspend/Resume button to resume operation. In Suspend mode, your data is maintained for some time, but if a power source is not provided promptly, the Power indicator stops flashing and the goes out, in which case you have lost the data that was not saved. Once you provide power, you can continue to use your computer while an adapter charges the battery.
Starting Your Notebook
POWER ON
Suspend/Power On Button
The suspend/power on switch is used to turn on your notebook from its off state. Once you have connected your AC adapter or charged the internal Lithium-Ion battery, you can power on your notebook by pressing the suspend/power on button located above the keyboard. If you need to take an extended break press the button again to turn it off.
Do not carry your notebook around with the power on or subject it to shocks or vibration, as you risk damaging the hard disk.
When you power on your notebook, it will perform a Power On Self Test (POST) to check the internal parts and configuration for correct functionality. If a fault is found, your computer emits an audio warning and or displays and error message.
Depending on the nature of the problem, you may be able to continue by starting the operating system or by entering the BIOS setup utility and revising the settings.
After satisfactory completion of the Power On Self Test (POST), your notebook loads the installed operating system.
Never turn off your notebook during the Power On Self Test (POST), or an unrecoverable error may occur.
STATUS INDICATORS
The status indicator lights correspond to specific operating modes. These modes are: Power on/Suspend status, Battery/AC Adapter status, and hard disk drive (HDD) activity.

Power On Indicator
This light on the power button and on the front of the system illuminates when the computer is powered on.
Suspend Status Indicator
This light flashes when the computer is in the Suspend mode.
Battery/AC Adapter Status Indicator
The Battery/AC Adapter status indicator tells you whether your notebook is operating from the AC Adapter or the Lithium-Ion battery, and whether the Lithium-Ion battery is charging or not.
- The light illuminates when the computer is operating from the AC Adapter.
- If you are charging your battery, the indicator remains on even if your notebook is shut off.
- If there is no battery activity, the power adapter is not connected, or the power switch is Off, the indicator will also be off.
- Batteries subjected to shocks, vibrations or extreme temperatures can be permanently damaged.
Hard Disk Drive (HDD) Activity Indicator
The Hard Disk Drive (HDD) Activity indicator tells you whether your internal hard drive is being accessed and, if so, how fast.
USING FUNCTION KEYS
Your computer has 12 function keys, F1 through F12. The functions assigned to these keys differ for each application. You should refer to your software documentation to find out how these keys are used.
The [FN] key provides extended functions for the notebook and is always used in conjunction with another key.
- [FN+F1]: Places the notebook in Suspend mode. Pressing the Power button returns it to active mode.
- [FN+F2]: Enables or disables the wireless network connection.
- [FN+F3]: Allows you to change your selection of where to send your display video. Each time you press the combination of keys you will step to the next choice. The choices, in order, are: built-in display panel only, both built-in display panel and external monitor, or external monitor only.
- [FN+F4]: Decreases the screen Brightness.
- [FN+F5]: Increases the screen Brightness.
- [FN+F6]: Mutes the computer's volume.
- [FN+F7]: Decreases the computer's volume.
- [FN+F8]: Increases the computer's volume.
• [FN+F9]: Plays or pauses the current multimedia track. - [FN+F10]: Stops the current multimedia track.
- [FN+F11]: Goes to the previous multimedia track.
- [FN+F12]: Goes to the next multimedia track.
- [FN+Esc]: Enables or disables the TouchPad function.
USING THE TOUCHPAD
A TouchPad pointing device comes built into your computer. It is used to control the movement of the pointer to select items on your display panel.
The TouchPad consists of a cursor control, a single rocker bar, and a scroll bar. The cursor control works the same way a mouse does, and moves the cursor around the display. It only requires light pressure from the tip of your finger. The single rocker bar includes the left and right buttons that function as mouse buttons. The actual functionality of the rocker bar may vary depending on the application that is being used. Finally, the scroll bar allows you to navigate quickly through pages, without having to use the on-screen cursor to manipulate the up and down scroll bars.

natural_image
Line drawing of a laptop with a screen and a stylus, no text or symbols presentClicking
Clicking means pushing and releasing a button. To left-click, move the cursor to the item you wish to select, press the left button once, and then immediately release it. To right-click, move the mouse cursor to the item you wish to select, press the right button once, and then immediately release it. You also have the option to perform the clicking operation by tapping lightly on the TouchPad once.
Double-Clicking
Double-clicking means pushing and releasing the left button twice in rapid succession. This procedure does not function with the right button. To double-click, move the cursor to the item you wish to select, press the left button twice, and then immediately release it. You also have the option to perform the double-click operation by tapping lightly on the TouchPad twice.
Dragging
Dragging means pressing and holding the left button, while moving the cursor. To drag, move the cursor to the item you wish to move. Press and hold the left button while moving the item to its new location and then release it. Dragging can also be done using only the TouchPad. First, tap the TouchPad twice over the item you wish to move making sure to leave your finger on the pad after the final tap. Next, move the object to its new location by moving your finger across the TouchPad, and then release your finger. Using the Scroll bar allows you to navigate through a document quickly without using the window's scroll bars. This is particularly useful when you are navigating through on-line pages.
MEMORY MODULE UPGRADE
To increase your notebook's memory capacity (up to 8 GB maximum), additional memory modules may be installed. The memory upgrade must be a dual-in-line (DIMM) SDRAM module.
Installing a Memory Module
The following steps describe how to install a memory upgrade module. We do not recommend that you do this yourself.
-
Turn off power to your notebook using the power switch, disconnect the power adapter, and/or remove the battery pack.
-
Place your notebook upside-down on a clean work surface.
-
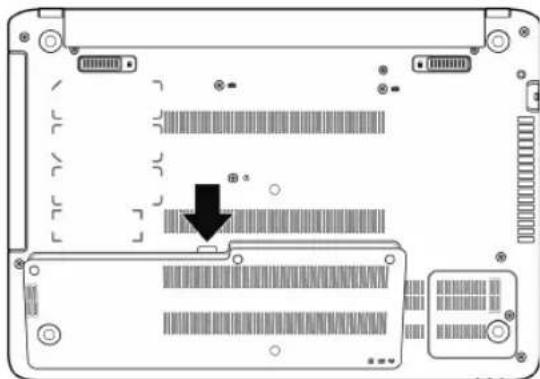
Remove the three screws securing the main compartment cover in place.
-
Pry up the main compartment cover starting from the center of the top edge, then around the left and right side. Once the cover is released from the securing tabs, lift it away from the system.
-
The memory upgrade module can be severely damaged by electrostatic discharge
natural_image
Laptop rear panel showing internal circuitry with no visible text or symbols(ESD). Be sure you are properly grounded when handling and installing the module.
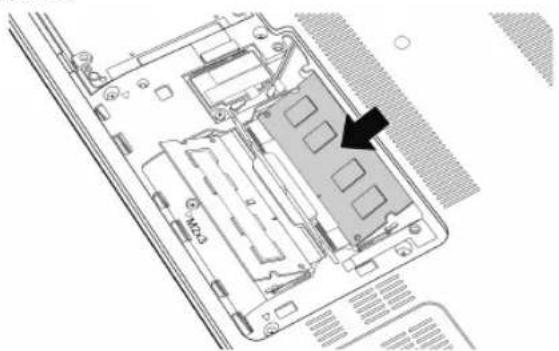
- Align the connector edge of the memory upgrade module, chip side up, with the connector slot in the compartment.
natural_image
Architectural floor plan showing internal compartments and storage areas (no text or labels)-
Insert the memory upgrade module at a 45 ° angle and press it firmly onto the connector.
-
Press the memory upgrade module down into the compartment until it locks into the retaining clips on either side. You will hear a click when it is properly in place. If you are using two memory modules, repeat steps 5 to 7 for the other slot.
-
Replace and align the cover with the tabs on the right side. Press downward on the cover to engage the tabs and around the left side to the bottom edge until it clicks into place. Installation of the new memory module is now complete.
The memory upgrade module is not something you routinely remove from your notebook PC. Once it is installed, you should leave it in place unless you want to increase system memory capacity.
TROUBLESHOOTING
Your notebook PC is sturdy and subject to few problems in the field. However, you may encounter simple setup or operating problems that you can solve on the spot, or problems with peripheral devices, that you can solve by replacing the device. The information in this section helps you isolate and resolve some of these straightforward problems and identify failures that require service.
Identifying the Problem
If you encounter a problem, go through the following procedure before pursuing complex troubleshooting:
- Turn off your notebook.
- Make sure the AC adapter is plugged into your notebook and to an active AC power source.
- Make sure that any card installed in the PC Card slot is seated properly. You can also remove the card from the slot, thus eliminating it as a possible cause of failure.
- Make sure that any devices connected to the external connectors are plugged in properly. You can also disconnect such devices, thus eliminating them as possible causes of failure.
- Turn on your notebook. Make sure it has been off at least 10 seconds before you turn it on.
- Go through the boot sequence.
- If the problem has not been resolved, contact your support representative.
Before you place the call, you should have the following information ready so that the customer support representative can provide you with the fastest possible solution:
- Product name
• Product configuration number
• Product serial number - Purchase date
- Conditions under which the problem occurred
- Any error messages that have occurred
- Hardware configuration
- Type of device connected, if any
See the Configuration Label on the bottom of your notebook for configuration and serial numbers.
MEMO
Federal Communications Commission (FCC) Statement
This device complies with Part 15 of the FCC Rules. Operation is subject to the following two conditions:
(1) This device may not cause harmful interference.
(2) This device must accept any interference received, including interference that may cause undesired operation.
Any changes or modifications (including the antennas) made to this device that are not expressly approved by the manufacturer may void the user's authority to operate the equipment. FCC RF Radiation Exposure Statement: This equipment complies with FCC RF radiation exposure limits set forth for an uncontrolled environment. This device and its antenna must not be co-located or operating in conjunction with any other antenna or transmitter. This equipment has been tested and found to comply with the limits for a class B digital device, pursuant to part 15 of the FCC Rules. These limits are designed to provide reasonable protection against harmful interference in a residential installation.
This equipment generates, uses and can radiate radio frequency energy and, if not installed and used in accordance with the instructions, may cause harmful interference to radio communications. However, there is no guarantee that interference will not occur in a particular installation. If this equipment does cause harmful interference to radio or television reception, which can be determined by turning the equipment off and on, the user is encouraged to try to correct the interference by one or more of the following measures:
- Reorient or relocate the receiving antenna.
- Increase the separation between the equipment and receiver.
- Connect the equipment into an outlet on a circuit different from that to which the receiver is connected.
- Consult the dealer or an experienced radio/TV technician for help.
FCC RF Radiation Exposure Statement:
- This Transmitter must not be co-located or operating in conjunction with any other antenna or transmitter.
- This equipment complies with FCC RF radiation exposure limits set forth for an uncontrolled environment. To maintain compliance with FCC RF exposure compliance requirements, avoid direct contact to the transmitting antenna during transmitting.
MEMO
- TAKING CARE OF YOUR NOTEBOOK PC
- BEFORE YOU START
- Make sure you have everything
- Familiarize yourself with the computer OPENING THE DISPLAY PANEL
- FRONT OVERVIEW
- Camera
- Microphone
- Display Panel
- Keyboard
- TouchPad Pointing Device
- Status Indicator Lights
- Suspend/Power On Button
- LEFT SIDE OVERVIEW
- Power Adapter Port
- LAN (RJ-45) Port
- HDMI Port
- USB Ports
- Memory Card Reader
- Kensington Lock Slot
- RIGHT SIDE OVERVIEW
- Audio Combo Jack (Headphone & Microphone)
- USB Port
- Optical Drive\*
- Optical Drive Eject Button\*
- Emergency Tray Release\*
- BACK OVERVIEW
- BOTTOM OVERVIEW
- Battery Lock
- Lithium-Ion Battery Compartment
- Battery Release Latch
- Fan Outlets
- Compartment Covers
- Rating Label
- GETTING STARTED
- Power Sources
- CONNECTING THE POWER ADAPTERS
- Connecting the AC Adapter
- Switching from AC Adapter Power to Battery Power
- RECHARGING THE BATTERY
- Low Battery State
- Battery Replacement
- Starting Your Notebook
- POWER ON
- STATUS INDICATORS
- Power On Indicator
- Suspend Status Indicator
- Battery/AC Adapter Status Indicator
- Hard Disk Drive (HDD) Activity Indicator
- USING FUNCTION KEYS
- USING THE TOUCHPAD
- Clicking
- Double-Clicking
- Dragging
- MEMORY MODULE UPGRADE
- Installing a Memory Module
- TROUBLESHOOTING
- Identifying the Problem
- MEMO
- Federal Communications Commission (FCC) Statement
- FCC RF Radiation Exposure Statement:
Brand : HAIER
Model : 7G-5H
Category : Desktop computer