CLARA-15A - Loudspeaker Citronic - Free user manual and instructions
Find the device manual for free CLARA-15A Citronic in PDF.


| Product Type | Active Speaker Cabinet with DSP |
| Brand | Citronic |
| Model | CLARA-15A |
| Power Supply | 90-254Vac, 50/60Hz (IEC) |
| Amplifier Construction | Class-D bi-amplifier with DSP |
| Main Driver | 380mm (15") woofer |
| Voice Coil | 63mm (2.5") |
| HF Driver | 44mm (1.75") Titanium Compression Driver |
| Power Output (RMS) | 400W + 70W (bi-amp) |
| Max Power | 1000W |
| Max SPL | 126dB |
| Frequency Response | 45Hz - 19kHz |
| Inputs | XLR/jack mic/line (Input B), XLR/jack line (Input A) |
| Audio Source | Bluetooth receiver |
| Line Output | XLR (MIX OUT) |
| DSP Settings | Normal, Jazz, Pop, Classic, Custom |
| Flying Points | 3x M8 for vertical suspension |
| Dimensions (WxHxD) | 710 x 435 x 385 mm |
| Weight | 20.5 kg |
| Cleaning | Use soft dry or slightly damp cloth; avoid solvents |
| Safety | Must be earthed; avoid moisture; no user serviceable parts |
| Spare Parts / Repairability | No user-serviceable parts; refer to qualified personnel |
Frequently Asked Questions - CLARA-15A Citronic
User questions about CLARA-15A Citronic
0 question about this device. Answer the ones you know or ask your own.
Ask a new question about this device
Download the instructions for your Loudspeaker in PDF format for free! Find your manual CLARA-15A - Citronic and take your electronic device back in hand. On this page are published all the documents necessary for the use of your device. CLARA-15A by Citronic.
USER MANUAL CLARA-15A Citronic
Active Speaker Cabinets with DSP
Item ref: CLARA-12A (178.712UK)
Item ref: CLARA-15A (178.715UK)
User Manual
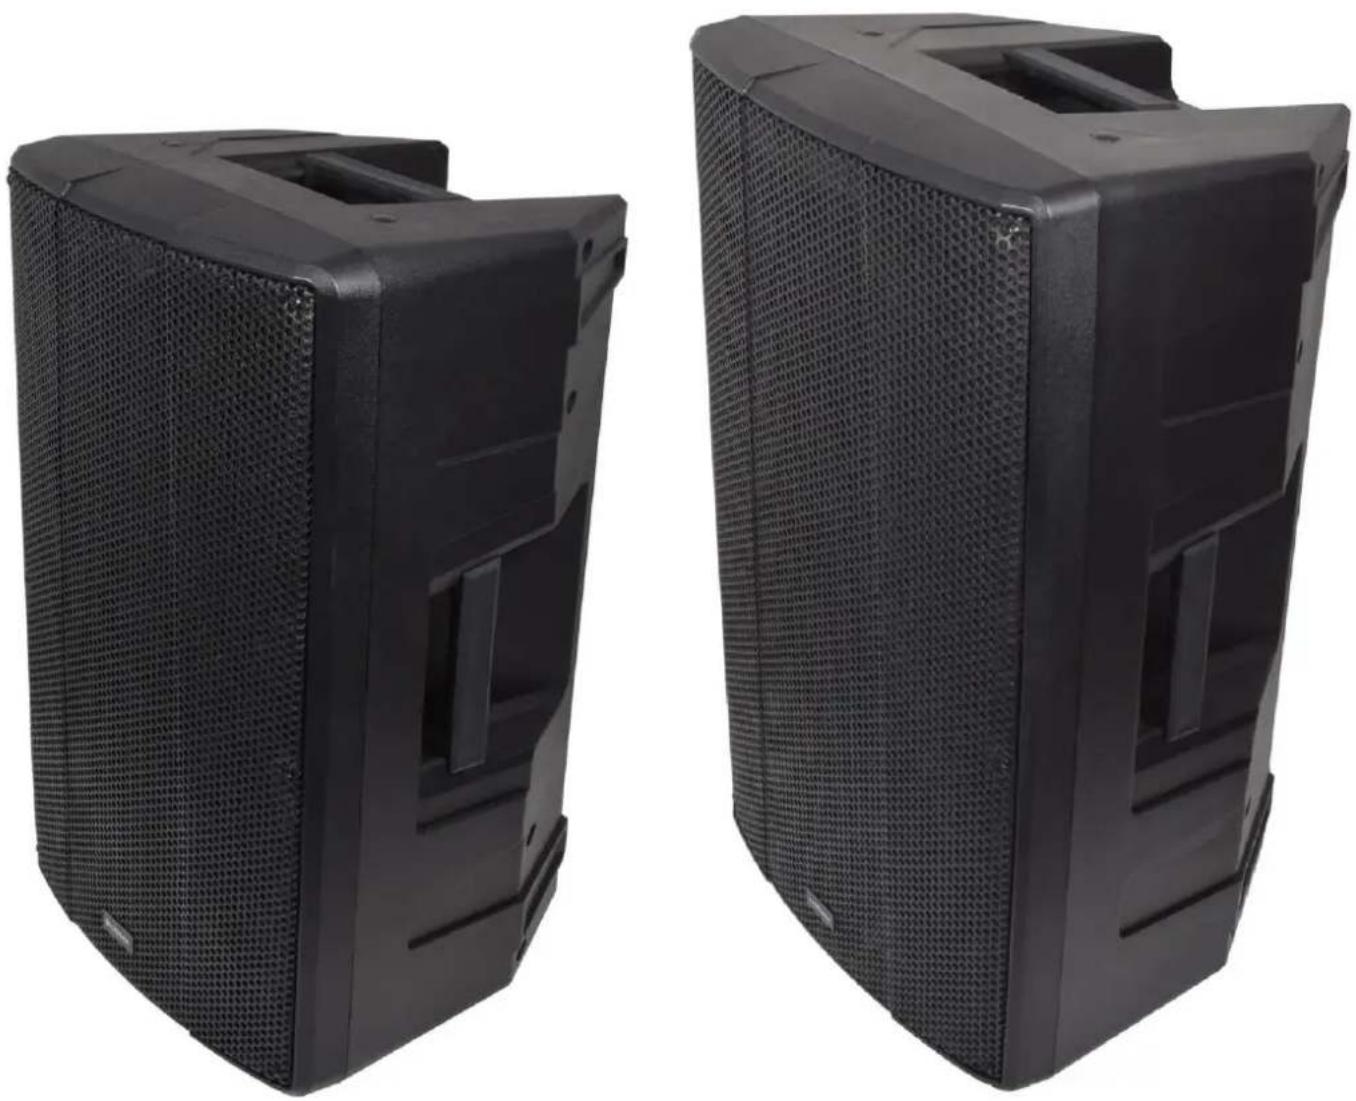
natural_image
Two black plastic speaker bases with mesh backouts, shown from front and side views (no text or symbols visible)Version 1.0

Caution: Please read this manual carefully before operating
Damage caused by misuse is not covered by the warranty
Introduction
Thank you for choosing a CLARA active speaker cabinet as part of your sound system.
This product is designed to provide high power output for a wide range of sound reinforcement applications. Please read this manual to achieve optimum performance from your speaker cabinet and avoid damage through misuse.
Package Contents
• CLARA-series active speaker cabinet
- Mains lead(s)
This product contains no user-serviceable parts, so make no attempt to try to fix or modify this item yourself as this will invalidate the warranty. We recommend you keep the original package and proof of purchase for any possible replacement or return issues.
Warning
To prevent the risk of fire or electric shock, do not expose any of the components to rain or moisture.
Avoid impact to any of the components.
No user serviceable parts inside - refer servicing to qualified service personnel.
Safety
- Please observe the following warning conventions

CAUTION: RISK OF ELECTRIC SHOCK DO NOT OPEN


This symbol indicates that dangerous voltage constituting a risk of electric shock is present within this unit

This symbol indicates that there are important operating and maintenance instructions in the literature accompanying this unit.
• Ensure that the correct mains lead is used with adequate current rating and mains voltage is as stated on the unit
- Avoid ingress of water or particles into any part of the housing. If liquids are spilled on the cabinet, stop using immediately, allow the unit to dry out and have checked by qualified personnel before further use

Warning: this unit must be earthed
Placement
- Keep the electronic parts out of direct sunlight and away from heat sources.
- Position the cabinet on a stable surface or stand that is adequate to support the weight of the product.
- Allow adequate space for cooling and access to controls and connections at the rear of the cabinet.
- Keep the cabinet away from damp or dusty environments.
Cleaning
• Use a soft dry or slightly damp cloth to clean surfaces of the cabinet
- A soft brush can be used to clear debris from controls and connections without damaging them
• To avoid damage, do not use solvents to clean any parts of the cabinet.
Rear panel layout
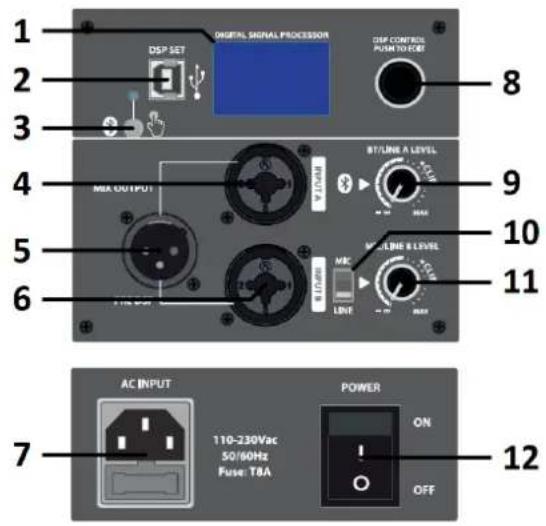
- DSP display
- DSP USB port
- Bluetooth on/off/pairing button
- INPUT A line input XLR/Jack socket
- MIX OUT line output XLR
- INPUT B mic/line input XLR/Jack socket
- IEC power inlet and fuse holder
- DSP control rotary selector
- LINE A input & Bluetooth level control
- Input B MIC or LINE level switch
- MIC/LINE B input level control
- POWER on/off switch
Setting up
Position your CLARA active speaker cabinet(s) on a stable surface capable of supporting the load and vibrations from the cabinet or ideally on a strong 35mm∅ pole mount or speaker stand with an adequate safe working load to support the cabinet. Also, each CLARA cabinet has M8 flying points for suspending from a ceiling or truss if required. It is recommended to use 3 or more fixing points for suspension.
Aim the cabinet towards the audience or listeners and not in direct line of sight with any microphones that are connected to the sound system to avoid feedback (howling or squealing caused by the mic "hearing" itself)
Each CLARA active speaker has an inbuilt Bluetooth receiver, which can be paired with a smart phone by holding the Bluetooth on/off & pairing button (3) for 3 seconds. The blue status LED will flash to indicate pairing mode. Search for "CLARA-12A", or "CLARA-15A" in the Bluetooth menu of the smart phone and select to pair. Once paired, the LED will be lit constantly and the audio output from the smart phone will be streamed wirelessly to the CLARA speaker. This input is governed by the LINE A input & Bluetooth level control (9). Pressing the Bluetooth on/off pairing button briefly will switch the Bluetooth receiver on or off. If a previously paired device is within range, the Bluetooth receiver will auto connect.
If a mixing console is being used to control input sources, connect the output of the mixer to the CLARA cabinet LINE input (4) or MIC/LINE (6) with "LINE" selected on the MIC/LINE switch (10) using XLR or 6.3mm jack connectors. If the system is in stereo, then usually one CLARA cabinet will serve the right-side output and another for the left-side output. Normally, the volume of the CLARA cabinet LINE input is turned up high and the output will be controlled at the mixer.
A microphone may also be connected directly to input A if the MIC/LINE switch (10) is in the "MIC" position.
If a playback device (e.g. mp3 or CD player) is to be connected directly to the CLARA cabinet, this is usually connected to the LINE A input using a stereo to mono lead.
If the inputs to the CLARA speaker cabinet are to be linked onto a further active cabinet or amplifier, the mix of all MIC/LINE/Bluetooth inputs can be fed from the MIX OUT line output XLR to further equipment (5)
When all necessary connections are made, finally connect the supplied IEC power cable (or equivalent) from the mains power supply to the IEC power inlet on the CUBA speaker cabinet, ensuring that the supply voltage is as indicated on the CUBA speaker unit (14)
Operation
With both input volume controls turned fully down, switch on the power (12) to the CLARA speaker cabinet.
The LCD display (1) will light up and show the VOLUME level. Use the rotary selector (8) to adjust the master output volume between 0dB and 60dB. Keep this setting at 60dB for testing and reduce, if necessary, later.
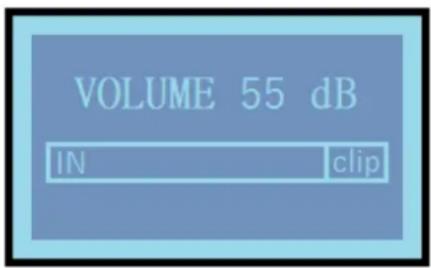
If a smart phone is paired with the CLARA cabinet, make sure that the Bluetooth receiver is switched on (3) and play a track from the smart phone to test the speaker, turning up the level control (9) gradually.
If a mixer is connected to the CLARA speaker unit, ensure a signal is present, turn up the mixer output part way and gradually increase the volume of the input that the mixer is connected to for checking the output from the speaker. If the sound is present and OK, turn down the mixer and turn up the level on the speaker to the maximum required output and then control the volume from the mixer.
If a microphone is connected directly to MIC/LINE B input (6), speak into the microphone whilst gradually increasing the volume of the MIC/LINE B input (11) until the required sound level is reached.
For playback devices connected to the LINE A or B input, play an audio track with the playback device volume turned up part way and gradually increase the volume of the relevant input so that the output can be checked and increase to the required output level.
DSP Settings
Each CLARA active speaker has an inbuilt Digital Signal Processor (DSP) unit to control the tonal and dynamics character of the speaker for optimal performance in any given application. This DSP can be programmed directly from the rear panel or from a windows PC connected to the speaker by a USB lead.
As described above, on power-up, the backlit display will show the master output VOLUME, and this can be adjusted using the rotary selector. It is advised to reduce the input levels whilst making adjustments and turn fully down if powering down the CLARA speaker unit to avoid loud noises.
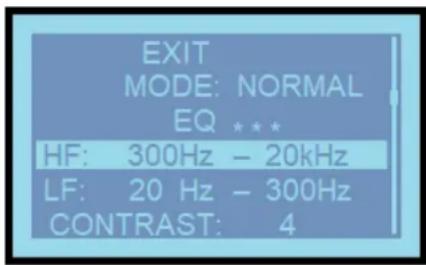
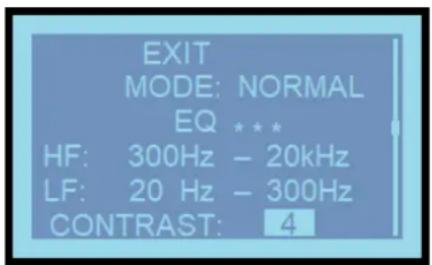
To access the internal DSP functions directly, press the rotary selector and the page opposite will be displayed. Turn the rotary selector to navigate through the listed options and press the rotary selector to select the highlighted option or setting.
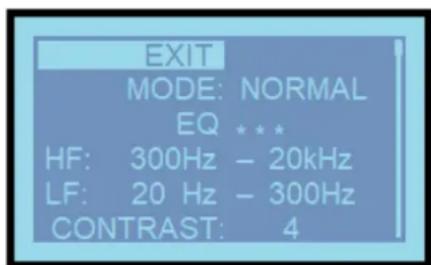
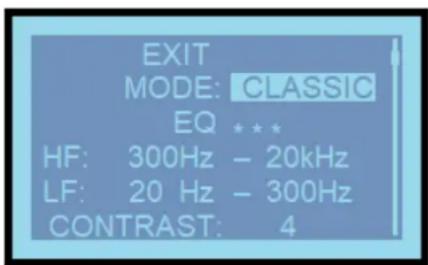
Turning to "MODE" and pressing the selector offers 5 x DSP profile settings: NORMAL, JAZZ, POP, CLASSIC and CUSTOM. Rotate the selector to the required profile and press to select.
The CUSTOM profile is set aside for user programming. NORMAL is a pre-set generic setting and JAZZ, POP and CLASSIC are pre-set as an optimal profile for different music types.
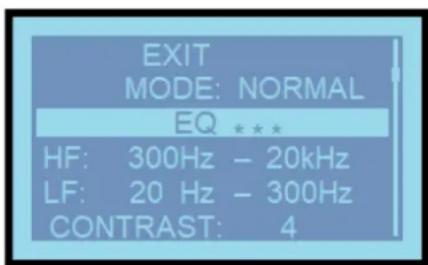
Navigating to the "EQ ..." section and pressing the selector gives access to a programmable parametric EQ. There are 5 separate EQ bands, named EQ1, EQ2, EQ3, EQ4 and EQ5.
Each of the 5 bands has fully editable frequency, resonance and gain values.
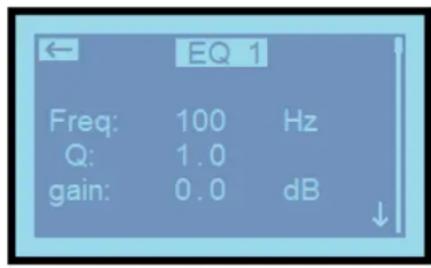

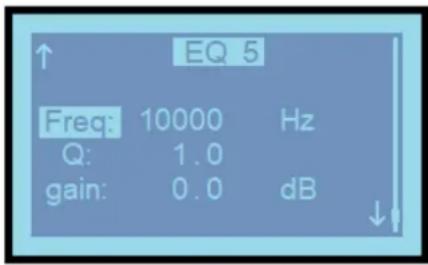
Scrolling down the settings using the rotary selector will highlight "Freq:" for setting the centre frequency of the selected EQ band. Press the selector to adjust the frequency in Hertz (Hz). Press the selector again to save the setting.
Scrolling down to "Q:" and pressing the selector allows the resonance setting to be adjusted, which shapes the steepness of the filter cutoff, varying effect between a wide band and a narrow focus either side of the centre frequency. Low values (1.0 is minimum) are less acute with a wider bandwidth and higher values give a sharper and more focused effect. Press the selector again to save the setting.
Scrolling down to "gain:" and pressing the selector will open the gain setting, which is the amount of cut or boost applied to the given centre frequency at the chosen amount of Q (resonance or focus). Positive values will boost the selected band and negative values will cut this band. Press the selector again to save the setting.
Scrolling down further will move onto the next EQ band and through its individual settings. EQ1 → EQ2 → EQ3 → EQ4 → EQ5 → EQ1... etc.
When all EQ settings are adjusted, navigate back to "EQ1" with the left arrow highlighted (top left corner of the display) Press the selector to exit back to the main menu. The DSP mode will now be set to CUSTOM.
Each CLARA active cabinet has a built in bi-amplifier section, which powers the Low Frequency woofer and High Frequency tweeter independently. This design offers the most efficient way to drive the woofer and tweeter.
The signal fed to the HF and LF components is controlled by the active crossover function of the DSP controller. Scrolling down the display to highlight "HF:" or "LF:" and pressing the selector will enter the settings for the crossover.
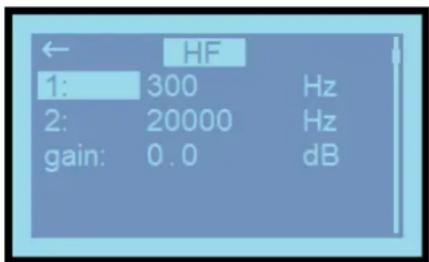
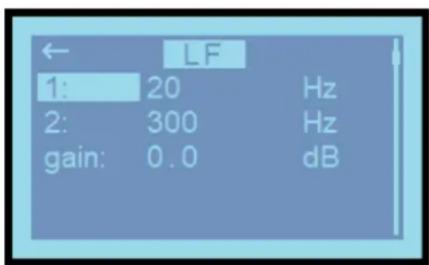
In the menu for the HF or LF crossover settings, there is a field for 1, 2, and gain. "1" is the lowest frequency, "2" is the highest frequency and "gain" can be used to adjust the level of signal to that frequency range, which can be used to boost or cut overall treble or bass response.
For HF, the setting for "1" relates to the lowest frequency that the tweeter is asked to produce, which is usually around to the high (2) setting for the woofer. The setting for "2" is the highest frequency that the tweeter is asked to produce, which should be 20,000Hz or lower as needed. Often better efficiency can be achieved if the "2" setting is slightly lower than 20,000 as these very high frequencies cannot be easily produced by the tweeter or even heard by the listener. Press the left arrow to exit.
For LF, the 1 and 2 settings are again the lowest and highest frequencies fed to the woofer. Here, the "2" setting should be around the low (1) setting for the tweeter and the "1" setting should be 20Hz or above. Settings above 20Hz may reduce very low frequency content but can dramatically improve output efficiency. Press the left arrow to exit.
The visibility of the LCD display can be adjusted by scrolling down to CONTRAST on the main menu and pressing the selector to set the contrast value between 1 and 5. This can be useful to make the display more legible with different light or viewing angles.
Scrolling down further switches to the second menu page.
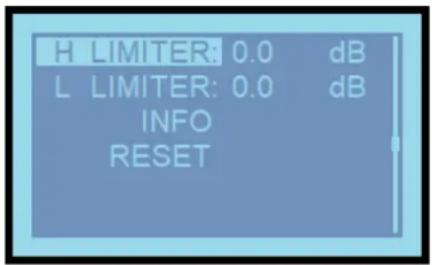
The next section of the DSP menu controls the limiter for each of the high and low frequency components. A limiter is a device that will reduce the volume differences above a set signal level. This can help to protect the amplifier and speaker components from overload when driven very hard.
Scroll down to highlight either "H LIMITER" or "L LIMITER" and press the selector to adjust the limiter level for either high frequency or low frequency amplifier sections. The maximum setting is 0.0dB, which has minimum effect, and lower (negative) dB settings will cause the limiter to take effect earlier (i.e. at lower peak levels)
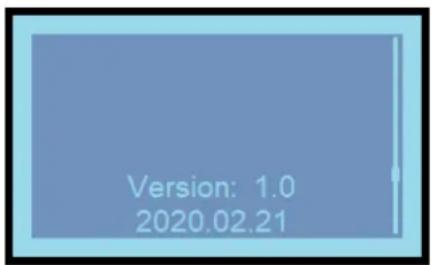
Scrolling down from the limiter section leaves 2 further options. The first option is "INFO" which provides information about the firmware of the DSP.
Press the selector to show the current version information and date.
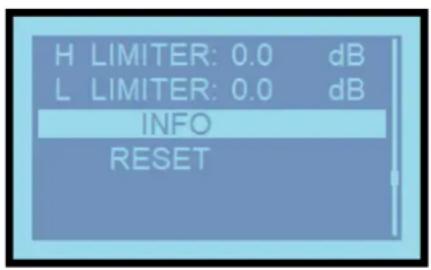
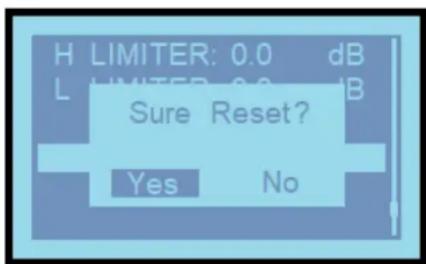
The last menu option is "RESET" which takes the DSP back to the factory settings. Press the selector and a pop-up window will ask to confirm if you want to reset the DSP settings to the default values.
Programming via USB
For more targeted and in-depth programming, the CLARA active cabinets may be edited via a USB connection, as described below. This offers more in-depth editing and the option to save DSP profiles as files on the laptop, which may be useful for different venues and/or applications.
Before connecting the CLARA active speaker to a laptop, please download the "ADU" application from the AVSL website... https://www.avsl.com/assets/downloads/178152UK-software.zip. Please ensure the laptop is running Windows 10 or above.
Connect the USB port of the speaker to the laptop via a USB A to B lead and switch the power on to the CLARA speaker cabinet.
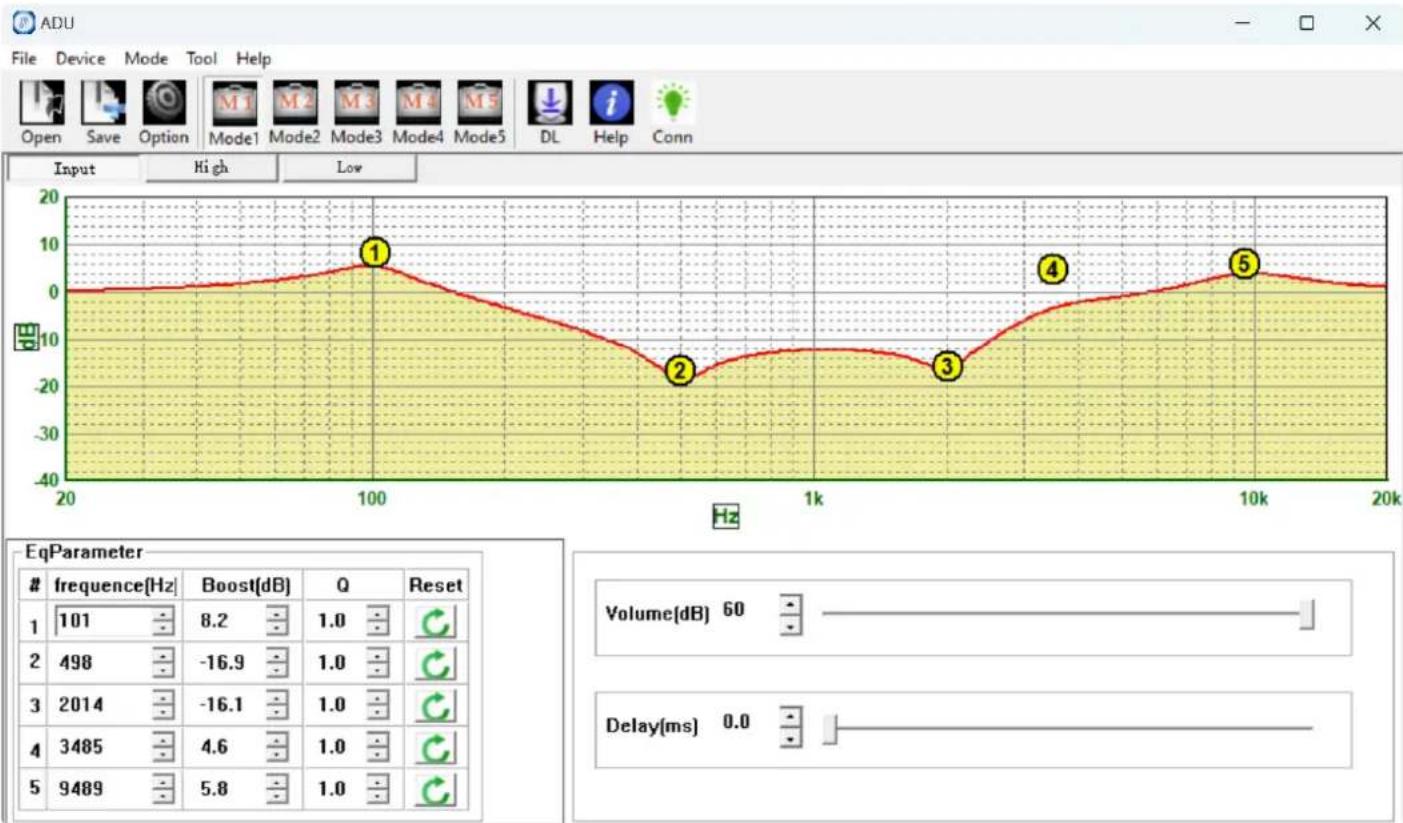
Once connected, run the ADU software application on the laptop and the program will open in a window with a graphic representation of an audio spectrum along with all editable settings.
The graphic user interface of the ADU software is as shown below, with the audio response shown as a Spectrum Graph to show the frequency response.
line
| Peak | Frequency [Hz] | Boost [dB] | Q | Reset | |------|----------------|----------|------|-------| | 1 | 101 | 8.2 | 1.0 | | | 2 | 498 | -16.9 | 1.0 | | | 3 | 2014 | -16.1 | 1.0 | | | 4 | 3485 | 4.6 | 1.0 | | | 5 | 9489 | 5.8 | 1.0 | |There are 5 main drop-down options at the top left of the window.
- File allows a DSP file to be saved to or opened from laptop memory.
- Device has options to Connect, Disconnect, Download (settings to the speaker memory) or Upload (settings from the speaker memory).
• Mode addresses the 5 DSP profiles in the speaker - Normal, Jazz, Pop, Classic, Custom - Tool sets the display options for the toolbars (the Option and Oscillator functions are not used)
- Help has software version information only under the "About" option.
There is also a row of buttons above the Spectrum Graph.
Open and Save buttons can open a file from the laptop or save it to the laptop (same as the File menu). Option is not used.
Mode 1-5 address the 5 DSP profiles in the speaker - Normal, Jazz, Pop, Classic, Custom.
DL downloads the settings from the software to the CLARA speaker.
Help is not used.
Conn green light bulb icon confirms that the CLARA cabinet is communicating with the laptop via USB. If there is no connection, this will show red.
Beneath this row of buttons are 3 tabs. If the Input tab is selected, this will show the audio response with five moveable EQ nodes, numbered 1-5. These nodes can be clicked and moved around the screen or adjusted numerically by frequency, Boost and Q settings at the bottom left of the window. Either click on the ▲▼ buttons or enter the value directly. Clicking "Reset" returns all values to default settings.
When editing via the nodes on screen, dragging a node left or right will adjust its centre-frequency. Dragging a node up or down will adjust the boost or cut to that frequency range.
In addition, there are two virtual sliders to adjust the overall Volume (master) and Delay (delay is used for time-aligning cabinets for phase correction in large areas)
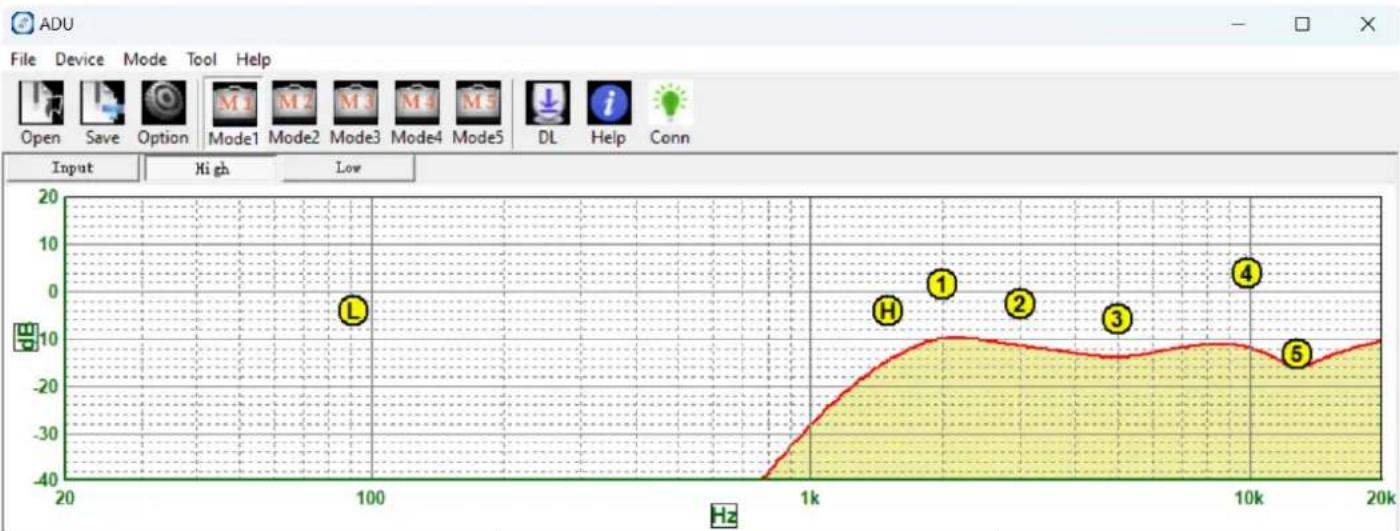
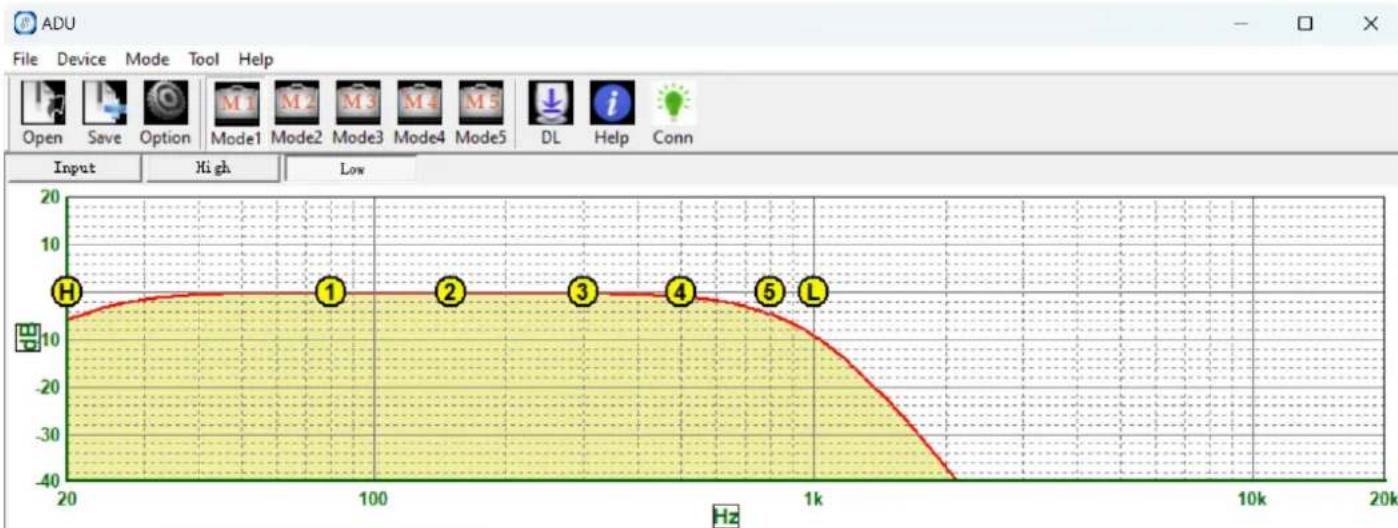
The ADU software also has 2 more tabs for High and Low frequency sections (Tweeter and Woofer control) Each of these pages can be seen below, this time showing just the audio response of either the tweeter or woofer, again with 5 editable EQ nodes. Additionally, there are 2 more nodes called L and H for setting the highest and lowest frequencies that will be used for that specific driver (tweeter or woofer).
line
| Frequency (Hz) | Amplitude (dB) | | -------------- | -------------- | | 100 | -5 | | 1k | -10 | | 10k | 5 | | 10k | -10 |![EqParameter frequency(Hz) Boost(dB) Q Reset 1 2000 1.5 2.0 2 3000 -2.5 1.0 3 5000 -6.0 1.0 4 9900 4.0 1.0 5 12898 -13.4 1.0 CrossOver High Butterworth 36 Low Butterworth 48 Freq(Hz) 1503 Freq(Hz) 90 Gain(dB) Inv -4.0 Limiter On/Off Limiter(dB) 0.0 Rmstc[dB/s] 120 Hold(ms) 0 Decay[dB/s] 10](/content/2026/05/936218/images/60b1737f73bffcd32b88db5e419400062c4fbd04968944cfa09bc2560d1122a9.jpg)
line
| Frequency (Hz) | Amplitude | | -------------- | --------- | | 20 | ~5 | | 100 | ~5 | | 1k | ~5 | | >1k | Decreasing |![EqParameter frequency[Hz] Boost[dB] Q Reset 1 80 0.0 1.0 2 150 0.0 1.0 3 300 0.0 1.0 4 500 0.0 1.0 5 800 0.0 1.0 CrossOver High Low Gain[dB] Butterworth 24 Butterworth 36 Freq[Hz] 20 Freq[Hz] 1000 Inv 0.0 Limiter On/Off Limiter[dB] 0.0 Rmstc[dB/s] 120 Hold[ms] 0 Decay[dB/s] 10](/content/2026/05/936218/images/62a043da458d42cf5f9322c454f58c8f6aa42cbbfeec2548fc8bac4462c184b4.jpg)
The EQ nodes are editable in the EqParameter section in the same way as for the main Input tab. These nodes can be clicked and moved around the screen or adjusted numerically by frequency, Boost and Q settings at the bottom left of the window. Either click on the ▲▼ buttons or enter the value directly. Clicking "Reset" returns all values to default settings.
In the Crossover section, the L and H nodes can also be dragged on the screen or adjustable via 2 virtual sliders, or ▲▼ buttons, or by entering the values directly. Also in this section are drop-down options for the filter-type (Bypass or Butterworth 12/24/36/48). The crossover uses an industry standard Butterworth filter type and the number dictates the steepness of the filter slope. 12, 24, 36 or 48 deciBels per octave (dB/oct) with higher numbers having a steeper (more focused) slope.
Overall Gain is handled by a vertical virtual slider, or ▲▼ buttons, or by entering the values directly. This section also has a "tick" button to invert the signal (reverse polarity) if required for phase alignment.
A Limiter section has a tick button for on/off and sliders for 4 parameters.
- Limiter(dB) sets the signal level (in dB) that the limiter becomes activated.
- Rmstc(dB/s) sets the reaction speed in deciBels per second.
- Hold(ms) sets how long the limiter remains active after the signal drops below the Limiter(dB) level.
- Decay(dB/s) adjusts the release curve of the limiter after any Hold time.
When all relevant settings are made, they can be saved to the speaker and/or stored on the laptop for future use as required.
Specifications
| Model | CLARA-12A | CLARA-15A |
| Power supply | 90-254Vac, 50/60Hz (IEC) | |
| Amplifier construction | Class-D bi-amplifier with DSP | |
| Main driver | 300mm∅ (12") | 380mm∅ (15") |
| Voice coil | 63mm∅ (2.5") | 63mm∅ (2.5") |
| HF driver | 34mm (1.35") Ti CD | 44mm (1.75") Ti CD |
| Power: rms | 350 + 50W | 400 + 70W |
| Power: max. | 800W | 1000W |
| Max. SPL | 125.0dB | 126.0dB |
| Frequency response | 50Hz – 19kHz | 45Hz – 19kHz |
| Inputs | XLR/jack mic/line, XLR/jack line | |
| Audio source | Bluetooth receiver | |
| Line output | XLR | |
| DSP settings | Normal, Jazz, Pop, Classic, Custom | |
| Flying Points | 3 x M8 for vertical suspension | |
| Dimensions | 610 x 380 x 350mm | 710 x 435 x 385mm |
| Weight | 16.5kg | 20.5kg |



Disposal: The "Crossed Wheelie Bin" symbol on the product means that the product is classed as Electrical or Electronic equipment and should not be disposed with other household or commercial waste at the end of its useful life. The goods must be disposed of according to your local council guidelines.
Hereby, AVSL Group Ltd. declares that the radio equipment type 178.152UK and 178.155UK is in compliance with Directive 2014/53/EU
The full text of the EU declaration of conformity for 178.152UK is available at the following internet address: http://www.avsl.com/assets/exportdoc/1/7/178152UK%20CE.pdf
The full text of the EU declaration of conformity for 178.155UK is available at the following internet address: http://www.avsl.com/assets/exportdoc/1/7/178155UK%20CE.pdf
Errors and omissions excepted. Copyright© 2023.
AVSL Group Ltd. Unit 2-4 Bridgewater Park, Taylor Rd. Manchester. M41 7JQ
AVSL (EUROPE) Ltd, Unit 3D North Point House, North Point Business Park, New Mallow Road, Cork, Ireland.
Brand : Citronic
Model : CLARA-15A
Category : Loudspeaker