CM12A - Pregnant Citronic - Free user manual and instructions
Find the device manual for free CM12A Citronic in PDF.

| Product Type | Passive PA Speaker |
| Brand | Citronic |
| Model | CM12A |
| Woofer Size | 12 inches |
| Tweeter Size | 1 inch |
| RMS Power Handling | 300 W |
| Peak Power Handling | 600 W |
| Impedance | 8 ohms |
| Frequency Response | 55 Hz - 20 kHz |
| Sensitivity (1W/1m) | 97 dB |
| Maximum SPL | 122 dB |
| Connector Type | 2 x Speakon NL4 |
| Cabinet Material | Birch Plywood |
| Grille Material | Steel with acoustic foam |
| Mounting Options | Pole mount, flying points |
| Dimensions (H x W x D) | 600 x 400 x 350 mm |
| Weight | 19.5 kg |
| Care and Cleaning | Wipe with a dry cloth; avoid solvents |
| Safety Features | Rubber feet, protective circuit for tweeter |
| Spare Parts Availability | Contact Citronic support for replacements |
| Recommended Amplifier | 500 W at 8 ohms per speaker |
Frequently Asked Questions - CM12A Citronic
User questions about CM12A Citronic
0 question about this device. Answer the ones you know or ask your own.
Ask a new question about this device
Download the instructions for your Pregnant in PDF format for free! Find your manual CM12A - Citronic and take your electronic device back in hand. On this page are published all the documents necessary for the use of your device. CM12A by Citronic.
USER MANUAL CM12A Citronic
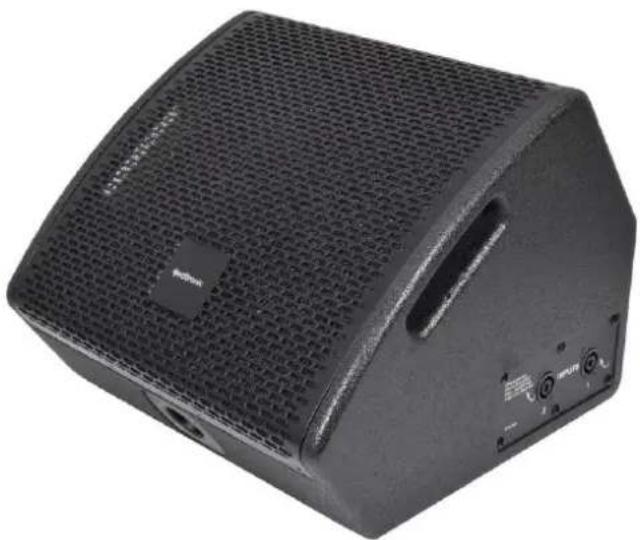
Stage Wedge Monitors
Item ref: CM10A 178.690UK
CM12A 178.692UK
CM15A 178.695UK
CM10 178.691UK
CM12 178.693UK
CM15 178.696UK
User Manual
natural_image
Black audio amplifier speaker with mesh grille and control buttons (no visible text or symbols)
natural_image
Black audio amplifier device with visible internal components and ventilation grille (no text or symbols)Version 1.1

Caution: Please read this manual carefully before operating
Damage caused by misuse is not covered by the warranty
Introduction
Thank you for choosing a Citronic CM-series stage wedge monitor. These units are available in passive and active versions and can be positioned free-standing or pole-mounted via the 35mm socket. Please read this manual to achieve optimum performance from your speaker cabinet and avoid damage through misuse.
Package Contents
• CM-series stage wedge monitor
- Mains lead (active models only)
If you find any part is missing or the product has arrived with any problems, please contact your retailer at once. This product contains no user-serviceable parts, so make no attempt to try to fix or modify this item yourself as this will invalidate the warranty. We recommend you keep the original package and proof of purchase for any possible replacement or return issues.
Please note below for active models
Warning
To prevent the risk of fire or electric shock, do not expose any of the components to rain or moisture. Avoid impact to any of the components. No user serviceable parts inside - refer servicing to qualified service personnel.
Safety
- Please observe the following warning conventions

CAUTION: RISK OF ELECTRIC SHOCK DO NOT OPEN


This symbol indicates that dangerous voltage constituting a risk of electric shock is present within this unit

This symbol indicates that there are important operating and maintenance instructions in the literature accompanying this unit.
- Ensure that the correct mains lead is used with adequate current rating and mains voltage is as stated on the unit
- Avoid ingress of water or particles into any part of the housing. If liquids are spilled on the cabinet, stop using immediately, allow the unit to dry out and have checked by qualified personnel before further use

Warning: this unit must be earthed
Placement
- Keep the electronic parts out of direct sunlight and away from heat sources.
- Position the cabinet on a stable surface or stand that is adequate to support the weight of the product.
- Allow adequate space for cooling and access to controls and connections at the rear of the cabinet.
- Keep the cabinet away from damp or dusty environments.
Cleaning
• Use a soft dry or slightly damp cloth to clean surfaces of the cabinet
• A soft brush can be used to clear debris from controls and connections without damaging them
• To avoid damage, do not use solvents to clean any parts of the cabinet.
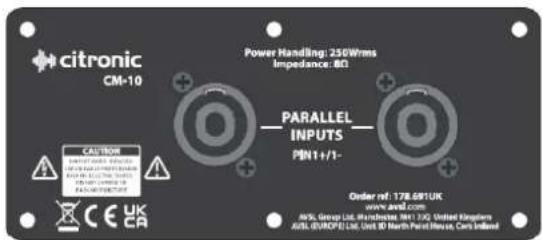
Passive panel layout
text_image
citronic CM-10 Power Handling: 250Wrms Impedance: 8Ω PARALLEL INPUTS PIN1+/1- Order ref: 178.691UK www.alvd.com MSL Group Ltd, Wachard, MT 130, United Kingdom ASIL (SWAP) Ltd, Unit 87 North Parallel Ramps, Cents IrelandBoth SPK input sockets are wired to 1+/1- in parallel
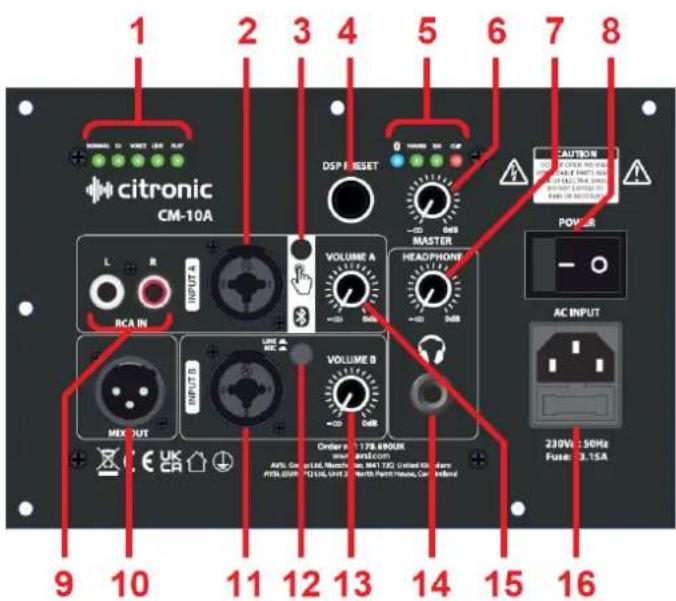
Active panel layout
text_image
1 2 3 4 5 6 7 8 citronic CM-10A DSP RESET HOLDEN 100 MP -20 0dB MASTER CAUTION POWER L R INPUT A VOLUME A HEADPHONE RCA IN HEADPHONE INPUT B VOLUME B HEADPHONE MIX OUT AC INPUT VOLUME B Number 1: 178.890UK AVL, Gm, m, L, M, M, M, M, M, M, M, M, M, M, M, M, M, M, M, M, M, M, M, M, M, M, M, M, M, M, M, M, M, M, M, M, M, M, M, M, M, M, M, M, M, M, M, M, M, M, M, M, M, M, N/A 30Hz 230V 30Hz Fuse: 3.15A 9 10 11 12 13 14 15 16- DSP setting indicator LEDs
- LINE A input combo Jack/XLR
- Bluetooth on/off & pairing button
- DSP rotary selector
- Bluetooth & Amplifier status LEDs
- MASTER volume control
- HEADPHONE output volume control
- Power on/off switch
- LINE A input RCA (L+R)
- MIX line output XLR
- MIC/LINE B input combo Jack/XLR
- Input B MIC/LINE level selector
- MIC/LINE B volume control
- HEADPHONE 6.3mm stereo output
- LINE A volume control
- IEC mains inlet & fuse holder
Setting up
For live stage monitoring, position your CM-series stage wedge on the floor facing upward toward the listener. The wedge can also be mounted onto a 35mm∅ speaker stand or wall bracket for use as a PA speaker. The coaxial main driver has an integral tweeter for full-range output from a focused, compact cabinet.
Passive models are connected via either of the two SPK input sockets, wired 1+/1- (pins 2 not connected). Connect to only one of these from the amplifier (another passive speaker may be connected to the other) Ensure that the CM passive monitor can handle the power from the amplifier at 8Ω (or 4Ω if 2 are connected).
Active models have 2 independent inputs...
Input A (2, 9) can accept a line level signal from a mixer, audio source or electronic instrument. The volume level of input A is controlled by the VOLUME A rotary control (15).
Input B (11) is switchable to accept either a microphone directly or a line input via the MIC/LINE button (12). The volume level of input B is controlled by the VOLUME B rotary control (13).
The overall output level of the monitor is governed by the MASTER volume control (6).
The mix of Input A and Input B (and Bluetooth as described below) can be output to further active speakers or monitors from the MIX OUT XLR connector (10).
A stereo HEADPHONE output (14) enables personal headphone monitoring, governed by a volume control (7).
Operation
When all signal connections are made, turn down the MASTER volume and connect to mains using the supplied IEC lead to the mains inlet (16). Switch on the power and a green POWER LED (5) will light. Turn up the MASTER control gradually, checking input signal(s) and gradually adjusting the VOLUME A and VOLUME B controls until the required volume is reached.
Corresponding to the output signal are a SIG (signal) and CLIP LED. The green SIG LED should be lit when sound is being produced and the CLIP LED may light very briefly on the loudest transients (beats) of the signal. If the red CLIP LED lights anything more than very briefly on each peak of the sound, the volume needs to be reduced to avoid overload and distortion of the output.
For wireless connection from a smart phone, the input section has a Bluetooth on/off and pairing button (3). Press this button to switch on the Bluetooth receiver, which will automatically connect to a previously paired smart phone and allow playback through channel A of the monitor. A blue LED (5) will light to confirm this.
To pair a smartphone with the CM-series active monitor, press and hold the Bluetooth button (3), which will cause the blue LED to flash, indicating pairing. Open the Bluetooth menu on the smart phone and search for a Bluetooth ID corresponding to the model number (e.g. CM10A) of the wedge monitor. Select and accept to pair to the CM monitor and the blue LED will stay lit constantly to confirm the pairing.
CM-series active monitors have an inbuilt DSP which has 5 optimal settings for different types of input or audio program material: Normal / DJ / Voice / Live / Flat. Although quite self-explanatory, it is worth experimenting with each profile to find the ideal EQ and tone response for each application. Simply turn the DSP rotary selector (4) and the DSP setting indicator LEDs (1) show which setting is active.
Specifications
| Model | CM10/CM10A | CM12/CM12A | CM15/CM15A |
| Power supply (active) | 230Vac, 50Hz (IEC) | ||
| Main driver | 250mm∅ (10") coaxial | 300mm∅ (12") coaxial | 380mm∅ (15") coaxial |
| HF driver | 44mm∅ (1.75") Ti compression driver | ||
| Frequency response | 65Hz – 20kHz | 55Hz – 20kHz | 45Hz – 20kHz |
| Impedance (active / passive) | 4Ω / 8Ω | ||
| Power: rms | 250W | 300W | 350W |
| Power: max. | 500W | 600W | 700W |
| Sensitivity | 95dB | 96dB | 97dB |
| DSP settings (active) | Normal, DJ, Voice, Live, Flat | ||
| Dimensions | 355 x 350 x 275mm | 355 x 350 x 275mm | |
| Weight (active / passive) | 9.87kg / 8.64kg | 12.10kg / 10.50kg | 15.00kg / 13.10kg |


Disposal: The "Crossed Wheelie Bin" symbol on the product means that the product is classed as Electrical or Electronic equipment and should not be disposed with other household or commercial waste at the end of its useful life. The goods must be disposed of according to your local council guidelines.
Hereby, AVSL Group Ltd. declares that the radio equipment type 178.690UK is in compliance with Directive 2014/53/EU
The full text of the EU declaration of conformity is available at the following internet address: http://www.avsl.com/assets/exportdoc/1/7/178690UK%20CE.pdf