
KSV35HRB - Air Conditioning KELVINATOR - Free user manual and instructions
Find the device manual for free KSV35HRB KELVINATOR in PDF.


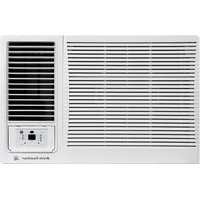
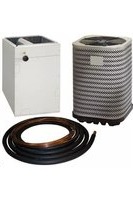
| Product Type | Inverter Split-type Room Air Conditioner |
| Brand | Kelvinator |
| Model | KSV35HRB |
| Refrigerant | R410A |
| Cooling Capacity | 3.5 kW (approx.) |
| Heating Capacity | 3.5 kW (approx., reverse cycle model) |
| Power Supply | 220-240V, 50Hz |
| Indoor Unit Dimensions (WxHxD) | 800 x 280 x 200 mm (approx.) |
| Outdoor Unit Dimensions (WxHxD) | 800 x 550 x 300 mm (approx.) |
| Indoor Unit Weight | 10 kg (approx.) |
| Outdoor Unit Weight | 30 kg (approx.) |
| Energy Efficiency | Inverter technology for energy savings |
| Operating Modes | AUTO, COOL, HEAT, DRY, FAN |
| Fan Speeds | Auto, Low, Med, High |
| Remote Control | Infrared with LCD display |
| Timer | 24-hour ON/OFF programmable timer |
| Additional Features | ECO mode, Follow Me, Auto Restart, Turbo, Self-Diagnosis |
| Air Filter | Washable, clean every month |
| Air Freshening Filter | Replaceable every 4-5 months |
| Warranty | 24 months (residential), 36 months if installed by licensed technician (Australia) |
Frequently Asked Questions - KSV35HRB KELVINATOR
User questions about KSV35HRB KELVINATOR
0 question about this device. Answer the ones you know or ask your own.
Ask a new question about this device
Download the instructions for your Air Conditioning in PDF format for free! Find your manual KSV35HRB - KELVINATOR and take your electronic device back in hand. On this page are published all the documents necessary for the use of your device. KSV35HRB by KELVINATOR.
USER MANUAL KSV35HRB KELVINATOR
Inverter Split-type Room Air Conditioner
User Manual
KSV26HRB, KSV35HRB, KSV53HRB,
KSV62HRB, KSV70HRB, KSV80HRB,
Refrigerant R410A
natural_image
Black-and-white photo of a family celebrating outdoors with a baby, no visible text or symbolsCongratulations Contents
Congratulations and thank you for choosing our Inverter split-type room air conditioner. We are sure you will find your new air conditioner a pleasure to use. Before you use the air conditioner, we recommend that you read through the entire user manual, which provides the description of the air conditioner and its functions.
To avoid the risks that are always present when you use an electrical appliance, it is important that the air conditioner is installed correctly and that you need the safety instructions carefully to avoid misuse and hazards.
We recommend that you keep this instruction booklet for future reference and pass it on to any future owners. After unpacking the air conditioner please check it, is not damaged. If in doubt, do not use the air conditioner but contact your local Electrolux Customer Care Centre.

environmental tip
Information on disposal for users
- Most of the packing materials are recyclable. Please dispose of those materials through your local recycling depot or by placing them in appropriate collection containers.
- If you wish to discard this air conditioner, please contact your local authorities and ask for the correct method of disposal.

caution
- The air conditioner is not intended for use by young children or informed persons without supervision.
- Young children should be supervised to ensure that they do not play with the air conditioner.
- Contact an authorised installer for installation of the unit
- Contact an authorised service technician for repair or maintenance of this unit.
- If the power cord is to be replaced, replacement work shall be performed by authorised personnel only.
- Installat on work must be performed in accordance with the national wiring standards by authorised personnel only.
Conditions of use
This appliance is intended to be used in household and similar applications such as:
• Staff kitchen areas in shops, offices and other working environments
- Farm houses
• By clients in hotels, hotels, and other residential type environments
- Bed and breakfast type environments
Safety Instructions
Warning
Caution
Prior to operation....4
Operating instructions
Uni. Identification
Additional features
Operating temperature
Colims co-ralian
Using the remote control
Location of the remote control
Replacing batteries 7
Features of the remote control 7
How to operate the air conditioner
Automatic operation....10
Cooling/Heating/Fan only operation
Drying operation....11
Timer operation 11
Setting the clock 13
Maintenance
Maintenance 14
Troubleshooting tips
Troubleshooting tips....15
Operation tips 15
Normal function of the air conditioner....16
Warranty
Warranty instructions 17
Important notes
- Contact an authorised installer for installation of this unit
- Contact an authorised service technician for repair or maintenance of the unit.
• The socket outlet required to supply power must be connected and commissioned by a licensed contractor. - This appliance is not intended for use by persons (including children with reduced physical, sensory or mental capabilities, or lack of experience and knowledge, unless they have been given supervision or instruction concerning use of the appliance by a person responsible for their safety.
- Young children should be supervised to ensure that they do not play with the air conditioner.
- If the power cord is to be replaced, replacement work shall be performed by authorised personnel only.
• Installation work must be performed in accordance with the national wiring standards and the electricity suppliers service rules by authorised personnel only. - If the system is to be moved to another location or disposed of, only a suitably qualified person is permitted to undertake such work.
• Take care not to catch fingers on the fan blade when adjusting vertical louses. - This air conditioner uses R410A refrigerant (Confirm before installation)
Safety precautions
How to properly use and maintain your air conditioner. Just a little preventative care on your part can save you a great deal of time and money over the life of your air conditioner. You'll find many answers to common problems in the chart of troubleshooting tips. If you review the chart of Troubleshooting Tips first, you may not need to call for service.
Meanings of symbols used in this manual are shown below:

warning
This symbol indicates information concerning your personal safety

caution
This symbol indicates information on how to avoid damaging the appliance.

tips and Information
This symbol indicates tips and information about use of the appliance

environmental tip
This symbol indicates tips and information about economical and ecological use of the appliance

embol indicates never to do this

This symbol indicates always do this

Always do this

warning

Connect with power properly.
Do not operate or stop the unit by switching on or off the power.
It may raise electric shock or fire causes to heat generation.

Do not damage or use an unspecified power cord.
- may cause electric shock or fire.

Do not modify power cord length or share the outlet with other appliances.
(1) may cause electric shock of the due to next generation,

Do not operate with wet hands or in damp environment. If may cause electric shock

Do not direct airlow at room occupants only. This could damage your health.

Always ensure effective earthing.
No nothing may cause electric shock.

Do not allow water to run into electric parts. I may cause failure of machine or electric shock.

Always install circuit breaker and a dedicated power circuit.

improper installation may cause line and electric shock.

Disconnect the power if strange sounds, smell, or smoke comes from unit. It may cause fire and electric shock.

Do not drink water drained from air conditioner.

- CDF (in the CDF) is a result of: 0.98% (628–733).

Do not open the unit during operation.

I may cause electric shock

Use correctly rated circuit breaker or fuse. There is risk of fire or electric shock.

Do not use the power cord close to heating appliances. It may cause fire and electric shock.

Do not use the power cord near flammable gas or combustibles, such as gasoline, benzene, thinner, etc.

Ventilate room before operating air conditioner if there is a gas leakage from another appliance. It may cause explosion, fire and burns.

Do not disassemble or modify unit. It may cause failure and electric shock.

caution
| When the air filter is to be removed, do not touch the metal parts of the unit. If may cause an injury. | |
| Do not clean the air conditioner with water.Wear or may enter the unit and degrade the insulation.If may cause an electric shock. | |
| Ventilate the room well when used together with a stove, etc.An oxygen shortages may occur. | |
| Do not put a pet or house plant where it will be exposed to direct air flow.This could injure the pot or plant. | |
| Do not use for special purposes.Do not use the air sound timer to preserve proximity devices, food, pots, paints, and art objects. It may cause deterioration of quality, etc. | |
| Stop operation and close the window in storm or hurricane.Operation with windows opened may cause wetting of indoor and viewing of household furniture. | |
| Do not place obstacles around air-inlets or inside of air outlet.It may cause failure of appliance or accident. | |
| Turn off the main power switch when not using the unit for a long time. It may cause failure of product or hrs. | |
| Do not use strong detergent such as was or thinner.Use a soft cloth for cleaning.Apprecnance may be deteriorated due to change of product colour or according to its surface. | |
| Ensure that the installation bracket of the outdoor appliance is not damaged due to prolonged exposure.If blocker is damaged, there is concern of damage due to falling out. | |
| Always insert the filters securely. Clean filter once every two weeks.Operation without filters may cause failure. | |
| Do not place heavy object on the power cord and take care so that, the cord is not compressed.There is danger of line or electric shock. | |
| Use caution when unpacking and installing. Sharp edges could cause injury. | |
| If water enters the unit, turn the unit off and disconnect the power, contact a qualified service technician. | |
| Hold the plug by the head of the power plug when taking it out.Failure to do so may cause electric shock and damage. |
Prior to Operation
Preparing for operation
1 Contact an installation specialist for installation.
2 Plug in the power plug properly.
3. Do not use a damaged or non-standard power cord.
4 Do not share the same outlet with other appliances.
5. Do not use an extension cord.
6. Do not start/stop operation by plugging/unplugging the power cord.
Usage
- Exposure to direct airflow to occupants, pets or plants for an extended period of time could be hazardous to your health.
- Due to the possibility of oxygen deficiency, ventilate the room when used together with stoves or other heating devices.
- Do not use this air conditioner for non-specified special purposes (e.g. preserving precision devices, food, pets, plants, and art objects). Usage in such a manner could harm such property.
Cleaning and maintenance
Do not touch the metal parts of the unit when removing the filter. Injuries can occur when handling sharp metal edges.
2. Do not use water to clean inside the air conditioner, Exposure to water can destroy the insulation, leading to possible electric shock.
3 When cleaning the unit, first make sure that the power and circuit breaker are turned off.
Service
For repair and maintenance, contact your authorised service dealer.
Operating instructions
Parts names
Indoor unit
- Front panel
- Panel frame
- Chavis
- Air filter
- Horizontal louver
- Vertical leuver
- Indicator Lamps
- Manual control button
- Remote control
- Refrigerant pipe
- Drain hose

Outdoor unit
12 Connecting caplo
13 Refrigerant pipe
14 Stop valve

NOTE: All the pictures in this manual are for explanation purpose only. Your all conditioner may be slightly different. The actual shape shall prevail.
LED display panel on indoor device
1 Auto indicator
This indicator illuminates when the air conditioner is in AUTO operation.
2 Timer indicator
This indicator illuminates when Timer is set ON/OFF.
3 Defrost indicator
(For Heating & Cooling model only)
This indicator illuminates when the air conditioner starts de frosting automatically or when the warm air control feature is activated in heating operation.

4 Temperature indicator
A: Usually it displays the temperature settings.
When changing the setting temperature, this indicator begins to flash, and stops 20 seconds later.
- It displays the room temperature when the air
conditioner is in PAN only operation
c. Displays the malfunction code or protection code.
5 Operation frequency display
This display is separated into five zones.
The zones illuminate based on the compressor current frequency. For example, higher frequency will illuminate more zones.
Operation frequency display not available on KSV70
and KSV80.
Additional features
Eco mode:
This function enables the unit to automatically increase (cooling) or decrease (heating) 1°C per hour for the first two hours, then hold steady for the next 5 hours, after that the unit will stop operation. It can maintain the most comfortable temperature and save energy.
Auto-Restart function:
When the power is off and then on, the unit automatically restores the previous function settings.
Easy-cleaned panel:
The front panel may be easily removed for periodic cleaning. Self-diagnosis and Auto-protection function:
This function can electronically detect the errors and display the diagnosis by number displayed on the LED window on the indoor unit.
Then the unit will automatically switch to protection mode.
Operating temperature
| Mode/Temperature | Coolingoperation | Heatingoperation | Dryingoperation |
| RoomTemp | 31^ × 10^-3 | ^ × 10^-4 | ^ |
| 18^ × 20^ | |||
| OutdoorTemp | 15^ × 20^ forthe modals withlow temperature,cooling system | 15^ × 20^ × 10^-4 | ^ × 20^ |
! caution
If the air conditioner is used outside of the above conditions, certain safety protection features may come into operation and cause the unit to function abnormally.
- Room relative humidity less than 80%. If the air conditioner operates in excess of this figure, the surface of the air conditioner may attract condensation. Please set the vertical air flow louver to its maximum angle (vertically to the floor), and set HIGH fan mode.
- Optimum performance will be achieved within these
Suggestion: For the unit adopts an Electric Heater, when the outside ambient temperature is below 0 °C, we strongly recommend you to keep the machine plugged in in order to guarantee it running smoothly.
Manual operation
Units are equipped with a switch to activate the emergency operation mode. This switch can be used as an emergency switch to turn the system on and off if the remote control fails to work.


NOTE: The unit must be turned off before operating the manual control button. If the unit is operational, continue pressing the manual control button until the unit is off.
1 Open and if the front panel up to an angle until it remains fixed with a clicking sound.
2. One press of the manual control button will load to the forced AUTO operation. If you press the button twice within five seconds, the unit will operate under forced COOL operation.
3 Close the panel firmly to its original position.
! caution
- It is recommended not to use for ongoing operation of the unit.
- To restore the remote control operation, use the remote control directly.
Optimal operation
To achieve optimal performance, please note the following:
- Adjust the air flow direction correctly so that it is not directed on people.
- Adjust the temperature to achieve the highest comfort level. Do not adjust the unit to excessive temperature levels.
- Close doors and windows on COOL or HEAT modes, otherwise performance may be reduced.
- Use TIMER ON button on the remote control to select a time you want to start your air conditioner.
- Do not put any object near the air inlet or air outlet, as the efficiency of the air conditioner may be reduced and it may even stop running.
- Clean the air filter periodically, otherwise cooling or heating performance may be reduced.
- Do not operate the unit with horizontal source in closed position.
Using the remote control
Location of the remote control
- Keep the remote control where its signals can reach the receiver of the indoor unit (a distance of 8m is allowed).
- When you select the timer operation, the remote control automatically transmits a signal to the indoor unit at the specified time.
- If you keep the remote control in a position that hinders proper signal transmission, a time lag of up to 15 minutes may occur.


! caution
- The air conditioner will not operate if curtains, doors or other materials block the signals from the remote control to the indoor unit.
- Prevent any liquid from falling into the remote control. Do not expose the remote control to direct sunlight or heat.
- If the infrared signal receiver on the indoor unit is exposed to direct sunlight, the air conditioner may not function properly. Use curtains to prevent the sunlight from falling on the receiver.
• If other electrical appliances react to the remote control, either move these appliances or consult your local dealer.
Replacing batteries
The remote control uses two AAA batteries.
1. Slide the cover of the battery compartment off according to the arrow direction, then replace the old batteries with new ones.
2. Insert the new batteries making sure that the (1) and (-) of battery are installed correctly.
3. Reach the cover by sliding it back into position. After replacing batteries, set the remote control clock.
NOTE: Do not dispose batteries as unsorted municipal waste. Collection of such waste separately for special treatment is necessary.
Features of the remote control

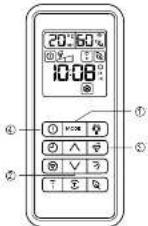
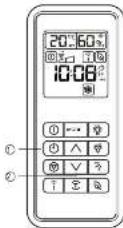
1 MODE Select Button:
Each time you push the button, a mode is selected in a sequence that goes from AUTO DRY TAN COOL and HEAT, as the following figure indicates:

NOTE: COOL only model has no HFAT feature
2 ON/OFF Button:
Push this button to start or stop operation. If you keep pressing for more than 2 seconds, the self cleaning feature will activate.
3 CLOCK/TIMER Button
First press of the button will initiate the TIMER ON setting program, the timer on indicator light illuminates and the setting time flashes at 1Hz. Second press of the button will activate the TIMER OFF setting program, the timer off indicator light illuminates and the setting time flashes at 1Hz.
Third press of the button will revert back to display the clock time.
4 CANCEL Button:
(a) If the TIMER ON, TIMER ON OFF or TIMER OFF ON feature has been set, pressing the Cancel button will override the TIMER program and turn off the unit as well.
(a) If only the TIMER OFF feature is set, pressing the Cancel button will cancel the timer off setting and turn on the unit (when the unit is off).
(c) If no TIMER feature has been set, press the Cancel button, and nothing will happen.
5 FOLLOW ME Button (not available for KSV70HRB and KSV80HRB):
Push this button to initiate the Follow Me feature, the remote displays the temperature at its location. The remote control will send this signal so the air conditioner in 3 minute intervals until you press the Follow Me button again. The air conditioner will automatically cancel the Follow Me feature if it does not receive the signal during any 7 minute interval.
NOTE: The Follow Me feature is not available under DRY and FAN mode. Starting the operating mode or turning off the unit will cancel the Follow Me feature automatically. The remote control needs to be within 8m reach of the indoor unit for the Follow Me mode to work appropriately.
6 TURSO Button:
Push this button on COOL mode, the air conditioner goes into powerful cooling operation. Push again to cancel the TURBO function.
7 Display on/off Button:
Press this button to turn off the digital display on the air conditioner, press it again to activate it. If you keep pressing for 2 or more seconds, the indoor unit will display the ambient room temperature.
B TEMP/TIME Button:
Push the "▲" button to increase the indoor temperature setting or to adjust the TIMER (clock time) in a clockwise direction. Push the "▼" button to decrease the indoor temperature setting or to adjust the TIMER (clock time) in a counter clockwise direction.
NOTE: Press and "old" ▲"and▼"buttons together for 3 seconds while temate the temperature display between the C & F scale.
9 FAN SPEED Button:
Used to select the Fan Speed in four steps-AUTO LOW MED or HIGH. Each time the button is pressed, the fan speed mode is shifted. The fan speed can not be selected under AUTO and DRY mode.
10 SWING Button:
Press this button to change the swing angle of the louver. The angle of the horizontal louver will adjust by 6 degrees with each press of the button. If you keep pressing the button for 2 or more seconds, the louver will swing up and down automatically.
11 ECO Button:
Press this button to go into the Energy Saving operating mode. Press it again to cancel. This function can only be used on COOL and HEAT mode and maintain the most comfortable temperature for you.
NOTE: While the unit is running under Economic operation mode, it will be cancelled when changing the mode or the fan speed.
Indicators on remote control

Note: All items shown in the figures are for explanation on purpose only. During the actual operation, only the relative functional items are shown on the display panel. After installing the batteries for the first time, the backlight function is not available.
88°E SET
Temp display
Displays the ambient room temperature. Under temperature setting operation, the temperature can be adjusted in a range of 17°C/62°F to 30°C/88°F. Under FAN mode, the temperature can not be adjusted.
88%
Humidity display
Displays the room relative humidity in percent value.
[NO TEXT]
Transmission Indicator
This transmission indicator lights when the remote control transmits signals to the indoor unit.
①
ON/OFF display
Displayed by pressing the ON/OFF button. Press the ON/OFF button again to remove.
[Non-Text]
Fan speed display
Displays the selected fan speed, AUTO (no display) and three fan speed levels (LOW) (MED) (HIGH) can be indicated.
Displays * when the operating mode is either AUTO or DRY.
i
FOLLOW ME display
Displayed when follow me feature is activated.
[Figure]
ECO Display
Displayed by pressing the ECO button. Press the ECO button again to remove.
28:88
Time display
Indicate Timer on/off time (0-23.50 hours) or clock time,
→
Timer display
When the TIMER ON is set, it displays “ ^1 ”. If only TIMER OFF is set, it displays “ ^2 . When both TIMER ON and TIMER OFF are set, it displays “ ^3 .
AUTO
Mode display
Displays the current operation mode, Including
AUTO (☐), DRY (☐), FANI (☐), COOL (☐), HEAT (☐) (No applicable to cooling only model) and back to AUTO (☐).
Airflow direction control
- Adjust the airflow direction properly otherwise, it might cause discomfort or cause brown room temperatures.
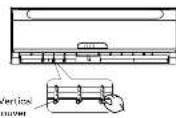
- Adjust the horizontal louver using the remote control. - Adjust the vertical louver manually.
To set the vertical air flow (Up-Down) direction
Perform the function while the unit is an operation. Keep pressing the aim button on the remote control to move the lower to the desired direction. The angle of the horizontal lower will adjust by 6 degrees with each press of the button.

To set the horizontal air flow direction (left-right)
Adjust the vertical louver manually using the lever on the left or right sides of the vertical louver arm (Depending on model). Take care not to catch fingers on the fan, horizontal louver or to damage the vertical louver. When the air conditioner is in operation and the horizontal louver is in a specific position, move the lever at left (or right, depending on model) end of the air outlet to the desired position.

Range
Left and right air flow
! caution
- The aim/swing button will be disabled when the air conditioner is not in operation (including when the TIMER ON is set).
- Do not operate the air conditioner for long periods with the air flow direction set downward in cooling or dry mode. Otherwise, condensation may occur on the surface of the horizontal lower causing moisture to drop on to the floor or an furnishings.
- Do not move the horizontal louver manually. Always use the aim/swing button. If you move this louver manually, it may malfunction during operation. If the louver malfunctions, stop the air conditioner once and restart it.
-
When the air conditioner is started immediately after it was stopped, the horizontal lower might not move for approximately 10 seconds.
-
Open angle of the horizontal lower should not be set too small, as COOLING or HEATING performance may be impaired due to a restricted airflow area.
- Do not operate unit with horizontal lower in closed position.
- When the air conditioner is connected to power (initial power), the horizontal lower may generate a sound for 10 seconds, this is a normal operation.
How to operate the air conditioner Automatic operation
When you set the air conditioner to AUTO mode, it will automatically select cooling, heating (only for reverse cycle models), or fan on any operation depending on what temperature you have selected and the room temperature. Once you select the operating mode, the operating conditions are saved in the unit's microcomputer memory. Thereafter, the air conditioner will start operating under the same conditions when you simply push the CNOIT button on the remote control.
Start
Ensure the unit is plugged in and power is available. The OPERATION indicator on the display panel of the indoor unit starts flashing.
Mode select button (MODE) Press to select AUTO.
2 EMP/TIME button
Set the desired temperature. Normally,
set is between 21 °C/70° to 28°C/84°
- ON/OFF button
When the remote control is pH, push this button to start the air conditioner.
Stop
ON/OFF button
Push this button again to stop the air conditioner.
If the AUTO mode is uncomfortable, you can select the desired conditions manually.
When you select the AUTO mode, you do not have to set the fan speed. The fan speed will be automated by controlled.

AUTO operation
The air conditioner will control room temperature.
automatically around the temperature point set by you.
If the AUTO mode is uncomfortable, you can select desired conditions manually.
Cooling/Heating/Fan only operation
Start
Ensure unit is plugged in and power is available.
The OPERATION lamp on the display panel of the indoor unit starts fleshing.
- Mode select button (MODE) Press to select COOL, HEAT (Not applicable to cooling only models), or FAN ONLY.
2 TEMPS/TIME button
Set the desired temperature, the most comfortable temperature is between 21°C/70°F to 28°C/84°F.
- Fan speed button
Press to select 'AUTO' "LOW", 'MED' and 'HIGH' 4 ON/OFF button
When the remote control is off, push this button to start the air conditioner.
Stop
CN/OFF button
Push this button again to stop the air conditioner.
The FAN ONLY mode does not control temperature.
Therefore, perform only steps 1,3, and 4 to activate this mode.

Drying operation
Start
Ensure unit is plugged in and power is available.
The OPERATION indicator on the display panel of the indoor unit starts flashing.
- Mode select button (MODE)
Press to select DRY.
2 TEMP/TIME button
Push the "TEMP/TIME" button to set the desired temperature.
3 ON/OFF Button
Stop
When the remote control is off, push this button to start the air conditioner.
ON/OFF button
Push this button again to stop the air conditioner.
Note. The fan speed cannot be adjusted when the unit is in ALTO and DRY mode.
- The fan speed will be automatically controlled under dry operation.
- During the dry operation, if the room temperature is lower than 10°C, the compressor stops operating and restarts only when the room temperature is above 12°C.
Eco operation
When you push the ECO button on the remote control during cooling, heating, or AUTO operation, the air conditioner will automatically increase cooling) or decrease (heating) the set temperature by 1°C per hour for the first two hours, then ho d steady for the next 5 hours, after that the unit will stop operation. The fan speed will be automatically controlled. This feature can maintain its most comfortable temperature and save more energy for you.
Fen operation

Fen operation

Timer operation
1 CLOCK/TIMER button
Press the CLOCK/TIMER button, the current timer setting is displayed alongside either the TIMER ON or TIMER OFF indicator, and will flash.
2 TEMP/TIME button
Press to set the desired time.

Each time you push the button, the time moves forward or backward by 10 minutes depending on which direction you press. The time alters as quickly as you press the button.
3 After setting the timer for TIMER ON and TIMER OFF, check that, the TIMER indicator on the display panel of the indoor unit is illuminated.
4 Cance button (CANCEL)
Press the CANCEL button to cancel the timer setting. Preform steps 1, 2 and 3 to change the settings.

When you select the timer operation, the remote control automatically transmits the timer signal to the indoor unit at the specified time.
Therefore, keep the remote control in a location from which it can transmit the signal to the indoor unit properly.
The effective operation time set by remote control is limited within 24 hours.
Examples of timer settings
Timer On
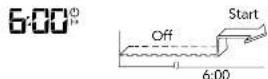
The TIMER ON feature is useful when you want the unit to turn on automatically before you return home. The air conditioner will automatically start operating at the set time.
IMPORTANT: The time will be registered within a 0.5 second period (after pressing the TEMP/TIME button), so you should continue pressing the button until the desired time is established. Otherwise you must repeat the steps again.
Example
To start the air condition at 6:00 p.m.
- Press the CLOCK/TIMLER button, the TIMER ON indicator illuminates and the setting time flashes (if the displayed time is just 6:00, 3 seconds later, the TIMER ON function will be activated automatically).
2 Use the TEMP/TIME button to display 6:00" on the TIMER ON display of the remote control.
- Wait for 3 seconds and the setting time stops flashing and this function is activated. The screen reverts back to displaying the clock time.


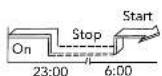
Combined timer
(Setting both ON and OFF timers simultaneously) TIMER OFF → TIMER ON
(On → Stop → Start operation)
This feature is useful when you want to stop the air conditioner after you go to bed, and start it again in the morning when you wake up or when you return home. Example:
Now it is 20.00 hours in the evening. You want to stop the air conditioner at 23.00 and start it again the next morning at 6:00
- Press the CLOCK/TIMER button until the TIMER OFF indicator displays and time setting flashes.
2 Use the TEMP/TIME button to display "23:00" besides the TIMER OFF display.
- Press the CLOCK/TIMER button again to display the TIMER ON indicator.
4 Use the TEMP/TIME button to display "6:00" besides the TIMER ON display.
- Wait for 3 seconds and the setting time stops fleshing and this function is activated. The screen will revert back to displaying the clock time.

(Off → Start → top operation)
This feature is useful when you want to start the air conditioner before you wake up and stop. I after you leave the house.
Example:
To start the air conditioner at 6:00 the next morning, and stop it at 9:00.
Press the CLOCK/TIMER button, the TIMER ON indicator illuminates and the set time flashes.
2 Use the TEMP/TIME button to display "500" besides the TIMER ON display of the remote control
3 Press the CLOCK/TIMER button again to activate the TIMER OFF feature.
4 Use the TEMP/TIME button to display "8.00" besides the TIMER OFF display
5. Wait for 3 seconds and the setting time stops flashing and this function is activated. The screen will revert back to displaying the clock time.


Notes: The timer setting (TIMER ON or TIMER OFF) that in sequence occurs directly after the actual time will be activated first.

When replacing batteries, do not use pie batteries or different types of batteries. Otherwise it may cause the remote control to malfunction.
2. Remove the batteries when not being used for a long time. Otherwise, battery leakage may damage the remote control.
3. To prevent damage, please do not drop the remote control.
4. The average battery life during normal use is approximately 5 months.
The actual battery life is based on operation conditions. Replace the batteries when there is no receiving beep from the indoor unit or if all the indicators are shown on the LCD window during operation.
- Be sure there are no barriers between the remote control and the receiver of the indoor unit otherwise the air condition or will not work.
6 Keep the Remote Control away from all liquids.
7. Protect the Remote Control from high temperatures and exposure to radiation.
8. Keep the indoor receiver out of direct sunlight or the Air Conditioner may malfunction.
9 Keep remote control away from EMI (Electro-Magnetic Interference) generated by other household appliances.
Specification
Model RGD3A/BGEF-ELBR, RGD3A/BGEF-ELBR
| Rated Voltage | 3.0V/Alkaline dry bar teres Lr03 2l |
| Transmission Distance | Per ferrier voltage because (over the transmission distance will be reduced) |
| Environment | -50 C 60 (A-10F - 140CF) |
Digital display button function

(Display off)
When you press the DIGITAL button, the setting temperature display on indoor unit will be shot off.
Press the button again and the display will be activated. This function is useful when you want to shut down the display when you are sleeping.
Setting the clock
Before you start operating the air conditioner, set the clock of the remote control using the procedures given in this section. The clock panel on the remote control will display the time regardless of whether the air conditioner is in use or not.
Initial Setting of the Clock
After batteries are inserted in the remote control, the clock panel will display '1200' and begin to flash.
- TEMP/TIME adjust button
- Press this button to set the time.

Forward Backward
- Each time you press the button, the time moves forward or backward by one minute depending on which side you press.
• The time alters as quickly as you push the button
- Keep pressing the button without relasing, the time moves forward or backward by 10 minutes depending on which side you press.
When the right time is achieved, press the CLOCK/TIMER button to confirm or release the button and wait for 3 seconds, the clock time stops flashing and the clock starts operating.
Clock/Timer button
When the right time is set, press the CLOCK/TIMER button to confirm or release the ▲ or ▼ and wait for 3 seconds, the clock time stops flashing and the clock starts operating.
Note. The time of the CLOCK must be set before the AUTO-TIMER feature can operate. The CLOCK time can not be adjusted after setting the AUTO ON/OFF timer.
Press the CLOCK/TIMER button on the remote control for about 3 seconds, the previous time displays and starts to flash
* Clock accuracy is within 15 seconds per day. To set the new time, follow 1 and 2 of "Initial Setting of the Clock"

caution
Static electricity or other factors (in case of extremely high voltage) can cause the remote control clock to re-initialise. If your remote control is initialised flashing "12:00", readjust the clock before you start operation.
Maintenance
The units are designed to operate for long periods of time with a minimum of maintenance.
However, the following operation must be performed regularly.
| Items | Maintenance Operations | Recommended Frequency |
| Air filter Clean | Every month or more often necessary | |
| Air freshening filter | Changefreplace a new one | Every 5 months |
| Unit casing Clear | Every month or more often necessary | |
| Water tray and resacurant piping | Clean and chose for short-range | Each season before start up* |
| Indoor/outdoor walls Clear | Each season before start up* | |
| Compressor No need |
* This operation must be performed by qualified personnel only.
Note: Supply power must be disconnected before cleaning the indoor unit.
Cleaning the Grille, Case and Remote Control
Switch the system pH before cleaning. To clean, wipe with a soft dry cloth. Do not use bleach or abrasives.

! caution
- A cloth soaked in warm water may be used on the indoor unit if it is very dirty. Then wipe it with a dry cloth.
- Do no, use a chemically treated cloth or duster to clean the unit.
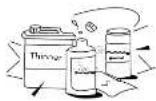
- Do not use benzine, thinner, polishing powder, or similar sovents for cleaning. These may cause the plastic surface to crack or deform.
- Never use water hotter than 40°C to clear the front panel, it could cause deformation of discolouration.
Cleaning the air filter
NOTE: Supply power must be disconnected before cleaning the indoor unit.
A clogged air filter reduces the cooling efficiency of the unit. Please clean the filter every month or more often if necessary.
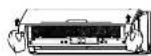
T. Lift the indoor unit front panel up to an angle until it stops with a clicking sound.
2 Take hold of the handle of the air filter and lift it up slightly to take it out from the filter holder, then pull it downwards.
3. Remove the AIR FILTER from the indoor unit. Clean the AIR FILTER with a vacuum cleaner or water, then dry it in cool place.
4. Remove the Air Freshening Filter from its support frame. Optional Filters, Plasma Duster Collector / Silver Ion Filter / Rig Filter / Vitamin C Filter / 3M air purifier Filter from its support frame.
There is slight difference on installation/removing the filter; see the pictures marked Ⓡ and Ⓡ on the left.
- Clean the air freshening filter at least once a month, and replace it every 4.5 months.
- Clean it with a vacuum cleaner, then dry it in a cool place.
! warning
Do not touch the Plasma Dust Collector Filter within 10 minutes after opening the front panel, it may cause an electric shock
5 Install the air freshening filter back into position
6 Insert the upper portion of air filter back into the unit, taking care that the left and right edges line up correctly and place filter into position.
Maintenance
If the air conditioner is not going to be used for some period of time:
Let the fans run for 3-4 hours to allow the device to completely dry out.
2. Switch off the device and pull the power plug. Remove the batteries from the remote control.
3 The outdoor unit requires periodic maintenance and cleaning. Do not attempt to do this yourself. Contact your dealer or servicer.
Checks before operation
- Check that the wiring is not broken off or disconnected.
- Check that the air filter is installed.
- Check if the air outlet or inlet is blocked after the air condition has not been used for a long time.

Filter Handle


! caution
- Do not touch the metal parts of the unit when removing the filter. Injuries can occur when handling sharp metal edges.
- Do not use water to clean inside the air conditioner. Exposure to water can destroy the insulation, leading to possible electric shock.
- When cleaning the unit, first make sure that the power and circuit breaker are turned off
Troubleshooting Tips
Before you contact customer service, check the following first:
The air conditioner does not start. Check the following:
1. Is voltage present at the plug socket outlet?
2. Check the plug fuel
3 is the timer set?
The air conditioner does not provide satisfactory cooling. Check the following:
1 Has an appropriate temperature been set?
2. In the air filter solid? Clean and fit back in place.
3. Are the mets and outlets on the outdoor unit blocked?
4. Are the doors and windows closed?
The remote control does not work. Check the following:
1. Important it only works within a range of 5m from the indoor unit.
2. Are the batteries still OK? Replace if necessary!
3. Have the batteries been inserted correctly? Check that the + and - terminals are in the correct positions!
Stop the air conditioner immediately if one of the following faults occur. Disconnect the power and contact your service center.
1 Fuse blows frequently or circuit breaker trips frequently.
2 Other objects or water penetrate the air conditioner.
3. If one of the malfunction codes appears on the LED display window: E0, E1, E2, E3, E4, E5, F0, F1, F2, F3, F4, F5, F6, F7, F8, F9, F10, F11, F12, F13 or F14.
NOTE: When more than one malfunction occur, pressing any button on the remote control will display the error codes in sequence, and the unit will respond by a beep for each press.
4 Other abnormal situations.
Operation tips
The following events may occur during normal operation
1 Protection of the air conditioner.
Compressor protection
- The compressor can't restart for 3 minutes after it stops Anti-colos air
- The unit is designed not to blow cold air on HEAT mode, when the indoor heat exchanger is in one of the following three situations and the set temperature has not been reached:
A: When heating has just starting.
II) Defrosting.
C) Low temperature heating.
• The indoor or outdoor fan stop running when defrosting. Defrosting
- Frost may be generated on the outdoor unit during heat cycle when outdoor temperature is low and humidity is high resulting in lower heating efficiency of the air conditioner.
- During this condition the air conditioner will stop seating operation and start deforming automatically.
- The time to defrost may vary from 4 to 10 minutes according to the outdoor temperature and the amount of frost buildup on the outdoor unit.
2 A white mist coming out from the indoor unit
- A white mist may be generated due to a large temperature difference between air inlet and air outlet on COCL mode in an indoor environment that has a high relative humidity.
- A white mist may be generated due to moisture generated from the defrosting process when the air conditioner restarts in HEAT mode operation after defrosting.
3 Low noise of the air conditioner
- You may hear a low hissing sound when the compressor is running or has just stopped running.
This sound is the sound of the refrigerant flowing or coming to a stop
- You can also hear a low "squeak" sound when the compression is running or has just stopped running. This is caused by heat expansion and cold contraction of the plastic parts in the unit when the temperature is changing.
• A noise may be heard due to lower restoring so its original position when power is first turned on.
4 Dust is blown out from the indoor unit.
This is a normal condition when the air conditioner has not been used for a long time or during first use of the unit.
5 A peculiar smell comes out from the indoor unit.
This is caused by the indoor unit circulating smells permeated from building material, from furniture, or smoke.
6 The air conditioner turns to FAN only mode from COOL or HEAT mode.
When indoor temperature reaches the temperature setting on air conditioner, the compressor will stop automatically, and the air conditioner turns to FAN only mode.
The compressor will start again when the indoor temperature rises on COOL mode or falls on HEAT mode to the set point.
7 Dripping water may generate on the surface of the indoor unit when cooling in a high relative humidity (relative humidity higher than 80%); Adjust the horizontal level to the maximum air outlet position and select HIGH fan speed.
B Heating mode
The air conditioner draws in heat from the outdoor unit and releases it via the indoor unit during heating operation. When the outdoor temperature falls, heat drawn in by the air conditioner decreases accordingly. At the same time, heat loading of the air conditioner increases due to larger differences between indoor and outdoor temperature.
If a comfortable temperature can't be achieved by the air conditioner, we suggest you use a supplementary heating device.
9 Auto-restart function
Power failure during operation will stop the unit completely.
For the unit without Auto-restart feature, when the power restores, the OPERATION indicator on the indoor unit starts flashing. To restart the operation, push the ON/OFF button on the remote control. For the unit with Auto-restart feature, when the power restores, after a delay of 3 minutes to protect the compressor the unit restarts automatically with all the previous settings preserved by the memory function.
- Lightning or a car wireless telephone operating nearby may cause the unit to malfunction. Disconnect the unit from power and then to connect the unit with power again. Push the ON/OFF button on the remote control to restart operation.
Normal function of the air conditioner
The following symptoms do not indicate air conditioner malfunction.
| Problem Cause | |
| After pressing the start key, the unit is not started by the microprocessor for 3 minutes. | It is for the protection of the compressor, please wait. |
| Low noise can be heard | The cicking noise are caused by the contractor and expansion of the front panel to response to temperature differences. |
| The cicking noise may be caused by the fan or the compressor when walking on it. | |
| You may near missing water: This is not a fault. The refrigerant in the air conditioner may have happened. | |
| Cold smell in the room | The air conditioner also circulates the transportation from the walls, carrots, smoke, furniture and clothing in the air. |
| Water drops from the indoor unit | Dripping water may generate on the surface of the indoor unit when cooling in a high relative humidity (red more than 80%). Adjust the horizontal lower to the maximum air outlet position and select HOH fan speed. |
| Air is not blown out immediately in heat mode. | The unit is designed not to blow mild air on HEAT inside, when the indoor heat exchanger is one of the following three structures and the set temperature has not been reached: A) When feeling her just started B) Defrosting C) Low temperature too heating. The indoor or outdoor fan stop turning when defrosting (cooling and heating modes only). |
| The unit turns to Fan mode from cool or heat mode automatically | What the warm temperature reaches the temperature setting on air conditioner, the compressor will stop automatically, and the air conditioner turns to PAN only made. The compressor will start again when the warm temperature deal or COOL mode or falls on HEAT mode (for cooling & heating models only) to the sat point. |
Notes
Electrolux Warranty
FOR GAI PR IN AUSTRAI A AND NEW ZEAL AND
APPLANCE KILLVNA CHS-PLI SYSTEM AIR COND UNLR
This document sets out the terms and conditions of the product warranties for Electrolux Appliances. It is an important document. Please keep it with your proof of purchase documents in a safe place for future reference should you require service for your Appliance.
(1) 'acceptable quality' se referred to in clause 10 of this warranty has the same meaning referred to in the ACL
(b) ACI means Trade Phillips Amendment (Australian Consumer
and "Appliance" means any Electrous product purchased by you accompanied by this document.
(d) ABC means Electrical manufacture serviced centres;
(2) Electrical Electrical Engineering Products By (MCF) 103 O-Hordan Street, Massor, NEW 2020. AIN 51 C04 /92-341 In respect of Appliances purchased in Australia and Electrical (NZ) United of 3-5 Nell Burgess Road, Mount Wellington, in respect of Appliances purchased in New Zealand
(1) "major failure" as referred to in cause. 10 of this warranty has the same meaning referred to in the AG, and includes a situation when an Appliance cannot be repaired or it is uncomfortable for Electrify, at its discretion, to repair an Appliance during the Warranty Period, at "Warranty Period" means.
(3) which the Appliance is used for personal, concrete or household use (i.e., normal single family use) as well out in the instruction manual. The Appliance is warranted signs, manufacturing defects in Australia for 24 months and in New Zealand for the period of 24 months, following the issue of original purchase of the Appliance and a number of 35 months in Australia. More is evidence provided to Ecrolux that the appliance was related by a licensed room or conditioner installer; in New Zealand it there is evidence that the Appliance was installed according to the Ecrolux installation guidance which can be inspected on the Ecrolux website.
(4) Where the Appliance is used for commercial purposes (including being used to directly assist a business or where the Appliance is used in a multi-family commune or share-type environment, the Appliances will then be warranted against manufacturing defects in Australia for 3 months and in New Zealand for 6 months, following the date of original purchase of the Appliance.
(1) "you" means the purchaser of the Appliance not having purchased the Appliance for te-els, and "you" has a corresponding meeting.
-
This warranty only applies to Appliances purchase and used in Australia or New Zealand and is in addition to land does not exclude, restrict, or modify in any way any non-exercisable statutory warranties in Australia or New Zealand.
-
During the Warranty Period Electrolux or its ASO will not no extra charge if your Appliance is ready to access for service, without special equipment and subject to these terms and conditions, repair or replace any parts which I consider to be defective. Electrolux or its ASO may use manufactured parts to retail your Appliance. You agree that any replaced Appliances or parts become the property of Hostelux. This warranty does not apply to light gloves, batteries, filters or solar panel shops.
-
Parts and Appliances not supplied by Electrolux are no, covered by this warranty.
-
You will bear the cost of transportation, travel and delivery of the Appliance to and from Electrolux or its ASC. If you make outside of the service area, you will bear the cost of:
(i) Transportation and delivery of the Appliance to and from Fibroplux or its ASC.
In all instances, unless the Appliance is transported by Electrolux or an Electricity uncorrected representative. The Appliance is transported at the owner's case and risk while in transit to and from Electrolux or its ASC. 6. Proof of purchase is required before you can make a claim under this warranty.
- You may not make a claim under this warranty unless the defect claimed is due to faulty or defective parts or workmanship. Electrolux is not liable in the following situations (which are not exhaustive):
(a) The Appliance is damaged by:
it accident
(1) misuse of abuse, including failure to properly maintain or service
(10) normal wear and tear
N. power ranges, electrical storm damage or increased power supply
(M) incomplete or improper retaliation
M. In contrast, by proper or representative operation
(### or v###)
(54) Failure to comply with any additional instructions supplied with the Appliance;
(b) the Appliance is modified without authority from Electrolux in writing
(c) The Acpliance's social number or warranty seal has been removed or defeces.
The Appliance was serviced or received by anyone other than Electrolux, an authorized repair or ASC.
B. This warranty, the contract to which it relates and the relationship between you and Lecitoux are governed by the law applicable where the Appliance was purchased. Where the Acprance was purchased in New Zealand for business purposes the Consumer Guarantee Act does not apply.
-
To the extent permitted by law, Executive excludes all warranties and facilities (other than se contained in this document; including liability for any idea or damage whether direct or indirect arising from your purchase, use or non-use of the Appliance
-
For Appliances and services provided by Boctelux in Australia, the Appliances come with a guarantee by Electrolux that cannot be excluded under the Australian Consumer Law. You are entitled to a replacement or refund for a major failure end for compensation for any other reasonably foreseeable loss or damage. You are also entitled to have the Appliances repaired or replaced it. The Appliances fail to be of acceptable quality and the failure cost no. amount to a major failure. The benefit is to you given by this warranty are in addition to your other rights and remedies under a law in relation to the Appliances or services to which the warranty relates
-
At all times during the Warranty Policy, a circular shall, at its discretion, determines whether repair, replacement or reuse will apply if an Appliance has a valid warranty claim applicable to it.
-
For Appliances and services provided by Electrolux in New Zealand, the Appliances come with a guarantee by Electrolux pursuant to the provisions of the Consumer Guarantees Act, the Sale of Goods Act and the Hair Trading Act.
-
To encourage about claiming under the warranty, please follow these steps (i) carefully check the operating instructions, user manual and the terms of this warranty;
(1) have the model and serial number of the Appliance available; (2) have the proof of purchase (eg an invoice) available; (3) telephone the numbers shown below.
- You accept that if you make a warranty claim, Electrolux and its ASC may exchange information in relation to you to check Electrolux to most its obligations under this warranty.
Important Notice
Before calling for service, please ensure that the steps listed in point 13 above have been followed.
| FOR SERVICEor to find the substance of your neareststate service centre in AustraliaPLEASE CALL 13 13:49For the work of local and outside (a) | SERVICE AUSTRALIAElectroluxELECTROUX HOVE PRODUCTSwww.electrolux.com.au | FOR SPARE PARTSor to find the substance of your neareststate service centre in AustraliaPLEASE CALL 13 13:50For the work of local and outside (a) |
| FOR SERVICEor to find the substance of your nearestauthor and service centre in New ZealandFREE CALL 0800 10:66:10For next session | SERVICE NEW ZEALANDElectroluxELECTROUX HOVE PRODUCTSwww.electrolux.com.au | FOR SPARE PARTSor to find the substance of your neareststate service centre in New ZealandFREE CALL 0800 10:66:20For next session |
(05542)ao_4q11
If you'd like further information about Kelvinator appliances, please visit your retailer, phone or email our Customer Care team or visit our website.
telephone: 1300 363 640
fax: 1800 350 067
email: customercare@electrolux.com.au
web: www.kelvinator.com.au
Kelvinator. We are part of the Electrolux family.
Share more of our thinking at www.electrolux.com.au
- Inverter Split-type Room Air Conditioner
- User Manual
- Congratulations Contents
- environmental tip
- Information on disposal for users
- caution
- Conditions of use
- Safety Instructions
- Operating instructions
- Using the remote control
- How to operate the air conditioner
- Maintenance
- Troubleshooting tips
- Warranty
- Important notes
- Safety precautions
- warning
- tips and Information
- Prior to Operation
- Preparing for operation
- Usage
- Cleaning and maintenance
- Service
- Parts names
- Indoor unit
- Outdoor unit
- LED display panel on indoor device
- Auto indicator
- Timer indicator
- Defrost indicator
- Temperature indicator
- Operation frequency display
- Additional features
- Eco mode:
- Auto-Restart function:
- Easy-cleaned panel:
- ! caution
- Manual operation
- Optimal operation
- Location of the remote control
- Replacing batteries
- MODE Select Button:
- ON/OFF Button:
- CLOCK/TIMER Button
- CANCEL Button:
- FOLLOW ME Button (not available for KSV70HRB and KSV80HRB):
- TURSO Button:
- Display on/off Button:
- B TEMP/TIME Button:
- FAN SPEED Button:
- SWING Button:
- ECO Button:
- Indicators on remote control
- 88°E SET
- Temp display
- 88%
- Humidity display
- [NO TEXT]
- Transmission Indicator
- ①
- ON/OFF display
- [Non-Text]
- Fan speed display
- i
- FOLLOW ME display
- [Figure]
- ECO Display
- 28:88
- Time display
- →
- Timer display
- AUTO
- Mode display
- Airflow direction control
- To set the horizontal air flow direction (left-right)
- How to operate the air conditioner Automatic operation
- Start
- Stop
- AUTO operation
- Cooling/Heating/Fan only operation
- Drying operation
- Eco operation
- Timer operation
- Timer On
- Example
- Combined timer
- Setting the clock
- Initial Setting of the Clock
- Clock/Timer button
- Cleaning the air filter
- ! warning
- Checks before operation
- Operation tips
- Dust is blown out from the indoor unit.
- A peculiar smell comes out from the indoor unit.
- The air conditioner turns to FAN only mode from COOL or HEAT mode.
- B Heating mode
- Auto-restart function
- Normal function of the air conditioner
- Notes
- Electrolux Warranty
Brand : KELVINATOR
Model : KSV35HRB
Category : Air Conditioning