K24FM - Monitor EKO - Free user manual and instructions
Find the device manual for free K24FM EKO in PDF.


| Product Type | 24-inch LED Monitor |
| Screen Size | 24 inches (61 cm diagonal) |
| Resolution | 1920 x 1080 (Full HD) |
| Aspect Ratio | 16:9 |
| Refresh Rate | 60 Hz |
| Response Time | 5 ms (typical) |
| Brightness | 250 cd/m² |
| Contrast Ratio | 1000:1 (static) |
| Viewing Angle | 178° / 178° (horizontal/vertical) |
| Connectivity | HDMI, VGA, 3.5 mm audio out |
| Power Consumption | 25 W (typical), 0.5 W (standby) |
| Power Supply | External power adapter, 100-240 V AC, 50/60 Hz |
| Dimensions (with stand) | 540 x 400 x 200 mm (W x H x D) |
| Weight (with stand) | 3.5 kg |
| VESA Mount | 100 x 100 mm |
| Tilt Adjustment | -5° to +20° |
| Features | Flicker-free technology, Blue light filter, On-screen display (OSD) |
| Included Accessories | Power adapter, HDMI cable, VGA cable, Quick start guide |
| Cleaning Instructions | Wipe with dry soft cloth; do not use liquid cleaners or sprays |
| Safety | CE, RoHS compliant; do not expose to moisture or heat |
| Spare Parts Availability | Contact EKO support for power adapter or stand replacement |
| Reparability | Repairs should be carried out by qualified personnel only |
Frequently Asked Questions - K24FM EKO
User questions about K24FM EKO
0 question about this device. Answer the ones you know or ask your own.
Ask a new question about this device
Download the instructions for your Monitor in PDF format for free! Find your manual K24FM - EKO and take your electronic device back in hand. On this page are published all the documents necessary for the use of your device. K24FM by EKO.
USER MANUAL K24FM EKO
Please read this manual carefully before using, and keep it for future reference.
natural_image
Abstract light burst pattern with magenta and blue streaks against a dark background (no text or symbols)
CUSTOMER SUPPORT
This product comes with warranty. For all product related enquiries or technical questions please use the following to get in touch:

02 8279 8606

help@eko-entertainment.com.au

www.eko-entertainment.com.au or by scanning the QR Code.
CONTENTS
| General | Safety | ||
| Installation | |||
| Attaching | the | Stand | |
| Wall or Arm Mounting Instructions 9 | |||
| Controls | and | Connections | |
| Operation | |||
| Brightness | 12 | ||
| Image | |||
| Color | Temp. | ||
| Language | 16 | ||
| Reset | 17 | ||
| MISC. | 18 | ||
| Specifications | 19 | ||
| Customer | Helpline | Last | |
4
13
GENERAL SAFETY
Read this manual thoroughly before you start using the Monitor.
Store this manual, the completed warranty card, your receipt and the product packaging.
The safety precautions instructions reduces the risk of fire, electric shock and injury when correctly complied to.
Please follow all instructions and take notice of all warnings.
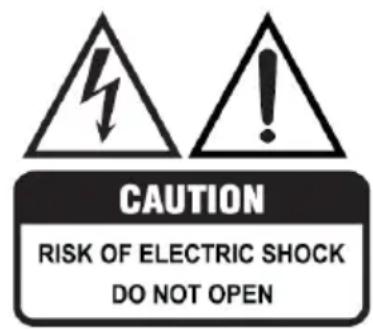
The cover (or back) of the unit should not be removed to prevent risk of electric shock.
This unit must be serviced by a qualified service personnel only.
natural_image
Warning symbol of a lightning bolt inside a triangle (no text or numbers)
The lightning flash with symbol within the triangle is intended to warn you of a non-insulated dangerous voltage in the product's enclosure that could be of sufficient magnitude to generate a risk of electric shock to persons.
The exclamation point within the triangle is intended to warn you to the presence of important operating and maintenance instructions in the documents included with the product.
IMPORTANT INFORMATION
The lightning flash symbol within the triangle is intended to warn you of non-insulated dangerous voltage the product's enclosure that could be of sufficient magnitude to generate a risk of electric shock to persons.
- Using Cabinets or stands recommended by the manufacturer of the monitor.
- Only using furniture that can safely support the Products.
- Ensure the Product is not overhanging the edge of the supporting furniture.
- Do not place the product on a high furniture without securing both the furniture and the product to a stable support.
- Do not place the product on cloth or other conductive materials.
- Warn children of the dangers of climbing on furniture to reach the monitor or its controls and to call for an adult to assist.
GENERAL SAFETY (CONT.)
IMPORTANT INFORMATION
- Do not expose this appliance to rain or moisture as it may result in fire or an electric shock hazard
- Do not tamper or change or modify the product in any way.
- Only use Accessories outlined and recommended by the manufacturer.
- Please do not expose the product to splashing or water contact
- Please do not place any object on top of the product including objects filled with liquids such as vases.
Installation
Please follow instruction when installing this product in accordance with the instruction manual. This product must be positioned in a sufficiently stable location, it can be potentially hazardous due to falling and can cause injury, particularly to children if it positioned incorrectly.
- Before installing this Monitor, make sure your outlet voltage corresponds to the voltage stated on the product rating label
- Do not plug several devices into the same outlet. Doing so may cause the outlet to overheat and start a fire. Make sure the outlet is readily accessible during operation of the equipment.
- Do not cover the ventilation openings of the product with items such as newspapers, tablecloths, curtains etc or insert objects into the slots available on the products. As this could result in the product temperature rising and could cause a fire.
- If you notice any unusual odors or smoke around the unit, immediately disconnect the unit from the outlet and contact the service center. Failure to do so may result in fire or electric shock.
- When not using the unit for long periods of time or when you are moving the unit please ensure to disconnect the power cord from the adapter.
GENERAL SAFETY (CONT.)
- Please beware that Dust could accumulate over time on the unit and cause it to generate heat and or deteriorate insulation, which in turn may result in an electrical fire.
- The product is not intended for use by persons (including children) with reduced physical, sensory or mental capabilities, or young children of any age, They must be supervised product by a person responsible for their safety.
- To maintain the product do not use any chemical or cleaning agent or wet cloth, please only ensure to utilize a dry cloth to wipe it down from marks or dust and only after unplugging the product from the power socket.
- Please ensure to contact our call center for any repair or service required for the products.
- Make sure to always carry Monitor from the sides, always be sure to have assistance by another person. Do not carry the Monitor from the middle.
WARNING!
Toppling furniture and Monitor's can cause serious injury or death.
If a monitor is not positioned in a sufficiently stable location, it can be potentially hazardous due to falling. Many injuries, particularly to children, can be avoided by taking simple precautions such as:
- Using cabinets or stands recommended by the manufacturer of the monitor.
- Only using furniture that can safely support the monitor.
- Ensuring the monitor is not overhanging the edge of the supporting furniture.
- Not placing the monitor on tall furniture (for example, cupboards or bookcases) without anchoring both the furniture and the monitor to a suitable support.
- Not standing the monitor on cloth or other materials placed between the monitor and supporting furniture.
- Educating children about the dangers of climbing on furniture to reach the monitor or its controls.
GENERAL SAFETY (CONT.)
Please make sure upon positioning this product, the place is:
- Not wet or damp and Well ventilated
- Away from direct sunlight or heaters.
- Away from splashes or food.
- Protected from excessive dust or grease.
- Do not install this equipment in a confined space such as a bookcase or similar unit.
- Do not install the Monitor set near heat sources such as radiators, stoves or other audio visual equipment that produce heat.
- Do not place containers with liquids, if liquid falls inside the products it may result in short-circuit, fire or electric shock.
- Do not place small metallic objects on top of the unit. Metal object falls inside the product it may result in short-circuit, fire or electric shock.
- Do not use or store flammable or combustible materials near the unit. Doing so may result in fire or explosion. Do not place any naked flame sources, such as lit candles, cigarettes or incense sticks on top of the Monitor set.
• Install the unit at a reasonable distance from the wall to ensure sufficient ventilation.

HIGH-DEFINITION MULTIMEDIA INTERFACE
The terms HDMI, HDMI High-Definition Multimedia Interface, and the HDMI Logo are trademarks or registered trademarks of HDMI Licensing Administrator, Inc.
INSTALLATION
Install the stand as described below, or if you want to mount it to a wall, please contact a professional installer. Please ensure the monitor is not plugged into the wall socket and furthermore we recommend to get another person to assist in the following task.
Attaching the stand
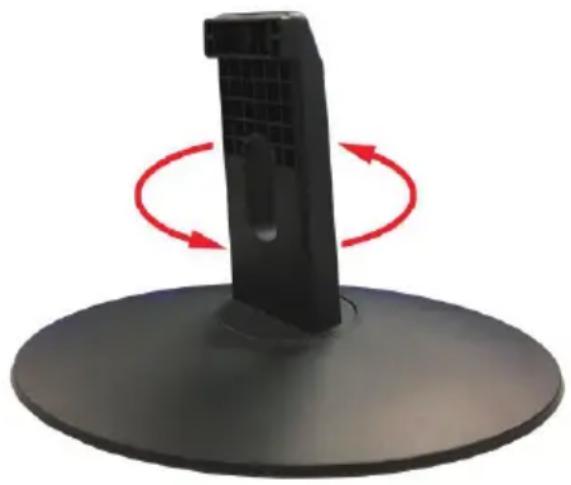
Step 1
Insert the neck stand into the base with the front of the neck facing left at a 45 degree angle and twist the neck stand counter-clockwise until you hear a clear sound and the neck stand is facing forward aligned with the base.
natural_image
Black plastic stand with red circular arrows indicating rotational motion (no text or symbols)Step 2
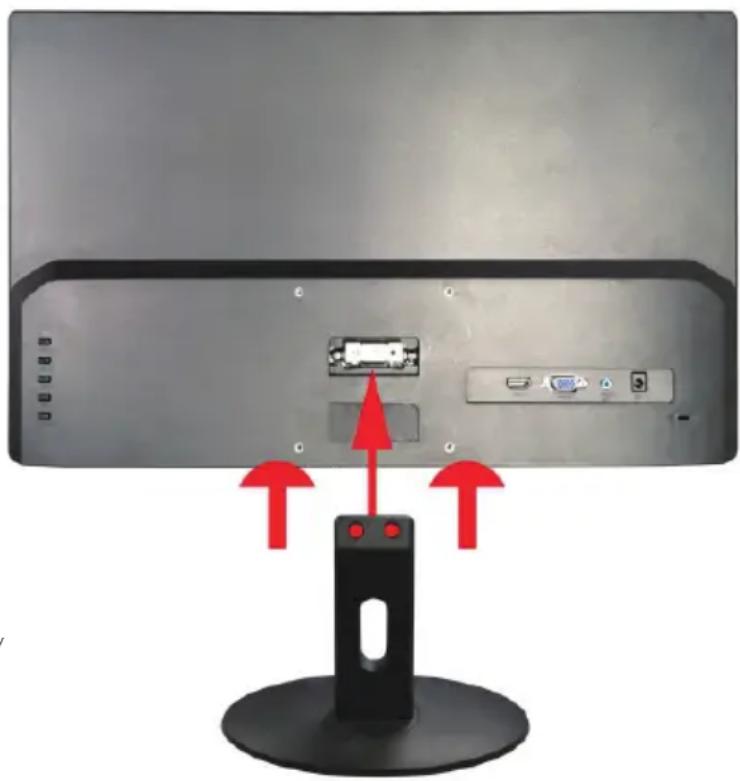
Lay the monitor flat on the surface and stick the Neck Stand + Base assembly into the back of the monitor. Secure the top of the neck by screwing in 2 x screws.
natural_image
Back view of a computer monitor showing internal components and a red arrow indicating direction (no text or symbols)CAUTION! Do not apply excessive as this may damage the screw holes.
INSTALLATION (CONT.)
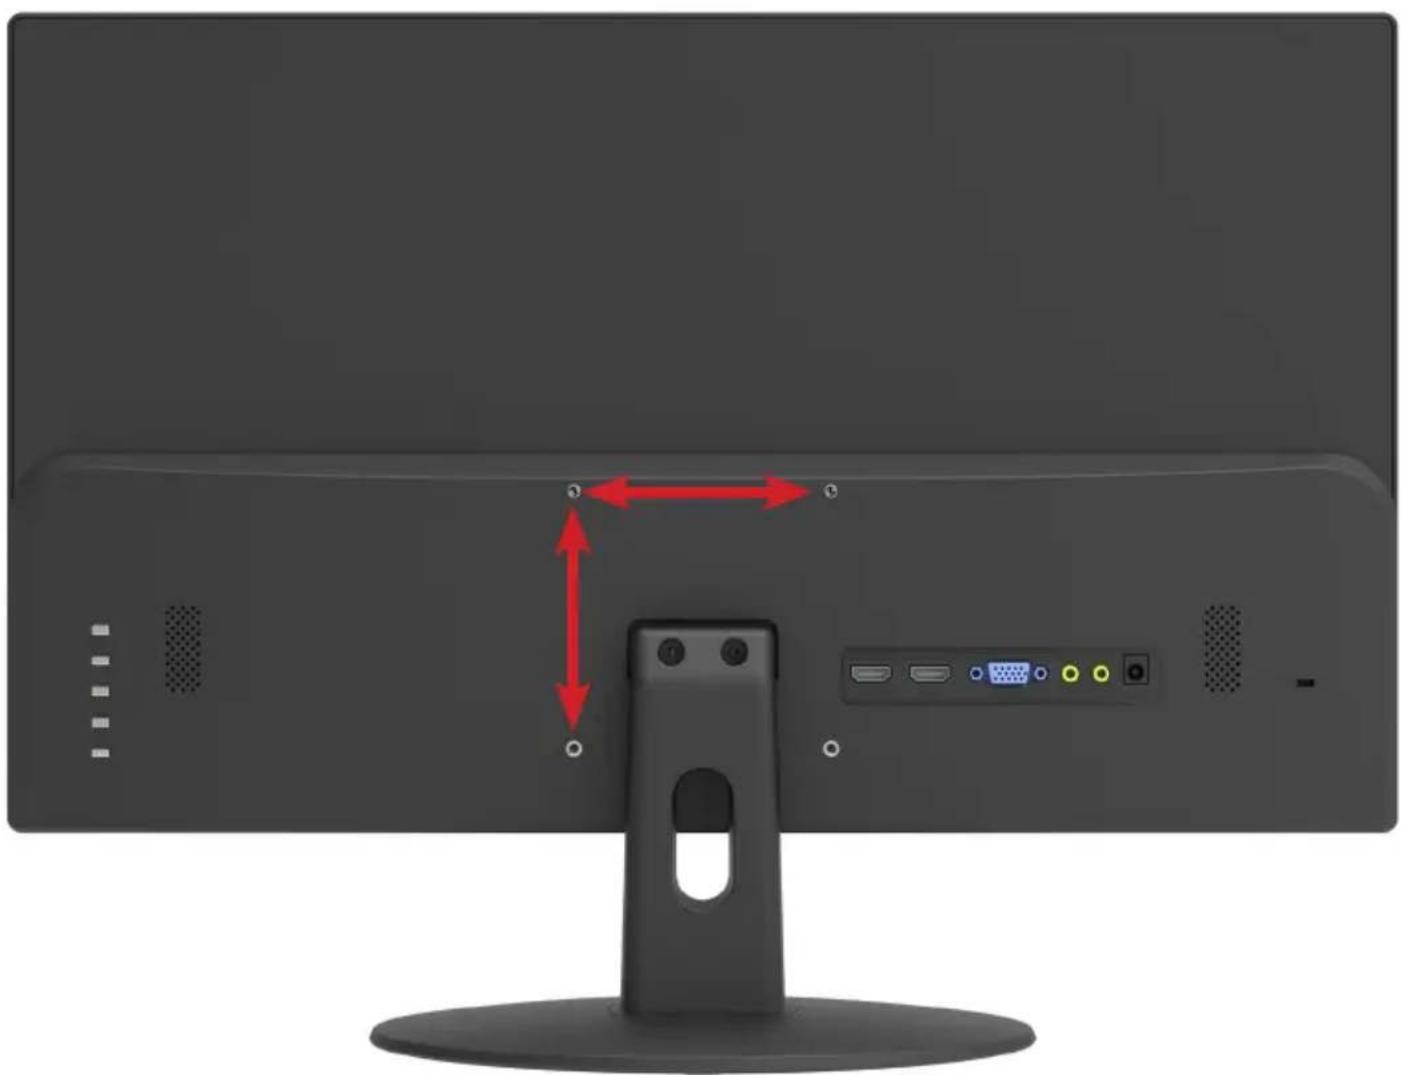
Wall OR Monitor Arm Mounting Instructions
Please ensure the Monitor is not plugged into the wall socket and furthermore we recommend to get another person to assist in the following task.
• We recommend you use a professional installer as we assume no liability for any eventual damage to the product or injury to yourself if you mount the Monitor on your own.
BACK OF MONITOR
VESA PATTERN: 100 (w) x 100 (h) mm
natural_image
Back view of a computer monitor with red double-headed arrows indicating alignment or bidirectional movement, no text or symbols present.CONTROLS AND CONNECTIONS
natural_image
Back view of a computer monitor with a blue circular icon pointing to a small screen (no text or symbols visible)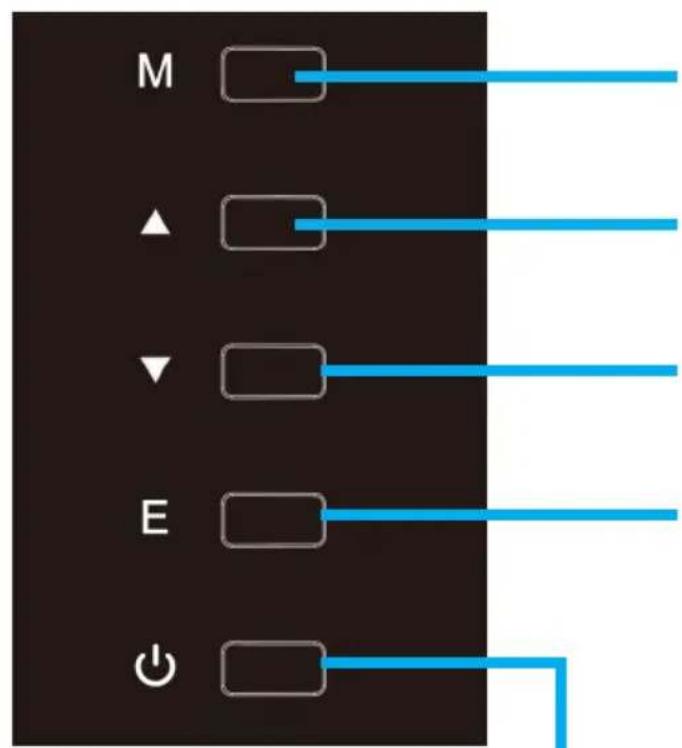
flowchart
graph TD
    M["Input M"] --> A["Control Block"]
    ▲[Input ▲] --> B["Control Block"]
    ▼[Input ▼] --> C["Control Block"]
    E["Input E"] --> F["Control Block"]
    Power["Power Symbol"] --> G["Output G"]
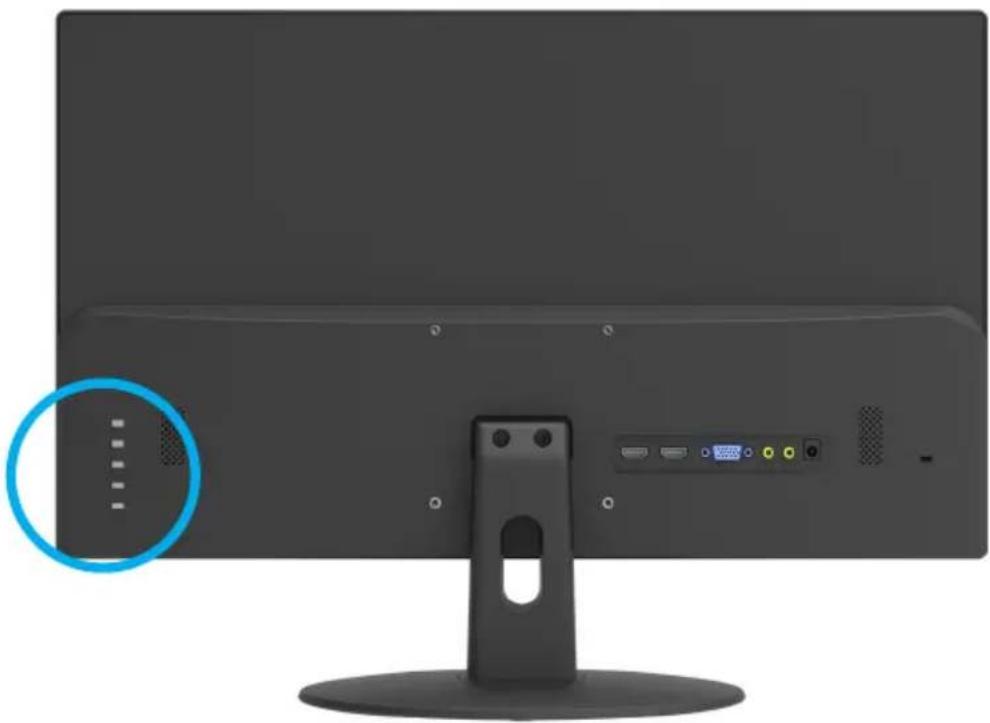
M - MENU / SELECT
UP / VOLUME +
DOWN / BRIGHTNESS
E - EXIT / AUTO FUNCTION
When you encounter blurry screen, blurred letters or screen flicker while using device, Press AUTO button to improve resolution
STANDBY POWER OFF/ON
CONTROLS AND CONNECTIONS
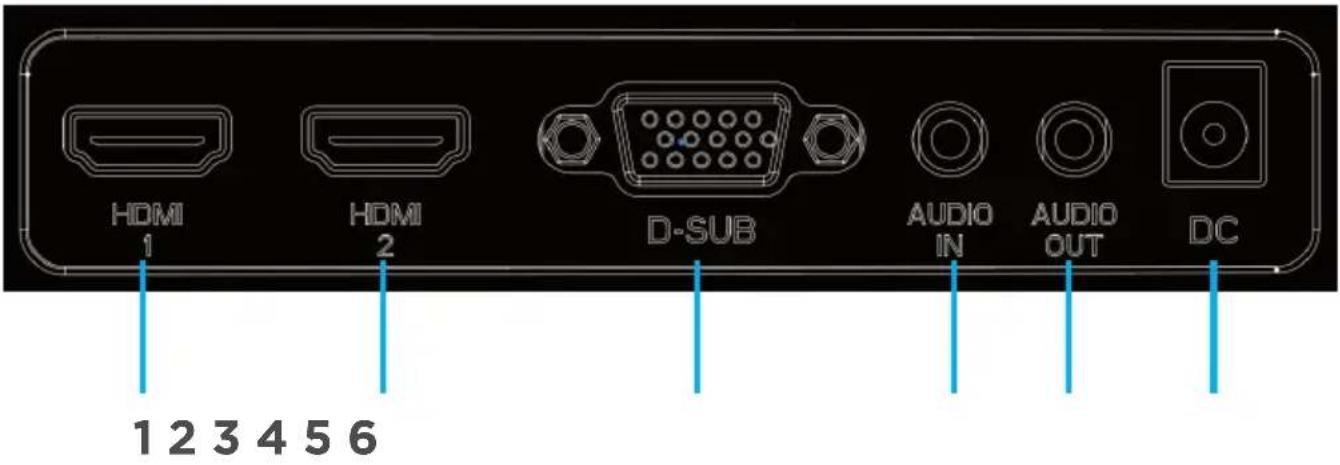
- HDMI 1
- HDMI 2
- D-SUB (VGA)
- AUDIO IN (HEADPHONES)
- AUDIO OUT (EXTERNAL SPEAKERS)
- DC IN (POWER)
OPERATION
LUMINENCE
Press MENU button, and the main menu page will appear as follows: (BRIGHTNESS MENU), and then press MENU button to enter.
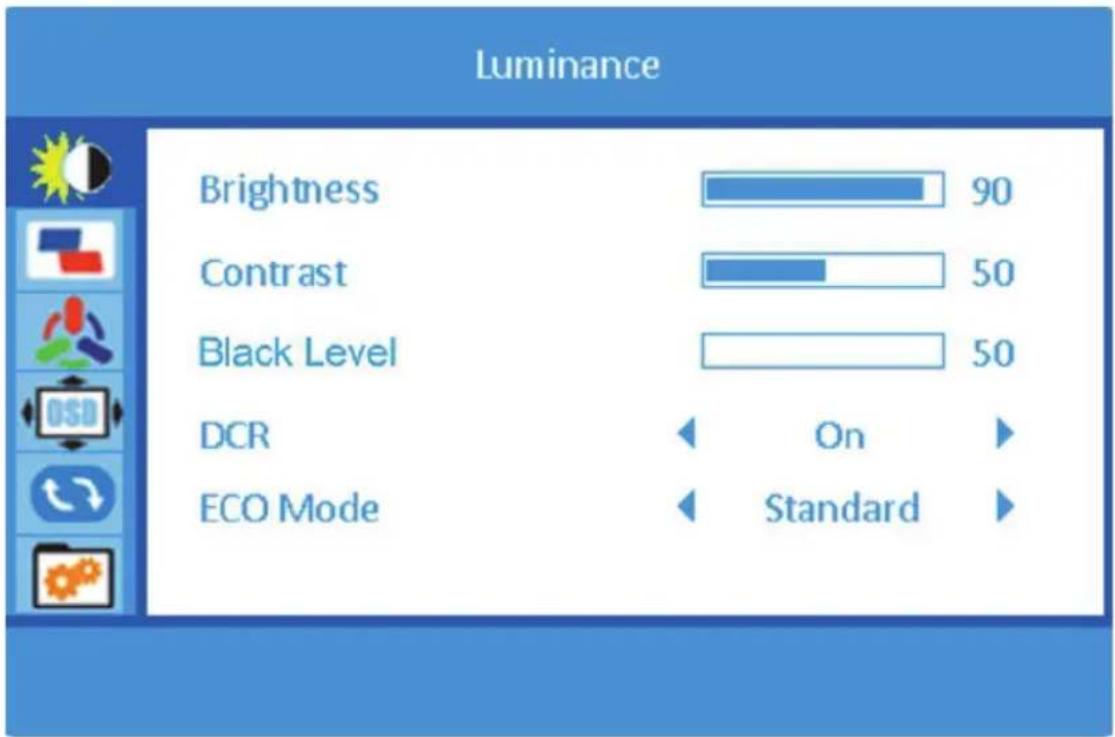
BRIGHTNESS
CONTRAST
BLACK LEVEL
DCR
ECO MODE
To adjust the brightness of the screen.
To adjust the contrast of the screen.
Adjusts and controls the detail in dark colors.
Automatically judge the overall brightness of the screen
To adjust energy consumption of the display
OPERATION (CONT.)
IMAGE
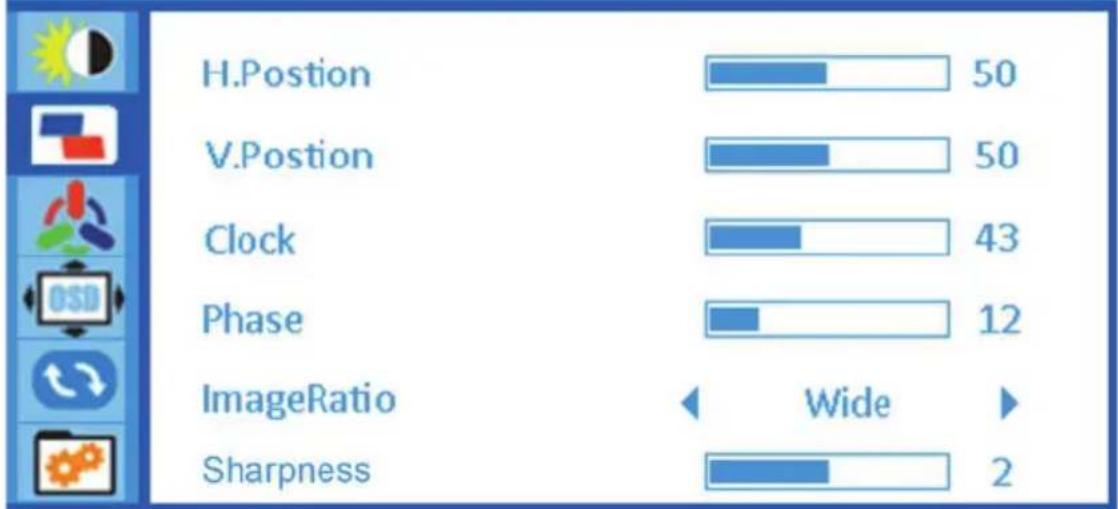
Press ▼/▲ button to select IMAGE, and then press MENU button to confirm your selection. This item can adjust the configuration automatically.
Image Setup
bar
| Metric | Value | | :--- | :--- | | H.Postion | 50 | | V.Postion | 50 | | Clock | 43 | | Phase | 12 | | ImageRatio | Wide | | Sharpness | 2 |H. POSITION To move image left and right.
V. POSITION To move image up and down.
CLOCK To minimize any vertical bars or stripes visible on the screen background.
The horizontal screen size will also change.
PHASE To adjust the focus of the display, this item allows you to remove any horizontal noise and clear or sharpen the image of characters.
IMAGE RATIO Wide: Adjust the image ratio to widescreen mode.
4:3 : Adjust the image ratio to 4:3 mode
SHARPNESS To adjust the sharpness of the picture.
OPERATION (CONT.)
COLOUR TEMP.
Press ▼/▲ button to select Color in the main menu, and then press MENU button to enter.
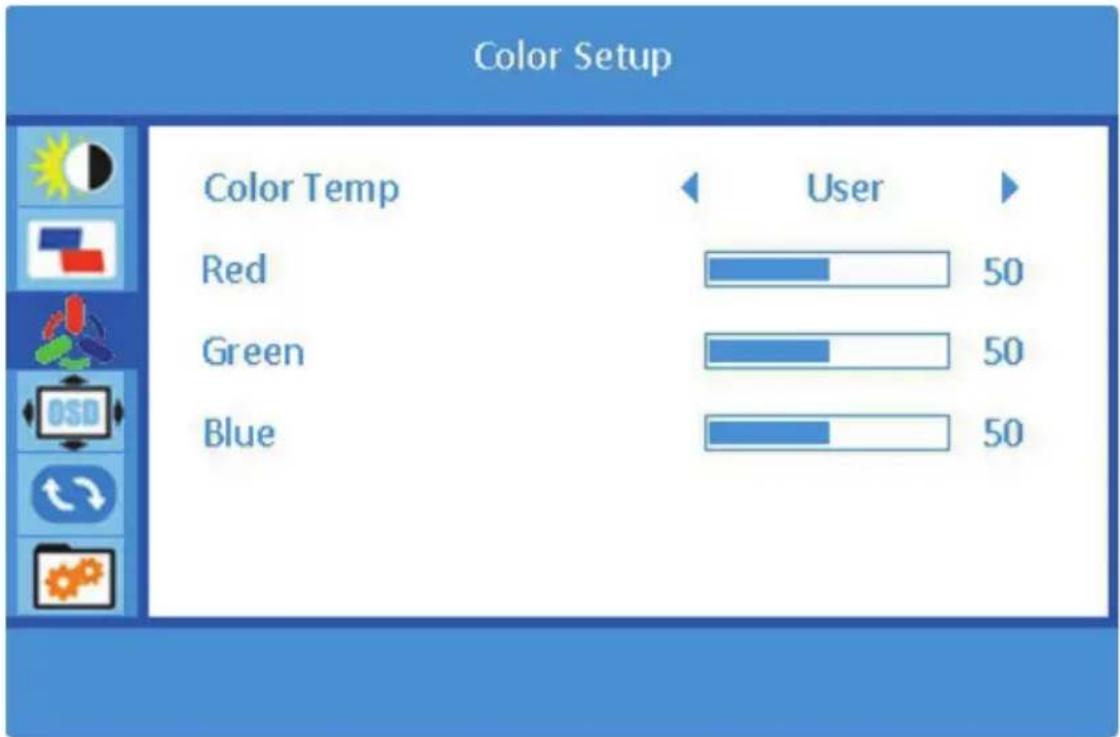
COLOR TEMP
User: To move image left and right. (RED, GREEN, BLUE)
Warm: Set to warm color temperature.
Cool: Set to cool color temperature.
Normal: Set to normal color temperature.
OPERATION (CONT.)
OSD
Press ▼/▲ button to select Color in the main menu, and then press MENU button to enter.
OSD Setup
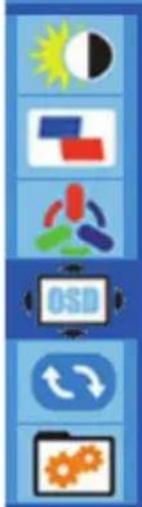
Language
H.Postion
V. Postion
Timeout
Tansparence
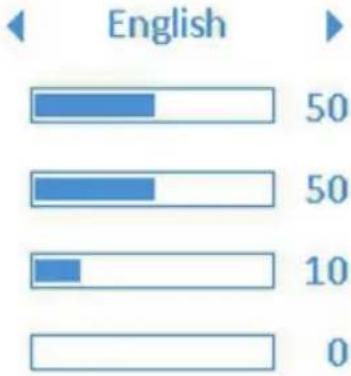
bar
English | Category | Value | |---|---| | 0 | 50 | | 1 | 50 | | 2 | 10 | | 3 | 0 |LANGUAGE Select the language displayed in the OSD menu.
H.POSTION Adjust the horizontal position of the OSD.
V.POSSION Adjust the vertical position of the OSD.
TIMEOUT Adjust OSD display time.
TANSPARENCE Adjust OSD transparency.
OPERATION (CONT.)
RESET
Press ▼/▲ button to selec reset in the main menu, and then press MENU button to enter.
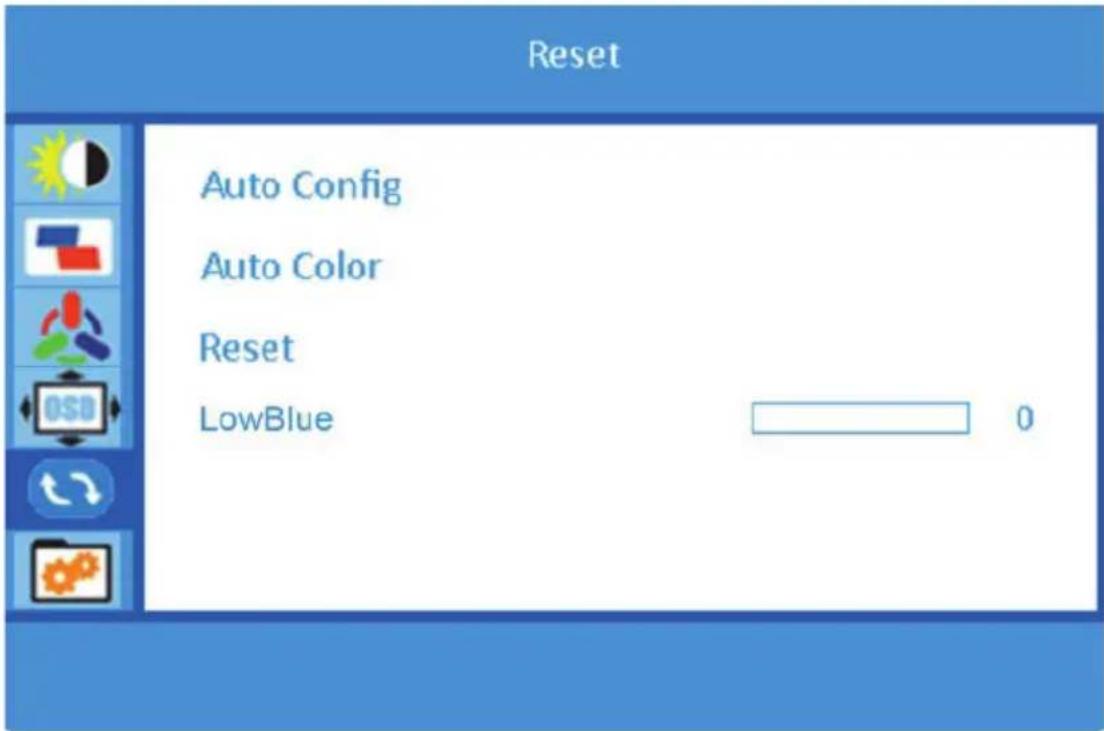
AUTO CONFIG Automatically adjust the image.
AUTO COLOR Automatically adjust the color.
RESET Restore factory settings.
LOWBLUE Adjusts the blue light value to reduce strain on eyes.
OPERATION (CONT.)
RESET
Press ▼/▲ button to selec reset in the main menu, and then press MENU button to enter.
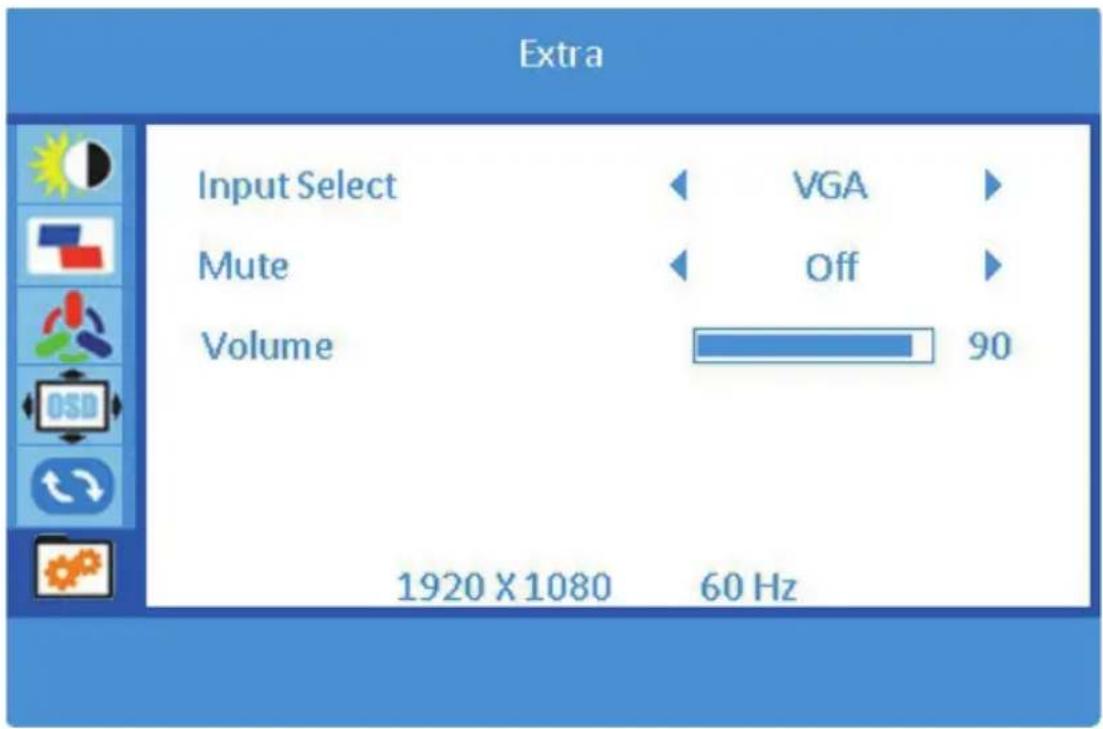
INPUT SELECT VGA: Analog signal input.
HDMI: HDMI signal input.
MUTE Turn off or turn on the sound.
VOLUME Adjust speaker volume(Only available for the model with audio)
SPECIFICATIONS
| Resolution 1920 x 1080 | ||
| Display Colours 16.7 Million | ||
| Contrast ratio: 4000 : 1 | ||
| Brightness 250 cd/m2 | ||
| Refresh Rate 75Hz | ||
| Power Source DC 12V 2.5A | ||
| Power Consumption 30W | ||
| Dimensions | With stand: 548.4 (w) × 178.4 (d) × 402.1 (h) mm | |
| Without stand: 548.4 (w) × 32.5 (d) × 322.9 (h) mm | ||
| Accessories | 1 x Instruction Manual Monitor Stand with screws | |
| 1 x Warranty Card 1 x HDMI Cable | ||
| 1 x Power Adaptor | ||
EKO
CUSTOMER SUPPORT:
help@eko-entertainment.com.au
DISTRIBUTED BY:
Ayonz Pty Ltd
- CUSTOMER SUPPORT
- CONTENTS
- GENERAL SAFETY
- IMPORTANT INFORMATION
- GENERAL SAFETY (CONT.)
- Installation
- WARNING!
- Please make sure upon positioning this product, the place is:
- Attaching the stand
- Step 1
- Step 2
- INSTALLATION (CONT.)
- Wall OR Monitor Arm Mounting Instructions
- BACK OF MONITOR
- CONTROLS AND CONNECTIONS
- E - EXIT / AUTO FUNCTION
- OPERATION
- LUMINENCE
- OPERATION (CONT.)
- IMAGE
- COLOUR TEMP.
- COLOR TEMP
- OSD
- OSD Setup
- RESET
- EKO
Brand : EKO
Model : K24FM
Category : Monitor