
VCO 4320 WR - Vacuum Cleaner BEKO - Free user manual and instructions
Find the device manual for free VCO 4320 WR BEKO in PDF.


| Product Type | Canister Vacuum Cleaner |
| Brand | Beko |
| Model | VCO 4320 WR |
| Dimensions (L x W x H) | 44 x 25 x 32 cm |
| Weight | 5.2 kg |
| Power Supply | 220-240 V, 50/60 Hz |
| Power Consumption | 800 W |
| Suction Power | 300 Air Watts |
| Dust Capacity | 2.5 L (bagged) or 1.5 L (bagless variant) |
| Filtration System | HEPA 13 filter |
| Noise Level | 78 dB(A) |
| Cord Length | 7 m |
| Operating Radius | 9 m |
| Accessories Included | Crevice tool, upholstery nozzle, dusting brush |
| Floor Nozzle | Combination floor nozzle (hard floor and carpet) |
| Variable Power Control | Yes, electronic slider |
| Bag Full Indicator | Yes |
| Automatic Cord Rewind | Yes |
| Parking System | Vertical parking |
| Maintenance | Replace dust bag when full; clean HEPA filter every 6 months |
| Spare Parts Availability | Dust bags (type VAC 600), HEPA filter (type HEPA 13) |
| Safety Features | Thermal cut-off, motor protection filter |
Frequently Asked Questions - VCO 4320 WR BEKO
User questions about VCO 4320 WR BEKO
0 question about this device. Answer the ones you know or ask your own.
Ask a new question about this device
Download the instructions for your Vacuum Cleaner in PDF format for free! Find your manual VCO 4320 WR - BEKO and take your electronic device back in hand. On this page are published all the documents necessary for the use of your device. VCO 4320 WR by BEKO.
USER MANUAL VCO 4320 WR BEKO
natural_image
Simple line drawing of a decorative pattern with circular motifs inside a square frame (no text or symbols)VC04320WR
EN - TR - RU - BS - SR - MK - TH - SQ
01M-8817233200-2621-02
01M-8817243200-2621-02
Please read this user manual first!
Dear Customer,
Thank you for preferring a Beko product. We hope that you get the best results from your product which has been manufactured with high quality and state-of-the-art technology. Therefore, please read this entire user manual and all other accompanying documents carefully before using the product and keep it as a reference for future use. If you handover the product to someone else, give the user manual as well. Follow all warnings and information in the user manual.
Meanings of the symbols
Following symbols are used in the various section of this manual:

Important information or useful hints about usage.

Warning for hazardous situations with regard to life and property.

Protection class for electric shock.
CONTENTS
ENGLISH 04-09
| TÜRKÇE | 10-20 |
| РУССКИЙ | 21-32 |
| BOSANSKI | 33-40 |
| SRPSKI | 41-47 |
| MAKEДОНСКИ | 48-56 |
| Íŋy 57-63 | |
| SHQIP | 64-71 |
1 Important safety and environmental instructions
This section contains safety instructions that will help protect from risk of personal injury or property damage.
Failure to follow these instructions invalidates the granted warranty.
1.1 General safety
- This appliance complies with the international security standards.
- This appliance can be used by children aged from 8 years and above and persons with reduced physical, sensory or mental capabilities or lack of experience and knowledge if they have been given supervision or instruction concerning use of the appliance in a safe way and understand the hazards involved. Children shall not play with the appliance. Cleaning and user maintenance shall not be made by children without supervision.
- Do not use it if the power cable or the appliance itself is damaged. Contact an authorized service.
- Your mains power supply should comply with the information supplied on the rating plate of the appliance.
- The mains supply of the appliance must be secured with a minimum 16 A fuse.
- Do not use the appliance with an extension cord.
- In order to prevent the power cable from getting damaged, make sure that it doesn't get stuck, twisted or rub against sharp surfaces.
- Do not touch the appliance or its plug when it is plugged if your hands are damp or wet.
- Do not pull the power cable when unplugging the appliance.
- Do not vacuum flammable materials and when vacuuming cigarette ashes make sure that it got cold.
- Do not vacuum water or other liquid materials.
- Protect the appliance from rain, humidity and heat sources.
1 Important safety and environmental instructions
- Never use the appliance in or near to combustible or inflammable places and materials.
- Unplug the appliance before cleaning and maintenance.
- Do not dip the appliance or its cable in water to clean it.
- Check the hose of the appliance regularly. Do not use if it is damaged and contact an authorized service.
- Do not attempt to dismantle the appliance.
- Only use the original parts or parts recommended by the manufacturer.
- Do not use the appliance without filters; otherwise it can get damaged.
- When vacuuming the stairs, the appliance should be located below the user.
- If your store the package material, keep it out of the reach of children.
1.2 Compliance with WEEE Directive and Disposing of the Waste Product
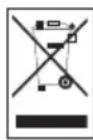
This product complies with EU WEEE Directive (19/2012/EU). This product bears a classification symbol for waste electrical and electronic equipment (WEEE). This symbol indicates that this product shall not be disposed with other household wastes at the end of its service life. Used device must be returned to official collection point for recycling of electrical and electronic devices. To find these collection systems please contact to your local authorities or retailer where the product was purchased. Each household performs important role in recovering and recycling of old appliance. Appropriate disposal of used appliance helps prevent potential negative consequences for the environment and human health.
1.3 Compliance with RoHS Directive
The product you have purchased complies with EU RoHS Directive (2011/65/EU). It does not contain harmful and prohibited materials specified in the Directive.
1.4 Package information

Packaging materials of the product are manufactured from recyclable materials in accordance with our National Environment Regulations. Do not dispose of the packaging materials together with the domestic or other wastes. Take them to the packaging material collection points designated by the local authorities.
2 Your vacuum cleaner
2.1 Overview

- Handle
- Vacuum control
- Telescopic tube
- Telescopic tube adjustment latch
- Parquet/carpet brush
- Cord winding button
- Parquet/carpet brush parking groove
- On/Off button
- Suction power adjustment knob
- Carriage handle
- Dust container removal latch
- Dust container
- Suction nozzle
- Hose cap
- Hose
2.2 Technical data
Supply voltage : 220-240V\~50/60 Hz
Power : 1600 W Nom
Operating radius : 8m
Suction power : 300 W
Filter :HEPA 12
Rights to make technical and design changes are reserved.
The values which are declared in the markings affixed on your appliance or other printed documents supplied with it represent the values which were obtained in the laboratories pursuant to the pertinent standards. These values may vary according to the usage of the appliance and ambient conditions.
3 Usage
3.1 Intended use
The appliance has been designed for household use and is not suitable for industrial use.
3.2 Attaching/removing the hose
- To attach the hose (15), push the hose cap (14) to match it with the slot (a click sound will be heard).
- Projecting parts on the hose cap should be aligned correspondingly.
- To remove the hose (15), press the unlocking buttons on the sides of the hose cap (14) and pull the hose.
3.3 Attaching/removing the telescopic tube
- Attach the telescopic tube (3) to the handle (1).
- Pull the telescopic tube (3) from the handle (1) to remove it.
- To adjust the length of the telescopic tube, push the telescopic tube adjustment latch (4) in the arrow direction and pull it from the end of it.

natural_image
Close-up of a metallic cylindrical mechanical component with a small protrusion and an arrow indicating direction (no text or symbols)3.4 Attaching/removing the parquet/carpet brush
- Attach the telescopic tube (3) to the parquet/ carpet brush (5).
- Pull the telescopic tube (3) from the parquet/ carpet brush (5) to remove it.
3.5 Adjusting the parquet/carpet brush
By pressing the adjustment latch located on the parquet carpet brush (5);
- Use "position for hard floors and parquet."
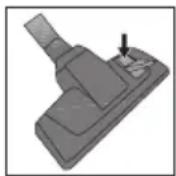
- Use "" position for rugs and carpets.

3.6 Operation
- Plug in the appliance after pulling the power plug located at the back of the appliance.
- Press the on/off button (8) to switch on your appliance.
3.6.1 Adjusting the suction power
You can increase the suction power of the appliance by turning the suction power adjustment knob (9) located on the body of the appliance clockwise according to the type of the surface to be cleaned. To decrease the suction power, turn the suction power adjustment knob anti-clockwise.
3.6.2 Vacuum control
You can lower the suction power of the parquet carpet brush (5) by pulling backward the vacuum adjustment control (2) located on the handle (1) without the need to use the suction adjustment knob (9) found on the appliance.
3 Usage
3.7 Accessories
Crevice tool

natural_image
Simple 3D illustration of a cylindrical object with a shaded cross-section (no text or symbols)Suitable for cleaning surfaces difficult to clean, such as areas under sofas and furniture.
Dust brush

Suitable for cleaning objects such as curtains, floorings, delicate fragile items, couches, sofas etc.

WARNING: Do not perform cleaning tasks using the end part of the handle (1).
3.8 Switching off the vacuum cleaner and parking feature
- Switch off the appliance with the on/off button (8) and unplug it.
- Press the cord winding button (6) to rewind the power cord.
Vertical parking feature
Insert the hook of the parquet/carpet brush (5) into the parking groove located at the bottom section of the appliance.
Horizontal parking feature
Insert the hook of the parquet/carpet brush (5) into the parking groove (7) located at the rear section of the appliance.
4 Cleaning and care
Switch off and unplug the appliance before cleaning it.

WARNING: Never use gasoline, solvent, abrasive cleaning agents, metal objects or hard brushes to clean the appliance.
4.1 Emptying the dust container
- Pull the dust container removal latch (11) towards yourself to remove the dust container (12).
- Press the dust container release button located beneath the dust container to open the cover and empty the container.
- When you have emptied dust, close the dust container cover (12); a click sound will be heard.
- Insert the dust container (12) back into its location.
4.2 Cleaning the filters

WARNING: Do not use appliances producing hot air such as hair dryer or heater to dry the filters.

WARNING: Do not install the filters without completely drying them; otherwise, smell of moisture may occur during use, water can leak from the back of the appliance or the filters may get damaged.

WARNING: Attach the filters into their places after they have dried.
4.2.1 Motor protection filter
These filters are located on the rear side of the dust container (12).
-
Pull the dust container removal latch (11) towards yourself to remove the dust container (12).
-
Remove the HEPA filter and motor protection filter found at the back of the dust container (12).
- After washing the sponge protection filter under running water, wring it out slightly and leave it to dry (for 24 hours minimum).
- Shake off the HEPA inlet filter to eliminate the dusts on it. After that, you can wash it by holding its clean side under running cool water.
- If you wash the HEPA filter, dry it at room temperature (for 24 hours minimum). Do not use it before ensuring that it is completely dry.
4.2.2 HEPA filter
HEPA outlet filter is located on the rear side of the appliance.
- Remove the HEPA filter by pulling it from its handle.
- Shake off the HEPA outlet filter to eliminate the dusts on it. After that, you can wash it by holding its clean side under running cool water.
- If you wash the HEPA filter, dry it at room temperature (for 24 hours minimum). Do not use it before ensuring that it is completely dry.
4.3 Storage
If you do not intend to use the appliance for a long time, store it carefully.
- Unplug the appliance.
- Keep the appliance out of the reach of children.
4.4 Handling and transportation
- During handling and transportation, carry the appliance in its original packaging. The packaging of the appliance protects it against physical damages.
- Do not place heavy loads on the appliance or on the packaging. The appliance may get damaged.
- Dropping the appliance may render it non-operational or cause permanent damage.
natural_image
Pure mechanical component diagram without any text, numbers, or symbolsnatural_image
Simple 3D illustration of a cylindrical object with a curved top surface (no text or symbols)natural_image
Simple line drawing of a decorative border with circular motifs (no text or symbols)VC04320WR
RU
natural_image
Pure mechanical component diagram without any text, numbers, or symbolsnatural_image
Simple 3D illustration of a cylindrical object with a shaded cross-section (no text or symbols)natural_image
Close-up of a metallic cylindrical mechanical component with an arrow indicating direction (no visible text or symbols)3.4 Postavljanje/uklanjanje četke za parket/tepih
- Postavite teleskopsku cijev (3) na četku za parket/tepih (5).
- Povucite teleskopsku cijev (3) s četke za parket/tepih (5) da biste je uklonili.
natural_image
Simple 3D illustration of a cylindrical object with a curved top surface (no text or symbols)natural_image
Close-up of a cylindrical mechanical component with an arrow indicating direction (no visible text or symbols)3.4 Postavljanje/uklanjanje četke za parket/tepih
- Povežite teleskopsku cev (3) sa četkom za parket/tepih (5).
- Povucite teleskopsku cev (3) sa četke za parket/tepih (5) da biste je uklonili.
natural_image
Simple 3D illustration of a cylindrical object with a shaded cross-section (no text or symbols)Pogodan za čišćenje površina koje je teško očistiti, kao što su oblasti ispod kauča i nameštaja.
Četka za prašinu
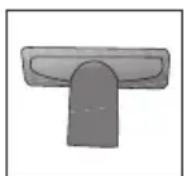
Pogodan za čišćenje predmeta kao što su zavese, podovi, osetljivi lomljivi objekti, kauči, sofe itd.

4.4 Prenos i transport
- Tokom prenosa i transporta, nosite aparat u njegovom originalnom pakovanju. Pakovanje aparata ga štiti od fizičkih oštećenja.
•Nemojte stavljati teške predmete na aparat ili njegovo pakovanje. Aparat se može oštetiti. - Ako vam aparat ispadne, to može izazvati trajno oštećenje, odnosno aparat može postati nefunkcionalan.
natural_image
Close-up of a metallic cylindrical mechanical component with a pointed end and an arrow indicating direction (no text or symbols)natural_image
Simple 3D illustration of a cylindrical object with a shaded top section (no text or symbols)natural_image
Close-up of a cylindrical mechanical component with an arrow indicating direction (no visible text or symbols)natural_image
Simple 3D illustration of a cylindrical object with a shaded cross-section (no text or symbols)natural_image
Close-up of a metallic cylindrical mechanical component with an arrow indicating direction (no text or symbols)natural_image
Simple 3D illustration of a cylindrical object with a curved top surface (no text or symbols)natural_image
Close-up of a cylindrical mechanical component with an arrow indicating a feature (no visible text or symbols)natural_image
Three-step diagram showing a mechanical component with a handle, including a separate view and a final close-up of the end (no text or symbols present)natural_image
Close-up of a mechanical shaft component with a small protrusion and an arrow indicating direction (no text or symbols)natural_image
Simple line drawing of a decorative border with circular motifs (no text or symbols)VC04320WR
AR - FA
01M-8817233200-2621-02
01M-8817243200-2621-02
- Please read this user manual first!
- Meanings of the symbols
- CONTENTS
- Important safety and environmental instructions
- General safety
- Compliance with WEEE Directive and Disposing of the Waste Product
- Compliance with RoHS Directive
- Package information
- Your vacuum cleaner
- Overview
- Technical data
- Usage
- Intended use
- Attaching/removing the hose
- Attaching/removing the telescopic tube
- Attaching/removing the parquet/carpet brush
- Adjusting the parquet/carpet brush
- Operation
- Adjusting the suction power
- Vacuum control
- Accessories
- Crevice tool
- Dust brush
- Switching off the vacuum cleaner and parking feature
- Vertical parking feature
- Horizontal parking feature
- Cleaning and care
- Emptying the dust container
- Cleaning the filters
- Motor protection filter
- HEPA filter
- Storage
- Handling and transportation
- Postavljanje/uklanjanje četke za parket/tepih
- Četka za prašinu
- Prenos i transport
Brand : BEKO
Model : VCO 4320 WR
Category : Vacuum Cleaner