K5128X22H - Television Kunft - Free user manual and instructions
Find the device manual for free K5128X22H Kunft in PDF.


| Product Type | LED TV |
| Screen Size | 22 inches |
| Resolution | HD (1366 x 768) |
| Power Consumption | 36 W (typical), Standby < 1 W |
| Power Supply | AC 100-240 V, 50/60 Hz |
| Weight | Approx. 3.5 kg |
| Dimensions (with stand) | Approx. 50.5 x 31.0 x 16.0 cm |
| Dimensions (without stand) | Approx. 50.5 x 29.5 x 8.0 cm |
| VESA Mount Compatible | Yes (100 x 100 mm) |
| Inputs | HDMI, VGA, AV, USB, SCART, Antenna (RF), CI slot |
| Outputs | Headphone jack, Coaxial (SPDIF) |
| Remote Control | Included (2 x AAA batteries) |
| Tuner | DVB-T/T2, DVB-C, DVB-S/S2 |
| PVR Function | Yes (USB recording) |
| Teletext | Yes |
| Sleep Timer | Yes (Off, 15-240 min) |
| Child Lock / Parental Control | Yes (password-protected) |
| Energy Efficiency Class | A+ (typical) |
| Operating Temperature | 0°C to 45°C |
| Safety Class | Class II (double insulated) |
| Cleaning Instructions | Switch off and unplug; clean with dry soft cloth only |
| Spare Parts / Accessories | Remote control (RC-XXXX), power cord, stand (supplied) |
Frequently Asked Questions - K5128X22H Kunft
User questions about K5128X22H Kunft
0 question about this device. Answer the ones you know or ask your own.
Ask a new question about this device
Download the instructions for your Television in PDF format for free! Find your manual K5128X22H - Kunft and take your electronic device back in hand. On this page are published all the documents necessary for the use of your device. K5128X22H by Kunft.
USER MANUAL K5128X22H Kunft
natural_image
Black-and-white photo of a modern flat-screen TV displaying leaf patterns against a blurred sky background (no text or symbols visible)
led tv 22" HD
is perfectly enough
K5128X22F
kunft.®
Dear client,
Thank you for purchasing this product.
The quality of this appliance has been certified by several laboratory tests. This instructions manual is provided to simplify the use of the appliance as well as to guarantee a safe use.
Please read carefully the instructions and safety measures described in this manual.
We sincerely hope you will be satisfied when using your new appliance.
led tv 22" HD
K5128X22F
EN
INDEX
- SAFETY INSTRUCTIONS 4
1.1. Power Supply 5
1.2. Power Cord and Other Cables 6
1.3. Humidity and Water 6
1.4. Cleaning 6
1.5. General Precautions 6
- OPERATING INSTRUCTIONS 10
2.1. Product usage 10
2.2. Troubleshooting 47
-
TECHNICAL SPECIFICATIONS 51
-
POST-SALE SERVICE 52
-
ENVIRONMENTAL PROTECTION 52
3
1. SAFETY INSTRUCTIONS
 | WARNING |  |
| Risk of Electric ShockDo Not Open | ||
| Warning: to avoid the risk of electric shock, do not remove the cover.The interior does not contain any parts that can be repaired by the user.Ask for assistance from the Customer Support Service. | ||
IMPORTANT WARNINGS
Before using your appliance, read these instructions manual carefully and keep it in a safe place as you may need to consult it in the future.
Before turning on your appliance, and to ensure a correct operation, do not use if:
- It has fallen to the ground;
- You notice any evidence of damage;
- Any anomaly occurs during its operation.
To avoid hazards or deterioration of your appli-ance through incorrect use it is advisable to read these instructions thoroughly.
Your appliance should not be used for other purposes than the ones intended and solely for household use. Any damage resulting from using the appliance outside this scope, any incorrect use, as well as any manual modifications to the product
4
will not be covered and automatically voids the warranty.
Assistance
In case of malfunction, take your appliance to the Customer Support Service.
This appliance can be used by children aged 8 years and over.
and by people with reduced physical, sensorial or mental capabilities and/or lack of experience or knowledge if they have been given instructions on using the appliance safely and if they understand the hazards involved. Children may not play with the appliance. Cleaning and maintenance must not be carried out by children without supervision.
These instructions are also available at
www.suporteworten.pt
1.1. Power Supply
Make sure the main voltage is compatible with the appliance's. If this is not the case, please consult the Customer Support Service.
1.2. Power Cord and Other Cables
Do not tangle the cord or pull it to disconnect the appliance. Keep the cord away from warm surfaces. Never use the appliance if it has a damaged cable or socket. Take it to the Customer Support Service for replacement.
1.3. Humidity and Water
Do not use your appliance in humid places. Do not allow the appliance to become wet under any circumstances as this may be dangerous. To avoid fire hazard or electric shock do not expose your appliance to humidity or water. Furthermore, do not place your appliance under water (e.g. for cleaning).
1.4. Cleaning
Before cleaning, be sure to switch off the appliance and remove the plug from the main power supply. Always allow the unit to cool down before cleaning. To clean the exterior of the appliance, use a dry soft cloth only.
1.5. General Precautions
- Please follow the instructions in the user manual which will help you to properly install and operate this product and enjoy its advanced features. Please keep the instructions for future reference.
- Read all instructions before using the product.
- Maintenance or service operations are only to be carried out by authorized professionals.
- Any damage caused by manual modifications to the product is not covered by the warranty.
- If this product is used for other purposes than the ones originally intended, or if it is not correctly connected, the product may become damaged and the warranty will be voided.
- Keep these instructions.
- Heed all warnings.
- Follow all instructions.
- Do not use this appliance near water.
- Clean only with dry cloth.
- Do not block any ventilation openings, install in accordance with the manufacturer's instructions.
- Do not install near any heat sources such as radiators, heat registers, stoves, or other appliance (including amplifiers) that produce heat.
- Do not defeat the safety purpose of the polarized or grounding-type plug. A polarized plug has two blades, one wider than the other. A grounding type plug has two blades and a third grounding prong. The wide blade or the third prong are provided for your safety. If the provided plug does not fit into your outlet, consult an electrician for replacement of the obsolete outlet.
- Protect the power cord from being walked on or pinched particularly at plugs, convenience receptacles, and the point where they exit from the appliance.
- Only use attachments /accessories specified by the manufacturer.

- Use only with the cart, stand, tripod, bracket or table specified by the manufacturer, or sold with the appliance. When a cart is used caution when moving the cart/ appliance combination to avoid injury tip-over.
- Unplug this appliance during lightning storms or when unused for long periods of time.
Caution:
- To reduce the risk of electric shock or fire, do not expose this appliance to rain or moisture.
- The socket-out shall be installed near the equipment and shall be easily accessible.
- This product should never be placed in a built-in installation such, as a bookcase or rack, unless proper ventilation is provided or the manufacturer's instructions have been adhered to.
- The appliance shall not be exposed to dripping or splashing, and that no objects filled with liquid, such as vases, shall be placed on the appliance.
- Do not place any sources of danger on the appliance (e.g. liquid filled objects, lighted candles).
- Wall or Ceiling Mounting - The appliance should be mounted to a wall or ceiling only as recommended by the manufacturer.

Never place the TV, remote control or batteries near naked flames or other heat sources, including direct sunlight. To prevent the spread of fire, keep candles or other flames away from the TV, remote control and batteries.
led tv 22" HD
K5128X22F
EN
- The USB terminal should be loaded with 0.5 A under normal operation.
- The battery shall not be exposed to excessive heat such as sunshine, fire or the like.
- This equipment is a Class II or double insulated electrical appliance. It has been designed in such a way that is does not require a safety connection to electrical earth.
- The maximum using environment temperature is 45 degrees. The maximum using altitude is 2000 meters.
Caution
RISK OF ELECTRIC SHOCK. DO NOT OPEN
High voltages are used in the operation of this product. To reduce the risk of electric shock, do not remove cover of the appliance. Refer servicing to the Customer Support Service.
If the TV needs any changes or adjustments, there may be electric shocks which, with by contact, may injuries. Do not attempt to open the appliance for maintenance – contact the Customer Support Service.

The exclamation point within an equilateral triangle is intended to alert the user to the presence of important operating in the documentation accompanying the appliance.

Warning
The lightning flash with an arrowhead symbol within an equilateral triangle is intended to alert the user to the presence of uninsulated dangerous voltage within the products enclosure that may be of sufficient magnitude to constitute a risk of electric shock.
2. OPERATING INSTRUCTIONS
2.1. Product usage
TV BRACKET ASSEMBLE
Fix the TV on the wall
- Start by placing the TV on the table smoothly and with some soft cloth on the table to avoid scratching the screen.
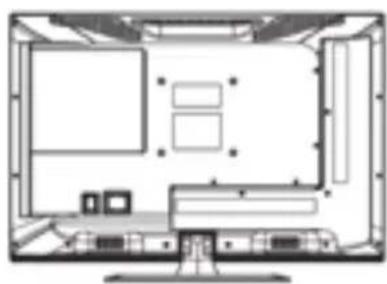
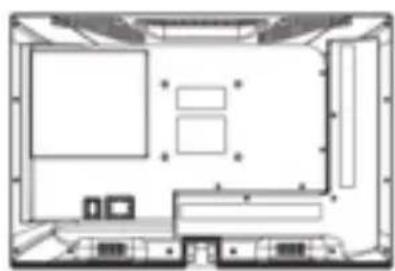
- Use the screw driver to take off the screws which are fixed on the bottom stand (for the direction of the arrow refer to photo 1). Take off the bottom stand (remove the screws and bottom stand carefully).
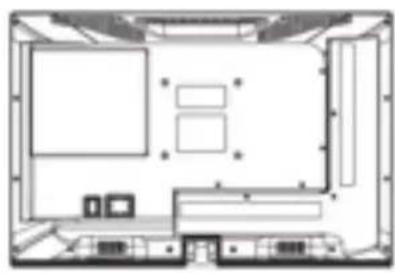
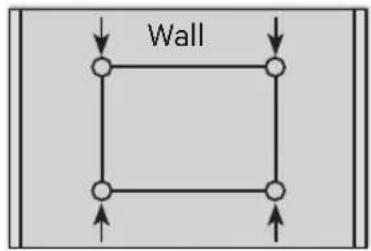
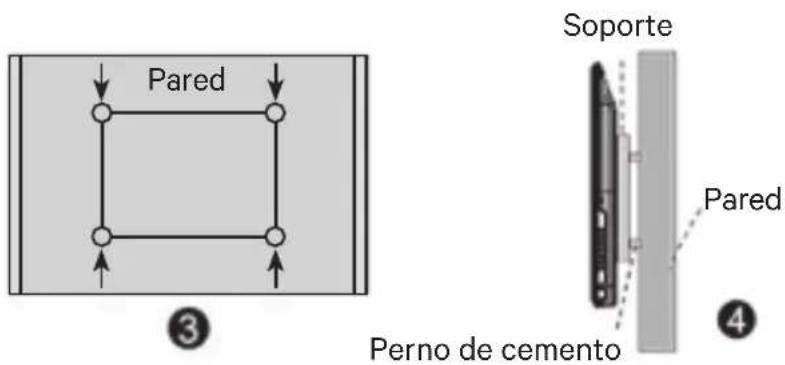
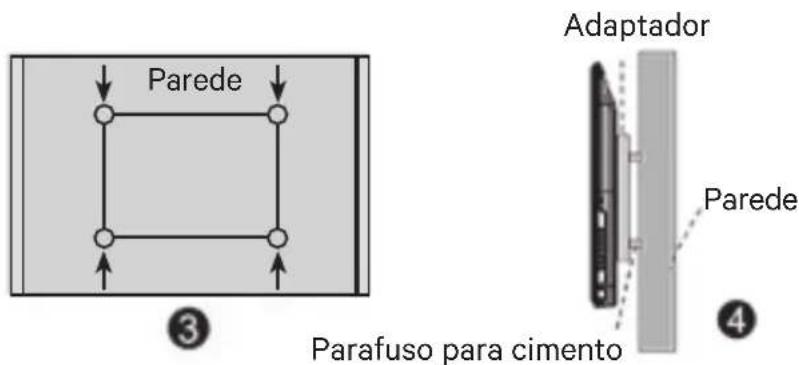
- Make one bracket which can be fixed on the wall according to the size of the arrow direction of photos 2 and 3.
- Drill four holes on the wall (size for reference only) and insert four screws, (optional parts).
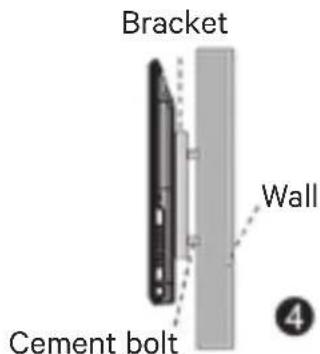
- According to the step 4, use the screwdriver to lock the screw on the back of the TV and then hang the TV on the wall.
led tv 22" HD
K5128X22F
EN
natural_image
Top-down schematic of a computer monitor layout showing front, top, and side views (no text or symbols)1
natural_image
Top-down architectural floor plan showing room layouts and furniture (no text or labels)②
③

Note:
- The bracket fixed on the wall is an optional part.
- When you assemble the TV, there should be no other articles around or in front of the TV. Please keep the distance from other articles.
- When assembling the TV, please ask the Customer Support Service to fix, in order to avoid danger.
- The fixing picture is for reference only.
- Please follow the user manual about bracket assemble to fix the TV.
- Attach the mounting bracket from the VESA compatible wall mounting kit.
TV Buttons and Terminal Interface TV Buttons
Note: The following is only a functional schematic and the actual position and arrangement may differ on different models.
VOL+ VOL- CH+ CH- MENU SOURCE
: Turn ON/OFF Power.
SOURCE: External Signal Input Selection.
MENU: Displays Main MENU and Confirms MENU Item Selection.
CH+/-: Selects Channel.
VOL+/-: Adjusts Volume.
Terminal Interface
Note: The following are the various terminal interfaces, the actual position and arrangement, the number of different models may vary.
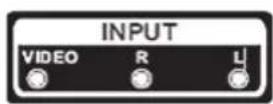
AV input
External AV Signal Input and Relevant Right/Left Sound Channel
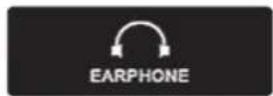
EARPHONE output
When the earphones are plugged in, the speakers are disabled

CI input
The card reader input CI (Common Interface) requires a CAM (conditional access module) used for pay TV.
led tv 22" HD
K5128X22F
EN

USB input
Connect a USB device here to play its media files or to record programmes via the PVR function.
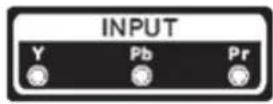
Y Pb Pr input
Connect to the composite terminal of your DVD/VCR (some models do not have this interface)
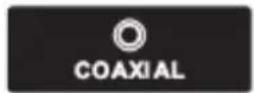
COAXIAL
Connect the SPDIF receiver.
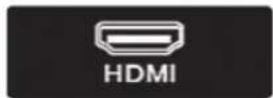
HDMI input
Digital signal input from HDMI video connector
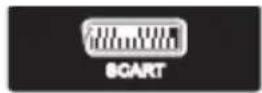
SCART input
Standard, it supports composite and RGB signal input. European connection (some models do not have this interface)
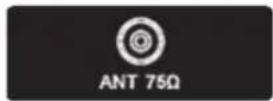
ANT 750
Connects the antennal/cable tv input (75/VHF/UHF)
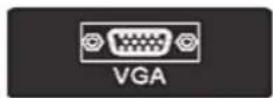
VGA input
PC analog signal input
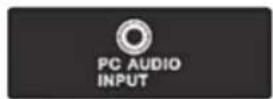
PC AUDIO INPUT
VGA input and audio input when VGA input is used
kunft.®
External device connection diagram
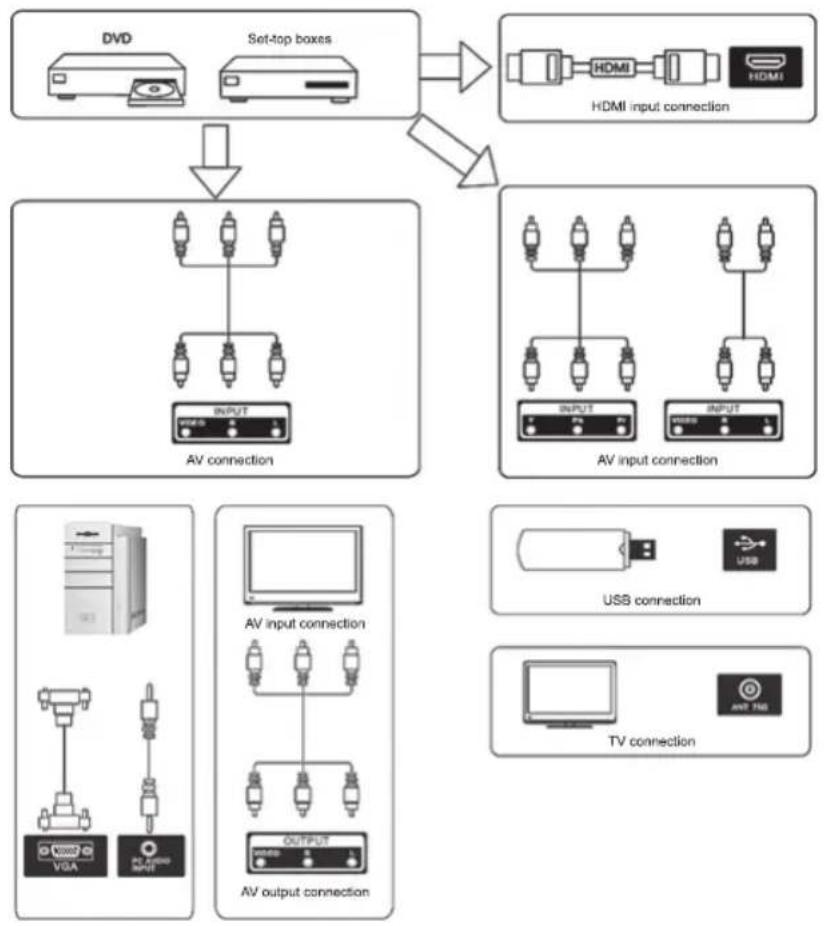
flowchart
graph TD
    A["DVD"] --> B["Set-top boxes"]
    B --> C["HDMI input connection"]
    B --> D["AV connection"]
    D --> E["AV input connection"]
    D --> F["AV output connection"]
    E --> G["USS connection"]
    F --> H["TV connection"]
    style A fill:#f9f,stroke:#333
    style B fill:#f9f,stroke:#333
    style C fill:#ccf,stroke:#333
    style D fill:#cfc,stroke:#333
    style E fill:#fcc,stroke:#333
    style F fill:#cff,stroke:#333

14

led tv 22" HD
K5128X22F
EN
TV Installation and Connection
Set your TV
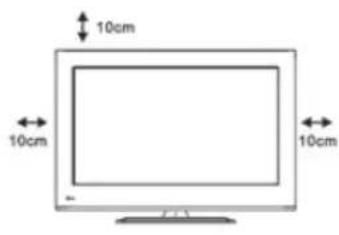
Place your TV in a firm place which can bear its weight.
To avoid danger, please don't place the TV near water or heating sources (such as light, candle, heaters) and do not block the ventilation at the back of TV.
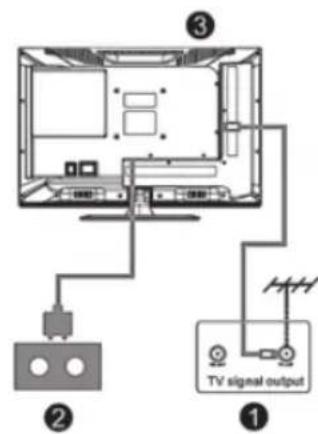
Connect antenna and power
-
Connect the antenna cable to the antenna socket on the back of the TV.
-
Plug the power cord of TV.
Turn on TV
- Press the TV's power button and the light indication will turn green. If it is on standby mode (the light is red), press the power button on the remote control to turn on the TV.
Note: Picture for reference purposes only.
kunft.®
TV Stand Installation Instructions
- Open the cardboard box and remove the TV, scattered accessories and stand (some models do not have a stand).
-
To avoid damaging the TV, cover it with a soft blanket, put it on the table, face down on the soft blanket, with the stand towards where it will be screwed
-
Screw the base and connect to the TV.
- The installation is complete.
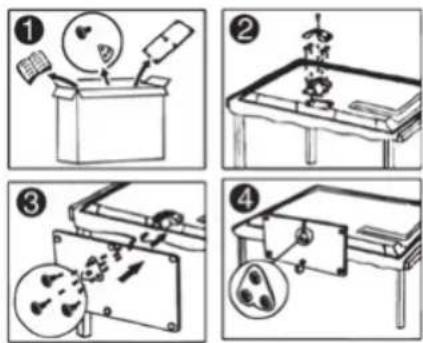
Note: Picture for reference purposes only. The actual design of the appliance shall prevail.
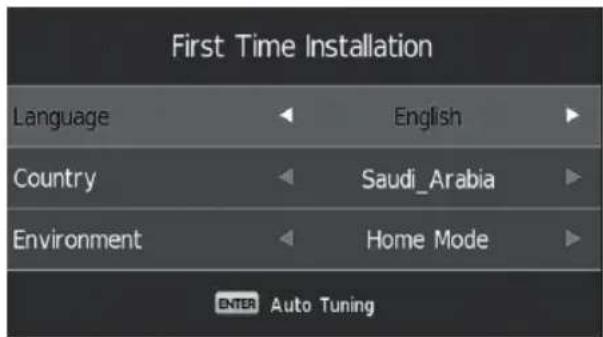
First Time Installation
Connect an RF cable from the TV's input called "RF-In" and to your TV Aerial socket.
Select Language
Press the ◀/▶ button to select the language to be used for menus and message.
Select Country
Press the ▼/▲ button to highlight the country menu. Press the ◀/▶ button to select the desired country.
led tv 22" HD
K5128X22F
EN
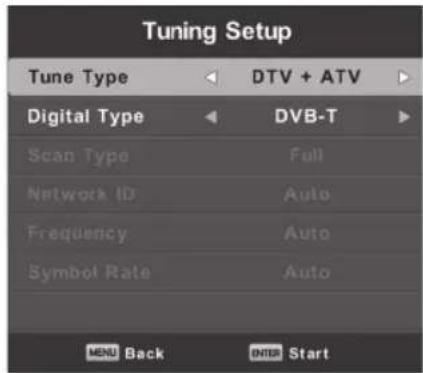

Main Menu Operation
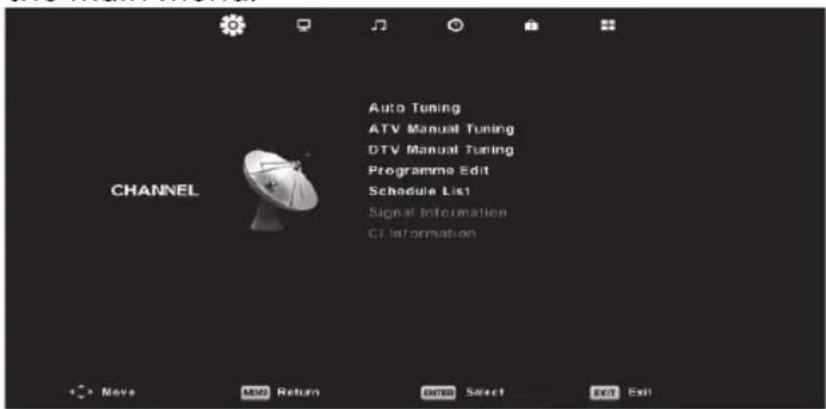
Channel Menu
Press the MENU button to display the main menu and press the ◀/▶ button to select CHANNEL in the main menu.
-
Pressthe ▼/▲ button to select the option that you want to adjust in the CHANNEL menu.
-
Press the Enter button to adjust.
kunft.®
- After finishing your adjustments, press the Enter button to save the changes and return to the previous menu.
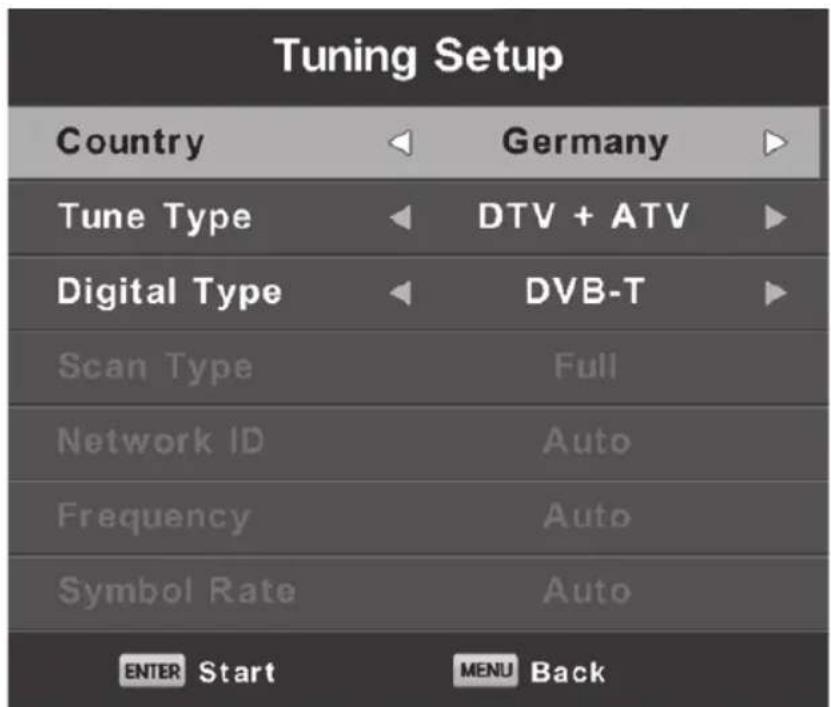
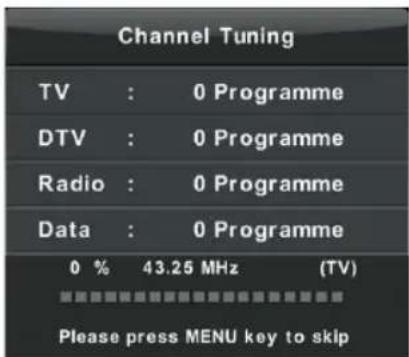
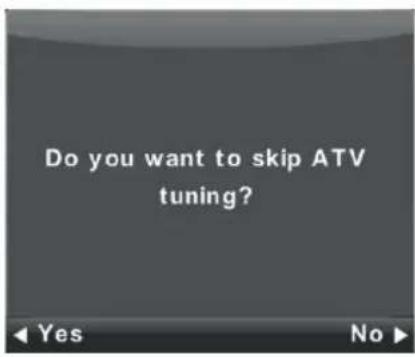
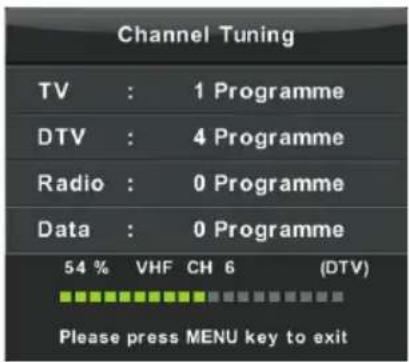
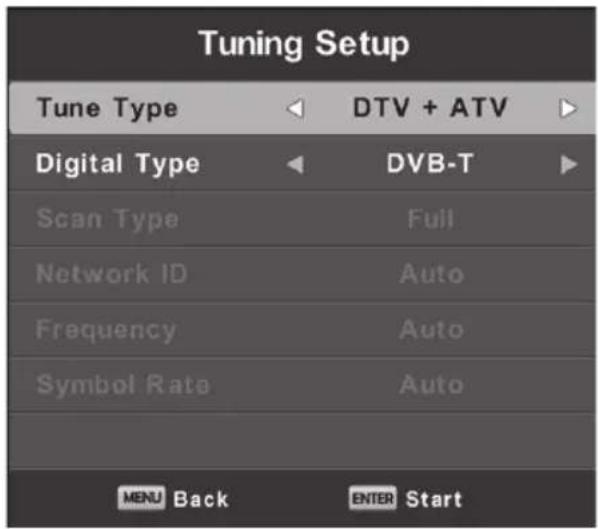
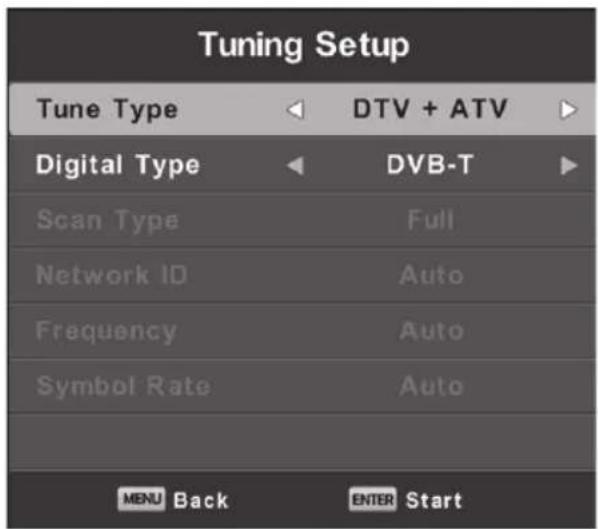
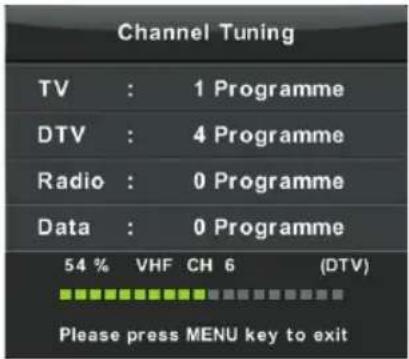
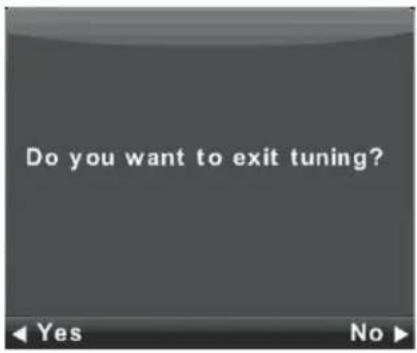
Auto Tuning
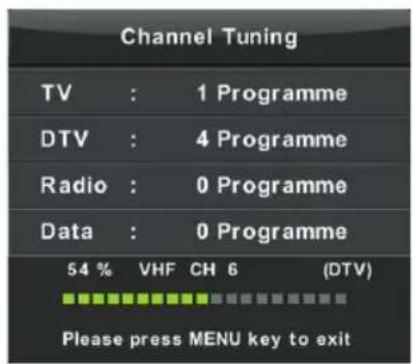
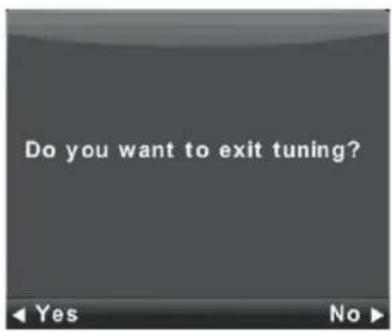
Press the ▼/▲ button to select Auto Tuning, then press Enter/ ▶ button to enter.
led tv 22" HD
K5128X22F
EN
ATV Manual Tuning
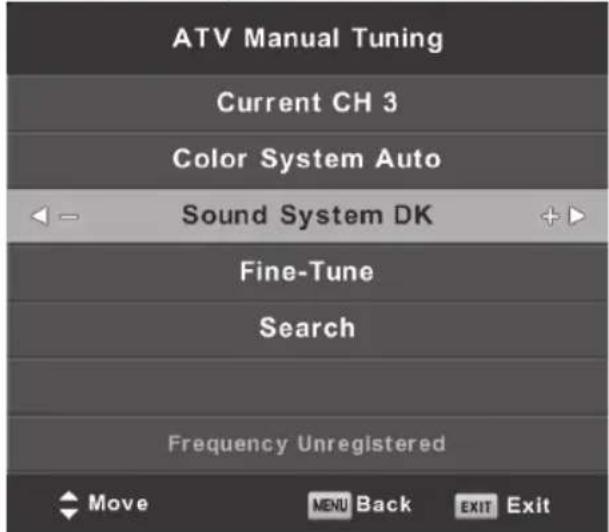
Current CH
Sets the channel number.
Colour System
Sets the colour system (Available System: AUTO, PAL, SECAM)
Sound System
Sets the Sound system
Fine-Tune
Adjusts the frequency of the channel finely.
Search
Starts searching channels.
kunft.®
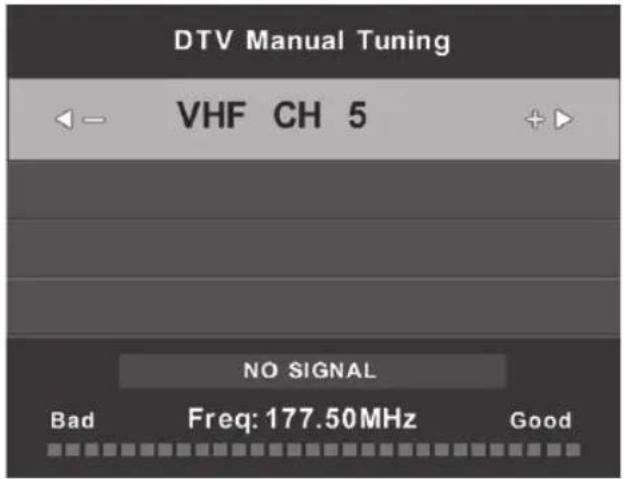
DTV Manual Tuning
Press the ▼/▲ button to select DTV Manual Tuning and then press the Enter button to enter the sub-menu.
Press the ◀/▶ button to select the channel and then press the Enter button to search for a programme.
Programme Edit
Press the ▼/▲ button to select Programme Edit and then press the Enter button to enter the sub-menu.
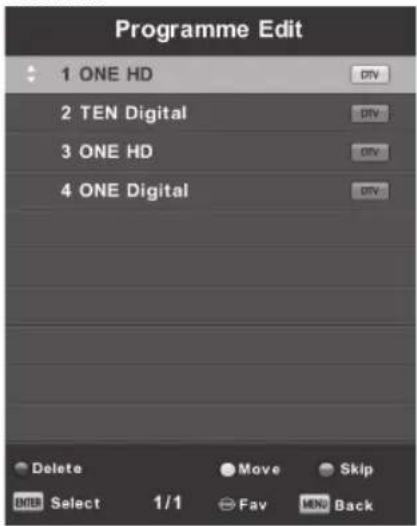

The three coloured key is the shortcut key for programming the channel.
First, press the ▼/▲ button to highlight the channel you want to select, and then:
20
-presstheRed button to delete the programme in the list;
-presstheYellow button to move the channel in the list.
- press the Blue button to skip the selected channel.
-pressFav button to add or remote the channel to your favourite list. (your TV set will skip the channel automatically when using CH+/- to view the channels.)
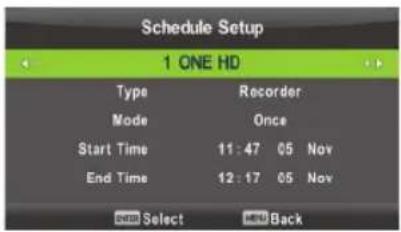
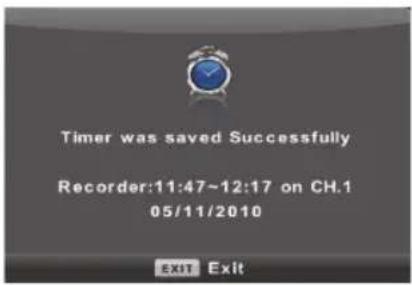
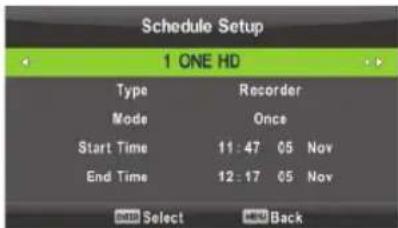
Schedule List
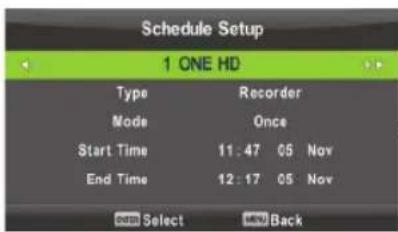
Press the ▼/▲ button to select Schedule List and then press the Enter button to enter the sub-menu, if available in DTV and via satellite.
![Schedule List (0% Used) 11:44 05 Nov 1/1 Programme Title Date 1 ONE HD 1 [DTV]Manual Timer Set 05/11/2010 Manual Timer Set 11:47~12:17 Move Delete Add Edit Exit](/content/2026/05/935358/images/066289f3726aa156bfdc7ccc612a69c607c7a1cb1754695acf53c153b5abc403.jpg)
Press the YELLOW button to enter the interface below.
When there is a conflicting time appointment, it will sound a warning message.
Signal Information
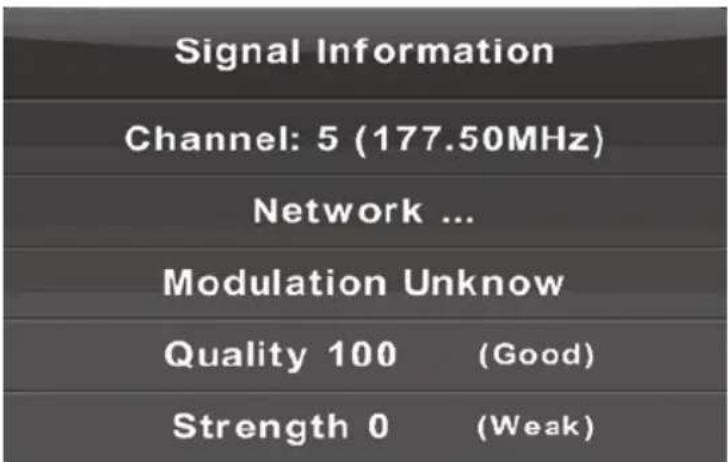
Press the ▼/▲ button to select Signal Information and press the Enter button to see the detail information about the signal. This option is only available when the DTV has a signal.
CI Information (must support the CI function)
Press the ▼/▲ button to select CI Information and then press the Enter button to display details if you have inserted the CI card.
22
led tv 22" HD
K5128X22F
EN
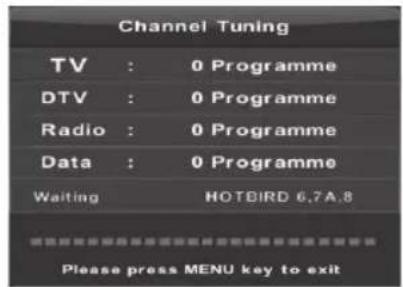
CHANNEL List via Satellite (must support the DVB-S2 function)
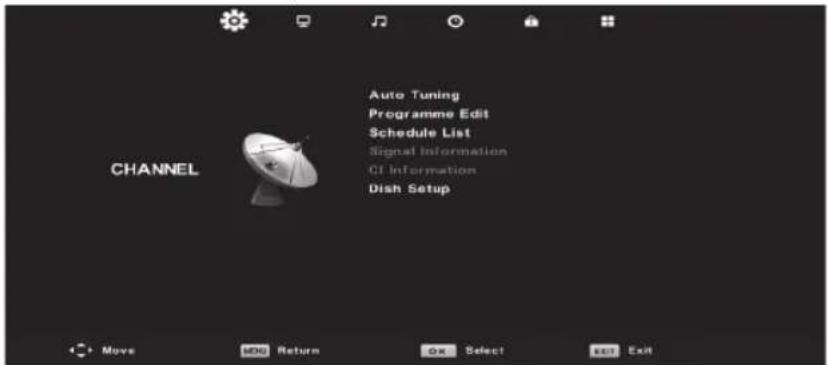
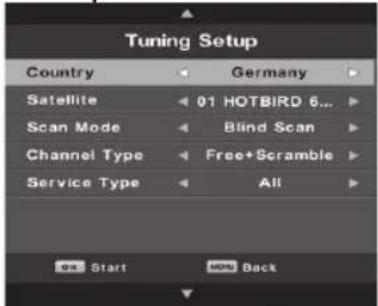
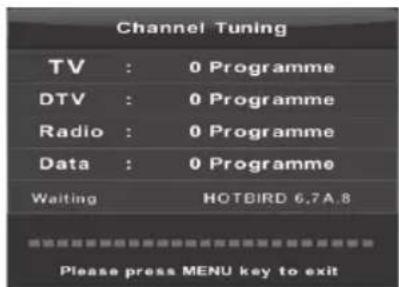
Auto Tuning
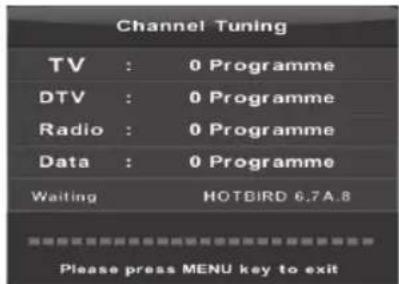
Press the ▼/▲ button to select Auto Tuning and then press the Enter/▶ button to enter.
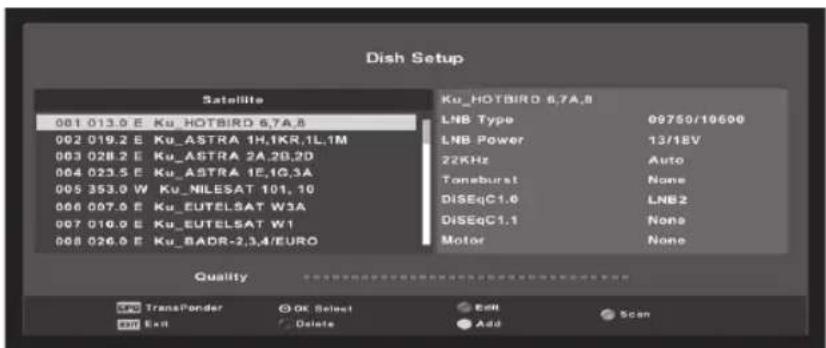
Dish Setup
Press the ▼/▲ button to select Dish Setup and then press the Enter/ ▶ button to enter.
23
Picture Menu
Press the MENU button to display the main menu and then press the ◀/▶ button to select PICTURE in the main menu.
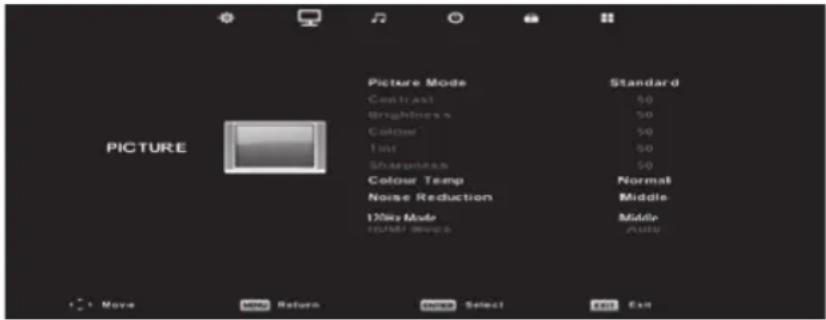
Note: The 120 Hz MODE function is only supported with UHD TV.
- Pressthe ▼/▲ button to select the option that you want to adjust in the PICTURE menu.
- Press the OK button to make the desired adjustments.
- After finishing your adjustment, press the MENU button to save and return to the previous menu.
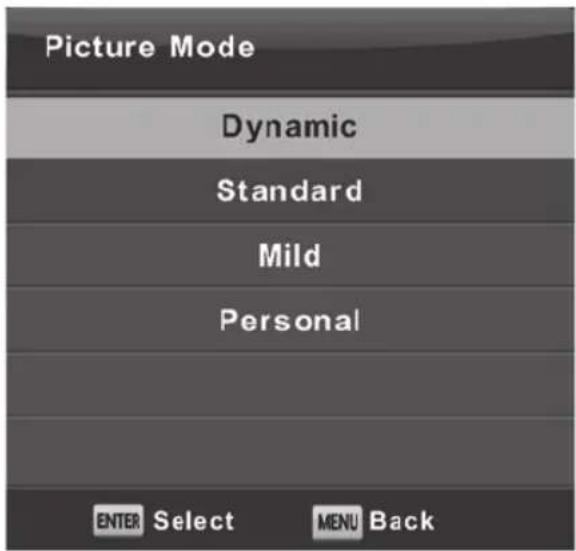
Picture Mode
Press the ▼/▲ button to select Picture Mode and then press the OK button to enter the sub-menu. You can change the value of contrast, brightness, colour, sharpness and tint when the picture is in Personal mode.
TIP: You can press the PMODE button to change the Picture Mode directly.
led tv 22" HD
K5128X22F
EN
Contrast / Brightness / Colour / Tint / Sharpness Press the ▼/▲ button to select the desired option and then press the Enter/▶ button to adjust.
Contrast Adjusts the highlight intensity of the picture, but the shadow of the picture is invariable.
Brightness Adjusts the optical fibre output of the entire picture, it will affect the dark region of the picture.
Colour Adjusts the saturation of the colour based on your own like.
Tint Used to compensate colour changed with the transmission in the NTSC code.
Sharpness Adjusts the peaking in the picture detail.
kunft.
Colour Temp
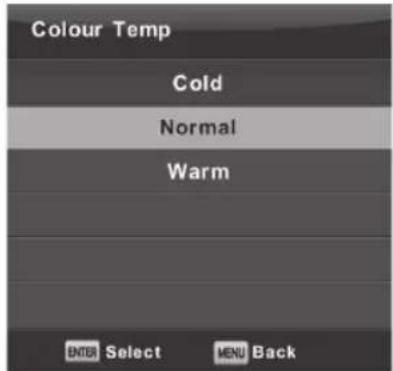
Changes the overall colour cast of the picture.
Press the ▼/▲ button to select Colour Temperature and then press the OK button to enter the sub-menu.
Press the ▲/▼ button to select. (Picture modes available: Cool, Medium, Warm).
Cold Produces a gentle blue-hued image.
Normal Produces a vivid image.
Warm Produces a red-hued image.
Noise Reduction
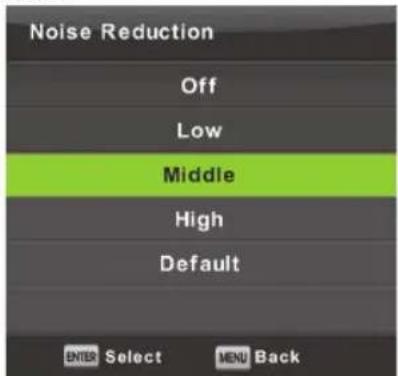
To filter out and reduce the image noise and improve picture quality.
Press the ▼/▲ button to select Noise Reduction and then press the OK button to enter sub-menu.
led tv 22" HD
K5128X22F
EN
Off Turns off the video noise detection.
Low Detects and reduces low video noise.
Middle Detects and reduces moderate video noise.
High Detects and reduces high video noise.
Default Set as Default.
(120Hz mode only with UHD TV)
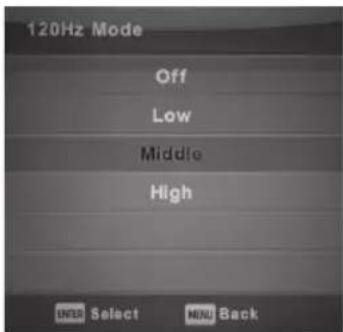
Adjusts the motion compensation.
Higher setting may improve the motion performance when watching sports or playing games.
Press the ▼/▲ button to select [Off/Low/Middle/High]
HDMI Mode
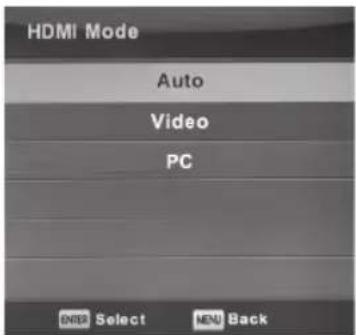
Press the ▼/▲ button to select the HDMI Mode and then press the OK button to enter the sub-menu.
27
kunft.®
Press the ▼/▲ button to select (Picture mode available: Auto, Video, PC).
Sound Menu
Press the MENU button to display the main menu. Press the ◀/▶ button to select SOUND in the main menu.
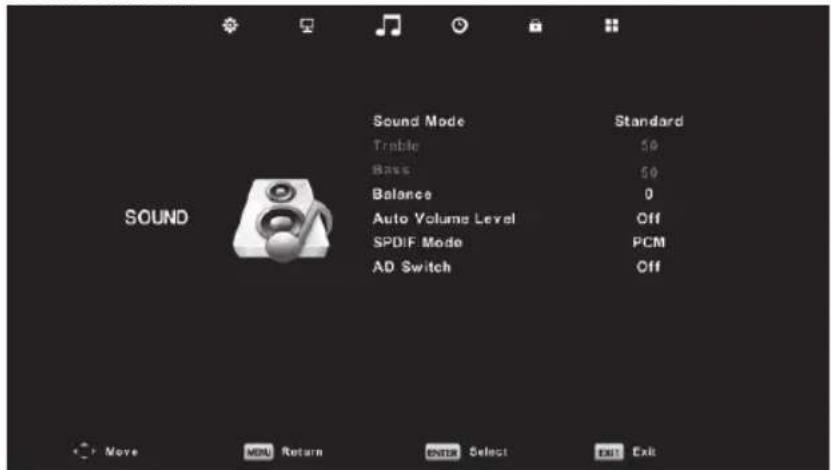
- Pressthe ▼/▲ button to select the option that you want to adjust in the SOUND menu.
- Press the Enter button to adjust.
- After finishing your adjustment, press the Enter button to save and return to the previous menu.
Sound Mode
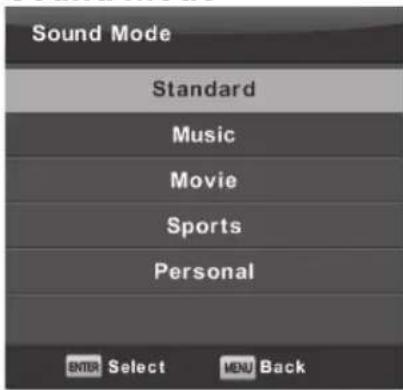
Press the ▼/▲ button to select Sound Mode and then press Enter button to enter sub-menu. Press ▼/▲ button to select.
led tv 22" HD
K5128X22F
EN
You can change the value of Treble and Bass when the sound is in Personal mode.
TIP: You can press the SMODE button on the remote control to change the Sound Mode directly.
Standard Produces a balanced sound in all environments.
Music Preserves the original sound. Good for musical programmes.
Movie Enhances treble and bass for a rich sound experience.
Sports Enhances vocals for sports.
Personal Customizes picture settings.
Note: The treble and bass are only available in personal mode; you can adjust them as you like.
Balance
Press the ▼/▲ button to select an option and then press the ◀/▶ button to make the desired adjustments.
Auto Volume level
Press the ▼/▲ button to select Auto Volume Level and then press the ◀/▶ button to select On or Off.
SPDIF Mode
Press the ▼/▲ button to select SPDIF Mode and then press the ◀/▶ button to select Off/PCM/Auto.
kunft.®
AD Switch
Press the ▼/▲ button to select AD Switch and then press the ◀/▶ button to select On or Off.
Auto Volume: This feature reduces the difference between the channel and the programme's volume automatically.
Time Menu
Press the MENU button to display the main menu. Press the ◀/▶ button to select TIME in the main menu.
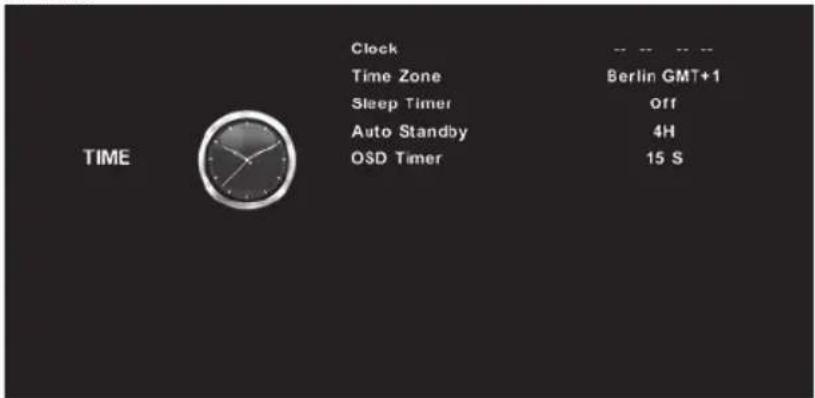
- Pressthe ▼/▲ button to select the option that you want to adjust in the TIME menu.
- Press the Enter button to adjust.
- After finishing your adjustment, press the Enter button to save and return to the previous menu.
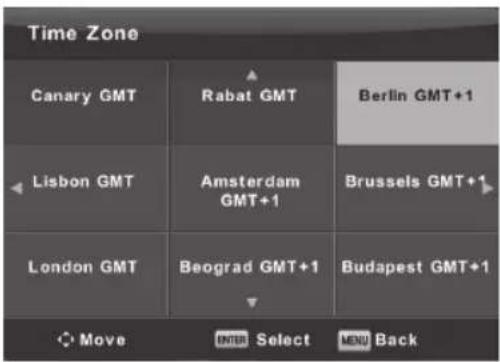
Time Zone
Press the ▼/▲ button to select Time Zone and then press the Enter button to enter the sub-menu.
Press the ▼/▲ / ◀/▶ button to select a time zone.
led tv 22" HD
K5128X22F
EN
Sleep Timer
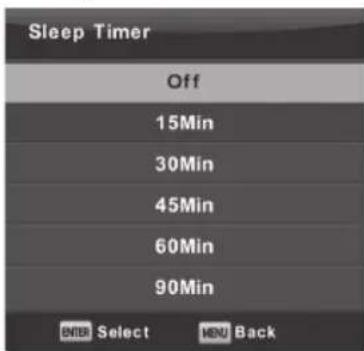
Press the ▼/▲ button to select Sleep Timer and then press the Enter button to enter the sub-menu.
Press the ▼/▲ button to select. (Available options are: Off, 15 min, 30 min, 45 min, 60 min, 90 min, 120 min, 240 min).
Auto Standby
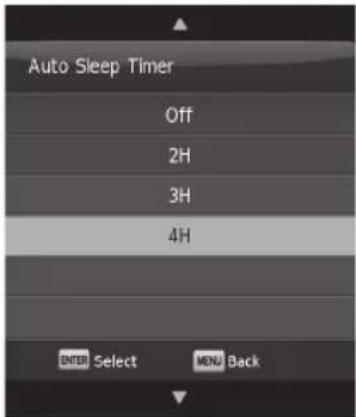
Press the ▼/▲ button to select Auto Standby and then press the Enter button to enter the sub-menu.
Press the ▼/▲ button to select.
Tip: if no operations are made using the remote control when time's up, the tele-
vision will change to stand-by mode automatically. If you make any changes, the timer will be reset.
kunft®
OSD Timer
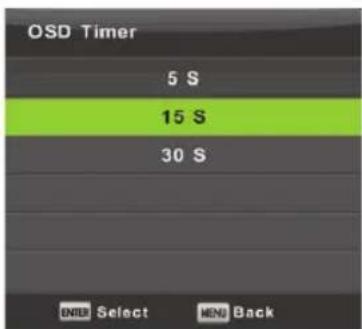
Press the ▼/▲ button to select OSD Timer and then press the Enter button to enter the sub-menu.
Press the ▼/▲ button to select.
Lock Menu
Press the MENU button to display the main menu. Press the ◀/▶ button to select Lock in the main menu.
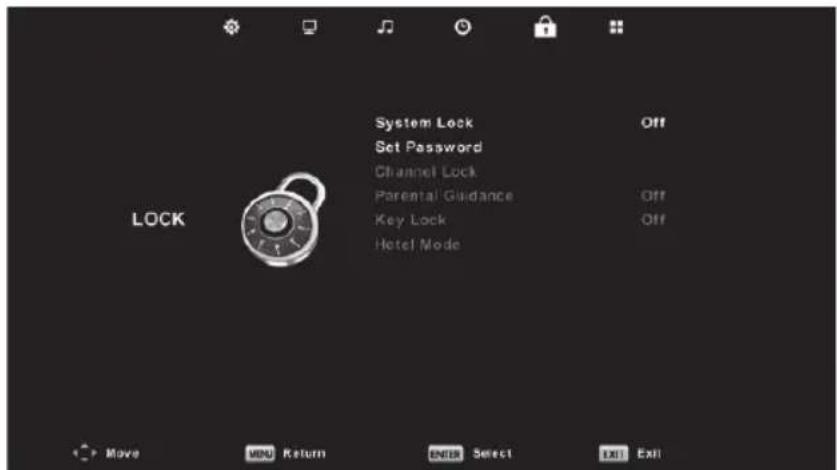
- Pressthe ▼/▲ button to select the option you want to adjust in the LOCK SYSTEM menu.
- Press the Enter/ ◀/▶ button to adjust.
- After finishing your adjustments, press the MENU button to return back to the previous menu.
Lock System
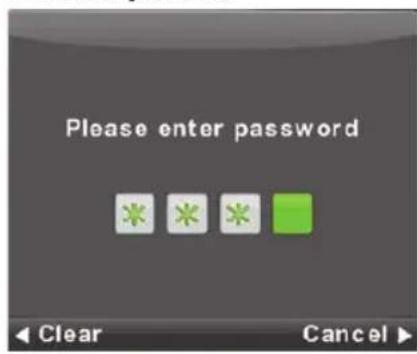
Press the ▼/▲ button to select the System Lock and then press the Enter button to make the following 3 options valid.
The default password is 0000. If you forget your password, please contact the Customer Support Service.
Set Password
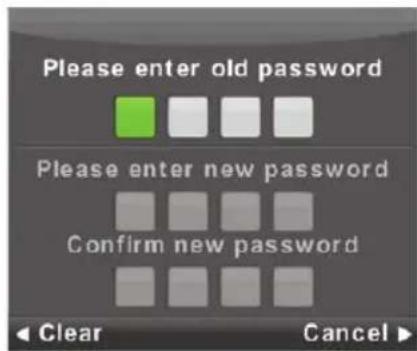
Press the ▼/▲ button to select Set Password and then press the Enter button to enter the sub-menu to set new password.
Channel Lock
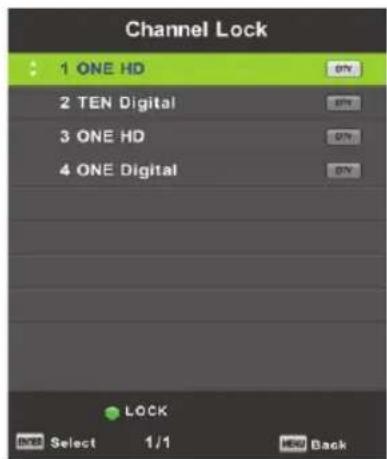
Press the ▼/▲ button to select Channel Lock and then press the Enter button to enter the sub-menu to select. Press the Green button to lock or unlock the channel.
Parental Guidance
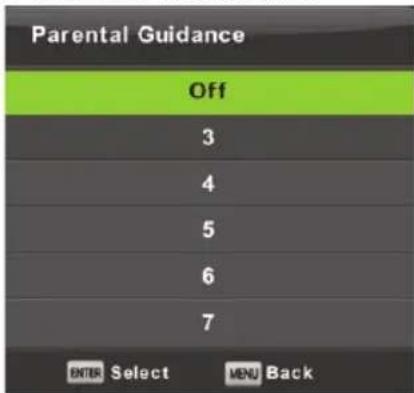
Press the ▼/▲ button to select Parental Guidance and then press the Enter button to enter the sub-menu.
Key Lock
Press the ▼/▲ button to select Key Lock and then press the ◀/▶ button to select Off or On. When the Key Lock is On, you cannot use the Keypad.
Hotel Mode (must support Hotel Mode)
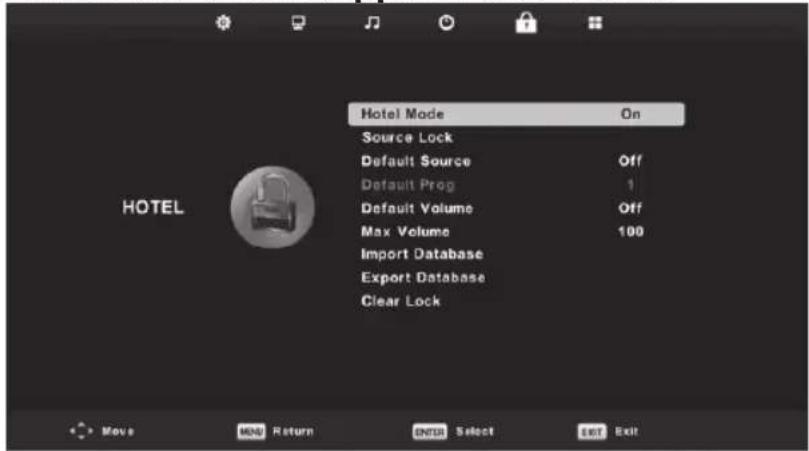
-
Pressthe ▼/▲ button on the remote control to select Hotel Mode in the Lock menu.
-
PresstheEnter button on the remote control to enter the sub-menu.
-
After finishing your adjustments, press the MENU button to save and return to the previous menu
Hotel Mode
Press the ▼/▲ button to select Hotel Mode and then press the ◀/▶ button to select On or Off.
Source Lock
Press the ▼/▲ button to select Source Locke and then press the Enter button to enter the sub-menu to select.
Default Source
Press the ▼/▲ button to select Default Source and then press the Enter button to enter the sub-menu to select.
Default Prog
Press the ▼/▲ button to select Default Prog and then press the ◀/▶ button to make the necessary adjustments.
It is available when the default source is TV.
Max Volume
Press the ▼/▲ button to select Max Volume and then press the ◀/▶ button to make the necessary adjustments.
Clear Lock
Press the ▼/▲ button to select Clear Lock and then press the Enter button to clear the locked setting.
Setup Menu
Press the MENU button to display the main menu and then press the ◀/▶ button to select SETUP in the main menu.
kunft.
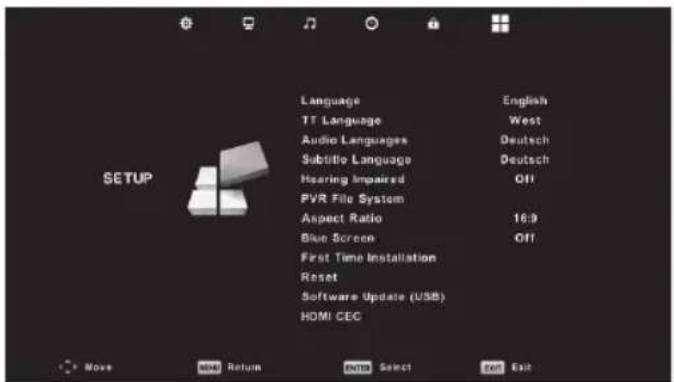
- Pressthe ▼/▲ button to select the option you want to adjust in the SETUP menu.
2.PresstheEnter button to make the necessary adjustments. - After finishing your adjustments, press the Enter button to save and return to the previous menu.
OSD Language
Select an OSD menu to display the language. Default English is selected as menu language. Press the ▼/▲/◄/► button to select Language Menu.
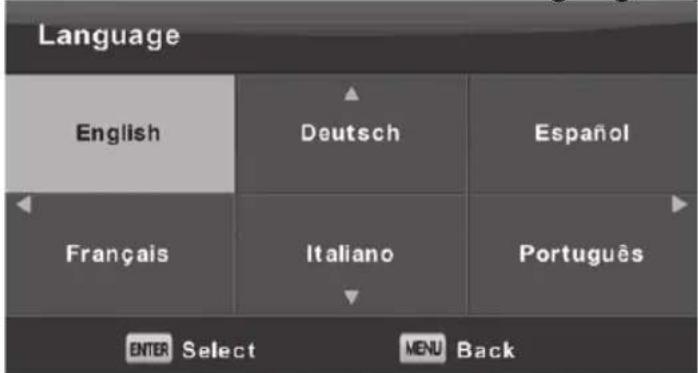
led tv 22" HD
K5128X22F
EN
TT Language
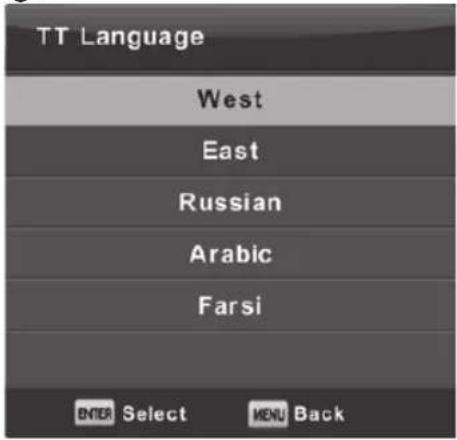
Press the ▼/▲ button to select TT Language and then press the Enter button to enter sub-menu. Press the ▼/▲ button to select the desired TT language.

Audio Languages
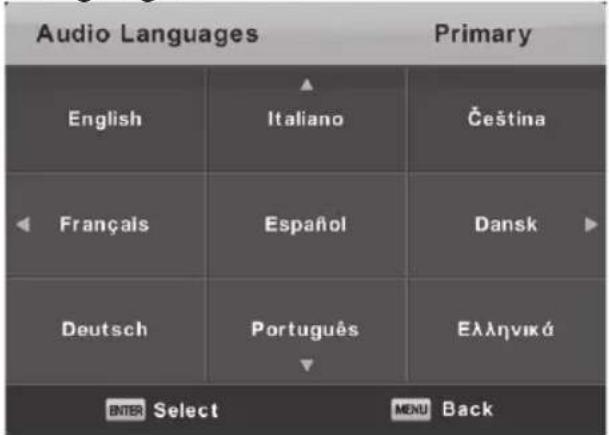
Press the ▼/▲ button to select Audio Languages and then press the Enter button to enter the sub-menu. Press the ◀/▶ button to select the primary Audio Languages.
Press the ▼/▲/◄/► button to select the Audio Languages.
Subtitle Language
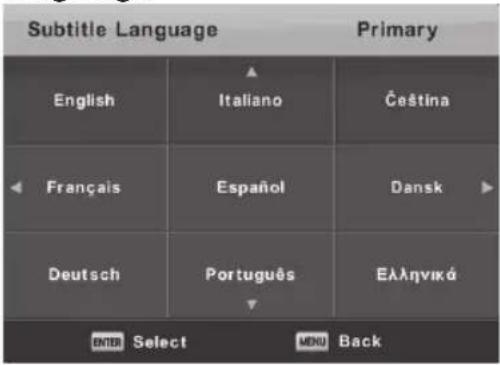
Press the ▼/▲ button to select Subtitle Language and then press the Enter button to enter the sub-menu. Press the ◀/▶ button to select the primary Subtitle Language. Press the ▼/▲/◀/▶ button to select the Subtitle Language.
Hearing Impaired
Press the ▼/▲ button to select Hearing Impaired and then press the Enter button to select On or Off.
PVR File System
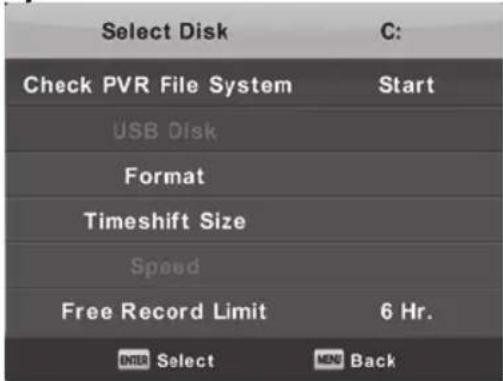
Press the ▼/▲ button to select PVR File System and then press the Enter button to enter the sub-menu. Press the ▼/▲ button to select Check PVR File System and then press the Enter button to enter. It will, then, check the USB speed.
Aspect Ratio
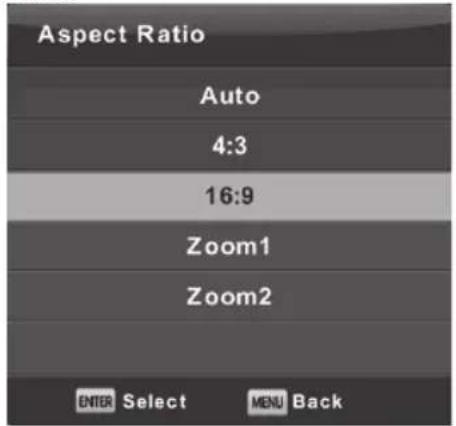
Press the ▼/▲ button to select Aspect Ratio and then press the Enter button to enter the sub-menu. Press the ▼/▲ button to select the desired Aspect Ratio (available options: Auto, 4:3,16:9, Zoom1, Zoom2).
Blue Screen
Press the ▼/▲ button to select Blue Screen and then press the Enter button to select On or Off.
First Time Installation
Press the ▼/▲ button to select First time installation and then press the Enter button to enter sub-menu.
Reset
Press the ▼/▲ button to select Reset and then press the Enter button to enter sub-menu.
Software Update (USB)
Press the ▼/▲ button to select Software Update (USB), plug your USB device into the USB slot and then press the Enter button to update the right software.
HDMI CEC (must support the HDMI CEC/ARC function)
Press the ▼/▲ button to select HDMI CEC and then press the Enter button to enter the sub-menu.
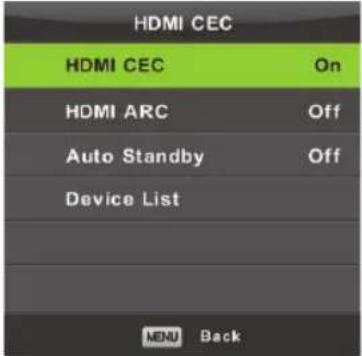
HDMI CEC→Press the ◀/▶ button to turn the HDMI CEC On or Off.
HDMI ARC→Press the ◀/▶ button to turn the HDMI ARC On or Off.
Auto Standby Press the ◀/▶ button to turn the Auto Standby On or Off.
Device List→Press the Enter button to open the device's main menu.
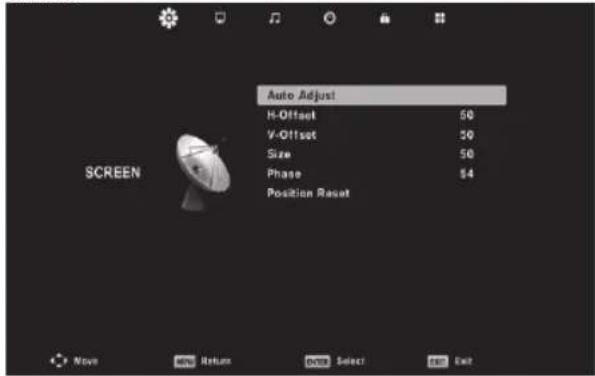
Screen Menu
Press the MENU button to display the main menu. Press the ◀/▶ button to select SCREEN in the main menu.
40
- Pressthe ▼/▲ button to select the option you want to adjust in the SCREEN menu.
- Press the Enter button to adjust.
- After finishing your adjustments, press the Enter button to save and return to the previous menu.
Auto Adjust
Press the Enter button to start adjusting H-Offset/V-Offset/Size/Phase automatically.
H-Offset
Adjusts the horizontal position of the picture. Press the ▼/▲ button to select H-Offset and then press the Enter button to enter the sub-menu.
V-Offset
Adjusts the vertical position of the picture. Press the ▼/▲ button to select V-Offset and then press the Enter button to enter the sub-menu.
Size
Adjusts the display size. Press the ▼/▲ button to select Size and then press the Enter button to enter the sub-menu.
Phase
Adjusts the horizontal interfering lines. Press the ▼/▲ button to select Phase and then press the Enter button to enter the sub-menu.
Position Reset
Press the ▼/▲ button to select Position Reset and then press the Enter button to enter.
kunft.®
Notes:
- Noise Reduction in PICTURE menu is invalid.
- AD Switch in SOUND menu is invalid.
- TIME menu and description are the same as that for Air mode.
- Block Programme and Parental Guidance in LOCK menu is invalid.
- Audio Languages, Subtitle Language, Hearing Impaired and PVR File System in SETUP menu is invalid.
- PC mode has no CHANNEL menu.
MEDIA OPERATION
NOTE: Before operating the Media menu, plug in the USB device and then press the Source button to set the Input Source to Media. Press the ▼/▲ button to select Media in the Source menu, then press the Enter button to access.
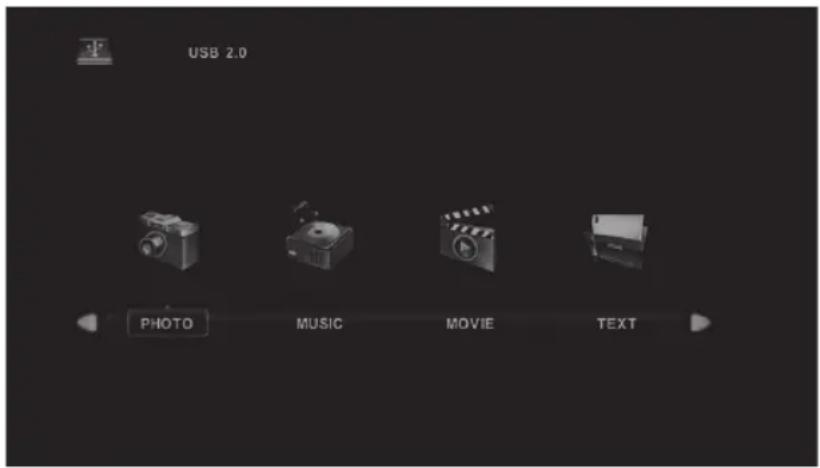
42
Press the ◀/▶ button to select the option you want to adjust in the main Media menu and then press the Enter button to enter.
Photo Menu
Press the ◀/▶ button to select PHOTO in the main menu and then press the Enter button to enter. Press the Exit button to return to the previous menu and exit menu to quit.
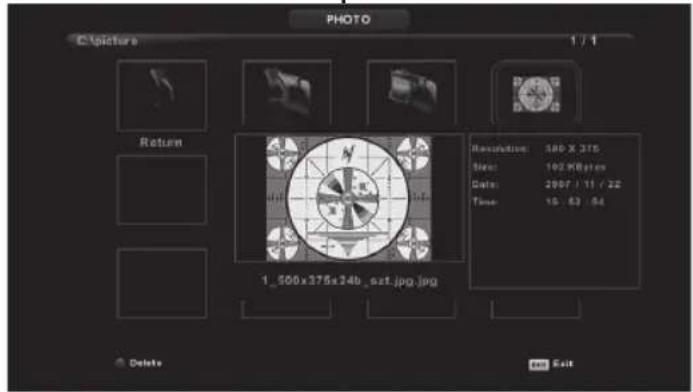
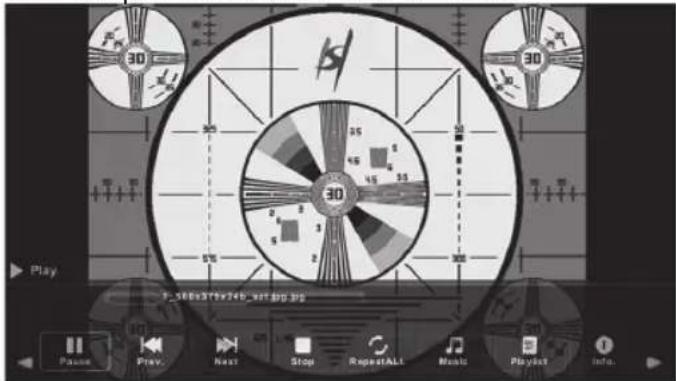
Press the ◀/▶ button to select the file you want to watch in the file selecting menu and then press the Enter button to display picture.
When highlighting the option you selected, the file information will appear on the right and the picture will be previewed in the centre.
kunft.
Music Menu
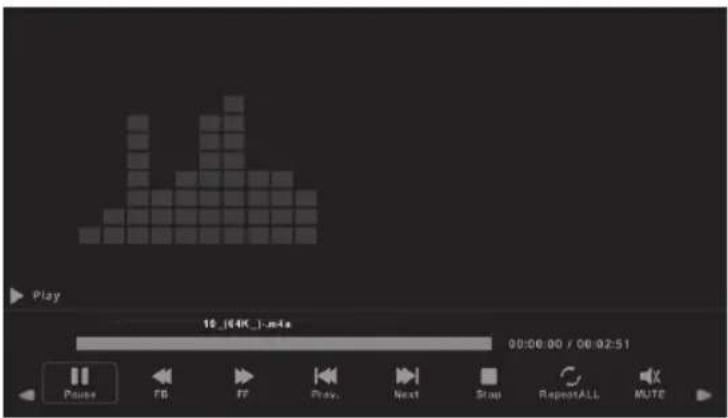
Press the ◀/▶ button to select MUSIC in the main menu and then press the Enter button to enter. Press the Exit button to return to the previous menu and quit the entire menu.
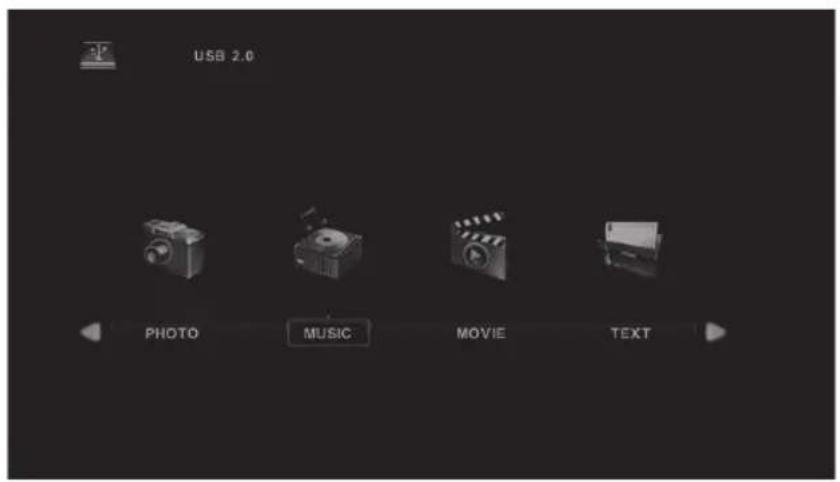
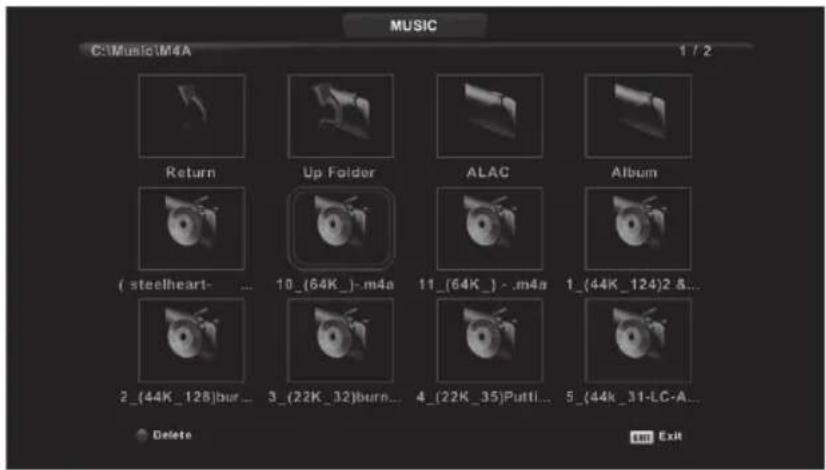
Press the ◀/▶ button to select the drive disk you want to watch and then press the Enter button to enter. Press the ◀/▶ button to select a return option to the previous menu.
44
led tv 22" HD
K5128X22F
EN
Movie Menu
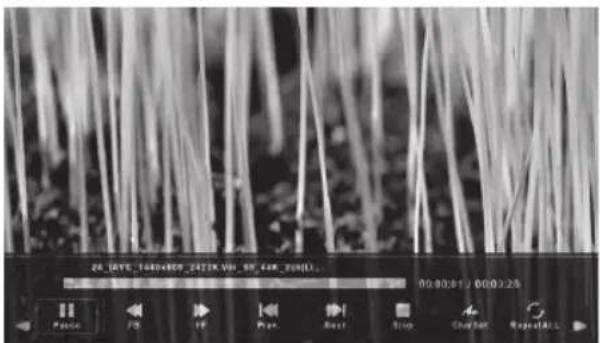
Press the ◀/▶ button to select MOVIE in the main menu and then press the Enter button to enter. Press the Exit button to return to the previous menu and quit the entire menu.
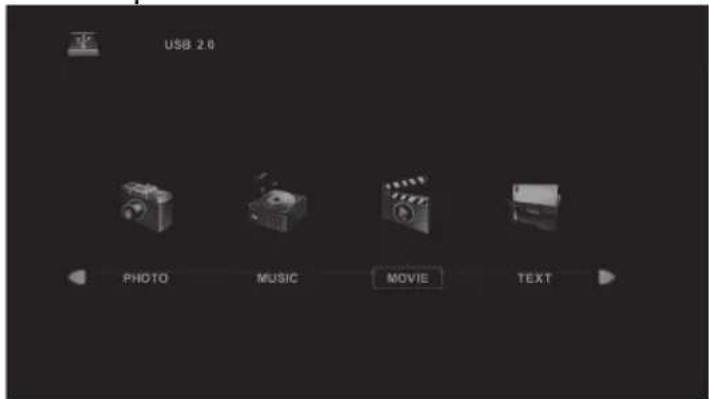
Press the ◀/▶ button to select the drive disk you want to watch and then press Enter button to enter. Press the Enter button to play the selected movie. Press the Display button to select the menu in the bottom you want to run and then press the Enter button to operate.
Press the Exit button to return to the previous menu and quit the entire menu.
kunft.
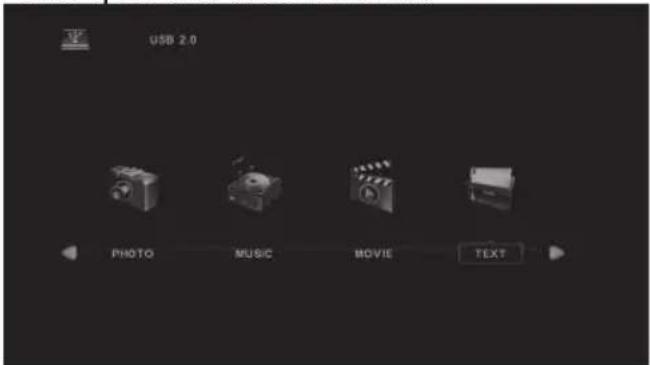
Text Menu
Press the ◀/▶ button to select TEXT in the main menu and then press the Enter button to enter.
Press the Exit button to return to the previous menu and quit the entire menu.
Press the ◀/▶ button to select the drive disk you want to watch and then press the Enter button to enter. Press the ◀/▶ button to select a return option to the previous menu.
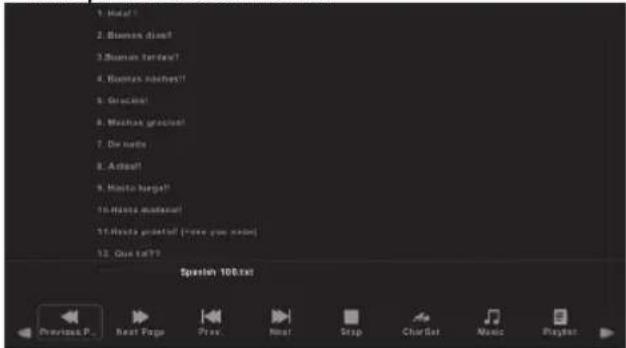
2.2. TROUBLESHOOTING
No power • Check if the TV's AC cord is plugged in. If it is plugged in and there's still no power, disconnect the plug, wait 60 seconds and reconnect it to the socket. Then, turn the power back on.
- Double or phantom images buildings or mountains close to where you are. You can adjust the image thru manual operation: refer to instruction of Vernier regulation, or adjust the direction of the external antenna.
| Signal not received properly | Double or phantom images may appear on your TV if there are high buildings or mountains close to where you are. You can adjust the image thru manual operation: refer to instruction of Vernier regulation, or adjust the direction of the external antenna.If you use an indoor antenna, under certain circumstances signal reception may be more difficult. Adjust the direction of the antenna for optimum reception. If this does not improve reception, you may have to switch to an external antenna. |
| No picture• Check if the antenna at the back of the TV is connected properlyView other channels to see if the problem still occurs | |
| There is video but no audio | Try increasing the volume.Check if the TV's sound is on mute or not. |
| There is audio but no video | Try adjusting the contrast and brightness. |
| Static noise affects video and audio quality | Check if the antenna at the back of the TV is connected properly. |
| Broken lines on screen | Electrical appliances such as hair dryers or vacu-ums etc may interfere with your TV. Switch these appliances off. |
| Remote doesn't work• | Make sure the plastic bag which came with the remote control is removed. Try using the remote at a shorter distance from the TV. Check if the placement of the batteries is correct, or try replacing the remote control's batteries.The TV will go into Standby mode if it receives no response in a few minutes. |
kunft.®
| No video (PC mode) • | Check if the cable is connected to the VGA port correctly or if the cable is bent. |
| Vertical line blinking (PC Mode) | • Enter the main menu and adjust the vertical placement to eliminate the vertical line. |
| Horizontal tearing (PC Mode) | • Adjust the horizontal placement of the screen to clear any horizontal lines. |
| Screen is too bright or dark (PC Mode) | • Adjust the brightness or contrast in the main menu. |
| No response from the PC | • Check if the PC's display resolution is set to a compatible resolution with the TV. |
| Lines appear when a device is connected to the RCA port | • Make sure you are using a good quality cable. |
| Problems are unresolved | • Unplug the power cable, wait for 30 seconds and then reconnect it to the socket. If the problems persist, do not attempt to repair the TV by yourself, but contact the Customer Support Service. |
Do not leave your TV displaying a static image, whether it is from a paused video, menu screen, etc. for an extended period of time, as doing so will damage the display and may cause image burn-in.
Remote control
- POWER: Sets your TV to Power On or Standby mode.
- MUTE: Mutes the sound. Press again or press VOL+ to unmute.
-
0-9: Press 0-9 to select a TV channel directly while watching TV. The channel will change after 2 seconds. Applicable for entering page number in teletext mode and so on.
-
DTV/ATV: Switches between Analog and Digital TV.
-
: Returns to the previous viewed programme.
-
S.MODE: Cycles through the different sound settings.
-
SLEEP: Selects amount of time before the TV turn itself Off automatically.
-
MTS: Searches the NICAM modes.
-
P. MODE: Cycle through the different picture settings.
-
MENU: Navigates the on-screen menus.
-
SOURCE: Opens the main menu and press to list the sources.
-
▲/▼/◄/► ENTER: Navigates the on-screen menus and adjusts the system settings to your preference.
-
EXIT: Exits the menu or sub-menu and cancels the function in process (if applicable).
-
DISPLAY: Displays the source and channel's info.
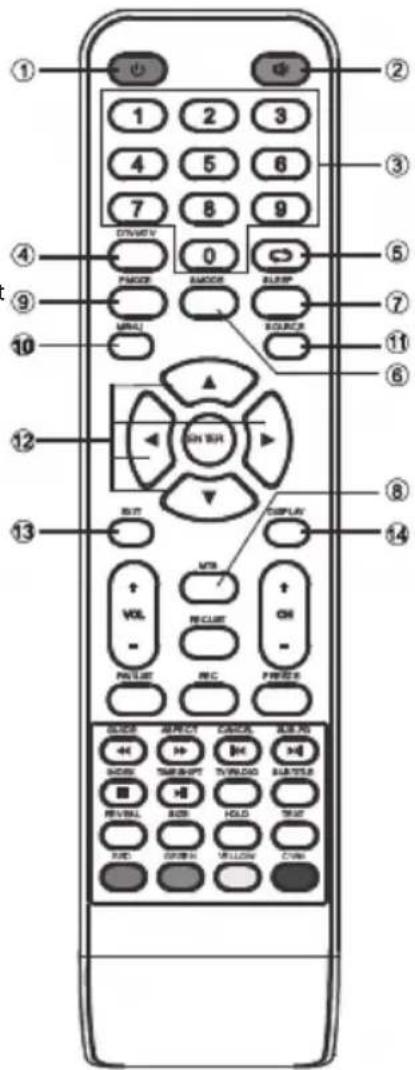

kunft.
- VOL+/VOL-: Increases / Decreases the sound level.
- TV/RADIO: When watching a channel, switches between TV and Radio modes.
- GUIDE: 1. Launches the EPG (Electronic Programme Guide)
- Fast reverse in PVR or Media Player mode.
- TIME SHIFT: 1. DTV channel time shift Function. 2. Play on PVR or Media Player mode.
- CANCEL: 1. When a page is selected in the TEXT mode, it may take some time before it becomes available; pressing the CANCEL key will return to the TV mode. When the required page is found, the page number will appear at the top of the TV picture. Then, press CANCEL to return to the TEXT mode for you to browse this page. 2. Previous chapter in PVR or Media Player mode.
- INDEX: 1. Accesses the Index page in Teletext mode. 2. Exits the playing function in PVR or Media Player mode.
- SIZE: Changes the size of display in Teletext mode.
- REVEAL: Shows or Hides subtitles.
- COLOR BUTTONS: Teletex switch between analogue parts, items selection in the menu of the digital parts and practice of the M
- CH+/CH-: Scans through the channels.
- FAV/LIST: Opens the favourite list to select the favourite channels.
- ASPECT: 1. Selects the picture scale. 2. Fast forward in PVR or Media Player mode.
- FREEZE: Freezes the picture.
- SUB. PG (Subpage): 1. Accesses the subpage. 2. Next chapter in PVR or Media Player mode.
- SUBTITLE: Shows and set the language of the current DTV.
- HOLD: Holds On or Off for current page display.
31 TEXT: Switches the teletext On and Off. - RECLIST: Shows the recorded list.
- REC: Recording begins in PVR mode.
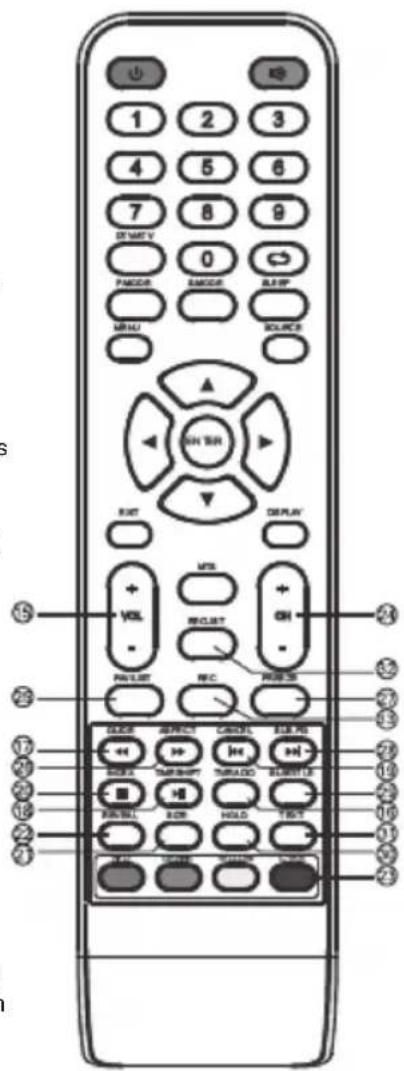
Battery Installation:
Remove the battery compartment lid on the back of the remote control by sliding the lid down and then off. Place two AAA batteries inside the battery compartment with their + and - polarity's ends aligned as indicated. Do not mix old and new batteries or different types of batteries. Slide the lid until you hear it click into place.
Using the Remote Control:
Unless otherwise stated, the remote control can operate all TV features.
Always point the remote control directly at the remote sensor in front of the TV.
3. TECHNICAL SPECIFICATIONS
Screen Size power Consumption Main accessories
| 16” 24 W | ||
| 19” 36 W / 48 W | ||
| 22” 36 W / 48 W | ||
| 24” 36 W / 48 W | ||
| 28” 36 W 1x User's manual | ||
| 32” 56 W / 65 W / 100 W 1x Remote control | ||
| 39”/40” | 60 W / 70 W / 76 W | 1x Power cord |
| 42” | 67 W / 70 W / 95 W / 100 W | 2x AAA Batteries |
| 43” | 65 W / 80 W | |
| 50” | 100 W / 108 W / 135 W | |
| 55” | 100 W / 135 W / 140 W / 160 W | |
| 65” | 159 W / 165 W / 195 W | |
LIFE TIME: 60 000 Hrs
4. POST-SALE SERVICE
KUNFT has designed this appliance in order to guarantee maximum reliability. However, if a problem occurs do not attempt to open the appliance - there is a risk of electrical shock. If you are not able to solve the problem, please contact the Customer Support Service of any Worten, Modelo or Continente store in order to be assisted. Worten Equipment para o Lar provides a 2-year warranty for manufacturing defects from the date of purchase of the appliance.
WARNING: any attempt to repair the appliance without contacting the manufacturer or seller will void the warranty.
All users must be familiar with these instructions. Knowing what could go wrong can help prevent problems from occurring.
5. ENVIRONMENTAL PROTECTION
In order to protect the environment, we strive to reduce the volume of packaging used, limiting it to three easily sorted materials: cardboard, paper
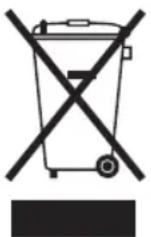
and plastic. The appliance is manufactured using recyclable materials after disassembled by a specialized company. Please comply with local regulations concerning the recycling of all materials.
led tv 22" HD
K5128X22F
EN
Worten hereby declares that this equipment (7080 554_TV LED 22" FHD KUNFT K5128X22H) is in compliance with Directive 2014/53/EU of the European Parliament and of the Council of 16 April 2014. The full declaration is available at the following Internet address: https://www.suporteworten.pt
53
Estimado cliente,
natural_image
Top-down schematic of a computer monitor layout showing front, top, and side views (no text or labels)1
natural_image
Top-down architectural floor plan showing room layouts and furniture (no text or labels)②
kunft.®
Nota:
SOURCE: External Signal Input Selection.
Menú principal
Menú de Canales
70
led tv 22" HD
K5128X22F
ES
kunft.®
Current CH [Canal actual]
AD Switch [Interruptor AD]
AD Switch [Interruptor AD]
natural_image
Microscopic view of fibrous structures with no visible text or symbols101
natural_image
Top-down line drawing of a computer monitor layout with no text or symbols1
![Kunft K5128X22H - AD Switch [Interruptor AD] - 1](/content/2026/05/935358/images/ade91f8a6e060676c7a2e03b542cfbbe50d3db60b29fd1c4b3aa76e291580499.jpg)
natural_image
Top-down schematic of a room layout with furniture and fixtures (no text or labels)②
kunft.®
Menu Principal
Menu de Canais
AD Switch [Interruptor AD]
AD Switch [Interruptor AD]
Aspect Ratio [Formato]
Screen Menu [Menu Ecră]
natural_image
Microscopic view of fibrous material with scale bar and control buttons (no readable text or symbols)Text Menu [Menu Texto]
![Kunft K5128X22H - Text Menu [Menu Texto] - 1](/content/2026/05/935358/images/cbfc2412ea95b8c755f9ea3f4331e59da060365e5b3135c789062eee17c5b540.jpg)
kunft.
Imported, produced and distributed by:
- led tv 22" HD
- kunft.®
- INDEX
- SAFETY INSTRUCTIONS
- IMPORTANT WARNINGS
- Assistance
- Power Supply
- Power Cord and Other Cables
- Humidity and Water
- Cleaning
- General Precautions
- Caution:
- Caution
- RISK OF ELECTRIC SHOCK. DO NOT OPEN
- Warning
- OPERATING INSTRUCTIONS
- Product usage
- TV BRACKET ASSEMBLE
- Fix the TV on the wall
- Note:
- TV Buttons and Terminal Interface TV Buttons
- Terminal Interface
- AV input
- EARPHONE output
- CI input
- USB input
- Y Pb Pr input
- COAXIAL
- HDMI input
- SCART input
- ANT 750
- VGA input
- PC AUDIO INPUT
- TV Installation and Connection
- Set your TV
- Connect antenna and power
- Turn on TV
- TV Stand Installation Instructions
- First Time Installation
- Select Language
- Select Country
- Main Menu Operation
- Channel Menu
- Auto Tuning
- Current CH
- Colour System
- Sound System
- Fine-Tune
- Search
- DTV Manual Tuning
- Programme Edit
- Schedule List
- Signal Information
- CI Information (must support the CI function)
- Dish Setup
- Picture Menu
- Picture Mode
- kunft.
- HDMI Mode
- Sound Menu
- Balance
- Auto Volume level
- SPDIF Mode
- AD Switch
- Time Menu
- Time Zone
- kunft®
- Lock Menu
- Key Lock
- Hotel Mode
- Source Lock
- Default Source
- Default Prog
- Max Volume
- Clear Lock
- Setup Menu
- OSD Language
- Hearing Impaired
- Aspect Ratio
- Blue Screen
- Reset
- Software Update (USB)
- HDMI CEC (must support the HDMI CEC/ARC function)
- Screen Menu
- Auto Adjust
- H-Offset
- V-Offset
- Size
- Phase
- Position Reset
- Notes:
- MEDIA OPERATION
- Photo Menu
- Music Menu
- Movie Menu
- Text Menu
- TROUBLESHOOTING
- Remote control
- Battery Installation:
- TECHNICAL SPECIFICATIONS
- Screen Size power Consumption Main accessories
- POST-SALE SERVICE
- ENVIRONMENTAL PROTECTION
- K5128X22F
- Nota:
- Menú principal
- Menú de Canales
- Current CH [Canal actual]
- AD Switch [Interruptor AD]
- Menu Principal
- Menu de Canais
- Aspect Ratio [Formato]
- Screen Menu [Menu Ecră]
- Text Menu [Menu Texto]
Brand : Kunft
Model : K5128X22H
Category : Television