
AK-WVDCMB - Tumble dryer AKAI - Free user manual and instructions
Find the device manual for free AK-WVDCMB AKAI in PDF.


| Product Type | Tumble Dryer |
| Brand | AKAI |
| Model | AK-WVDCMB |
| Capacity (kg) | 8 |
| Height (cm) | 85 |
| Width (cm) | 60 |
| Depth (cm) | 60 |
| Weight (kg) | 40 |
| Power Supply | 220-240 V, 50 Hz |
| Power Consumption (W) | 2000 |
| Energy Efficiency Class | B |
| Noise Level (dB) | 65 |
| Number of Drying Programs | 15 |
| Drying Technology | Sensor drying, Condenser |
| Special Features | Anti-crease, Delay start, Child lock |
| Filter Type | Lint filter |
| Condenser Cleaning | Automatic self-cleaning |
| Warranty (years) | 2 |
| Color | White |
| Safety Features | Overheating protection, Child lock |
| Spare Parts Availability | Yes (various online stores) |
Frequently Asked Questions - AK-WVDCMB AKAI
User questions about AK-WVDCMB AKAI
0 question about this device. Answer the ones you know or ask your own.
Ask a new question about this device
Download the instructions for your Tumble dryer in PDF format for free! Find your manual AK-WVDCMB - AKAI and take your electronic device back in hand. On this page are published all the documents necessary for the use of your device. AK-WVDCMB by AKAI.
USER MANUAL AK-WVDCMB AKAI
natural_image
Front view of a white Akai washing machine with a black circular lid and digital display (no visible text or symbols)Washer Dryer Combo
(10 kg Washer & 6 kg Dryer)
INSTRUCTION MANUAL
MODEL: AK-WVDCMB
Contents
03 General Safety Instructions
08
Unpacking
09 Product Overview
11
Installation
17
Instructions
27 FAQs and Troubleshooting Guide
30 Other Useful Information
General Safety Instructions
IMPORTANT SAFETY INSTRUCTIONS
READ CAREFULLY AND KEEP FOR FUTURE REFERENCE
Read this manual thoroughly before first use, even if you are familiar with this type of product. The safety precautions enclosed herein reduce the risk of fire, electric shock and injury when correctly adhered to. Keep the manual in a safe place for future reference, along with any warranty information and your purchase receipt. If applicable, pass these instructions on to the next owner of the appliance.
Always follow basic safety precautions and accident prevention measures when using an electrical appliance, including the following:
Pay particular attention to safety advice following the words DANGER, WARNING and CAUTION. These words are used to alert you to a potential hazard that can seriously injure you and others. The instructions will tell you how to reduce the chance of injury and let you know what can happen if the instructions are not followed.
DANGER means that failure to read this safety statement may result in severe personal injury or death.
WARNING means that failure to read this safety statement may result in extensive product damage or serious personal injury.
CAUTION means that failure to read this safety statement may result in minor or moderate personal injury, property or equipment damage.
Electrical safety and cord handling
- Voltage: Before connecting and turning on the appliance, ensure the electrical voltage and circuit frequency correspond to those indicated on the appliance rating label.
- Separate circuit: We strongly recommend you connect the appliance to a separate circuit serving only this appliance. This provides the best performance and also prevents overloading the house wiring circuits that could cause a fire hazard from overheating.
- Power supply system: Make sure the power supply system (current, power voltage and cabling) at your home can meet the normal loading requirements of electrical appliances.
- WARNING! Only connect this washer dryer to a grounded (earthed) electrical outlet. Do not overload the wall outlet, as overloading can result in fire or electric shock. Insert the power plug securely.
- Protect from moisture: To avoid electric shock, fire and malfunction, do not install this machine in a damp place. Do not pull out or insert the plug with wet hands or bare feet. Do not expose the appliance, cord or plug to rain, moisture or other liquid.
General Safety Instructions (Cont.)
- Power cord: Do not kink or damage the power cord, and position it out of the way so no one steps on or places anything on the cord or against it.
- WARNING! Do not use the machine if the cord or plug is damaged to avoid an electric shock, short circuit or fire. If the cord is damaged, it must be replaced by the manufacturer's service agent or a properly qualified person in order to avoid a hazard.
- CAUTION! Do not connect the appliance to the power supply using a power adaptor or extension cord. Use of an extension cord does not guarantee the required safety.
• After use: Always unplug the appliance and turn off the water after use. - Disconnect: Unplug the washer dryer from the power supply before cleaning, servicing, maintenance or moving the appliance. Pull by the plug, not by the cord.
- Keep openings clear: Do not insert any objects into ventilation or similar openings.
- WARNING: The machine must not be supplied through an external switching device such as a timer or remote control, or connected to a circuit that is regularly switched on and off by a utility.
- RCD: Unless your home is already fitted with a residual current device (safety switch), we recommend installing an RCD with a rated residual operating current not exceeding 30 mA to provide additional safety protection when using electrical appliances. See your electrician for professional advice.
Installation
- WARNING! This appliance is extremely heavy. Transport with care! A team lift or mechanical aid is required when moving the machine. Do not hold the washing machine by the door or any other protruding part while lifting or transporting it.
- Damage: Do not operate the appliance after it malfunctions or has been dropped or damaged. In case of damage, contact our after sales support centre for advice.
• Freestanding use only: This appliance is not to be built in.
- Do NOT install the appliance:
- outdoors or in a damp or wet environment (such as a bathroom)
– in areas where caustic or explosive gases are present - near open flames or heat sources
– in a tight-fitting cabinet
– behind a lockable door, a sliding door or a door with a hinge on the opposite side to that of the washer in such a way that a full opening of the washer door is restricted.
- Installation surface: This machine must be installed on a flat, even and stable ground to avoid overturning during use or maintenance. Do not place it on carpet. If the machine must be positioned on carpet, place a plastic mat underneath the machine and make sure any ventilation openings in the base are not obstructed.
- Clearances: Ensure that there is a distance of at least 200 mm between the appliance and any external heat sources, such as appliances containing heating elements.
General Safety Instructions (Cont.)
- Installation: Make sure that all water and electrical connections are made by qualified persons only, observing local safety regulations and following the installation instructions in this manual (refer to “Installation”, pages 13–18). Do not use the appliance until it is fully installed.
- Water connection: This machine has only one inlet for water (cold). Do not connect it to the hot water supply. Connect the machine to the water mains using new hose sets. Do not reuse old hose sets. The required water pressure is 0.02 MPa (min.) to 0.8 MPa (max.).
- Drainage: Do not allow the water drained out of the appliance to accumulate.
- Ventilation openings: Do not cover any air inlet or exhaust openings. Exhaust air must not be discharged into a flue which is used for exhausting fumes from appliances burning gas or other fuels.
- Electrical connection: During installation, the power cord must not be excessively or dangerously bent or flattened. The plug must be accessible after installation.
- Misuse: Improper installation or faulty use may result in the risk of fire, electric shock and/or injury. We accept no liability for any eventual damages or injury caused by improper installation, misuse or noncompliance with these instructions.
Usage conditions and restrictions
- Domestic use only: This appliance is intended for indoor household use only. It is NOT suitable for commercial, industrial or trade use.
- Intended purpose: This washer dryer combo is designed for washing and/or drying domestic quantities of textiles suitable for machine-washing and/or machine drying. Do not use the machine for anything other than its intended purpose, and only use it as described in this manual.
- No outdoor use: Do not operate the appliance outdoors.
- Usage restriction: This appliance is not intended for use by persons (including children) with reduced physical, sensory or mental capabilities, or lack of experience and knowledge, unless they have been given supervision or instruction concerning use of the appliance by a person responsible for their safety.
- Children: Supervise children to ensure they do not play with the appliance. Close supervision is necessary when any appliance is used by or near children. Do not allow children (or anyone else) to climb up and sit on top of the washing machine.
- Handling: Handle the washing machine with care. Do not place or store flammable items or heavy objects on top of the machine. Do not sit on the top cover.
- Door handling: Handle the door with care. Do not lean against the machine door. Do not let children swing from the door. Do not close the door with excessive force. If you find it difficult to close the door, please check and ensure that the clothes are properly loaded and well distributed.
General Safety Instructions (Cont.)
• Before loading the washer dryer:
– ensure no young child or pet has climbed into the drum
- ensure the water inlet hose is properly connected and the tap is turned on
- remove all objects from pockets such as lighters and matches
– check clothing for any hard, sharp objects such as coins, safety pins, paper clips, bra wires, nails, screws or stones can cause extensive damage to the appliance and block the pump. Any damage or malfunction resulting from foreign objects is not covered by your warranty and may lead to expensive repairs.
- Suitability for washing: Only load suitable items into the washing machine. See page 28 for which materials are unsuitable for the washing machine.
- Suitability for tumble drying: Only load suitable items into the clothes dryer. See page 28 for which materials are unsuitable for the clothes dryer and may present a fire risk.
CAUTION!
- Do not use the tumble dryer function if industrial chemicals have been used for cleaning.
- Do not dry unwashed items using tumble dryer function.
- Adequate ventilation has to be provided to avoid the backflow of gases into the room from appliances burning other fuels, including open fires.

WARNING: Risk of fire
This symbol alerts you to take care as oil-affected items can ignite spontaneously, especially when exposed to heat, such as in a clothes dryer. The items become warm, causing an oxidation reaction in the oil. Oxidation creates heat. If the heat cannot escape, the items can become hot enough to catch fire. Piling, stacking or storing oil-affected items can prevent heat from escaping and so create a fire hazard.
- Cool down: The final part of a clothes dryer cycle occurs without heat (cool down cycle) to ensure that the items are left at a temperature that will not damage them.
WARNING: Never stop a tumble dryer before the end of the drying cycle unless all items are removed quickly and spread out so the heat is dissipated.
- Door lock: In order to prevent burns, during the final part of the dry cycle the machine will reduce the temperature of the drum. The time on the display will stop reducing during this process. The door will unlock only after the temperature has reduced. Do not stop the machine during this cooling period.
- Flammable, explosive or toxic substances must not be used as washing detergents or for cleaning the machine.
- Capacity: Do not overload this machine; its maximum capacity is 10 kg (for a dry wash load), or 6 kg for the dryer function. See page 23 for more information.
• Water intake: Never refill the water by hand during washing.
- After use: After the program is finished, wait until the drum has stopped spinning and the door lock icon is no longer lit before opening the door. If water is still visible, do not attempt to open the door. Do not add or remove clothes while the drum is spinning.
General Safety Instructions (Cont.)
- Subsequent cycles: After turning off the power supply to the machine, wait at least two minutes before turning it back on again.
- Disconnect the water and power supplies after use.
CAUTION: Hot!
- Parts of the appliance can become hot during use and retain heat for some time after turning off. Do not touch hot surfaces! Keep the power cord away from hot parts. Do not cover the appliance.
- During a hot wash, or the drying process, the door window may become hot. Do not touch it, and ensure to keep children and pets away from the machine during operation.
- Be careful of burning when the machine drains hot washing water.
Cleaning and maintenance
- Disconnect: Before cleaning or carrying out maintenance, always unplug the appliance from the power supply.
- CAUTION! After each wash, clean the door and the door seals and remove any threads, lint or foreign objects. Also check the detergent drawer and clean out detergent residues. Regularly clean the power plug to remove dust and dirt and avoid contact failure. Cleaning and user maintenance shall not be carried out by children without supervision. Do not spray the machine with water.
- CAUTION! Cleaning the inside of your machine regularly is particularly important if you frequently use a cold wash cycle, especially if you also use a fabric softener. Liquid detergents can cause detergent scum to build up around the outside of the drum, which cold water will not remove and which can cause bacteria, unpleasant odours, and eventually soiling of your wash load.
- Do not open the housing: The washing machine has no user-serviceable parts contained within. Do not attempt to repair or dismantle it.
- Do not attempt to modify this product in any way. Doing so is dangerous and will void your warranty.
- Service: Only have the appliance serviced by authorised service personnel. Service or repairs carried out by inexperienced or unqualified persons may cause injury and/or make more serious repairs to the appliance necessary.
- NOTE: While your washer dryer combo does not have a lint filter to maintain, excess lint can collect in the drain pump. It is important to clean the drain pump every two months to ensure optimal product performance and the longevity of your machine.
CAUTION!
The door will not unlock when the temperature inside the drum is above 53 °C, and/or when the water is above a certain level.
For your safety, do not turn the program dial to the off position [O], open the machine and access the washing while the machine is running, or when the power supply is cut off. The water temperature may be high and it may scald you. The door will automatically unlock at the end of a wash program when the temperature of the drum has cooled down.
Unpacking
Unpacking the washing machine
CAUTION: EXTREMELY HEAVY!
A team lift or mechanical aid is required when moving this appliance. Keep the washing machine as upright as possible during transportation.
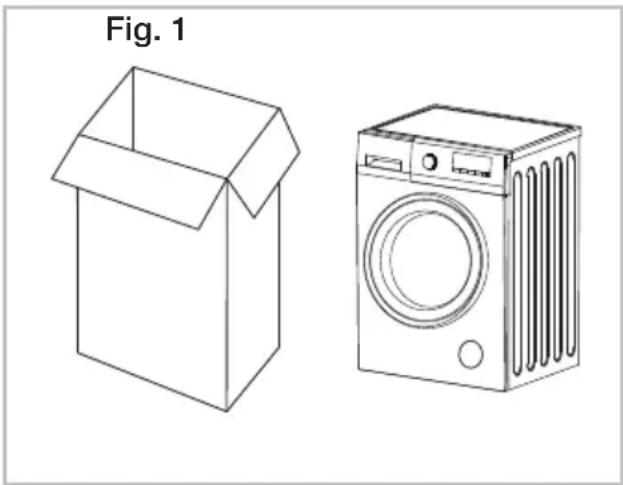
- This product has been packaged to protect it against transportation damage. Remove all packaging materials from around the appliance and inside the drum, including the foam base (Fig. 1).
- Keep the original packaging carton and materials in a safe place. It will help prevent any damage if the product needs to be transported in the future, and you can use it to store the appliance when it is not in use. In the event that the packaging materials are to be disposed of, please recycle them where possible.
natural_image
Line drawing of a cardboard box and a washing machine, both without any text or symbols- Plastic wrapping can be a suffocation hazard for babies and young children, so ensure all packaging materials are out of their reach and disposed of safely.
- Remove any tapes securing the power supply cord and drain hose and all accessory parts from the drum.
- If you notice any water drops on the packaging bags or the door glass, do not be alarmed. This is normal as the appliance is fully checked in the factory before it is being packaged for transport.
Checking the package contents
- Check all parts of the package against the scope of delivery list on the following pages and ensure you have received all items.
- Check the washer dryer for any damage from transportation. Unwind the power cord to its full length and inspect it for damage. Do not use the appliance if the appliance or its cord has been damaged or is not working properly. In case of damage, or if anything is missing, please contact our after sales support centre for advice on examination, repair or return of the damaged product.
- Read this manual to familiarise yourself with all the parts and operating principles of the washing machine. Pay particular attention to the safety instructions on the previous pages.
Product Overview
Scope of delivery
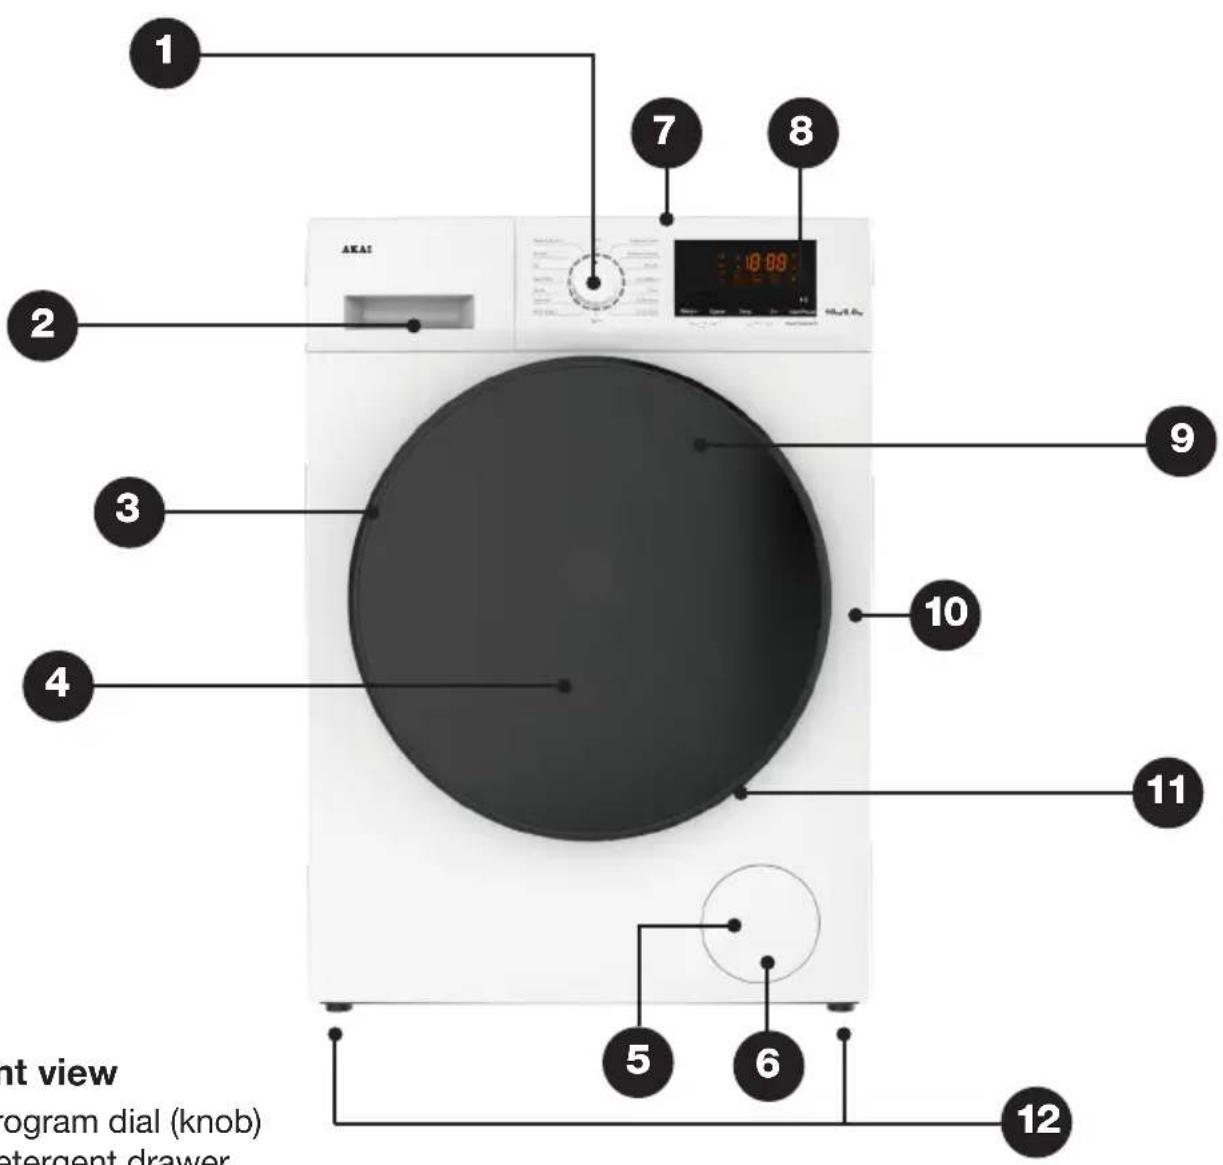
Front view
1 Program dial (knob)
2 Detergent drawer
3 Door
4 Door glass window
5 Service cover
6 Drain pump filter (behind the service cover)
7 Top cover
8 Control panel with LED display
9 Wash/spin drum (inside the door)
10 Housing
11 Door seal (inside the door)
12 Adjustable feet (4)
Product Overview (Cont.)
Rear view
13 Power cord and plug
14 Transit bolts (4)
15 Back cover
16 Drain hose connection (drain hose included, but not shown here)
17 Cold water inlet valve

Accessories
18 Cold water supply (inlet) hose
19 Transit hole caps (4)
20 Drain hose support (elbow)
Documentation (not shown)
Instruction manual
Quick start guide
Warranty certificate

flowchart
graph TD
    A["Start"] --> B["Circle with wheel and valve"]
    B --> C["Add 18 units"]
    C --> D["Line with hose"]
    D --> E["Add 20 units"]
    E --> F["Clamp"]
NOTE: Due to continued product improvement, images and illustrations in this manual may vary slightly from the product purchased. All images in this manual are for reference purposes only. Parts are not necessarily pictured to scale.
Removing the transit bolts
WARNING!
Before installing the washer dryer, you must remove the transit bolts from the back of the housing and cover the holes with the transit hole caps provided.
The bolts hold the drum in place during transport but they must be removed before use so the drum can move during the wash and spin cycles. Leaving the bolts installed will result in strong shock and noise during use, malfunction and serious damage to the machine.
- Dismantle the four transit bolts from the back of the machine using an appropriate tool (Fig. 2).
- Keep the bolts in a safe place; you will need them again when moving the appliance, if you move house, for example.
• Cover the holes with the supplied caps.
Selecting the location
Before installing the appliance, make sure the location meets the following requirements:
- A concrete floor is the most suitable installation surface for a washer dryer, being far less prone to vibration during the spin cycle than wooden floorboards or a carpeted surface.
- The machine must be level and securely positioned. It must be protected from direct sunlight, water and weather.
- The distance between the machine and wall must be more than 10 cm (Fig. 3).
- To avoid vibrations during spinning, the machine should not be installed on soft floor coverings. If the appliance must be placed on a carpeted surface, place a plastic mat underneath and ensure any ventilation openings in the base are not obstructed.
Fig. 2
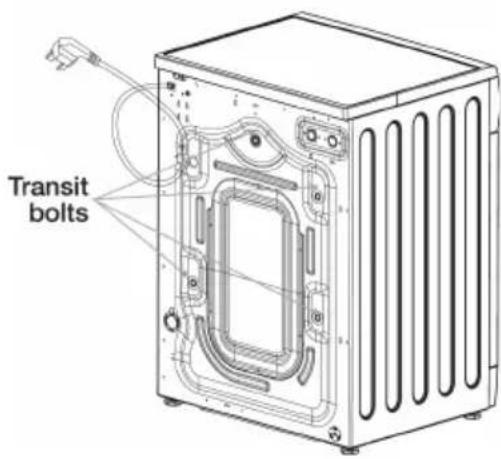
Fig. 3

WARNING!
Stability is important to prevent the appliance from moving during operation. Make sure that the machine does not stand on the power cord.
Installation (Cont.)
Levelling the machine
WARNING!
It is very important to level the washer dryer carefully, especially if your floor is uneven. Failure to do so may result in the machine shaking and moving during the spin cycle, or out-of-balance problems.
Place the machine on solid, dry and level ground. The machine must stand perfectly level on all four feet to ensure safe and proper operation. Incorrect installation may cause vibrations and noise and may cause the machine to move about.
To determine whether levelling is necessary, place a spirit level on top of the washer dryer and hold it upright against the housing to identify any inclinations. If the machine needs levelling, proceed as follows (Fig. 4):
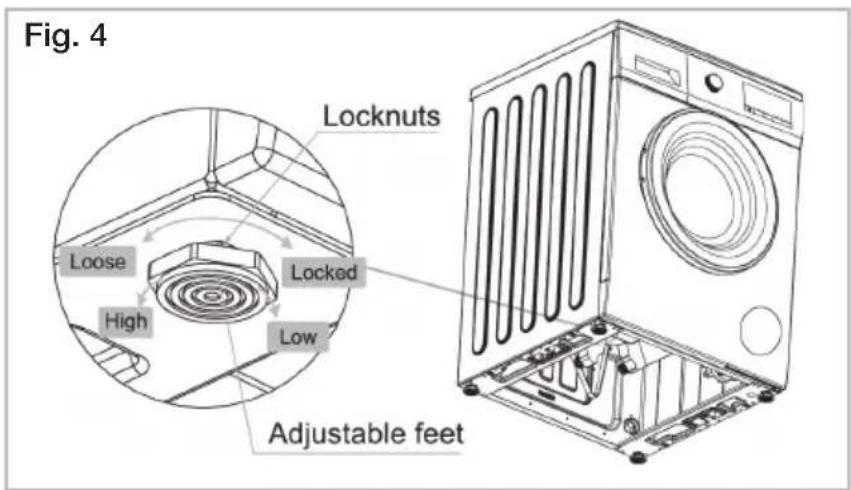
- Loosen the lock nut with a spanner, turning it anticlockwise to loosen.
- Adjust the foot by hand until it makes close contact with the floor. Turn it clockwise to lower the foot or anticlockwise to raise it.
- When the machine is level, use a spanner to turn the lock nut in a clockwise direction to tighten.
WARNING!
The lock nuts on all four feet must be screwed tightly against the housing, otherwise the machine may vibrate noisily during operation.
Installation (Cont.)
Installing the drain hose
WARNING!
Do not kink or protract the drain hose.
Position the drain hose properly in order to prevent water spillage onto the floor and potential damage.
Never immerse the end of the drain hose in water.
The drain hose is installed at the back of the machine. For drainage of the washing water, you can install the other end of the hose two different ways: either directly into a laundry sink or into a standpipe.
Drain hose connection into a sink (Fig. 5)

- If the spigot outlet has not been used before, remove any blanking plug that may be in place.
- Push the drain hose onto the spigot and secure with a clip, if required.
- Ensure a loop is formed in the drain hose to prevent waste from the sink entering the washer dryer.
- If required, the drain hose may be extended to a length of 4 m.
Installation (Cont.)
Drain hose connection into a standpipe (Fig. 7)
- Firstly, form a hook in the end of the drain hose using the supplied drain hose elbow (Fig. 6).
- Place the drain hose into your standpipe, which should have an internal diameter of approximately 30 mm, thus ensuring there is an air break between the drain hose and standpipe.
- When discharging into a standpipe, ensure that the drain hose reaches at least 30 cm into the standpipe, and the top of the standpipe is no more than 90 cm and no less than 60 cm above floor level (Fig. 7).


WARNING!
Never lay down the drain hose as water will be discharged.
Be sure the drain hose is properly routed so it will not kink or lift off the sink.
Leave the drain hose affixed to the back of the machine.
FROST PROTECTION
Do not install the washer dryer in places where temperatures drop to below 0^ . The reliability of the electronic control unit may be impaired at temperatures below freezing point, and the machine's inlet valve and draining systems may get damaged as frozen hoses may burst or split.
If temperatures drops to below 0 °C , transfer it to an area with a warmer ambient temperature before use and ensure no residual water is frozen in hoses and pipes.
Installation (Cont.)
Connecting the water supply hose
WARNING!
To prevent leakage or water damage, make sure to follow the instructions in this section when connecting the appliance to your water supply.
Do not kink, crush, modify or sever the water inlet hose.
- Connect the supplied cold water supply hose to an ordinary laundry tap with a 3/4" thread (Fig. 8). Installation should comply with all requirements and regulations of your local water and building authorities.

- When there is an inlet valve at the back of the machine, it must be connected to a cold water supply. Follow the pictorial instructions below (Fig. 9) to complete the connection.

- Turn on the tap and check for leaks. In case of leakage, repeat the connection steps above, or tighten the nut more firmly. If your water pressure is strong, close the water tap completely, then open it slightly.
CAUTION!
When tightening the coupling nut, take care not to damage the water inlet valve joint. Apply force evenly and do not twist the water inlet valve.
Use only the new (supplied) hose with your new appliance. Do not use a hose from an existing machine, or one that has been used previously.
Installation (Cont.)
Electrical connection
WARNING! This appliance must be earthed.
In the event of a malfunction or breakdown, earthing will reduce the risk of an electric shock by providing a path of least resistance for the electric current.
This appliance is equipped with a cord having an equipment-earthing conductor and an earthing plug. The plug must be plugged into an appropriate outlet that is installed and earthed in accordance with all local standards and requirements.
Do not modify the plug under any circumstances. If the plug does not fit your outlet, consult a licensed electrician and have the outlet changed.
Power supply system
- Make sure the power supply system (current, power voltage and wire) at your home can meet the normal loading requirements of electrical appliances. The electrical voltage and circuit frequency are listed on the appliance rating label.
- WARNING! Only connect the washer dryer to a single, grounded (earthed) electrical outlet. Do not overload the outlet, as overloading can result in fire or electric shock. Insert the power plug securely. Do not use a power adaptor or extension cord.
Electrical installation advice
- To avoid electric shock, fire and malfunction, do not install this machine in a damp place. Do not pull out or insert the plug with wet hands or bare feet. Do not expose the appliance, cord or plug to rain, moisture or other liquid.
- Do not kink or damage the power cord, and position it out of the way so no one steps on or places anything on the cord or against it.
- Ensure the washer dryer is unplugged from the power supply before installation. The plug must be accessible after installation.
- CAUTION! Do not use a power adaptor or extension cord.
- Unless your home is already fitted with a residual current device (safety switch), we recommend installing an RCD with a rated residual operating current not exceeding 30 mA to provide additional safety protection when using electrical appliances. See your electrician for professional advice.
- All electrical connections must be made by qualified personnel, and all instructions in this manual as well as local safety regulations must be observed.
Instructions
Control panel (Fig. 10)

1 Program dial: Turn the program dial (knob) clockwise or anticlockwise to switch on the machine and select the required wash program (see page 22 for details). Once you press the Start/Pause button and the machine is running, the program cannot be changed.
2 Start/Pause: Press this button to start a wash program or to pause it. The door cannot be opened when the machine is paused.
3 Dry: Press this button to add a dry program, or alter the dry time. NOTE: All of the available programs on this machine (except for Dry, Quick Dry, and Refresh) are washing programs. In order to add a drying time to a cycle, press the Dry button after selecting the desired wash program. Press repeatedly to change the drying time (see page 22 for more information on the different cycles and drying times).
4 Delay: Press and hold the Temp. and Dry buttons for 3 seconds to add a delay time (1-24 hours).
5 Temp: Press this button to change a wash temperature (see page 22 for details).
6 Mute: Press and hold the Temp. button for 3 seconds to mute the prompt tone and alert sound. Press and hold the Temp. button again to restore the sound.
7 Speed: Use this button to change a program's default spin speed (see page 22 for details).
Instructions (Cont.)
8 Child lock
- To activate the child lock after the washing cycle has started, press and hold the Rinse+ and Speed buttons simultaneously for 3 seconds. The child lock
icon will light up on the display, indicating that the control panel is locked to prevent misuse by children. In an emergency you can power the machine off by turning the dial to the [O] position. - To cancel the child lock, press and hold the Rinse+ and Speed buttons for 3 seconds.
- You can only activate the child lock after the washing cycle has started. It will release automatically after the washing program has finished.
9 Rinse+: Use this button to change the rinse times (see page 22 for the number of rinses).
10 OFF [O] position
At the end of a program, turn the knob to the [O] position to switch the machine off.
NOTE: While your washer dryer combo does not have a lint filter to maintain after each wash, excess lint can collect in the drain pump. It is important to clean the drain pump every two months to ensure optimal product performance and the longevity of your machine (see page 36).
AUTOMATIC BALANCE CONTROL
The machine is fitted with a balance control device, which ensures the machine is stable during the spin cycle. To protect the machine, it will cut in if the laundry is not evenly distributed in the drum. The laundry is redistributed by reverse rotation of the drum. This may happen several times before the unbalance disappears and normal spinning can resume.
If after 15 minutes the laundry is still not evenly distributed in the drum, the machine will not spin. In this case, please redistributed the load manually and reselect the spin program.
Instructions (Cont.)
Display icons (Fig. 11)

Table 1: Display icons
| Icon Meaning Description | ||
| 18:88 | Digital display | Shows the time, speed, rinse times, error codes. |
 | Remaining Time | Illuminates when the display shows the remaining time. |
 | Delay time | Illuminates when the display shows the delay time. |
 | Child lock | Illuminates when the child lock has been set. |
 | Door lock | Illuminates when the door is locked. |
 | Main wash | - When applicable: illuminates in standby mode.- Flickers when the machine is in operation.- Stays brightly lit when the program is paused.- Turns off when the program is finished. |
 | Rinse | - When applicable: illuminates in standby mode.- Flickers when the machine is in operation.- Stays brightly lit when the program is paused.- Turns off when the program is finished. |
 | Final spin | - When applicable: illuminates in standby mode.- Flickers when the machine is in operation.- Stays brightly lit when the program is paused.- Turns off when the program is finished. |
 | Dry | - Illuminates when the drying function is selected.- Flickers during the drying process. |
Instructions (Cont.)
| Program Wash | Time(hr:min) | Temperature(°C) | Numberof Rinses | Spin Speed(rpm) | Dry Time(min) |
| Express Cotton | 1:16 0/20/40 | 60/95 2/3/4/5 | 0/400/600/800/1000/1200/1400 | 0/60/90/120/150/180/210/240/270/300/330 | |
| Standard Cotton | 3:17 0/20/40 | 60/95 2/3/4/5 | 0/400/600/800/1000/1200/1400 | 0/60/90/120/150/180/210/240/270/300/330 | |
| Mix 20° | 0:49 20 2/3/4/5 | 0/400/600/800/1000/1200 | — | ||
| Anti-Allergy 2: | 11 95 2/3/4/5 | 0/400/600/800 | 1000 — | ||
| Down 1:06 0/20 | 0/40 3/4/5 | 0/400/600/800 — | |||
| Bulky Items 1: | 39 0/20/40 | 60 3/4/5 | 0/400/600/800/1000/1200 | — | |
| Drum Clean | 1:49 | 60/95 | 2 | 600 | 35 |
| Spin | 0:11 — | — | 0/400/600/800/1000/1200/1400 | 0/60/90/120/150/180/210/240/270/300/330 | |
| Rinse&Spin 0: | 16 — | 1/2/3/4 | 0/400/600/800/1000/1200/1400 | 0/60/90/120/150/180/210/240/270/300/330 | |
| Synthetic | 0:51 | 0/20/40/60 | 2/3/4 | 0/400/600/800 | 0/60/90/120/150/180/210/240/270 |
| Quick | 0:18 0 | 2/3/4 | 0/400/600/800/1000/1200 | — | |
| Quick Dry ^ | — | — | — | — | 42 |
| Dry ^ | — | — | — | 0/1400 | 60/90/120/150/180/210/240/270/300/330/360/390 |
| Refresh ^ | — | — | — | — | 35 |
| Wash&Dry60 | 1:00 | 0 | 2/3/4 | 0/400/600/800/1200 | 42 |
Table 2: Program parameters *
Instructions (Cont.)
Table 3: Program suitability
| Program | Max. Load (kg) | Suitable for ... |
| Express Cotton | 10 | Cottons, linens or cotton mix fabrics, e.g. table linen, towelling, underwear, T-shirts etc. |
| Standard Cotton | 10 | Cottons, linens or cotton mix fabrics, e.g. table linen, towelling, underwear, T-shirts etc.This is the most energy and water efficient program with the highest washing intensity for normally soiled cotton laundry |
| Mix 20° 7 A cool water wash | (20 °C) | |
| Anti-Allergy 6 | A hygiene wash for items that may be washed in very hot (95 °C) water | |
| Down 4 Down jackets and coats | ||
| Bulky Items 10 | Bulky or heavier items | |
| Drum Clean 0 A hot water program for cleaning the inside of the wash drum | ||
| Spin 10 A spin only program for cotton and linen items | ||
| Rinse&Spin 10 | A separate rinse and spin program for items that may be washed in a cotton program | |
| Synthetic 5 | Synthetic or mixed fabrics, underwear, coloured garments, non-shrink shirts | |
| Quick 3.5 Small loads of items which require freshening up | ||
| Quick Dry ^ 1 Small, slightly damp loads | ||
| Dry ^ | 6 | Cottons, linens or cotton mix fabrics, e.g. table linen, towelling, underwear, T-shirts etc. |
| Refresh ^ | 4 | Small, dry loads that need creases or odours removed - make sure that the water tap is open and do not add any detergents or fabric softeners |
| Wash&Dry60 | 1 Small, lightly soiled loads | |
NOTES:
* The default values are bold.
— This symbol indicates that this feature is not available for the selected program.
(A) The running times are for the default programs and are for reference purposes only. The actual running times may be different depending on the type and weight of your wash load and the washing temperature.
(B) The standard cotton wash program was used for energy efficiency testing to the standard (with a water temperature of 60 °C and 1400 rpm spin speed). It is the most energy and water efficient program with the highest washing intensity for normally soiled cotton laundry.
^ Quick Dry, Dry and Refresh are all dry-only programs.
Instructions (Cont.)
Before first use
CAUTION!
Make sure the washing machine is properly and securely installed before using it. Before using the washing machine for washing clothes, run a complete washing cycle without clothes, using the drum clean program.
Before using this machine for the first time, please review the following important points and make sure you have completed all preparatory steps.
• All transit bolts are removed.
- The washing machine is stable and level. If necessary, adjust the levelling feet to stabilise the machine (see page 14).
- The water supply hose is properly installed (see page 17) and the water tap is open.
- The power plug is firmly inserted into a nearby power point and power is switched on to the outlet.
- The drain hose is properly installed and secured into the laundry sink or a standpipe (see pages 15–16).
- IMPORTANT! Before using the washing machine for the first time, run a complete drum clean program without laundry items and without any detergent. This will ensure any residual water from factory quality checks is removed from the tub.
Door lock
- The door of the front load washing machine locks automatically when the machine is working. It cannot be opened without first pausing the wash program. To unlock the door, press the Start/Pause button. Then turn the program dial (knob) to the [O] position: the door will unlock after approximately two minutes.
- The door will not unlock when the temperature inside the drum is above 53 °C, and/or when the water is above a certain level.
- At the end of a wash program, the door will unlock after two minutes.
- Suds may flow out of the open door if it is opened during the wash cycle. Beware of suds escaping from the machine and have a cloth/towel ready for catching spills.
CAUTION!
For your safety, do not turn the program dial to the position [O] position, open the machine and access the washing while the machine is running, or when the power supply is cut off. The water temperature may be high and it may scald you. The door will automatically unlock at the end of a wash program when the temperature of the drum has cooled down.
Do not attempt to open the door forcibly. Doing so is unsafe and will cause damage to the locking mechanism.
Instructions (Cont.)
Detergent recommendations
WARNING!
Do not use flammable and explosive or toxic solvents, petrol, alcohol or other chemicals in the machine.
Keep detergents and clothing care preparations out of reach of children.
- Only use low-sudsing detergent and clothing care preparations that are suitable for use in a front load washing machine, or in a top and front load machine. Detergents for top load machines are unsuitable because they tend to produce too much suds, which may cause overflowing from the detergent drawer.
- Use detergent in the amounts recommended on the detergent packaging. Dosage depends on your amount of washing, the degree of soiling, water hardness and the washing performance of your detergent. Using too little detergent will give poor washing results, but too much will affect rinse performance and may cause overflow of suds, which could interfere with machine operation. Do not overfill detergent!
- Pull open the detergent dispenser drawer and add detergent, as illustrated (Fig. 12) and described below.

II or II The detergent compartment on the left side of the drawer is for low-sudsing detergent for the main wash.
or The detergent compartment on the right side of the drawer is for low-sudsing detergent for the pre-wash.
or ✅The middle compartment is for fabric softener. It will be dispersed through the washing during the last rinse cycle. Concentrated fabric softeners should be diluted as required. Do not exceed the maximum level mark.
Instructions (Cont.) Instructions (Cont.)
Each wash/dry cycle
Before loading the washing machine/clothes dryer:
- Make sure you have read all safety precautions in this manual and are aware of the items (listed on page 28) that cause a hazard if placed in the washing machine or clothes dryer.
- Check that no young child or pet has climbed into the drum.
- Ensure that the water inlet hose and the drain hose are properly connected.
- Ensure that the drain hose is securely connected into the drain spout or sink.
When loading the machine:
- Empty all pockets of clothing to be washed. Hard, sharp objects such as coins, safety pins, hair pins, paper clips, bra wires, nails, screws or stones can cause extensive damage to the appliance and block the pump. Any damage or malfunction resulting from foreign objects is not covered by your warranty and may lead to expensive repairs.
- Remove any combustible objects (such as lighters and matches) or materials from inside pockets.
- Turn items with zippers inside out, close zippers, hooks and eyelets, fasten buckles and tie fabric belts. This will also help reduce impact noise when the items hit against the turning drum.
- Ensure all items are marked as suitable for machine washing and/or tumble drying (see page 32).
- Sort your washing/drying according to fabric type and washing/drying program. Separate dark and light coloured items. Place small or delicate items into a wash bag for protection. (Do not dry underwire bras in the washer dryer.)
- Brush dirt, sand or pet hair off clothes and turn pockets inside out. Pretreat stains.
- Turn items that pill easily inside out.
- Knitted textiles may shrink a little when tumble dried. Please do not over-dry such items. Allow for shrinkage when choosing the size of new purchases.
- The laundry must be thoroughly spun before tumble drying. Easy care items such as shirts should be briefly pre-spun before drying.
- To avoid a static charge when drying is completed, use either a fabric softener when you are washing the laundry or a fabric conditioner specifically for tumble dryers.
- As the dryer heat may permanently set stains, check and ensure your washing is clean and free of stains.
Instructions (Cont.)
- Do not overload the machine; the maximum dry washing capacity is 10 kg, and the maximum drying capacity is 6 kg (see the table on page 23 for specific information on the capacities of different programs). If you have selected a program that uses both washing and drying functions, load the machine based on its maximum drying capacity.
- To avoid items getting tangled up in the dryer, which results in uneven drying, shake items out thoroughly before placing them into the dryer one at a time.
- Put your washing/drying in the machine, loading items uniformly in the drum. For best results, include both larger and smaller items in a wash.
- When your washing is properly loaded in the machine, close the door and ensure that no items are caught in the door.
When selecting a program:
- Pull out the detergent dispenser and add detergent as required, then close the dispenser (see page 25 for instructions).
- Select a wash and/or dry program (see pages 19-20 for more details).
- Make any desired modifications to this program. Remember, Dry, Quick Dry and Refresh are dry only programs. To add a drying cycle to a wash program, press the relevant button. Now is also the time to add a delayed start, extra rinse cycle, or engage the mute function and/or child lock.
- Select the Start/Pause button to start the program.
When unloading the machine:
- Wait for the cycle to finish; a buzzer will sound when the drum has cooled sufficiently and any remaining water has drained. The machine will change into standby mode after 10 minutes of inactivity.
- Turn the dial back to the [O] position. Unplug the machine from the power supply and close the water tap.
- Open the door and unload the washer dryer. We recommend you leave the door slightly ajar so the drum can dry properly and to prevent mould and odour development.
Instructions (Cont.)
CAUTION: Do NOT wash the following items in the washing machine:
- jackets, raincoats, sleeping bags, fishing coats and similar clothes
- carpets or floor rugs
- underwire bras—instead, ensure these are placed in a closed garment bag before washing in the machine
- clothes that have any residues of flammable materials, as this may result in fire or explosion (for example, articles that have been cleaned in, washed in, soaked in, or dabbed with industrial chemicals, or combustible or explosive substances e.g. wax, oil, paint, petrol, alcohol, degreasers, dry-cleaning solvents, kerosene, etc.); items containing such substances must be washed by hand or rinsed thoroughly before machine-washing them
- single items, as this can cause unbalance problems during the wash or spin cycles; we suggest you always add a few more items to the wash to avoid such problems
- items such as ties, suits, evening attire; silk or fur attire; or anything else labelled unsuitable for machine-washing—always check the garment label (see page 32).
CAUTION: Do NOT dry the following items using the dryer function:
- woollen clothes, silks, and clothes that contain leather, foam rubber (also known as latex foam) or similarly textured rubber-like materials
- undergarments that contain metal reinforcements (such as underwire bras), which can come loose during drying and damage the clothes dryer
- plastic articles such as shower caps or waterproof baby bibs
- rubber-backed articles, clothes fitted with foam rubber pads, pillows, galoshes and rubber coated tennis shoes
- fabric softeners or similar products, unless they are specifically recommended by the product manufacturer for use in a clothes dryer to eliminate the effects of static electricity
- clothes that have any residues of flammable materials, as this may result in fire or explosion (for example, articles that have been cleaned in, washed in, soaked in, or dabbed with industrial chemicals, or combustible or explosive substances e.g. vegetable oil, cooking oil, acetone, wax, oil, paint, petrol, alcohol, degreasers, dry-cleaning solvents, spot-removers, wax-removers, some hair-care products, kerosene, etc.) (see note)
- single items, as this can cause unbalance problems during the dry or spin cycles; we suggest you always add a few more items to the wash to avoid such problems
- items such as ties, suits, evening attire, fur attire, or anything else labelled unsuitable for tumble-drying—always check the garment label (see page 32).
NOTE:
- If it is unavoidable that fabrics that contain vegetable or cooking oil or have been contaminated by hair care products be dried in the machine, they should first be washed in hot water with extra detergent. This will reduce, but not eliminate, the hazard.
- Items that have been soiled with substances such as oil, acetone, alcohol, petrol, kerosene, spot removers, turpentine or wax removers should first be washed in hot water with extra detergent before being dried in the tumble dryer.
FAQs and Troubleshooting Guide
When the following problems occur, the microcomputer inside the washer dryer will detect the abnormal condition, display an error message and the machine will stop operating. If after your remedial action the problem persists, please contact our after sales support centre for advice or to book a service.
Table 4: Error messages
| Error message Possible cause Solution | ||
| [E01] No water | ·Ensure the tap is open.·Check the water inlet valve filter and ensure it is clean, unblocked and undamaged.·Ensure the drain hose is properly fitted.·Check for a water stoppage in your area. | |
| [E02] Door lock alarm | ·Ensure the door is properly locked.·If a garment is caught in the door, place it inside the drum and lock the door properly.·If the door lock is damaged, call for a service. | |
| [E03] | Continuous drainage | ·Check and ensure the drain hose is not squashed or kinked.·Check and ensure the drain hose filter is unblocked.·Check and ensure that nothing is caught in and blocking the drain hose. |
| [E04] Water overflowing | ·Ensure the water inlet is undamaged.·If the water sensor malfunctions, call for a service. | |
| [E05] | The motor does not work | ·If the machine is overloaded, an overheat protection has been triggered. Switch off the machine, let it cool, reduce the load and restart.·If the motor is malfunctioning, call for a service. |
| [E06] Heater problem Call for a service. | ||
| [E07] | Temperature sensor problems | Call for a service. |
| [Edc] | Long cooling after dry cycle (more than 10 mins) | Call for a service. |
| [E09] | Inverter fails to start | Call for a service. |
FAQs and Troubleshooting Guide (Cont.)
Not all unusual incidents you may encounter with your washer dryer are faults, or cause for concern. Check in the list below what issues may arise and why. Also check in the table on the previous page for solutions to problems that may be resolved without the need for a service call.
If none of the solutions offered below and on the previous page help you solve the problem, please contact our after sales support centre.
Table 5: Troubleshooting
| Problem Possible cause Solution | ||
| The machine does not start up. | · The door is not closed properly, or items are caught up in the door.· The plug is not firmly plugged in.· Have you selected a program and pressed the Start/Pause button?· The water tap is closed. | · Check and ensure no items are caught in the door, then close the door properly and restart.· Ensure you have properly inserted the plug, selected a program and pressed the Start/Pause button.· Ensure the water tap is open. |
| The door cannot be opened. | · The machine's safety protection design is working.· The drum temperature is still too high. | · Wait a few moments after the end of a program before opening the door.· Wait until the drum has cooled. |
| No water | · The water tap is closed.· Water is frozen in the supply hose.· The water inlet valve filter is blocked.· There is a water stoppage in your area. | · Ensure the tap is open.· See page 35 for solving water freezing issues.· Ensure the water inlet valve filter is clean and unblocked.· Restart when the water is back. |
| Water leakage | · The water supply hose or drain hose are not tightly connected.· The drain hose is blocked. | · Check and ensure both hoses are securely connected.· Check and ensure the drain hose is not blocked. |
FAQs and Troubleshooting Guide (Cont.)
Table 5: Troubleshooting (Cont.)
| Problem Possible cause Solution | ||
| Abnormal noises | The transport bolts have not been removed.The machine is installed on an uneven or unstable floor.A loose object is knocking against the drum walls of the washer dryer.Heavy, wet clothes tumbling in the drum can cause bumping noises when the drum is turning. | Make sure the transport bolts have been removed.Make sure the machine is installed on a solid, level floor.Ensure to check pockets before the wash and remove any coins, hairpins, etc.These noises are normal.Make sure your drying load is properly spin dried to limit the noises. |
| Clothes shrink | The clothes are unsuitable for drying in the clothes dryer.The clothes have been dried at too high heat. | Check the clothes labels and hang dry, if recommended.Choose a drying program more suitable for the fabric. |
| The washing is not thoroughly dried. | The drain hose has become blocked.An inappropriate program was chosen.Too much washing has been loaded.The washing has been twisted while drying. | Check and remove obstructions.Choose a program with a higher drying intensity.Reduce the amount of washing.Untwist the items and dry them for a little longer. |
| Keep in mind that it is normal if you can still feel a little moisture in your washing at the end of a program (depending on the heat level and drying time selected). Any residual moisture is insignificant and will dissipate as soon as you shake the items out. | ||
| Drying takes unusually long. | The drying load is too large. Reduce the volume of the drying load. | |
Other Useful Information
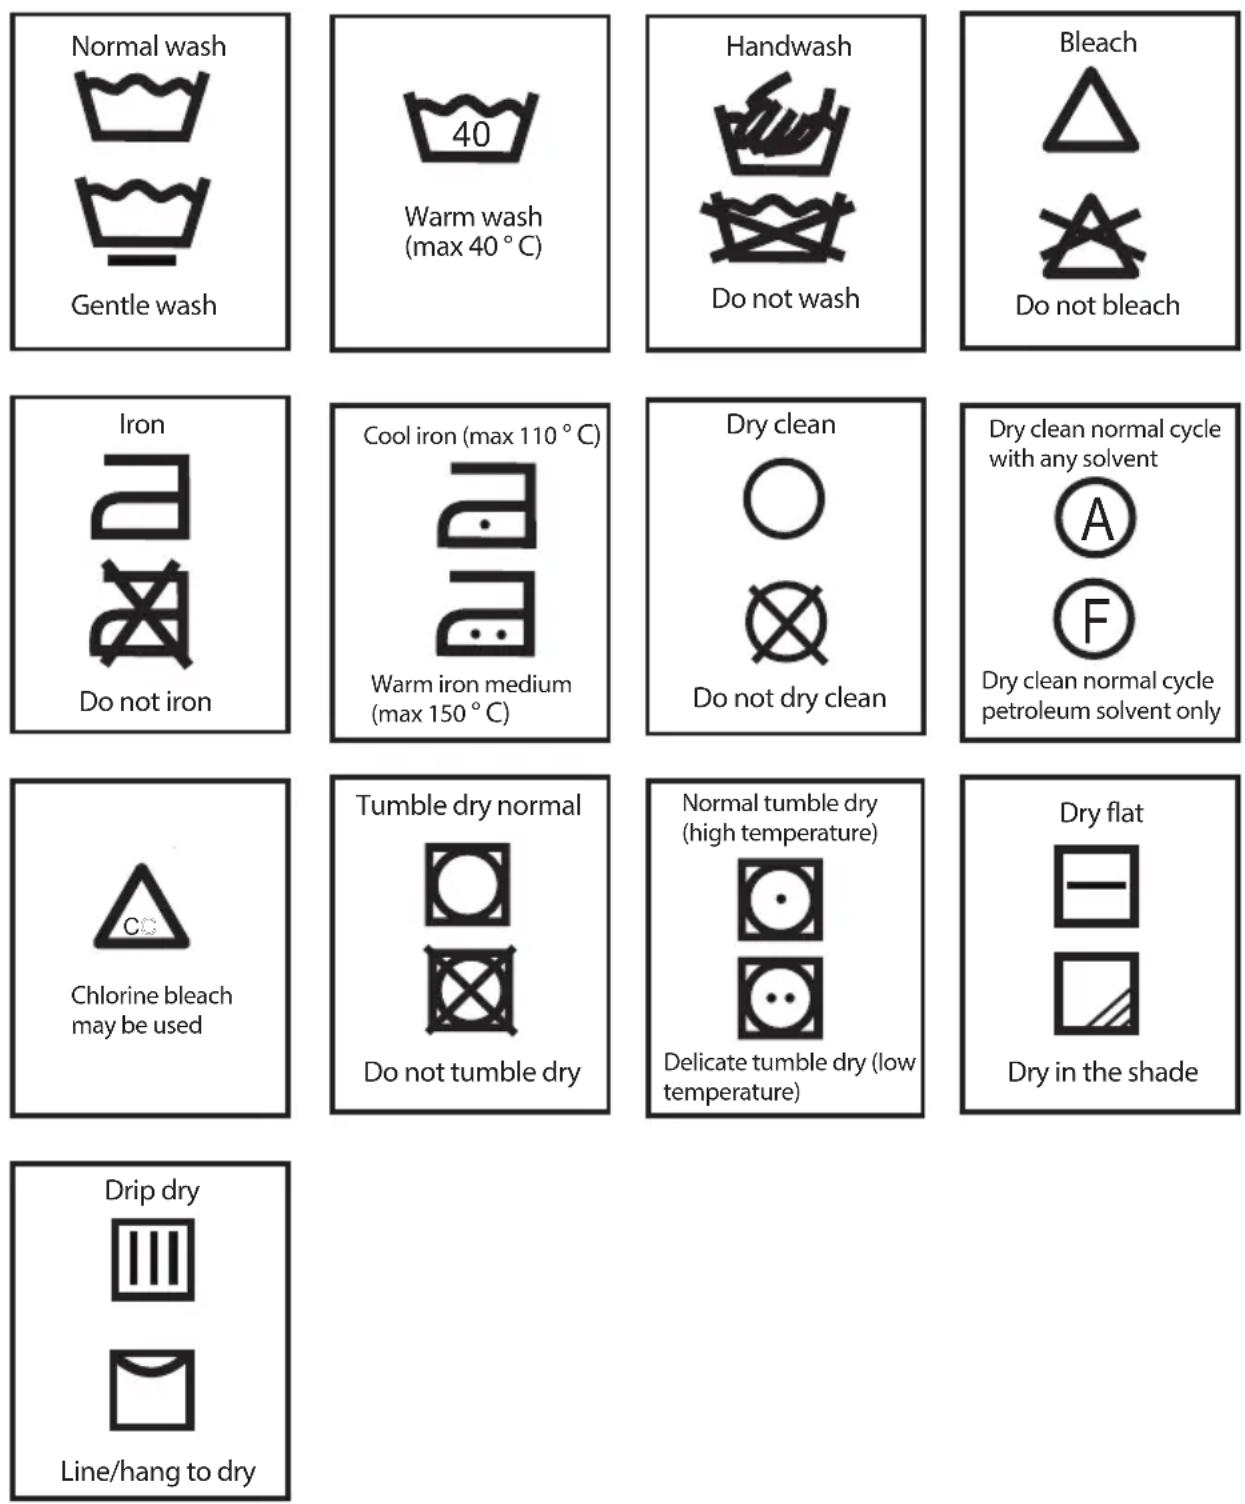
Garment care symbols
When choosing a wash and/or dry program, check for any labels in your clothes and follow the instructions. Below are some commonly used symbols and explanations what they mean.
Fig. 13
Other Useful Information (Cont.)
Cleaning and care
To prolong the service life of the machine, keep it in good condition and perform regular maintenance.
WARNING!
For any type of cleaning and maintenance, make sure the washer dryer is disconnected from the mains power supply and the water tap is closed.
Cleaning the cabinet (when required)
- Use a soft cloth to wipe any water or dirt off the washer housing.
- To remove dirt and stains, use a mild detergent solution and a damp cloth. Squeeze it almost dry to avoid leaving water residues.
WARNING!
Do not use any solvents, alcohol, harsh chemicals, alkaline or abrasive cleaning agents, or sharp objects, to avoid damaging the surface. Do not hose down the appliance or spray water directly onto the housing.
Cleaning the drum (every three months)
- Make sure all laundry items are removed from the drum, then wipe it clean with a soft dry or damp cloth.
- If you notice any rust residues left inside the drum from laundry items with metal parts (such as buttons or zippers), wipe the residues off immediately with chlorine-free detergent. Never use steel wool.
- To remove dirt and/or detergent residues and scum build-up from the inside and outside of the drum, run the Drum Clean program every three months without any clothes or detergent.
CAUTION!
Cleaning the inside of your washer dryer regularly is particularly important if you frequently use a cold wash cycle, especially if you also use a fabric softener. Liquid detergents can cause detergent scum to build up around the outside of the drum, which cold water will not remove and which can cause bacteria, unpleasant odours, and eventually soiling of your wash load.
Other Useful Information (Cont.)
Cleaning the detergent drawer (when required)
Remove detergent residues regularly. The detergent dispenser may be removed for cleaning.
- Pull open the dispenser drawer until you feel a resistance. Press down the release catch and at the same time pull the drawer right out of the machine (Fig. 14).
- Remove the siphon from the compartment and clean it.
- Clean the drawer using a brush and warm water (Fig. 15).
- Use a bottle brush to remove detergent residues from inside the drawer housing (Fig. 16).
- Wipe all parts dry with a clean cloth, then reinstall the drawer back into its space.
NOTE: Do not use any solvents, alcohol, harsh chemicals, alkaline or abrasive cleaning agents, or sharp objects, to avoid damaging the surface.


natural_image
Line drawing of a hand pouring liquid into a container on a surface (no text or symbols)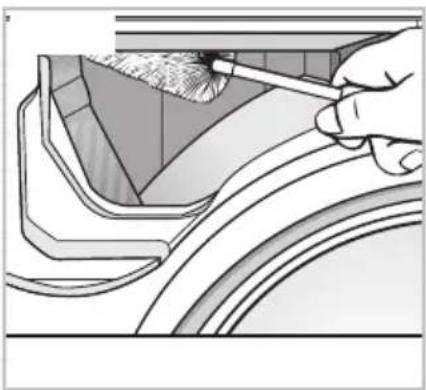
natural_image
Diagram of a hand using a tool to interact with a mechanical component, showing layered structure and motion (no text or symbols)Cleaning the door seal and glass (after each wash)
After each wash:
- Wipe the glass and seal to remove lint and stains. A build-up of lint can cause leaks.
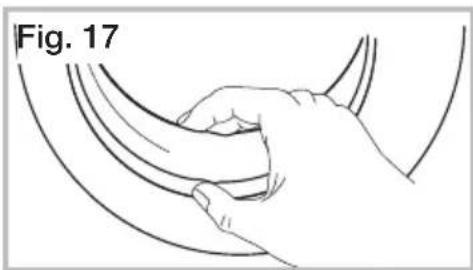
- Check for coins, buttons and other small objects in the seal creases (Fig. 17) and remove them.
- Leave the door slightly ajar so the inside can dry properly. This will also help prevent the development of mould or odours.
natural_image
Line drawing of a hand gripping a curved object, labeled 'Fig. 17' (no other text or symbols)Other Useful Information (Cont.)
Cleaning the water inlet filter
To avoid blockage of the mesh filters at the water tap or hose after long time use, we recommend you clean these filters every 6 months, or more often if there are frequent interruptions to the water supply.
CAUTION!
Before cleaning the water inlet filter, make sure you have turned off the water supply at the tap.
- Use pointed nose pliers to withdraw the plastic filter from the water inlet valve at the back of the machine (Fig. 18).
- Clean the filter with a soft brush, then assemble the cleaned filter back into the valve.
- Reconnect the water supply hose to the water tap on your wall and to the water inlet valve at the back of the washer dryer. For more detailed connection instructions, please refer to page 17.

Freezing conditions
If the washer dryer is exposed to temperatures below 0 °C , you should take certain precautions to prevent water freezing in the pipes.
- Turn off the water tap.
- Unscrew the water inlet hose.
- Unhook the drain hose from the rear support and position the end of this hose and that of the inlet hose in a bowl. Run the spin program.
- Disconnect the appliance.
- Reconnect the inlet hose and reposition the drain hose.
- When you intend to start the machine up again, make sure that the room temperature is above 0 °C .
If the temperature drop was unexpected and water has frozen in the water supply hose, proceed as follows:
- Wrap a hot towel around the water tap and the water supply hose joint.
- Disconnect the water supply hose and soak it in a tub of hot water of approximately 50^ C.
- Pour about 2–3 litres of hot water (approximately 50 °C) into the drum of the machine.
- When all frozen water has thawed, reconnect the water supply hose, open the tap and start the machine to check whether all blockages have been removed.
Other Useful Information (Cont.)
WARNING!
For any type of cleaning and maintenance, make sure the washer dryer is disconnected from the mains power supply and the water tap is closed.
Do not open the pump filter cover during the course of a wash program.
If you are checking the drain pump after a hot water wash, take particular care as any residual water in the machine may be hot. Wait until the water has cooled down to avoid burns.
Drain pump maintenance (every two months)
NOTE: While your washer dryer combo does not have a lint filter to maintain, excess lint can collect in the drain pump. It is therefore important to clean the drain pump every two months to ensure optimal product performance and the longevity of your machine.
In order to avoid blockages created by excess lint, threads or items such as bobby pins, coins, etc., check the drain pump filter regularly, especially if the machine fails to drain the water or spin properly, or if you notice any unusual noises during the drain or spin cycles. We recommend you clean the filter every two months, or when there is a fault and the error code [E03] is displayed on the screen.
CAUTION: If you are checking the drain pump after a hot water wash, wait until any residual water has cooled to a safe level.
- Open the service cover using a screwdriver (Fig. 19).
- Place a container underneath the drain pump filter when removing it, and always keep a rag nearby to dry up any water spillage.
- Remove the filter plug. Any residual water will drain out (Fig. 20).
- Remove any foreign objects. Clean the filter plug carefully with water and a soft brush (Fig. 21).
- Screw the filter plug back into position.
- Close the service cover and secure it with the screw.

natural_image
Diagram showing a curved line with a circle and arrow, labeled 'Fig. 19' (no text or symbols on the diagram itself)
natural_image
Illustration of a hand washing a small orange object in a basin, labeled 'Fig. 20' (no other text or symbols)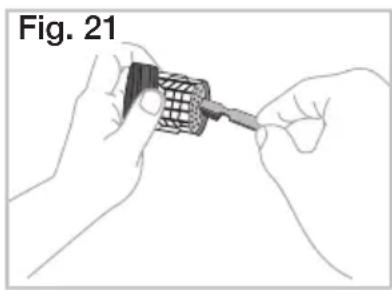
natural_image
Illustration of hands holding a tool with a grid-patterned component (no text or symbols)WARNING!
Make sure to reinstall the drain pump filter and close the cover panel securely, otherwise water may leak.
Other Useful Information (Cont.)
Storage
If the appliance is not going to be used for an extended period of time, please unplug the machine from the power supply and disconnect all hoses. Clean the machine and filters as described on the previous pages. Let the machine air-dry thoroughly, then store it in the original packaging in a dry location, out of reach of children.
IMPORTANT!
Unscrew the drain pump filter to let water run out when you are not going to use the washing machine for a long time.
Service, repair and spare parts
If the appliance is damaged, do not attempt to repair it yourself. If it requires repair or service, please contact our after sales support centre to arrange for examination and repair.
Our after sales support centre stocks spare water inlet hoses, drain hoses and adjustable feet for the appliance. To purchase a spare part, contact the centre using the details at the bottom of the page.
Technical specifications
| Model number AK-WVDCMB | |
| Washing/drying capacity 10 kg/6 kg | |
| Rated power 2000 W | |
| Rated voltage 220–240 V~ | |
| Rated frequency 50 Hz | |
| Water pressure 0.02 MPa – 0.8 MPa | |
| Liquid ingress protection IPX4 | |
| Net weight/gross weight 70 kg/75 kg | |
| Dimensions (approx.) 638 (W) x 590 (D) x | 845 (H) mm |
Compliance
This appliance has been fully tested and meets all requirements as set out by standards AS/NZS 60335.1, AS/NZS 60335.2.7 and AS/NZS 60335.2.11.

The RCM Mark (Regulatory Compliance Mark) indicates that the product complies with the relevant guidelines of the ACMA as well as corresponding government requirements for the safety of electrical devices.
Other Useful Information (Cont.)
Responsible disposal


Packaging materials are recyclable. Please dispose of them responsibly for recycling.
At the end of its working life, do not throw this appliance out with your household waste. Electrical and electronic products contain substances that can have a detrimental effect on the environment and human health if disposed of inappropriately. Observe any local regulations regarding the disposal of electrical consumer goods and dispose of it appropriately for recycling.
Contact your local authorities for advice on recycling facilities in your area. Or find recycling scheme services listed on Planet Ark's website at www.recyclingnearyou.com.au, or call Planet Ark on 1300 733 712.
This page has been left blank intentionally.
This page has been left blank intentionally.
This page has been left blank intentionally.
Warranty returns
Should you for any reason need to return this product for a warranty claim, make sure to include all accessories with the product.
Product does not work?
If you encounter problems with this product, or if it fails to perform to your expectations, make sure to contact our After Sales Support Centre on 1300 886 649 for advice.
For an electronic copy of this manual, please contact our after sales support centre.
Distributed by Tempo (Aust) Pty Ltd ABN 70 106 100 252
PO BOX 132, Frenchs Forest NSW 1640, Australia
Customer Helpline:
(AU) 1300 886 649 (NZ) 0800 836 761
Web Support: tempo.org/support
IM-V1.1
Issue:
N


- Washer Dryer Combo
- Contents
- General Safety Instructions
- IMPORTANT SAFETY INSTRUCTIONS
- READ CAREFULLY AND KEEP FOR FUTURE REFERENCE
- Electrical safety and cord handling
- General Safety Instructions (Cont.)
- Installation
- Usage conditions and restrictions
- • Before loading the washer dryer:
- CAUTION!
- CAUTION: Hot!
- Cleaning and maintenance
- Unpacking
- Unpacking the washing machine
- CAUTION: EXTREMELY HEAVY!
- Checking the package contents
- Product Overview
- Scope of delivery
- Front view
- Product Overview (Cont.)
- Rear view
- Accessories
- Documentation (not shown)
- Removing the transit bolts
- WARNING!
- Selecting the location
- Installation (Cont.)
- Levelling the machine
- Installing the drain hose
- Drain hose connection into a sink (Fig. 5)
- Drain hose connection into a standpipe (Fig. 7)
- FROST PROTECTION
- Connecting the water supply hose
- Electrical connection
- WARNING! This appliance must be earthed.
- Power supply system
- Electrical installation advice
- Instructions
- Instructions (Cont.)
- Child lock
- AUTOMATIC BALANCE CONTROL
- NOTES:
- Before first use
- Door lock
- Detergent recommendations
- Instructions (Cont.) Instructions (Cont.)
- Each wash/dry cycle
- Before loading the washing machine/clothes dryer:
- When loading the machine:
- When selecting a program:
- When unloading the machine:
- CAUTION: Do NOT wash the following items in the washing machine:
- CAUTION: Do NOT dry the following items using the dryer function:
- NOTE:
- FAQs and Troubleshooting Guide
- FAQs and Troubleshooting Guide (Cont.)
- Other Useful Information
- Garment care symbols
- Other Useful Information (Cont.)
- Cleaning and care
- Cleaning the cabinet (when required)
- Cleaning the drum (every three months)
- Cleaning the detergent drawer (when required)
- Cleaning the door seal and glass (after each wash)
- After each wash:
- Cleaning the water inlet filter
- Freezing conditions
- Drain pump maintenance (every two months)
- Storage
- IMPORTANT!
- Service, repair and spare parts
- Compliance
- Responsible disposal
- Warranty returns
- Product does not work?
Brand : AKAI
Model : AK-WVDCMB
Category : Tumble dryer