RedPlanet RP-400 - Telescope Carson - Free user manual and instructions
Find the device manual for free RedPlanet RP-400 Carson in PDF.


| Product Type | Telescope |
| Brand | Carson |
| Model | RedPlanet RP-400 |
| Optical Design | Newtonian Reflector |
| Aperture | 76 mm (3 inches) |
| Focal Length | 400 mm |
| Focal Ratio | f/5.3 |
| Maximum Useful Magnification | 180x |
| Mount Type | Altazimuth |
| Tripod | Aluminum adjustable tripod |
| Finderscope | 5x24 optical finderscope |
| Eyepieces Included | 20 mm (20x) and 10 mm (40x) |
| Eyepiece Barrel Diameter | 1.25 inches |
| Barlow Lens | 2x Barlow lens included |
| Moon Filter | Yes, included |
| Dimensions (assembled) | 60 x 30 x 25 cm (23.6 x 11.8 x 9.8 in) |
| Weight | 5.5 kg (12.1 lbs) |
| Power Source | None (manual operation) |
| Cleaning Method | Use lens brush or compressed air; avoid solvents |
| Safety Warning | Never point at the sun without a solar filter |
| Spare Parts Available | Eyepieces, finderscope, and tripod legs are replaceable |
Frequently Asked Questions - RedPlanet RP-400 Carson
User questions about RedPlanet RP-400 Carson
0 question about this device. Answer the ones you know or ask your own.
Ask a new question about this device
Download the instructions for your Telescope in PDF format for free! Find your manual RedPlanet RP-400 - Carson and take your electronic device back in hand. On this page are published all the documents necessary for the use of your device. RedPlanet RP-400 by Carson.
USER MANUAL RedPlanet RP-400 Carson
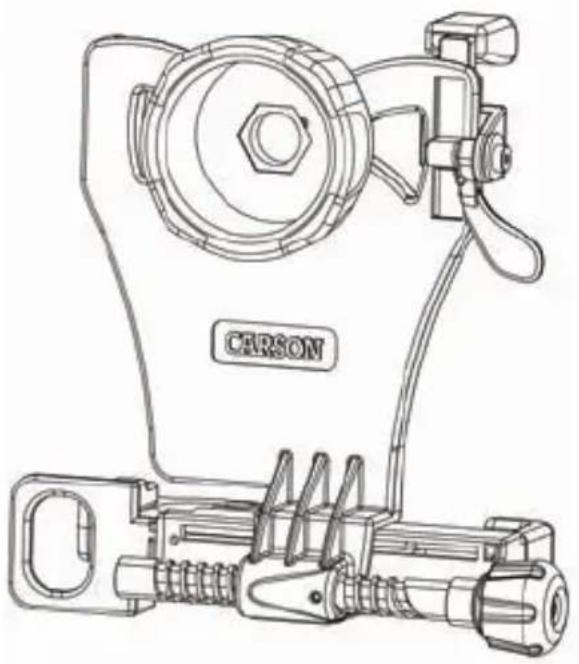
Smartphone Telescope Adapter
Included with:
• RP-100SP Telescope
• RP-200SP Telescope
• RP-300SP Telescope
• RP-400SP Telescope
natural_image
Technical line drawing of a carson sewing machine (no text or symbols on the diagram itself)Instructions for Use

PDF / ➤ VIDEO: www.carson.com/telescopic
English / Français / Español / Deutsch / 日本語
HookUpz™
Table of Contents
Optic Side Diagram...... 2
Phone Side Diagram.... 3
Inserting Phone...... 4-5
Align & Lock...... 6-7
Attaching to Optic 8-9
Frequently Asked Questions...... 10-13
Tips and Tricks...... 14
Storage/Cleaning Information.... 15
Customer Service.... 15
Carson Optical
2070 5th Avenue
Ronkonkoma, NY 11779
www.carson.com info@carson.com
Tel: 631-963-5000 Fax: 631-427-6749
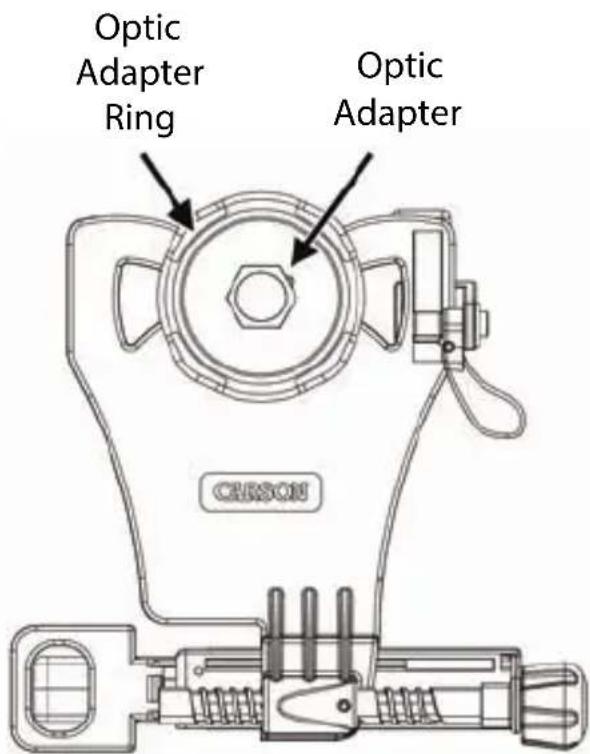
Optic Side
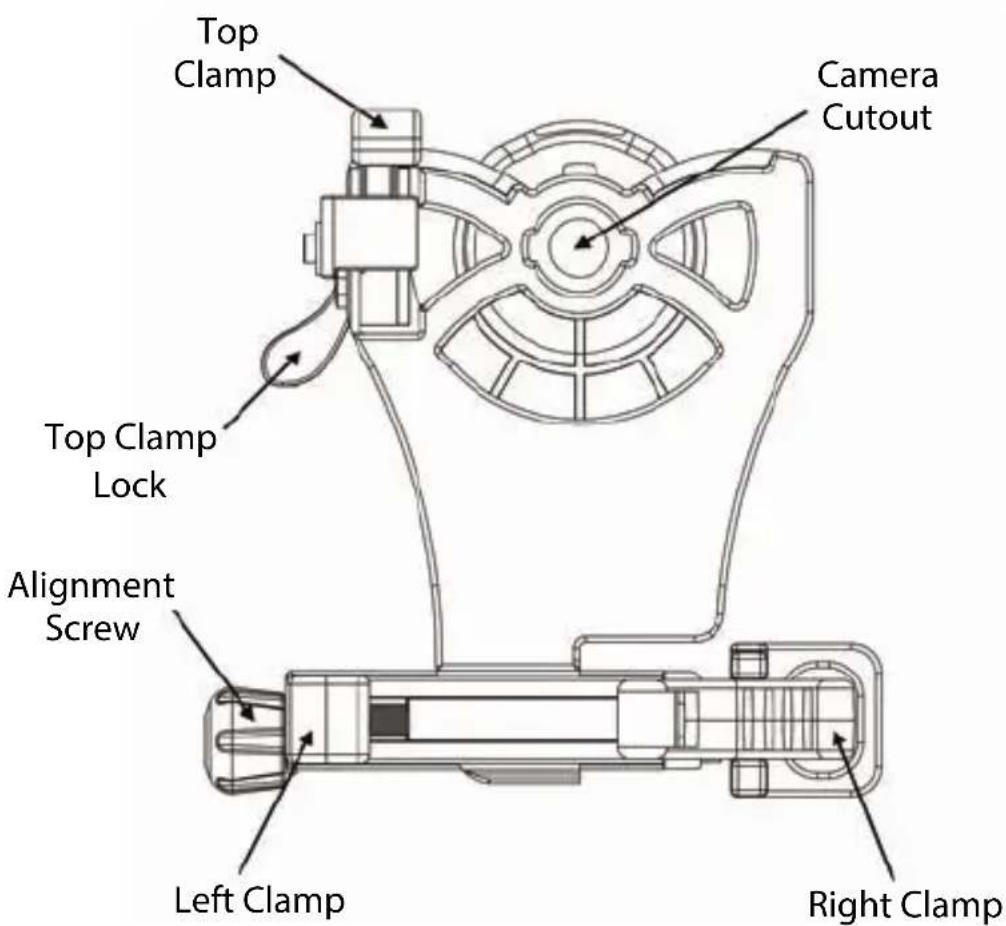
Phone Side
Inserting Phone
Fig.1
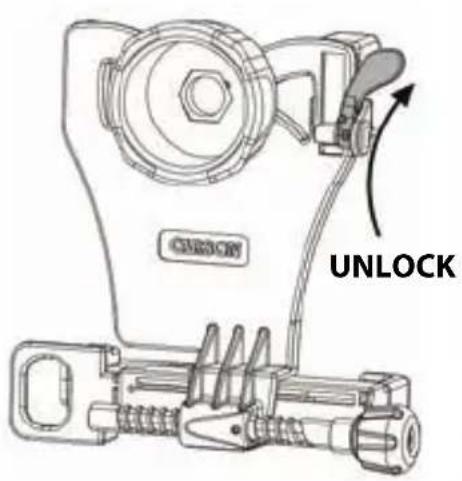
Rotate to unlock top clamp.
Fig.2
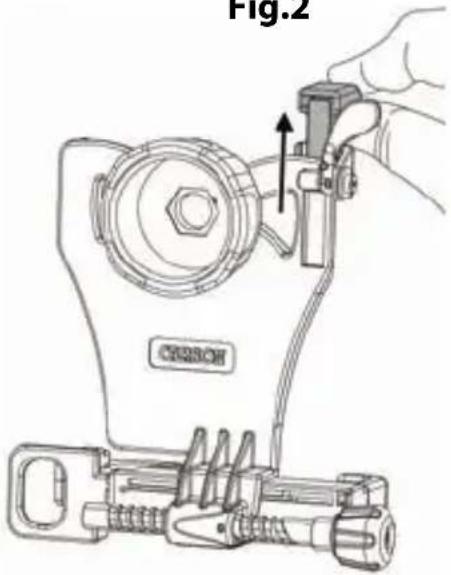
Slide top clamp into uppermost position.
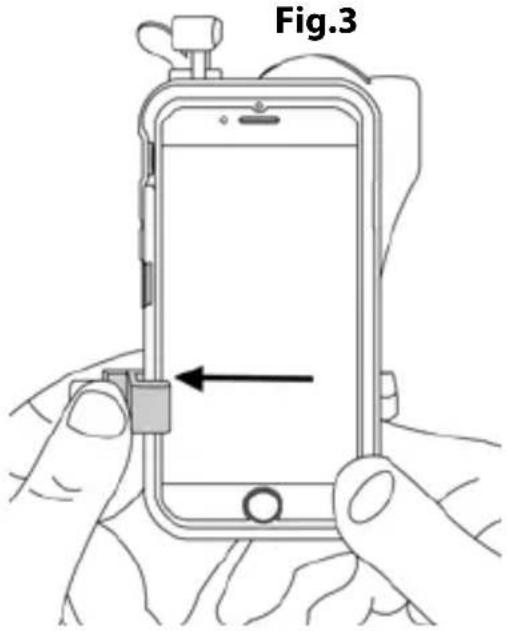
Insert phone into left clamp.
Inserting Phone (cont.)
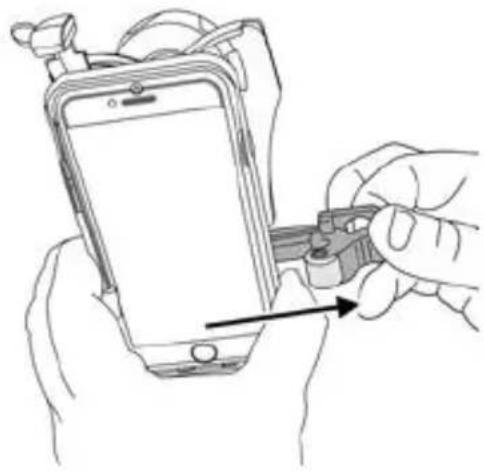
Fig.4
natural_image
Line drawing of hands holding a smartphone with a tool, showing the screen and cable (no text or symbols)Squeeze and pull right clamp past edge of phone.
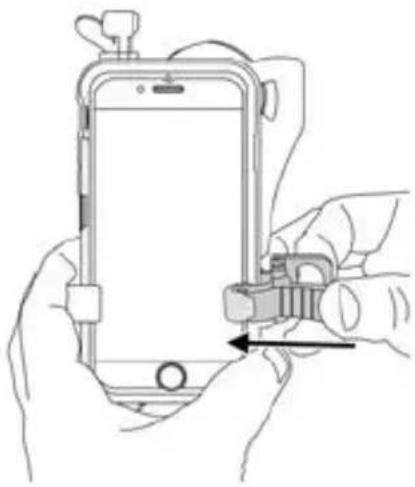
Fig.5
natural_image
Line drawing of hands holding a smartphone with a lock and cable (no text or symbols)Release right clamp to secure phone.
Fig.6
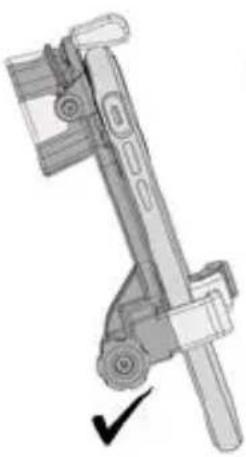
natural_image
Mechanical device with a black checkmark indicating a specific part (no text or symbols visible)Ensure phone is flat as possible to adapter.
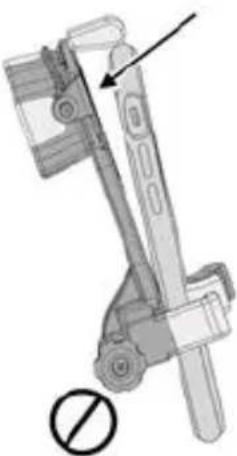
natural_image
Mechanical device with a circular symbol indicating no change, showing no text or labels.Align & Lock
Fig.7
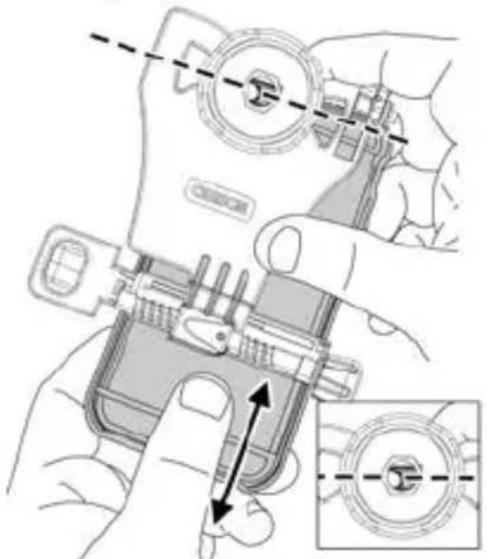
natural_image
Illustration of a hand operating a device with a close-up view showing internal components (no text or symbols)Slide phone vertically until camera is roughly aligned with camera cutout.
Fig.8
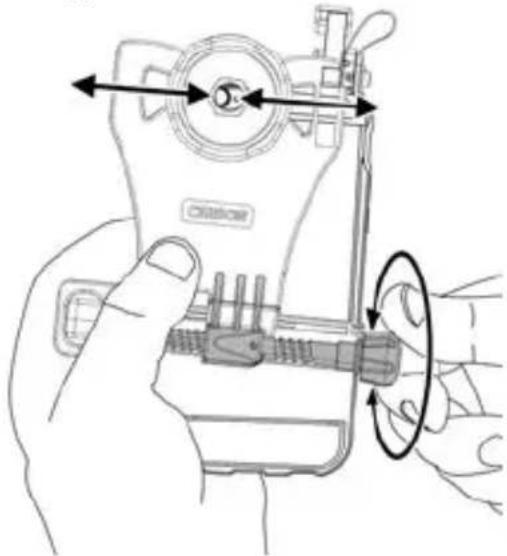
natural_image
Line drawing of a hand holding a device with arrows indicating rotation or adjustment (no text or symbols)Turn alignment screw until camera is centered in camera cutout.
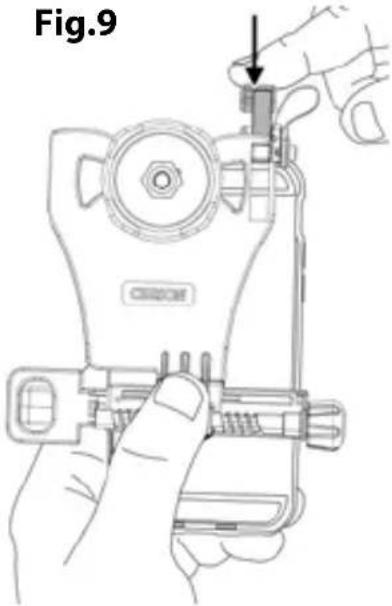
Slide top clamp down against phone edge.
MULTIPLE-LENS CAMERA PHONE:
If there is more than one rear-facing camera, use the primary one. Typically, the primary is a 1x wide-angle color camera, and the other camera(s) are secondary.
For Apple dual camera phones, the primary camera is the one closest to the corner. Use photo or video mode only. For Android, the primary camera can be determined by which does not show an image in your app while blocking the individual camera.
For the latest instructions on multiple camera phones, please visit www.carson.com/multicam.
Align & Lock (cont.)
Fig.10
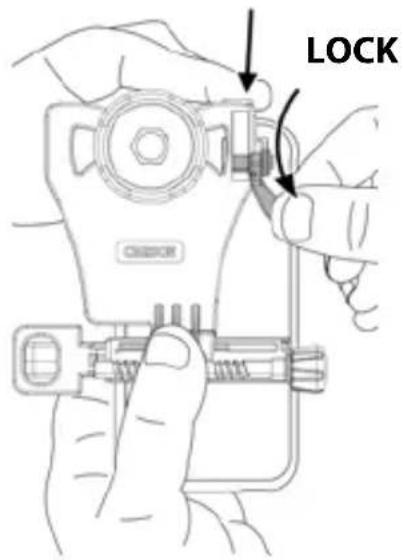
While holding top clamp tight to phone, rotate to lock.
Fig.11
natural_image
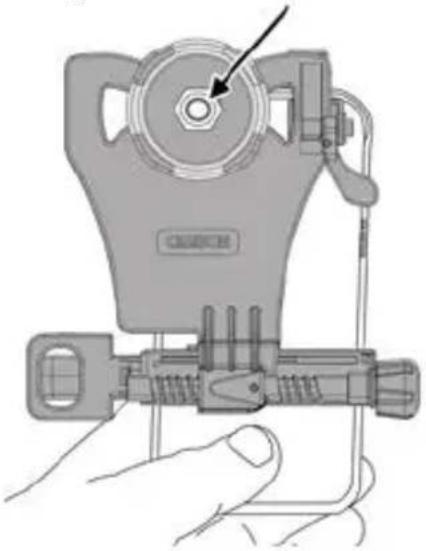
Illustration of a hand holding a C#UCH device with a circular component and connector (no text or symbols)Figure 11 shows a properly aligned camera. If needed, use alignment screw and top clamp to make further adjustments.
Fig.12
natural_image
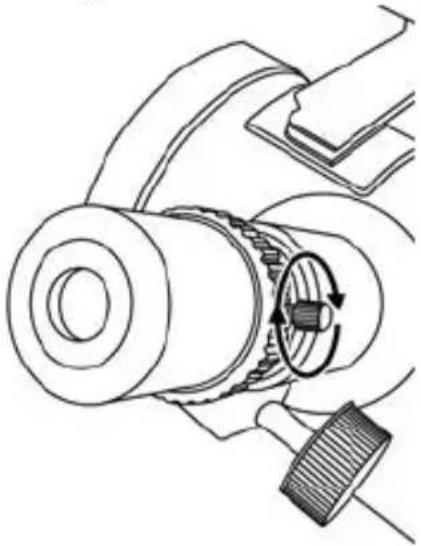
Mechanical assembly diagram showing gear and shaft components with rotational motion arrows (no text or labels)To prevent eyepiece from rotating, tighten set screw to lock in place.
Attaching to Optic
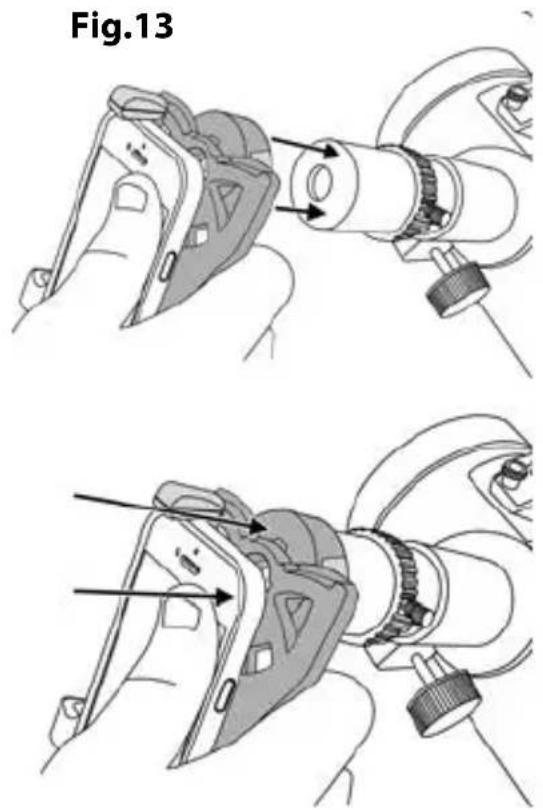
Align optic adapter over eyepiece and press down firmly. Be careful not to move your camera out of alignment.
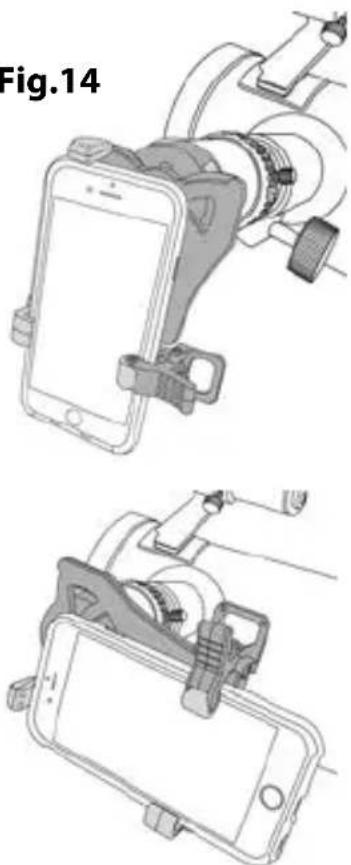
Fig.14
natural_image
Two technical diagrams showing a smartphone mounted on a stand with attached clips, no text or symbols present.Phone can be positioned in either portrait or landscape mode.
Attaching to Optic (cont.)
Fig.15
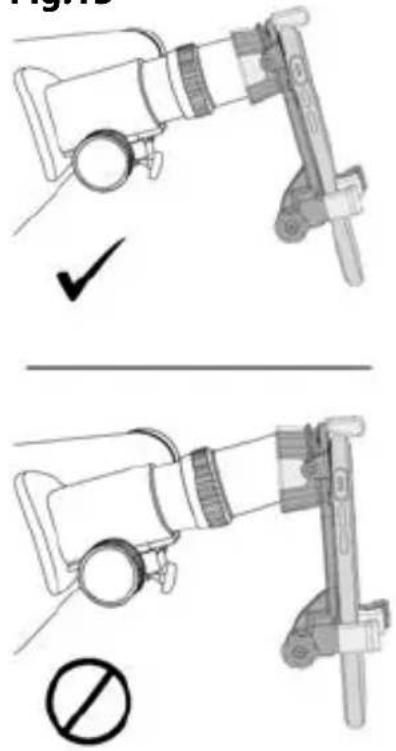
Ensure that optic adapter is flush to the eyepiece of your telescope.
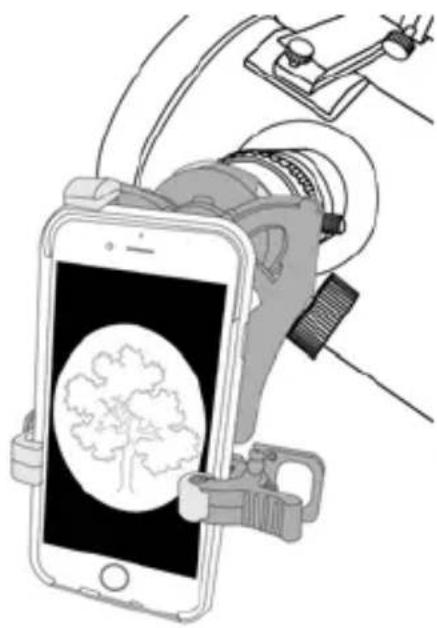
Fig.16
natural_image
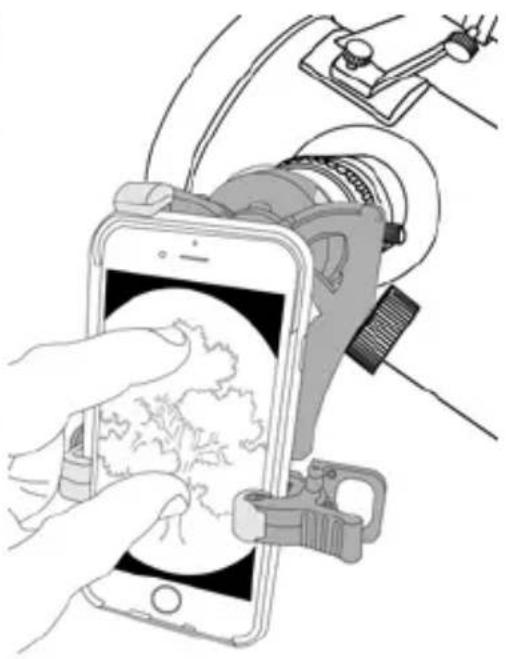
Illustration of a smartphone with a brain icon being handled, no text or symbols presentTurn on camera. If image is not centered, repeat alignment steps.
Fig.17
natural_image
Illustration of a hand holding a smartphone displaying a map, with a camera and mechanical device nearby (no text or symbols)To maximize your image, pinch to enlarge image. For best results, use in video mode.
TO REMOVE PHONE FROM ADAPTER:
To save your alignment, make no further adjustments to the top clamp and alignment knob. Simply remove phone using right clamp only as shown in Fig. 4.
USING ADAPTER AGAIN:
The alignment of your phone to the adapter should be saved from the initial setup, so many steps can be skipped (FIG 1-2, 7-10) and only a quick fine adjustment of the alignment may be needed.
Frequently Asked Questions:
Q1: Why does the top clamp touch the round corner of my phone, instead of the top flat edge?
A1: This is normal for some models of phones. Just fit as close to rounded edge as possible and lock top clamp as normal.
Q2: Why am I getting reflections and/or glare in my image?
A2: This may occur with indoor lighting. Please avoid overhead lighting or change the angle of the lighting relative to phone. Also, please use without flash to avoid reflections and/or glare in photos. If there's glare on your phone screen that makes image hard to view, increase brightness setting on phone and view from a position with less overhead light.
Q3: I can't align my phone vertically with the top clamp; it won't fit. What should I do?
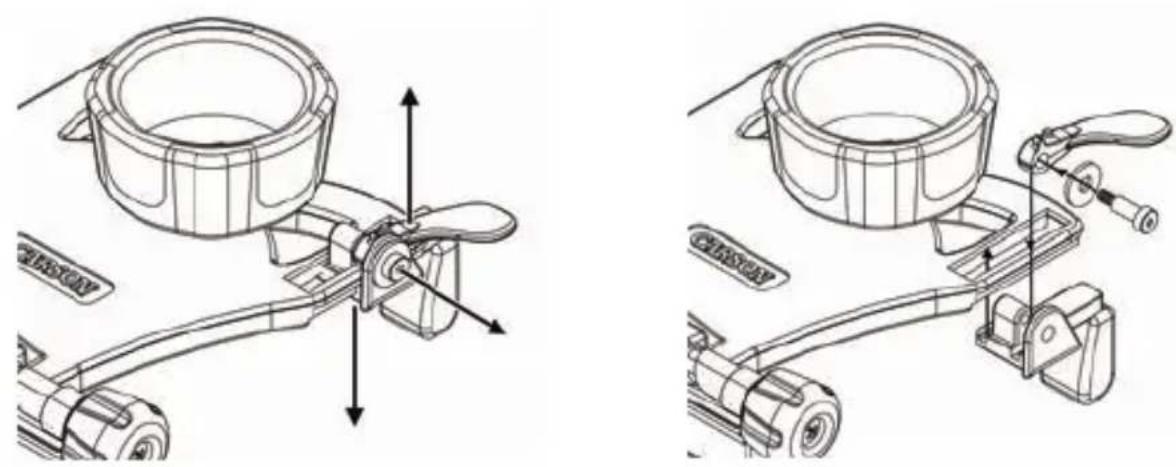
A3: If you go through the alignment process and there is no way to achieve vertical alignment, because it's restricted by the top clamp, try removing your phone case. Alternatively, you can remove top clamp assembly using screw as shown below in left figure. For this configuration, you will not be able to save your vertical alignment between uses. Your phone will have to be adjusted for vertical positioning each time it's placed within the adapter. We recommend you save these four parts for use with other phones, and you can reassemble the top clamp as shown below in right figure.
natural_image
Technical line drawings of a mechanical device with labeled parts, showing assembly and mounting features (no text or symbols present)Q4: How do I know which phones will work with the adapter?
A4: Please see the smartphone sizing guide below.
SMARTPHONE SIZING GUIDE
If your phone (in its case) fits in "portrait" orientation between the 2 arrows, it will fit the smartphone telescope adapter.
Q5: Why does my phone rotate on the eyepiece when used in landscape (horizontal) mode?
A5: If the eyepiece can rotate on your telescope, lock it in place by tightening the set screw (Fig 12).
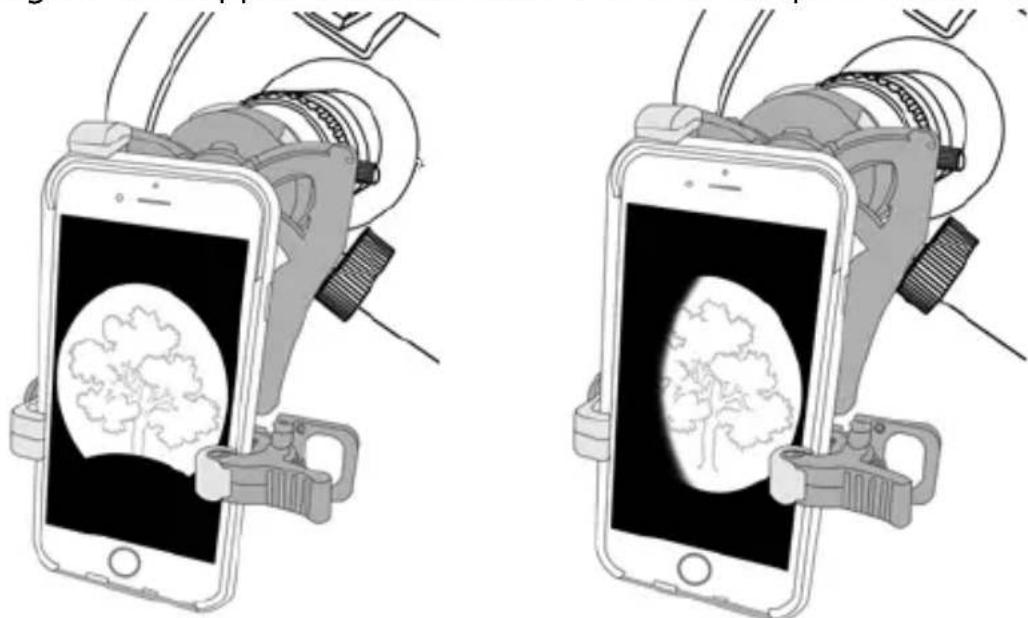
Q6: My image doesn't appear to be centered or is not a complete round image; what's wrong?
natural_image
Illustration of two smartphones with a brain inside, shown from different angles (no text or symbols)A6: The phone alignment needs to be adjusted in vertical direction using top clamp (FIG 7) and in horizontal direction by using alignment screw (FIG 8). Check that phone is flat on adapter (FIG 6), and adapter is flush with optic (FIG 15).
Q7: My other phone camera or flash is covered by adapter. Why is that?
A7: First, we recommend using the device with only the primary rear camera. If problems persist, please contact customer support. Second, the flash can be covered, and is not needed for use with optic. We recommend flash setting is turned off at all times when using adapter.
Tips & Tricks:
PHOTOGRAPHY
- Tap object of interest on your phone screen to autofocus.
- For videos, tap and hold object of interest on phone screen for a second to lock focus. Tap again to release the focus lock.
- In low light conditions, turn your phone screen brightness to its lowest level.
- For long sessions, try using battery cases or phone chargers to prevent your battery from draining.
APPS
- Share photos and videos through various apps (e.g. FaceTime, Messages, Facebook, Instagram, etc.).
- Apps that allow you to set exposure and focus manually can expand the potential of the adapter. This is especially helpful for telescopes to set longer exposure times to get the best images of sky objects.
STABILIZATION
- Place telescope on a stable surface to prevent external vibrations from shaking image.
- To prevent shaking while capturing photos, attach headphones to smartphone and use the volume buttons to activate shutter.
- Many phones have image stabilization features. Check your phone and turn on this feature if available. If not, there are camera apps with stabilization features.
Storage/Cleaning Information:
- For longest life of springs/plastic, store in dry area at room temperature.
- Adapter should be cleaned with soft, damp cloth only. Do not use any chemicals or abrasives.
Customer Service:
We will be happy to help you with any problems you may experience with your HookUpz™ Smartphone Telescope Adapter. Email us at info@carson.com or call toll-free at 1-800-967-8427.
CARSON®
Carson Optical
2070 5th Avenue
Ronkonkoma, NY 11779
www.carson.com info@carson.com
Tel: 631-963-5000 Fax: 631-427-6749
IT-100B / ©2017 - R1
- Smartphone Telescope Adapter
- Included with:
- Instructions for Use
- Table of Contents
- Inserting Phone
- Inserting Phone (cont.)
- Align & Lock
- MULTIPLE-LENS CAMERA PHONE:
- Align & Lock (cont.)
- Attaching to Optic
- Attaching to Optic (cont.)
- TO REMOVE PHONE FROM ADAPTER:
- USING ADAPTER AGAIN:
- Frequently Asked Questions:
- SMARTPHONE SIZING GUIDE
- Tips & Tricks:
- PHOTOGRAPHY
- APPS
- STABILIZATION
- Storage/Cleaning Information:
- Customer Service:
- CARSON®
Brand : Carson
Model : RedPlanet RP-400
Category : Telescope