USER MANUAL PGE121 DOMETIC
natural_image
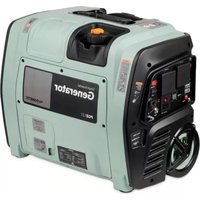
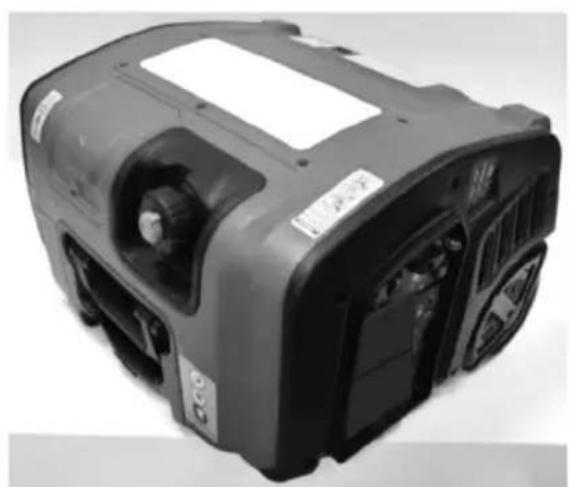
Front view of a smart home device labeled 'Generator' with visible branding and control buttons (no readable text beyond label)
PGE121

Portable Generator
Operating Manual
Please read this instruction manual carefully before first use, and store it in a safe place. If you pass on the product to another person, hand over this instruction manual along with it.
Table of contents
1 Explanation of symbols....3
2 Safety instructions....3
3 Scope of delivery .....7
4 Technical description ....8
5 Preparation 13
6 Operating the generator ....15
7 Special requirements 29
8 Troubleshooting 30
9 Maintenance 32
10 Transport and storage.... 42
11 Warranty 47
12 Disposal.... 47
13 Technical data 48
14 Copyright 50
1 Explanation of symbols

DANGER!
Safety instruction: Indicates a hazardous situation that, if not avoided, will result in death or serious injury.

WARNING!
Safety instruction: Indicates a hazardous situation that, if not avoided, could result in death or serious injury.

CAUTION!
Safety instruction: Indicates a hazardous situation that, if not avoided, could result in minor or moderate injury.

NOTICE!
Indicates a situation that, if not avoided, can result in property damage.

NOTE
Supplementary information for operating the product.
2 Safety instructions
The manufacturer accepts no liability for damage in the following cases:
- Damage to the product resulting from mechanical influences and incorrect connection voltage
• Alterations to the product without express permission from the manufacturer
- Use for purposes other than those described in the operating manual
The declaration of conformity can be requested from the manufacturer (contact information on the back).
Note the following basic safety information when using electrical devices to protect against:
- Electric shock
- Fire hazards
- Injury
2.1 General safety

DANGER!
- Do not operate the device in spaces where danger of explosion is present.
- Operate the generator only in a well-ventilated area.

WARNING!
• Electrical devices are not toys
Keep electrical devices out of reach of children or infirm persons. Do not allow them to use electrical devices without supervision.
- Operate the generator only in an area where pedestrians, children and pets are not likely to touch it.
• People (including children) whose physical, sensory or mental capacities prevent them from using this device safely may not be allowed to operate it without the supervision of a responsible adult.
- Exhaust fumes contain carbon monoxide which is a highly toxic, odourless and colourless gas. Do not inhale any exhaust fumes.
- Only use the device as intended.
- Do not make any alterations or modifications to the device.
- Do not operate the generator in rain, snow or wet conditions.
- Do not touch the generator and the cables with wet hands.
- Do not operate the device with a damaged cord or plug, or a damaged output cable.
- Check fuel leakage before each use. Do not use the generator if the generator is leaking fuel.
- Remove all flammable materials such as petrol, paints, solvents, etc., from the vicinity of the generator.
- Ensure that hot parts of the generator do not come in contact with any flammable materials.
- Avoid placing any flammable materials near the exhaust outlet.
- The muffler becomes very hot during operation and remains hot for a while after stopping the engine. Be careful not to touch the muffler while it is hot.
- Only refuel the generator when it is switched off and in a well ventilated area. Petrol is highly flammable and can explode.
- Do not refuel the generator nearby a running vehicle.
- Wipe up spilled petrol properly and wait until the fumes have cleared before turning on the engine.
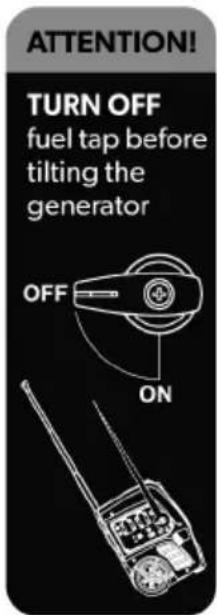
- Never tilt the generator while it is on. The generator may only be tilted back towards the drawbar. Tilting it in any other direction may cause oil or petrol to leak and damage the engine. Leaking petrol can result in a fire or explosion.
- Turn off the fuel tap before tilting the generator.
- Installation, maintenance and repairs of the generator may only be carried out by qualified personnel who are familiar with the risks involved when handling generators as well as the relevant regulations. Inadequate repairs may cause serious hazards. For repair service, please contact the manufacturer's branch office in your country (addresses on the back page).
- Ground the generator to avoid electrical hazards.

CAUTION!
- Keep the generator at least 1 m from buildings or other equipment, or the generator may overheat.

NOTICE! MATERIAL DAMAGE.
- Do not disconnect any cables when the device is still in use.
- Let the engine cool before storing the generator indoors.
- Don't remove any cover of the generator case while the engine is running. Doing so can result in permanent damage to the generator.
2.2 Connection notes

Do not connect to a building electrical system unless an isolation switch has been installed by a qualified electrician.

NOTICE! MATERIAL DAMAGE.
It's not allowed to connect the generator in parallel with any other generator without the optional Parallel Kit, see chapter "AC operation" on page 22.
3 S c o p e o f d
Designation Referenz
PGE121 generator 9600027157
DC charging cable with alligator clips –
Tool bag –
Operating manual –
4 Technical description
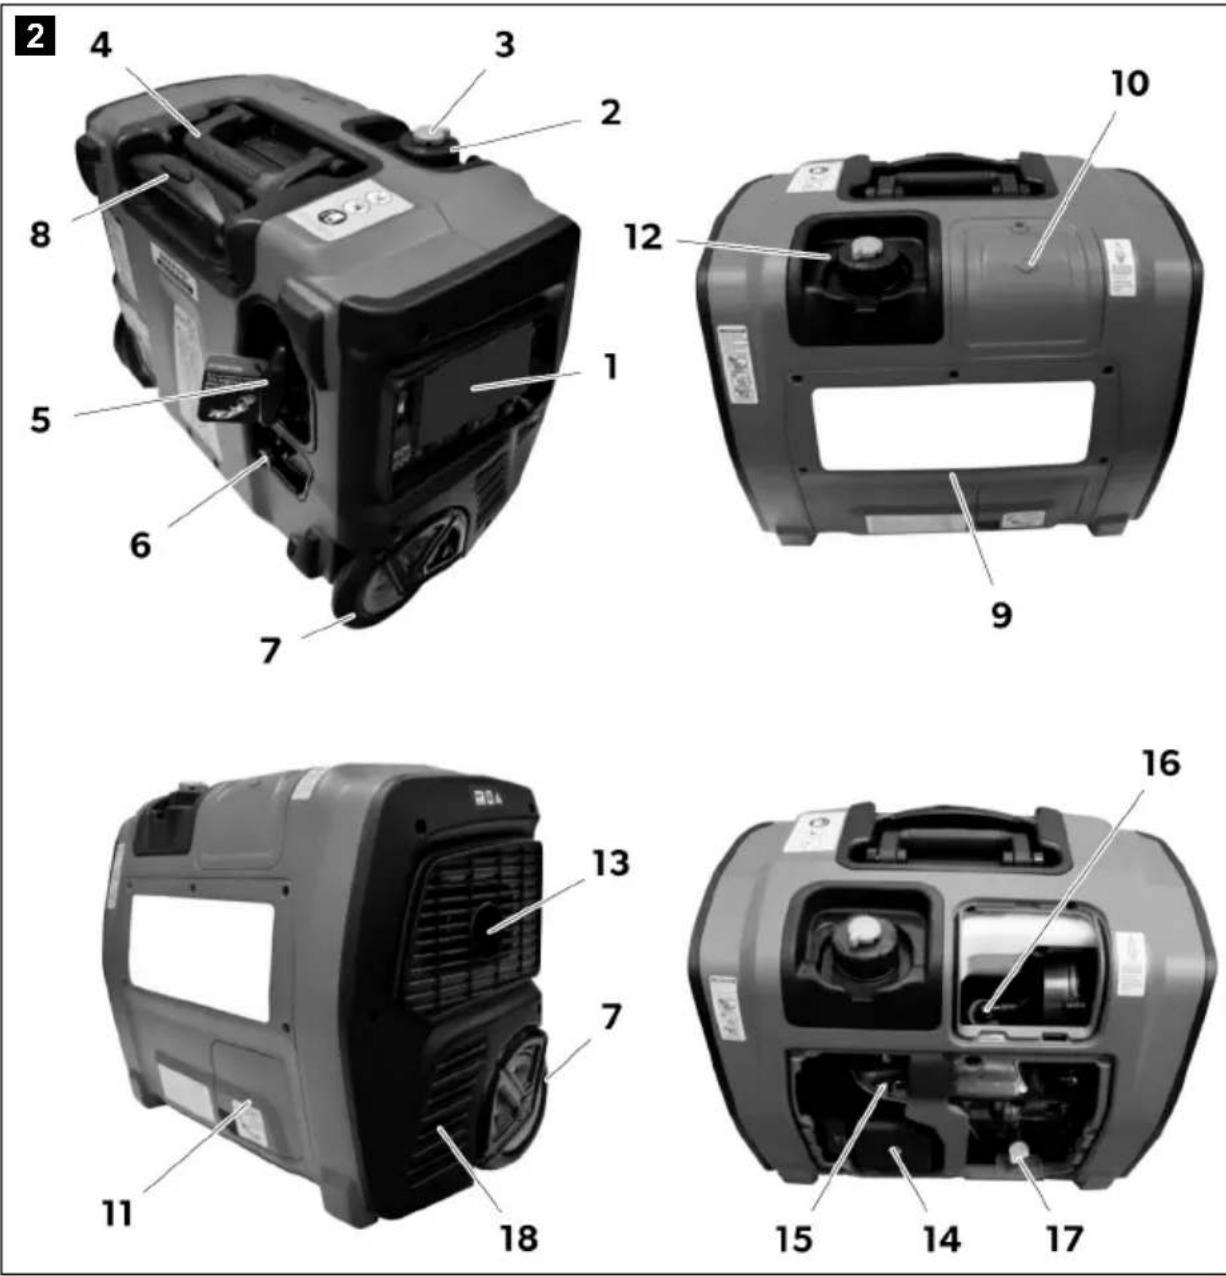
No. in
fig. 2
Description
1 Control panel (Location of generator controls and output power sockets)
2 Fuel cap (Access to fuel tank)
3 Fuel cap vent lever
4 Carrying handle (Lift the generator by this handle only)
5 Starter grip (Pull starter grip for starting engine)
No. in fig. 2
Description
6 Choke knob (Cold engine starting aid)
7 Wheels
8 Draw bar handle (Use this handle to wheel the generator around)
9 Maintenance cover (Access to air filter, carburettor, dipstick, etc.)
10 Spark plug maintenance cover (Access to spark plug)
11 Oil maintenance cover (Access to fill in the engine oil)
12 Fuel gauge (Check fuel level in fuel tank)
13 Muffler (Lowers engine exhaust noise)
14 Air filter (Prevents abrasive particulate matter from entering the engine's cylinders)
15 Carburettor (Supply the fuel-air mixture to engine)
16 Spark plug (Ignites the fuel-air mixture)
17 Dipstick (Access to fill, check or drain engine oil)
18 Air intake (Inlet for fresh air into the housing)
The PGE121 generator delivers power wherever independent power generation is needed. This makes it possible to provide electricity in gardens, on building sites, at camping sites, in workshops and garages.
The generator comes with the following features:
• ECO mode for economical operation
- Low oil level indicator
• Overload warning system
- Recoil starter
- Electric starter
• 12V DC miniature circuit breaker
- 2 x 230V-AC sockets
• 1 2 V - D C sockets
• 2 x 5 V D C U S B p l u g s
4.1 Important label locations
Please read the following labels carefully before operating this generator.

4
①
DANGER!
Using a generator indoors CAN KILL YOU IN MINUTES.
Generator exhaust contains carbon monoxide.
This is a poison you cannot see or smell.

Never use inside a home or garage, EVEN IF doors and windows are open.
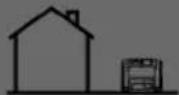
Only use OUTSIDE and far away from windows, doors and vents.
⚠ WARNING!


Tilt down only on this side.
②
WARNING!

Read owner's manual and all labels before operating.

Only operate in well-ventilated areas. Exhaust gas contains poisonous carbon monoxide.

Ground unit to avoid electrical hazards.

Keep unit dry. Do not expose to rain or wet locations.

Stop enginge before refueling. Check for spilled fuel or fuel leaks. Do not operate near flammable materials. Turn OFF the fuel tap after this unit is used.

This symbol indicates that when the end-user wishes to discard this product, it must be sent to separate collection facilities for recovery and recycling.
5
③

④
⑤

⑥
⑦

⑧
4.2 Control Panel
No. in
fig. 6
Description
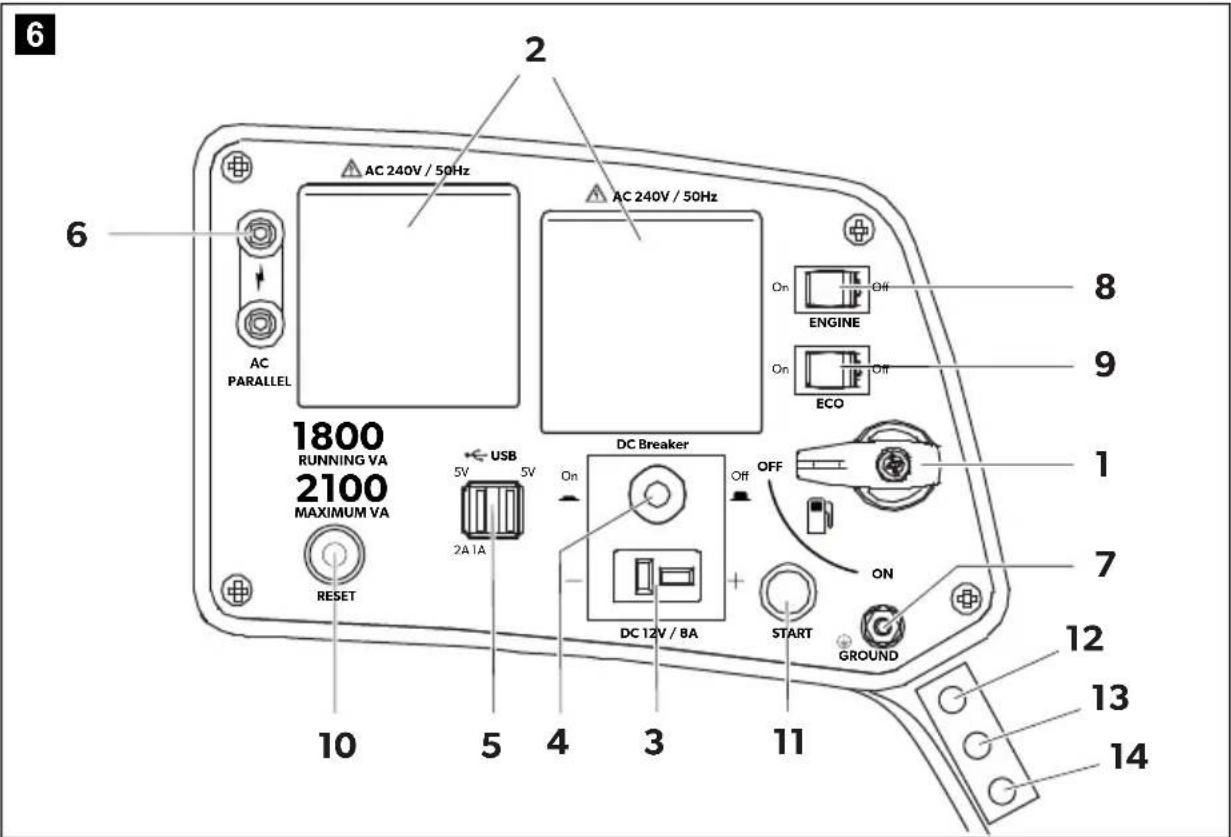
1 Fuel tap (Controls fuel supply to the carburettor)
2 AC power sockets (AC output for connecting AC devices)
3 12V DC power socket (Connection 12V DC batteries)
4 12V DC circuit breaker (Overload protection for the 12VDC charging system)
5 USB plug (Output sockets for charging USB devices)
6 Parallel terminal (AC Parallel operation outlets for two generators)
7 Ground terminal (Grounding point for the generator. Be sure to ground the generator when the connected equipment is grounded.)
8 Engine switch (Turns ON or OFF engine ignition system)
9 ECO switch (Slows the engine speed to save fuel, lessen noise and engine wear)
10 Reset button (Resets overload protection)
11 Start button (Starting the engine equipped with electric starter)
No. in
fig. 6
Description
12 Ready LED (green) (Lights ON when the generator is operating normally.)
13 Overload LED (red) (Lights ON if the generator is overloaded, or if there is a short circuit at AC power sockets.)
14 Low oil level LED (yellow) (Lights up when oil level is below safe operating level, and the engine shuts down automatically)
5 P r e p a r a t i
5.1 Fill the oil tank

NOTE
The engine has been shipped without oil. Fill in oil before starting.
See chapter "Engine oil check/change" on page 34.
5.2 Fill the fuel tank

WARNING!
FIRE AND/OR EXPLOSION HAZARD.
Only refuel the generator when it is switched off and in a well ventilated area. Petrol is highly flammable and can explode.
- Don't smoke while refuelling the generator.
- Ensure there are no naked flames nearby while refuelling the generator.

NOTICE!
- You may use regular unleaded petrol containing no more than 10% Ethanol (E10).
- Immediately wipe off spilled fuel with a clean, dry, soft cloth, since fuel may deteriorate painted surfaces or plastic parts.
- Never use an oil/petrol mixture.

1 F u e l c a
2 Red marker for upper fuel level
3 Fuel gauge
▶ Make sure, the generator is on a flat level surface.
Remove the fuel cap (fig. 7 1) and fill the fuel into the tank up to the red level marker (fig. 7 2).
Do not fill above the red level marker, otherwise it may overflow when the fuel warms up and expands.
The fuel level can be checked through the fuel gauge (fig. 7 3).
▶ Make sure the fuel cap (fig. 7 1) is tightened securely after refuelling the generator.
6 Operating the generator
6.1 Before each use
▶ Check engine oil, see chapter "Engine oil check/change" on page 34.
8

No. in
fig. 8
Description
1 Fuel gauge
F Fuel indicator full
E Fuel indicator empty

WARNING! FIRE AND/OR EXPLOSION HAZARD.
Only refuel the generator when it is switched off and in a well ventilated area. Gasoline is highly flammable and can explode.
- Don't smoke while refuelling the generator.
- Ensure there are no naked flames nearby while refuelling the generator.
▶ Make sure the engine switch (fig. 6 8, page 12) is in the "OFF" position and the generator is on a flat level surface.
▶ Check fuel level through the fuel gauge (fig. 8 1).
√ If the red mark is close to "E" position the fuel level is low. If the red mark is close to "F" position the fuel level is high.
▶ Refuel if necessary.

NOTICE!
- Use only unleaded gasoline. The use of leaded gasoline will cause severe damage to internal engine parts.
- You may use regular unleaded gasoline containing no more than 10% Ethanol (E10).
- Immediately wipe off spilled fuel with a clean, dry, soft cloth, since fuel may deteriorate painted surfaces or plastic parts.
- Never use an oil/gasoline mixture.
Don't fill above the red marker for upper fuel level (fig. 7 2, page 14).
▶ After fill the fuel, make sure the fuel cap is tightened securely.

WARNING! FIRE AND/OR EXPLOSION HAZARD.
Gasoline is highly flammable and can explode.
- Check fuel leakage before each use.
- Do not use the generator if the generator is leaking fuel.
▶ Check generator for fuel leakage.

Turn the fuel cap vent lever (fig. 9 1) to „ON“ position (fig. 9 2).
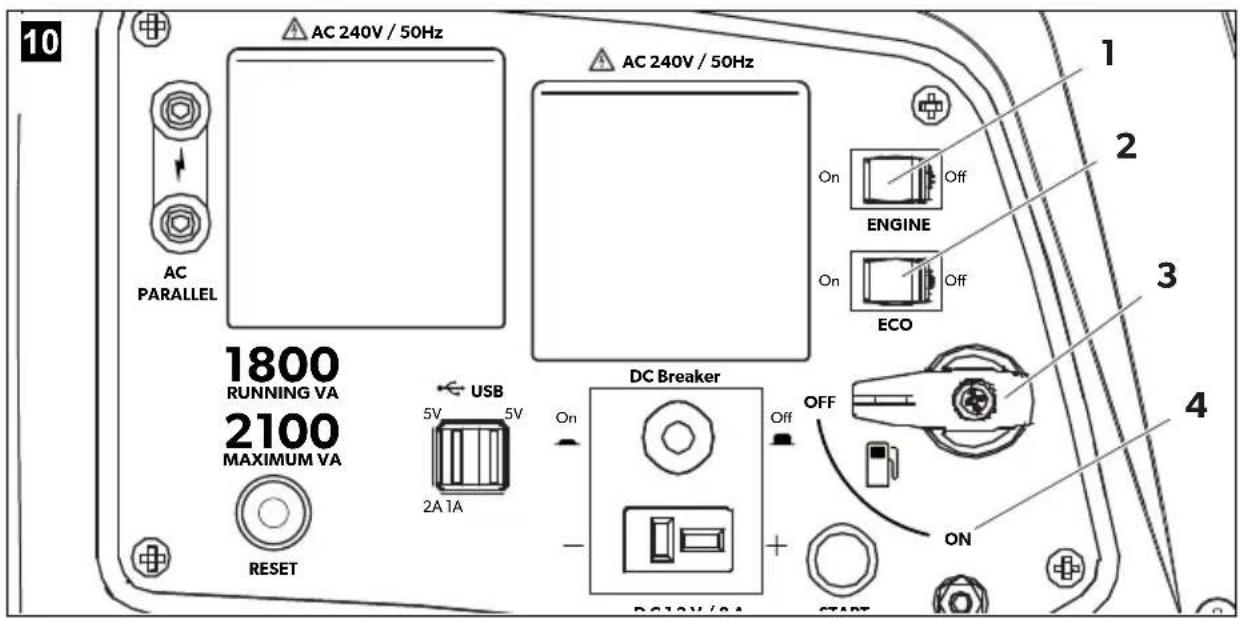
Turn the fuel tap (fig. 10 3) to "ON" position (fig. 10 4).
▶ Turn the engine switch (fig. 10 1) to "ON" position.
√ Ready LED lights green.
▶ Turn the ECO switch (fig. 10 2) to "OFF" position.
Use choke

NOTE
The choke is not required to start a warm engine. Push the choke knob into the "RUN" position.
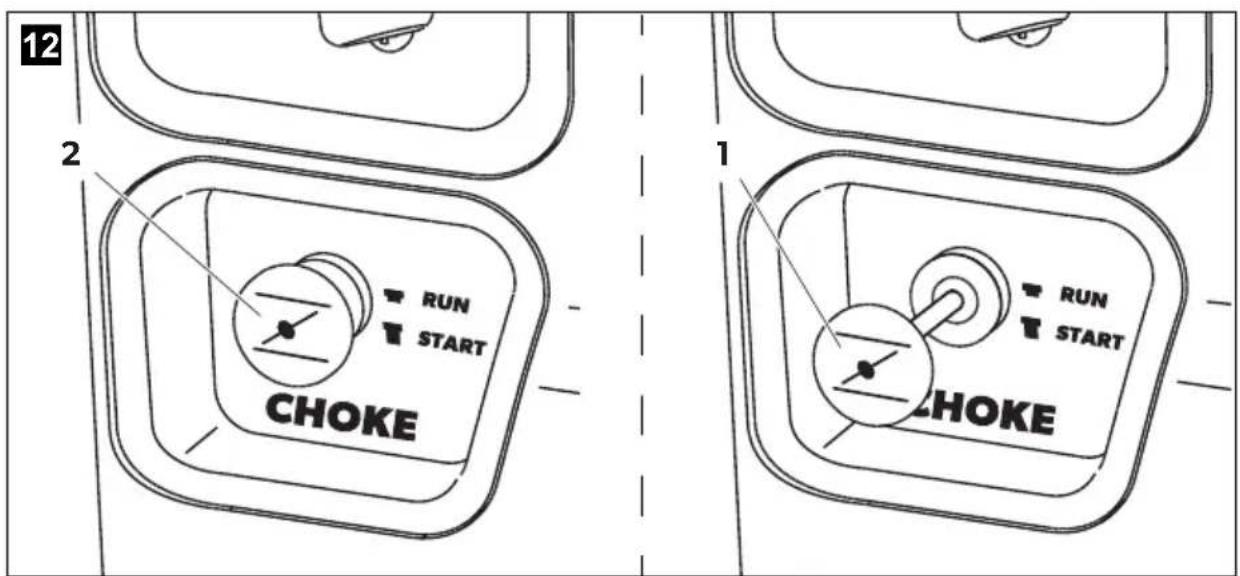
| No. in fig. 12 | Description |
| 1 | Choke position "START" |
| 2 | Choke position "RUN" |
▶ Pull the choke knob fully out to „START“ position (fig. 12 1).
Keep the choke knob in "START" position for 2 pulls of the recoil starter or 2 pushes of the electric start button.
▶ After second pull or push, push choke knob into the "RUN" position (fig. 12 2) for up to the next 3 pulls or pushes.

NOTE
Too much choke leads to spark plug fouling /engine flooding due to the lack of incoming air. This will cause the engine not to start.
Keep the choke knob in "START" position (fig. 12 1) for more pulls or pushes if weather is cold.
Close choke
▶ Push the choke knob fully into the "RUN" position (fig. 12 2, page 18).

NOTE
Wait a few seconds until the engine speed is stable before closing the choke. In cold weather conditions it may take a little longer until the engine speed is stable.
6.2 Start the Generator

DANGER! MORTAL DANGER.
Exhaust fumes contains poisonous carbon monoxide (CO), a colourless and odourless gas. Breathing CO can cause loss of consciousness and may lead to death.
- Operate the generator only in a well-ventilated area.
- Never run your generator inside a building, even if the doors or windows are open.
▶ Make sure, the generator is on a flat level surface when start or operate the generator.
▶ Turn off or unplug all electrical loads connected to the generator AC power sockets before starting the engine.
The engine switch is in "ON" position, see chapter "Before each use" on page 15.
▶ Pull the choke knob into "START" position, see chapter "Use choke" on page 18.
Recoil start
13

natural_image
Close-up of hands using a screwdriver to adjust or install a mechanical device (no visible text or symbols)
▶ Pull the starter grip (fig. 13 1) slowly until resistance is felt and then pull rapidly.

NOTE
Normally the engine starts within three pulls.
Keep the choke knob in "START" position for 2 pulls.
After second pull, push the choke knob into the "RUN" position for up to the next 3 pulls.

NOTE
Don't let the starter grip snap back against the generator. Return it gently to prevent damage to the starter or housing.
Electric start
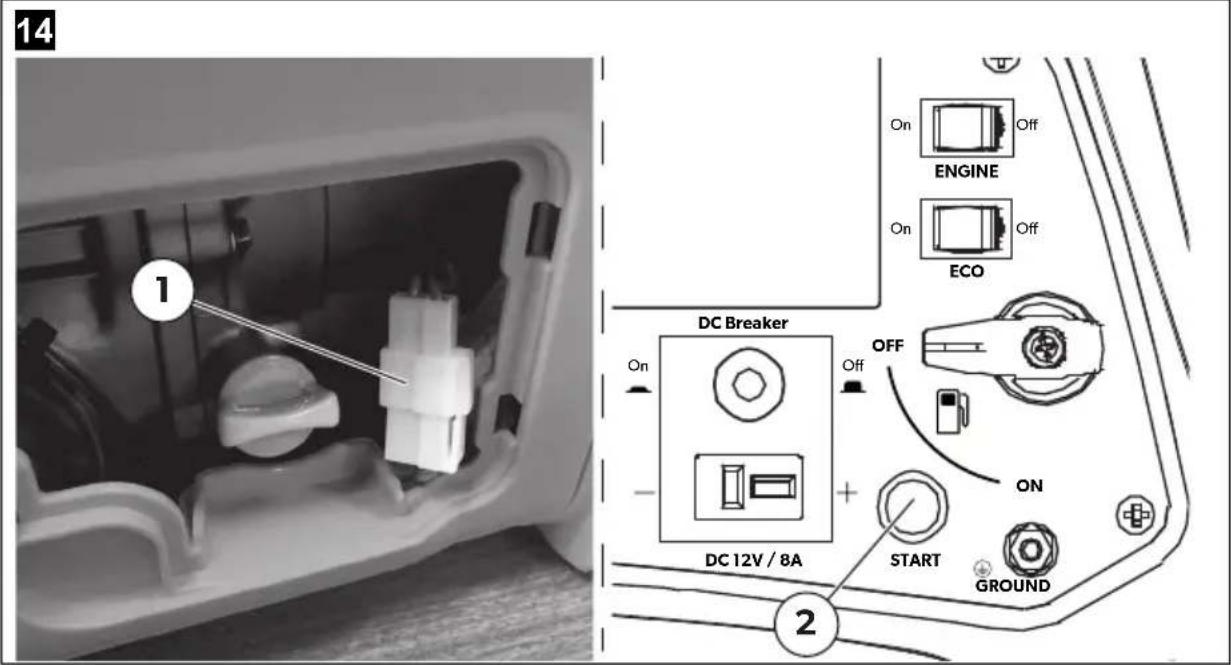
▶ Open the oil maintenance cover to connect the battery connector (fig. 14 1) before using the electric starter.
▶ Push the start button (fig. 14 2) to the end and then release it.

NOTE
Normally the engine starts within three pushes with the start button. Keep the choke knob in "START" position for 2 pushes.
After second push, push the choke knob into the "RUN" position for up to the next 3 pushes.

NOTICE!
The electric starter is equipped with an over-temperature sensor that will shut down the electric starter automatically when the engine temperature is too high.
6.3 AC operation
Follow these steps before you start operation:
▶ Start the engine, see chapter "Start the Generator" on page 19.
▶ Let the engine run for 2 or 3 minutes to warm up.
▶ Connect the electrical devices.
Use the ECO mode
This system controls the engine speed according to the connected load. This results in a better fuel consumption and less noise.

WARNING! ELECTRICAL SHOCK
AC sockets are always live when the generator is on.
- Do not operate with wet hands.

No. in
fig. 15
Description
1 ECO switch
2 Reset button
3 AC power sockets
4 Start button
5 Ready LED (green)
6 Overload LED (red)
▶ Switch the ECO switch (fig. 15 1) to "ON" position to use economy control system.
▶ Connect an electrical device to either AC power socket (fig. 15 3, page 22). If the generator is overloaded (device draws too much power), or if there is a short circuit in a connected appliance, the overload LED (fig. 15 6, page 22) will light on.
The power to the connected appliance(s) will shut off, and the ready LED (fig. 15 5, page 22) turns off.
The reset button (fig. 15 2, page 22) can be used to reset output of the generator after overload protection. It is unnecessary to restart engine. Before pushing the reset button check and correct the problem, such as a short circuit in a connected appliance or wire.
▶ Turn on the electric devices for operation.
The ECO switch (fig. 15 1, page 22) must be turned to "OFF" position when using electric devices that require a large starting current, such as a compressor, pump, motor or other high electrical loads.
Be sure the total load is within generator rated output and the socket load current is within socket rated current (10A).
When an attached electrical device is started, the overload LED (fig. 15 6, page 22) may light on. This is normal if the overload LED turns off after a few seconds.
Shut down the generator

No. in fig. 16
Description
12 x AC power sockets
2 Engine switch
3 F u e l t a
4 Fuel cap vent lever
▶ Disconnect or turn off all electrical loads connected to the generator AC power sockets (fig. 161).
▶ Turn the fuel tap (fig. 16 3) to the "OFF" position.
▶ Turn the engine switch (fig. 16 2) to "OFF" position.
▶ Allow the engine to cool down well.
▶ Turn the fuel cap vent lever (fig. 16 4) to "OFF" position.

NOTICE!
• Always allow the generator to cool down before moving or storing. High temperature will be present at the rear side of the unit for some time after shutdown.
- Don't turn the fuel cap vent lever (fig. 16 4, page 24) to "OFF" position before the engine is cooled down.
6.4 DC operation

WARNING! SERIOUS INJURIES
- Never smoke, avoid open flames and sparks or make and break connections of the battery while charging.
- Batteries may give off explosive hydrogen gas while recharging. Sparks may ignite the hydrogen gas. Provide adequate ventilation when charging or using batteries.
- Wear protective goggles and gloves when working around a battery. Battery electrolyte is an extremely corrosive sulfuric acid solution that can cause severe burns.
- Avoid electrolyte from the battery coming into contact with skin, eyes or clothing. If a contact occurs, flush area with water immediately.
Connecting the battery charging cable
17


▶ Disconnect the vehicle battery ground cable from the negative (-) battery terminal.
Plug the battery charging cable (fig. 17 1, page 25) into the 12V DC power socket (fig. 17 2, page 25) of the generator.
▶ Connect the red charger clip (fig. 17 4, page 25) to positive (+) battery terminal and the black charger clip (fig. 17 5, page 25) to negative (-).
▶ Turn the ECO switch (fig. 17 3, page 25) to the "OFF" position.
▶ Start the generator to charge the battery (see chapter "Start the Generator" on page 19).
Charging time will vary with battery size and condition. The DC circuit breaker (fig. 17 6, page 25) does not prevent over-charging of a battery.
Remove the charging cable from the generator after the battery is fully charged.

NOTE
- Do NOT connect the battery charging cable to AC power socket on the generator panel. Because AC output voltage is very high, and operators will be in danger of electrical shock hazard.
- The 12V DC power socket should only be used for charging 12V lead-acid batteries.
- When using the 12V DC output, turn the ECO switch to the "OFF" position.
- Never reverse the polarity when connecting the battery terminals to the charging jack. Severe damage may occur to the generator and battery.
- Do not start the vehicle while the battery charging cable is connected and the generator is running. The vehicle or the generator may be damaged.
- An overloaded DC circuit or a wiring problem will trip the DC circuit breaker (fig. 17 6, page 25).
(Push button extends out)
- If this happens, wait a few minutes before pushing in the DC circuit breaker (fig. 17 6, page 25) to resume operation.
If the DC Circuit Breaker (fig. 17 6, page 25) continues to go off, discontinue charging and contact your authorized generator dealer.
Disconnect the battery charging cable
▶ Turn the engine switch to "OFF" position to stop the engine after the battery is fully charged, see chapter "Shut down the generator" on page 24.
▶ Disconnect the battery charging cable from the 12V DC socket of the generator.
▶ Disconnect the black charger clip (fig. 17 5, page 25) of the battery charging cable from the negative (-) battery terminal.
▶ Disconnect the red charger clip (fig. 17 4, page 25) of the battery charging cable from the positive (+) battery terminal.
▶ Connect the vehicle battery ground cable to the negative (-) battery terminal.
6.5 AC parallel operation
Two generators can be operated in parallel to increase the available output power reach 3.6 KVA.
The parallel kit is not supplied as a standard item with the generator, it is available as an accessory item if required.

NOTE
A parallel kit (optional equipment) is required for the parallel operation.

natural_image
Diagram of two connected electrical devices with a cable and labeled connection point (no text or symbols present)
No. in
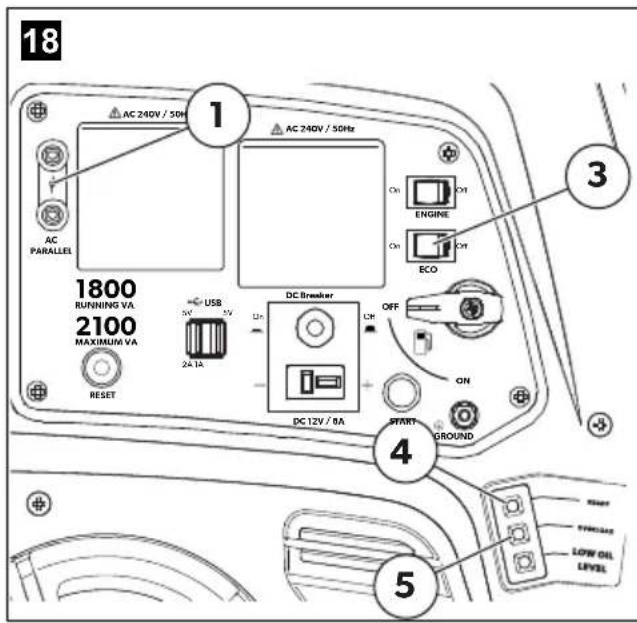
fig. 18
Description
1 Parallel terminal
2 Parallel kit (Sold separately)
3 ECO switch
4 Ready LED (green)
5 Overload LED (red)
Start AC parallel

WARNING! HIGH VOLTAGE
- Don't operate with wet hands.
- Don't allow generator to be operated by children.
- Make sure to ground the generator.

NOTICE!
- Don't connect the generator with any other generator than a second PGE121.
- Don't connect the Parallel Kit when the engine is running.
- Don't use the Parallel Kit for single operation.
- Make sure the electrical appliance rated power does not exceed the total rated power of the two generators.
- If an appliance begins to operate abnormally turn it off immediately.
- The ECO switch must be in the same position on both generators.
- Most motorized appliances require more than the rated wattage for start-up. Therefore it is normal if the Overload LED comes on shortly and goes off after a few seconds.
▶ Disconnect all electrical devices from both generators.
▶ Connect the Parallel Kit (fig. 18 2, page 27) between the parallel terminals of the two generators.
▶ Start the two generators and make sure the ready LED (fig. 18 4, page 27) comes on.
▶ Plug the electrical device into the power socket of the Parallel Kit (fig. 18 2, page 27).
▶ Turn on the electrical device to use.
Stop AC parallel
▶ Disconnect all electrical devices from the Parallel Kit (fig. 18 2, page 27).
▶ Stop the engine, see page 24.
▶ Allow the generator to cool down before transporting or storing.
7 Special requirements

NOTICE!
- Do not modify the generator.
- The generator is only allowed to be laid down on the drawbar side (fig. 271) as shown.
27

natural_image
Black-and-white photo of a portable electronic device with visible ports and labels, no readable text or symbols beyond the label '1'
natural_image
Black industrial machine component with visible fan and control panel (no text or symbols)
▶ Turn the fuel tap to "OFF" position before tilting the generator.

NOTE
- Do not turn the fuel cap lever to "OFF" position before the engine is cooled down.
- Keep all cooling holes on the front panel open and clear of debris, mud and water.
- Do not remove any cover of the generator when the engine is running.
8 Troubleshooting
Problem Cause Remedy
The engine does not start. No fuel in the fuel tank. Refill the fuel tank.
| Engine switch in OFF position. | Turn the Engine switch to ON position. |
| The fuel tap is closed. Turn the fuel tap to ON position. |
| Fuel cap vent lever is closed. Turn the Fuel cap vent lever to ON position. |
| Choke knob is in RUN position. | Pull the Choke knob completely. |
| Not enough oil in the engine. | Add the recommended oil. |
| Spark plug is in bad condition. | Clean, readjust gap and dry the spark plug. Replace it if necessary. |
| Defiled fuel in the carburetor. | Turn counterclockwise drain screw on the bottom of the carburetor to drain out the defiled fuel in the carburetor. |
| The engine starts, then shuts down. | Low fuel level. Add fuel to the tank. |
| The fuel cap vent lever is closed. | Open fuel cap vent lever. |
| Incorrect engine oil level. Check engine oil level, add or drain as needed. |
| Defiled fuel in the fuel tank. Replace fuel in the fuel tank, clean the fuel filter. |
| The engine starts, then runs rough. | Choke stuck or left on. | Turn choke to RUN position. |
| Air cleaner dirty or clogged. | Clean or replace the air filter element. |
| Spark plug is in bad condition. | Clean or replace spark plug. |
Problem Cause Remedy
| No AC output. Generator overloaded. Reduce loads and push reset |
| button to reset module. |
| Low AC voltage. Verify the choke is on RUN position, and check fuel in the fuel tank and carburetor, and check air filter. |
| Electrical device short circuit. Verify condition of any extension cords and all items being powered, then push reset button to reset module. |
| No DC output Low DC voltage. Verify ECO switch is on the "0" OFF position. |
| DC circuit protector is OFF. Push the DC circuit protector ON. |
| Fault in connected electrical appliance. | Change or replace the appliance. |
| Fuel leaks from drain hoses. Excessive pressure in the fuel tank. | Open fuel tank vent to balance pressure. |
| The carburetor drain in bowl is open. | Turn drain screw clockwise to close. |
| The Fuel Tap is not closed while tilting the generator. | Close the fuel tap. |
9 Maintenance
Periodic maintenance will keep your generator in the best operating condition.

WARNING! FIRE AND /OR EXPLOSION HAZARD
Be careful when working around gasoline.
• Use only a non-flammable solvent, not gasoline, to clean parts.
- Keep cigarettes, sparks, and flames away from all fuel-related.

NOTICE! MATERIAL DAMAGE
- Read the instructions before you begin, and make sure you have the tools and skills required.
- Stop the engine before starting maintenance work.

NOTE
- If you are not familiar with maintenance work, have a authorized dealer do it for you.
- Use only equivalent quality parts for replacement. Ask an authorized dealer for further attention.
9.1 Maintenance Schedule
| Item | Regular Service Period |
| Each use Every 6 months or 50 hrs. | Every 1 year or 100 hrs. | Every 2 years or 300 hrs. | |
| Engine oil Check level X | | | | |
| Change | x^1 | | |
| Air cleaner Clean | | | x^2 | |
| Spark plug Check/Adjust | | | X | |
| Replace X | | | |
| Spark arrester Clean X | | | | |
| Valve clearance Check/Adjust | | | | x^3 |
| Combustion chamber | Clean | | | | x^3 |
| Fuel tank & filter | Clean X | | | | |
| Fuel line Check/Replace | x^3,4 | | | |
^1 Change engine oil after the first 10 hrs.
^2 Service more frequently when used in dusty areas.
^3 These items should be serviced by your servicing dealer.
^4 Replace fuel line every 2 years if necessary.

NOTE
For commercial use and long hours of operation it is necessary to determine proper maintenance intervals.
Failure to follow this maintenance schedule could result in non-warrantable failures.
The battery of the generator equipped with electric starter must be charged no more than 6 months by the matched charger, or by running the generator more than 5 hours.
9.2 Engine oil check/change
The engine is equipped with a low oil sensor that will prevent the engine from running if the oil level falls below a critical level.
28


No. in
fig. 28
Description
1 Oil maintenance cover
2 D i p s t i
3 Oil level indicator
L Low oil level
H High oil level
Check engine oil
Place the generator on a flat level surface.
▶ Make sure, the engine switch (fig. 6 8, page 12) is in "OFF" position.
▶ Turn the fuel tap (fig. 6 1, page 12) to "OFF" position and close the fuel cap tightly.
▶ Turn the fuel cap vent lever to the "OFF" position.
▶ Open the oil maintenance cover (fig. 28 1).
▶ Remove the dipstick (fig. 28 2) and wipe it clean.
▶ Check the oil level by inserting the dipstick (fig. 28 3, page 34) into the filler neck without screwing it in.
√ The engine oil level has to be between the lower and upper marker on the oil level indicator.
▶ Fill to the upper limit of the oil filler neck with the recommended oil, see chapter "Technical data" on page 48.
If the wet line on the oil level indicator (fig. 28 3, page 34) is between "L" position and "H" position, the oil level is OK. If the oil is below "L" position, the oil level is too low.
▶ Fill to the upper limit of the oil level indicator with the recommended oil, see chapter "Technical data" on page 48.
▶ Tighten the dipstick (fig. 28 2, page 34) and reinstall the oil maintenance cover (fig. 28 1, page 34).
Change engine oil

NOTE
Drain the engine oil while the engine is warm.
29


Place the generator on a flat level surface.
▶ Make sure, the engine switch (fig. 6 8, page 12) is in "OFF" position.
Before tipping the engine to drain the used oil, drain the fuel in the carburetor to prevent fuel leakage, see chapter "Long time storage >6 month" on page 43.
▶ Turn the fuel tap (fig. 6 1, page 12) to "OFF" position and close the fuel cap tightly.
▶ Make sure the fuel cap vent lever is turned to position "OFF" to reduce the risk of fuel leakage.
▶ Open the oil maintenance cover (fig. 29 1).
▶ Place a suitable oil pan under the oil filler neck (fig. 29 3) to catch the used oil.
▶ Remove the dipstick (fig. 29 2).
Drain the used oil into the oil pan by tipping the engine toward the oil filler neck (fig. 29 3). Use an oil funnel to lead the drained oil from the oil filler neck into the oil pan.

NOTICE!
Do not tilt the generator when adding engine oil. This could result in overfilling and damage to the engine.
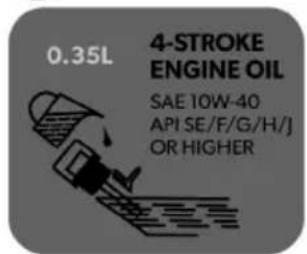
With the generator in a level position, use the oil funnel to fill in the specified amount of the recommended engine oil, see chapter "Technical data" on page 48.

NOTE
Keep the engine oil level between the lower "L" and upper marker "H" on the oil level indicator. Too much or too little oil will shorten the service life of the engine.
▶ Tighten the dipstick (fig. 29 2, page 35) and reinstall the oil maintenance cover (fig. 29 1, page 35).

NOTE
Improper disposal of engine oil can be harmful to the environment. The used oil should be put in a sealed container, and take it to a recycling station.
9.3 Air Cleaner service
A dirty Air Cleaner will restrict air flow to the Carburettor. To prevent Carburettor malfunction, clean the air cleaner regularly. Service more frequently when operating the generator in extremely dusty areas.

WARNING! FIRE AND /OR EXPLOSION HAZARD
- Using gasoline or flammable solvent to clean the air cleaner can cause a fire or explosion.
- Use only a non-flammable solvent or soapy water to clean parts.

NOTICE! MATERIAL DAMAGE
Operating the engine without an air filter, or with a damaged air filter, will allow dirt to enter the engine. This leads to rapid engine wear. This type of damage is not covered by Dometic.
30

natural_image
Close-up of a hand using a screwdriver to adjust or install a component, with no visible text or symbols.
No. in
fig. 30
Description
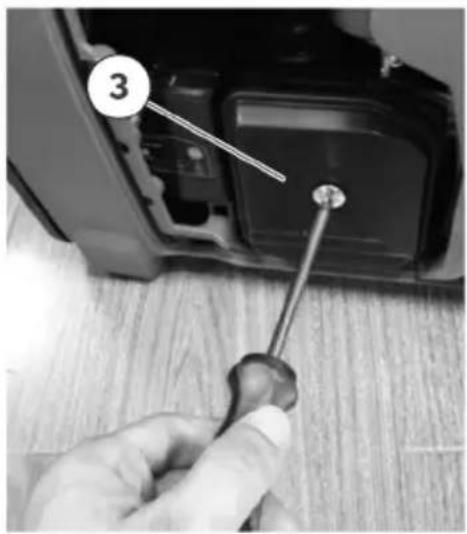
1 Maintenance cover
2 Maintenance cover screws
3 Air filter cover
▶ Loosen five screws (fig. 30 2) and remove the maintenance cover (fig. 30 1).
▶ Loosen the cover screw and remove the air filter cover (fig. 30 3).
31


natural_image
Close-up of a hand holding a black mechanical component with a numbered label (4) pointing to it, against a textured wooden surface.
No. in
fig. 31
Description
3 Air filter cover
4 Sponge
▶ Clean the sponge (fig. 31 4) in a solution of household detergent and warm water, then rinse thoroughly, or wash in non-flammable or high flash point solvent.
▶ Let the sponge (fig. 31 4) dry thoroughly.
Reinstall the sponge (fig. 31 4) and air filter cover (fig. 31 3), and tighten the cover screw.
▶ Reinstall the maintenance cover (fig. 30 1, page 37).
9.4 Spark plug service

NOTE
- To ensure proper engine operation, the spark plug must be properly gapped and free of deposits.
- An incorrect spark plug can cause engine damage.

WARNING! RISK OF BURNS
If the generator has been running, the engine will be very hot.
- Allow the engine to cool down before servicing the spark plug.
32

natural_image
Close-up of a hand holding a tool inside a vehicle engine compartment, no visible text or symbols
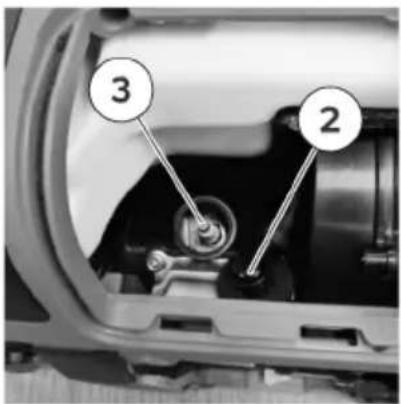
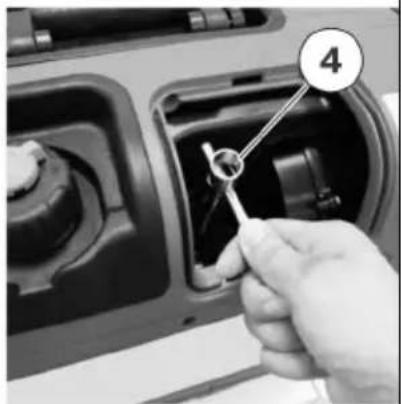
▶ Disassemble the screw (fig. 32 5) and remove the spark plug maintenance cover (fig. 32 5).
▶ Remove the spark plug cap (fig. 32 2).
▶ Use a spark plug wrench (fig. 32 4) to remove the spark plug (fig. 32 3).
Inspect the spark plug (fig. 32 3) and replace it if the electrodes are worn, the insulator is cracked, chipped or fouled.
33
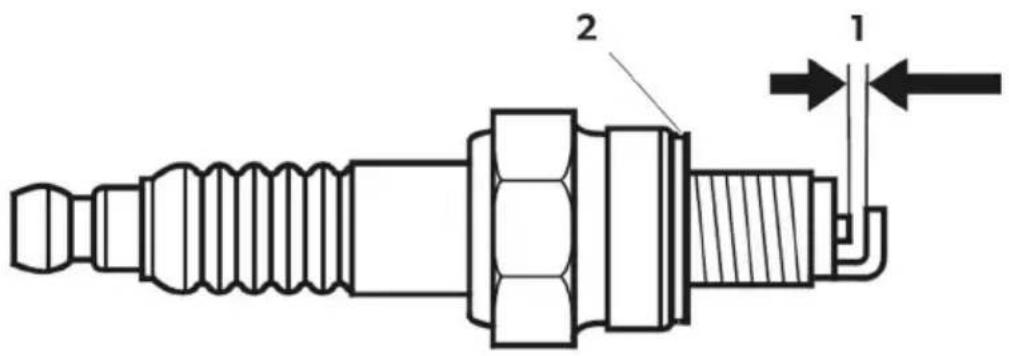
No. in
fig. 33
Description
1
Gap
2 Sealing washer
▶ Measure the spark plug electrode gap with a wire-type feeler gauge. If necessary correct the gap by carefully bending the side electrode.
√ Spark plug type:A5RTC (TORCH), gap: 0.024 - 0.028 in (0.60 - 0.70 mm).
▶ Check the spark plug sealing washer (fig. 33 2) and change spark plug if necessary.
▶ Use a spark plug wrench (fig. 32 4, page 38) to install the spark plug (fig. 32 3, page 38).

NOTE
- If installing a new spark plug, tighten 1/2 turn after the spark plug seats to compress the washer.
- If reinstalling a used spark plug, tighten 1/8 – 1/4 turn after the spark plug seats to compress the washer.
• Over tightening the spark plug can damage the threads in the cylinder head.
▶ Reinstall the spark plug cap (fig. 32 2, page 38).
▶ Reinstall the spark plug maintenance cover (fig. 32 1, page 38).
9.5 Spark arrester maintenance

WARNING! RISK OF BURNS
If the generator has been running, the muffler will be very hot.
- Allow it to cool before doing maintenance.

NOTE
The spark arrester must be serviced every 100 hours.
34

natural_image
Interior view of a washing machine with visible internal components and labeled parts (no text or symbols beyond label)

natural_image
Close-up of a mechanical component with a labeled pin (3) and a wire, showing internal structure without any readable text or symbols.
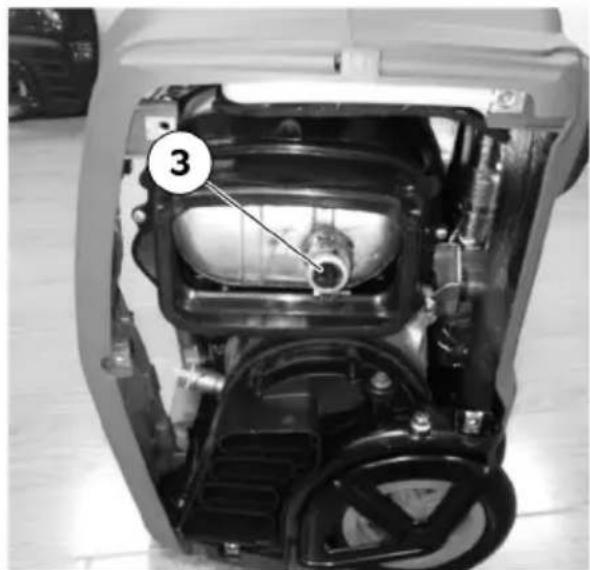
▶ Disassemble the five screws (fig. 34 2) and remove the back cover (fig. 34 1).
▶ Remove the spark arrester (fig. 34 3).
▶ Inspect the spark arrester (fig. 34 3, page 40) and replace if necessary.
▶ Use a brush to clean the spark arrester (fig. 34 3, page 40) from carbon deposits.
▶ Reinstall the spark arrester (fig. 34 3, page 40).
▶ Assemble the five screws (fig. 34 2, page 40) to attach the back cover (fig. 34 1, page 40)
9.6 Cleaning fuel tank filter

WARNING! FIRE AND /OR EXPLOSION HAZARD
Never smoke or use open flames while operate with gasoline.
35

natural_image
Close-up of a hand turning a car's dial into the engine compartment (no visible text or symbols)

natural_image
Close-up of a mechanical component with a threaded hole and a numbered label (2), no readable text or symbols present.
Remove the fuel cap (fig. 351).
▶ Remove the fuel tank filter (fig. 35 2).
Inspect the fuel tank filter (fig. 35 2) and replace if necessary.
▶ Clean the fuel tank filter (fig. 35 2) and wipe it.
▶ Install the fuel tank filter (fig. 35 2).
▶ Install the fuel cap (fig. 35 1) securely.
10 Transport and storage

WARNING! FIRE HAZARD
Transport or store the generator only if it has cooled down completely.
Before transporting and storing the generator, proceed as follows:
▶ Turn OFF the fuel tap.
▶ Allow the generator to cool off before moving or storing.
▶ Close the fuel cap tightly.
▶ Turn OFF the fuel cap vent lever.

NOTICE! FIRE HAZARD
- Always allow the generator to cool down before moving or storing. High temperature will be present at the rear side of the unit for some time after shutdown.
- Don't turn the fuel cap vent lever (fig. 16 4, page 24) to "OFF" position before the engine is cooled down.
During long-term storage it is important to prevent gum deposits from forming in essential fuel system parts such as the carburetor, fuel hose or tank.
10.1 Long time storage >6 month
Drain the fuel from the carburetor
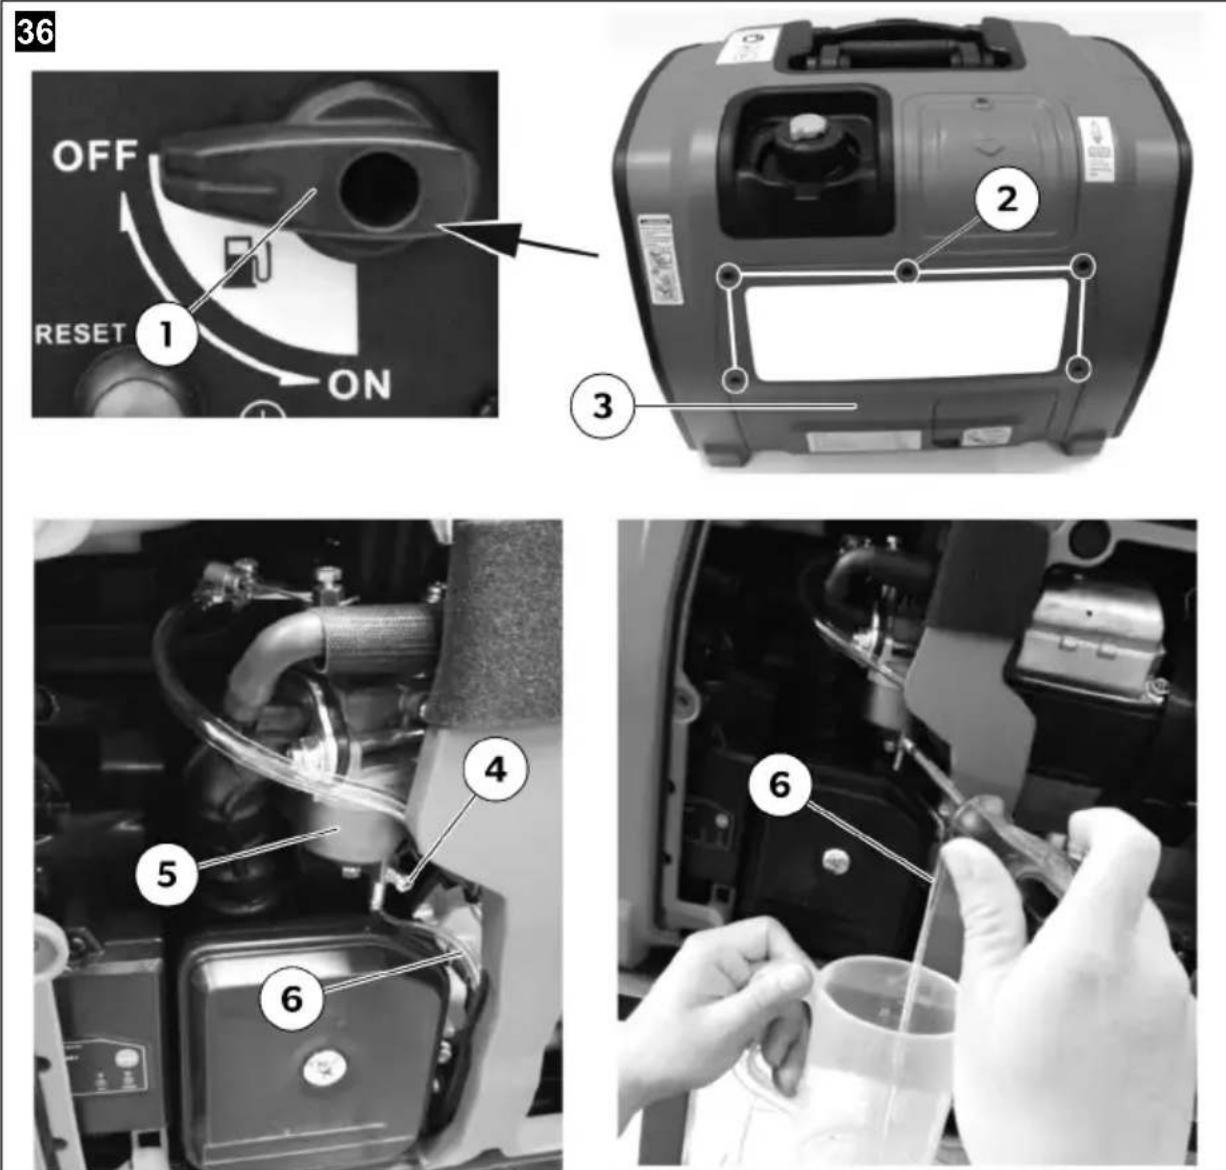
▶ Turn the fuel tap (fig. 36 1) to the "OFF" position.
▶ Loosen five screws (fig. 36 2) and remove the maintenance cover (fig. 36 3).
▶ Take out the drain hose (fig. 36 6) from the hole at the bottom casing, and put it into a suitable container.
▶ Loosen the drain screw (fig. 36 4) counterclockwise.
Drain the fuel from the carburetor (fig. 36 5) into the container through the drain hose (fig. 36 6).
▶ Tighten the drain screw (fig. 36 4, page 43) clockwise securely.
Drain the fuel from the tank
37

natural_image
Close-up of a hand inserting a device into a washing machine, with no visible text or symbols on the device itself.
▶ Unscrew the fuel cap, remove the fuel tank filter, see chapter "Cleaning fuel tank filter" on page 41.
▶ Empty the fuel tank into the suitable container by slowly tipping the generator toward the fuel tank Neck (fig. 37 1).
▶ Reinstall the fuel tank filter and the fuel cap.
▶ Tighten the fuel cap clockwise securely.
Drain the fuel from the carburetor again

▶ Turn the fuel cap vent lever to "ON" position, see chapter "Before each use" on page 15.
▶ Turn the fuel tap (fig. 38 1) to the "ON" position.
▶ Put the drain hose (fig. 38 6) into a suitable container.
▶ Loosen the drain screw (fig. 38 4) counterclockwise.
▶ Drain the fuel from the carburetor (fig. 38 5) into the container through the drain hose (fig. 38 6).
▶ Tighten the drain screw (fig. 38 4) clockwise securely.
▶ Reinstall the drain hose (fig. 38 6) into the hole at the bottom casing.
▶ Reinstall the maintenance cover (fig. 38 3).
▶ Turn the fuel tap (fig. 38 1) to the "OFF" position.
▶ Turn the fuel cap vent lever to "OFF" position.
Engine
▶ While engine is still warm, drain oil from crankcase. Refill with the recommended new oil.
Remove spark plug and pour about 15ml V_2 ounce) of engine oil into the cylinder through spark plug hole.
▶ Cover the spark plug hole with a rag.
▶ Pull the starting rope several times to coat the cylinder walls with engine oil.
▶ Install and tighten the spark plug.
▶ Pull the Starter Grip until you feel compression, then stop pulling.
√ This prevents the cylinder and valves from rusting.
▶ Clean the generator outer surfaces.
▶ Check that cooling air slots and openings on generator are open and unobstructed.
▶ Store the unit in a clean, dry place.
If possible, store the unit indoors and cover it to give protection from dust and dirt.
11 Warranty
If the product does not work as it should, please contact your retailer or the manufacturer's branch in your country (see dometic.com/dealer). The warranty applicable to your product is 2 years.
For repair and warranty processing, please include the following documents when you send in the device:
• A copy of the receipt with purchasing date
- A reason for the claim or description of the fault
Australia only
Our goods come with guarantees that cannot be excluded under the Australian Consumer Law. You are entitled to a replacement or refund for a major failure and for compensation for any other reasonably foreseeable loss or damage. You are also entitled to have the goods repaired or replaced if the goods fail to be of acceptable quality and the failure does not amount to a major failure.
New Zealand only
This warranty policy is subject to the conditions and guarantees which are mandatory as implied by the consumer guarantees act 1993 (NZ).
12 Disposal
Place the packaging material in the appropriate recycling waste bins wherever possible.

If you wish to finally dispose of the product, ask your local recycling centre or specialist dealer for details about how to do this in accordance with the applicable disposal regulations.

Protect the environment!
Do not dispose of any batteries with general household waste.
Return defective or used batteries to your retailer or dispose of them at collection points.
13 Technical data
| PGE121 |
| Type: 4-stroke gasoline OHV | |
| Cooling System: Forced air | |
| Cylinder Arrangement: Inclined single cylinder | |
| Displacement: | 79 cm^3 |
| Bore x Stroke: | 48.6 mm × 43.0 mm |
| Operation Hours: | 3.5 Hr at rated load |
| 8 Hr at 1/4 rated load |
| Fuel: Unleaded gasoline | |
| Fuel Tank Capacity: 4.2 L | |
| Engine Oil Capacity: 0.35 L | |
| Recommended Engine Oil: SAE 10W-30 or 10W-404-stroke engine oilAPI SE/SF/SG/SH/SJ or higher |
| Ignition System: CDI | |
| Starting System: Recoil starter / Electric starter | |
| Spark Plug Type: A5RTC (TORCH) | |
| Spark Plug Gap: 0.6 ~ 0.7 mm | |
| Dimensions (L x W x H): | 530 x 320 x 430 mm |
| Weight (Net): | 26 kg |
| Weight (Gross): | 29.5 kg |
Generator

NOTE
The generator output specifications are based on the standard environment as follows:
- Altitude: 0 m
- Ambient temperature: 25^ C
- Relative humidity: 30%
| PGE121 |
| AC Output: | Output Waveform Pure-Sine Wave, THD <3% |
| Rated Voltage* 240 V AC |
| Rated Frequency* 50 Hz | |
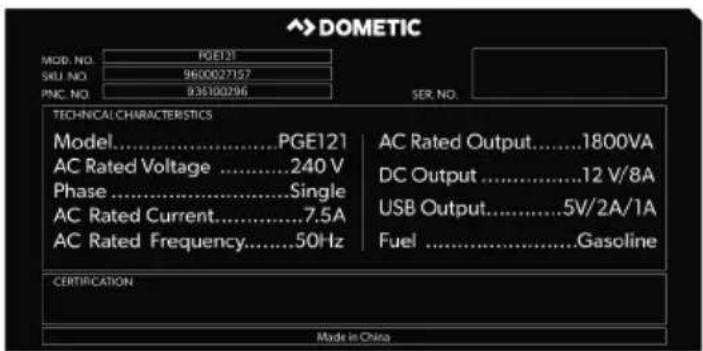
| Rated Output 1.8 kVA | |
| Maximum Output 2.1 kVA |
| Safety Device Type Electronic |
| DC Output: | Rated Voltage 12 V | |
| Rated Current 8 A | |
| USB 5VDC-1A | 5V DC - 2 A |
| Safety Device Type DC Protector |
*Parameters, see labels on the product.
13.1 Environment correction
Factor of environment correction C:
| Altitude (m) | Ambient temperature °C |
| 25 30 35 | 40 45 | | | |
| 010.98 | 0.96 0.93 0.90 | | | | |
| 500 0.93 | 0.91 0.89 0.87 | 0.84 | | | |
| 1000 0.87 | 0.85 0.82 0.80 | 0.78 | | | |
| 2000 0.75 | 0.73 0.71 0.69 | 0.66 | | | |
| 3000 0.64 | 0.62 0.60 0.58 | 0.56 | | | |
| 4000 0.52 | 0.52 0.50 0.48 | 0.46 | | | |

NOTE
- Relative humidity 60% correction factor C -0.01;
- Relative humidity 80% correction factor C -0.02;
- Relative humidity 90% correction factor C -0.03;
- Relative humidity 100% correction factor C -0.04;
• Example: Generator rated power PN = 1.8 kVA, Altitude: 1000 m, Ambient temperature: 35°C, Relative humidity: 80%,
• Actual power P:
P=PN*(C-0.02)=1.8*(0.82-0.02)=1.44kVA
14 Copyright
© 2020 Dometic Group. The visual appearance of the contents of this manual is protected by copyright and design law. The underlying technical design and the products contained herein may be protected by design, patent or be patent pending. The trademarks mentioned in this manual belong to Dometic Sweden AB. All rights are reserved.
dometic.com
YOUR LOCAL
DEALER
dometic.com/dealer
YOUR LOCAL
SUPPORT
dometic.com/contact
dometic.com/sales-offices