
GSO40 - Oven GEMINI - Free user manual and instructions
Find the device manual for free GSO40 GEMINI in PDF.


| Product Type | Combi Steam Oven |
| Brand | Gemini |
| Model | GSO40 |
| Capacity | 40 Litres |
| Power Supply | 220V, 50-60Hz, 2100W |
| Product Dimensions (H x W x D) | 370 x 525 x 520 mm |
| Cooking Modes | Steaming, Convection, Steaming + Convection, Air-Frying, Preset (37 programs), Self-Cleaning, Defrosting, Fermentation |
| Temperature Range | Steam: 95-105°C; Convection: 120-230°C; Steam+Convection: 120-230°C; Air-Fry: 120-230°C; Defrost: 50-60°C; Ferment: 35-45°C |
| Timer Range | 1-120 minutes (steam), 5-120 minutes (most modes), up to 480 minutes (fermentation) |
| Control Type | Knob control + LED display + touch buttons |
| Display | LED full-screen display |
| Child Lock | Yes, press and hold Lamp button for 3 seconds |
| Interior Light | Yes, automatic on/off with door and after 3 minutes |
| Rotisserie Function | Yes, with rotisserie set (rotisserie rod, forks, and rack) |
| Accessories Included | Grill rack, bake tray, steam tray, rotisserie set, heat-resistant glove |
| Self-Cleaning | Yes, descaling (C-01) and high-temperature disinfection (C-02) |
| Water Tank | Removable, with minimum and maximum level marks |
| Safety Features | Door safety switch, over-temperature protection, water shortage alarm, automatic fan cool-down |
| Installation Clearance | At least 10 cm free space on back, sides, and above |
| Cleaning | Wipe with damp cloth; avoid abrasive cleaners; descale periodically |
| Lamp Replacement | Switch off before replacing; contact qualified technician |
| Warranty & Support | Contact after-sales department for repairs; lamp and fan replacement by technician |
Frequently Asked Questions - GSO40 GEMINI
User questions about GSO40 GEMINI
0 question about this device. Answer the ones you know or ask your own.
Ask a new question about this device
Download the instructions for your Oven in PDF format for free! Find your manual GSO40 - GEMINI and take your electronic device back in hand. On this page are published all the documents necessary for the use of your device. GSO40 by GEMINI.
USER MANUAL GSO40 GEMINI
Please read and retain for future reference.
SAFETY INSTRUCTION - GENERAL
- Use this appliance solely in accordance with these instructions.
- This appliance is for household use only, not for commercial purpose.
- Remove all packaging material from the appliance before use.
- This appliance shall not be used by children of 0 to 8-year old.
- This appliance can be used by children older than 8-year old and persons with reduced physical, sensory or mental capabilities or lack of experience and knowledge, but only if they have been given supervision or instruction concerning use of the appliance in safe way and understand the hazards involved.
- Children should be supervised to ensure that they do not play with the appliance.
- Cleaning and maintenance must not be done by children.
- Have any repairs carried out solely by a qualified electrician. Never try to repair the appliance yourself.
- Do not handle the plug or appliance with wet hands.
- Do not immerse the main body in water.
• Children shall not play with the appliance. - Only use the attachments/accessories supplied with the product.
SAFETY INSTRUCTION - ELECTRICITY AND HEAT
- Ensure the appliance is in placed on a horizontal, even and stable surface.
- Verify that the mains voltage is the same as that indicated on the rating plate on the appliance before use.
- Make sure that you always use a grounded wall socket to connect the appliance.
• Always remove the plug from the wall socket when the appliance is not in use. - Remove the plug from the wall socket by pulling the plug, not the power cord.
- Make sure that the appliance, the power cord and plug do not make contact with water.
- Make sure that the appliance, the power cord and plug do not make contact with hot surface, such as a hot hob or naked flame.
- Check the appliance's power cord regularly to make sure it is not damaged. Do not use the appliance if the power cord is damaged. If the power cord is damaged, it must be replaced by an electrical technician or a person with similar qualification, in order to avoid any hazards.
SAFETY INSTRUCTION – DURING OPERATION
- The Steam Oven shall be kept in a dry and flat place with plenty of space around it, and free space of at least 10cm shall be left at the back and on two sides and above the product when the product is placed. Do not place any object on the product
- A high-temperature steam or high-temperature airflow will be released when you open its door during or after the operation of the product. A safe distance shall be maintained when the door of the product is opened to avoid scalding yourself.
- Do not insert any foreign matter into the Door Lock Switch of the Oven Door.
- Appliances will heat during use. Please pay attention to the Heating Unit in the Oven.
- During use the appliance becomes hot. Care should be taken to avoid touching the heating elements inside the oven.
- Do not use harsh abrasive cleaners or sharp metal scrapers to clean the Oven Door, since they can scratch the surface, which may result in shattering of the glass.
- WARNING: Ensure that the appliance is switched off before replacing the lamp to avoid the possibility of electric shock.
- The appliance must not be installed behind a decorative door in order to avoid overheating.
- Do not touch at random the steam oven in use because the surface may have a very high temperature. If it is needed to touch or move the Oven, please power off the product first and then use a pair of insulated gloves.
- Please do not share the Power Outlet with other high-power electrical devices to avoid a fire caused by the overload of the Circuit.
- Please check whether all cooking utensils are suitable for this product before using them. It is recommended to place food in high-temperature glass or ceramic containers. The capacity of holding the liquid food may not exceed two-thirds of the container.
- It is required to unplug the Power Plug from the Outlet when the Oven will not be used for a long time to avoid any electric leakage or fire caused by the aging of insulated rubber lines.
- The Water Tank shall not be overfilled with water. Please use it correctly according to the maximum water level.
- Please take out the Water Tank and allow the residual water of the product to flow out automatically from the product and drain or pour away the water from the bottom water holder after each use of the oven for cooking operation.
- The vent holes of the appliance must be kept unblocked.
PRODUCT OVERVIEW
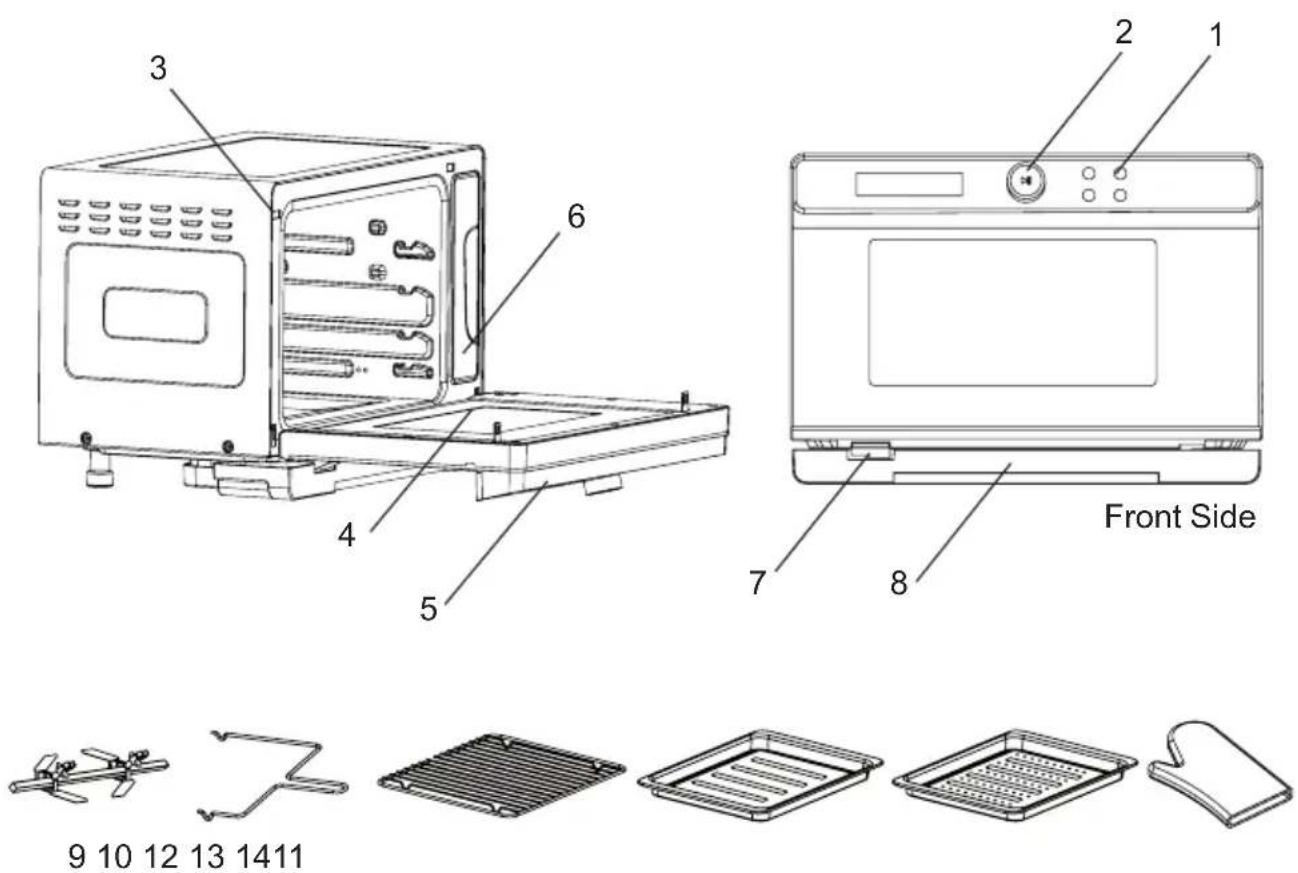
- Control Panel
- Knob
- Door Safety switch
- Oven Door
- Oven Door Handle
- Water Tank
-
Vent hole
-
Water Drip Collector
- Rotisserie Set
- Rotisserie Rack
- Grill Rack
- Bake Tray
- Steam Tray
- Heat Resistant Glove
CONTROL PANEL
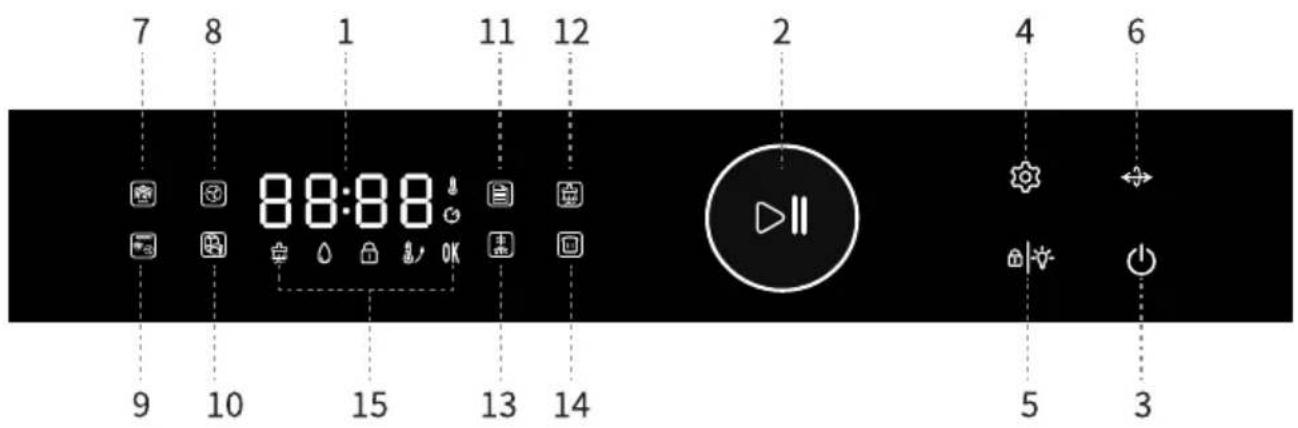
- LED display
- Knob control
- Power button
- Setting button
- Child Lock/ Lamp
- Rotisserie button
-
Steaming mode
-
Convection mode
- Steaming + Convection mode
- Air-Frying mode
- Preset mode
- Self-Cleaning mode
- Defrosting mode
- Fermentation mode
- Indicator
PRODUCT STRUCTURE
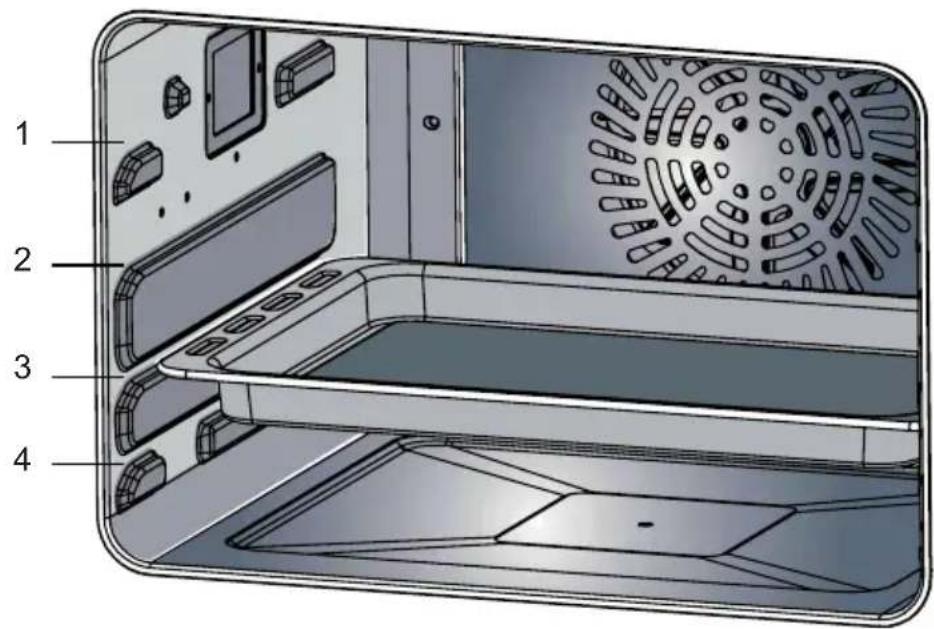
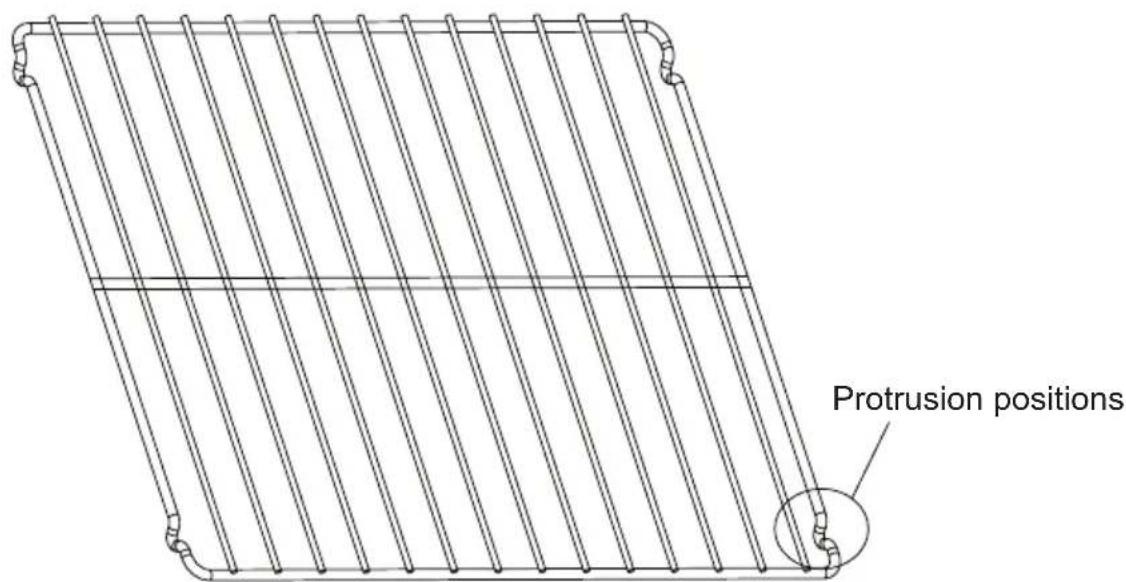
Wire rack Installation
There are 4 height levels for the grill rack and bake tray. Please keep the protrusion positions downward and push the grill rack into the oven. Select a height level based on food type or recipe.
ABOUT THE ELECTRIC BLANKET
For the first usage, select any mode, heat for 5-10 minutes.
Once the appliance is connected to the power, a "Beep" sounds would be heard and the LED display will display in full screen for 3 seconds and then off, the power button ⏻ flashes to save power, press the power button ⏻ , the full-screen icon is half bright, and the 📄icon flashes to enter function selection mode.
If no action is detected within 3 minutes, the full screen will be turned off, and the power button ⏻ flashes to return to the power-saving mode.
| Function Key Function Description | |
Power On/Off 1. | Press the power button , the full-screen icon is half bright,and the  flashes to enter function selection mode.2. Cancel key: Press this button to cancel the function being set and the food processing in progress, and return to the standby state. flashes to enter function selection mode.2. Cancel key: Press this button to cancel the function being set and the food processing in progress, and return to the standby state. |
Knob 1. Press the  | knob to Start or pause cooking.2. Turn the knob to select one of the operation modes (displayed in clockwise direction):Steaming/ Convection/ Steaming + Convection/ Air-Frying/Preset/ Self-cleaning/ Defrosting/ Fermentation. → [2AWT] → → [2AWT] →  → →  → →  → →  → [4T6S] → [C82S]3. In one of the modes, turn the knob to adjust the temperature and time settings.4. When the knob >II flashes, turn it to adjust or select settings, or press it to confirm current settings.5. When the oven is working, the knob ▶ lights up continuously. → [4T6S] → [C82S]3. In one of the modes, turn the knob to adjust the temperature and time settings.4. When the knob >II flashes, turn it to adjust or select settings, or press it to confirm current settings.5. When the oven is working, the knob ▶ lights up continuously. |
Settings 1. In standby mode, after selecting cooking mode, press the setting button  to enter time and ten [56V3] duration adjustment.When complete the time and temperature settings, press the knob to enter time and ten [56V3] duration adjustment.When complete the time and temperature settings, press the knob  to confirm. to confirm. 2. During operation, press setting button ⚙ to extend the time and temperature, then turn the knob ▶II to adjust and press it to confirm. 2. During operation, press setting button ⚙ to extend the time and temperature, then turn the knob ▶II to adjust and press it to confirm. | |
| Child lock/ Lamp 1.[BYGT] | Child Lock: After selecting cooking mode or during operation, press and hold the Child lock/ Lamp 📋 button for 3 seconds to lock or unlock the control panel.2. Lamp: In standby mode or during operation, press Child lock/ Lamp button for to on/off the lamp.3. When starting work, the furnace lamp will go out automatically after it is on for 3 minutes, and when the work is over, the furnace lamp will go out automatically after it is on for 3 minutes;4. When the furnace door is opened, the furnace lamp will be automatically extinguished after being on for 3 minutes, and after the furnace door is closed, the furnace lamp will be automatically extinguished after being on for 3 minutes;5. There is a button operation at any time, the furnace light will automatically go out after 3 minutes. |
Rotessier button 1. | During operation, press Rotessier button to start or stop rotate function. |
Steaming mode 1. | Steaming mode: Steaming + Top & Bottom heating tube + Back Fan2. Time range: 1 to 120 minutes3. Temperature range: 95°C, 100°C, 105°C4. When Steaming mode is selected, theicon lights up and flashes, press the knob to confirm, enter the steam mode, turn the knob to set the required time, after selecting the time, press the knob to confirm, enter the temperature setting, after the temperature is selected, press the knob to confirm, and the appliance starts to work, and the time begins to count down. |
Convection mode 1. | Convection mode: Top & Bottom heating tube + back Fan2. Time range: 5 to 120 minutes3. Temperature range: 120°C to 230°C (±5 per adjustment)4. When Convection mode is selected, theicon lights up and flashes, press the knob to confirm, enter the baking mode, turn the knob to set the required time, after selecting the time, press the knob to confirm, enter the temperature setting, after the temperature is selected, press the knob to confirm, and the appliance starts to work, and the time begins to count down. |
Steaming + Convection mode | 1. Steaming + Convection mode: Steaming + Top heating tube + Back heating tube + Back fan2. Time range: 5 to 120 minutes3. Temperature range: 120°C to 230°C (±5 per adjustment)4. When Steaming + Convection mode is selected, theicon lights up and flashes, press the knob to confirm, enter the Steaming + Convection mode, turn the knob to set the required time, after selecting the time, press the knob to confirm, enter the temperature setting, after the temperature is selected, press the knob to confirm, and the appliance starts to work, and the time begins to count down. |
Air-Frying mode 1. | Air-Frying mode: Top heating tube + Back heating tube + Back fan2. Time range: 5 to 120 minutes3. Temperature range: 120°C to 230°C (±5 per adjustment)4. When Oven-frying is selected, theicon lights up and flashes, press the knobto confirm, enter the Oven-Frying mode, turn the knob to set the required time, after selecting the time, press the knobto confirm, enter the temperature setting, after the temperature is selected, press the knobto confirm, and the appliance starts to work, and the time begins to count down. |
Pre-set Programs mode | 1. When the menu is selected, theicon lights up and flashes, press the knob to confirm to enter the menu setting mode and turn the knob to display the F-01~F-37 menu reciprocating cycle. After selecting the corresponding mode, press the knobto confirm, and the appliance starts to work. There are defaulted times and temperatures. |
Self-Cleaning mode | Main function of this mode is cleaning oven cavity after cooking.When the Self-Cleaning mode is selected, theicon lights up and flashes, press the knobto confirm to enter the Self-Cleaning mode, turn the knob clockwise to display the column “C-01”; “C-02”.“C-01” is Evaporation Pan Descaling function, preset time is 50 minutes, no adjustment allows.“C-01” Mode instructions1. When the accumulated working time of the Steam Generator reaches 50 hours, the cleaning modeicon will flash automatically (automatically enter C-01 cleaning mode) for cleaning.2. Combine 1 part descaler and 8 parts water and pour solution into water tank (water level must be above minimum mark).3. When the time counts down to 20 minutes, replace descaler in the water tank with clean water. When it counts down to 10 minutes, replace the water in the tank with clean water again. Once complete, the cleaning modeicon will go off.“C-02” is high-temperature disinfection function, preset time is 60 minutes, preset temperature is 100°C, no adjustment allows; After selecting the corresponding mode, press the knobto confirm, and the appliance starts to work, and the time begins to count down.During the cleaning operation, the indication indicator for cleaning mode is always on. |
Defrosting mode 1. | Time range: 5 to 120 minutesTemperature range: 50°C, 55°C, 60°CWhen Defrosting mode is selected, the icon lights up & flashes, press the knob to confirm, enter the Defrosting mode, turn the knob to set the required time, after selecting the time, press the knob to confirm, and enter the temperature setting, after the temperature is selected, press the knob to confirm, and the appliance starts to work, and the time begins to count down. |
Fermentation mode | Time range: 5 to 480 minutesTemperature range: 35°C to 45°C (± 1 per adjustment)When Fermentation mode is selected, the icon lights up & flashes, press the knob to confirm, enter the Fermentation mode, turn the knob to set the required time, after selecting the time, press the knob to confirm, and enter the temperature setting, after the temperature is selected, press the knob to confirm, and the appliance starts to work, and the time begins to count down. |
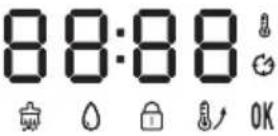 | Water refill: During any operation mode, this status icon will flash if the Water Tank is empty (water level is lower than the minimum mark). The oven will stop working and no key will respond until the Water Tank is refilled and put back into the Water Tank Slot.Preheat: When the oven is pre-heating, this status icon lights up. Once the oven reaches the desired temperature, this icon will be switched off.Complete: When the cooking program is done, the Display will show the word “END”. And the status icon lights up.Child Lock: When the control panel is locked, this status icon lights up. Press “Child Lock/ Lamp” button for 3 seconds to unlock.Cleaning: When the oven is descaling, this status icons light up. Once descaling is complete, this icon will be switched off.Cleaning icon, when the light of this icon flashes, it means that the product has been working for more than 50 hours and needs to be descaled |
NOTE
- During the working process, when the glass door is opened, the furnace lamp lights up, the heating tube stops working, but the back fan will continue to work for a while to cool the cavity down until 60°C then stop working, and the display panel flashes. After the glass door is closed, the work will continue automatically.
- Water Shortage alarm ⚙ : When using steam-related functions, if water level is lower than the minimum mark), the water shortage icon flashes and the oven stops working and no key will respond until the Water Tank is refilled and put back into the Water Tank Slot. After adding water, it automatically resumes, and the icon lights off. Functions that do not require steam can continue to work when there is water shortage.
- Fan: Under the following working modes (Steaming/ Convection/ Steaming + Convection/ Air-Frying/ Preset/ Self-Cleaning), the fan works. When the cooking program completes, the fan continues to work for a while to cool down the cavity until 60°C.
PRESET MENU LIST
This menu is for reference only. If users put more food inside or use multiple layers of grills to cook food at the same time, please press the knob to select other DIY cooking modes to adjust the required time and temperature.
| Code F-1 | F-2 F-3 F-4 | F-5 F-6 | F-7 F-8 | F-9 F-10 | ||||||
| Food Style | Steam Vegetable | Steam Rice | Steam Fish | Steam Shrimp | Steam Crab | Steam Eggs | Steam Chicken | Steam Buns | Steam Potatoes | Steam Chinese Preserve Meat |
| Heating time (Min.) | 16 50 | 30 15 30 | 18 50 30 | 50 | 30 | |||||
| Temperature (°C) | 100 | 100 | 100 | 100 | 100 | 100 | 100 | 100 | 100 | 100 |
| Food weight (g) | 600 | 500 | 300 | 500 | 800 | 300 | 600 | 500 | 1000 | 500 |
| Code | F-11 | F-12 | F-13 | F-14 | F-15 | F-16 | F-17 | F-18 | F-19 | F-20 |
| Food Style | Roast Chicken | Roast Steak | Roast Lamb | Roast Salmon | Roast Chicken legs | Roast Saury | Roast Potatoes | Roast Shrimp | Roast Sausages | Roast Sweet Potatoes |
| Heating time (Min.) | 28 11 | 35 20 25 | 20 35 10 | 10 | 50 | |||||
| Temperature (°C) | 230 | 230 | 200 | 200 | 220 | 200 | 200 | 180 | 200 | 220 |
| Food weight (g) | 1000 | 500 | 500 | 400 | 750 | 600 | 500 | 400 | 1000 | 800 |
| Code | F-21 | F-22 | F-23 | F-24 | F-25 | F-26 | F-27 | F-28 | F-29 | F-30 |
| Food Style | Soft Salty Bread | Wheat Bread | Pizza | Yogurt Cheese Cake | Chiffon Cake | Chocolate Cake | Cookies | Puff | Egg Tart | Beef Hamburger |
| Heating time (Min.) | 16 20 | 23 60 50 | 50 14 32 | 22 | 12 | |||||
| Temperature (°C) | 180 | 180 | 180 | 150 | 150 | 150 | 180 | 180 | 180 | 180 |
| Code | F-31 | F-32 | F-33 | F-34 | F-35 | F-36 | F-37 | |||
| Food Style | Peanut Kernel | Almond | Walnut | Melon Seeds | Cashew Nuts | Chestnut | Yogurt | |||
| Heating time (Min.) | 12 10 | 12 12 12 | 20 480 | |||||||
| Temperature (°C) | 160 140 | 160 | 160 | 160 | 180 45 | |||||
CLEANING AND MAINTENANCE
- Please turn off the Combi Steam Oven and unplug the Power Cord from the outlet before cleaning the cavity.
- Do not clean the Drip Tray surface with metal tool or abrasive material. It would damage the non-stick coating.
- Please keep the cavity clean at all time. When food or grease is splashed onto the inner wall of the oven, wipe with a damp cloth soaked with detergent rather than any hard substance.
- It is recommended to fill the tank with distilled water or pure water. If tap water is used for a long time, there will be scale on the inner walls of the cavity.
- The Water Tank should be checked regularly. Remove the Water Tank horizontally. It must be cleaned and wiped gently with soft cloth. After cleaning the inner wall of the oven, put the Water Tank back to its original place.
• After cooking is completed, remove the remaining water in the Water Tank. - The sealing surface of the oven door should be cleaned frequently and wiped with a soft, dry cloth.
- If the oven will not be used for a long time, please unplug and clean the cavity. The oven should be stored in a dry environment with no exposure to corrosive gas. Do not clean the glass of Oven Door with a rough detergent or sharp metal scraper because it may lead to damage of the glass.
- The Power cord must be unplugged when cleaning the cavity or replacing the lamp.
- Unplug the appliance and let it cool down completely before storage.
- Make sure all parts are cleaned and dry before storage.
TROUBLE SHOOTING
| Abnormal conditions P | Possible causes Solution | |
| E1 | Top sensor over temperature short circuit | Stop working, open the steam oven, wait for the cavity to cool naturally for 10 minutes, re-start again or contact the after-sales department for repair |
| E2 Top sensor open | Stop working, open the steam oven, wait for the cavity to cool naturally for 10 minutes, re-start again or contact the after-sales department for repair | |
| E3 | Bottom sensor over temperature short circuit | Stop working, open the steam oven, wait for the cavity to cool naturally for 10 minutes, re-start again or contact the after-sales department for repair |
| E4 Bottom sensor open | Stop working, open the steam oven, wait for the cavity to cool naturally for 10 minutes, re-start again or contact the after-sales department for repair | |
| E5 | Evaporator pan sensor over temperature short circuit | Contact the after-sales department for repair |
| E6 | Evaporator sensor open circuit | Contact the after-sales department for repair |
| No Display on the screen | 1. Check whether the power supply plug is plugged2. Display panel in poor contact | 1. Plug the power and turn on the power2. Contact the after-sales department for repair |
| Oven Lamp does not light | 1. Oven lamp is damaged2. Poor contact | 1. Replace or contact the after-sales department for repair2. Contact the after-sales department for repair |
| Exhaust fan does not work | 1.Poor contact2.Fan is damaged | 1.Replace or contact the after-sales department for repair2.Contact the after-sales department for repair |
| No response from the button | PCB is failed or damaged | Contact the after-sales department for repair |
| No Steam | 1.Water pipe is blocked2.Evaporator heater is damaged3.Water intake system is damaged | Contact the after-sales department for repair |
| Combi steam oven does not work | 1.Door is not closed tightly2.Poor contact of door control switch | 1.Re-close the oven door2.Contact the after-sales department for repair |
| Steam leakage from oven door | 1.Door is not closed in place2.Door sealant is off or damaged3.Too much steam is accumulated in the oven | 1.Push door by hand2.Replace sealant or contact the after-sales department for repair3. It is normal |
PRODUCT SPECIFICATIONS
Model no.: GSO40
Voltage: 220V
Frequency: 50-60Hz
Output power: 2100W
Capacity: 40 Litres
Product dimensions: 370(H) x 525(W) x 520(D) mm
The product specifications may be changed without prior notice.
Please contact customer service for details if necessary.
說明書內容以英文版本為準
If there is any inconsistency or ambiguity between the English version and the Chinese version, the English version shall prevail.
4/F, DCH Building, 20 Kai Cheung Road, Kowloon Bay, Hong Kong
a Gilman Group Company
Brand : GEMINI
Model : GSO40
Category : Oven