HICM-150WHYG - Sorbet maker Heinner - Free user manual and instructions
Find the device manual for free HICM-150WHYG Heinner in PDF.


| Product Type | Ice Cream Maker |
| Brand | Heinner |
| Model | HICM-150WHYG |
| Power | 120W |
| Bowl Capacity | 1.5L |
| Refrigerant | R600a (flammable) |
| Modes | Ice Cream, Yogurt, Cooling Only, Mixing Only |
| Timer Range (Ice Cream/Cooling/Mixing) | 1-60 minutes |
| Timer Range (Yogurt) | 1-24 hours |
| Power Supply | 220-240V ~ 50Hz |
| Auto Insulation | 1 hour after completion |
| Motor Self-Protection | Yes (stops if locked) |
| Compressor Delay Protection | ~3 minutes after stop |
| Control Panel | Digital display with buttons |
| Removable Bowl | Yes, with handle |
| Transparent Lid with Motor Assembly | Yes, with mixing blade |
| Mixing Blade | Yes, removable |
| Cleaning | Hand wash bowl, lid, and blade; do not immerse main unit |
| Package Contents | Ice cream maker, user manual, warranty card |
| Safety Features | Overload protection, children over 8 years supervision |
| Warranty | Yes (card included) |
Frequently Asked Questions - HICM-150WHYG Heinner
User questions about HICM-150WHYG Heinner
0 question about this device. Answer the ones you know or ask your own.
Ask a new question about this device
Download the instructions for your Sorbet maker in PDF format for free! Find your manual HICM-150WHYG - Heinner and take your electronic device back in hand. On this page are published all the documents necessary for the use of your device. HICM-150WHYG by Heinner.
USER MANUAL HICM-150WHYG Heinner
natural_image
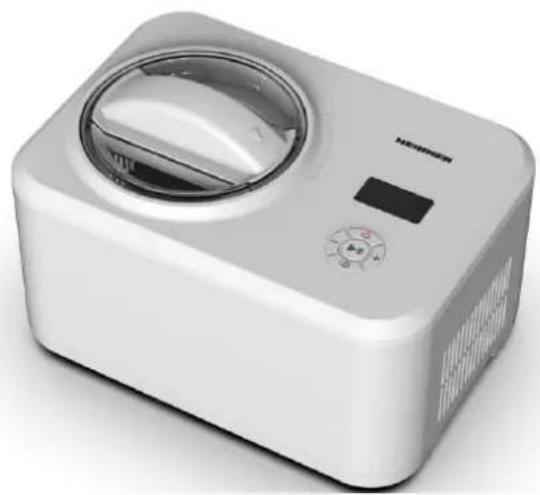
White rectangular milk carton with a circular vent and control panel (no visible text or symbols)- Ice cream maker
- Power: 120W
- Capacity: 1.5L
Thank you for purchasing this product!
I. INTRODUCTION
Before using the appliance, please read carefully this instruction manual and keep it for future reference.
This instruction manual is designed to provide you with all required instructions related to the installation, use and maintenance of the appliance.
In order to operate the unit correctly and safety, please read this instruction manual carefully before installation and usage.
II. CONTENT OF YOUR PACKAGE

Ice cream maker
User manual
Warranty card
III. SAFETY PRECAUTIONS
When using an electrical appliance, basic safety precautions should always be followed to reduce the risk of fire, electric shock, and/or injury, including the following:
- Please read the instruction manual carefully before use.
- Remove all packing material and carefully check your ice-cream maker to ensure it is in good condition and that the appliance, its power cord and the plug are not damaged.
- Before using the ice-cream maker for the first time, please wait 2 hours after positioning it, and keep the transparent lid open for at least 2 hours.
- The power cord plug and air outlet should not be drenched. Do not immerse the machine in water or other liquid to prevent electric shock.
- If the supply cord is damaged, it must be replaced by the manufacturer or its service agent or a similarly qualified person in order to avoid a hazard.
- When not in use or before cleaning, the power plug shall be disconnected from the power socket.
- Do not turn this product upside down or incline it over a 45°C angle.
- To protect against risk of electric shock, do not pour water on cord, plug and ventilation, and do not immerse the appliance in water or any other liquid.
- Unplug the appliance after using or before cleaning.
- When using, the inlet and outlet should be kept at a certain distance (about 8cm) from other items, so as not to affect the heat dissipation effect of the machine.
- Any accessories not recommended by the manufacturer may not be used.
- This appliance can be used by children aged from 8 years and above and persons with reduced physical, sensory or mental capabilities or lack of experience and knowledge if they have been given supervision or instruction concerning use of the appliance in a safe way and understand the hazards involved. Children shall not play with the appliance. Cleaning and user maintenance shall not be made by children without supervision.
- Do not use the appliance close to flames, hot plates or stoves.
- Do not switch on the power frequently (ensure 5min. interval at least) to avoid the damage of compressor.
- Metal sheet or other electric objects are not allowed to be inserted into the appliance to avoid fire and short circuit.
- When taking out the ice cream, do not knock the surface or the edge of the container to avoid damage to the container.
-
Do not start the machine when the ice cream container barrel is not properly installed, or the mixing paddle is not placed properly.
-
The initial temperature for making ice cream mixture is 20 ± 3^ . The prepared ice cream material cannot be put into the refrigerator for freezing and then put into the machine for making. In this way, the ice cream will solidify ahead of time and the motor will lock. The motor will be cut off because it enters the protection circuit ahead of time.
- After the machine starts freezing, do not remove the motor and transparent cover during the working process.
- This product cannot be used outdoors.
- Do not use chemical washing liquids and hard tools to clean the product. The transparent lid is not dishwasher safe, do not wash the evaporator directly under water.
- After the operation, please pull the plug-in time.
- When you turn the ice cream maker on without adding ice cream ingredients, you will slightly hear the mixing paddle scratching the loading bowl, which is a normal phenomenon.
- There are two round copper sheets at the motor assembly of the transparent cover installed on the upper cover. When using, please wipe the water stains on the transparent cover and on the copper plates. If the machine is in use, the two copper plates will be connected by water, which will lead to power failure of the motor. Pull out the power line, wipe the water stains, and restart it.
- Retain the instruction manual.
Warning: Do not store explosive substances such as aerosol cans with a flammable propellant in this appliance.
- This appliance is intended to be used in household and similar applications such as:
– staff kitchen areas in shops, offices and other working environments.
– farmhouses and by clients in hotels, motels and other residential type environments.
– bed and breakfast type environments.
– catering and similar non-retail applications.
-
When positioning the appliance, ensure the supply cord is not trapped or damaged.
-
Do not locate multiple portable socket-outlets or portable power supplies at the rear of the appliance
-
The refrigerant and insulation blowing gas is flammable, dispose of the appliance only at an authorized waste disposal centre. Do not expose to flame.

This symbol indicates the refrigerant R600a and the non-metallic materials of the ice are flammable. It's a warning symbol. Warning: Risk of fire / flammable materials.
WARNING: When positioning the appliance, ensure the supply cord is not trapped or damaged.
WARNING: Do not locate multiple portable socket-outlets or portable power supplies at the rear of the appliance.
Children should be supervised to ensure that they do not play with the appliance.
To avoid contamination of food, please respect the following instructions:
– Clean regularly surfaces that can come in contact with food and accessible drainage systems.
– Clean water tanks if they have not been used for 48 h; flush the water system connected to a water supply if water has not been drawn for 5 days.
- If the refrigerating appliance is left empty for long periods, switch off, defrost, clean, dry, and leave the door open to prevent mould from growing within the appliance.
IV. PRODUCT DESCRIPTION
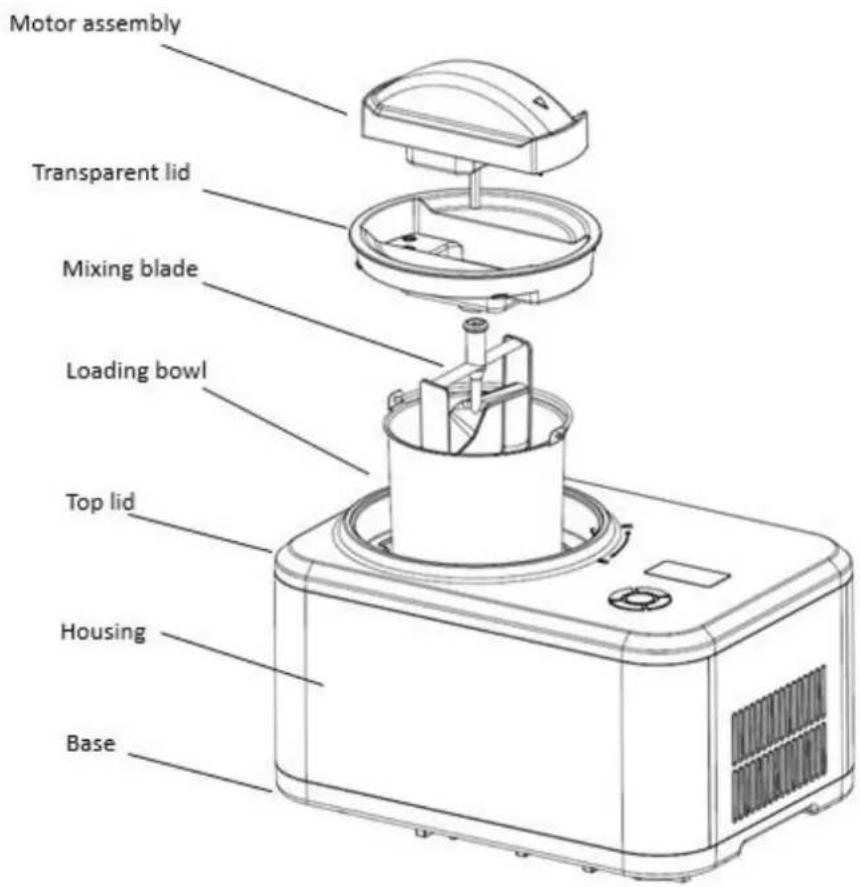
V. CONTROL PANEL
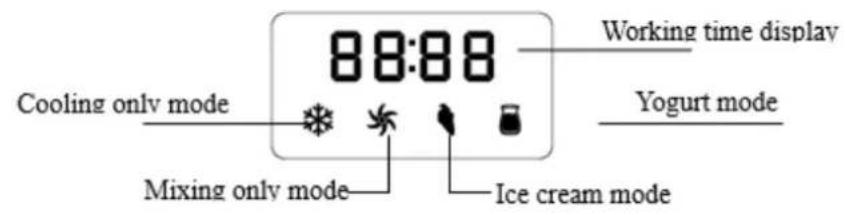
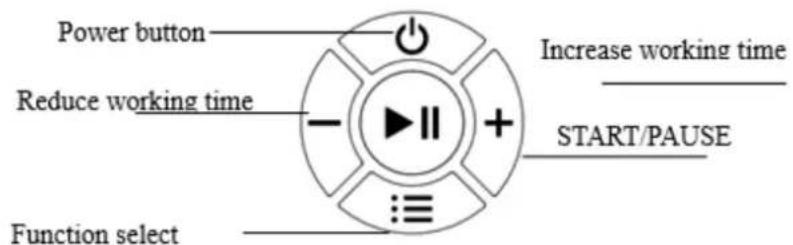
flowchart
graph TD
    A["Power button"] --> B["Power icon"]
    C["Reduce working time"] --> D["+/-"]
    E["Function select"] --> F["≡"]
    G["Increase working time"] --> H["START/PAUSE"]
    I["Start/PAUSE"] --> J["+"]
    K["Power switch"] --> L["+/-"]
VI. USING INSTRUCTIONS
HOW TO MAKE ICE CREAM
Please thoroughly clean all parts that will contact with ice cream before use, including: cooling bowl, loading bowl, mixing fan blade, transparent lid, etc.
Before cleaning, you must ensure that the power cord plug is disconnected from the outlet. When making ice cream, keep the machine flat on a level surface to ensure that the compressor of the machine is working properly.
Here are the steps to make an ice cream:
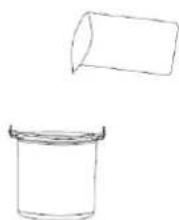
- Pour the well-prepared recipe ingredients and warm water into the removable bowl, then have a uniform mixing.
natural_image
Simple line drawing of a cylindrical container and an empty cylindrical container (no text or symbols)- Then put the loading bowl into the ice cream machine, both ends of the loading bowl handle shall be aligned with the groove of the upper cover.
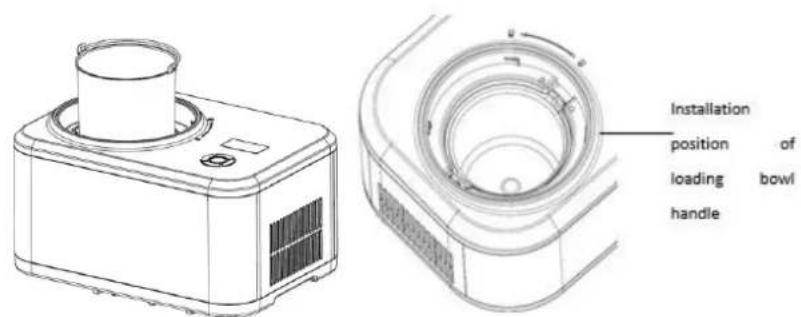
- Install the transparent lid and motor components.
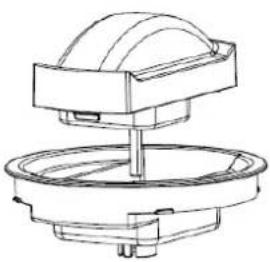
natural_image
Technical line drawing of a mechanical device with a dome-shaped top component and a circular base (no text or symbols)- Install the mixing fan blade, transparent lid and motor components
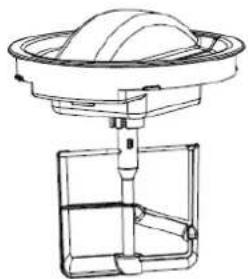
natural_image
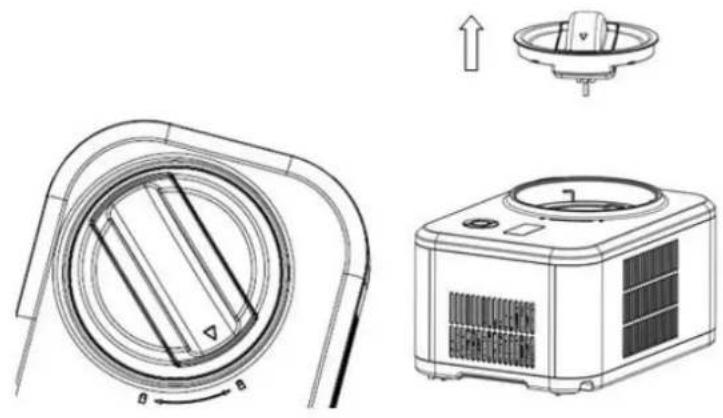
Technical line drawing of a mechanical device with a dome-shaped top and a rectangular base (no text or symbols)- Put the components installed in step 4 into the ice cream machine, make sure that the center of the convex hull of the loading bowl and the motor components of the mixing fan blade are in the same straight line, lock the components clockwise, and make sure that the triangle mark on the components rotates to the "LOCK" mark.
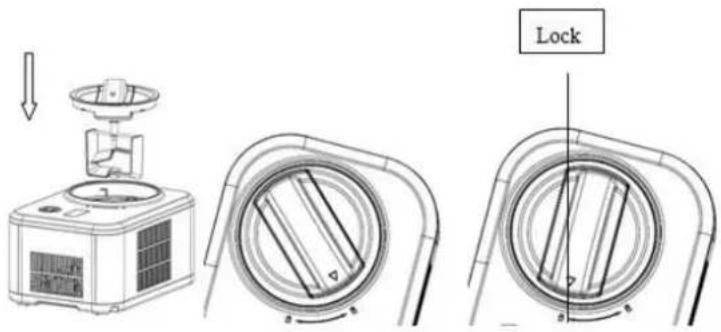
- Plug in power, select the ice cream mode and working time, and press the START/PAUSE button finally.
- When the ice cream is finished, there will be 10 short beeps.
- Turn the transparent lid and motor components anticlockwise. In the process of spinning out, there will be a slight friction sound, which is normal. When the triangle mark is aligned with the unlocking mark, take out the components and then take out the loading bowl.
natural_image
Technical line drawing of a microwave oven and air conditioner unit (no text or symbols)VII. OPERATION
-
Connect the power supply and plug the power cord into a suitable socket. The shape and voltage of the socket shall be the same as those indicated.
-
Operation process
1) Function description of buttons and display icons
: POWER BUTTON
Single cooling function
: Ice cream function
+: Increase working time
:≡: Function select
I>II: START/PAUSE
: Single mixing function
: Yogurt function
— : Reduce working time
2) Operation process of making ice cream
a. Press the button to start the machine.
b. Press the :≡ button, select the ▼ icon and enter the ice-cream mode.
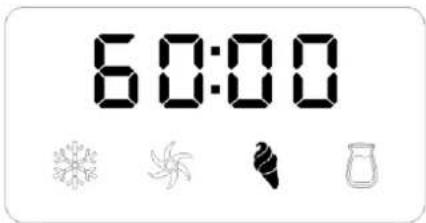
c. [Ice cream] the default production mode is 60 minutes. If you need to adjust the working time, press the "+" and "-" buttons. Press the button once to change for 1 minute, and long press for 2 seconds to change quickly, up to 60 minutes.
d. After setting the time, press the ▶□ button to count down the time and start making ice cream at the same time. In this process, if you press the ▶button, the machine will stop working, and the screen will display the time when it stops. If you press the ▶□
button again, you will continue to work according to the currently set mode and the remaining time. When the time or soft hardness reaches the set value, 10 beeps will prompt completion.
e. After the production process is completed, if there is no other operation, it will automatically enter the insulation program. Please enjoy this delicious ice cream in time or keep it in the refrigerator to avoid melting.
3) Operation process of single cooling function
a. Press the ⏻ button to start the machine.
b. Press the :≡ button, select the ✿ icon and enter the single cooling mode.
c. In the [single cooling] mode, if you need to adjust the working time, press the "+" and "-" buttons. Press the button once to change for 1 minute, and press it for 2 seconds to change quickly, up to 60 minutes.
d. After setting the time, press ▷II button to start refrigeration, and select the time to start countdown. In this process, if you press the ▷II button, the machine will stop working, and the screen will display the time when it stops. If you press the ▷II button again, you will continue to work according to the currently set mode and the remaining time. When the time reaches the set value, 10 beeps will prompt completion.
4) Operation process of single mixing
a. Press the ⏻ button to start the machine.
b. Press the :≡ button, select the 🎩 icon and enter the single mixing mode.
c. In the [single mixing] mode, if you need to adjust the working time, press the "+" and "-" buttons. Press the button once to change for 1 minute, and press it for 2 seconds to change quickly, up to 60 minutes.
d. After setting the time, press the ▶ button to start single mixing, and select the time to start the countdown. In this process, if you press the ▶ button, the machine will stop working, and the screen will display the time when it stops. If you press the ▶ button again, you will continue to work according to the currently set mode and the remaining time. When the time or soft hardness reaches the set value, 10 beeps will prompt the completion of mixing.
5) Operation process of yogurt function
a. Press the button to start the machine.
b. Press the ⌘ button, select the 📋 icon and enter the yogurt mode.
c. In the [yogurt] mode, if you need to adjust the working time, press the "+" and "-" buttons. Press the button once to change for 1 minute, and press it for 2 seconds to change quickly, up to 24 hours.
d. After setting the time, press ▶II button to start refrigeration, and select the time to start countdown. In this process, if you press the ▶II button, the machine will stop working, and the screen will display the time when it stops. If you press the ▶II button again, you will continue to work according to the currently set mode and the remaining time. When the time reaches the set value, 10 beeps will prompt completion.
e. In yogurt mode, the heating wire start heating, transferring heat to the food. The machine goes into fermentation mode. The maximum temperature point reaches 41^ C.
3. Keep cool function
Ice cream insulation function: In order to prevent you from leaving during the ice-cream making process, and the ice-cream can not be eaten or stored in time after the completion of the production, which causes the ice-cream to melt, we have added the following humanized design: when the ice-cream making is completed, but no one operates, it will automatically enter the insulation program. The insulation time is 1 hour. After 1 hour, the machine will enter the standby state.
4. Motor self-protection function
In the single mixing and ice cream modes, as the production time becomes longer, the ice cream becomes harder and harder, and the mixing motor will be locked in advance. At this time, the PCB will monitor the motor and automatically stop the motor to ensure the service life of the mixing motor.
5. Compressor self-protection function
After the compressor stops from ice cream mode or cooling only mode, if the ice cream mode or cooling only mode is selected again, the compressor will have a protection time of about 3 minutes. However, after the power cord is plugged in, the machine is restarted by default. At this time, there is no delay in selecting ice cream mode or cooling only mode.
ELECTRICAL DIAGRAM
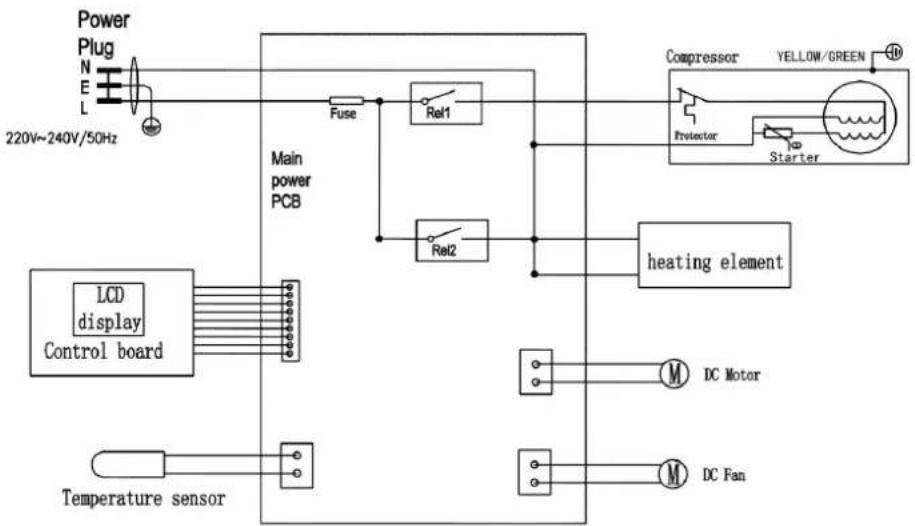
flowchart
graph TD
    A["Power Plug"] --> B["Main power PCB"]
    B --> C["Fuse"]
    C --> D["Rel1"]
    D --> E["heating element"]
    E --> F["DC Motor"]
    E --> G["DC Fan"]
    H["LCD display Control board"] --> I["Control board"]
    J["Temperature sensor"] --> K["Control board"]
    L["Compressor"] --> M["yellow/green"]
    N["Protector"] --> O["Starter"]
    P["220V~240V/50Hz"] --> A
VII. MAINTENANCE AND TROUBLESHOOTING
Caution: The plug must be removed before cleaning to avoid electric shock.
(1) Take out the mixing blade, wipe it with a dampened cloth.
(2) Take out the removable bowl, clean it with a dampened soft cloth.
(3) Wipe the transparent lid and refill lid with a dampened cloth.
(4) Remove the dirty on the body or other places with a dampened cloth, and do not pour water on cord, plug and ventilation, immerse the appliance in water or any other liquid.
(5) Allow drying thoroughly with a dry cloth, then return the component to the home position.
| No. | Fault | Possible cause | Troubleshooting |
| 1 | Not easy to take out loading bowl after the ice cream is finished | There are water drops between the refrigeration barrel and the loading bowl that are not wiped clean, resulting in freezing | Wait 3-8 minutes before taking out the loading bowl. |
| 2 | The transparent lid is lifted to the mixing fan blade, and it cannot be stuck in place | The mixing fan blades not in place, and pay attention to the alignment of the convex hull at the bottom | Put the mixing fan in place and rotate the transparent cover in place |
| 3 | The loading bowl cannot be placed in the cooling bowl | Deformation caused by improper use of loading bowl | Buy a new loading bowl |
| 4 | At the beginning of making ice cream, the mixing fan seriously scratched or jammed. | Deformation caused by improper use of loading bowl | Buy a new loading bowl |
115g granulated sugar
180g heavy cream, well chilled
1 /2 teaspoons pure vanilla extract, to taste
In a medium bowl, use a hand mixer or a whisk to combine the milk and granulated sugar until the sugar is dissolved, about 1 – 2 minutes on low speed. Stir in the heavy cream and vanilla to taste. Turn machine on, pour mixture into freezer bowl through ingredient spout and let mix until thickened, about 50 – 60 minutes.
BASIC CHOCOLATE ICE CREAM
240g whole milk
115g granulated sugar
1/2 cup granulated sugar
240g bittersweet or semi-sweet chocolate (your favorite), broken into 1/2-inch pieces
240g cups heavy cream
1 teaspoon pure vanilla extract
Heat the whole milk until it is just bubbling around the edges (this may be done on the stovetop or in a microwave). In a blender or food processor fitted with the metal blade, pulse to process the sugar with the chocolate until the chocolate is very finely chopped. Add the hot milk, process until well blended and smooth. Transfer to a medium bowl and let the chocolate mixture cool completely. Stir in the heavy cream and vanilla to taste.
Turn the machine ON, pour mixture into freezer bowl through ingredient spout and let mix until thickened, about 50 – 60 minutes.
FRESH STRAWBERRY ICE CREAM
250g or 1 pint fresh ripe strawberries, stemmed and sliced
52.5g freshly squeezed lemon juice
115g sugar, divided
240g whole milk
240g heavy cream
1 teaspoon pure vanilla extract
In a small bowl, combine the strawberries with the lemon juice and 1/3 cup of the
sugar; stir gently and allow to the strawberries to macerate in the juices for 2 hours.
In a medium bowl, use a hand mixer or a whisk to combine the milk
and granulated sugar until the sugar is dissolved, about 1 – 2 minutes on low speed.
Stir in the heavy cream plus any accumulated juices from the strawberries and vanilla.
Turn the machine ON, pour mixture into freezer bowl through ingredient spout and let mix until thickened, about 50 – 60 minutes. Add the sliced strawberries during the last 5 minutes of freezing.
FRESH LEMON SORBET
350g sugar
420g water
120g freshly squeezed lemon juice
0.5 tablespoon finely chopped lemon zest
Combine the sugar and water in a medium saucepan and bring to a boil over medium-high heat. Reduce heat to low and simmer without stirring until the sugar dissolves, about 3 – 5 minutes. Cool completely. This is called a simple syrup, and may be made ahead in larger quantities to have on hand for making fresh lemon sorbet.
Keep refrigerated until ready to use.
When cool, add the lemon juice and zest; stir to combine. Turn the
machine ON, pour the lemon mixture into freezer bowl through ingredient spout and mix until thickened, about 50 – 60 minutes.
CHOCOLATE FROZEN YOGURT
240g whole milk
180 g bittersweet or semisweet chocolate, chopped
400 g low-fat vanilla yogurt
50g sugar
Combine the milk and chocolate in a blender or food processor fitted with the metal blade and process until well blended and smooth, 20 – 30 seconds. Add the yogurt and sugar; process until smooth, about 15 seconds. Turn the machine ON, pour mixture into freezer bowl through ingredient spout and let mix until thickened, about 50 – 60 minutes.
Environment friendly disposal
You can help protect the environment!
Please remember to respect the local regulations: hand in the non-working electrical equipment's to

HEINNER is a registered trademark of Network One Distribution SRL. Other brands and product names are trademarks or registered trademarks of their respective holders.
No part of the specifications may be reproduced in any form or by any means or used to make any derivative such as translation, transformation, or adaptation without permission from NETWORK ONE DISTRIBUTION.

This product is in conformity with norms and standards of European Community
HEINNER
APARAT DE FĂCUT ÎNGHEȚATĂ Model: HICM-150WHYG
natural_image
White rectangular milk carton with a circular lid and control panel (no visible text or symbols)Thank you for purchasing this product!
I. INTRODUCERE
natural_image
Simple line drawing of a cylindrical container with an open top (no text or symbols)natural_image
Technical line drawing of a microwave oven and its side view showing internal components (no text or symbols)natural_image
Technical line drawing of a mechanical device with a dome-shaped top component and a circular base (no text or symbols)natural_image
Diagram of a mechanical device with a dome-shaped top and a side view showing liquid and a handle (no text or symbols)natural_image
Technical line drawings of a microwave oven and air conditioner unit (no text or symbols)VII. MOD DE UTILIZARE
natural_image
White rectangular milk carton with digital display and control knob (no visible text or symbols)- Уред за сладолед
- Мощност: 120 W
- Обем: 1,5 литра
natural_image
Technical line drawing of a microwave oven and its side view (no text or symbols)natural_image
Technical line drawing of a mechanical assembly with a dome-shaped component and rotating base (no text or symbols)natural_image
Technical line drawing of a mechanical device with a dome-shaped top and base, showing internal components (no text or symbols)natural_image
Technical line drawings of a vacuum cleaner with internal components and a top-mounted fan (no text or symbols)VII. ОПЕРАЦИЯ
natural_image
White rectangular milk carton with a circular lid and control panel (no visible text or symbols)natural_image
Technical line drawing of a microwave oven and its internal structure (no text or symbols)natural_image
Technical line drawing of a mechanical assembly with a dome-shaped component and a central shaft (no text or symbols)natural_image
Technical diagram of a mechanical assembly with a dome-shaped component and a rectangular base (no text or symbols)natural_image
Technical line drawings of a portable air conditioner unit, showing internal components and airflow direction (no text or symbols)VII. MÚVELET
- Thank you for purchasing this product!
- INTRODUCTION
- CONTENT OF YOUR PACKAGE
- SAFETY PRECAUTIONS
- PRODUCT DESCRIPTION
- CONTROL PANEL
- USING INSTRUCTIONS
- HOW TO MAKE ICE CREAM
- OPERATION
- Keep cool function
- Motor self-protection function
- Compressor self-protection function
- MAINTENANCE AND TROUBLESHOOTING
- BASIC CHOCOLATE ICE CREAM
- FRESH STRAWBERRY ICE CREAM
- FRESH LEMON SORBET
- CHOCOLATE FROZEN YOGURT
- Environment friendly disposal
- HEINNER
- INTRODUCERE
- MOD DE UTILIZARE
- ОПЕРАЦИЯ
- MÚVELET
Brand : Heinner
Model : HICM-150WHYG
Category : Sorbet maker