
Ultracare Pro - Beard trimmer FAKIR - Free user manual and instructions
Find the device manual for free Ultracare Pro FAKIR in PDF.


| Product Type | Beard Trimmer |
| Brand | Fakir |
| Model | Ultracare Pro |
| Dimensions (L x W x H) | 15 cm x 3.5 cm x 3.5 cm |
| Weight | 170 g |
| Power Source | Rechargeable Lithium-ion battery |
| Charging Time | 8 hours |
| Usage Time | 60 minutes (cordless) |
| Blade Material | Self-sharpening stainless steel |
| Cutting Length Settings | 20 precise settings (0.5 mm to 10 mm) |
| Attachment Combs | 2 adjustable combs (3-10 mm and 13-20 mm) |
| Waterproof Rating | IPX5 (washable under running water) |
| Cleaning | Removable blade for easy cleaning |
| Display | LED battery indicator |
| Safety | Travel lock and safety blade guard |
| Included Accessories | Charger, cleaning brush, oil |
| Spare Parts Available | Blade unit, combs (check Fakir website) |
| Warranty | 2 years |
| Country of Origin | Germany |
| Motor | High-torque rotary motor |
| Grip | Ergonomic, non-slip rubber coating |
| Voltage | 100-240V automatic |
Frequently Asked Questions - Ultracare Pro FAKIR
User questions about Ultracare Pro FAKIR
0 question about this device. Answer the ones you know or ask your own.
Ask a new question about this device
Download the instructions for your Beard trimmer in PDF format for free! Find your manual Ultracare Pro - FAKIR and take your electronic device back in hand. On this page are published all the documents necessary for the use of your device. Ultracare Pro by FAKIR.
USER MANUAL Ultracare Pro FAKIR
natural_image
Black-and-white photo of a pair of hairbrushes with filterers and accessories (no visible text or symbols)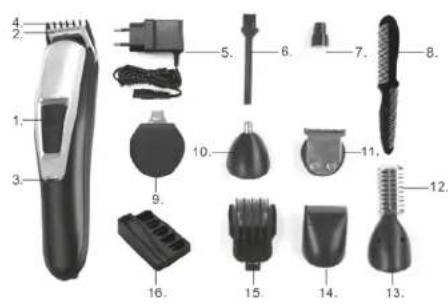
Safety is important.... 17
Important safeguards.... 17
Parts of description.... 19
Specifications 19
Charging your personal groomer.... 20
Attaching and removing the guide combs 21
Using the miniscreen shaver 22
Trimming edge of sidebruns 22
Trimming the nape of your neck 22
To remove hair from nose and ear 23
To remove hair from eyebrows.... 23
Using the body trimmer 23
Using the detail trimmer.... 23
Attaching and removing the trimmer comb attachment.... 24
Tips for best results 24
Care for your personal groomer 24
After each use 24
Cleaning causions 24
Storage 24
Battery removal 27
Ce declaration of conformity.... 28
Waste disposal 28
Dispatch....28
Thank you for purchasing Fakir ULTRACARE PRO All In Washable Men's Grooming Kit, which has been designed and manufactured to give you many years of trouble-free service. You may already be familiar with using a similar product, but do please take time to read these instructions - they have been written to ensure you get the very best from your purchase.
Safety is important
For yours and others safety please read the instructions before using the appliance. Please keep this instruction in a safe place for the further use. If you pass the appliance on, pass on the instructions too. Remove all packaging, but keep it until you are satisfied that the appliance is working.
Important Safeguards
When use electrical appliances, basic safety precautions should always be followed, including the following
- Read the instruction manual through carefully before using the equipment for the first time.
- Never immerse the hair clipper's surface or the mains adapter in water or any other liquid while charging.
- Never touch your clipper if having dropped down in to water or any other liquid.
- Unplug from mains after use or before cleaning.
- When unplugging the mains adapter, pull it out by the housing, not by the cable. When plugging in or unplugging the mains adapter, never touch it with wet hands.
- Before operating your appliance, make sure that your network's voltage is compatible with your appliance's voltage.
- Do not cover the mains adapter, since this will cause it to heat up excessively.
- Check the mains adapter and hair clipper regularly for any mechanical defects.
- Please do not try to repair your appliance, mains adaptor or the plug by yourself. All the repair operations should be done by an authorized Fakir Service.
• Make sure that the cable is not trapped in cupboard doors or laid across hot surfaces. This could damage the cable insulation, causing a risk of electric shock!
- The cutting attachment is very sharp. Do not use the appliance if the comb attachment or cutting head is faulty. This could cause injury!
- Please use this appliance depending on the information which is emphasized on the rating label.
- Do not use on open wounds, cuts, sunburn or blisters. Only operate the appliance in accordance with the instructions on the rating plate.
- Do not expose the hair clipper to temperatures below -10^ or above +40^ .
- Clean the appliance thoroughly each time after use.
- Do not use your hair clipper for animal hairs.
- Do not attach accessories belonging to any other appliances. Use only with its own accessories.
- Never touch any moving parts of your hair clipper when in use. Keep a distance from your cloth, eyelash and any other items.
- Do not use your hair clipper on wigs or false hairs.
- If your hair clipper is used by others, please clean your appliance before use.
- In the case of obvious damage to the appliance, mains adaptor or the cable, please connect with an authorized Fakir Service.

CAUTION!
- Use this appliance only for its intended use as described in this manual. Do not use attachments not recommended.
- Do not use this product if it is not working correctly, if it has been dropped for damaged, or dropped into water.
Parts of description
- On/off switch
- Precision trimmer attachment
- Charging indicator light
- Small cutting guide
- Charging adaptor
- Cleaning brush
- Lubricating Oil
- Comb
- Detail Trimmer
- Nose & ear trimmer attachment
- Full size trimmer attachment
- Body trimmer guide
- Body trimmer
- Micro shaver attachment
- Big cutting guide
- Storage base
Specifications:
Power Adaptor:
Input: AC100-240V 50/60Hz
Output:DC 5V 500mA
Waterproof IPX5
Motor Voltage: 3.7V d. c.
Charging Time: 2.5-3hours
Battery Capacity: 600mAh ×1(lithium battery)
Working Time: 50-60 minutes
Protection class: II
Usage life: 7 years
GETTING STARTED
CHARGING YOUR PERSONAL GROOMER
Before using your personal groomer for the first time, charge for 4-6 hours.
- Ensure the product is switched off.
- Connect the charging adaptor to the product and then to the mains. The charging indicator will light up.
Your personal groomer cannot be overcharged. However, if the product is not going to be used for an extended period time (2-3 months). Unplug it from the mains and store. Fully recharge your personal groomer when you would like to use it again.
To preserve the life of your batteries. Let them run out every six months then recharge for 4-6 hours.
HOW TO USE
BEFORE YOU BEGIN
Always comb your beard or moustache with a fine comb before you start trimming.
ATTACHING AND REMOVING THE GUIDE COMBS
- With the trimmer blade facing away from you. Slide the guide comb on top of the full size trimmer attachment and click into position.
- With the trimmer blade facing away from you, carefully push the guide comb away from the trimmer blade.
Table 1. precision trimmer
Setting Remaining hair length (mm)
| 1 | 3,0 |
| 2 | 4,0 |
| 3 | 5,0 |
| 4 | 6,0 |
Table 2. full size trimmer
Setting Remaining hair length (mm)
| 1 | 10,5 |
| 2 | 12,0 |
| 3 | 13,5 |
| 4 | 15,0 |
| 5 | 16,5 |
Table 3. Body trimmer
Setting Remaining hair length (mm)
| 1 | 3 | |
| 2 | 6 | |
| 3 | 9 |
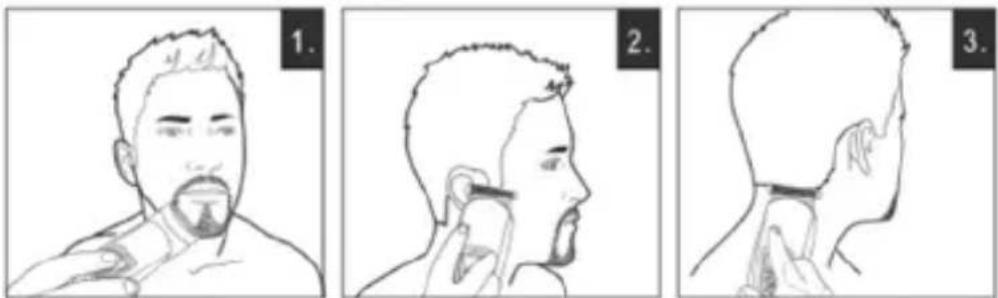
USING THE MINISCREEN SHAVER (Diagram 1)
- Attach the mini Screen shaver.
- Hold the groomer so the Mini Screen gently touches your face in a 45 degree angle.
- Use short, well-controlled movements to shaver around your beard or moustache. Use your free hand to scratch your skin. This encourages the hair to stand upright, making it easier to shave.
NOTE!
The Mini Screen shaver was designed to shave the detail areas around your beard/moustache/sideburns. It was not designed to shave your entire face. For a close comfortable shave, guaranteed, use one of electric shavers.
TRIMMING EDGE OF SIDEBRUNS (Diagram 2)
- Hold the personal groomer with full size trimmer attachment facing you.
- Start with edge of sideburn, and with the trimmer blades resting lightly against your skin. Use motions towards edge of sideburn line to trim to desired locations in facial area.
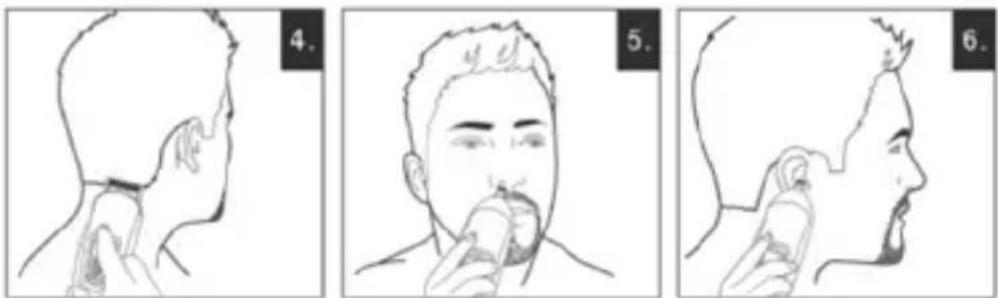
TRIMMING THE NAPE OF YOUR NECK (Diagram 3 & Diagram 4)
NOT!
You will need a hand mirror for this operation if performing it alone.
- Before you begin, attach the full size trimmer attachment .Then attached to the precision trimmer attachment.
- Use your fingers to lift the hair at the base of your head up off the neck. Your index finger should be covering the roots of the hairs you are lifting to prevent accidental removal by the personal groomer.
- Using your other hand, hold the personal groomer to the base of your neck with the cutting unit facing up, and move the personal groomer up the length of the neck until it touches your finger covering the hair roots at the base of your head.
- Be sure to move the unit slowly when performing this operation and to keep the hair roots at the base of your head out of the way of the trimmer.
TO REMOVE HAIR FROM NOSE AND EAR (Diagram 5 & 6)
- Attach the nose trimmer attachment.
- Insert the personal groomer gently into nostril or ear.
• Gently move the groomer in and out of the nostril or ear and at the same time rotate. - Avoid inserting the cutting unit more than 6mm into your nostril or ear .
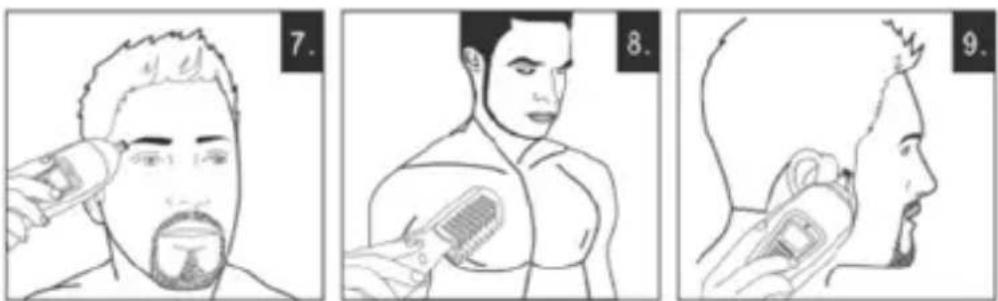
TO REMOVE HAIR FROM EYEBROWS (Diagram 7)
- Attach the nose trimmer attachment
• Gently guide cutting unit to stray, unwanted hairs along the eyebrow line or protruding from the eyebrow itself.
• To remove the hairs completely lower onto the skin and move over desired area. - Use slow and well-controlled movements.
USING THE BODY TRIMMER (Diagram 8)
- Attach the body trimmer.
- Hold the groomer so the body trimmer gently touches your body.
- Use short, well-controlled movements to shaver around your body. Use your free hand to scratch your skin. This encourages the hair to stand upright, making it easier to shave.
USING THE DETAIL TRIMMER (Diagram 9)
- Attach the detail trimmer.
• Gently move the groomer to create a variety of shapes you need. - It also can trim nose and ear trimmer but avoid inserting the cutting unit more than 6mm into your nostril or ear.
ATTACHING AND REMOVING THE TRIMMER COMB ATTACHMENT
NOTE!
Always ensure the personal groomer is switched off before changing any attachments.
- To remove, hold the personal groomer with one hand and turn the trimmer head anti-clockwise with the other.
- To attach, hold the personal groomer with one hand and turn the trimmer head clockwise with the other.
TIPS FOR BEST RESULTS
- Remove trimmer comb attachment if you are : defining hairline edges such as sideburns. Trimming the nape of your neck, trimming your beard line on front of neck.
- Turn the personal groomer off.
- Gently brush the remaining hairs away / rinse under warm water from the guide comb and trimmer blade.
CLEANING CAUSIONS
- The guide comb attachment and trimmer blade may be removed from the product for cleaning.
- Cleaning should only be done with a soft brush, such as the brush supplied with the product.
- Use the light-grade oil supplied or sewing machine oil on the blades.
- Do not use harsh or corrosive cleaners on the units or their blades.
STORAGE
- Do not wrap the cord of the charging adaptor around the appliance.
DANGER
To reduce the risk of electric shock:
- Do not reach for an appliance that has fallen into water. Unplug it immediately.
- Do not place or drop into water or other liquid.
- Do not place or store this appliance where it can fall or be pulled into a tub or sink.
- Except when charging, always unplug this appliance from the electrical outlet immediately after using.
- Unplug this appliance before cleaning it.

WARNING!
KEEP THE APPLIANCE DRY.
This appliance can be used by children aged from 8 years and above and persons with reduced physical, sensory or mental capabilities or lack of experience and knowledge if they have been given supervision or instruction concerning use of the appliance in a safe way and understand the hazards involved. Children shall not play with the appliance. Cleaning and user maintenance shall not be made by children without supervision.
The battery must be removed from the appliance before it is scrapped.
The appliance must be disconnected from the supply mains when removing the battery.
The battery is to be disposed of safely.
Before the appliance is scrapped, remove the cover and screws and open the enclosure, separating the batteries from the PCB.
(Don't let the batteries short circuit when removing the batteries).
It is best done by qualified persons in order to avoid a hazard.
NOTE!
THE CHARGING ADAPTOR CANNOT USED IN THE BATH OR SHOWER. DO NOT PLACE OR DROP THE CHARGING ADAPTOR INTO WATER OR OTHER LIQUID.
To reduce the risk of burns, fire, electric shock or injury to persons:
• This appliance is for household use only.
- An appliance should never be left unattended when it's plugged in, except when charging a rechargeable appliance.
- Close supervision is necessary when this appliance is used by, on, or near children or persons with special needs or certain disabilities.
- Use this appliance only for its intended use as described in this manual.
- Keep the cord away from heated surfaces.
- Never operate this appliance if it has a damaged cord or plug, if it is not working properly, if it has been dropped or damaged, or if it has been dropped into water.
- Never drop or insert any object into any of the appliance's openings.
- Do not use outdoors or operate where aerosol (spray) products are being used, or where oxygen is being administered.
- Always store this appliance and cord in a moisture-free area. Do not store it in temperatures exceeding 140^(60☒) .
- Make sure the cord is disconnected from the groomer stand when storing.
- Do not use this appliance with a damaged or broken cutter unit, as injury may occur. Always make sure blades are aligned properly.
- Do not use an extension cord or a voltage converter with this appliance.
- Do not wrap the cord around the appliance.
- The power unit is intended to be correctly oriented in a vertical or floor mount position.
- This appliance can only be charged by the power supply that the unit offers.
Battery Removal
NOTE!
Always recycle or properly dispose of batteries according to Local and State requirements.
- Unplug groomer from outlet to avoid risk of electrical shock.
- Remove rear groomer cover by first prying the rubber panel from the product with a flat head screwdriver.
- Next, pry the back panel from the product with a flat head screwdriver. This will expose the batteries.
- With wire cutters, clip the wires leading to the batteries.
- Remove the batteries from the product .Contact your local authorities for proper disposal.

CAUTION!
THESE BATTERIES MUST BE RECYCLED OR DISPOSED OF IN ACCORDANCE WITH STATE AND LOCAL REGULATIONS.
Do not burn or mutilate, as they may burst or release toxic materials. Do not short-circuit, as this may cause burns.
CE Declaration of Conformity
This appliance fulfills the requirements of the Appliance and Product Safety Law (GPSG) and the EU Directives 2004/108/EC “Electromagnetic Compatibility” and 2006/95/EC “Low-Voltage Directive.” The appliance bears the CE mark on the rating plate.
Waste Disposal
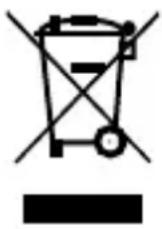
If the service life of the device has ended, in particular if functional disturbances occur, make the worn-out device unusable by cutting through the power cable.
Dispose of the device according to the environmental regulations applicable in your country.

Electrical waste must not be disposed of together with household waste. Bring the worn-out device to a collection center. The packaging of the device consists of recycling capable materials. Place these, sorted out according to material, in the collectors provided, so that recycling can be
carried out on them.
For advice on recycling, refer to your local authority or your dealer.
This appliance is compatible with 2002/96/EC WEEE directive.
Dispatch:
Carry the appliance in the original package or a similar, well-padded package to prevent damage to the appliance.
| Ayar | Kalan saç uzunluğu (mm) | |
| 1 | 3,0 | |
| 2 | 4,0 | |
| 3 | 5,0 | |
| 4 | 6,0 | |
natural_image
Line drawing of a person's head and shoulders, no text or symbols present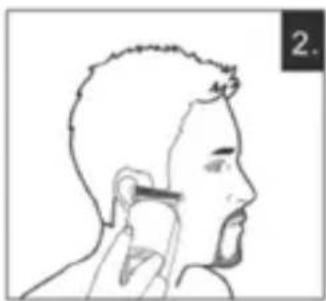
natural_image
Line drawing of a person applying a hair mask to their ear (no text or symbols)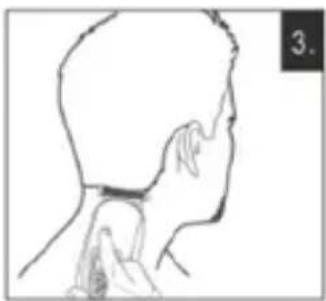
natural_image
Side profile sketch of a person's head and neck (no text or symbols)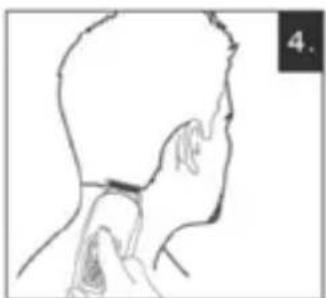
natural_image
Side profile sketch of a person's head and neck (no text or symbols)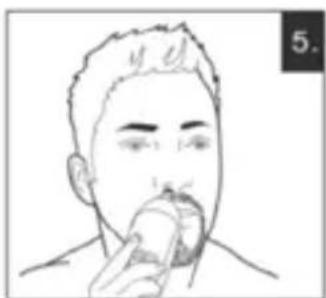
natural_image
Line drawing of a person applying oral care to their mouth (no text or symbols)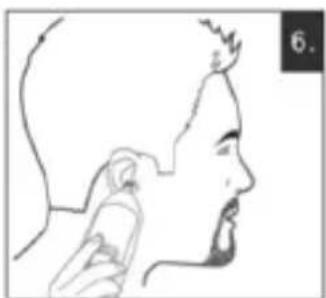
natural_image
Side profile sketch of a person's head and neck, showing facial features and hand near ear (no text or symbols)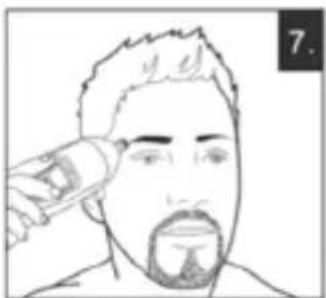
natural_image
Line drawing of a person applying makeup to their face (no text or symbols)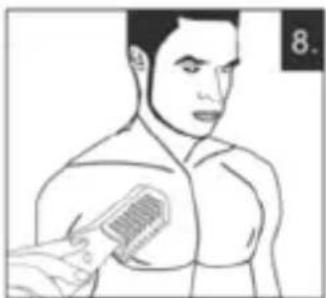
natural_image
Line drawing of a person brushing their chest with a comb (no text or symbols)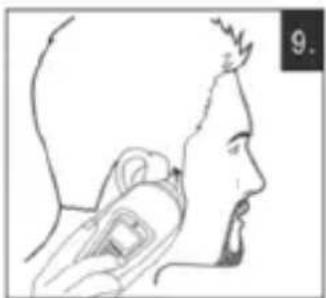
natural_image
Side profile sketch of a person holding an ear with a device, no text or symbols present| 1 | 3,0 |
| 2 | 4,0 |
| 3 | 5,0 |
| 4 | 6,0 |
natural_image
Line drawing of a person's head and shoulders, no text or symbols present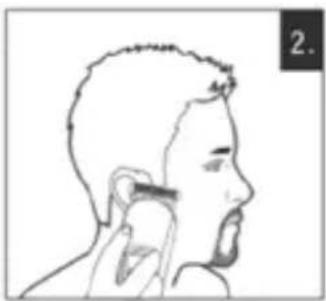
natural_image
Side profile sketch of a person holding an ear with a bandage (no text or symbols)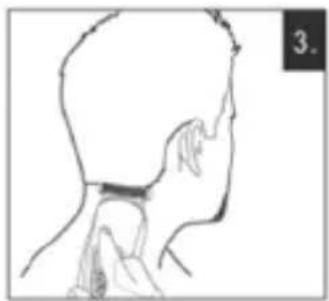
natural_image
Side profile sketch of a person's head and neck (no text or symbols)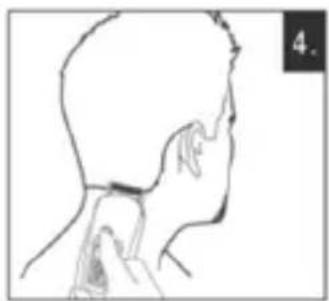
natural_image
Line drawing of a human head and neck with a small object attached to the neck area (no text or symbols)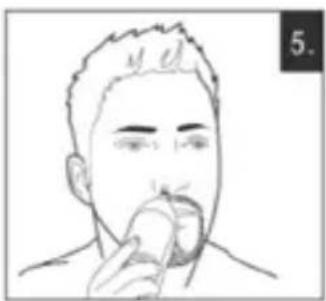
natural_image
Line drawing of a person applying facial massage to their mouth (no text or symbols)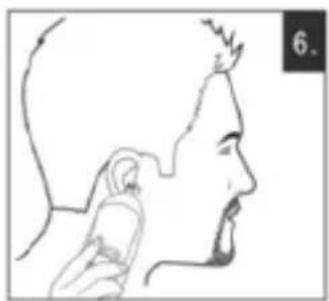
natural_image
Side profile sketch of a human head and neck (no text or symbols)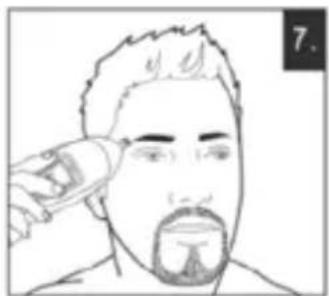
natural_image
Line drawing of a person applying facial hair to their beak (no text or symbols)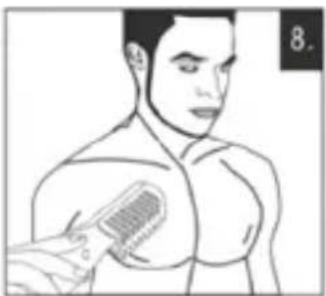
natural_image
Line drawing of a person applying a brush to their chest area (no text or symbols)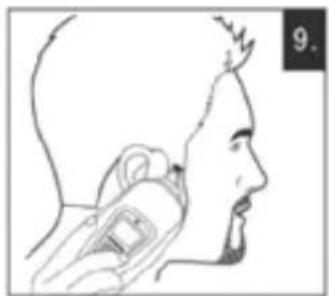
natural_image
Side profile illustration of a person wearing a headset (no text or symbols)طريقة الاستخدام
قبل البدء
- Safety is important
- Important Safeguards
- CAUTION!
- Parts of description
- Specifications:
- GETTING STARTED
- CHARGING YOUR PERSONAL GROOMER
- HOW TO USE
- BEFORE YOU BEGIN
- ATTACHING AND REMOVING THE GUIDE COMBS
- USING THE MINISCREEN SHAVER (Diagram 1)
- NOTE!
- TRIMMING EDGE OF SIDEBRUNS (Diagram 2)
- NOT!
- TO REMOVE HAIR FROM NOSE AND EAR (Diagram 5 & 6)
- TO REMOVE HAIR FROM EYEBROWS (Diagram 7)
- USING THE BODY TRIMMER (Diagram 8)
- USING THE DETAIL TRIMMER (Diagram 9)
- ATTACHING AND REMOVING THE TRIMMER COMB ATTACHMENT
- Always ensure the personal groomer is switched off before changing any attachments.
- TIPS FOR BEST RESULTS
- CLEANING CAUSIONS
- STORAGE
- DANGER
- To reduce the risk of electric shock:
- WARNING!
- KEEP THE APPLIANCE DRY.
- To reduce the risk of burns, fire, electric shock or injury to persons:
- Battery Removal
- CE Declaration of Conformity
- Waste Disposal
- Dispatch:
Brand : FAKIR
Model : Ultracare Pro
Category : Beard trimmer