
PIPI-200 - Paint gun Truper - Free user manual and instructions
Find the device manual for free PIPI-200 Truper in PDF.


| Type of Product | Paint Spray Gun (Pneumatic) |
| Brand / Model | Truper PIPI-200 |
| Code | 14037 |
| Jar Capacity | 0.26 gal (approx. 1 liter) |
| Air Pressure Range | 20 PSI - 50 PSI |
| Air Consumption | 6 CFM |
| Connection Diameter | 1/4 NPT |
| Nozzle Diameter | 0.05" (1.27 mm) |
| Recommended Compressor (Household) | 1.5 CV with 25-liter tank |
| Recommended Compressor (Professional) | 3 CV with 100-liter tank minimum |
| Paint Suction Pipe Orientation | Adjustable forward (horizontal) or backward (overhead) |
| Volume Adjustment | Adjusting screw (counterclockwise increases, clockwise decreases) |
| Spray Distance | 8" - 11" from surface |
| Spray Pattern | Fan; cross-pattern for large areas |
| Viscosity Measurement | Using viscosity measuring glass (not included); times vary by product |
| Safety Features | Trigger control; requires safety glasses, mask, gloves |
| Cleaning Method | Disassemble and clean with solvent; do not immerse gun in solvent |
| Spare Parts Available | Nozzle, needle, needle seal, suction pipe, gasket |
| Repairability | User-replaceable nozzles, needle seal |
| Warranty Validity | Regular cleaning and care required; inadequate cleaning voids warranty |
Frequently Asked Questions - PIPI-200 Truper
User questions about PIPI-200 Truper
0 question about this device. Answer the ones you know or ask your own.
Ask a new question about this device
Download the instructions for your Paint gun in PDF format for free! Find your manual PIPI-200 - Truper and take your electronic device back in hand. On this page are published all the documents necessary for the use of your device. PIPI-200 by Truper.
USER MANUAL PIPI-200 Truper
natural_image
Illustration of a spray gun with label 'TRUPER' on the handle (no other text or symbols)PIPI-200
natural_image
Illustration of a hand holding a spray gun with a labeled bottle (no text or symbols on the gun itself)
natural_image
Illustration of a hand holding a spray gun with a black cable, no text or symbols present
natural_image
Pure geometric diagram with dashed and solid lines forming a grid-like pattern, no text or symbols presentD
Encendido

natural_image
Illustration of a hand holding a spray gun with a cross mark, no text or symbols present
natural_image
Illustration of a hand holding a spray gun with a cross mark, no text or symbols presentLimpieza y cuidados
natural_image
Illustration of a hand using a spray gun to spray a bottle (no text or symbols)Sello de la aguja
Safety Warnings for the Use of
Pneumatic Tools 3

Safety Warnings for the Use of
Spray Guns 4
Parts 5
Preparation 6
Start Up 7
Maintenance 8
Troubleshooting 9

CAUTION
To gain the best performance of the tool, prolong the duty life, make the Warranty valid if necessary, and to avoid hazards of fatal injuries please read and understand this Manual before using the tool.
Keep this manual for future references.
The illustrations in this manual are for reference only. They might be different from the real tool.
Technical Data
| PIPI-200 | |
| Code | 14037 |
| Description | Spray Gun |
| Jar Capacity | 0,26 gal |
| Air Pressure | 20 PSI- 50 PSI |
| Connection Diameter | 1/4 NPT |
| Air Consumption | 6 CFM |
| Nozzle Diameter | 0.05" |
Pneumatic Requirements
- For household jobs, it is possible to use 1,5 CV compressors with a 25 liters' deposit. For more demanding jobs, like bodywork, industry, etc., we recommend using 3 CV compressors with a 100-liter deposit as minimum.
- Use high-pressure hoses with the adequate length to do the job comfortably.
CAUTION • Dust and water condensation inside the compressor tank can cause a deficient finish in the surface to be painted. To prevent that possibility, install a regulating filter between the compressor and the gun.

Pressure hose

natural_image
Illustration of a hand using a spray gun to handle a spray bottle (no text or symbols visible)Keep your work area clean, tidy and well lit.
CAUTION Cluttered and dark areas may cause accidents.

Never use the tool in explosive environments or near flammable liquids.

DANGER Sparks generated by the tool may cause explosion or fire.
Keep children and visitors at a safe distance when using the tool.
WARNING Distractions may cause loosing control and cause accidents.

Avoid contact with power lines and circuits.
DANGER Find and avoid both power lines and circuits, especially hidden wires and grounded devices.

Stay alert, use care and common sense.
CAUTION Do not rely on your knowledge of the tool. Do not get distracted while operating it. It could cause accidents.

Do not use the tool when tired or under the influence of drugs, alcohol or medication.
DANGER One second of distraction while using the tool may cause severe injuries.

Use the tool with guards and protective devices in place and in good working conditions.
WARNING Failure to comply with these measures may cause severe injuries.

Secure and support the work piece properly.
CAUTION Use bench vices and a stable working area.
Do not force the tool.
CAUTION It will do the job better and safer at the rate for which it was intended.

Store the tool in a safe place away from the reach of children.
WARNING Power tools are dangerous for inexperienced people.

Dress properly.
WARNING Loose clothing, jewelry or long hair may get caught in moving parts.

Keep your hands away from rotating and/or mobile parts.
WARNING Failure to comply with this safety measure exposes you to severe personal injury.

Use adequate personal protection.
CAUTION Using safety glasses, anti-dust mask, safety non-skid shoes, helmet and earplugs used in adequate conditions considerably reduce the risk of injury.


Disconnect the air hose from the tool servicing, changing devices or storing.
WARNING Reduce the risk of unintentional starting causing accidents.

Never use a tool if the switch is not working or is not properly assembled.
WARNING You are exposed to severe personal injury.

Do not overreach.
CAUTION Good footing and balance allow you to gain better control of the tool in unexpected situations.

Never pull the air hose.
WARNING Do not use it to carry or disconnect the tool pulling out the air supply. Damaged or tangled hoses can burst and shoot residues towards the operator.

Avoid accidental start up.
WARNING Make sure the air supply tool is switched off before connecting or moving the tool.

Remove vices before starting the tool.
DANGER Additional tools or vices set into a moving part may cause severe injury.

Service the tool and verify it is in excellent working conditions.
CAUTION Carefully check all moving parts, alignment and assembly. Make this periodically. Look for damaged or malfunctioning parts to immediately be repaired.

Accessories.
CAUTION Use only accessories or spare parts recommend this MANUAL or certified by TRUPER

Never leave a running tool unattended.
CAUTION Switch off and disconnect the tool from the air supply after operating and before putting it aside. Avoid severe injury.

Substances and Materials
CAUTION • The unit is designed to apply covering materials like paint, varnish, enamel, etc. These should have an ignition point not lower than 70 °F. Check the product can label or container.
WARNING • Do not spray substances you are not familiar with and if their potential danger is unknown to you.
WARNING • Do not spray flammable substances.
- Use care with dangers originated by the sprayed substances. Read the text and information in the cans and containers or the manufacturer specifications.
Before operating the unit
CAUTION • The unit shall not be used in enclosed areas or explosive environments.
- If working outdoors consider wind direction. Wind carries the covering to great distances, causes damages and makes the job difficult.
CAUTION • If working indoors, verify there is adequate ventilation.
WARNING • The work area shall be free of any ignition source. Do not smoke while spraying or near the work area.
CAUTION • Wear a face mask and safety goggles when spraying. Prevents damaging lungs and eyes.
- Wearing gloves and an overall is recommended to protect hands and clothes from the product when applying.
While operating the device
CAUTION • Never point the sprayer towards your body, passersby or animals.
- Make sure that the equipment does not absorb any steam solvent.
CAUTION • In the event you need to pause during the application process, do not set the sprayer sideways. Hold it by the hook of somewhere for it be vertical.
After operating the unit
WARNING • When finishing the job clean the gun perfectly to eliminate any product residue. Accumulations can damage the gun and cancel the Warranty

- To make a good job, it is important to prepare the surface to be sprayed. Thin the paint or product to gain the right viscosity before applying.
• Always double check the surface is free of dust, dirt or grease. - Make sure to cover with adhesive tape, some newspaper and/or plastic those areas that do not require spraying.
- Paint or product to be sprayed shall be mixed perfectly before filling the jar to prevent they settle and to make them lump-free.
- Before buying the product read the manufacturer recommendations.
Thinning the material
- Most paints are sold ready to be used with a brush. They need to be thinned before applying with a spray gun. Follow the manufacturer's instructions to thin it.
- Adding a thinner is recommended. Add 5 to 10% until reaching the right viscosity to apply the material.
- Use the viscosity measuring glass (not included) to determine right viscosity of the paint. Viscosity is determined by counting the seconds it takes for the material to be discharged into the measuring glass. The following table shows the recommended times for different products.
| Product | Second to discharge |
| Water based Paint | 20 - 25 |
| Primer | 24 - 28 |
| Varnish | 20 - 25 |
| Oil Based Paint | 18 - 22 |
| Enamel Paint | 18 - 22 |
| Aluminum Paint | 22 - 25 |
| Automotive Sealant | 25 - 35 |
| Wood Sealant | 28 - 35 |
| Wood Preserver | Thinning is not Required |
| Wood Stain |
- If after thinning the product the dispersion capacity is too low, add thinner. Add slowly from 5 to 10% until the dispersion capacity meets your needs.
- If the paint is too thick, the painted surface will be too rough (orange peel). If the paint is too liquid, there is risk of dripping.

Filling the Jar
- Unscrew the paint gun jar.
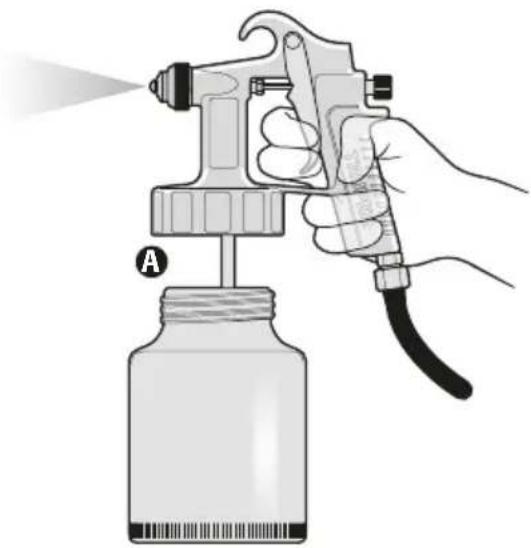
- Align the suction pipe suitable for the job: To spray horizontal objects set the suction pipe forward (A). To spray surfaces above your head, set the suction pipe backwards (B).
- Set the jar onto a piece of newspaper. Pour the prepared covering material and tighten the jar firmly into the paint gun.

natural_image
Illustration of a hand holding a spray gun with a labeled bottle (A), no text or symbols present.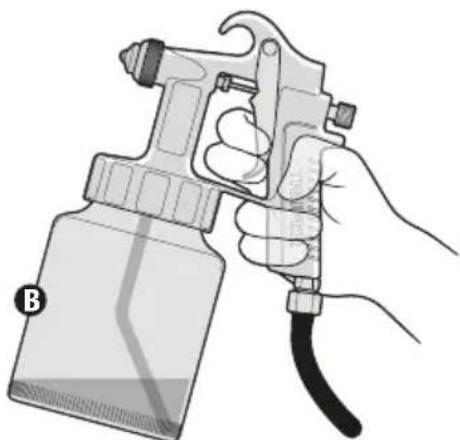
natural_image
Illustration of a hand holding a spray gun with a black handle and label B (no text or symbols on the gun itself)Volume Selector
- Turn the adjusting screw (A) in a counterclockwise direction to increase the volume of the material to be sprayed.
- Turn the adjusting screw in a clockwise direction to diminish the volume of the material to be sprayed.
Spraying Techniques
- To get the best result keep the gun always level and parallel to the surface (C). Keep the nozzle 8" - 11" away from the surface and spray evenly from side to side and up and down. Do not spray in an angle otherwise the paint may run through the surface. Do soft and uniform passes. When spraying large surfaces use a crossed pattern (D).
- Move the gun with a steady and uniform speed. Fast movements produce thinner layers. Slow movements produce thicker layers.
- Apply one layer at a time. In the event of needing a second layer read the drying recommendations from the
product manufacturer before applying an extra layer. Remember that to get a better finish applying two thin layers is better than only one thick layer.
- When spraying small areas turn the adjusting screw to lessen the volume of the material. This prevents using too much paint and over-spraying
• To assure a uniform application, do not pause while spraying an object when possible. - Do not tilt the paint gun in an angle higher than 45irc .


natural_image
Pure geometric diagram with dashed and solid lines forming a grid-like pattern, no text or symbols presentD
Start up
- Start the compressor.
- Press the trigger (B) to open the air flow and start suctioning the product from the jar. Point the paint gun towards a piece of cardboard until the spray flows.
- Release the trigger to stop the spray flow.


natural_image
Illustration of a hand holding a spray gun with a cross mark, no text or symbols presentCleansing and Care
- It is very important to clean the spray gun thoroughly after each use.
WARNING An inadequate cleansing can result in malfunctioning and will cancel the Warranty. - Turn the jar to remove it from the gun. Do not remove completely. Press the trigger to remove remaining product from inside the spray gun system (A).
- Pour the remaining material into an adequate container.
- Disconnect the paint gun hose.
- Clean the jar, the gasket seal and the suction pipe thoroughly with a rag soaked with the solvent that is right for the product.
- Disassemble the regulator, the sprayer, the nozzle and the needle. Clean them with a brush and solvent.
- Clean the paint gun body with a piece of rag moistened with solvent.
CAUTION Do not immerse the gun in solvent. The gasket may get damaged.
- When the parts are clean assemble back the spray gun.
- Pour a small amount of solvent into the jar.
- Connect the hose to the spray gun.
- Start the compressor and spray into a container until getting clean solvent out through the nozzle.
natural_image
Hand holding a spray gun applying paint to a bottle (no text or symbols visible)Needle Seal
- Use special care adjusting the needle seal. This is very important to obtain good results.
- Adjust the needle seal using a wrench (B).
- Periodically check the seal to be sure it is not damaged. To gain access to the seal remove the needle and remove the seal pressing piece (C).

Problem Cause Solution
| Paint drips through the nozzles. | Dirty or obstructed nozzles.Damaged nozzles. | Clean the nozzles.Replace the nozzles. |
| Paint leaking through the needle seal.Paint adheres to the needle. | The seal in the needle is too tight or damaged.The seal in the needle is missing. | Tighten or replace the needle seal (see page 8).Set a new seal fro the needle (see page 8). |
| Wrong fan spraying pattern. | Dirty or obstructed nozzles.Damaged nozzles.Obstructed air orifices. | Clean the nozzles.Replace the nozzles.Clean the regulator, the sprayer, nozzles, needle, suction pipe, air and paint ducts. |
| Wrong Spray Pattern | Right Spray Pattern | |
| Spray is not consistent. | The jar has not enough paint.Nozzles are not tightened correctly or are damaged.Needle seal is loose or damaged. | Fill up the jar with paint.Tighten or replace the nozzles.Tighten or replace the needle seal. |
| There is boiling in the paint deposit. | Nozzles are not tightened correctly or are damaged.Filter is dirty or obstructed.The jar is not tightened correctly or the jar washer is damaged. | Clean or replace the nozzles.Clean the filter or replace it.Tighten the jar. Replace the washer if damaged. |

natural_image
Illustration of a spray gun with a spray bottle and handle (no text or symbols)

Brand : Truper
Model : PIPI-200
Category : Paint gun