
BLBD210GW - Blender BLACK & DECKER - Free user manual and instructions
Find the device manual for free BLBD210GW BLACK & DECKER in PDF.


| Product Type | Blender |
| Brand | Black & Decker |
| Model | BLBD210GW |
| Capacity | 1.5 liters (approx.) |
| Power | 700 watts (typical) |
| Speed Settings | 2 speeds + pulse function |
| Blade Material | Stainless steel |
| Jar Material | Glass or plastic |
| Safety Feature | Safety lock mechanism |
| Non-Slip Base | Yes |
| Dishwasher Safe Parts | Jar and lid (top rack recommended) |
| Cord Length | About 1 meter |
| Weight | Approx. 2.5 kg |
| Dimensions (H x W x D) | Approx. 40 x 18 x 18 cm |
| Power Supply | 220-240 V, 50-60 Hz |
| Maintenance | Clean after each use; do not immerse base |
| Spare Parts Available | Yes, jar and blade assembly |
| Warranty | 2 years (depending on region) |
Frequently Asked Questions - BLBD210GW BLACK & DECKER
User questions about BLBD210GW BLACK & DECKER
0 question about this device. Answer the ones you know or ask your own.
Ask a new question about this device
Download the instructions for your Blender in PDF format for free! Find your manual BLBD210GW - BLACK & DECKER and take your electronic device back in hand. On this page are published all the documents necessary for the use of your device. BLBD210GW by BLACK & DECKER.
USER MANUAL BLBD210GW BLACK & DECKER
natural_image
Black and white photo of a modern blender with handle and control panel (no visible text or symbols)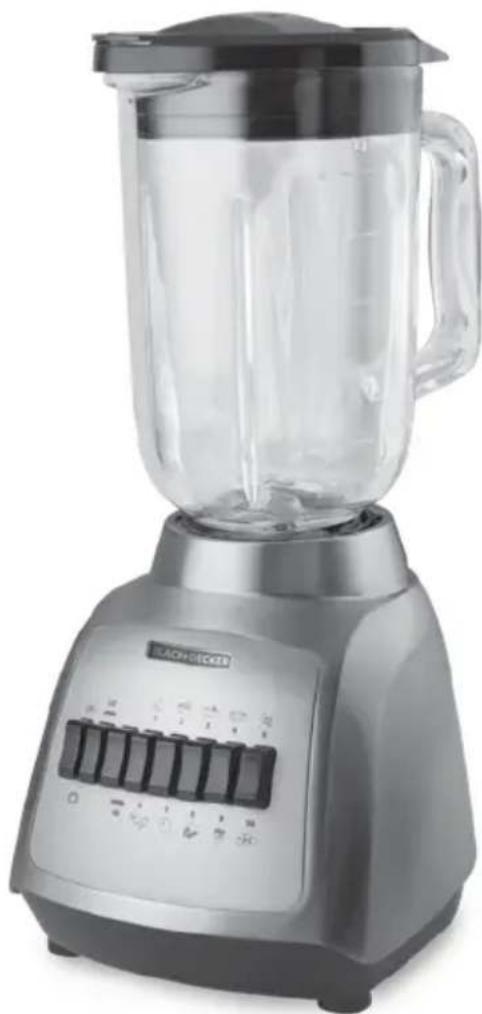
natural_image
Exterior view of a modern kitchen blender with control panel (no visible text or symbols)BLBD210GB
BLBD210GPW
BLBD210GW
BLBD210PB
BLBD210PW
BLBD210PW-CL
BLBD210PG
BLBD210PR
BLBD210PP
BLBD210PV
BLBD210GSS
BLBD210GSS-CL
BLBD210GB-2G
natural_image
Close-up of a mechanical component being extruded into a transparent plastic jar (no text or symbols visible)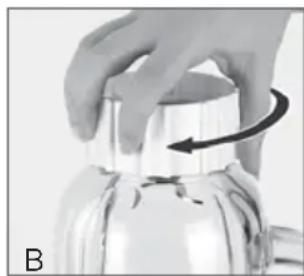
natural_image
Close-up of a hand pressing down on a metallic object with a curved arrow indicating rotation (no text or symbols)USO DE LA LICUADORA
C.A.B.A. - Argentina
Chile
SERVICIO DE MAQUINAS Y
HERRAMIENTAS LTDA.
Portugal N° 644
Santiago - Chile
Fonos: 02-6355208 / 02-6341169
Email: servicio@spectrumbrands.cl
Call center: 800-171-051
Colombia
Rayovac Varta S.A
Col. Centro, Cuauhtemoc,
México, D.F.
Tel. 01 800 714 2503
Nicaragua
LRM ELECTRONICA
Managua - Sinsa Altamira
Plaza Dorado, Local 2.
Panama
Tel. (507) 392-6231
Perú
Servicio Central Fast Service
City Market Nivel Plaza Local 153
Diagonal Hotel Melia, Caracas.
Tel. (582) 324-0969
Please Read and Save this Use and Care Book.
IMPORTANT SAFEGUARDS.
When using electrical appliances, basic safety precautions should always be followed, including the following:
- Read all instructions.
- To protect against risk of electrical shock do not immerse cord, plugs or appliance in water or other liquid.
- Close supervision is necessary when any appliance is used by or near children.
- Unplug from outlet when not in use, before putting on or taking off parts, and before cleaning.
- Avoid contacting moving parts.
- Do not operate any appliance with a damaged cord or plug or after the appliance malfunctions, or is dropped or damaged in any manner. Call the appropriate toll-free number within this manual.
- The use of attachments, including canning jars, not recommended by the manufacturer may cause fire, electric shock or injury.
- Do not use outdoors.
- Do not let cord hang over edge of table or counter or touch hot surfaces.
-
Do not place on or near a hot gas or electric burner or in a heated oven.
-
Keep hands and utensils out of container while blending to reduce the risk of severe injury to persons or damage to the blender. A scraper may be used, but must be used only when the blender is not running.
- Blades are sharp. Handle carefully.
- To reduce the risk of injury, never place blade assembly on base without jar properly attached.
• Always operate blender with cover in place. - When blending hot liquids, remove lid cap from lid.
- This appliance is not intended for use by persons (including children) with reduced physical, sensory or mental capabilities, or lack of experience and knowledge, unless they have been given supervision or instruction concerning use of the appliance by a person responsible for their safety.
• Children should be supervised to ensure that they do not play with the appliance. - Be careful if hot liquid is poured into the food processor or blender as it can be ejected out of the appliance due to a sudden steaming.
SAVE THESE INSTRUCTIONS.
This product is for household use only.
SAFETY FEATURES
POLARIZED PLUG (120V models only)
This appliance has a polarized plug (one blade is wider than the other). To reduce the risk of electric shock, this plug is intended to fit into a polarized outlet only one way. If the plug does not fit fully into the outlet, reverse the plug. If it still does not fit, contact a qualified electrician. Do not attempt to modify the plug in any way.
TAMPER-RESISTANT SCREW
Warning: This appliance is equipped with a tamper-resistant screw to prevent removal of the outer cover. To reduce the risk of fire or electric shock, do not attempt to remove the outer cover. There are no user-serviceable parts inside. Repair should be done only by authorized service personnel.
ELECTRICAL CORD
- A short power-supply cord is provided to reduce the risk resulting from becoming entangled in or tripping over a longer cord.
- Extension cords may be used if care is exercised in their use.
- If a long detachable extension cord is used:
a) The marked electrical rating of the power cord or extension cord should be at least as great as the electrical rating of the appliance.
b) If the appliance is of the grounded type, the extension cord should be a grounding-type 3-wire cord.
c) The cord should be arranged so that it will not drape over the countertop or tabletop where it can be pulled on by children or tripped over.
Note: This appliance has important markings on the plug blade. The attachment plug or entire cord set (if plug is molded onto cord) is not suitable for replacement. If damaged, the appliance shall be replaced.
For Mexico market only: If the line cord and plug is damaged it must be replaced by the warranty department listed in the manual.
GETTING TO KNOW YOUR BLENDER
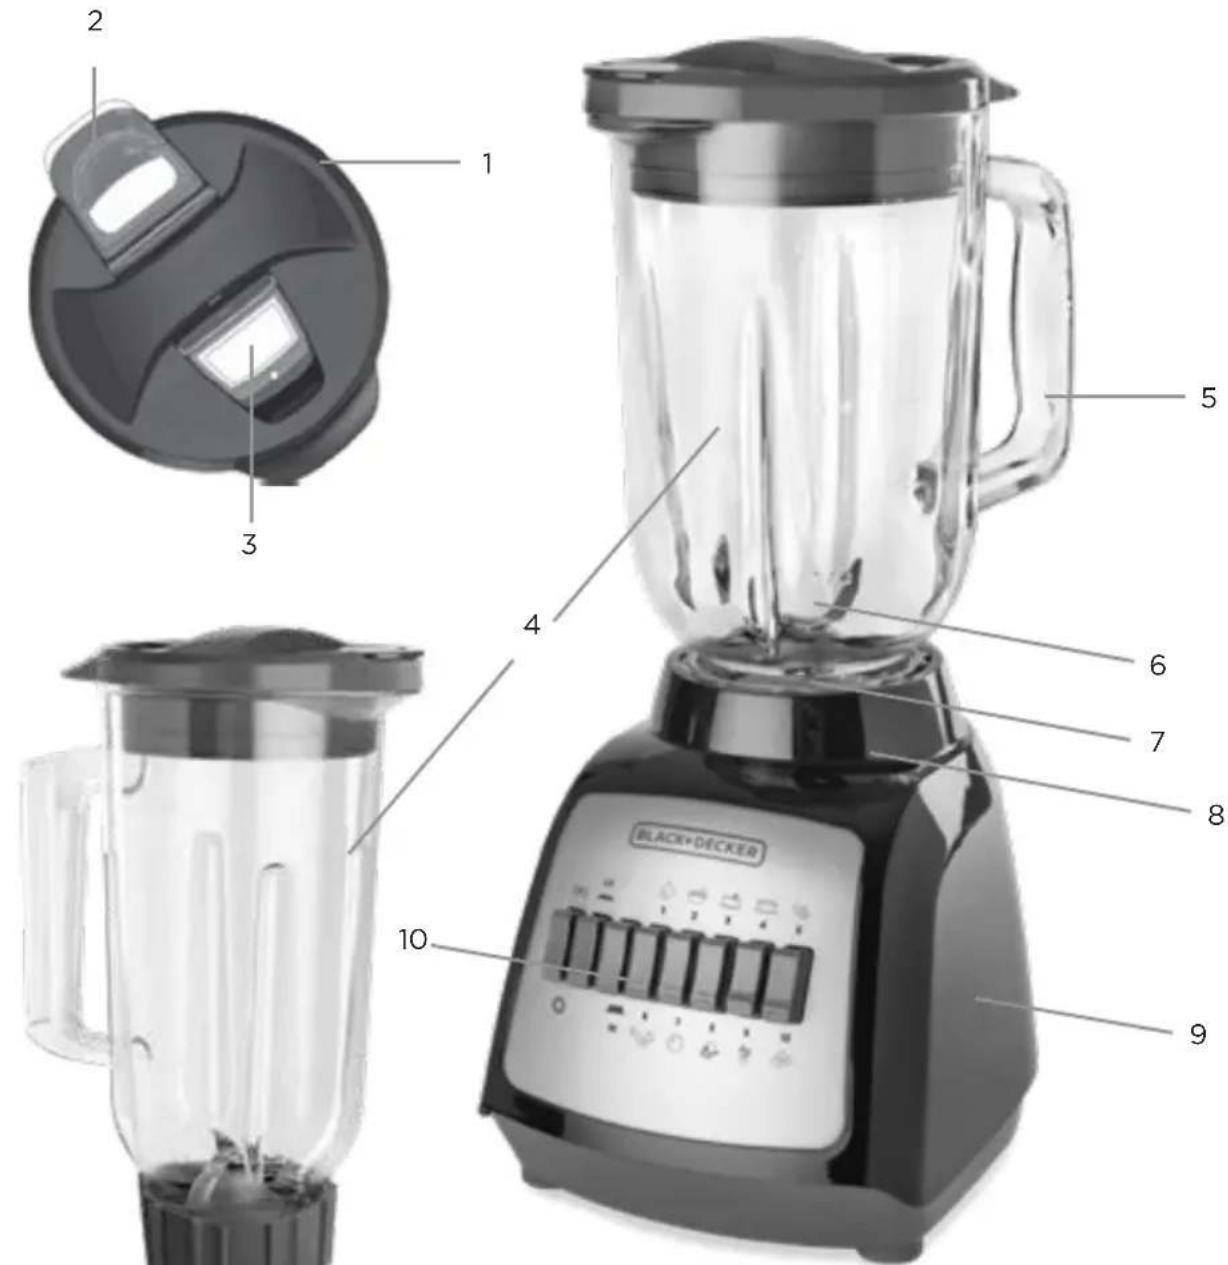
- Dual-opening lid
- Pour spout
- Ingredient slot
- Blending jar
GLASS 42 oz (1,25L)
BLBD210GB
BLBD210GW
BLBD210GPW
PLASTIC
50 oz (1,5 L)
BLBD210PB
BLBD210PW
- Handle
- Blade assembly
- Gasket
- Jar base
- Blender base
- Speed Button
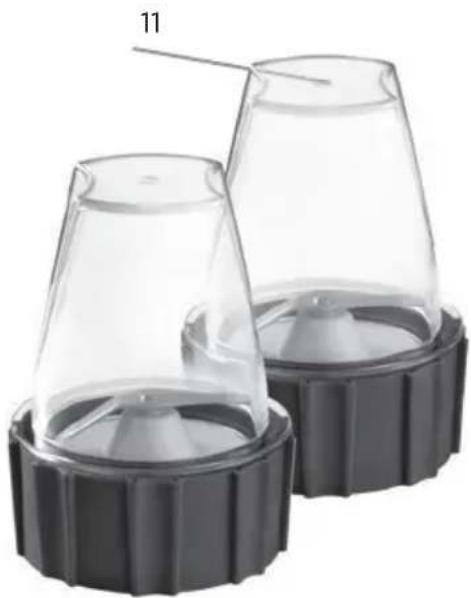
- Grinding attachment
BLBD210GB-2G
natural_image
Two transparent plastic cup holders with black fluted bases, one labeled '11' pointing to a lid (no text or symbols on the cups themselves)Product may vary slightly from what is illustrated.
HOW TO USE
This appliance is intended for household use only.
GETTING STARTED
- Remove all packing material, any stickers from the product, and the plastic band around the plug.
- Remove and save literature.
- Wash all removable parts as instructed in Care & Cleaning Section of this manual.
BLENDER JAR ASSEMBLY
- Turn blending jar upside down and place flat on countertop or work surface.
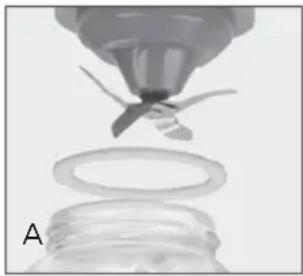
- Place the gasket against the glass jar.
Important: Gasket MUST be between the jar and blade assembly or the blender will not function properly.
- Place the blade assembly, blade first, into the jar. (A).
- Place jar base onto jar and rotate clockwise until it is tight (B).
- Turn assembled jar right side up.
- Place lid with lid cap onto blending jar.
Note: Do not plug in the cord.
- Place jar on base, making sure it is pressed firmly into place. (Jar base should not extend more than 1/8-inch above the rim at the top of the base.)
USING YOUR BLENDER
- Make sure appliance is OFF Ⓞ and the jar is securely situated on the base.
- Place foods to be blended into jar. For best results, place ingredients in the jar in the following order: liquids, powders, soft foods, hard foods, ice.
- Place lid on jar; make sure lid cap is in place.
- Plug power cord into outlet.
Note: When in use, do not leave blender unattended.
When using hard foods, such as ice, cheese, nuts and coffee beans, keep one hand on the lid to keep blender in place.
- Press the (HI) or (LO) button; then select the speed that best suits your desired task. To switch speeds, press the (HI) or (LO) button and the new speed desired. (See SPEED CHART.)
- When blending thick mixtures, such as smoothies, protein drinks and milkshakes press the PULSE (P) button several times to begin the blending process. Use Pulse for no more than 5 seconds at a time, allowing the blender to rest briefly between each pulse, for no more than 2 minutes total. This helps break up the ice and distribute the ingredients.
- Open the ingredient slot to add ingredients while the blender is running and drop ingredients through the opening.
Important: Do not remove the lid while the blender is running.
- When finished, press the Pulse/Off (P) / Ⓞ button. Make sure blades have completely stopped before attempting to remove the blending jar from the base.
- To remove the jar, grasp the handle and lift straight up. Do not twist the jar.
- Remove lid to pour.
- Always unplug the appliance when not in use.
natural_image
Close-up of a mechanical component with a spiral tip and a plastic cap, labeled 'A' (no text or symbols on the diagram itself)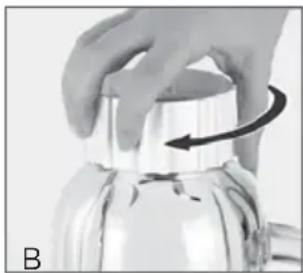
natural_image
Close-up of a hand pressing down on a metallic cylindrical object with a curved arrow indicating rotation (no text or symbols)USING THE GRINDING ATTACHMENT
IMPORTANT: The grinding attachments are NOT suitable for processing liquids because they may leak during use. Two grinding attachments are provided. This allows you to use one exclusively for grinding items which have strong flavors or aromas (such as coffee beans, spices, etc.) and keep the other for different ingredients.
- Check that the speed control is off.
- Unscrew the grinding blade assembly from the bottom of the grinding cup.
- Add the ingredients to be ground. For best results don't fill the cup past the MAX mark.
- Refit the grinding blade assembly. Tighten firmly.
- Lower the assembled grinding attachment onto the motor unit.
- Place the palm of your hand over the top of the grinding attachment and press firmly downwards. Maintain this pressure during processing to steady the grinding attachment.
- Turn the speed control to Pulse for a second or two, then release it. Check the results and repeat as required.
- To process continuously, turn the speed control to desired speed.
- Once processing has finished, remove the grinding attachment, carefully unscrew the blade assembly and empty out the contents.
BLENDING TIPS AND TECHNIQUES
- Cut food into pieces no larger than ^3/_4 inch for use in the blender.
- When preparing foods with several different kinds of ingredients, always add liquids first.
- If ingredients splatter onto the sides of the jar or the mixture is very thick, press the OFF Ⓞ button to turn appliance off. Remove the lid and use a rubber spatula to scrape down the sides of the jar. Replace the lid and continue blending.
Important: Blender should always have lid in place when in use.
Caution: Do not place blending jar on base when motor is running.
- When making bread crumbs, chopping nuts or grinding coffee beans make sure blending jar is completely dry. Do not run for longer than 30 seconds.
- Start blending on the lowest speed and then increase to a higher speed, if necessary.
- To stop blending, press the OFF ⏻ button at any time.
- When blending hot liquids always let them cool at least 5 minutes before blending. Before blending, remove the lid cap and put it back with the opened side tilted away from you. Cover lid with a cloth to avoid splattering and only use lowest speed. Do not blend more than 2 12 to 3 cups at a time.
- Blender not recommended for hard foods such as raw turnips, bones, hard salami or sausages and boiling liquids.
-
Not recommended for whipping cream, beating egg whites, mixing dough, mashing potatoes, grinding meats or extracting juice.
-
Do not overfill the blender.
- Do not store foods in jar.
- Do not run blender for longer than 30 seconds when using dry ingredients or 2 minutes when blending liquids.
- Do not use if blending jar is chipped or cracked.
SPEED CHART
| (P) | Pulse/Off | • Use for thick mixtures |
| (LO) | ||
| 1 Fast Clean (Limpiar) | [28WC] | • Combine drop of dishwashing liquid and hot water to clean blender |
| 2 Stir/Mix |  | • Prepare sauces• Remove lumps from gravies• Reconstitute frozen juices, drink mixes and condensed soups• Prepare salad dressings• Puree hot liquids |
| 3 Blend | [86TB] | • Mix puddings• Combine pancake and waffle batter or mixes• Beat eggs for omelets and custards |
| 4 Grate |  | • Grate hard cheeses and coconut• Make superfine sugar• Grind coffee beans, spices and chocolate |
| 5 Beat |  | • Beat eggs for omelets and custards |
| (HI) | ||
| 6 Puree | • Puree fruits and vegetables• Blend protein drinks | |
| 7 Crumb | • Make cookie, cereal and bread crumbs | |
| 8 Chop | • Chop fruits and vegetables• Chop cooked meats• Chop nuts, coarse-to-fine | |
| 9 Liquefy | • Liquefy frozen drinks | |
| 10 Smoothies /Ice Crush | • Crush ice• Prepare smoothies and milkshakes | |
RECIPE
WILD BERRY YOGURT COOLER
2 cups pineapple juice
1 cup wild berry frozen yogurt
1 cup frozen cubed mango
1 cup frozen hulled strawberries
Combine all ingredients in order listed into blending jar and close with lid. Pulse for several seconds (three to four times). Press High plus ten and run until mixture is smooth and well blended; about 30 seconds.
Makes about 4^1/2 cups.
CARE AND CLEANING
This product contains no user serviceable parts. Refer service to qualified service personnel.
CLEANING
- Before cleaning, turn off and unplug appliance.
- Lift blending jar by handle off power base.
- Remove jar base by turning counterclockwise until loose.
- Remove gasket and blade assembly.
Caution: Blades are sharp, handle carefully.
- Remove lid and lid cap.
- Wash removable parts by hand or in your dishwasher. Place jar on bottom rack and rest of parts on top-rack only.
Important:
- Do not place jar parts in boiling liquids.
- Do not immerse base in liquid. Wipe base with damp cloth and dry thoroughly.
- Remove stubborn spots by rubbing with damp cloth and nonabrasive cleaner.
Note: If liquids spill onto base, wipe with damp cloth and dry thoroughly. Do not use rough scouring pads or cleansers on parts or finish.
QUICK CLEANING
For quick cleanup, combine 1 cup hot water and a drop of liquid dish soap in the blending jar. Cover and blend on Speed 1 for about 30 seconds. Discard liquid and rinse jar thoroughly.
STORAGE
For convenient storage, wrap the cord around the feet on the bottom of the blender base.
TROUBLESHOOTING
| PROBLEM | POSSIBLE CAUSE | SOLUTION |
| Jar bottom does not come off of jar. | A vacuum has been formed. | Place the jar on the blender and turn counter clockwise until jar is released from the bottom. |
| Liquid is leaking from bottom of jar. | Gasket is either missing or not in place correctly. | Check that jar is assembled correctly. |
| Appliance does not turn on. | Appliance is not plugged in. | Check that appliance is plugged into a working outlet. |
| Mixture in blender does not seem to be blending. | Not enough liquid in mixture or too much ice. | Turn the blender off and use a rubber spatula to redistribute the food; add some liquid and pulse the mixture to aid in the blending process. |
| Herbs or bread are sticking to sides of blender and not getting chopped. | Blender jar, food to be chopped and blade are not dry. | Always make sure that the jar, the blade and the food to be chopped are dry. |
| Food chopped is too fine or watery. | Food is over processed. Use | Pulse in short bursts or blend for a shorter time. |
Spectrum Brands Mexico, S.A. DE C.V.
Autopista México Querétaro No.3069-C,
Oficina 004
Col. Centro Industrial Tlalnepantla CP 54030
Tlalnepantla, Estado de México
Tel. 01-800-714-2503
© 2017 The Black & Decker Corporation and Spectrum Brands, Inc.
Middleton, WI 53562
Household Products Chile Ltda
BLACK & DECKER, BLACK+DECKER, the BLACK & DECKER and BLACK+DECKER logos and product names are trademarks of The Black & Decker Corporation, used under license. All rights reserved.
© 2017 The Black & Decker Corporation and Spectrum Brands, Inc. Middleton, WI 53562 2017/11/10
T22-5003466
- USO DE LA LICUADORA
- Chile
- Colombia
- Nicaragua
- Please Read and Save this Use and Care Book.
- IMPORTANT SAFEGUARDS.
- SAVE THESE INSTRUCTIONS.
- This product is for household use only.
- SAFETY FEATURES
- POLARIZED PLUG (120V models only)
- TAMPER-RESISTANT SCREW
- ELECTRICAL CORD
- GETTING TO KNOW YOUR BLENDER
- HOW TO USE
- GETTING STARTED
- BLENDER JAR ASSEMBLY
- USING YOUR BLENDER
- Important: Do not remove the lid while the blender is running.
- USING THE GRINDING ATTACHMENT
- BLENDING TIPS AND TECHNIQUES
- RECIPE
- WILD BERRY YOGURT COOLER
- CARE AND CLEANING
- CLEANING
- Important:
- QUICK CLEANING
- STORAGE
Brand : BLACK & DECKER
Model : BLBD210GW
Category : Blender