
DB165 - Hi-Fi System CLARION - Free user manual and instructions
Find the device manual for free DB165 CLARION in PDF.


| Product Type | Hi-Fi System (Car Stereo) |
| Brand | Clarion |
| Model | DB165 |
| Display | High contrast blue negative LCD (13x8 digits) with screen saver |
| Audio Features | Z-Enhancer (3 preset sound effects), MAGNA BASS EX dynamic bass enhancement |
| Tuner | FM: 87.9-107.9 MHz, AM: 530-1710 kHz |
| CD Player | Compact disc digital audio system, supports CD, CD-R, CD-RW |
| Maximum Power Output | 180 W (45 W × 4 ch) |
| RMS Power Output | 19 W × 4 ch at 4 Ω, 1% THD+N |
| Dimensions (Source Unit) | 7" (W) × 1-15/16" (H) × 6-1/8" (D) [178 × 50 × 155 mm] |
| Weight (Source Unit) | 2.42 lb (1.1 kg) |
| Power Supply | 14.4 V DC (10.8-15.6 V allowable), negative ground |
| Current Consumption | Less than 15 A |
| Speaker Impedance | 4 Ω (4 Ω to 8 Ω allowable) |
| Audio Controls | Bass, Treble, Balance, Fader (±7 to ±13 steps) |
| Preset Stations | 24 (6 FM1, 6 FM2, 6 FM3, 6 AM) |
| DCP (Detachable Control Panel) | Removable for theft protection; connector care required |
| Special Functions | ISR (Instant Station Recall), Preset Scan, Auto Store |
| CD Playback Modes | Repeat, Random, Scan, Top function |
| Screen Saver | Adjustable on/off |
| Frequency Response (CD) | 10 Hz to 20 kHz (±1 dB) |
| Signal-to-Noise Ratio | 80 dBA (reference 1 W into 4 Ω) |
| Harmonic Distortion | 0.03% (CD) |
| Line Output Level | 1.7 V (CD 1 kHz) |
Frequently Asked Questions - DB165 CLARION
User questions about DB165 CLARION
0 question about this device. Answer the ones you know or ask your own.
Ask a new question about this device
Download the instructions for your Hi-Fi System in PDF format for free! Find your manual DB165 - CLARION and take your electronic device back in hand. On this page are published all the documents necessary for the use of your device. DB165 by CLARION.
USER MANUAL DB165 CLARION
Thank you for purchasing this Clarion product.
* Please read this owner's manual in its entirety before operating this equipment.
* After reading this manual, be sure to keep it in a handy place (e.g., glove compartment).
* Check the contents of the enclosed warranty card and keep it carefully with this manual.
Contents
- FEATURES....2
- CONTROLS 3
- NOMENCLATURE 4
Names of the Buttons and their Functions 4
- PRECAUTIONS 5
Handling Compact Discs 6
LCD Screen 6
- DCP 7
- OPERATIONS 8
Basic Operations 8
Radio Operations 9
CD Operations 10
- SPECIFICATIONS ...... 11
- IN CASE OF DIFFICULTY 12
- ERROR DISPLAYS 12
1. FEATURES
• High contrast blue negative display (13 x 8 Digits) with screen saver
- "Z-ENHANCER" sound customization & "MAGNA BASS EX" dynamic bass enhancement
- Rotary volume control

- Be sure to read this chapter referring to the front diagrams of chapter "2. CONTROLS" on page 3 (unfold).
Names of the Buttons and their Functions
[RELEASE] button
- Press the [RELEASE] button to unlock the DCP.
[ROTARY] knob
- Adjust the volume by turning the knob clockwise or counterclockwise.
- Use the knob to perform various settings
[CD SLOT]
- CD insertion slot.
[Z] button
- Use the button to select one of the 3 types of sound characteristics already stored in memory.
[▲] button
- Eject a CD when it is loaded into the unit
[DIRECT] buttons
- Store a station into memory or recall it directly while in the radio mode.
[ISR] button
- Recall ISR radio station in memory.
- Press and hold for 2 seconds or longer: Store current station into ISR memory (radio mode only).
[RPT] button
- Repeat play while in the CD mode.
[RDM] button
• Perform random play while in the CD mode.
[SCN] button
- Perform scan play for 10 seconds of each track while in the CD mode.
[M-B] button
- Press the button to switch the MAGNA BASS EXTEND on/off.
[D] button
- Switch the display indication (Main display, Clock display).
- Press and hold the button for 1 second or longer to enter the adjust mode.
[BND] button
- Switch the band, or seek tuning or manual tuning while in the radio mode.
- Play a first track while in the CD mode.
[SRC] button
- Press the button to turn on the power. Press and hold the button for 1 second or longer to turn off the power.
- Switches the operation mode among the radio and CD mode.
[▶ III] button
- Play or pause a CD while in the CD mode.
- Perform preset scan while in the radio mode. When the button is pressed and held for 2 seconds or longer, auto store is performed.
[A-M] button
- Use the button to switch to the audio mode (bass, treble, balance, fader).
[◀◀], [▶▶] buttons
- Select a station while in the radio mode or select a track when listening to a CD. These
buttons are used to make various settings
- Press and hold the button for 1 second or longer to switch the fast-forward/fast-backward while in the CD mode.
4. PRECAUTIONS
-
When the inside of the car is very cold and the player is used soon after switching on the heater moisture may form on the disc or the optical parts of the player and proper playback may not be possible. If moisture forms on the disc, wipe it off with a soft cloth. If moisture forms on the optical parts of the player, do not use the player for about one hour. The condensation will disappear naturally allowing normal operation.
-
Driving on extremely bumpy roads which cause severe vibration may cause the sound to skip.
- This unit uses a precision mechanism. Even in the event that trouble arises, never open the case, disassemble the unit, or lubricate the rotating parts.
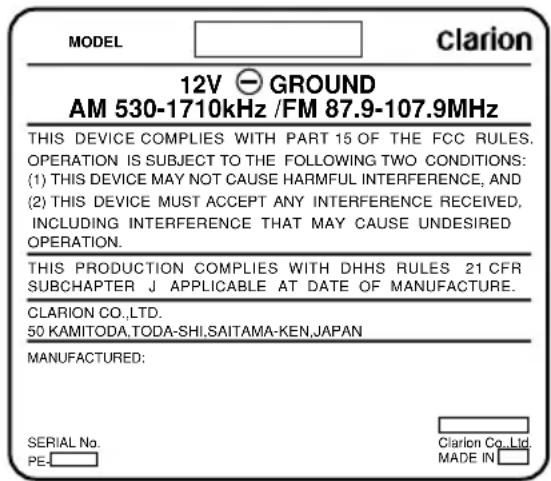
This equipment has been tested and found to comply with the limits for a Class B digital device, pursuant to Part 15 of the FCC Rules.
These limits are designed to provide reasonable protection against harmful interference in a residential installation.
This equipment generates, uses, and can radiate radio frequency energy and, if not installed and used in accordance with the instructions, may cause harmful interference to radio communications. However, there is no guarantee that interference will not occur in a particular installation.
If this equipment does cause harmful interference to radio reception, which can be determined by turning the equipment off and on, the user is encouraged to consult the dealer or an experienced radio technician for help.
CAUTION
USE OF CONTROLS, ADJUSTMENTS, OR PERFORMANCE OF PROCEDURES OTHER THAN THOSE SPECIFIED HEREIN, MAY RESULT IN HAZARDOUS RADIATION EXPOSURE.
THE COMPACT DISC PLAYER SHOULD NOT BE ADJUSTED OR REPAIRED BY ANYONE EXCEPT PROPERLY QUALIFIED SERVICE PERSONNEL.
CHANGES OR MODIFICATIONS NOT EXPRESSLY APPROVED BY THE MANUFACTURER FOR COMPLIANCE COULD VOID THE USER'S AUTHORITY TO OPERATE THE EQUIPMENT.
INFORMATION FOR USERS:
CHANGES OR MODIFICATIONS TO THIS PRODUCT NOT APPROVED BY THE MANUFACTURER WILL VOID THE WARRANTY AND WILL VIOLATE FCC APPROVAL.
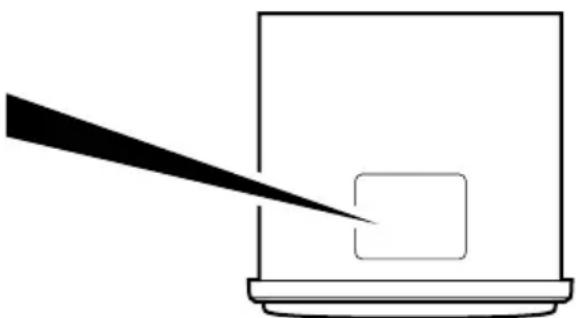
natural_image
Simple line drawing of a laptop with a pointer and a blank square on the screen (no text or symbols)Bottom View of Source Unit
Use only compact discs bearing the mark.

Do not play heart-shaped, octagonal, or other specially shaped compact discs.
Some CDs recorded in CD-R/CD-RW mode may not be usable.
Handling
- Compared to ordinary music CDs, CD-R and CD-RW discs are both easily affected by high temperature and humidity and some of CD-R and CD-RW discs may not be played. Therefore, do not leave them for a long time in the car.
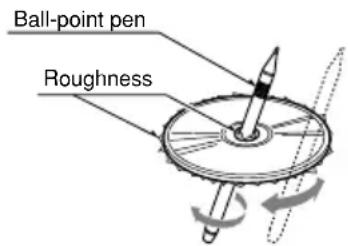
- New discs may have some roughness around the edges. If such discs are used, the player may not work or the sound may skip. Use a ball-point pen or the like to remove any rough disc.
- Never stick labels on the surface of the compact disc or mark the surface with a pencil or pen.
- Never play a compact disc with any cellophane tape or other glue on it or with peeling off marks. If you try to play such a compact disc, you may not be able to get it back out of the CD player or it may damage the CD player.
LCD Screen
- Do not use compact discs that have large scratches, are misshapen, cracked, etc. Use of such discs may cause misoperation or damage.
- To remove a compact disc from its storage case, press down on the center of the case and lift the disc out, holding it carefully by the edges.
- Do not use commercially available CD protection sheets or discs equipped with stabilizers, etc. These may damage the disc or cause breakdown of the internal mechanism.
Storage
- Do not expose compact discs to direct sunlight or any heat source.
- Do not expose compact discs to excess humidity or dust.
- Do not expose compact discs to direct heat from heaters.
Cleaning
- To remove fingermarks and dust, use a soft cloth and wipe in a straight line from the center of the compact disc to the circumference.
- Do not use any solvents, such as commercially available cleaners, anti-static spray, or thinner to clean compact discs.
• After using special compact disc cleaner, let the compact disc dry off well before playing it.
In extreme cold, the screen movement may slow down and the screen may darken, but this is normal. The screen will recover when it returns to normal temperature.
5. DCP
Removing the DCP
- Press the [SRC] button for 1 second or longer to switch off the power.
- Press in the [RELEASE] button.
![[RELEASE] button](/content/2026/05/930720/images/13f351e2c48d97b52d59eff71b050f604fd4bfb9895128f15de1372a10dcb850.jpg)
*The DCP is unlocked
- Remove the DCP.
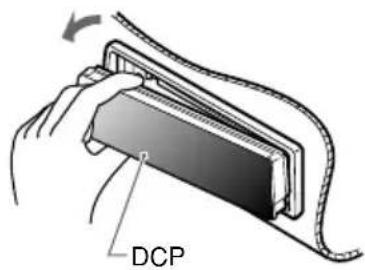
Attaching the DCP
- Insert the right side of the DCP into the main unit.
- Insert the left side of the DCP into the main unit.
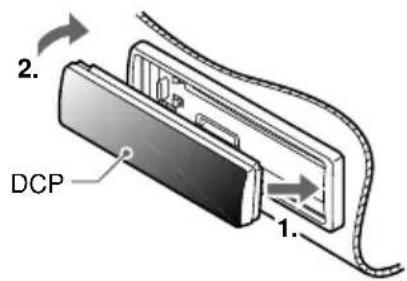
CAUTION
- The DCP can easily be damaged by shocks. After removing it, be careful not to drop it or subject it to strong shocks.
- The connector connecting the main unit and the DCP is an extremely important part. Be careful not to damage it by pressing on it with fingernails, pens, screwdrivers, etc.
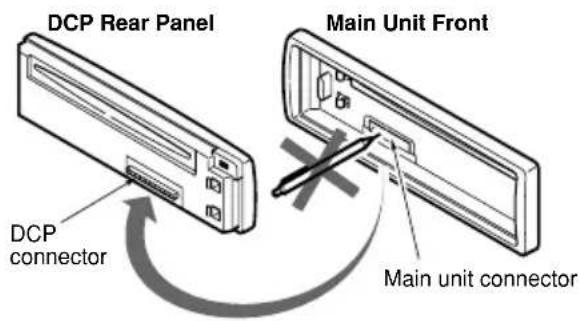
Note:
- If the DCP is dirty, wipe off the dirt with a soft, dry cloth only.
6. OPERATIONS
Basic Operations
Note: Be sure to read this chapter referring to the front diagrams of chapter "2. CONTROLS" on page 3 (unfold).
CAUTION
Be sure to lower the volume before switching off the unit power or the ignition key. The unit remembers its last volume setting. If you switch the power off with the volume up, when you switch the power back on, the sudden loud volume may hurt your hearing and damage the unit.
Turning on/off the power
Note:
- Be careful about using this unit for a long time without running the engine. If you drain the car's battery too far, you may not be able to start the engine and this can reduce the service life of the battery.
- Press the [SRC] button.
- The illumination and display on the unit light up. The unit automatically remembers its last operation mode and will automatically switch to display that mode.
- Press and hold the [SRC] button for 1 second or longer to turn off the power for the unit.
Selecting a mode
- Press the [SRC] button to change the operation mode.
- Each time you press the [SRC] button, the operation mode changes in the following order:
Radio mode → CD mode → Radio mode...
Note:
- If the CD mode is selected when no disc is inserted, the display shows "NO DISC".
Adjusting the volume
Turning the [ROTARY] knob clockwise increases the volume; turning it counterclockwise decreases the volume.
*The volume level is from 0 (minimum) to 33 (maximum).
Switching the display
Press the [D] button to select the desired display. Each time you press the [D] button, the display switches in the following order:
Main display → Clock display → Main display...
Setting the Z-Enhancer
This unit are provided with 3 types of sound tone effects stored in memory. Select the one you prefer.
* The factory default setting is "Z-EHCR OFF".
- Each time you press the [Z] button, the tone effect changes in the following order:
"Z-ENHANCER 1" (bass emphasized)
→ "Z-ENHANCER 2" (treble emphasized)
→ "Z-ENHANCER 3" (bass and treble emphasized) → "Z-EHCR OFF" (no sound effect) → "Z-ENHANCER 1"...
Audio Mode Adjustments
- Press the [A-M] button to select the adjustment mode. The mode switches as follows each time the [A-M] button is pressed:
BASS → TREB → BAL → FAD → Previous mode
*When the Z-Enhancer function is turned on, BASS (bass) and TRE (treble) cannot be selected.
- Turning the [ROTARY] knob to adjust the selected audio mode.
BASS (bass): Adjustment range: -7 to +7
TREB (treble): Adjustment range: -7 to +7
BAL (balance): Adjustment range: L13 to R 13
FAD (fader): Adjustment range: F12 to R12
- When the adjustment is complete, press the [A-M] button several times until the function mode is reached.
*The display returns to the previous mode 7 seconds after the adjustment.
Adjusting MAGNA BASS EXTEND
The MAGNA BASS EXTEND does not adjust the low sound area like the normal sound adjustment function, but emphasizes the deep bass sound area to provide you with a dynamic sound.
*The factory default setting is off.
- Press the [M-B] button to turn on or off the MAGNA BASS EXTEND effect. "M-B EX" lights in the display on or off.
Turning the screen saver function on or off
This unit is provided with the screen saver function.
You can turn on or off this function.
If the button operation is performed with the screen saver function on, the operation display corresponding to the button operation is shown for about 30 seconds and the display returns to the screen saver display.
* The factory default setting is on.
- Press and hold the [D] button for 1 second or longer to switch to the adjustment selection display.
- Press the [◀◀] or [▶▶] button to select "SCRN SVR".
- Turn the [ROTARY] knob to select the setting. Each time you turn the [ROTARY] knob, the setting changes in the following order:
SS OFF ← SS ON
- Press the [D] button to return to the previous mode.
Setting the Clock
- Press and hold the [D] button for 1 second or longer to switch to the adjustment selection display.
- Press the [◀◀] or [▶▶] button to select "CLOCK
". - Press the [] button.
- Press the [◀◀] or [▶▶] button to select the hour or the minute.
- Turn the [ROTARY] knob to set the correct time.
* The clock is displayed in 12-hour format.
-
Press the [] button to store the time into memory.
-
Press the [D] button to return to the previous mode.
Note:
- If you select another operation mode while you are setting the clock, the clock setting operation will be canceled.
- If you remove the vehicle's battery for a check or repair, the clock will be reset, so you must set it again.
Illumination dimmer function
When the illumination line of this unit is connected with the car-side illumination signal line, the display illumination of this unit dims in connection with turning on the car-side illumination.
Listening to the radio
- Press the [SRC] button and select the radio mode. The frequency appears in the display.
- Press the [BND] button and select the radio band. Each time the button is pressed, the radio reception band changes in the following order:
F1 (FM1) → F2 (FM2) → F3 (FM3) → AM → F1 (FM1)...
- Press the [◀◀] or [▶▶] button to tune in the desired station.
Seek tuning
- Press the [BND] button and select the desired band.
* If "MANU" is lit in the display, press and hold the [BND] button for 1 second or longer. "MANU" in the display goes off and seek tuning is now available.
- Press the [◀◀] or [▶▶] button to automatically seek a station.
When the [▶▶] button is pressed, the station is sought in the direction of higher frequencies; if the [◀◀] button is pressed, the station is sought in the direction of lower frequencies.
Manual tuning
- Press the [BND] button and select the desired band.
* If "MANU" is not lit in the display, press and hold the [BND] button for 1 second or longer. "MANU" is lit in the display and manual tuning is now available. - Press the [◀◀] or [▶▶] button to manually tune in a station.
Recalling a preset station
A total of 24 preset positions (6-FM1, 6-FM2, 6-FM3, 6-AM) exist to store individual radio stations in memory. Pressing the corresponding [DIRECT] button recalls the stored radio frequency automatically.
- Press the [BND] button and select the desired band.
- Press the corresponding [DIRECT] button to recall the stored station.
* Press and hold one of the [DIRECT] buttons for 2 seconds or longer to store that station into preset memory.
Manual memory
- Select the desired station with seek tuning, manual tuning or preset tuning.
- Press and hold one of the [DIRECT] buttons for 2 seconds or longer to store the current station into preset memory.
Auto store
Auto store is a function for storing up to 6 stations that are automatically tuned in sequentially. If 6 receivable stations cannot be received, a previously stored station remains unoverwritten at the memory position.
- Press the [BND] button and select the desired band.
- Press and hold the [] button for 2 seconds or longer. The stations with good reception are stored automatically to the preset channels.
Preset scan
Preset scan receives the stations stored in preset memory in order. This function is useful when searching for a desired station in memory.
- Press the [] button.
- When a desired station is tuned in, press the [▶] button again to continue receiving that station.
Note:
- Be careful not to press and hold the [] button for 2 seconds or longer, otherwise the auto store function is engaged and the unit starts storing stations.
Instant station recall (ISR)
Instant station recall is a special radio preset that instantly accesses a favorite radio station at a touch of a button. The ISR function even operates with the unit in other modes.
●ISR memory
- Select the station that you wish to store in ISR memory.
- Press and hold the [ISR] button for 2 seconds or longer.
●Recalling a station with ISR
In any mode, press the [ISR] button to turn on the radio function and tune the selected radio station. "ISR" appears in the display. Press the [ISR] button again to return to the previous mode.
Loading a CD
Insert a CD into the centre of the CD SLOT with the labeled side facing up. "LOADING" appears in the display, the CD enters into the slot, and the play starts.
For CD (12 cm) For single CD (8 cm)
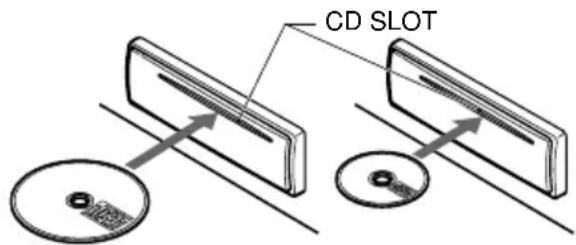
Notes:
- Never insert foreign objects into the CD SLOT.
- If the CD is not inserted easily, there may be another CD in the mechanism or the unit may require service.
- Discs not bearing the mark and CD-ROMs cannot be played by this unit.
- Some CDs recorded in CD-R/CD-RW mode may not be usable.
Loading 8 cm compact discs
*No adapter is required to play an 8 cm CD.
*Insert the 8 cm CD into the centre of the insertion slot.
Listening to a CD already inserted
Press the [SRC] button to select the CD mode. Play starts automatically. If no CD is loaded in the unit, "NO DISC" appears in the display.
Pausing play
- Press the [] button to pause play. "PAUSE" appears in the display.
- To resume CD play, press the [] button again.
Ejecting a CD
- Press the [▲] to eject the CD. Take it out from the ejected position.
Note:
- If you force a CD into before auto reloading, this can damage the CD.
* If a CD (12 cm) is left in the ejected position for 15 seconds, the CD is automatically reloaded (Auto reload).
*8 cm CDs are not auto reloaded. Be sure to remove it when ejected.
Selecting a track
●Track-up
- Press the [▶▶] button to move ahead to the beginning of the next track.
- Each time you press the [▶▶] button, the track advances ahead to the beginning of the next track.
●Track-down
- Press the [◀◀] button to move back to the beginning of the current track.
- Press the [◀◀] button twice to move to the beginning of the previous track.
Fast-forward/fast-backward
●Fast-forward
Press and hold the [▶▶] button for 1 second or longer.
●Fast-backward
Press and hold the [◀◀] button for 1 second or longer.
Top function
The top function resets the CD player to the first track of the disc. Press the [BND] button to play the first track (track No. 1) on the disc.
Scan play
The scan play locates and plays the first 10 seconds of each track on a disc automatically. This function continues on the disc until it is cancelled.
*The scan play is useful when you want to select a desired track.
- Press the [SCN] button to start scan play. "SCN" lights in the display.
- To cancel the scan play, press the [SCN] button again. "SCN" goes off from the display and the current track continues to play.
Repeat play
The repeat play continuously plays the current track. This function continues automatically until it is cancelled.
- Press the [RPT] button. "RPT" lights in the display and the current track is repeated.
- To cancel the repeat play, press the [RPT] button again. "RPT" goes off from the display and normal play resumes.
Random play
The random play selects and plays individual tracks on a disc in no particular order. This function continues automatically until it is cancelled.
- Press the [RDM] button. "RDM" lights in the display, an individual track is selected randomly and play begins.
- To cancel the random play, press the [RDM] button again. "RDM" goes off from the display and normal play resumes.
7. SPECIFICATIONS
FM Tuner
Frequency Range: 87.9 MHz to 107.9 MHz
Usable Sensitivity: 11 dBf
50dB Quieting Sensitivity: 17 dBf
Alternate Channel Selectivity: 75 dB
Stereo Separation (1 kHz): 35 dB
Frequency Response ( ±3 dB): 30 Hz to 15 kHz
AM Tuner
Frequency Range: 530 kHz to 1710 kHz
Usable Sensitivity: 25 μV
CD Player
System: Compact disc digital audio system
Usable Discs: Compact disc
Frequency Response ( ± 1 dB): 10 Hz to 20 kHz
Dynamic Range (1 kHz): 93 dB
Harmonic Distortion: 0.03%
Audio
Maximum Power Output: 180 W (45 W × 4 ch)
Bass Control Action (100 Hz): ±14 dB
Treble Control Action (10 kHz): ±14 dB
Line Output Level (CD 1 kHz): 1.7 V
General
Power Supply Voltage:
14.4 V DC (10.8 to 15.6 V allowable), negative ground
Current Consumption: Less than 15 A
Speaker Impedance: 4 Ω (4 Ω to 8 Ω allowable)
Weight / Source unit: 2.42 lb. (1.1 kg)
Dimensions / Source unit:
7" (Width) × 1-15/16" (Height) × 6-1/8" (Depth)
[178 (W) × 50 (H) × 155 (D) mm]
Power Output :
19 W RMS x 4 Channels at 4 Ω and 1 % THD+N
Signal to Noise Ratio:
80 dBA (reference: 1 W into 4 Ω)

Note:
- Specifications and design are subject to change without notice for further improvement.
8. IN CASE OF DIFFICULTY
| Problem | Cause Measure | ||
| General | Power does not turn on.(No sound is produced.) | Fuse is blown. | Replace with a fuse of the same amperage. If the fuse blows again, consult your store of purchase. |
| Incorrect wiring. | Consult your store of purchase. | ||
| Nothing happens when buttons are pressed.Display is not accurate. | The microprocessor has malfunctioned due to noise, etc. | Turn off the power, then press the [RELEASE] button and remove the DCP.Press the reset button for about 2 seconds with a thin rod.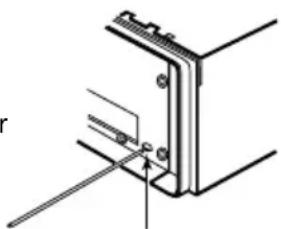 Reset button Reset button | |
| DCP or main unit connectors are dirty. | Wipe the dirt off with a soft cloth moistened with cleaning alcohol. | ||
| CD | Compact disc cannot be loaded. | Another compact disc is already loaded. | Eject the compact disc before loading the new one. |
| Sound skips or is noisy. | Compact disc is dirty. | Clean the compact disc with a soft cloth. | |
| Compact disc is heavily scratched or warped. | Replace with a compact disc with no scratches. | ||
| Sound is bad directly after power is turned on. | Water droplets may form on the internal lens when the car is parked in a humid place. | Let dry for about 1 hour with the power on. |
9. ERROR DISPLAYS
If an error occurs, one of the following displays is displayed.
Take the measures described below to eliminate the problem.
| Error Display | Cause | Measure | |
| CD | ERROR 2 | A CD is caught inside the CD deck and is not ejected. | This is a failure of CD deck s mechanism and consult your store of purchase. |
| ERROR 3 | A CD cannot be played due to scratches, etc. | Replace with a non-scratched, non-warped-disc. |
If an error display other than the ones described above appears, press the reset button. If the problem persists, turn off the power and consult your store of purchase.
Clarion Co., Ltd.
All Rights Reserved. Copyright © 2005: Clarion Co., Ltd.
Printed in China / Imprimé en Chine / Impreso en China
- Contents
- FEATURES
- Names of the Buttons and their Functions
- [RELEASE] button
- [ROTARY] knob
- [CD SLOT]
- [Z] button
- [▲] button
- [DIRECT] buttons
- [ISR] button
- [RPT] button
- [RDM] button
- [SCN] button
- [M-B] button
- [D] button
- [BND] button
- [SRC] button
- [▶ III] button
- [A-M] button
- [◀◀], [▶▶] buttons
- PRECAUTIONS
- CAUTION
- INFORMATION FOR USERS:
- Handling
- LCD Screen
- Storage
- Cleaning
- DCP
- Removing the DCP
- Attaching the DCP
- Note:
- OPERATIONS
- Basic Operations
- Turning on/off the power
- Selecting a mode
- Adjusting the volume
- Switching the display
- Setting the Z-Enhancer
- Audio Mode Adjustments
- Adjusting MAGNA BASS EXTEND
- Turning the screen saver function on or off
- Setting the Clock
- Illumination dimmer function
- Listening to the radio
- Seek tuning
- Manual tuning
- Recalling a preset station
- Manual memory
- Auto store
- Preset scan
- Instant station recall (ISR)
- ●ISR memory
- ●Recalling a station with ISR
- Loading a CD
- Notes:
- Loading 8 cm compact discs
- Listening to a CD already inserted
- Pausing play
- Ejecting a CD
- Selecting a track
- ●Track-up
- ●Track-down
- Fast-forward/fast-backward
- ●Fast-forward
- ●Fast-backward
- Top function
- Scan play
- Repeat play
- Random play
- SPECIFICATIONS
- FM Tuner
- AM Tuner
- CD Player
- Audio
- General
- Power Output :
- Signal to Noise Ratio:
- IN CASE OF DIFFICULTY
- ERROR DISPLAYS
- Clarion Co., Ltd.
Brand : CLARION
Model : DB165
Category : Hi-Fi System