MVOA407S - Vacuum Cleaner Vacmaster - Free user manual and instructions
Find the device manual for free MVOA407S Vacmaster in PDF.


| Brand | Vacmaster |
| Model | MVOA407S |
| Product Type | Upright Vacuum Cleaner |
| Dimensions (H x W x D) | 30 x 12 x 12 inches |
| Weight | 15 lbs (6.8 kg) |
| Power Supply | 120V AC, 60Hz, 12 Amps |
| Motor Power | 1200 Watts |
| Dust Capacity | 2.5 Liters |
| Filtration System | HEPA Media Filter |
| Cord Length | 30 feet (9.1 m) |
| Cleaning Path Width | 13 inches |
| Brush Roll Type | Motorized with Height Adjustment |
| Attachments Included | Crevasse Tool, Upholstery Brush, Dusting Brush |
| Noise Level | 75 dB |
| Maintenance | Replace HEPA filter every 6 months; clean brush roll regularly |
| Safety Features | Thermal overload protection; automatic shut-off when blocked |
| Spare Parts Available | HEPA filters, brush rolls, belts, bags (if bagged) |
| Repairability | User-replaceable belts and filters; professional service for motor |
| Warranty | 1 year limited warranty |
| Manual Pages | 30 pages in English |
Frequently Asked Questions - MVOA407S Vacmaster
User questions about MVOA407S Vacmaster
0 question about this device. Answer the ones you know or ask your own.
Ask a new question about this device
Download the instructions for your Vacuum Cleaner in PDF format for free! Find your manual MVOA407S - Vacmaster and take your electronic device back in hand. On this page are published all the documents necessary for the use of your device. MVOA407S by Vacmaster.
USER MANUAL MVOA407S Vacmaster
natural_image
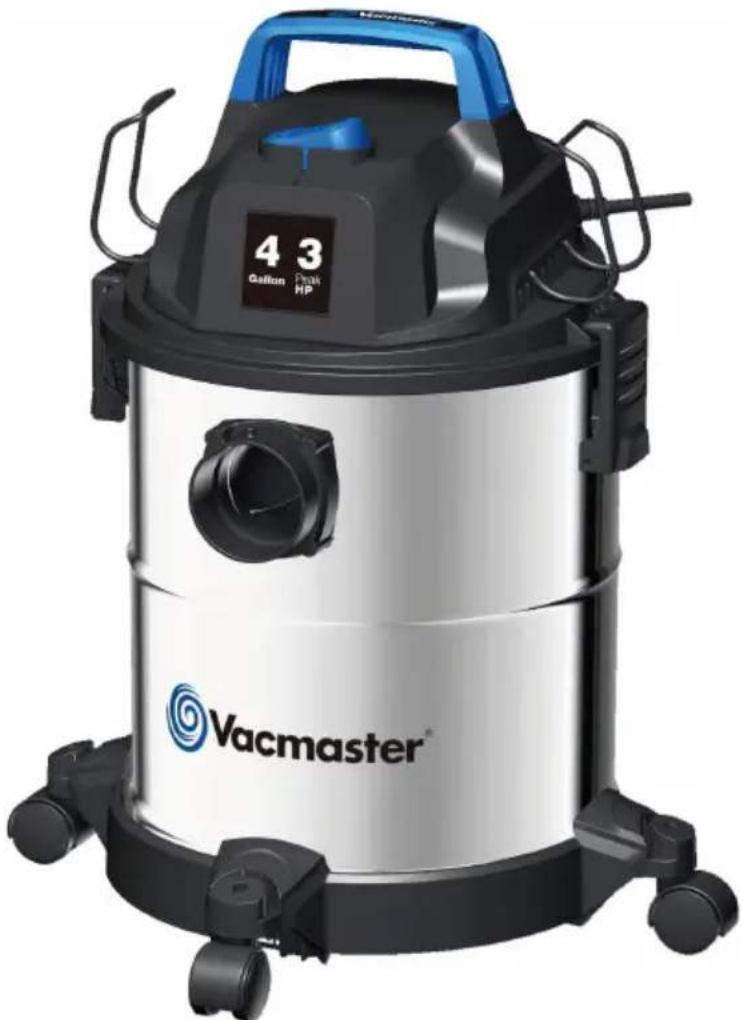
Exterior view of a vacuum cleaner with 'Vacmaster' branding and digital display (no text-heavy elements)4 Gallon
Model No.
MVOA407S
FOR YOUR SAFETY
Read and understand this manual before use.
Keep this manual for future reference.
TABLE OF CONTENTS
SECTION PAGE
Warranty 2
Important Safety Instructions 3
Double Insulation Instructions 4
Extension Cords 5
Symbols 5
Unpacking & Checking Carton Contents 6
General Assembly Instructions 7
Dry Vacuum Operation 8
Liquid Vacuum Operation 9
Blower Operation 10
Maintenance 11
Installing & Cleaning Reusable Cloth Filter 12
Installing & Cleaning Foam Wet Filter 12
Troubleshooting 13
Exploded View 14
Parts List 15
Thank you for purchasing this Vacmaster ^® wet/dry vacuum cleaner. Feel confident that with Vacmaster ^® you are obtaining a high quality product engineered for optimal performance. This vacuum is capable of picking up liquids and dry materials.
FOR YOUR SAFETY: CAREFULLY READ AND UNDERSTAND ALL INSTRUCTIONS.
WARRANTY
We take pride in producing a high quality, durable product. This Vacmaster ^® product carries a limited two (2) year warranty against defects in workmanship and materials from date of purchase under normal household use. If product is to be used for commercial, industrial, or rental use, a 90 day limited warranty will apply. Please keep your receipt as proof of purchase. This warranty gives you specific legal rights, which may vary from state to state. For product service call Customer Service at 1-866-384-8432.
Not Covered by Warranty:
- Any part that has become inoperative due to misuse, negligence, direct/indirect abuse, accidents, improper maintenance, repairs, or alterations;
- Consumables such as filters and accessories;
- Normal wear and tear of parts and attachments, such as hose, nozzles, or casters;
- Normal deterioration of the exterior finish due to use or exposure;
- Any product where serial number/data label is tampered with or removed;
- Any product purchased from an unauthorized retailer.
IMPORTANT SAFETY INSTRUCTIONS
READ AND UNDERSTAND ALL INSTRUCTIONS BEFORE USING THIS VACUUM.
Read and understand this operator's manual and all labels on the Wet/Dry Vacuum cleaner before operating. Safety is a combination of common sense, staying alert and knowing how your vacuum works. Use this Wet/Dry Vacuum only as described in this manual. To reduce the risk of personal injury or damage to your Wet/Dry Vacuum, use only manufacturer recommended accessories.
SAVE THIS MANUAL FOR FUTURE REFERENCE.
When using a vacuum, basic precautions should always be followed including the following:

WARNING: TO REDUCE THE RISK OF FIRE, ELECTRIC SHOCK OR INJURY:
- Do not run vacuum unattended.
- Do not use to pick up flammable or combustible liquids, such as gasoline, or use in areas where they may be present.
- Do not vacuum, or use this Wet/Dry vacuum near flammable liquids, gases, or explosive vapors like gasoline or other fuels, lighter fluids, cleaners, oil-based paints, natural gas, hydrogen, or explosive dusts like coal dust, magnesium dust, grain dust, or gun powder. Sparks inside the motor can ignite flammable vapors or dust.
• To reduce the risk of health hazards from vapors or dusts, do not vacuum toxic materials.
- Do not use or store near hazardous materials.
- Do not pick up anything that is burning or smoking, such as cigarettes, matches, or hot ashes.
- Do not expose to rain. Store indoors.
- If vacuum is not working as it should, has been dropped, damaged, left outdoors, or dropped into water, return it to a service center.
- Do not unplug by pulling on cord. To unplug, grasp the plug, not the cord.
- Do not use with damaged cord or plug.
- Do not pull or carry by cord, use cord as a handle, close a door on cord, or pull cord around sharp edges or corners.
- Keep cord away from heated surfaces.
- Do not run the vacuum over cord.
- Do not handle plug or vacuum with wet hands.
- Do not use without dust bag and/or filters in place.
- Do not allow to be used as a toy. Close attention is necessary when used by or near children.
- To reduce the risk of injury from accidental starting, unplug power cord before changing or cleaning filter.
- Do not leave vacuum when plugged in. Unplug from outlet when not in use and before servicing.
- Turn off all controls before unplugging.
- Unplug before connecting or disconnecting hose, or any other accessories.
- Do not put any object into openings. Do not use with any opening blocked; keep free of dust, lint, hair, and anything that may reduce air flow.
- Keep hair, loose clothing, fingers, and all parts of body away from openings and moving parts.
- Use extra care when cleaning on stairs.
- Use only as described in this manual. Use only manufacturer's recommended attachments.
- This vacuum is provided with double insulation. Use only identical replacement parts. See DOUBLE INSULATION INSTRUCTIONS.

CAUTION: To reduce the risk of injury from moving parts - Unplug before servicing.
WARNING: To reduce the risk of electric shock - Unplug before cleaning or servicing.
When using as blower:
- Direct air discharge only at work area.
- Do not use Wet/Dry Vacuum as a sprayer.
- Do not direct air at bystanders.
- Keep children away when blowing.
- Wear safety goggles.
SAVE THESE INSTRUCTIONS
For Household Use Only
DOUBLE INSULATION INSTRUCTIONS
This Wet/Dry Vacuum is double-insulated, eliminating the need for a separate grounding system. Use only identical replacement parts. Read the instructions for Servicing Double-Insulated Wet/Dry Vacuum before servicing. Use this Wet/Dry Vacuum as described in this manual. Observe the following warnings that appear on the motor housing of your Wet/Dry Vacuum.

DOUBLE INSULATED - GROUNDING NOT REQUIRED - WHEN SERVICING USE ONLY IDENTICAL REPLACEMENT PARTS.

WARNING: TO REDUCE THE RISK OF ELECTRIC SHOCK - DO NOT EXPOSE TO RAIN. STORE INDOORS.

WARNING: FOR YOUR OWN SAFETY, READ AND UNDERSTAND THE OPERATOR'S MANUAL. DO NOT RUN UNATTENDED. DO NOT PICK UP HOT ASHES, COALS, TOXIC, FLAMMABLE OR OTHER HAZARDOUS MATERIALS. DO NOT USE AROUND EXPLOSIVE LIQUIDS OR VAPORS.

CAUTION: DO NOT VACUUM DRYWALL DUST OR FIREPLACE SOOT OR ASH WITH STANDARD WET/DRY FILTER. THIS TYPE OF DUST IS VERY FINE WHICH MAY NOT BE CAPTURED BY THE FILTER AND CAUSE DAMAGE TO MOTOR. WHEN VACUUMING FINE DUST USE A FINE DUST FILTER (SOLD SEPARATELY).

WARNING: SERVICING OF DOUBLE-INSULATED WET/DRY VACUUM WITH A DOUBLE-INSULATED WET/DRY VACUUM, TWO SYSTEMS OF INSULATION ARE PROVIDED INSTEAD OF GROUNDING. NO GROUNDING MEANS IS PROVIDED ON A DOUBLE-INSULATED APPLIANCE, NOR SHOULD A MEANS FOR GROUNDING BE ADDED. SERVICING A DOUBLE INSULATED WET/DRY VACUUM REQUIRES EXTREME CARE AND KNOWLEDGE OF THE SYSTEM, AND SHOULD BE DONE ONLY BY QUALIFIED SERVICE PERSONNEL. REPLACEMENT PARTS FOR A DOUBLE-INSULATED WET/DRY VACUUM MUST BE IDENTICAL TO THE PARTS THEY REPLACE. YOUR DOUBLE-INSULATED WET/DRY VACUUM IS MARKED WITH THE WORDS 'DOUBLE INSULATED' AND THE SYMBOL (SQUARE WITHIN A SQUARE) MAY ALSO BE MARKED ON THE APPLIANCE.
EXTENSION CORDS
When using an extension cord with your Wet/Dry Vacuum refer to the following table to determine the required A.W.G. wire size. Before using the cleaner make sure the power cord and extension cord are in good working condition. Make repairs or replacements before using the vacuum cleaner. Only use extension cords that are rated for outdoor use.
| Length of Extension Cord | |||||
| 120V 25ft (7.62m) | 50ft (15.24m) | 100ft (30.48m) | 150ft (45.72m) | ||
| Ampere rating | A.W.G. Wire Size | ||||
| More than Not more than | |||||
| 0 6 18 16 16 14 | |||||
| 6 10 18 16 14 12 | |||||
| 10 12 16 16 14 12 | |||||
| 12 16 14 12 Not recommended | |||||
SYMBOLS
| The following signal words and meanings are intended to explain the levels of risk associated with this product. | ||
| SYMBOL | SIGNAL | MEANING |
 | DANGER | Indicates an imminently hazardous situation, which, if not avoided, will result in death or serious injury. |
 | WARNING | Indicates a potentially hazardous situation, which, if not avoided, could result in death or serious injury. |
 | CAUTION | Indicates a potentially hazardous situation, which, if not avoided, may result in minor or moderate injury. |
| NOTICE | (Without Safety Alert Symbol) Indicates a situation that may result in property damage. | |
UNPACKING & CHECKING CARTON CONTENTS
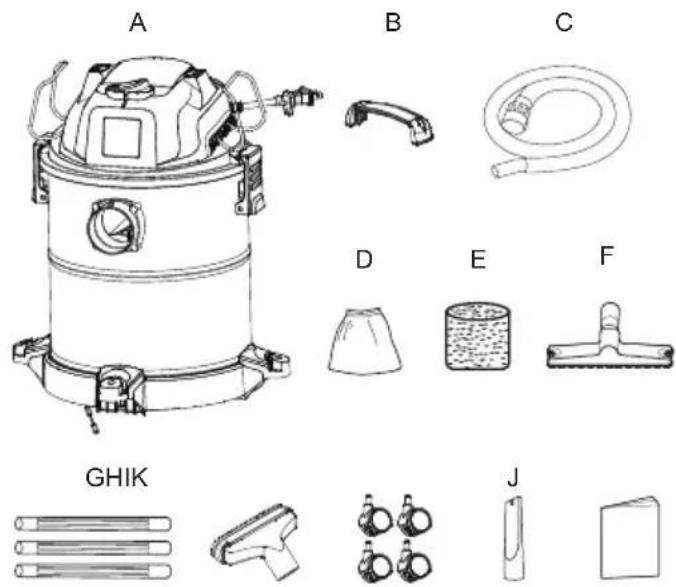
Remove all contents from the box. Remove the power head and take out any contents inside the collection tank. Check each item against the carton contents list.
Carton Contents List:
Key Description......Qty.
A Vacuum Assembly .....1
B Handle 1
C Hose 1
D Reusable Cloth Filter ....1
E Foam Wet Filter 1
F Floor Brush/Squeegee Nozzle...1
G Extension Wand....3
H 2-in-1 Utility Nozzle....1
I Caster 4
J Crevice Tool....1
K Operator's Manual....1
NOTE: The hose and accessories for this vacuum are 1-1/4" (3.2 cm) diameter.
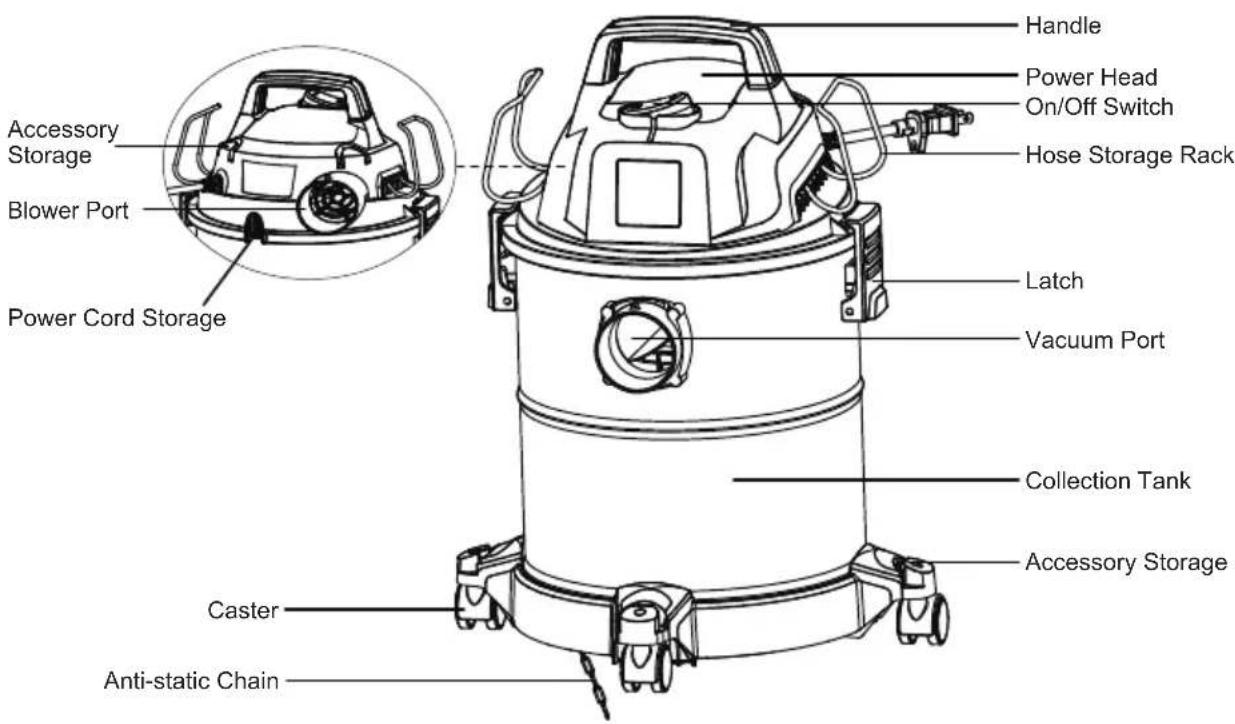
GENERAL ASSEMBLY INSTRUCTIONS

WARNING: DO NOT PLUG THE POWER CORD INTO A POWER OUTLET. MAKE SURE THE PLUG IS DISCONNECTED BEFORE ASSEMBLING THE WET/DRY VACUUM. TO REDUCE THE RISK OF ELECTRIC SHOCK, DO NOT EXPOSE TO RAIN.
natural_image
Illustration of a hand holding a plug with a shield, emitting arrows (no text or symbols)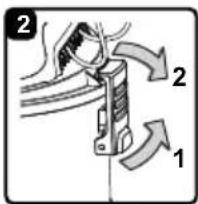
natural_image
Diagram of a mechanical device with directional arrows indicating motion or force (no text or symbols)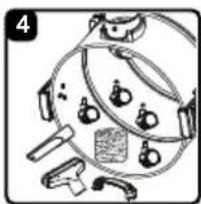
natural_image
Illustration of medical or laboratory equipment components including a circular device, tools, and a magnified view (no text or symbols)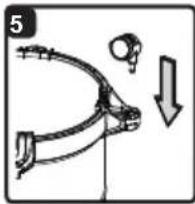
natural_image
Mechanical assembly diagram showing a curved bracket with a hanging part and a downward arrow indicating motion (no text or symbols)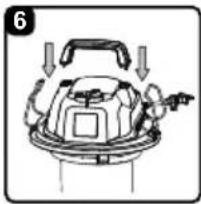
natural_image
Diagram of a device with a handle and internal components, no text or symbols present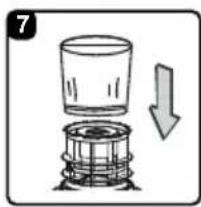
natural_image
Simple line drawing of a glass being heated by a stove, with a downward arrow indicating cooling (no text or symbols)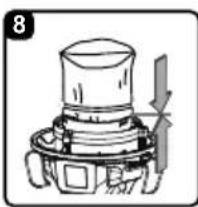
natural_image
Technical line drawing of a mechanical component with no visible text or symbols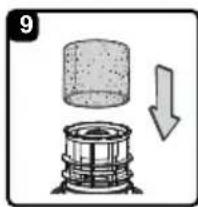
natural_image
Diagram showing a cylindrical object being placed on a base with a downward arrow indicating motion (no text or symbols)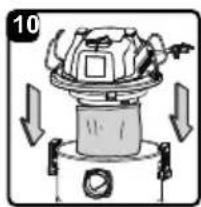
natural_image
Diagram of a mechanical device with directional arrows indicating motion or force (no text or symbols)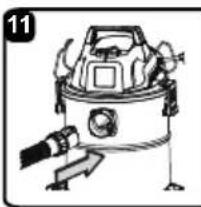
natural_image
Illustration of a spacecraft with attached equipment and a hand operating it (no text or symbols)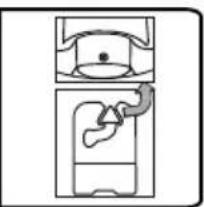
natural_image
Simple line drawing of a refrigerator with a handle and lid (no text or symbols)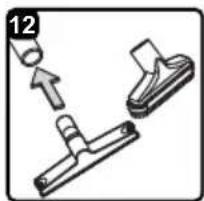
UNPACKING YOUR WET/DRY VACUUM & GENERAL ASSEMBLY
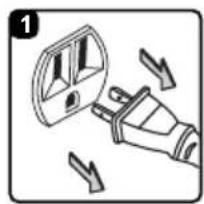
- Verify that the power cord is disconnected from the outlet (Fig. 1).
- Undo the latches (Fig. 2).
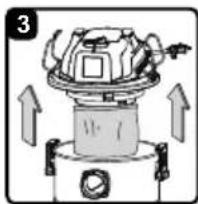
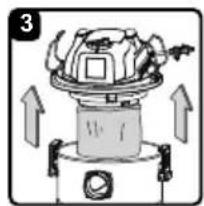
- Lift the power head off the collection tank (Fig. 3).
- Remove the contents from inside the collection tank; make sure you have all contents as listed on page 6 (Fig. 4).
- Turn the collection tank upside down and insert the four casters into the sockets on the bottom of the base. Press casters down until they snap into place (Fig. 5).
- Insert the handle into the slots located on the top of the power head (Fig. 6). Apply pressure until the handle snaps into place.
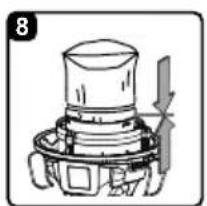
- Your vacuum comes ready for dry vacuum cleaning. If the reusable cloth filter is not installed, refer to page 12 for installation instructions (Fig. 7 & 8).
- For wet vacuum cleaning, remove the reusable cloth filter, and install the supplied foam wet filter. See page 12 for the foam wet filter installation instructions (Fig. 9).
- Place the power head back on the collection tank and secure into place using the latches (Fig. 10).
- Insert the locking end of the hose into the vacuum port on the collection tank and turn clockwise to lock into place (Fig. 11).
- Choose the desired attachment and insert onto the end of the hose or extension wand (Fig. 12).
NOTE: An anti-static chain is attached to the bottom of the tank. It is normal for this chain to drag on the ground. Operating the vacuum in dry conditions can build up static, and the chain helps dissipate any build-up by allowing it a path of least resistance to the ground.
POLARIZED PLUG
To reduce the risk of electrical shock, this appliance has a polarized plug (one blade wider than the other). This plug will fit in a polarized outlet only one way. If the plug does not fit fully in the outlet, reverse the plug. If it still does not fit, contact a qualified electrician to install the proper outlet.
Do not change the plug in any way. Double insulation ☐ eliminates the need for the three wire grounded power cord and grounded power supply system.
natural_image
Diagram of a hand holding a device with a circular component and an arrow indicating direction (no text or symbols)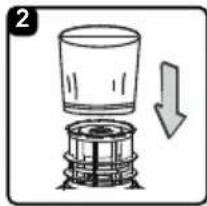
natural_image
Diagram showing a glass being placed on a stove with a downward arrow indicating cooling (no text or symbols)
natural_image
Technical line drawing of a mechanical component with no visible text or symbols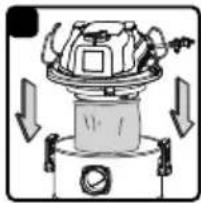
natural_image
Diagram of a mechanical device with directional arrows indicating motion or force (no text or symbols)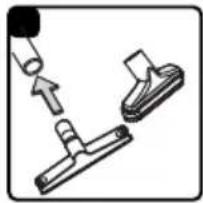
natural_image
Mechanical assembly diagram showing two components with arrows indicating motion (no text or symbols)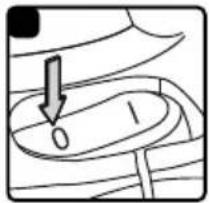
natural_image
Simple line drawing of a mechanical component with an arrow pointing to a circular feature (no text or symbols)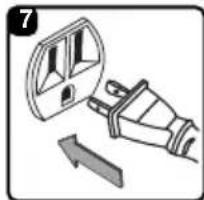
natural_image
Illustration of a hand holding a device with a magnified view showing internal components (no text or symbols)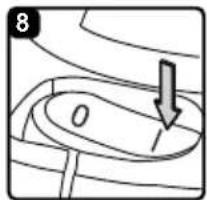
natural_image
Simple line drawing of a curved surface with an arrow pointing to a point labeled 'O' (no text or symbols beyond the label)DRY VACUUMING

WARNING: BE SURE TO READ, UNDERSTAND, AND APPLY INFORMATION ENTITLED "IMPORTANT SAFETY INSTRUCTIONS". DO NOT VACUUM IN AREAS WITH FLAMMABLE GASES, VAPORS, OR EXPLOSIVE DUSTS IN THE AIR. FLAMMABLE GASES OR VAPORS INCLUDE BUT ARE NOT LIMITED TO: LIGHTER FLUID, SOLVENT TYPE CLEANERS, OIL-BASED PAINTS, GASOLINE, ALCOHOL, OR AEROSOL SPRAYS. EXPLOSIVE DUSTS INCLUDE BUT ARE NOT LIMITED TO: COAL, MAGNESIUM, GRAIN, OR GUN POWDER. TO REDUCE THE RISK OF HEALTH HAZARDS FROM VAPORS OR DUST, DO NOT VACUUM TOXIC MATERIALS.

WARNING: DO NOT PLUG THE POWER CORD INTO A POWER OUTLET. MAKE SURE THE PLUG IS DISCONNECTED BEFORE CHANGING THE FILTERS.

CAUTION: DO NOT VACUUM DRYWALL DUST OR FIREPLACE SOOT OR ASH WITH STANDARD WET/DRY FILTER. THIS IS A VERY FINE DUST WHICH WILL NOT BE CAPTURED BY THE FILTER AND MAY CAUSE DAMAGE TO MOTOR. WHEN VACUUMING FINE DUST USE A FINE DUST FILTER (SOLD SEPARATELY).
- Verify that the power cord is disconnected from the outlet (Fig. 1).
- In order to prepare your vacuum for dry vacuuming, make sure the reusable cloth filter completely covers the filter cage. Your wet/dry vacuum comes with the reusable cloth filter pre-installed. For installation instructions, see page 12 (Fig. 2 & 3).
- Place the power head back on the collection tank and secure it in place using the latches (Fig. 4).
OPERATING INSTRUCTIONS: DRY VACUUMING
- Insert the locking end of the hose into the vacuum port on the collection tank and lock into place.
- Push the required attachment onto the free end of the hose or extension wand (Fig. 5).
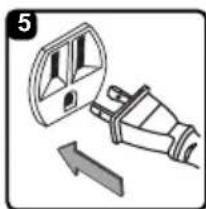
- Verify that the switch is in the 'O' OFF position before plugging the power cord into the power outlet. Plug the power cord into the outlet (Fig. 6 & 7).
- Turn the motor on by flipping the switch to the 'I' ON position and begin vacuuming (Fig. 8).
- Once you have completed vacuuming, flip the switch to the 'O' OFF position and unplug the power cord from the outlet.
$$ O = O F F \quad I = O N $$
DO NOT USE THE REUSABLE CLOTH FILTER FOR LIQUID VACUUMING.
natural_image
Mechanical component diagram showing a rotating part with a downward arrow indicating motion (no text or symbols)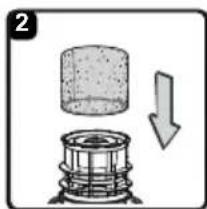
natural_image
Diagram showing a cylindrical component being lifted by a spring, with an arrow indicating downward motion (no text or symbols present)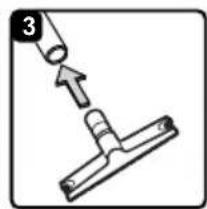
natural_image
Simple line drawing of a mechanical assembly with a tool and bracket (no text or symbols)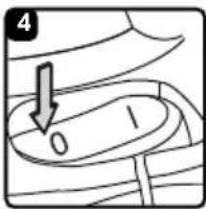
natural_image
Mechanical component diagram showing a housing with an arrow indicating direction (no text or symbols)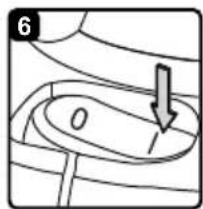
natural_image
Simple line drawing of a curved surface with an arrow pointing downward, no text or symbols present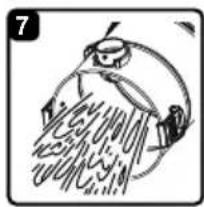
natural_image
Illustration of a person washing hands with water flowing out (no text or symbols)LIQUID VACUUMING

WARNING: BE SURE TO READ, UNDERSTAND, AND APPLY INFORMATION ENTITLED "IMPORTANT SAFETY INSTRUCTIONS". DO NOT VACUUM IN AREAS WITH FLAMMABLE GASES, VAPORS, OR EXPLOSIVE DUSTS IN THE AIR. FLAMMABLE GASES OR VAPORS INCLUDE BUT ARE NOT LIMITED TO: LIGHTER FLUID, SOLVENT TYPE CLEANERS, OIL-BASED PAINTS, GASOLINE, ALCOHOL, OR AEROSOL SPRAYS. EXPLOSIVE DUSTS INCLUDE BUT ARE NOT LIMITED TO: COAL, MAGNESIUM, GRAIN, OR GUN POWDER. TO REDUCE THE RISK OF HEALTH HAZARDS FROM VAPORS OR DUST, DO NOT VACUUM TOXIC MATERIALS.

WARNING: DO NOT PLUG THE POWER CORD INTO THE POWER OUTLET. MAKE SURE THE PLUG IS DISCONNECTED BEFORE CHANGING THE FILTERS.
- Verify that the power cord is disconnected from the outlet. Make sure that the collection tank is clean and free of dust and dirt (Fig. 1).
- Remove the reusable cloth filter, then carefully install the foam wet filter over the filter cage and place the power head back on the collection tank. For foam wet filter installation instructions, see page 12 (Fig. 2).
DO NOT USE THE REUSABLE CLOTH FILTER FOR LIQUID VACUUMING.
OPERATING INSTRUCTIONS: WET VACUUMING
- Insert the locking end of the hose into the vacuum port on the collection tank and lock into place.
- Push the required attachment onto the free end of the hose or extension wand (Fig. 3).
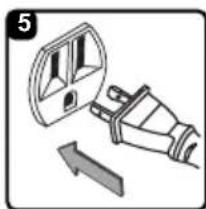
- Verify that the switch is in the 'O' OFF position before plugging the power cord into the power outlet. Plug the power cord into the outlet (Fig. 4 & 5).
- Turn the motor on by flipping the switch to the 'I' ON position (Fig. 6).
- Once you have completed vacuuming, flip the switch to the 'O' OFF position and unplug the power cord from the outlet.
- After use, empty the collection tank, clean and dry the inside and outside before storage (Fig. 7).
IMPORTANT! When vacuuming large quantities of liquids, do not immerse the nozzle completely in the liquid; leave a gap at the tip of the nozzle opening to allow air inflow. The machine is fitted with a float valve that stops the suction action when the collection tank reaches its maximum capacity. You will notice an increase in motor speed. When this happens, turn off the machine, disconnect from power supply, and drain the liquid into a suitable receptacle or drain. After wet vacuuming, turn the machine off and remove plug from power supply. Empty the collection tank, clean and dry the inside and outside before storage.
REMEMBER! The foam wet filter must be removed after wet vacuuming and the reusable cloth filter must be installed before dry vacuuming again.
BLOWER OPERATION
natural_image
Illustration of a hand holding an electrical plug with a magnified inset showing internal components (no text or symbols)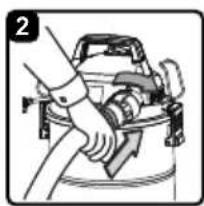
natural_image
Illustration of a hand using a tool to clean or adjust a mechanical component (no text or symbols visible)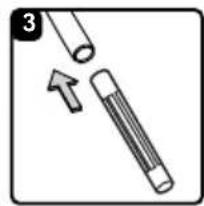
natural_image
Diagram showing two cylindrical objects with an arrow indicating a change or movement (no text or symbols present)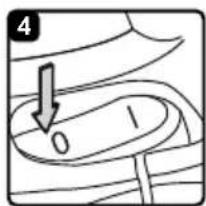
natural_image
Illustration of a plug with a magnified view showing internal components (no text or symbols)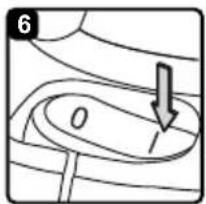
natural_image
Illustration of a hand holding a plug with a magnified view of the socket (no text or symbols)This Wet/Dry Vacuum has blowing capabilities. To use the blower feature follow the instructions listed.

WARNING: ALWAYS WEAR SAFETY GOGGLES COMPLYING WITH ANSI Z87.1 (OR IN CANADA, CSAZ94.3) BEFORE USING BLOWER.

WARNING: KEEP BYSTANDERS CLEAR FROM BLOWING DEBRIS.

WARNING: WEAR A DUST MASK IF BLOWING CREATES DUST THAT MIGHT BE INHALED.
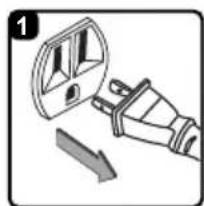
- Verify that the power cord is disconnected from the outlet (Fig. 1).
- Make sure the collection tank is empty before using as a blower. Clear all dirt and debris from the hose and collection tank.
- Remove the hose from the vacuum port.
- Insert the locking end of the hose into the blower port on the back of the power head and lock into place (Fig. 2).
- Fit the desired attachment onto the hose (Fig. 3).
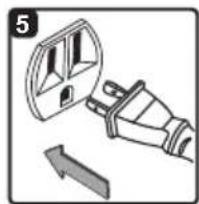
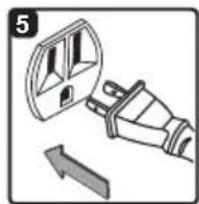
- Verify that the power switch is in the 'O' OFF position before plugging the power cord into the outlet. Plug the power cord into the outlet (Fig. 4 & 5).
- Before turning on the vacuum, firmly hold the loose end of the hose. Turn the motor on by flipping the switch to the 'I' ON position (Fig. 6).
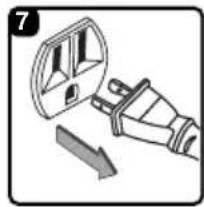
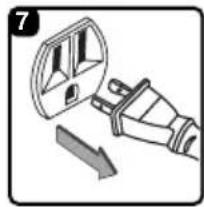
- Once you have completed blowing, flip the power switch to the 'O' OFF position and unplug the power cord from the outlet (Fig. 7).
MAINTENANCE
natural_image
Illustration of a plug with a circular socket and arrow indicating direction (no text or symbols)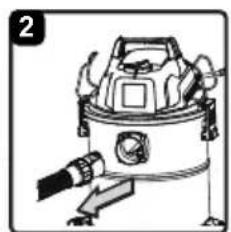
natural_image
Line drawing of a hand operating a vacuum cleaner device (no text or symbols)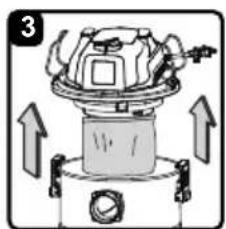
natural_image
Diagram of a mechanical device with upward arrows indicating motion or force (no text or symbols)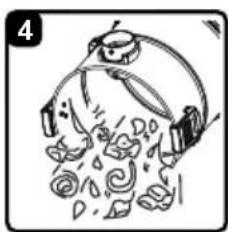
natural_image
Illustration of a cartoon character with wings and a bag, surrounded by falling petals (no text or symbols)EMPTYING THE COLLECTION TANK

WARNING: ALWAYS DISCONNECT THE PLUG FROM THE POWER OUTLET BEFORE REMOVING THE POWER HEAD FROM COLLECTION TANK.
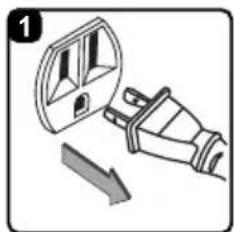
- Verify that the power cord is disconnected from the outlet (Fig. 1).
- Disconnect the hose from the vacuum (Fig. 2).
- Undo the latches and remove the power head from the collection tank (Fig. 3). Place power head on a soft, clean surface upside down.
- Clear all dirt or debris from the collection tank and hose into a proper waste container (Fig. 4).
- Clean or replace the filters.
- Check the hose, attachments, and power cord to ensure that they have not been damaged.
- Place the power head back onto the collection tank and secure latches.
IMPORTANT! Clean or change the filter regularly for best performance. ALWAYS USE THE REUSABLE CLOTH FILTER FOR DRY VACUUMING. If the machine is used without the reusable cloth filter, the motor will burn out and the warranty will be voided. Always keep spare filters on hand.
NOTICE! The filters included are made of high quality materials designed to stop small dust particles. The reusable cloth filter should be used for dry pick-up only. A dry reusable cloth filter is necessary to pick up dust. If the reusable cloth filter is wet, it will clog quickly and be very difficult to clean. Handle the filter carefully when removing it for cleaning and replacing it. Check the filters for tears or small holes. A small hole can let dust pass through and out of the filter. Do not use a filter with holes or tears; replace it immediately.
STORAGE
Before storing your vacuum, the collection tank should be emptied and cleaned. The accessories should be cleaned and stored so they can be readily available when needed. Store the wet/dry vacuum indoors.
REPAIRS
Repairs for this wet/dry vacuum should be performed only by qualified service personnel using only identical replacement parts.
INSTALLING & CLEANING REUSABLE CLOTH FILTER
INSTALLING REUSABLE CLOTH FILTER
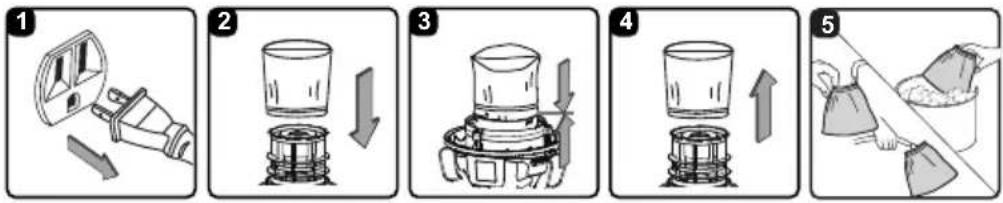
- Verify that the power cord is disconnected from the outlet (Fig. 1).
- Remove the power head and place in an upside down position.
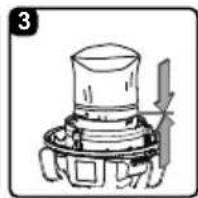
- Install the reusable cloth filter over the filter cage making sure the cage is completely covered (Fig. 2 & 3).
- Place the power head back onto the collection tank.
REMOVING & CLEANING REUSABLE CLOTH FILTER
- With the removed power head in an upside down position, carefully remove the reusable cloth filter from the filter cage (Fig. 4).
- Clean the reusable cloth filter by gently tapping or brushing dirt off. Cleaning should not be done indoors in living areas. For optimal performance a new filter is recommended.
- Use a mild soap and water solution to wash reusable cloth filter and rinse with clean water (Fig. 5).
- Allow filter to air dry for 24 hours before installing onto the filter cage.
INSTALLING & CLEANING FOAM WET FILTER
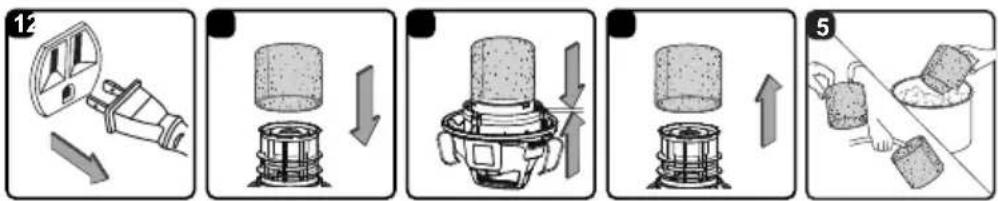
INSTALLING FOAM WET FILTER
- Verify that the power cord is disconnected from the outlet (Fig. 1).
- Remove the power head and place in an upside down position. Follow instructions to remove the reusable cloth filter on page 12.
- Carefully slide the foam wet filter down over the filter cage making sure the cage is completely covered (Fig. 2 & 3).
- Place the power head onto the collection tank.
CLEANING FOAM WET FILTER
- With the removed power head in an upside down position, carefully remove the foam wet filter (Fig. 4).
- Use a mild soap and water solution to wash the foam wet filter and rinse with clean water (Fig. 5).
- Allow the wet filter to air dry for 24 hours before installing onto the filter cage.
TROUBLESHOOTING

WARNING: TO REDUCE THE RISK OF ELECTRIC SHOCK, UNPLUG BEFORE TROUBLESHOOTING.
| PROBLEM POSSIBLE CAUSE SOLUTION | ||
| The wet/dry vacuum will not operate. | No power supply. | Check the power supply, cord, breakers, and fuses. |
| Faulty power cord. | Unplug and check the power cord. If damaged, have it repaired by a professional. | |
| Collection tank is full. Empty the collection tank. | ||
| Switch in the wrong position. | Press the ON ‘I’ button on the power head. | |
| The dust comes out from the motor cover. | The reusable cloth filter is missing or damaged. | Attach or replace the reusable cloth filter. |
| Vacuum has been used to collect fine dust, such as drywall dust, fireplace soot, or ash, without a fine dust filter equipped. | Remove the reusable cloth filter and install the appropriate fine dust filter. | |
| Reduced efficiency and motor/speed vibration. | There are blockages in the nozzle, hose, or the collection tank inlets. | Unplug and check nozzle, hose and collection tank inlets for blockages. |
| The reusable cloth filter is clogged by fine dust. | Take off the filter and clean it or install a new reusable cloth filter. | |
EXPLODED VIEW
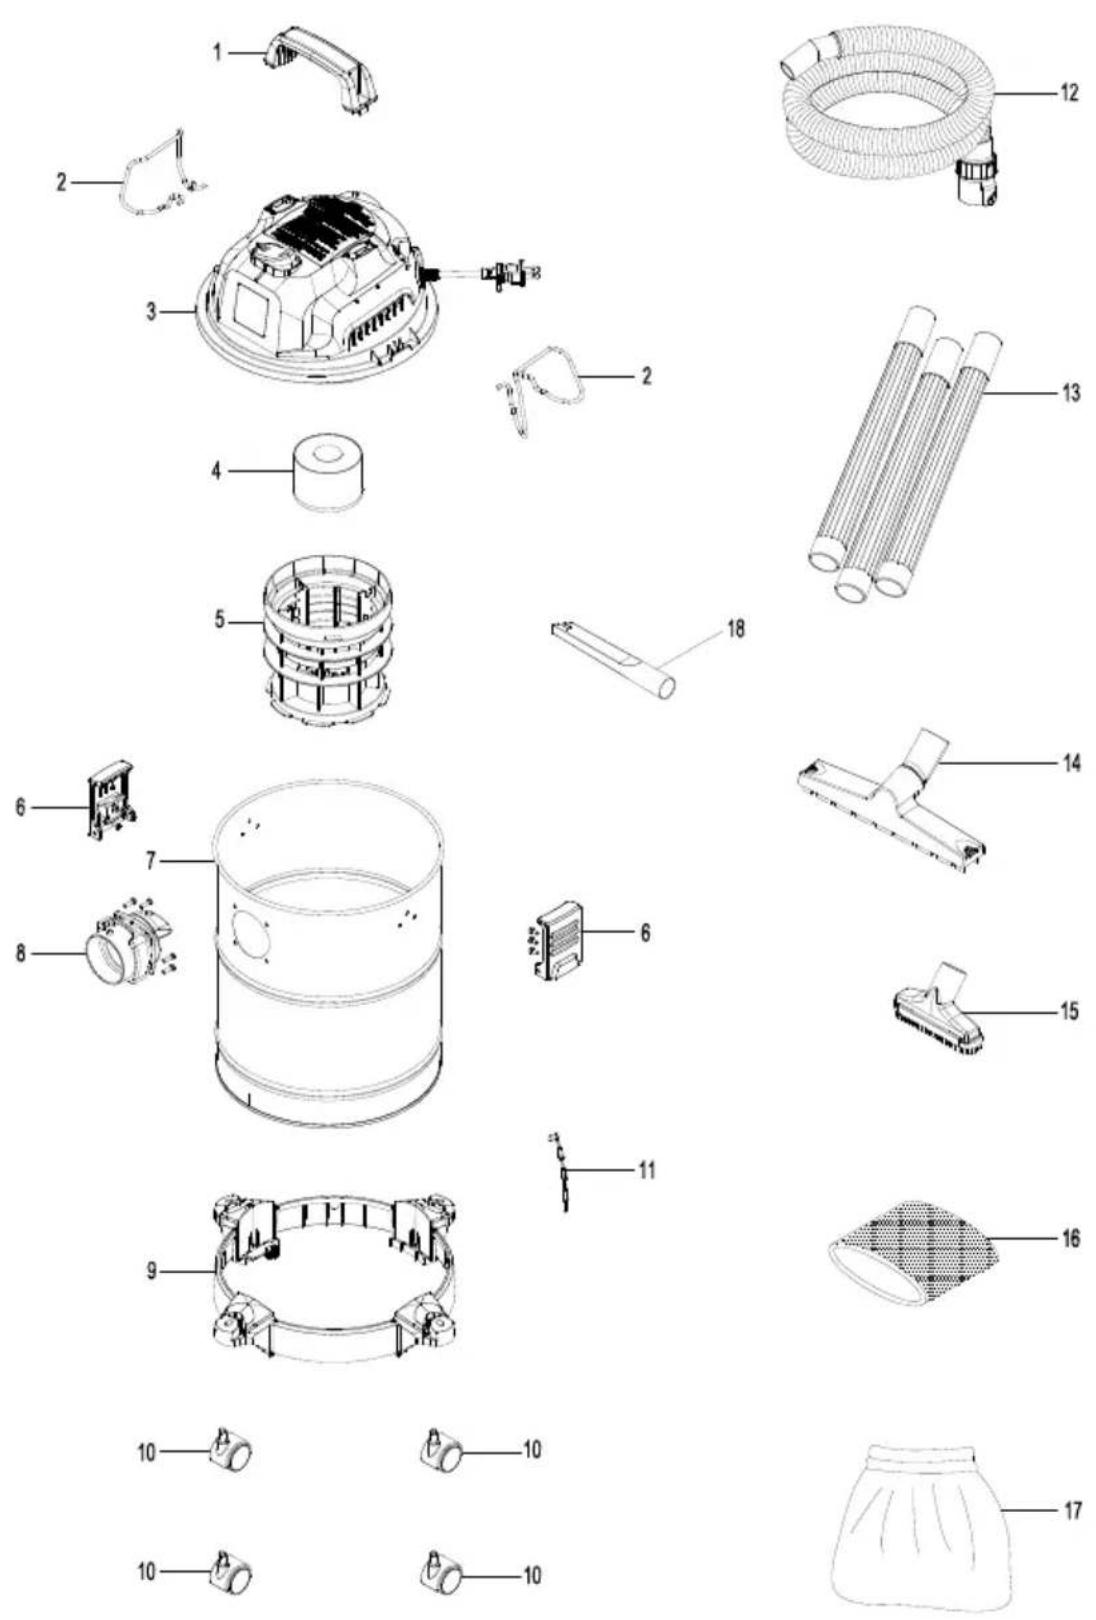
PARTS LIST
| Part | Part Number Description | Quantity | |
| 1 55 | 1549101 Handle 1 | ||
| 2 55 | 1549102 Hose Storage Rack 2 | ||
| 3 Power Head Assembly 1 | |||
| 4 55 | 1416106 Float 1 | ||
| 5 55 | 1437105 Filter Cage 1 | ||
| 6 55 | 1021116 Latch Assembly 2 | ||
| 7 Collection Tank | 1 | ||
| 8 | 551549105 | Vacuum Port Assembly | 1 |
| 9 55 | 1501111 Base | 1 | |
| 10 | 551012121 Caster | 4 | |
| 11 | 551408106 Anti-static Chain | 1 | |
| 12 | 551003108 Hose | 1 | |
| 13 | 551003109 Extension Wand | 3 | |
| 14 | 551549106 Floor Brush/Squeegee Nozzle | 1 | |
| 15 | 551004113 | 2-in-1 Utility Nozzle | 1 |
| 16 | 551002118 | Foam Wet Filter | 1 |
| 17 | 551003104 Reusable Cloth Filter | 1 | |
| 18 | 551004114 | Crevice Tool | 1 |
MANUAL DEL USUARIO
natural_image
Exterior view of a vacuum cleaner with 'Vacmaster' branding and digital display (no text-heavy elements)Modelo No. MVOA407S
PARA SU SEGURIDAD
natural_image
Illustration of a plug plug with arrows indicating direction (no text or symbols)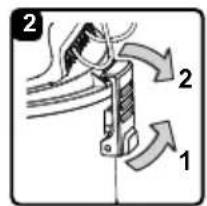
natural_image
Diagram of a mechanical device with directional arrows indicating motion (no text or symbols)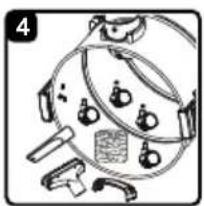
natural_image
Illustration of a medical or laboratory device with multiple components and no visible text or symbols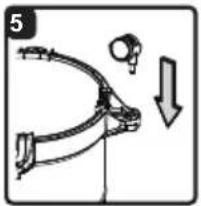
natural_image
Mechanical assembly diagram showing a curved bracket with a hanging component and a downward arrow indicating motion (no text or symbols)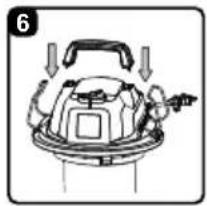
natural_image
Line drawing of a kettle with a handle and lid, showing mechanical components (no text or symbols)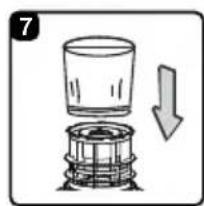
natural_image
Technical line drawing of a mechanical component with no visible text or symbols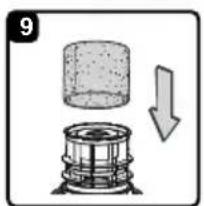
natural_image
Diagram showing a cylindrical object being placed on a stove next to a downward arrow indicating motion (no text or symbols)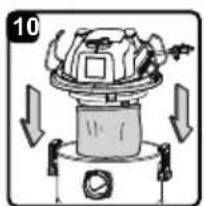
natural_image
Diagram of a mechanical device with directional arrows indicating motion or force (no text or symbols)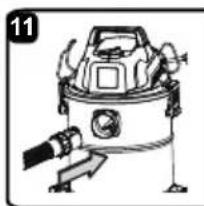
natural_image
Illustration of a spacecraft with attached equipment and a hand operating it (no text or symbols)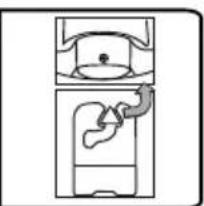
natural_image
Simple line drawing of a refrigerator with a handle and lid, no text or symbols present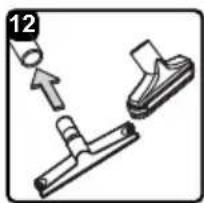
DESEMPAQUE DE SU ASPIRADORA EN MOJADO/SECO Y ENSAMBLAJE GENERAL
natural_image
Diagram of a hand holding a device with a circular component and an arrow indicating direction (no text or symbols)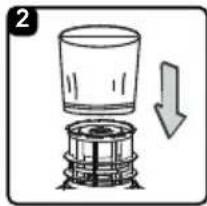
natural_image
Diagram showing a glass being placed on a stove burner with a downward arrow indicating motion (no text or symbols)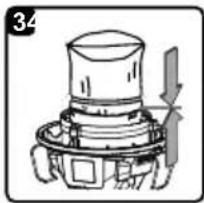
natural_image
Technical line drawing of a mechanical component with no visible text or symbols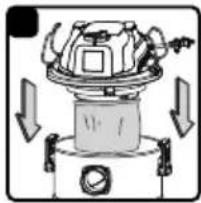
natural_image
Diagram of a mechanical device with directional arrows indicating motion or force (no text or symbols)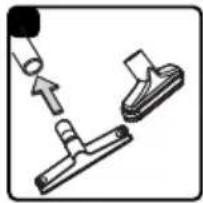
natural_image
Mechanical assembly diagram showing two components with arrows indicating motion (no text or symbols)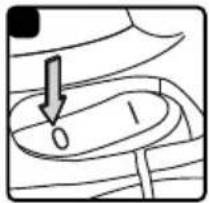
natural_image
Simple line drawing of a mechanical component with an arrow pointing to a circular feature (no text or symbols)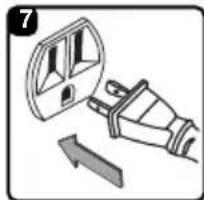
natural_image
Illustration of a hand holding a device with a magnified view showing internal components (no text or symbols)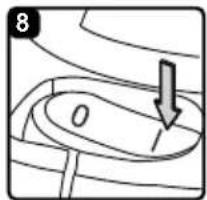
natural_image
Simple line drawing of a mechanical component with an arrow pointing to a circular feature (no text or symbols)ASPIRADO EN SECO

$$ O = A P A G A D O \quad I = E N C E N D I D O $$
NO USE EL FILTRO DE TELA REUTILIZABLE PARA ASPIRAR LÍQUIDOS.
natural_image
Mechanical component diagram showing a rotating part with a downward arrow indicating motion (no text or symbols)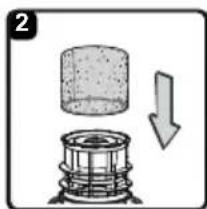
natural_image
Diagram showing a cylindrical component being lifted by a spring, with an arrow indicating downward motion (no text or symbols present)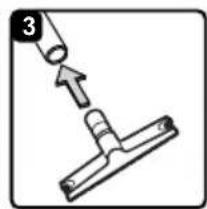
natural_image
Simple line drawing of a mechanical assembly with a tool and bracket (no text or symbols)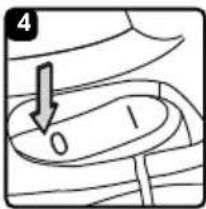
natural_image
Mechanical component diagram showing a housing with an arrow indicating direction (no text or symbols)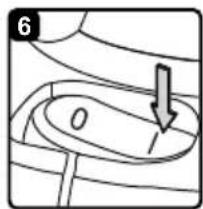
natural_image
Simple line drawing of a curved surface with an arrow pointing downward, no text or symbols present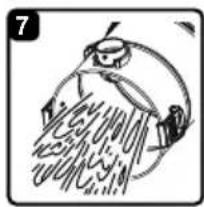
natural_image
Illustration of a person washing hands with water flowing out (no text or symbols)ASPIRADO EN MOJADO

natural_image
Illustration of a hand holding an electrical plug with a magnified inset showing internal components (no text or symbols)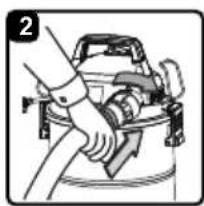
natural_image
Illustration of a hand using a tool to clean or adjust a mechanical component (no text or symbols visible)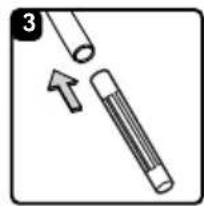
natural_image
Diagram showing two cylindrical objects with an arrow indicating a change or movement (no text or symbols present)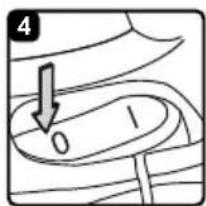
natural_image
Illustration of a plug with a magnified view showing internal components (no text or symbols)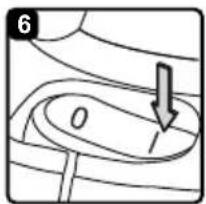
natural_image
Illustration of a hand holding a plug with a magnified view of the socket (no text or symbols)natural_image
Illustration of a plug with a circular socket and arrow indicating direction (no text or symbols)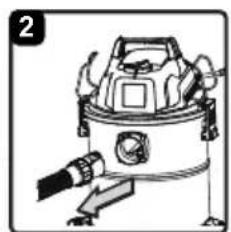
natural_image
Line drawing of a hand operating a vacuum cleaner device (no text or symbols)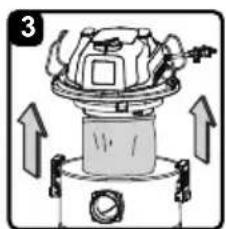
natural_image
Diagram of a mechanical device with upward arrows indicating motion or force (no text or symbols)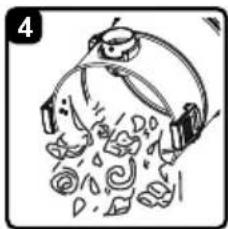
natural_image
Illustration of a cartoon character with wings and a bowl of flowers (no text or symbols)natural_image
Illustration of a hand holding an electrical plug with a magnified inset showing internal components (no text or symbols)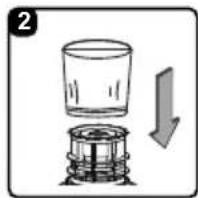
natural_image
Technical line drawing of a mechanical component with no visible text or symbols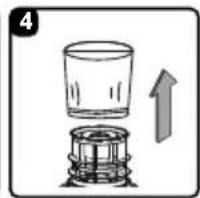
natural_image
Simple line drawing of a glass being placed on a cylindrical base with an upward arrow indicating motion (no text or symbols)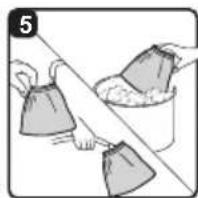
natural_image
Illustration of two hands lifting a bag over a bucket (no text or symbols)LISTA DE PARTES
- FOR YOUR SAFETY
- TABLE OF CONTENTS
- SECTION PAGE
- WARRANTY
- Not Covered by Warranty:
- IMPORTANT SAFETY INSTRUCTIONS
- READ AND UNDERSTAND ALL INSTRUCTIONS BEFORE USING THIS VACUUM.
- SAVE THIS MANUAL FOR FUTURE REFERENCE.
- WARNING: TO REDUCE THE RISK OF FIRE, ELECTRIC SHOCK OR INJURY:
- When using as blower:
- SAVE THESE INSTRUCTIONS
- DOUBLE INSULATION INSTRUCTIONS
- EXTENSION CORDS
- SYMBOLS
- UNPACKING & CHECKING CARTON CONTENTS
- Carton Contents List:
- GENERAL ASSEMBLY INSTRUCTIONS
- UNPACKING YOUR WET/DRY VACUUM & GENERAL ASSEMBLY
- POLARIZED PLUG
- DRY VACUUMING
- OPERATING INSTRUCTIONS: DRY VACUUMING
- LIQUID VACUUMING
- DO NOT USE THE REUSABLE CLOTH FILTER FOR LIQUID VACUUMING.
- OPERATING INSTRUCTIONS: WET VACUUMING
- BLOWER OPERATION
- MAINTENANCE
- EMPTYING THE COLLECTION TANK
- WARNING: ALWAYS DISCONNECT THE PLUG FROM THE POWER OUTLET BEFORE REMOVING THE POWER HEAD FROM COLLECTION TANK.
- STORAGE
- REPAIRS
- INSTALLING & CLEANING REUSABLE CLOTH FILTER
- INSTALLING REUSABLE CLOTH FILTER
- REMOVING & CLEANING REUSABLE CLOTH FILTER
- INSTALLING & CLEANING FOAM WET FILTER
- INSTALLING FOAM WET FILTER
- CLEANING FOAM WET FILTER
- TROUBLESHOOTING
- EXPLODED VIEW
- PARTS LIST
- PARA SU SEGURIDAD
- DESEMPAQUE DE SU ASPIRADORA EN MOJADO/SECO Y ENSAMBLAJE GENERAL
- ASPIRADO EN SECO
- ASPIRADO EN MOJADO
- LISTA DE PARTES
Brand : Vacmaster
Model : MVOA407S
Category : Vacuum Cleaner