
EKM9689X - Cooker ELECTROLUX - Free user manual and instructions
Find the device manual for free EKM9689X ELECTROLUX in PDF.


| Product Type | Freestanding Cooker |
| Brand | Electrolux |
| Model | EKM9689X |
| Color | Stainless Steel |
| Energy Type | Gas Hob + Electric Oven |
| Oven Type | Electric Fan Oven |
| Gross Oven Capacity | 130 Litres |
| Gas Burners | 5 (Wok 4.5 kW, Rapid 3.0 kW, Semi-Rapid 2.0 kW x2, Auxiliary 1.0 kW) |
| Number of Oven Fans | 2 |
| Oven Lamps | 2 (23W, E14, high temperature up to 300°C) |
| Ignition | Electric (push button) |
| Oven Functions | Defrost, Conventional Heat, Hot Air, Grill, Fast Grill, Turbo Grill, Bottom Heat with Fan |
| Timer | Mechanical 60-minute timer |
| Turnspit | Yes (max load 2.5 kg) |
| Dimensions (W x D x H) | 900 x 600 x 860 mm |
| Net Weight | 72 kg |
| Gross Weight | 78 kg |
| Power Supply | 220-240 V, 50/60 Hz (electric oven) |
| Gas Supply | LPG 30 mbar |
| Safety Features | Anti-tip chain, child safety, knob protection plate for grill |
| Cleaning | Removable burner caps, burner crowns, and oven door; oven cavity cleaning with mild detergent; avoid aluminum foil on oven bottom |
| Gas Hose Connection | 1 m max length, annual replacement recommended |
| Warranty | 12 months (parts and labor) from date of purchase, subject to conditions |
Frequently Asked Questions - EKM9689X ELECTROLUX
User questions about EKM9689X ELECTROLUX
0 question about this device. Answer the ones you know or ask your own.
Ask a new question about this device
Download the instructions for your Cooker in PDF format for free! Find your manual EKM9689X - ELECTROLUX and take your electronic device back in hand. On this page are published all the documents necessary for the use of your device. EKM9689X by ELECTROLUX.
USER MANUAL EKM9689X ELECTROLUX
Important safety information 2
Installation 3
Using cooker for the first time 7
Using the Gas hob burners 10
Using the Gas Oven 12
Using the electric oven and grill 14
Using the mechanical timer 16
Using the Turnspit 17
Tips for oven cooking 18
Cooking Time chart 20
Maintenance & Cleaning 21
Trouble Shooting 22
Guarantee and Service 23
Consumer Service Center 24
SPECIFICATION
| ELECTROLUX | MODEL COLOUR | NO.GAS | BURNER POWER | OVEN TYPE | |
| BURNER | (kW) | ||||
| 90CM | EKG9686X | STAINLESS STEEL | 5 | 4.5+3+2x2+1 | 62L GAS + GAS GRILL |
| EKG9688X | STAINLESS STEEL | 5 | 4.5+2x2+1+3 | 130L GAS + GAS GRILL | |
| EKM9689X | STAINLESS STEEL | 5 | 4.5+3+2x2+1 | 130L ELECTRIC | |
| EKM9682X | STAINLESS STEEL | 4 | 3.4+2x2+1 | 62L GAS + GAS GRILL | |
| ELECTROLUX MODEL | NO. NO.OVEN FAN | OVENLAMP | GAS COOKERIGNITION | GAS CYLINDERCOMPART MENT | |
| 90CM | EKG9686X 1 | 1 ELECTRIC YES | |||
| EKG9688X 2 | 2 ELECTRIC NO | ||||
| EKM9689X 2 | 2 ELECTRIC NO | ||||
| EKM9682X | 0 | 1 | ELECTRIC | YES | |
Dimension W x D x H: 900W x 600D x 860H (EKG9686X, EKG9688X, EKM9689X) 900W x 550D x 860H (EKM9682X)
Weight Net / Gross:
EKG9686X: 62Kg / 68Kg
EKG9688X: 75Kg / 81Kg
EKM9689X: 72Kg / 78Kg
EKM9682X: 60Kg / 66Kg
Oven Capacity Gross: 130Litre/62Litre (with gas bottle compartment)
Heat Input Gas Burners:
Wok Burner 4.5 kW
Triple Burner 3.4 kW
Rapid Burner 3.0 kW
Fish Burner 3.0kW
Semi Rapid Burner 2.0 kW
Auxiliary Burner 1.0 kW
Pressure: LPG / 30 mbar
This manual is prepared for more than one model. Your appliance may not have some of the features outlined in this manual. Please read this manual carefully and pay attention to the figures and information that relates to your model.
IMPORTANT SAFETY INFORMATION
It is very important that this instruction book should be kept safely for the future consultation. If the appliance should be sold or given to another person, please ensure that the booklet goes together with it, so that the new owner can know functions of this appliance and also be aware of the necessary precautions.
NOTE – Product warnings have been given for the safety of you and other users. We therefore ask you to read carefully the procedures of installing and using this cooker.
INSTALLATION
- The work on installation must be carried out by competent and qualified installers according to the local regulation in force.
- Any modifications to the domestic electrical main which maybe necessary for the installation of the appliance should be carried out only by a qualified technician.
- It is dangerous to modify, the characteristics of this appliance.
- Avoid installation of the cooker near flammable material (e.g. curtains, tea towels, etc.)
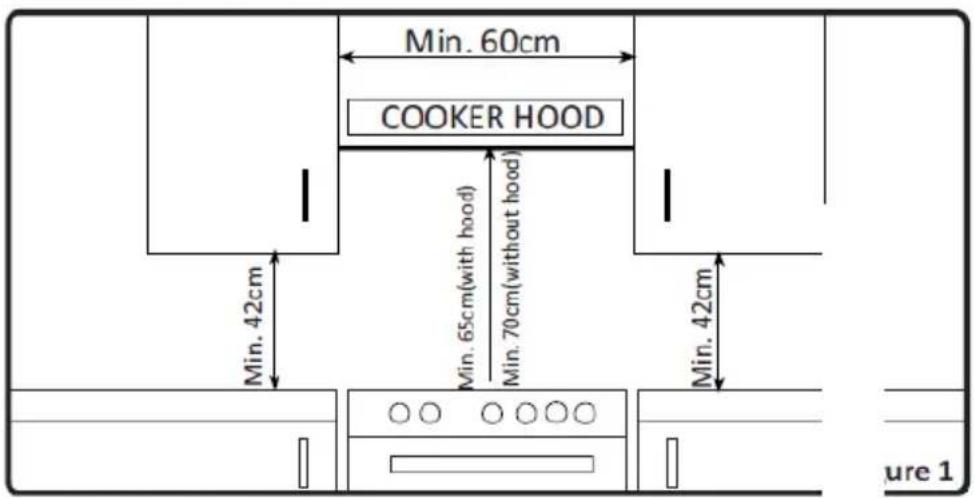
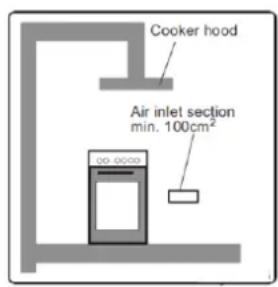
- If installing the cooker with a cooker hood ensure there is a minimum of 65cm to the underside of the hood ...see Figure 1
Cooker Ventilation
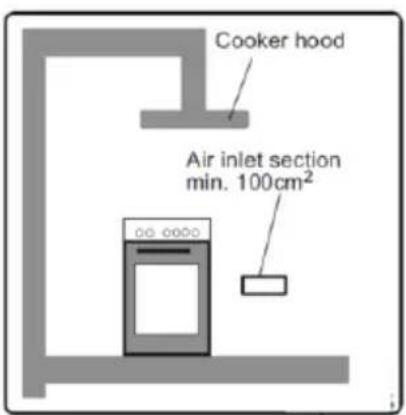
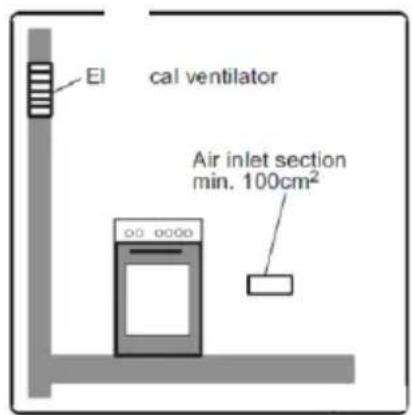
Note - It is important to allow adequate room ventilation for both gas and electric cookers.
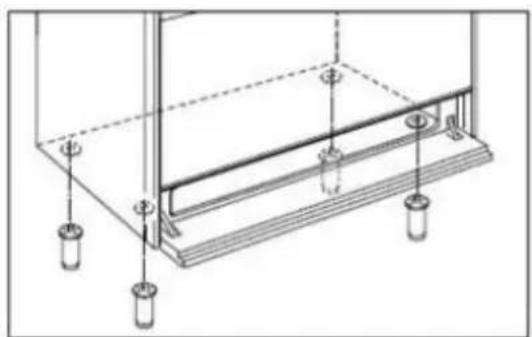
Where supplied you must use the adjustable feet.
The cooker chassis must not sit directly on the floor, a plinth or support surface.
To fit adjustable feet.-
-
Place the cooker on a piece of polystyrene packaging or similar exposing the base for fitting the feet.
-
Fit the 4 feet by screwing them tightly into the base as shown below.
-
Level the cooker by screwing the feet in or out.
natural_image
Technical line drawing of a mechanical assembly with mounting holes and structural supports (no text or symbols)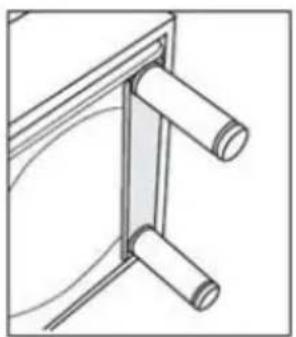
natural_image
Pure technical line drawing of a mechanical bracket or support structure without any text, numbers, or symbols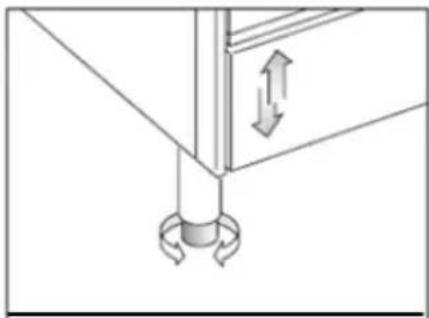
natural_image
Pure mechanical diagram showing a lever and pivot point with directional arrows, no text or symbols present
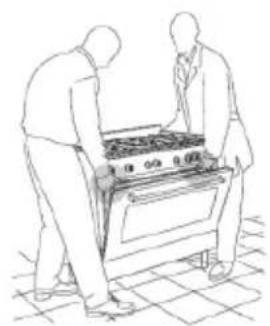
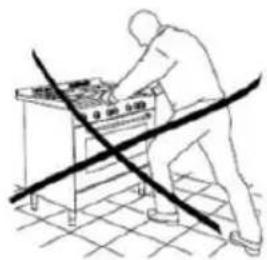
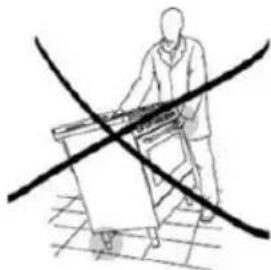
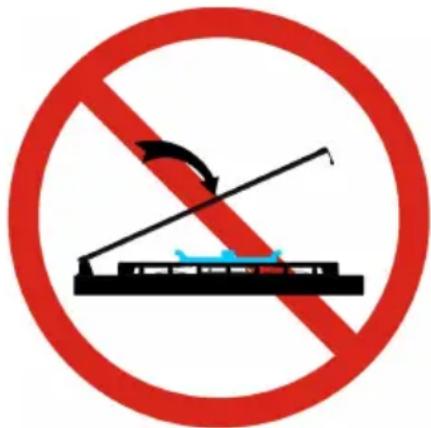
To prevent damaging the adjustable feet, ensure the cooker is always lifted by two people. DO NOT DRAG the cooker. Lift the feet clear of the floor.
Do not lift the cooker by the door handles
natural_image
Line drawing of two people assembling a large oven on a tiled floor (no text or symbols)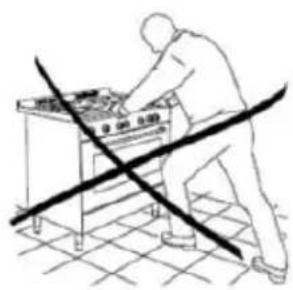
natural_image
Line drawing of a person using a computer with a diagonal line crossing over it, no text or symbols present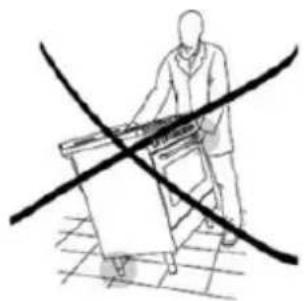
natural_image
Line drawing of a person using a tool on a cart with a crossed line indicating crossed position (no text or symbols)Correct Incorrect
The following instructions are meant for a qualified installer, in order that the operations of installation, regulation, and service are executed according to the existing regulations. Whenever changes are made involving the disconnection of the machine it is necessary to proceed with maximum caution.

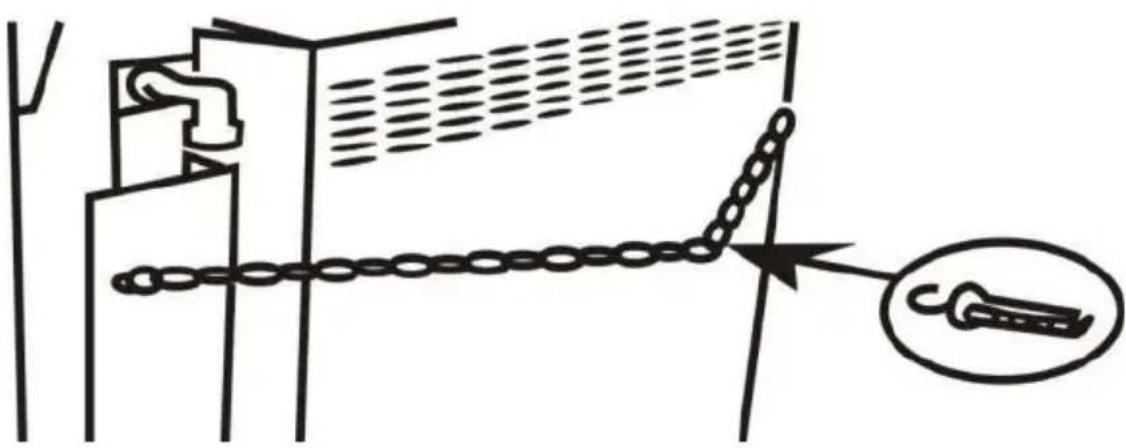
WARNING – The anti-tip chain must be installed and fixed securely to a wall behind the cooker to prevent accidental tipping of the cooker. (See Page 6)
THE MANUFACTURING COMPANY DECLINES ANY RESPONSIBILITY FOR POSSIBLE DAMAGES RESULTING FROM AN INSTALLATION WHICH DOESN'T COMPLY WITH THE RULES IN FORCE.

WARNING - This unit can be installed and can work only in constantly ted rooms, according to the national rules in force.
In order for the gas cooker to work properly, it is necessary that sufficient air for gas combustion can flow naturally into the room.
The air flow into the room must come directly through openings of external walls.
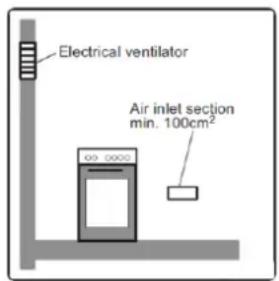
These openings must have a free passage of at least 100cm^2 (one or more openings can be made).
These openings (or opening) should be realized in such a way not to be obstructed both from inside and outside and preferably positioned near the floor, opposite the combustion products discharge. In case these systems can't be realized in the room where the unit is installed, the necessary air can come from a room nearby, provided that this room is not a bedroom or a dangerous environment and it is ventilated as requested, from national rule in force.
Combustion Products Discharge
Gas cooking units must discharge combustion products through hoods directly connected to flues or outside. In case the hood can't be installed, it is recommended to use an electric fan applied to the external wall or to the window of the room, with condition that openings to let air flow in the room are realized.
This electric fan must be powerful enough to ensure in a kitchen an air replacement of 3 to 5 times its volume per hour.

WARNING - If the oven touches the side of other pieces of the kitchen are, ensure they can withstand a temperature of 75^ C.
ELECTRICAL CONNECTION
Before you connect the gas cooker, please check that the voltage indicated on the rating plate to ensure that it corresponds to the mains power supply available. Appliance must be connected with mains supply outlet. The ground wires are easily recognized by its green and yellow colour. Make sure that the "line" and "neutral" wires are installed into their correct terminals. The installation must be carried out by an authorized electrician only.
Before connecting to the electric supply, make sure that:
- The protection fuse and the domestic wiring are suitable to carry the total electric load of the cooker.
- The electricity supply network (mains) has an efficient earth connecting according to the established rules and existing regulations.
- The cooker wire is long enough to reach the socket from where your cooker is situated.
THE MANUFACTURER WILL NOT BE RESPONSIBLE FOR ANY ACCIDENT CAUSED BY NON OBSERVANCE OF SAFETY INSTRUCTION.
GAS HOSE CONNECTION
First connect one end of the rubber hose to the gas regulator and tighten it with a hose clamp. The other end should be pushed tightly into the gas hose connector. Tighten it with a hose clamp, make sure that both ends are tighten otherwise gas might leak and this could be dangerous. Make sure all the control knobs are in the "off" position before connecting the gas supply. Connect the gas regulator to the LPG tank and your units ready for use.
Whenever connecting the hose to the cooker please ensure:
- The hose does not exceed a length of 1 meter.
- The hose must not be very tight or twisted and must not show any sharp bends or kinks. If there is a leak don't repair but replace it.
- The hose must not touch the back of the cooker.

Upon completing the installation, check and make sure that all pipes and hoses are connected correctly. Always use soapy water to check gas leaking. For safety reasons we would advise you to inspect and change the rubber hose for the gas connection yearly.

WARNING - USE THE CORRECT DOMESTIC GAS REGULATOR. DO NOT USE AN INDUSTRIAL GAS REGULATOR. DOMESTIC GAS REGULATOR FOR LPG 30mbar.
CHILD SAFETY
- This appliance has been designed for use by adults. Take care, therefore that children do not attempt to play with it.
- The appliance will become hot during operation and can remain hot for a long time after being switched off.
- Supervise children and pay attention that they do not touch surfaces or remain in the vicinity of the appliance when in use or when not completely cooled.

WARNING - Ensure the anti-tip chain is installed correctly to avoid the lity of the cooker falling over and injuring children.
The chain must be firmly secured to the wall behind the cooker by fitting a wall plug and hook to the wall at the same height as chain
USING COOKER FOR THE FIRST TIME
We recommend that before you cook in your new cooker you heat the oven to 180°C for 2hrs to run in your new oven. After the oven cools wipe it out with hot water and a mild detergent. We also recommend cleaning the racks and shelves before use.
When using the cooker for the first time you may notice the following.....
- There may be a smell. This is quite normal when the cooker is first heated as residual oil from production of parts will be burnt off quickly.
- There may be noises. This is also quite normal as new parts move and settle into place during the initial heating process.
- This product is intended for the cooking of food and must not be used for other purposes.
- Unstable or deformed pans should not be placed on the burners or hot plates in order to avoid accidents caused by spill over. Particular care should be taken when cooking with oil or fat.
- If the appliance is fitted with a cover, its function is to protect burners from dust when closed and when open is to protect kitchen wall from splashes of grease.
- Do not use the lid for other purposes. Always clean the cover before closing.
- All the glass covers are removable to facilitate cleaning.
- Glass or Metal covers should not be closed when the cooker hob is operating. Before close the cover please make sure to take out the wok adaptor.
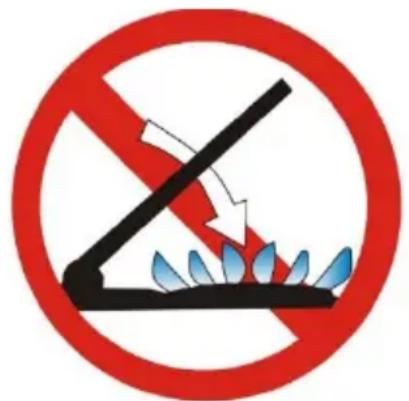
Do not shut lid when burner alight!
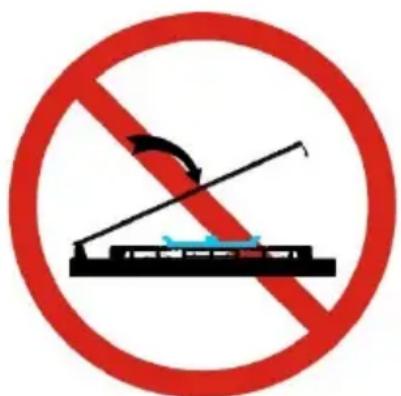
Must take out the wok adaptor before close cover!
- Always ensure that the knobs are in the "O" Off or Stop position when the appliance is not in use.
- Always insert the dripping pan when using the grill or when or cooking meat on the grid. We recommend you pour a little water into the dripping pan to avoid grease burning and creating unpleasant smell.
- Clean dripping pan regularly to ensure food, fat and grease do not build up and create a fire hazard.
- Before maintenance and cleaning, disconnect the appliance and allow cooling down. For reasons of hygiene and safety this appliance must always be kept clean.
- Take care when using cleaning products in spray form: never direct the spray onto the electrical wiring, thermostat and bulb.
- When placing food in the oven, or when removing a large quantity of oil, juice, etc., any spills onto the bottom of the oven must be cleaned before starting to
cook to avoid unpleasant smoke and also the possibility of these substances catching fire.
- Ensure that air can circulate around the gas appliance. Poor ventilation can result in lack of oxygen and extinguish the flame.
- The use of a gas cooking appliance produces heat and humidity in the room where it is installed.
- Ensure good ventilation of the room, keep adequate natural ventilation or install an extractor hood with a discharge tube.
• In case of doubt ask installer for advice.
- Supply the appliance with the type of gas stamped on the relevant label situated in the immediate vicinity of the gas connection tube.
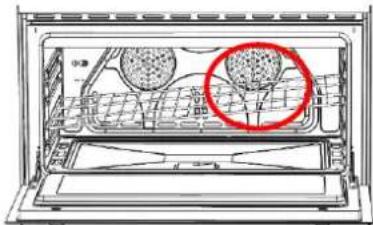
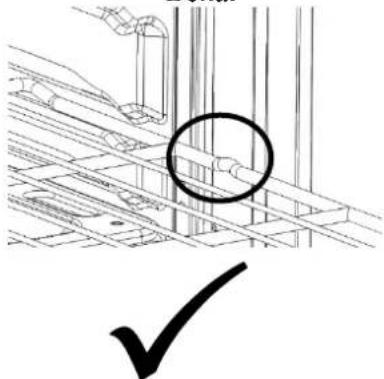
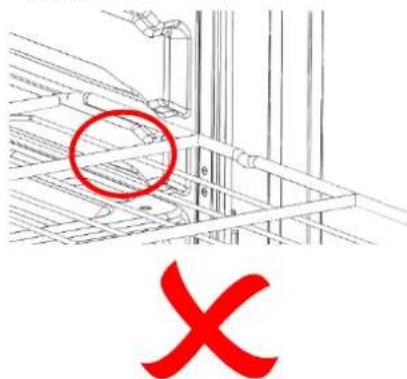
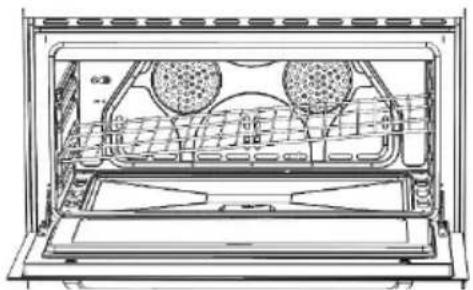
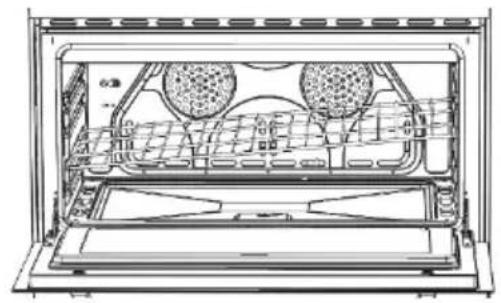
- Ensure that the oven grids are inserted correctly.(See instruction as below.)
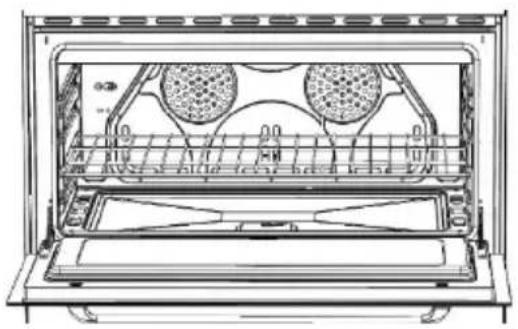
natural_image
Technical line drawing of an oven with two circular components and a tray (no text or symbols)Correct
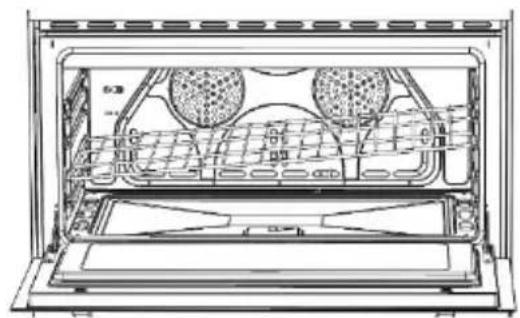
natural_image
Technical line drawing of an oven interior showing internal compartments and ventilation ducts (no text or symbols)Incorrect
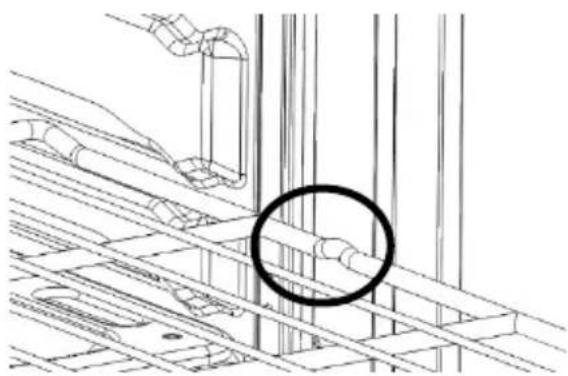
natural_image
Technical line drawing of a mechanical assembly with pipes and components (no text or symbols)
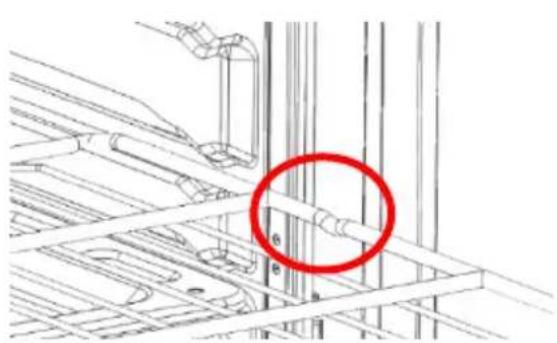
natural_image
Technical line drawing of a structural framework with a red circle highlighting a specific component (no text or symbols present)
- The gas oven becomes hot with the movement of air. The holes on the bottom of the oven must never be obstructed.
- Do not cover the sides of the oven with aluminum foil, particularly the lower part of the opening at the base of the gas oven.
• The appliance is heavy, move it carefully.
- To facilitate ignition, light the burners before placing pans on the grid. Check that the flame is regular.
• Always lower the flame or turn it off before removing the pan.
- Ensure burner caps are installed correctly
USING THE GAS HOB BURNERS

Make sure that burners are always in position and located correctly.
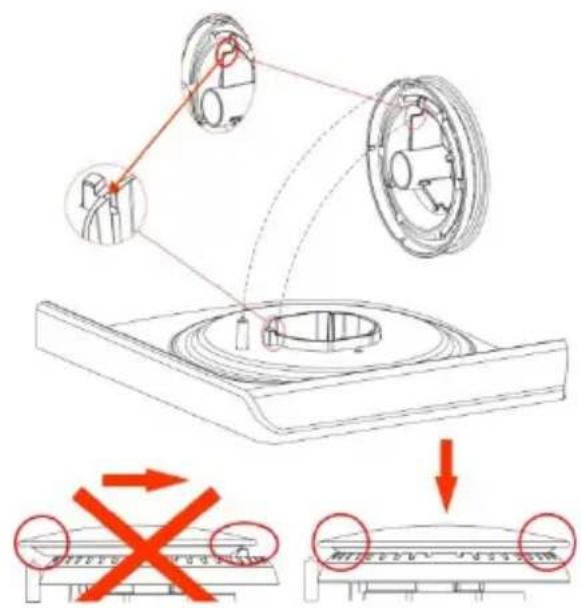
Fish burner and griddle (EKG9688X)
Before using the fish burner, you need to install tray as shown in the figure below.
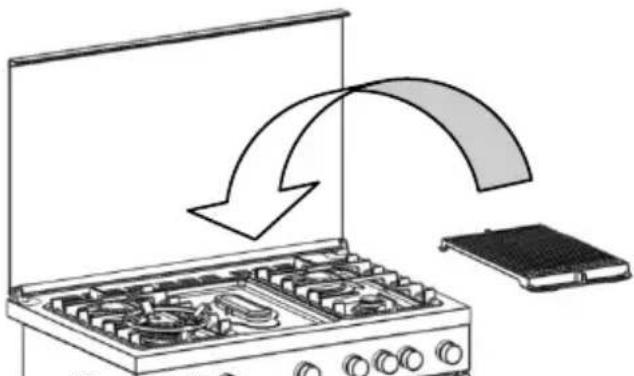
natural_image
Illustration of a gas stove with cooling fans and a flat-screen appliance, showing airflow direction (no text or symbols)Control knobs on the gas burners
The knobs for the gas burners of the cooker are found on the control panel. The regulating knobs should be turned in anti-clockwise direction until the small flame symbol, vice-versafor the larger flame symbol.
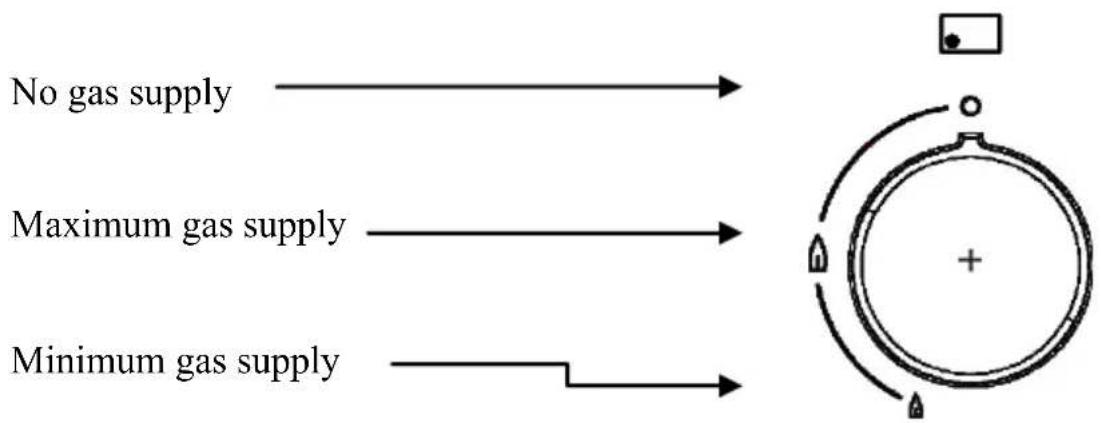
Ignition of the hob gas burners

To light up the burner, keep pushing the ignition button as indicated by Then push in the knob and turn it anti-clockwise to maximum, and hold it for 3 to 5 seconds.
The ignition will spark and ignite the burner. At this position the gas supply is at the maximum and the flame also at its maximum.
You can reduce the flame size by turning the knob in anti-clockwise direction to achieve your requirements.
Should the burner fail to light up, turn the knob to its original position and try again. Your burner flame should be blue in colour.
NOTE -When first used, the gas burner will not ignite immediately.
Time is required for the LPG to fully fill the operating system.
For 90cm ovens with bottle compartment, this same symptom will also be present when the gas cylinder has emptied and a new cylinder installed.
Air adjustment of the burner body
The mixing ratio of LPG and air is important to provide complete combustion of gas and to obtain a blue flame. The adjustment and nozzle used for each individual burner body on your cooker has been designed so as to achieve this requirement.
Manual ignition of the Oven burner
Open the oven door, then push and turn the oven knob in an anti-clockwise direction to the maximum position, introduce a small flame or spark lighter to the small ignition hole located in the front of the oven burner cover on the bottom of your oven.
Manual ignition of the Grill burner
Open the oven door, then push and turn the oven knob in anticlockwise direction to the maximum position and hold a flame near the gas grill burner holes. Check if the burner is lighted.
IMPORTANT SAFETY: Do not slam the oven door when closing.
- Gently close the oven door, and then check if the burner is lighted by looking through the window at the ignition hole. If flame has extinguished, immediately re-light the oven.
- After few minutes, check the temperature and adjust the oven control knob if necessary to obtain the required level.
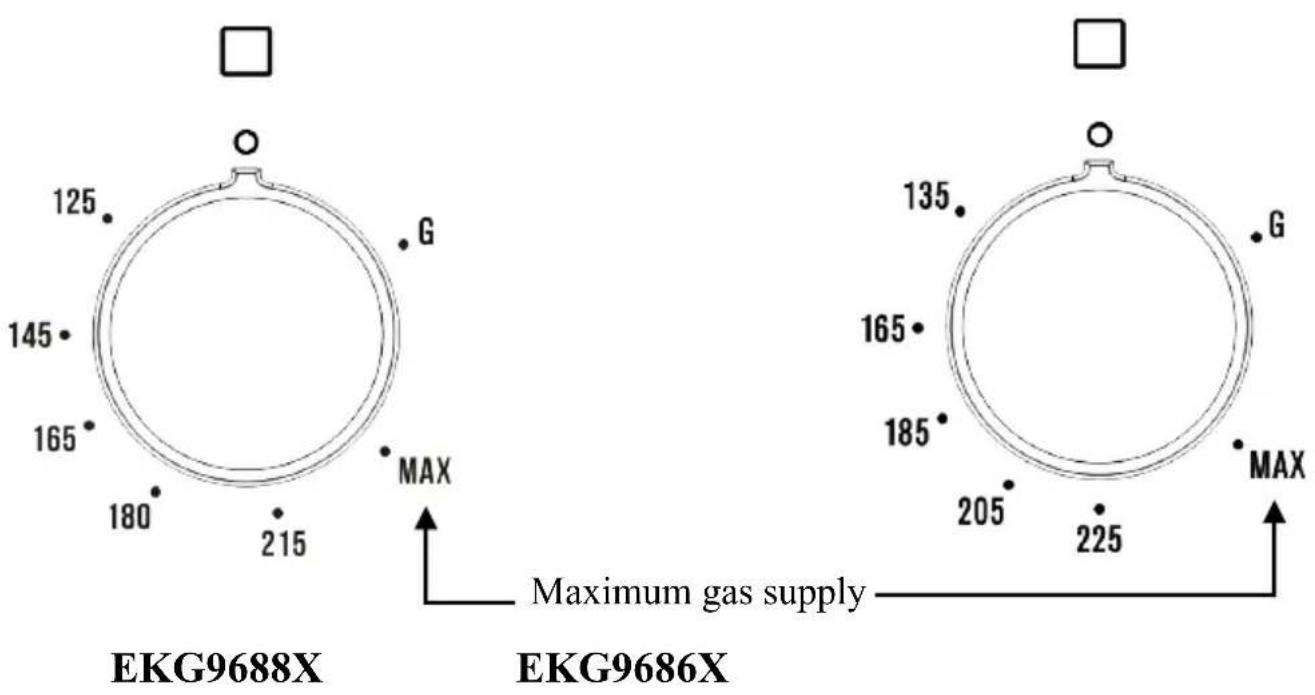
IMPOTRANT SAFETY: Apply knob protection plate when using gas grill burner.
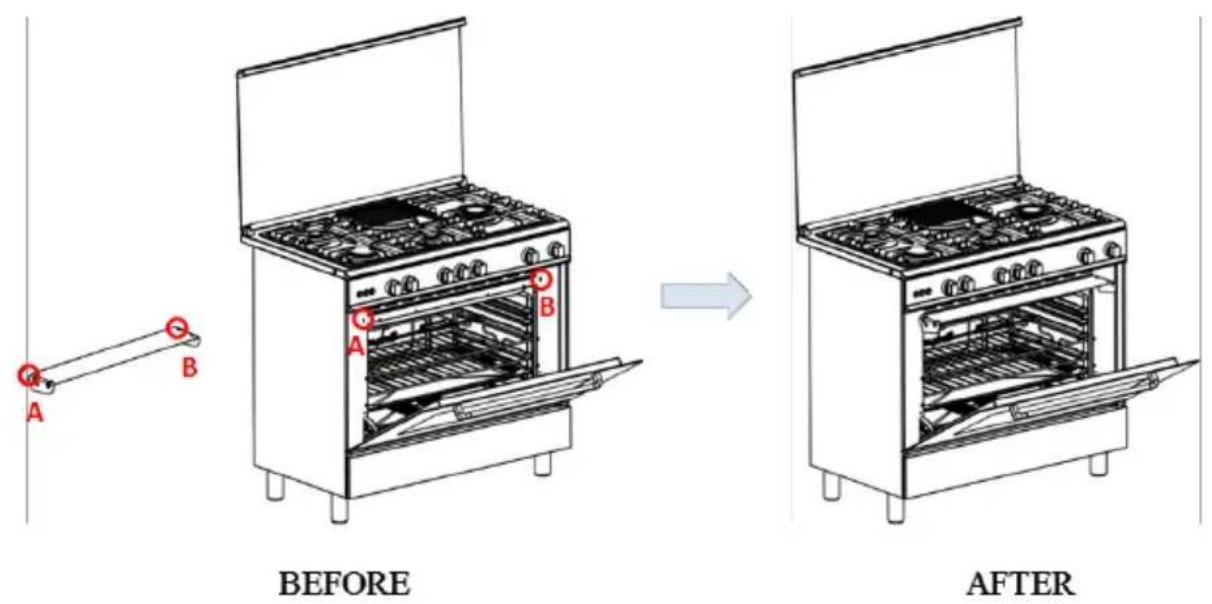
(Knob protection plate is stored at the compartment.)
After a few minutes check the temperature and adjust the grill control if necessary to obtain the required level.
IMPORTANT SAFETY:
In the event the flame in the oven extinguishes by itself, please take the following steps below:
1) SHUT OFF THE OVEN CONTROL KNOBON GAS OVEN MODEL ALSO SHUT OFF THEGASCYLINDER VALVE.
2) DO NOT RE-IGNITE THE OVEN IMMEDIATELY.
3) OPEN THE OVEN DOOR TO LET OUT UNBURNTGASFOR AT LEAST 15 MINUTES.
4) AFTER COMPLETING STEPS 1 TO 3, RE-IGNITE THEOVEN BURNER CAREFULLY WITH A SPARK GUN.
If the oven flame continues to go out or the similar phenomenon on happens, please contact your nearest Service Centre.
USING THE ELECTRIC OVEN
ELECTRIC OVEN FUNCTIONS
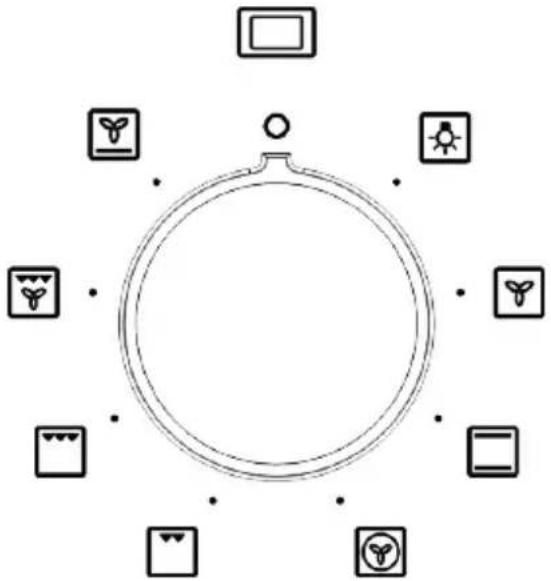
Our oven functions allow the user to have flexibility in the method of cooking and provide heating alternatives to suit a wide variety of dishes. The oven light stays lit in all selector positions.
flowchart
graph TD
    A[" "] --> B[" "]
    A --> C[" "]
    A --> D[" "]
    A --> E[" "]
    A --> F[" "]
    A --> G[" "]
    A --> H[" "]
    A --> I[" "]
    A --> J[" "]
    A --> K[" "]
    A --> L[" "]
    A --> M[" "]
    A --> N[" "]
    A --> O[" "]
    A --> P[" "]
    A --> Q[" "]
    A --> R[" "]
    A --> S[" "]
    A --> T[" "]
    A --> U[" "]
    A --> V[" "]
    A --> W[" "]
    A --> X[" "]
EKM9689X
Oven light

The oven light and general pilot light come on and will remain on as long as the oven is in use.
Defrost

No heat is emitted. Uses low temperature air that is circulated by the fan for easy defrosting, reducing the time normally required by about 1/3.
Conventional Heat

Heat comes from two elements - top and bottom. Bake and roast on one level. Suitable for cakes, muffins, pizzas, roasts and delicate egg dishes.
Hot Air

Heat comes from the element surrounding the fan for faster heat-up and shorter cooking times at lower temperatures. Evenly circulates the hot air around the oven cavity for even cooking results. Ideal for baking or cooking on up to 3 levels.
Grill

This cooking mode is used for grilling small amounts of food such as steak, chops, sausages and fish (low energy consumption). Heat comes from the top grill element which directs radiant heat onto the food.
Fast Grill

Heat comes from 2 powerful top grill elements which direct radiant heat onto the food. Used for grilling large quantities of food and cooks faster than the normal grill.
Turbo Grill

Heat comes from two powerful top grill elements and is spread evenly around the oven by the fan, allowing for faster and more precise cooking results. Used for roasting larger joints of meat or poultry on one level. Suitable for browning.
Bottom Heat with Fan

Heat comes from bottom elements, fan assists to evenly distribute the heat around the oven, good for extra browning the bottom of pastries.
USING ELECTRIC GRILL

The electric grill is operated by the selector switch on the control panel that marked with the grill symbol.
IMPORTANT -Before Grilling, hook the knob protection plate to the bottom of the front control panel. (For fitment of knob protection plate see illustration on P10.)
When cooking with the electric grill, you are advised to leave the oven door half open and to fit the knob protection plate.
1) Place the oven drip pan on the runner position under the grid rack on which you want to grill.
2) Close the oven door until it touches the knob protection plate.
3) Switch on the grill button to start grilling operation.
NOTE – Before placing food into the oven for grilling, it is advisable to preheat the grill for at least 10 minutes)
• For gas ovens the light is controlled by a push switch on the control panel.
• For electric oven, this light continuously illuminates the oven when in use.
• The light switch is on the function selector.
- The light can be used while cooking or cleaning the oven.
USING MECHANICAL TIMER
Some models are fitted with a mechanical 60min timer.
To use the timer, turn the control knob clockwise to full setting first (step1), then slowly turn it backwards to the position of the time required (step 2). The timer will ring once the pre-set indicated time is reached, however the oven will remain on.
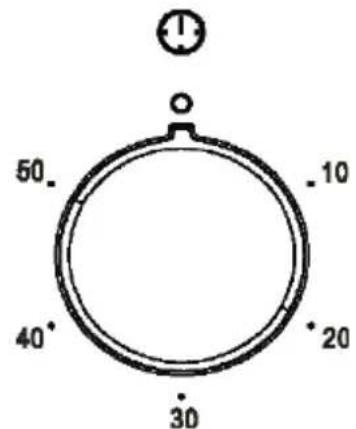
NOTE - If you don't turn the control knob clockwise to full setting, the timer will ring for a shorter period than normal, and maybe rang faster than the actual setting.
USING TURNSPIT

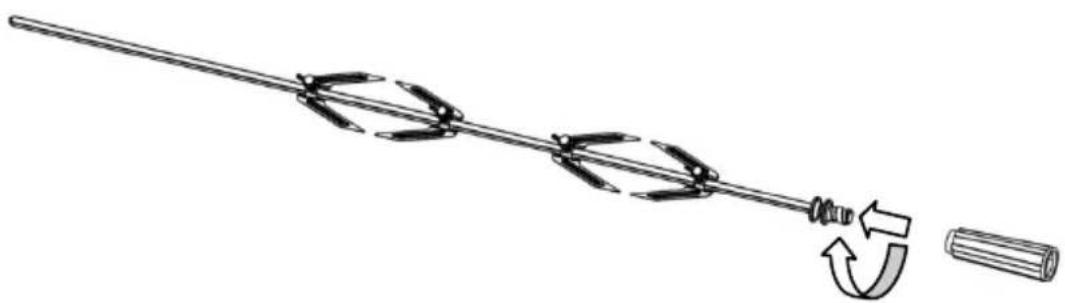
- First, insert the forked branch into the spindle of motor. Then take out the hook according to the direction of the figure below. Next, put the turnspit in which it has a slot hang on the hook. (While removing in reverse order.)
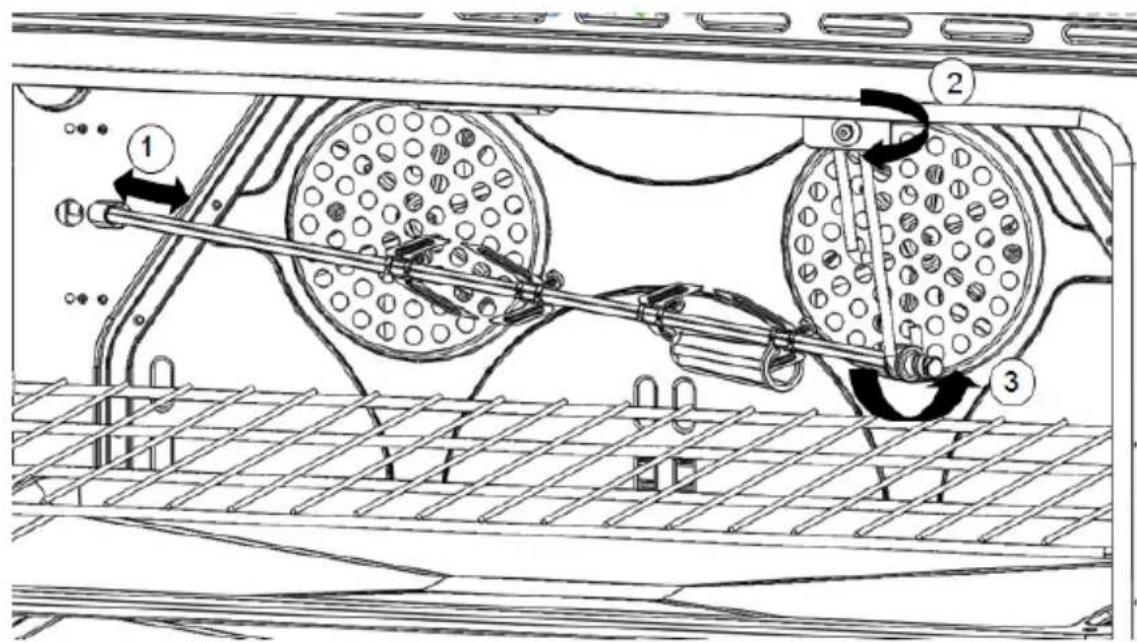
- When you use the turnspit, you need to screw out the forks of the rotisserie spit, and take out the insulating handle. Then put the food on the forked branch and use the forks to clamp the food. After finished using the turnspit, please clear with detergent and dry with a cloth.
- When carrying turnspit with food on it, please hold the turnspit with two hands, one at each side.
natural_image
Diagram of a mechanical tool with a rotating shaft and directional arrows indicating motion (no text or symbols)
Turnspit can hold the weight up to 2.5kg of food.
For baking cakes:
- Pre-heat the oven for at least 10minutes before use.
- Do not open the oven door when baking. The jet of cold air will block the raising block the raising process of some cakes, pastries and soufflés.
- To check if your cake is baked, insert a toothpick into the mixture; if it comes out clean, the cake is ready. Wait until at least 3/4 of the cooking time has passed before doing this check.
As a general rule remember that:
A dish which is well - cooked on the outside but not sufficiently cooked inside would have required a lower temperature and longer cooking time.
On the contrary, a "dry" texture would have required a shorter time and higher cooking temperature.
For cooking meat:
- Meat to be cooked in the oven should weigh at least 1 kilogram to avoid becoming too dry. If you want to roasts with a good colour, use very little oil.
• If the piece of meat is lean, use oil or butter or a little of both. - Butter or oil on the other hand unnecessary if the piece as a strip of fat. If the piece has a strip of fat on one side only, put it in the oven with this side upwards: When melting the fat will grease the lower side sufficiently.
- Red meat should be removed from the fridge one hour before cooking otherwise the sudden change of temperature could cause it to become tough. A roast, especially for red meat, must not be salted at the beginning of cooking as salt causes juices and blood to seep out of the meat, thus preventing the formation of a well - browned crust. If is advisable to salt the outside of the meat after just over half the cooking time.
- Place the roast in the oven in a dish having a low rim; a deep dish shields heat.
- Meat can be placed on an oven proof dish or directly on the grill, under which the dripping pan will be inserted to collect juice. Ingredients for gravy should only be put in the dish immediately if cooking time is brief, otherwise they should be added during the last half hour. Begin cooking raw meat at a high temperature, reducing the temperature to finish cooking the inside. The cooking temperature for white meat can be mode-rate throughout.
- The degree of cooking can be checked by pressing the meat with a fork, if it penetrates easily then it is cooked. At the end of cooking it is advisable to wait at least 15 minutes before cutting the meat in order that the juices are not lost. Before serving, plates can be kept warm in the oven at minimum temperature.
For cooking fish:
- Cook small fish from start to finish at a high temperature. Cook medium-sized fish initially at a high temperature and then gradually lower the temperature.
- Cook large fish at a moderate temperature from start to finish.
- To check that baked fish is cooked by gently lifting one side of the gut; the meat must be white and opaque throughout, except in the case of salmon, trout or similar.
For Grilling:
- The following types of meat are suitable for grilling. Mostly meat or offal cut in slices or pieces of various sizes, but not very thick, poultry cut in half and flattened, fish, some vegetables (e.g Courgettes, aubergines, tomatoes,etc.), skewers of meat or fish and seafood. Meat and fish to be grilled should be lightly brushed with oil and always placed on the grill; meat should be salted upon completion of cooking; whereas fish should be salted into before cooking. The grill should be positioned in the guides nearest or furthest from the grill element according to the thickness of the meat, In order to avoid burning the surface and having the inside insufficiently cooked.
- The formation of smoke caused by drops of juice and fat can be avoided by pouring 1 or 2 glasses of water into the dripping pan.
- The grill can also be used to brown, toast bread and grill certain types of fruit, such as bananas, halved grapefruit, slices of pineapple, apple, etc. Fruit should not be placed too near the source of heat.
The "TIPS FOR OVEN COOKING" relating to cooking in the oven and by grill is provided as a guide. Experience will show possible variations to the values set out in the table.
NOTE –If in doubt, always carefully follow the indications given in the in the recipes you intend to follow.

Do not place any utensils such as dripping pan, cake tins, casseroles, pyrex s, aluminium foil or others on the base of the oven when the oven is in use. Accumulation of heat might affect the cooking results and also damage the oven enamel.
Cooking times can vary according to the type of food, its density and its size. It is advisable to watch when cooking for the first time and check results since when preparing the same dishes, in the same conditions, similar results are obtained.
| TYPE OF FOOD | GAS OVEN | ELECTRIC OVEN | CONVECTION | TEMPERATURE DEGRESS C | TIME |
 |  |  | |||
| SHELF HEIGHT | |||||
| SWEETS | |||||
| Pastry 3 4 2 (2/4) 180/200 30/40 | |||||
| Sponge cakes 2 3 2 (1/3) 190/210 30/40 | |||||
| Jam tart 2 3 2 (1/3) 190/210 30/40 | |||||
| Fruit cake 3 4 2 (2/4) 180/200 30/40 | |||||
| FISH | |||||
| Fillets or slices | 2 3 2 (1/3) 160/180 | 15/20 | |||
| Roast | 2 3 2 (1/3) 180/200 | 25/35 | |||
| In foil 2 3 2 (2/4) 190/210 25/35 | |||||
| MEAT | |||||
| Veal | 3 4 2 (2/4) 180/200 | 60/70 | |||
| Pork | 3 4 2 (2/4) 180/200 | 60/70 | |||
| Chicken | 3 4 2 (2/4) 190/210 | 80/90 | |||
| Turkey | 3 4 2 (2/4) 190/210 | 80/90 | |||
| Beef | 3 4 2 (2/4) 200/220 | 70/80 | |||
| Lamb | 3 4 2 (2/4) 200/220 | 80/90 | |||
| BREAD and PIZZA | |||||
| Pizza | 3 4 2 (2/4) 190/210 | 20/30 | |||
| Muffins 3 4 2 (2/4) 180/200 20/30 | |||||
| Bread | 3 4 2 (2/4) 210/230 | 30/40 | |||
| BAKES | |||||
| Vegetable bake | 2 3 2 (1/3) 170/190 | 30/40 | |||
| Pasta bake | 2 3 2 (1/3) 180/200 | 30/40 | |||
Before each operation, disconnect the unit by unplugging the socket and gas hose.
Oven lamp replacement
Disconnect the power supply to the appliance, unscrew the lamp and replace it with a high temperature fitting (300°C) with the following specifications:-
Voltage: 220-240V, 50-60Hz)
Power: 23W
Convection: E14
NOTE- Use only a lamp designed for high temperature (300°C)
Cleaning the Hob
- Drops of sauce, fruit juice etc, should be removed as soon possible with a soft cloth soaked in warm detergent water.

Do not use steel wool or knives to take off stubborn layers of dirt or grease.
Remove stubborn marks with a well wet soap impregnated pad, but care must be taken not to scratch the enamel.
- Wash the enameled grids with water and detergent; these can also be washed in a dishwasher.
- Take off the burner covers and the grids and wash them carefully with warm water and detergent. Dry them well before putting them back in position.

Make sure that burner covers are always in position and located correctly.
- The burner can be cleaned by rubbing with steel wool or a slightly abrasive cloth.
- In cookers with an automatic ignition the spark plug should be cleaned periodically and accurately to avoid difficulties in lighting; furthermore check that the burner holes are not obstructed.
Cleaning the Door and Glass Hob Cover
- Clean the oven door and glass lid only with warm water, and avoid the use of rough cloths or abrasive substance.
Cleaning the Oven
- Clean the oven cavity carefully after use when it is still warm.
- When the oven is slightly warm it is easier to take off deposits of fats or other substances such as fruit juice, sugar particles or fat. You may use warm detergent water or an appropriate spray oven cleaner.
- Do not spray directly at the mat steel as this can damage them and pose hazard. Clean the oven accessories (grate, hot-plate, etc.) with warm water and detergent. Remove possible incrustations with a slightly abrasive powder.

WARNING - Never line any part of the oven with aluminium foil particularly the bottom. It can result in an accumulation of heat which might affect the cooking results and also damage the oven enamel.
Gas Cylinder Safety
- Periodically check the condition of the flexible hose of gas connection and have it replaced by skilled technicians as soon as it shows abnormalities. Annual replacement is recommended.
- For model with a gas cylinder compartment, do not use this space to keep a non-connected or empty cylinder.
- The unit equipped with cylinder compartment must be installed in such a way to ensure sufficient ventilation.
Note - The gas cylinder may become warm during operation of the cooker. This is normal... If however the cylinder becomes too hot to touch switch off the cooker and call your Customer Service Center.
TROUBLESHOOTING
PROBLEMS
Flow of gas seems abnormal
- Check that gas cylinder is not empty.
- Burner holes are dirty and clogged.
• Gas regulator is not working.
Smell of gas
- Gas valve is open.
• Gas hose is leaking (check with soapy water).
• Gas hose is bent or damaged or not positioned properly
Oven does not heat up
• Gas valve is not open.
- Oven knobs not opened properly.
- Oven fire has blown out (for gas oven).
• Power supply is not switched on (for electric oven).
Cooker smokes
- Burning of oils and fats left behind (oils & fats must be cleared off from oven after cooking).
GUARANTEE, AFTER SALES SERVICE AND SPARE PARTS
GUARANTEE AND SERVICE
- We, Electrolux, undertake that if within 12 months of the date of the purchase this Electrolux appliance or any part thereof is proved to be defective by reason only of faulty workmanship or materials, we will, at our option repair or replace the same FREE OF CHARGE for labour, materials or carriage on condition that:
- The appliance has been correctly installed and used only on the electricity supply stated on the rating plate.
- The appliance has been used for normal domestic purposes only, and in accordance with the manufacturer instructions.
- The appliance has not been serviced, maintained, repaired, taken apart or tampered with by any person not authorized by us.
- All service work under this guarantee must be undertaken by an Electrolux Service Centre. Any appliance or defective part replaced shall become the company property. This warranty is in addition to your statutory and other legal rights. This warranty does not include maintenance, like cleaning of hood.
The manufacturer waives all liability for failure to observe the instructions for the appropriate installation, maintenance and use of the appliance.
For further enquiries or after sales service, please contact you Consumer Care Center.
| Consumer Care Tel : (+66 2) 725 9000Electrolux Thailand Co., Ltd.Electrolux Building 14th Floor1910 New Phetchaburi Road,Bangkapi, Huai Khwang, Bangkok 10310Office Tel : (+66 2) 7259100Office Fax : (+66 2) 7259299Email : customercarethai@electrolux.com | Consumer Care Center Tel: 1300-88-11-22Electrolux Home Appliances Sdn. Bhd.Corporate Office Address: Unit T2-7, 7th Floor,Tower 2 , Jaya33 Hyper office, No. 3,JalanSemangat, Seksyen 13,46100 Petaling Jaya,SelangorOffice Tel : (+60 3) 7843 5999Office Fax : (+60 3) 7955 5511Consumer Care Center Address: Lot C6, No. 28,Jalan 15/22, Taman Perindustrain Tiong Nam,40200 Shah Alam, SelangorConsumer Care Center Fax : (+60 3) 5524 2521Email : malaysia.customercare@electrolux.com |
| IndonesiaHotline service: 08041119999PT. Electrolux IndonesiaElectrolux BuildingJl.AbdulMuis No.34,Petojo Selatan,Gambir Jakarta Pusat 10160Email : customercare@electrolux.co.idSMS & WA : 0812.8088.8863 | PhilippinesConsumer Care Center Toll Free : 1-800-10-845-CARE 2273Consumer Care Hotline : (+63 2) 845 CARE 2273Electrolux Philippines, Inc.10th Floor. W5th Avenue Building5th Avenue Corner 32nd StreetBonifacio Global City,Taguig Philippines 1634Trunkline: +63 2 737- 4756Website : www.electrolux.com.phEmail : wecare@electrolux.com |
| VietnamConsumer Care Center Toll Free : 1800-58-88-99Tel : (+84 8) 3910 5465Electrolux Vietnam Ltd.Floor 9th, A&B Tower76 Le Lai street - Ben Thanh Ward - District 1Ho Chi Minh City , VietnamOffice Tel : (+84 8) 3910 5465Office Fax : (+84 8) 3910 5470Email : vncare@electrolux.com | SingaporeConsumer Care Center Tel: (+65) 6727 3699Electrolux S.E.A. Pte Ltd.1 Fusionopolis Place,#07-10 Galaxis, West LobbySingapore 138522.Office Fax : (+65) 6727 3611Email : customer-care.sin@electrolux.com |
| HongkongTel: (+852) 8203 0298Dah Chong Hong, Ltd. - Service Centre8/F., Yee Lim Godown Block C2-28 KwaiLok Street, Kwai Chung, N.T. |
DAFTAR ISI
Spesifikasi 2
natural_image
Technical line drawing of a structural support frame with mounting holes and supports (no text or symbols)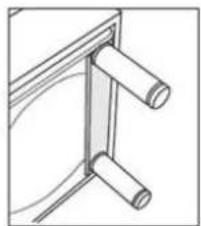
natural_image
Pure mechanical assembly diagram showing two cylindrical components mounted on a frame (no text or symbols)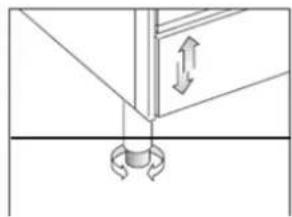
natural_image
Simple line drawing of a mechanical assembly with arrows indicating direction (no text or symbols)MENGGUNAKAN KOMPOR UNTUK PERTAMA KALINYA
natural_image
Technical line drawing of an oven with two circular components mounted on a tray (no text or symbols)Salah
natural_image
Interior view of an oven with two circular insets showing internal structures (no text or symbols visible)Benar
natural_image
Technical line drawing of a structural framework with a circled detail and a checkmark below (no text or symbols)Salah
natural_image
Illustration of a gas stove with cooling fans and a portable refrigerator on top (no text or symbols)natural_image
Diagram of a mechanical tool with a rotating arm and a cylindrical component (no text or symbols)Tusukan pemanggangdapat menahan bobot makanan hingga maksimum 2,5 kg.
TIPS UNTUK MEMASAK MENGGUNAKAN OVEN
natural_image
Technical line drawing of a structural support frame with mounting holes and vertical supports (no text or symbols)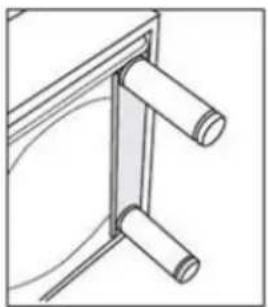
natural_image
Pure mechanical assembly diagram showing two cylindrical rods mounted on a vertical frame (no text or symbols)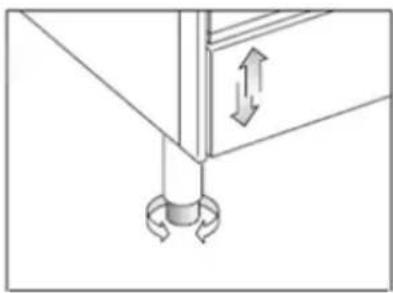
natural_image
Pure mechanical diagram showing a lever and rotating base with directional arrows (no text or symbols)natural_image
Line drawing of two people assembling a large oven on a tiled floor (no text or symbols)ถูกต้อง
natural_image
Line drawing of a person using a kitchen appliance with a diagonal line crossing the floor (no text or symbols)ไม่ถูกต้อง
natural_image
Simple line drawing of a person pushing a cart with a crossed diagonal line (no text or symbols)การใช้เตาครั้งแรก
natural_image
Technical line drawing of an oven with two circular components and a tray (no text or symbols)ถูกต้อง ไม่ถูกต้อง
natural_image
Technical line drawing of an open oven with two circular components and ventilation grilles (no text or symbols)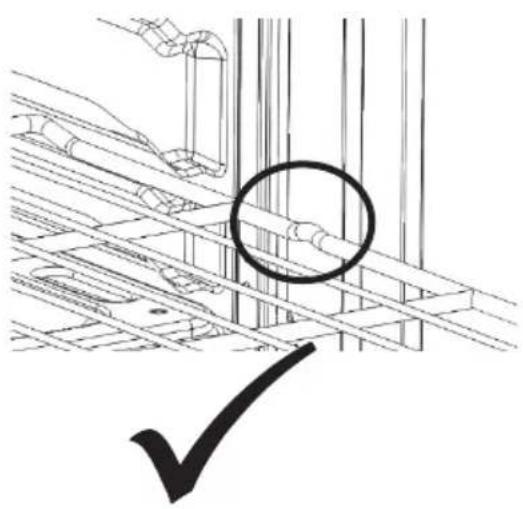
natural_image
Technical line drawing of a mechanical assembly with a circled detail (no text or symbols)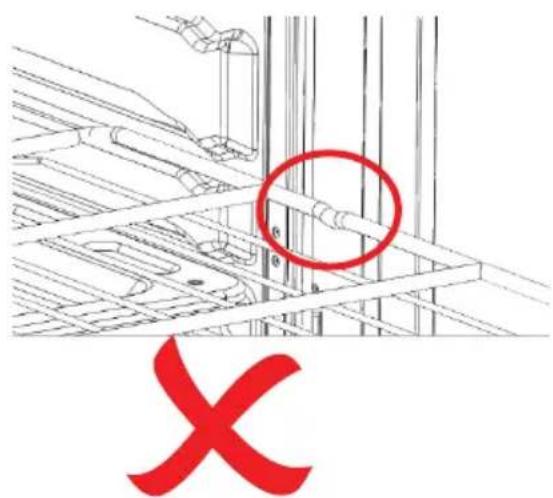
natural_image
Illustration of a gas stove with cooling fans and a battery on top (no text or symbols)EKG9686X
natural_image
Diagram of a mechanical tool with a rotating shaft and base, showing motion sequence (no text or symbols)
灶具通风要求
首次使用灶具
请勿在使用炉灶过程中关上盖子。
关上盖子之前请取出炒锅适配架。
natural_image
Technical line drawing of an oven with two circular components and a tray (no text or symbols)正确 错误
natural_image
Technical line drawing of an oven interior showing internal compartments and ventilation ducts (no text or symbols)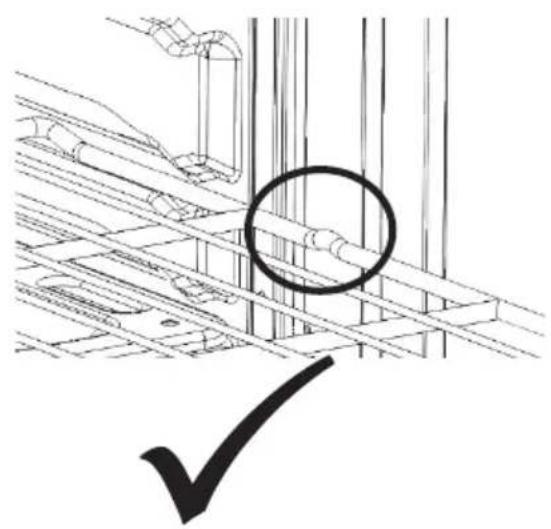
natural_image
Technical line drawing of a mechanical assembly with a circled detail (no text or symbols)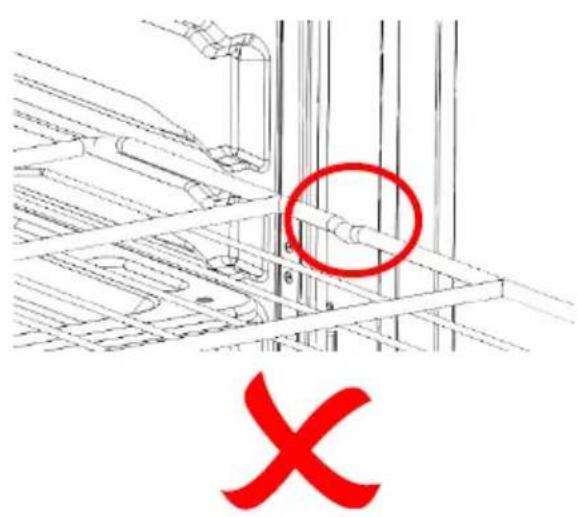
炉灶与喷嘴必须正确匹配
鱼型火眼与搁架(EKG9688X)
natural_image
Line drawing of a gas stove with cooling fans and a portable stove on top, showing airflow direction (no text or symbols)燃气炉控制旋钮
之前 之后
(把旋钮保护板收纳于储物格中)。
natural_image
Diagram of a mechanical tool with three blades and a cylindrical component, showing motion direction (no text or symbols)烤肉叉可承受2.5公斤重的食品。
烤箱烹饪提示
糕点烘培:
Electrolux Building 14th Floor
1910 New Phetchaburi Road,
Bangkapi, Huai Khwang, Bangkok 10310
Office Tel: (+66 2) 7259100
Office Fax: (+66 2) 7259299
Email: customercarethai@electrolux.com
Indonesia
Hotline service: 08041119999
Floor 9th, A&B Tower
76 Le Lai street - Ben Thanh Ward -
District 1
Ho Chi Minh City, Vietnam
Office Tel: (+84 8) 3910 5465
Office Fax : (+84 8) 3910 5470
Email: vncare@electrolux.com
Hongkong
Tel: (+852) 8203 0298
Dah Chong Hong, Ltd. - Service Centre
8/F., Yee Lim Godown Block C
2-28 KwaiLok Street, Kwai Chung, N.T.
Consumer Care Center Tel: 1300-88-11-22
Electrolux Home Appliances Sdn. Bhd.
Corporate Office Address: Unit T2-7, 7th Floor,
Tower 2, Jaya33 Hyperoffice, No. 3, Jalan
Semangat, Seksyen 13, 46100 Petaling Jaya,
Selangor
Office Tel: (+60 3) 7843 5999
Office Fax: (+60 3) 7955 5511
Consumer Care Center Address: Lot C6, No. 28,
Jalan 15/22, Taman PerindustrainTiong Nam,
40200 Shah Alam, Selangor
Consumer Care Center Fax : (+60 3) 5524 2521
Email : malaysia.customercare@electrolux.com
Philippines
Consumer Care Center Toll Free: 1-800-10-845
CARE 2273
Consumer Care Hotline : (+63 2) 845 CARE 2273
Electrolux Philippines, Inc.
10th Floor. W5th Avenue Building
5th Avenue Corner 32nd Street
Bonifacio Global City,
Taguig Philippines 1634
Trunkline: +63 2 737 - 4756
Website : www.electrolux.com.ph
Email : wecare@electrolux.com
Singapore
Consumer Care Center Tel: (+65) 6727 3699
Electrolux S.E.A. Pte Ltd.
1 Fusionopolis Place,
07-10 Galaxis, West Lobby
Singapore 138522.
Office Fax: (+65) 6727 3611
Email: customer-care.sin@electrolux.com
- IMPORTANT SAFETY INFORMATION
- INSTALLATION
- Cooker Ventilation
- WARNING - This unit can be installed and can work only in constantly ted rooms, according to the national rules in force.
- Combustion Products Discharge
- WARNING - If the oven touches the side of other pieces of the kitchen are, ensure they can withstand a temperature of 75° C.
- ELECTRICAL CONNECTION
- THE MANUFACTURER WILL NOT BE RESPONSIBLE FOR ANY ACCIDENT CAUSED BY NON OBSERVANCE OF SAFETY INSTRUCTION.
- GAS HOSE CONNECTION
- Whenever connecting the hose to the cooker please ensure:
- CHILD SAFETY
- USING COOKER FOR THE FIRST TIME
- USING THE GAS HOB BURNERS
- Fish burner and griddle (EKG9688X)
- Control knobs on the gas burners
- Ignition of the hob gas burners
- Air adjustment of the burner body
- Manual ignition of the Oven burner
- Manual ignition of the Grill burner
- IMPORTANT SAFETY: Do not slam the oven door when closing.
- IMPOTRANT SAFETY: Apply knob protection plate when using gas grill burner.
- (Knob protection plate is stored at the compartment.)
- IMPORTANT SAFETY:
- USING THE ELECTRIC OVEN
- ELECTRIC OVEN FUNCTIONS
- Oven light
- Defrost
- Conventional Heat
- Hot Air
- Grill
- Fast Grill
- Turbo Grill
- Bottom Heat with Fan
- USING ELECTRIC GRILL
- IMPORTANT -Before Grilling, hook the knob protection plate to the bottom of the front control panel. (For fitment of knob protection plate see illustration on P10.)
- USING MECHANICAL TIMER
- USING TURNSPIT
- For baking cakes:
- As a general rule remember that:
- For cooking meat:
- For cooking fish:
- For Grilling:
- Oven lamp replacement
- NOTE- Use only a lamp designed for high temperature (300°C)
- Cleaning the Hob
- Cleaning the Door and Glass Hob Cover
- Cleaning the Oven
- Gas Cylinder Safety
- TROUBLESHOOTING
- PROBLEMS
- Smell of gas
- Oven does not heat up
- Cooker smokes
- GUARANTEE, AFTER SALES SERVICE AND SPARE PARTS
- GUARANTEE AND SERVICE
- DAFTAR ISI
- Spesifikasi 2
- MENGGUNAKAN KOMPOR UNTUK PERTAMA KALINYA
- Tusukan pemanggangdapat menahan bobot makanan hingga maksimum 2,5 kg.
- TIPS UNTUK MEMASAK MENGGUNAKAN OVEN
- การใช้เตาครั้งแรก
- 灶具通风要求
- 首次使用灶具
- 鱼型火眼与搁架(EKG9688X)
- 燃气炉控制旋钮
- (把旋钮保护板收纳于储物格中)。
- 烤肉叉可承受2.5公斤重的食品。
- 烤箱烹饪提示
- 糕点烘培:
- 07-10 Galaxis, West Lobby
Brand : ELECTROLUX
Model : EKM9689X
Category : Cooker