
VPK104 - Video switch ATEN - Free user manual and instructions
Find the device manual for free VPK104 ATEN in PDF.


| Product Type | 4-Key Contact Closure Remote Pad |
| Model | VPK104 |
| Dimensions (L x W x H) | 69.4 x 48.5 x 37.3 mm |
| Weight | Approx. 0.2 kg |
| Power Supply | Powered by connected VP1420/VP1421 (LED Out, +5 VDC, 0.2 A) |
| Number of Keys | 4 |
| Key Type | Contact closure |
| Status LEDs | 4 green LEDs for source selection indication |
| Connection Ports | 1 x LED In (5-pole terminal block), 1 x Contact Out (5-pole terminal block) |
| Package Contents | 1 VPK104 remote pad, 4 x 4-pole terminal blocks, 1 user instructions |
| Mounting Options | Wall box (1-gang) with faceplate |
| Operating Temperature | 0 - 40°C |
| Storage Temperature | -20 - 60°C |
| Humidity | 0 - 80% RH, non-condensing |
| Housing Material | Plastic |
| Compatible Devices | ATEN VP1420 and VP1421 Presentation Switches |
| Control Function | Source selection for a preset display |
| Indicator Function | LED lights green when corresponding source is selected |
| Safety | For indoor use only. Follow installation instructions. |
| Maintenance | Clean with a damp cloth. Do not use liquid or aerosol cleaners. |
Frequently Asked Questions - VPK104 ATEN
User questions about VPK104 ATEN
0 question about this device. Answer the ones you know or ask your own.
Ask a new question about this device
Download the instructions for your Video switch in PDF format for free! Find your manual VPK104 - ATEN and take your electronic device back in hand. On this page are published all the documents necessary for the use of your device. VPK104 by ATEN.
USER MANUAL VPK104 ATEN
Compliance Statements
FEDERAL COMMUNICATIONS COMMISSION INTERFERENCE STATEMENT
This equipment has been tested and found to comply with the limits for a Class A digital device, pursuant to Part 15 of the FCC Rules. These limits are designed to provide reasonable protection against harmful interference when the equipment is operated in a commercial environment. This equipment generates, uses, and can radiate radio frequency energy and, if not installed and used in accordance with the instruction manual, may cause harmful interference to radio communications. Operation of this equipment in a residential area is likely to cause harmful interference in which case the user will be required to correct the interference at his own expense.
The device complies with Part 15 of the FCC Rules. Operation is subject to the following two conditions: (1) this device may not cause harmful interference, and (2) this device must accept any interference received, including interference that may cause undesired operation.
FCC Caution
Any changes or modifications not expressly approved by the party responsible for compliance could void the user's authority to operate this equipment.
Warning
Operation of this equipment in a residential environment could cause radio interference.
Achtung
The terms HDMI, HDMI High-Definition Multimedia Interface, and the HDMI Logo are trademarks or registered trademarks of HDMI Licensing Administrator, Inc.

RoHS
This product is RoHS compliant.
About this Manual
This user manual is provided to help you get the most from the 4 x 2 True 4K Presentation Matrix Switch and Remote Pad. It covers all aspects of installation, configuration, and operation for the following models:
| Device Type Device | Model Device Name | |
| Presentation Switch | VP1420 4 x | True 4K Presentation Matrix Switch |
| VP1421 4 x | True 4K Presentation Matrix Switch with Scaling, DSP, and HDBaseT-Lite | |
| Remote Pad VPK104 | 4-Key Contact C | Closure Remote Pad |
Chapter 1, Introduction introduces you to the VP1420 / VP1421. Its purpose, features, benefits, and installation considerations are described.
Chapter 2, Hardware Setup introduces the panel components of the 4 x 2 True 4K Presentation Matrix Switch and the IR Remote Control, and details the steps to quickly and safely install the VP1420 / VP1421.
Chapter 3, Local Operation provides information on how to locally operate and access the system settings via the panel pushbuttons and IR remote control.
Chapter 4, Remote Operation provides details on remote management and control tasks via the system web interface.
Chapter 5, CLI Commands provides details on the functions and RS-232 commands that you can use to control the VP1420 / VP1421 using a serial controller.
Chapter 6, Video Presentation Control App provides details on remotely configuring system settings via the ATEN Video Presentation Control App.
Appendix provides a list of safety instructions and precautions, contact information for ATEN technical support, product specifications, and other technical information.
Note:
- Read this manual thoroughly and follow the installation and operation procedures carefully to prevent any damage to the unit or any connected devices.
- ATEN regularly updates its product documentation for new features and fixes. For an up-to-date VP1420 / VP1421 documentation, visit http://www.aten.com/global/en/
Package Contents
Make sure that all of the items are present and in good order. If anything is missing or was damaged in shipping, please contact your dealer for further assistance.
VP1420
◆ 1 VP1420 4 x 2 True 4K Presentation Matrix Switch
◆ 1 IR receiver
◆ 1 IR remote control
◆ 2 3-pole terminal blocks
◆ 2 5-pole terminal blocks
◆ 1 power adapter
◆ 1 user instructions
VP1421
◆ 1 VP1421 4 x 2 True 4K Presentation Matrix Switch with Scaling, DSP, and HDBaseT-Lite
◆ 1 IR receiver
◆ 1 IR remote control
◆ 4 3-pole terminal blocks
◆ 2 5-pole terminal blocks
◆ 1 power adapter
◆ 1 user instructions
VPK104
◆ 1 VPK104 4-Key Contact Closure Remote Pad
◆ 4 4-pole terminal blocks
◆ 1 user instructions
User Information
Online Registration
Be sure to register your product at our online support center:
International http://eservice.aten.com
Telephone Support
For telephone support, call this number:
| International 886-2-8692-6959 | |
| China 86-400-810-0-810 | |
| Japan 81-3-5615-5811 | |
| Korea 82-2-467-6789 | |
| North America 1-888-999-ATEN ext 4988 | |
| 1-949-428-1111 | |
User Notice
All information, documentation, and specifications contained in this manual are subject to change without prior notification by the manufacturer. The manufacturer makes no representations or warranties, either expressed or implied, with respect to the contents hereof and specifically disclaims any warranties as to merchantability or fitness for any particular purpose. Any of the manufacturer's software described in this manual is sold or licensed as is.
Should the programs prove defective following their purchase, the buyer (and not the manufacturer, its distributor, or its dealer), assumes the entire cost of all necessary servicing, repair and any incidental or consequential damages resulting from any defect in the software.
The manufacturer of this system is not responsible for any radio and/or TV interference caused by unauthorized modifications to this device. It is the responsibility of the user to correct such interference.
The manufacturer is not responsible for any damage incurred in the operation of this system if the correct operational voltage setting was not selected prior to operation. PLEASE VERIFY THAT THE VOLTAGE SETTING IS CORRECT BEFORE USE.
Conventions
This manual uses the following conventions:
Monospaced Indicates text that you should key in.
[] Indicates keys you should press. For example, [Enter] means to press the Enter key. If keys need to be chorded, they appear together in the same bracket with a plus sign between them: [Ctrl+Alt].
- Numbered lists represent procedures with sequential steps.
◆ Bullet lists provide information, but do not involve sequential steps.
Indicates selecting the option (on a menu or dialog box, for example), that comes next. For example, Start > Run means to open the Start menu, and then select Run.

Indicates critical information.
Product Information
For information about all ATEN products and how they can help you connect without limits, visit ATEN on the Web or contact an ATEN Authorized Reseller. Visit ATEN on the Web for a list of locations and telephone numbers:
| International http://www.aten.com |
| North America http://www.aten-usa.com |
Table of Contents
Compliance Statements ...... ii
About this Manual iv
Package Contents v
VP1420 v
VP1421 v
VPK104 v
User Information ...... vi
Online Registration vi
Telephone Support vi
User Notice vi
Conventions vii
Product Information....vii
Table of Contents ......viii
1. Introduction
Overview 1
Features 2
VP1420 2
VP1421 4
Planning the Installation 6
Required Equipment 6
VP1420 6
VP1421 6
Optional Equipment 7
VP1420 7
VP1421 7
2. Hardware Setup
Hardware Overview 9
VP1420 9
Front View 9
Rear View 10
VP1421....11
Front View 11
Rear View 12
IR Remote Control 14
VPK104 15
Front View 15
Rear View 16
Side View 16
Mounting 17
Rack Mount 17
Under Desk Mount 18
Installation 19
VP1420 19
VP1421 21
VPK104 23
3. Local Operation
Overview....25
Operation Considerations 25
Switching Sources 25
Display Mode 26
Understanding Display Mode 26
Configuration....26
Audio Settings 27
Panel Lock 28
Power LED Indication 29
4. Remote Operation
Overview....31
Default Network and Login Settings 31
Supported Web Browsers 32
Logging In the Web Console 33
The Main Screen 34
General Settings 35
Audio & Video Settings 38
Audio Control 38
Audio Output 39
Audio Input (VP1420) 39
Audio Input (VP1421) 40
Apply vs. Auto Apply 40
Video Control 41
Apply vs. Auto Apply 42
System Settings 43
Maintenance 43
Upgrading the System Firmware 43
Backing Up System Settings 44
Restoring System Settings 44
Reseting the Default Settings 44
Network Settings 45
IP Settings 45
Browser 45
5. CLI Commands
Overview....47
Connecting to the VP1420 / VP1421 via Telnet 47
Connecting to the VP1420 / VP1421 via RS-232 48
Command Syntax 49
Command List ....50
Port Numbers 50
cec....50
displaymode ....51
echo....51
edid 52
mute 52
read....53
reset 54
scaling....54
standby 54
SW 55
swmode....55
volume 56
6. Video Presentation Control App
Overview 57
Installing and Configuring the App. 57
iOS Version....58
Main Page .58
Info....59
Logging in to the Control Panel 60
Logging in to the Control Panel Automatically....60
Logging in to the Control Panel via Manually Connect ..... 62
Leaving the Meeting 65
Enabling Standby Mode 66
Checking the Firmware Version 67
Video Panel 68
Switching a Source for a Display 68
Display A Settings 69
Display B Settings 71
Audio Panel 72
VP1420 Audio Output Settings 72
VP1421 Audio Output Settings 72
VP1420 Audio Input Settings....74
VP1421 Audio Input Settings....74
Android Version 78
Main Page 78
Info....79
Logging in to the Control Panel 80
Logging in to the Control Panel Automatically....80
Logging in to the Control Panel via Manually Connect ..... 82
Leaving the Meeting 85
Enabling Standby Mode 86
Checking the Firmware Version 87
Video Panel 88
Switching a Source for a Display 88
Display A Settings 89
Auto Switching....90
Display B Settings....90
Audio Panel 92
VP1420 Audio Output Settings 92
VP1421 Audio Output Settings 92
VP1420 Audio Input Settings 94
VP1421 Audio Input Settings 94
Appendix
Safety Instructions 99
General 99
Rack Mounting 101
Technical Support 102
International 102
North America 102
Specifications 103
VP1420 103
VP1421 105
Limited Warranty 113
This Page Intentionally Left Blank
Chapter 1
Introduction
Overview
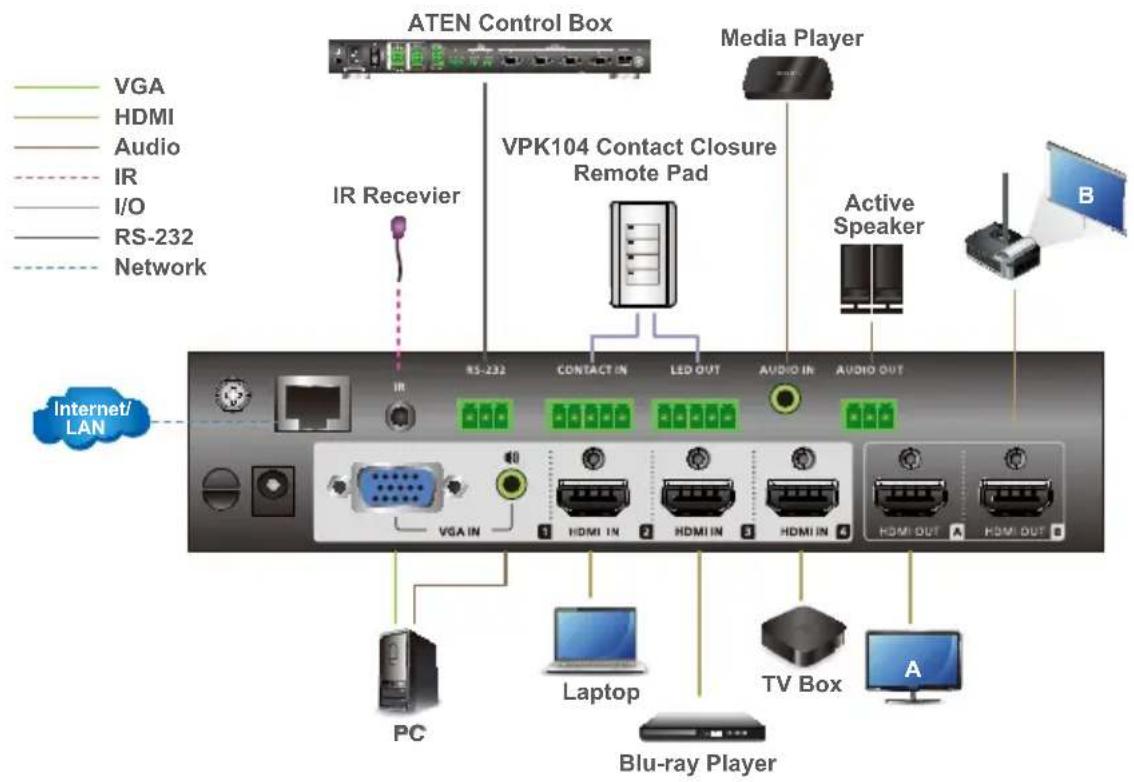
The ATEN VP1420/VP1421 is a multi-in-one presentation switch that integrates a video matrix switch, True 4K scaler, analog-to-digital converter, audio processor (VP1420), HDBaseT Extender (VP1421), and audio DSP (VP1421) into one compact device. With the four analog/digital inputs to 2 HDMI True 4K outputs (VP1420) / 1 HDMI & 1 HDBaseT outputs (VP1421), the VP1420/VP1421 is designed to boost the efficiency and impact of professional presentations.
With its versatile control via the front panel, IR remote controller, control protocols (RS-232 and Telnet), and web GUI, the VP1420/VP1421 reduces not only system device count, but also lowers operation complexity. The VP1420/VP1421 is suitable for all meeting space and education environments, such as huddle rooms, classrooms, training rooms, or any other presentation setting, such as exhibition galleries or hotels.
Features
VP1420
Analog/Digital AV Matrix
◆ Supports 4 multi-format inputs – 3 HDMI and 1 VGA inputs
◆ 2 HDMI outputs
- Audio embedding – stereo audio can be embedded into HDMI output or separated to stereo line out
- Audio de-embedding – HDMI audio can be extracted to stereo line out
- Auto switching – automatically detects and switches to a new source as soon as it is connected
High-definition Video with Optimum Output
- Superior video quality – True 4K resolutions up to 4096 x 2160@60Hz (4:4:4)(HDMI)
◆ Supports 4K HDR - Scaler – supports video upscaling to 4K for display A and downscaling to 1080p for display B
- EDID Export™ – automatically selects the optimum EDID settings for smooth power-up, high-quality display, and the best video resolution across connected devices
◆ HDMI (3D, Deep Color, 4K); HDCP 2.2 compliant
Versatile, Streamlined Operation
- Multiple Control Options – flexible control via the front panel, IR remote control, control protocols (RS-232 and Telnet), and web-based GUI through Ethernet
◆ Supports standby mode for power saving and fast waking up
◆ Consumer Electronics Control (CEC) support
Built-in contact in and LED out ports for keypad control using the ATEN VPK104 Contact Closure Remote Pad
VP1421
Analog/Digital AV Matrix
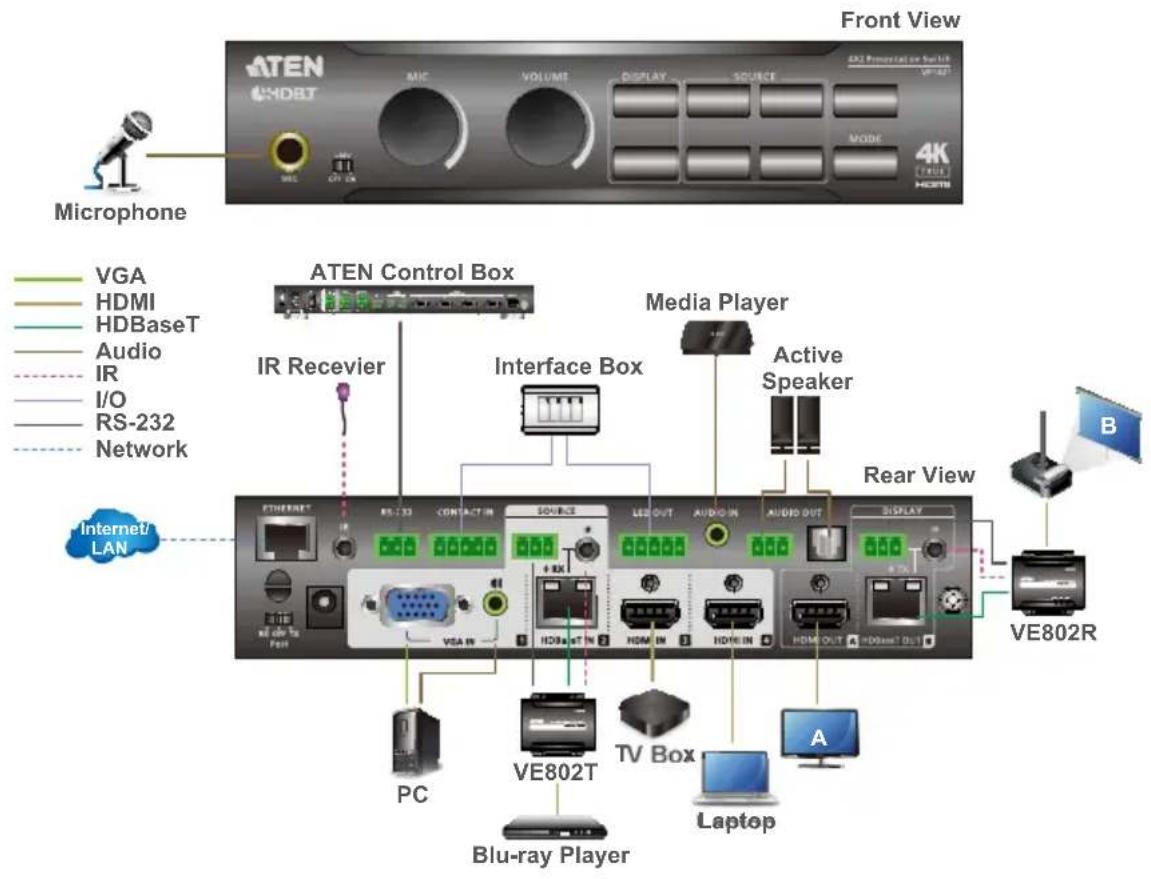
- Supports 4 multi-format inputs – 2 HDMI, 1 HDBaseT, and 1 VGA inputs
◆ 1 HDMI and 1 HDBaseT outputs - Audio embedding – stereo audio can be embedded into the display output or separated to stereo or optical audio outputs
- Audio de-embedding – HDMI/HDBaseT audio can be extracted to stereo audio output
Built-in audio DSP – supports microphone input with selectable 48V Phantom Power and allows microphone input to be mixed with program audio and embedded into display output - Automatically reduces program audio when a microphone signal is detected
- Auto switching – automatically detects and switches to a new source as soon as it is connected for time-saving and convenience
High-definition Video with Optimum Output
- Superior video quality— Up to 4096 x 2160@60Hz (4:4:4) (HDMI) / Up to 4096 x 2160@60Hz (4:2:0) (HDBaseT)
◆ Supports HDR - Scaler – supports video upscaling to 4K for display A and downscaling to 1080p for display B
- EDID Export™ – automatically selects the optimum EDID settings for smooth power-up, high-quality display, and the best video resolution across connected devices
◆ HDMI (3D, Deep Color, 4K); HDCP 2.2 compliant
Versatile, Streamlined Operation
- Multiple Control Options – flexible control via the front panel, IR remote control, control protocols (RS-232 and Telnet), and web-based GUI through Ethernet
- Bi-directional RS-232 and IR channel – allows AV device control over HDBaseT connection without additional cabling
◆ Supports standby mode for power saving and fast waking up
◆ Consumer Electronics Control (CEC) support
Built-in contact in and LED out ports for keypad control using the ATEN VPK104 Contact Closure Remote Pad
Extended Transmission over One Cable
- Long-distance transmission – transmit digital AV signal, bi-directional RS-232, and IR control signals up to 140 m via Cat 6/6a or ATEN 2L-2910 Cat 6 cables
Note: This is achieved using the HDBaseT In and HDBaseT Out ports on the VP1421, each extending the transmission up to 70 m.
- Power over HDBaseT (PoH) – remote powering over existing communication cable with selectable powering device.
Planning the Installation
Required Equipment
Prepare the following equipment before installing the VP1420 / VP1421.
VP1420
- Up to 3 input devices equipped with HDMI and 1 input device equipped with a VGA port
- Up to 2 display devices each equipped with an HDMI port
VP1421
- Up to 2 input devices equipped with HDMI ports, 1 input device equipped with an HDBaseT port and 1 device equipped with a VGA port
- Up to 2 display devices, one equipped with an HDMI port and the other equipped with an HDBaseT port
Optional Equipment
Prepare the following equipment as required.
VP1420
◆ 1 media player
◆ 1 active speaker
- 1 Ethernet cable to connect the VP1421 to a network switch for remote management via the web console
- 1 host computer, ATEN Controller, or third-party control system that supports RS-232 or Telnet
◆ 1 ATEN VPK104 Contact Closure Remote Pad for convenient operation
- Mounting kits:
Rack Mount Kit
♦ Under Desk Mount Kit
VP1421
◆ 1 microphone
◆ 1 media player
◆ 1 active speaker
◆ 1 video transmitter and 1 receiver equipped with HDBaseT ports for signal extension
- 1 Ethernet cable to connect the VP1421 to a network switch for remote management via the web console
- 1 host computer, ATEN Controller, or third-party control system that supports RS-232 or Telnet
◆ 1 ATEN VPK104 Contact Closure Remote Pad for convenient operation
- Mounting kits:
Rack Mount Kit
♦ Under Desk Mount Kit
This Page Intentionally Left Blank
Chapter 2
Hardware Setup

-
Please review the safety information regarding the placement of this device in Safety Instructions, page 99.
-
Do not power on the VP1420 / VP1421 until all the necessary hardware is connected.
Hardware Overview
VP1420
Front View
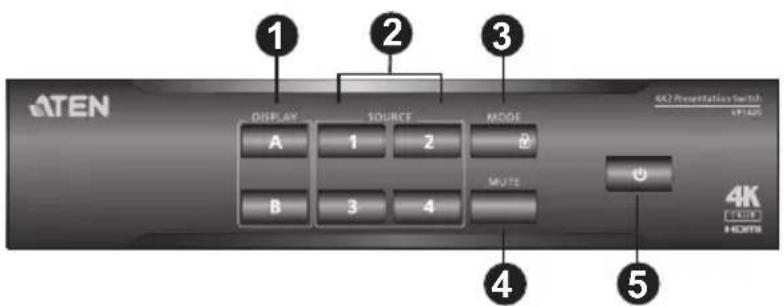
| No. | Component Description |
| 1 | display selection pushbuttons |
| 2 | source selection pushbuttons |
| 3 | mode pushbutton |
| 4 | mute pushbutton Press to mute all displays and speakers. |
| 5 | power pushbutton Used to power on/off the VP1420, or enable/disable the standby mode. For details, see Power LED Indication, page 29. |
Rear View

| No. | Component Description | |
| 1 | grounding terminal Grounds the VP1420 to prevent damages from power surge or static electricity. | |
| 2 | Ethernet port Connects to a network switch via an Ethernet cable to allow remote operation via the web console. | |
| 3 | IR receiver port Connects to an IR receiver to receive IR signals from the IR remote control. | |
| 4 | RS-232 serial port Connects to a hardware or software controller to transmit serial data. | |
| 5 | contact in Connects to the contact out terminal of a contact closure interface. | |
| 6 | LED out Connects to the LED In terminal of a contact closure interface | |
| 7 | audio in Receives an audio source. | |
| 8 | audio out Connects to an active speaker. | |
| 9 | cable tie slot Reserved for a cable tie to hold the power adapter in place. | |
| 10 | power jack Receives a power adapter of the VP1420. | |
| 11 | source (1) | Connects to a VGA source and a stereo audio source. |
| 12 | source (2), (3), (4) Each connects to an HDMI source device via an HDMI cable. | |
| 13 | HDMI out Each connects to an HDMI-enabled display device. |
VP1421
Front View

| No. | Component Description | |
| 1 | mic in port Connects to a microphone. | |
| 2 | Phantom power switch | Enables or disables the supply of phantom power to a condenser microphone. |
| 3 | mic volume control Use | the knob to adjust the microphone volume. |
| 4 | overall volume control | Use the knob to adjust the volume of all audio outputs. |
| 5 | display selection pushbuttons | Press a pushbutton to focus a display. The pushbutton for the focused display lights orange. |
| 6 | source selection pushbuttons | Press a pushbutton to select a source for the focused display. The pushbutton for the selected source lights green. |
| 7 | power pushbutton Used | to power on/off the VP1420, or enable/ disable the standby mode. For details, see Power LED Indication, page 29. |
| 8 | mode pushbutton | To show the current display mode, press the pushbutton onceTo switch between the Matrix mode and the Mirror mode, press the pushbutton twice. |
Rear View
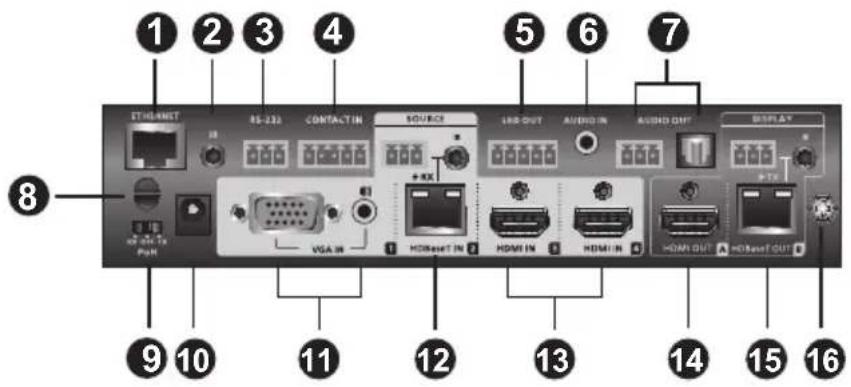
| No. | Component Description | |
| 1 | Ethernet port Connects to a network switch via an Ethernet cable to allow remote operation via the web console. | |
| 2 | IR receiver port Connects to an IR receiver to receive IR signals from the IR remote control. | |
| 3 | RS-232 serial port | Connects to a hardware or software controller to transmit serial data. |
| 4 | contact in Connects to the contact out terminal of a contact closure interface. | |
| 5 | LED out Connects to the LED In terminal of a contact closure interface | |
| 6 | audio in port Receives an audio source. | |
| 7 | audio out ports Connects to an active speaker. | |
| 8 | cable tie slot Reserved for a cable tie to hold the power adapter in place. | |
| 9 | PoH control switch | Enables the transmission of power along with data signals to either the Tx or Rx connected to the VP1421 over an Ethernet cable. |
| 10 | power jack Receives a power adapter of the VP1421. | |
| 11 | source (1) Connects to a VGA source and a stereo audio source. | |
| 12 | source (2) | Connects to a source device at a distance via a Tx device equipped with an HDBaseT port |
| 13 | source (3), (4) | Connect to HDMI source devices via HDMI cables. |
| 14 | output/display A | Connects to an HDMI-enabled display device. |
| No. | Component Description |
| 15 | output/display B Connects to an Rx device which in turn connected to a display device at a distance. |
| 16 | grounding terminalGrounds the VP1421 to prevent damages from power surge or static electricity. |
IR Remote Control
To operate the VP1420 / VP1421, insert the supplied IR Receiver to the IR Receiver Port on back panel of the device.

| No. | Buttons | Description |
| 1 | on/off Used | to power on the VP1420 / VP1421 and enable/disable the standby mode. For details, see Power LED Indication, page 29. |
| 2 | source Press | a source button to switch the focused display to the source. |
| 3 | display Press | a display button to focus the display. |
| 4 | mute Press | the button to mute all displays and speakers. |
| 5 | mode | Press the pushbutton once to show the current mode setting.Press the pushbutton twice to switch between the Matrix mode and the Mirror mode. |
VPK104
Front View

| No. | Component Description | |
| 1 | source selection Buttons | Press a source selection button to put the source onto the set display*. The number on each button represents the source number at the rear of the VP1420 / VP1421.Note: * The set display is selected using the VP1420 / VP1421 web GUI. |
| 2 | status LEDs Lights gr | green to indicate that the source is selected. |
Rear View
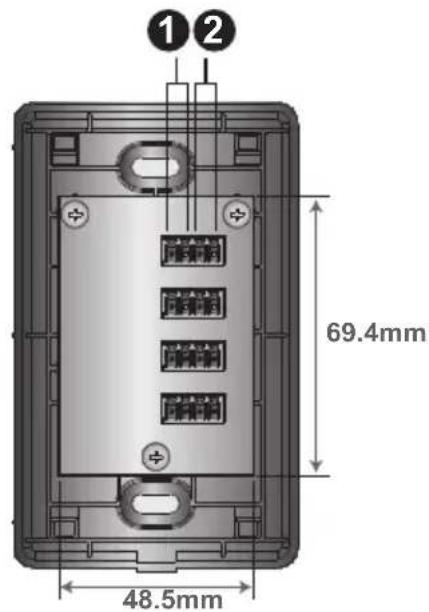
| No. | Component Description |
| 1 | LED in port Connects to the LED out port on the VP1420 / VP1421 to transmit and receive LED signals. |
| 2 | contact out port Connects to the contact in port on the VP1420 / VP1421 to transmit and receive operation signals. |
Side View

natural_image
Technical drawing of a rectangular component with a vertical side and dimension label (37.3mm), no readable text or symbols beyond the measurement.Mounting
Rack Mount
The VP1420 / VP1421 can be mounted on a 19" (1U) system rack. To conveniently access the front panel for local configuration and operation, mount the unit in a rack with the front panel facing outward.
Note: The Rack Mount Kit is not included in the package. Visit the product web page for more information.
- Use the M3 Phillips hex head screws supplied with the mounting kit to secure the rack mounting brackets onto the unit.

natural_image
Technical line drawing of a server rack with two connectors and a central drive unit (no text or symbols)VP1420

natural_image
Technical line drawing of a server rack unit with mounting brackets and ports (no text or symbols)VP1421
- Position the unit in the front of the rack and align the holes in the mounting brackets with the holes in the rack.
- Secure the mounting brackets to the rack using self-prepared screws.
Under Desk Mount
The VP1420 / VP1421 can be installed under a desk. To conveniently access the front panel for local configuration and operation, install the unit with the front panel facing forward.
Note: The mounting kit required for this installation is not included in the package. Visit the product web page for more information.
- Use the M3 Phillips hex head screws supplied with the mounting kit to secure the mounting brackets onto the unit.
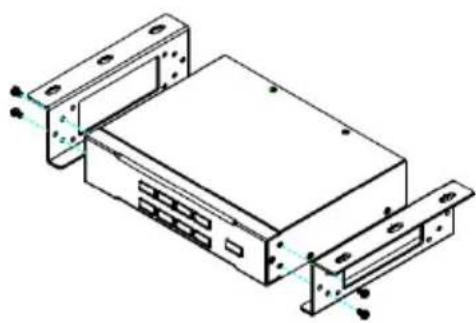
natural_image
Technical line drawing of a computer drive chassis with mounting brackets and mounting holes (no text or symbols)VP1420
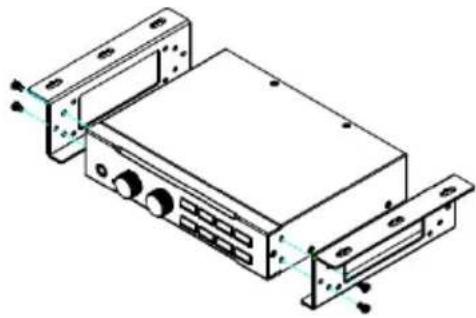
natural_image
Isometric technical drawing of a mechanical device housing with mounting brackets and internal components (no text or symbols)VP1421
- Position the unit to a spot under the desk where you can easily access the front panel, and then secure the racks to the desk with self-prepared screws.
Installation
VP1420
Follow the steps below to safely install sources, displays, and other equipment to the VP1420.

- Use a grounding wire to ground the unit by connecting one end to the grounding terminal, and the other end to a suitable grounded object.
Note: Do not omit this step. Proper grounding helps prevent damage to the unit from surges or static electricity.
-
Connect the unit to video sources.
-
To connect to a VGA source, use a VGA cable and a stereo audio cable to connect the source to the VGA in and the stereo audio in port respectively.
-
To connect to an HDMI-enabled source, use an HDMI cable to connect the device to the HDMI In port. You can connect up to three HDMI-enabled sources.
-
Use an HDMI cable to connect the unit to at least one HDMI-enabled display.
-
(Optional) Connect the unit to an audio source device, such as a media player, to the audio in port.
- (Optional) Connect an active speaker to the audio out port using the provided 3-pole terminal block.
- (Optional) To control the unit via a contact closure switch, connect the switch to the contact in and LED out ports using the provided 5-pole terminal blocks.
- (Optional) To configure the system settings via RS-232 serial commands, connect a hardware controller, such as ATEN Control Box, to the RS-232 serial port using the provided 3-pole terminal blocks.
- (Optional) To allow access to the web interface, use an Ethernet cable to connect the unit's Ethernet port to a network switch.
- (Optional) To control the VP1420 using an IR remote control, connect the supplied IR receiver to the IR receiver port.
- Plug the power adapter to the power jack. Optionally use the cable tie slot and a cable tie to hold the power cable in place.
- Press the power pushbutton to power on the unit.
- Power on all the connected devices.
VP1421
Follow the steps below to safely install sources, displays, and other equipment to the VP1421.

- Use a grounding wire to ground the unit by connecting one end to the grounding terminal, and the other end to a suitable grounded object.
Note: Do not omit this step. Proper grounding helps prevent damage to the unit from surges or static electricity.
-
Connect the unit to video sources.
-
To connect to a VGA source, use a VGA cable and a stereo audio cable to connect the source to Source (1) ports.
- To connect to a video source that requires signal extension, connect the VP1421's HDBaseT In port to the HDBaseT out port of a Tx device using an Ethernet cable.
Note: Visit the VP1421 web page for a list of supported video extenders.
- To connect to an HDMI source, connect the device to the VP1421's HDMI in port using an HDMI cable. You can connect up to two HDMI sources.
Note: The VP1421 supports bidirectional RS-232 and IR pass-through.
- Connect the unit to displays.
◆ Use an HDMI cable to connect the unit to an HDMI display.
- To set up a display at a distance, use an Ethernet cable to connect the VP1421's HDBaseT out port to the HDBaseT in port of a suitable Rx device, to which the display is connected.
Note: To supply power to the connected video transmitter through the Rx terminal of the VP1421, set the PoH Control Switch to Rx and vice versa.
- Optional) To supply independent audio, connect an audio source device (e.g. media player) or a microphone to the audio in port. If you use a condenser microphone, put the Phantom power switch to ON.
- (Optional) Connect an active speaker to the audio out port.
- (Optional) To control the VP1421 via a contact closure switch, connect the switch to the contact in and LED out ports using the provided 5-pole terminal blocks.
- (Optional) To configure the unit's settings via RS-232 commands, connect a hardware controller, e.g. ATEN Control Box, to the RS-232 serial port using the provided 3-pole terminal block.
- (Optional) To allow access to the web interface, use an Ethernet cable to connect the Ethernet port of the unit to a network switch.
- (Optional) To control the VP1421 using an IR remote control, connect the IR receiver to the IR receiver port.
- Plug the power adapter to the power jack. Optionally use the cable tie slot and a cable tie to holder the power cable in place.
- Press the power pushbutton to power on the unit.
- Power on all the connected devices.
VPK104
Follow the steps below to safely install the Remote Pad to the VP1420 / VP1421. Before you start, prepare 2 screws, 1 wall box, and some core wires.

- (Optional) Prepare your installation site.
a) Refer to the Panel Mount Cutout diagram (page 109) to cut out an opening to accommodate the Remote Pad and the connected cables.
b) Install a wall box (not included in the package) to the installation site.
-
Remove the faceplate from the Remote Pad.
-
Ground the Remote Pad.
a) Use core wires to serially connect the Remote Pad's LED in (-) poles to the GND pole of the LED out terminal on the Presentation Switch.
b) Use core wires to serially connect the Remote Pad's Contact out (-) poles to the GND pole of the contact in terminal on the Presentation Switch.
-
Use a core wire to connect the Remote Pad's LED in port 1 (+) to the LED out pole 1 on the Presentation Switch. Repeat this step for other LED in ports.
-
Use a core wire to connect the Remote Pad's contact out port 1 (+) to the contact in pole 1 on the Presentation Switch. Repeat this step for other contact out ports.
-
Make sure the keys are installed to the VPK104 and then secure the unit to the wall box using two screws.
- Cover the unit with the faceplate.

Overview
This chapter provides information on operating the VP1420 / VP1421 using the front panel and IR remote control.
Note: The instructions use pushbutton to refer to the front panel and button to refer to the IR remote control.
Operation Considerations
- To use the IR remote control, make sure to insert the IR receiver (supplied in the package) to the VP1420 / VP1421.
- To ensure smooth operation using the IR remote control, use the IR remote control within the effective range (6 m) and keep a clear line-of-sight between the remote control and the IR receiver connected to the VP1420 / VP1421.
Switching Sources
To switch the video source on a display:
- Press a Display Selection pushbutton/button to select a display. The pushbutton for the selected display lights orange.
- Press a Source Selection pushbutton/button to assign the source. The pushbutton for the selected source lights orange.
Note: appears on the top left corner of the OSD for 5 seconds when the source is switched. This is the resolution from the original source without scaling.
Display Mode
Understanding Display Mode
The VP1420 / VP1421 supports the following display modes:
- Matrix mode ( ) When enabled, the AV sources can be configured separately, capable of showing different outputs.
- Mirror mode ( ) When enabled, display B uses the AV source assigned for display A and shows identical content.
Configuration
To show the current display mode, press the Mode pushbutton/button once. The current setting displays at the bottom left corner of display A. To change the display mode, press the Mode pushbutton again.

- To adjust the volume for all audio outputs on the VP1421, use the Volume knob on the front panel or the Volume Up or Volume Down buttons on the IR remote control.
- To adjust the volume of a microphone or an independent audio source on the VP1421, use the MIC knob on the front panel.
-
To mute all audio outputs (displays and speaker):
-
For VP1420, press the Mute pushbutton/button.
- For VP1421, press the Volume knob on the front panel or press the Mute button on the IR remote control.
Panel Lock
To prevent accidental tampering of system settings via the front panel, you can lock the panel using the Mode pushbutton or set up an idle time for an auto lock via the web console (General > Panel Auto Lock). Refer to the table below for how to enable/disable the panel lock and the corresponding LED indication.
| Task | Lock LED (Mode Pushbutton) |
| To lock the front panel, press and hold the Mode pushbutton for about 3 seconds. | Lights red |
| To unlock the front panel, press and hold the Mode pushbutton for about 3 seconds. | Dims |
| If any front panel pushbutton/knob is adjusted when the panel is locked. | Flashes 3 times |
Note: If you have locked the panel using the Mode pushbutton, make sure to unlock only by pressing the Mode pushbutton. Disabling panel lock from the web console will not be effective in this case.
Power LED Indication
The power pushbutton is equipped with an LED that indicates the power status of the VP1420 / VP1421. Refer to the table below for the status and supported tasks for each LED indication.
| LED Indication (Power Pushbutton) | VP1420 / VP1421 Status Tasks | |
| Dim The VP1420 / VP1421 is powered off. | To power on the VP1420 / VP1421, press the Power pushbutton/button once. | |
| Flashes orange The VP 1420 / VP1421 is loading system information. | Wait for the unit to finish loading information. | |
| Orange The VP1420 / VP1421 is in standby mode. | The standby mode is a power-saving mode that shuts parts of the system down to allow the user to quickly resume operation when needed.To awake the VP1420 / VP1421, press the Power pushbutton/button once.Note: To power off the VP1420 / VP1421 when it is in standby mode, awake the unit first, and then follow the steps in the next entry to power off the unit. | |
| Green The VP1420 / VP1421 is awaken. | ◆ To enable the standby mode to conserve power, press the Power pushbutton/button once.◆ To power off the unit:(1) Press and hold the Power pushbutton for 3 seconds. A confirmation message appears in the OSD.(2) Press the Power pushbutton once. The VP1420 / VP1421 powers off.Note: The remote control can not be used to power off the VP1420 / VP1421. | |
This page is intentionally left blank.
Chapter 4
Remote Operation
Overview
This chapter provides information on how to remotely operate and configure the VP1420 / VP1421 via the web console.
Default Network and Login Settings
The VP1420 / VP1421 uses the following network settings and login credentials as its default settings.
◆ Default network settings
| Network Parameter Default Setting | |
| IP Address 192.168.0.60 | |
| Subnet Mask 255.255.255.0 | |
| Gateway 192.168.0.1 | |
| HTTP Port 80 | |
Note: If the VP1420 / VP1421 is connected to a router that supports DHCP, a dynamic IP address will be assigned to the VP1420 / VP1421 as soon as it connects to the network. Look up the IP address by sending a read command via an RS-232 serial controller. For more details, see Chapter 5, CLI Commands.
◆ Default login credentials
| Login Credential | Default Setting Limitations |
| Username administrator 5 to 30 characters in length without special characters, not case-sensitive | |
| Password password | |
Supported Web Browsers
The VP1420 / VP1421 supports access to its web UI through the following web browsers and operating systems:
| Operating System Web Browser Supported Version | ||
| Windows 10 x 64 Edge 40.15063.674.0 | ||
| Windows 10 x 64 Firefox 64.0 | ||
| Windows 10 x 64 Chrome 71.0.3578.98 | ||
| Windows 10 x 64 Opera 57.0.3098.91 | ||
| Windows 8.1 IE 11 | ||
| Windows 7 SP1 x 64 IE 11 | ||
| CentOS 7.5 x 64 Kernel 4.18.11-1 | Firefox 60.0.4 | |
| Ubuntu 18.04 x 64 Kernel 4.19.041900rc3 | Chrome 71.0.3578.98-1 | |
| Solaris 11.4 x 64 5.11 Firefox 52.9.0 | ||
| Windows 10 x 64 QQ 10.2.1 | ||
| Windows 10 x 64 Baidu 8.7.5000.4980 | ||
| Windows 10 x 64 360 | 9.1.0434 | |
| MAC 10.14.4 | Safari | 8 |
Logging In the Web Console
- In a web browser, type the IP address of the VP1420 / VP1421. This screen appears.

- Type the username administrator and the password.
- Click Log In. The main screen appears.
The Main Screen
The VP1420 / VP1421 defaults to the main screen after logging in. Refer to the illustration and table below for an overview of the web console.

| No. | Element Description | |
| 1 | Click the ATEN logo to visit ATEN's official website. | visits the device model and name. |
| 2 | Device Information Indicates the device model and name. | |
| 3 | Click this icon enable | the standby mode, a power-saving mode that shuts parts of the system down to allow the user to quickly resume operation when needed. |
| 4 | Click the icon to log out of the web console. | out of the web console. |
| 5 | Settings Tab Click on | the tabs to switch between different sets of settings. |
General Settings
The General page includes settings such as device name, panel lock, EDID, and login password. To access the general settings, log in the web console and the screen defaults to the page.
General
▼ Basic
Name
Room30999999
Firmware
V1.1.106
Panel Auto Lock
Disable
Control by APP

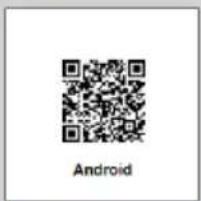
Download APP "ATEN Video Presentation Control"

Download image
Download image

ROOM Control Entry

Download Image
▼ Advance
EDID
Display A
Target of Contact Closure (DI)
Display A
HDCP Mode
2.2

Basic
Name: Type a name for the VP1420 / VP1421. A valid name should be within 30 characters in length and contains no special characters. This name appears on the web console immediately after the model name:

◆ Firmware: Indicates the firmware version for the VP1420 / VP1421.
◆ Panel Auto Lock: Sets the idle time for the front panel to be locked.
- Control by App:
- To download the ATEN Video Presentation Control app to your mobile device, use your mobile device and scan the QR code under (1) Download App.
- To log in the ATEN Video Presentation Control app as a basic user (has access to audio and video sources only), scan the QR code under (2) Room Control Entry.
Note: Make sure to set up the basic user account for the QR code to display. Advance
♦ EDID
◆ Display A: This mode sends the EDID of Display A to the connected sources.
- ATEN Default: This mode sends ATEN-predefined EDID to the connected sources.
- Remix: Sends the optimum EDID of the connected displays to the connected sources.
- Target of Contact Closure: Defines the display that a connected contact closure controls.
♦ HDCP Mode: Sets the HDCP of the VP1420 / VP1421.
- Change Password
- Administrator:The administrator account has access to all settings in the web console. The default password is administrator.
- Basic User: A basic user account has access to the audio and video controls on the web console or ATEN Video Presentation Control App. To create a basic user account, specify the username and password fields here.
Note: A valid password (for the administrator or basic user account) is not case-sensitive and should be 5 to 6 characters in length, without space or special characters.
Audio & Video Settings
Audio Control
To access the audio control page, log in the web console, and then go to Video & Audio > Audio.
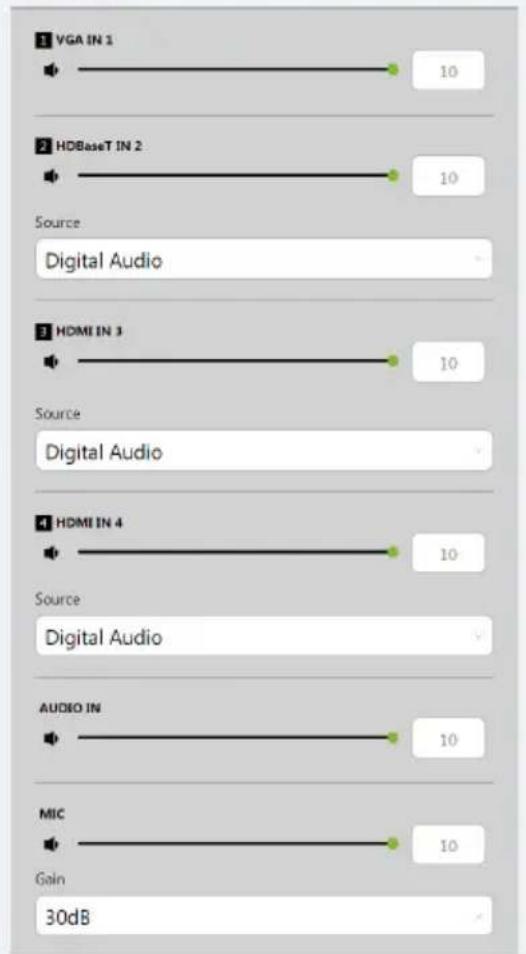
Audio Control

▼ Audio Input
Audio Output
Overall volume:
◆ VP1420: Mute or unmute the connected speaker.
◆ VP1421: Sets the volume of the connected speaker.
◆ Display A
◆ VP1420: Mute or unmute display A.
◆ VP1421: Sets the volume of display A.
◆ Display B
◆ VP1420: Mute or unmute display B.
◆ VP1421: Sets the volume of display B.
Audio Out
- VP1420: Mute or unmute the independent speaker connected to the Audio Out port.
-
VP1421: Sets the volume of the independent speaker connected to the Audio Out port.
Source: Sets the audio source for the independent speaker connected to the Audio Out port of the VP1420 / VP1421. -
To use the same audio source for display A, select Follow Display A.
- To use the same audio source for display B, select Follow Display B.
- To use the independent audio source (connected to the Audio In port), select Audio In.
Audio Input (VP1420)
♦ HDMI In 2 / HDMI In 3 / HDMI In 4: N/A.
Source: Sets the audio source for the HDMI 2 / HDMI 3 / HDMI 4 source. To use the audio source that comes along with the video, select Digital Audio. To use the audio source from the independent audio source (connected to the Audio In port), select Embedded Audio In.
Audio Input (VP1421)
♦ VGA In 1: Sets the volume of the VGA source.
- HDBaseT In 2: Sets the volume of the HDBaseT source.
Source: Sets the audio source for the HDBaseT source. To use the audio source that comes along with the video, select Digital Audio. To use the audio source from the independent audio source (connected to the Audio In port), select Embedded Audio In.
♦ HDMI In 3 / HDMI In 4: Sets the volume of the HDMI 3 / HDMI 4 source.
Source: Sets the audio source for the HDMI 3 / HDMI 4 source. To use the audio source that comes along with the video, select Digital Audio. To use the audio source from the independent audio source (connected to the Audio In port), select Embedded Audio In.
- Audio In: Sets the volume of the independent audio source connected to the Audio In port.
- Mic volume: Sets the volume of the microphone connected to the MIC port.
Gain: Sets the volume of the microphone connected to the MIC port.
Apply vs. Auto Apply
To automatically apply the changes you make on the Audio Control page, select Auto apply at the bottom of the page.
Video Control
Use the video control page to assign video sources and configure video settings. To access the video control page, log in the web console, and then go to Video & Audio > Video.

- Display A / Display B: Shows a preview of the currently selected source and indicates the source number at the center of the preview. Click to rename the source.
-
Mirror Mode: Select this option for display B to show identical video content as display A.
Source: Lists the connection status of all source ports and the currently assigned source (indicated in green). -
To switch the source for the display, click on one of the listed sources. The assigned source is highlighted green.
- To rename the source, click
- CEC: Consumer Electronics Control (CEC) allows for control of devices connected through HDMI ports to communicate with each other and makes the control of these devices using one remote control device possible. This setting is enabled by default.
- Scaler Up: To automatically scale the resolution of a 1080p source up to 4K, select Auto. For a list of supported upscaling resolutions, see Specifications, page 103.
- Scaler Down: To automatically scale the resolution of a 4K source down to 1080p, select Auto. For a list of supported downscaling resolutions, see Specifications, page 103.
- Auto Switching (Plugged): Defines the automatic switching of audio-video source on Display A when a new source is plugged in.
◆ Disable: Disable automatic switching.
◆ Next: Automatically switches to the newly plugged-in source.
- Auto Switching (Unplugged): Defines the automatic switching of video source on Display A when a previously used source goes detected.
◆ Disable: Disable automatic switching.
- Next: Automatically switches to the next available source when the current video source is plugged out.
- Last: Automatically switch the display to the previous available source based on the order of source connection. For example, if sources are connected to the VP1420 / VP1421 in the order of port 2, port 3, port 4 and then port 1, and that Display A is switched to port 3, when the source (port 3) is unplugged, Display A will automatically switch to port 2.
Apply vs. Auto Apply
To automatically apply the changes you make on the Video Control page, select Auto apply at the bottom of the page.
System Settings
Maintenance
Use the maintenance page to upgrade system firmware, back up or restore system configurations, and restore default settings. To access the maintenance page, log in the web console, and then go to System > Maintenance.
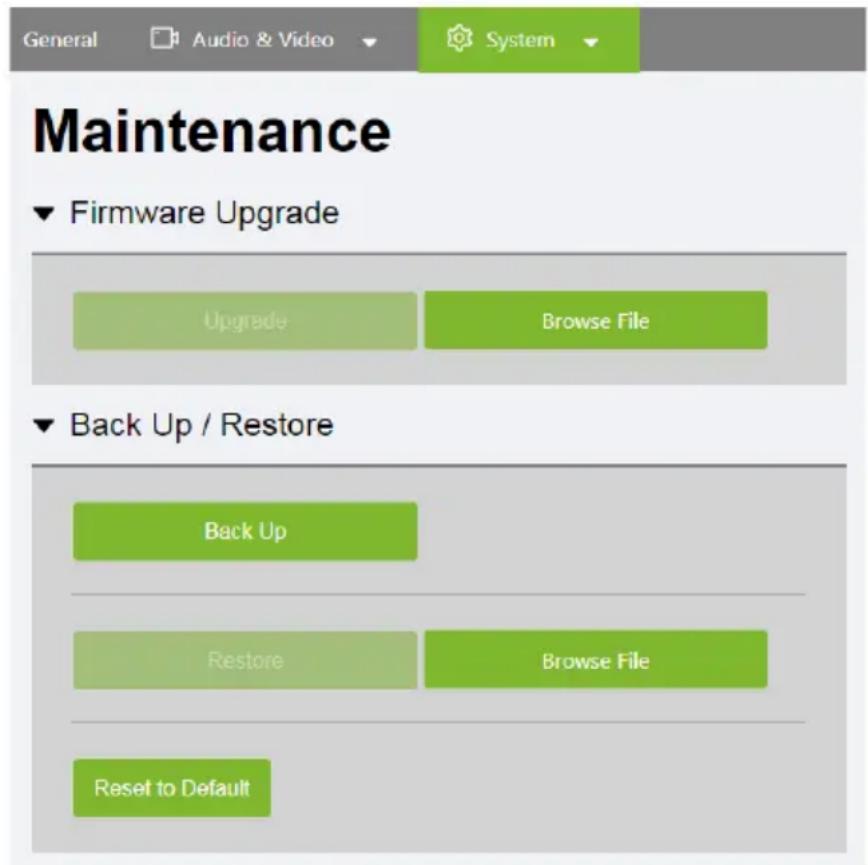
Upgrading the System Firmware
- Prepare the firmware file you wish to apply.
a) Visit the product web page from http://www.aten.com/global/en/
b) In the Support and Download tab, download a firmware file.
- Log in the VP1420 / VP1421's web console, and then go to System > Maintenance.
- In the Firmware Upgrade section, click Browse File to select the firmware file that you downloaded, and then click Upgrade. The upgrade starts immediately.
- When the upgrade is complete, a confirmation message appears and the unit reboots.
Backing Up System Settings
You can back up and export the VP1420 / VP1421's configurations. This backup will not include the username and password settings.
- Log in the VP1420 / VP1421's web console, and then go to System > Maintenance.
- Click Back Up.
Restoring System Settings
- Log in the VP1420 / VP1421's web console, and then go to System > Maintenance.
- To restore the VP1420 / VP1421's settings, click Browse File to locate a previously backed up file (.aes), and then click Restore.
Reseting the Default Settings
- Log in the VP1420 / VP1421's web console, and then go to System > Maintenance.
- Click Reset to Default. This will reset all the settings, including network settings to default.
Network Settings
To configure the VP1420 / VP1421's network connection settings, log in the web console, and then go to System > Network.

IP Settings
- Mode: Configure the method to which the VP1420 / VP1421 obtains an IP address and connects to the network.
- DHCP: Select this option for the connected network switch to dynamically assign an IP address, subnet mask, gateway, and DNS to the VP1420 / VP1421.
- Manual: Select this option for the VP1420 / VP1421 to use a fixed IP address. Specify the IP address, subnet mask, and default gateway.
Browser
Timeout: Sets the duration of time that a web browser waits to obtain connection to the VP1420 / VP1421 before terminating the request.
This Page Intentionally Left Blank
Overview
The VP1420 / VP1421 can be configured and controlled via RS-232 or Telnet commands when connected to a host computer or other device, such as a control system. This chapter provides information on how to connect to the VP1420 / VP1421 via RS-232/Telnet and command syntax.
Connecting to the VP1420 / VP1421 via Telnet
To establish a Telnet session with the VP1420 / VP1421, do the following:
- Connect a host computer or control system to a shared network with the VP1420 / VP1421.
- Open a command-line interpreter program from your computer.
- In the command-line interpreter, type the VP1420 / VP1421's IP address in the following way:
telnet [IP address]:23
- Press Enter. The login screen appears.
- At the login prompt, type the login username and password for the VP1420 / VP1421.
- When a session is established with the VP1420 / VP1421, you can control and configure the VP1420 / VP1421 via RS-232 commands. For more information on commands, see:
◆ Command Syntax, page 49
◆ Command List, page 50
Note: If a user logs in using a username that is already in session, the newest login takes effect and the previous session will be replaced.
Connecting to the VP1420 / VP1421 via RS-232
- Connect a host computer or control system to the RS-232 Serial port on the VP1420 / VP1421 unit.
-
Download and install controller software that supports RS-232 serial control and the operation system of your controller PC.
-
Execute the software and configure the connection settings to the following:
♦ Serial line to connect to: COM1
♦ Speed (baud): 19200
◆ Data bits: 8
- Stop bits: 1
Parity: None
◆ Flow control: None
- When a session is established with the VP1420 / VP1421, you can control and configure the VP1420 / VP1421 via RS-232 commands. For more information on commands, see:
◆ Command Syntax, page 49
◆ Command List, page 50
Command Syntax
◆ The general form of a command is:
command parameter<argument> {one|two|three}
| Notation Description | |
| command | The name of the command is shown in bold. |
| parameter | Indicates the name of the parameter. |
| Indicates the name of the value or the information that the user must provide. Only type the information in the angle brackets, not the brackets themselves. | |
| [ ] | Indicates optional items. Only type the information in the brackets, not the brackets themselves. |
| { } | Indicates a set of choices from which the user must choose one. |
| | | Indicates two or more mutually exclusive choices in a command line. Only type one of the choices in the command line, not the symbol. |
If you have two or more parameters, the order of these parameters among themselves does not affect the result of the operation. For example, both of the following commands execute the same task:
command name + parameter 1 + parameter 2
command name + parameter 2 + parameter 1
Command List
Use the following commands to control and configure the VP1420 / VP1421 via Telnet or RS-232. For details on establishing a Telnet or RS-232 session to the VP1420 / VP1421, see Connecting to the VP1420 / VP1421 via Telnet, page 47 and Connecting to the VP1420 / VP1421 via RS-232, page 48.
Port Numbers
Use the table below to find out the argument value for each input/output port on the VP1420 / VP1421. For example, the
| Source Source No. | Interface | Port Numbers | ||
| VP1420 VP | 1421 | |||
| Video Input | 1 | V | G | A V |
| 2 HDMI | HDBaseT i02 | |||
| 3 HDMI | HDMI i03 | |||
| 4 HDMI | HDMI i04 | |||
| Video Output | 1 HDMI | HDMI o01 | ||
| 2 HDMI | HDBaseT o02 | |||
| Audio Input N/A Stereo Stereo i05 | ||||
| Audio Output | N/A | - | Stereo o03 | |
| N/A | Optical | Optical | o03 | |
| MIC | N/A | - | √ | i06 |
cec
◆ Function
Enables/disables Consumer Electronics Control (CEC) on the specified port.
- Syntax
cec o
- Parameters
- o
- on: Enables CEC on the specified port.
- off: Disables CEC on the specified port.
Example
cec o01 on
displaymode
◆ Function
Sets the VP1420 / VP1421 to matrix or mirror mode.
- Syntax
displaymode {matrix|mirror}
- Parameters
matrix: When enabled, the AV sources can be configured separately, capable of showing different outputs.
- mirror: When enabled, display B uses the AV source assigned for display A and shows identical content.
Example
displaymode matrix
echo
◆ Function
Updates an RS-232 controller connected to the VP1420 / VP1421 when operations are made to the VP1420 / VP1421 via its front panel, web console, or telnet. Execute this function to keep the RS-232 controller in sync with the VP1420 / VP1421.
- Syntax
echo {on|off}
- Parameters
- on: Enables echo on the specified port.
- off: Disables echo on the specified port.
edid
◆ Function
Sets the VP1420 / VP1421's EDID mode.
- Syntax
edid {port1|remix|default}
- Parameters
- port1: Set the VP1420 / VP1421's EDID mode to follow the display connected to the output port A.
- remix: Set the VP1420 / VP1421's EDID mode to remix with which the system sends the optimum EDID of the connected displays to the sources.
default: Set the VP1420 / VP1421's EDID mode to ATEN Default which sends ATEN-predefined EDID to the connected sources.
Example
edid default
mute
◆ Functions and Syntax
| Syntax Function | |
| mute Indicates the mute setting for | each input and output port. |
| mute {i|i*} Indicates | the mute setting for the specified input or output port. |
| mute {ooutput_port>|osys|o*} | |
| mute {i|i*} {on|off} | Mutes / unmutes the audio of a specified audio input (VP1421 only) or output. |
| mute {ooutput_port|osys|o*} {on|off} |
- Parameters
◆ i
◆ i*: Refers to all input ports.
- o
◆ o sys: Refers to all audio outputs (display devices and speakers).
◆ ○*: Indicates all output ports.
◆ On: Mute the specified input/output ports.
- Off: Unmute the specified input/output ports.
Example
mute o01 off
read
◆ Functions and Syntax
| Syntax Function | |
| read Displays the video and | audio input assigned to each output port, EDID mode, device information, and network settings. |
| read version Displays the | system firmware version. |
| read o<output_port> connection | Displays the video and audio input assignment to the specified output port. |
| read o* connection video | Displays the video input assignment to all output ports. |
| read o<output_port> connection audio | Displays the audio assignment to the specified output port. |
| read o* connection audio | Displays the audio input assignment to all output ports. |
reset
◆ Function
Resets the VP1420 / VP1421 to its default settings.
- Syntax
reset
scaling
◆ Functions and Syntax
| Syntax Function | |
| scaling Reads the scaler settings on | output A and B. |
| scaling o{auto|off} | Configures the specified output port to Auto or Off. |
standby
| Syntax Function | |
| standby Displays the current | standby mode setting. Standby mode is a power-saving mode that shuts parts of the system down to allow the user to quickly resume operation when needed. |
| standby on|off Enables or disables the standby mode. | |
- Parameters
◆ On: Enable standby mode.
- Off: Disable standby mode.
SW
◆ Function
Switches the specified source on the specified display.
- Syntax
sw {o<output_port>|o*} {i<input_port>|i+|i-}
- Parameters
- i
◆ +: Indicates the next input port. - -: Indicates the previous input port.
- o
◆ ○*: Indicates all output ports.
Examples
sw o01 i02
sw o01 +
sw o* i02
swmode
◆ Function
Enables/disables auto switching.
- Syntax
For VP1421: swmode plugin {auto|off}
For VP1420: swmode {auto|off}
volume
◆ Functions and Syntax
| Syntax Function | |
| volume Indicates the Total Volume and the volume for each input and output port. | |
| volume{i|i*}v | Configures the volume of a specified input/output port. This command is only supported by the VP1421. |
| volume {o|o sys|o*} v | |
- Parameters
◆ i
◆ i*: Indicates all input ports.
- o
◆ Output 1 (VGA/Audio In): o01
◆ Output 2 (HDBaseT): o02
◆ ○*: Indicates all output ports.
- v
Examples
volume i01 v10
volume o03 v05
Chapter 6
Video Presentation Control App
Overview
The ATEN Video Presentation Control App is designed to help you conveniently configure system settings to your VP1420 / VP1421 device.
Supported Systems
The ATEN Video Presentation Control App supports the following mobile operating systems:
| Mobile Operating System Supported Versions | |
| Android version 8.0 or later | |
| iOS version 12 or later | |
Installing and Configuring the App
- Install the ATEN Video Presentation Control App on a mobile device.
a) From the mobile device, tap the App Store icon.
or Google Play
b) In the search box, type "ATEN Video Presentation Control App".
c) Tap ATEN Video Presentation Control App and install the app. Or,
d) Scan the QR Code below to install the app.





- From the mobile device, tap the ATEN Video Presentation Control App
icon

Note: Make sure to connect the mobile device to the network where the VP1420 / VP1421 is installed.
iOS Version
Main Page
When logged in, the ATEN Video Presentation Control App defaults to the scanning page. Refer to the table below for an overview of the functions on each tab.

| No. | Component Description | |
| 1 | Info  | Tap the info icon to show information such as version, privacy policy, and contact us. |
| 2 | Manually Connect | Tap this icon to manually connect and log in to the control panel by entering its IP address and password. |
| 3 | QR Code Reader | Tap this icon to scan a QR codes to join a meeting. |
| No. | Component Description |
| 4 | Load a QR code Image |
Info
Below screen is what the info page looks like. It shows the version, privacy policy and contact us. Tap on the Contact Us and it takes you straight to our ATEN's official website.

Logging in to the Control Panel
There are three ways to log in to the control panel through our ATEN Video Presentation Control App on VP1420 / VP1421. When the App is opened, it automatically scans for the device and available rooms to access. Or you can manually type in the IP address and password to log in to the control panel. Each methods are described below.
Logging in to the Control Panel Automatically
To automatically scan and log in to the control panel, follow the steps below.
- Open the ATEN Video Presentation Control App and wait for the scanning process to finish.
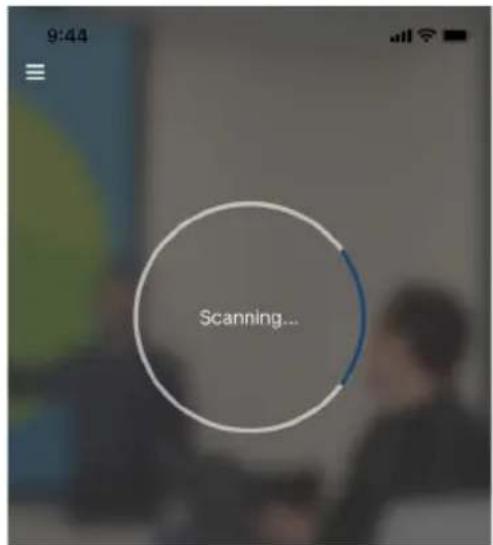
- When the scanning finishes, the Room List page appears. Tap on a room to log in to the control panel.
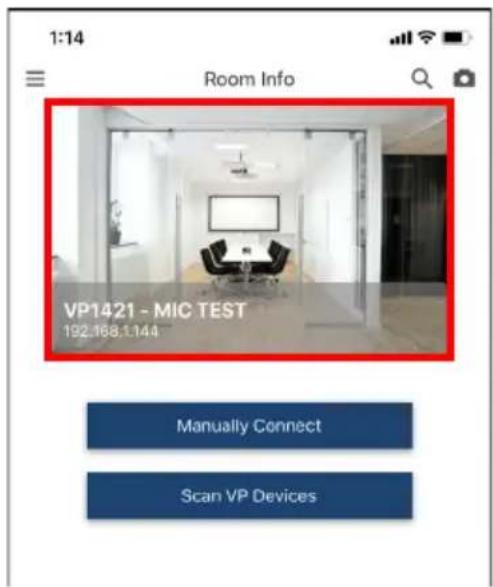
3. Enter the username and password, then tap Login.
Note: For security purposes, it is required to change the password from the VP1420 / VP1421 web console if you are logging in for the first time. For details, see General Settings, page 35.

- Now you have successfully logged in to the control panel.

Logging in to the Control Panel via Manually Connect
To manually connect and log in to the control panel, follow the steps below.
- Open the ATEN Video Presentation Control App and tap Manually Connect.

- Enter the IP address of the VP1420 / VP1421 and tap Connect.

3. Enter the username and password, then tap Log in.
Note: For security purposes, it is required to change the password from the VP1420 / VP1421 web console if you are logging in for the first time. For details, see General Settings, page 35.

- Now you have successfully logged in to the control panel. Or,
- From the Room List page, tap Manually Connect.
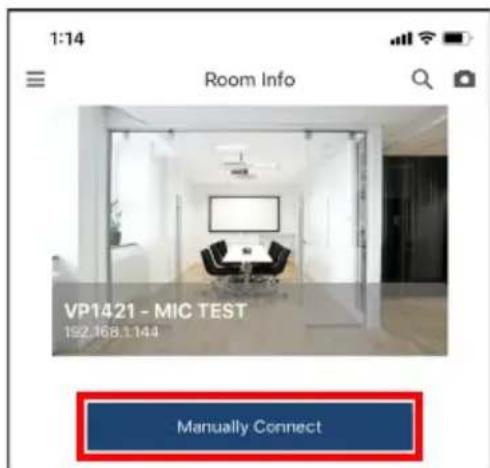
- Enter the IP address of the VP1420 / VP1421 and tap Connect.

- Enter the username and password, then tap Log in.
Note: For security purposes, it is required to change the password from the VP1420 / VP1421 web console if you are logging in for the first time. For details, see General Settings, page 35.

- Now you have successfully logged in to the control panel.
Leaving the Meeting
To leave the control panel, follow the steps below.
1. Press the

your main screen.

2. A warning screen appears, then tap Leave.

Enabling Standby Mode
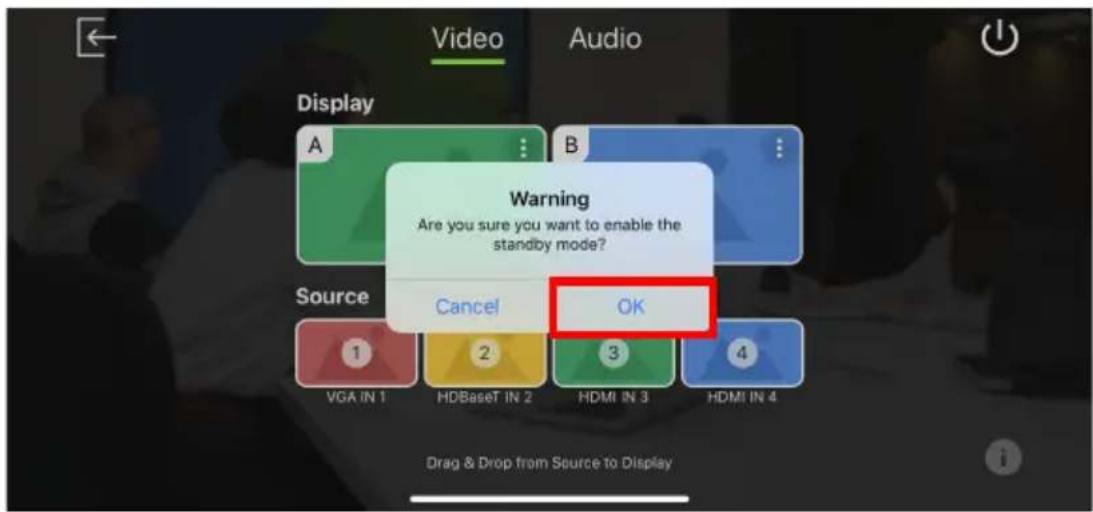
To enable standby mode, follow the steps below.
1. Press the

your main screen.

2. A warning screen appears, then tap OK.
Checking the Firmware Version
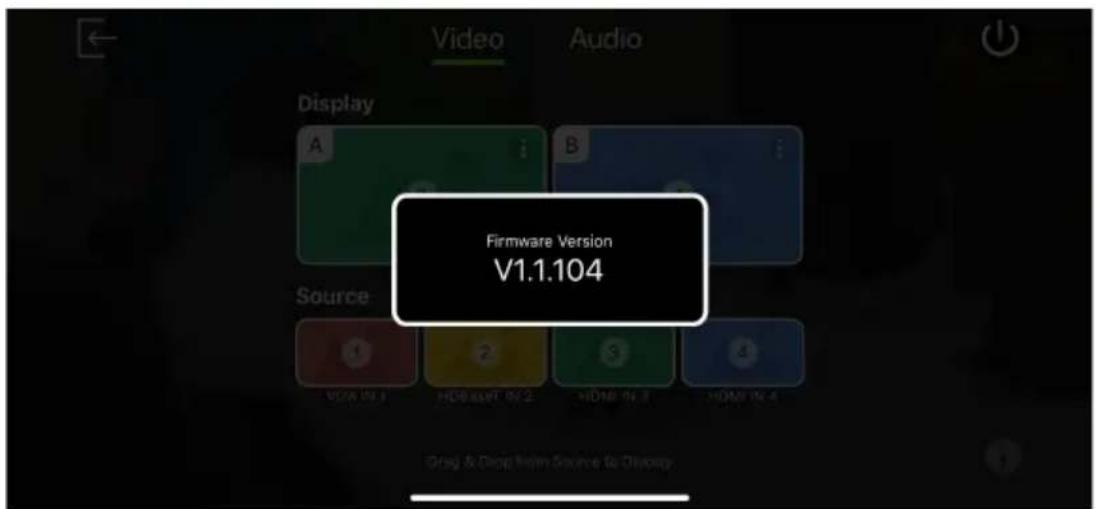
To check the firmware version, follow the steps below.
- Press the from your main screen.

- Below screen appears.
Video Panel

Switching a Source for a Display
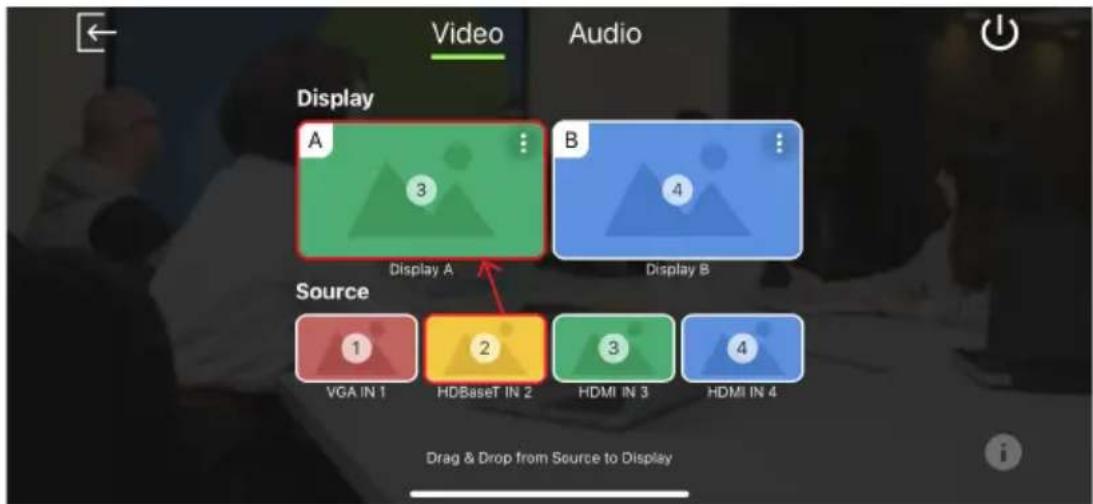
To switch a source for a display, follow the steps below.
- To switch Source 2 to Display A. From the display page, drag the Source to Display A.
flowchart
graph TD
    A["Source"] --> B["VGA IN 1"]
    A --> C["HDBaseT IN 2"]
    A --> D["HDMI IN 3"]
    A --> E["HDMI IN 4"]
    F["Display A"] --> G["3"]
    H["Display B"] --> I["4"]
    style A fill:#f9f,stroke:#333
    style B fill:#bbf,stroke:#333
    style C fill:#bfb,stroke:#333
    style D fill:#ffb,stroke:#333
    style E fill:#fbf,stroke:#333
    note right of A: "Drag & Drop from Source to Display"
- The Display A is now displaying content from Source 2.

Display A Settings
To configure display settings for the display A, follow the steps below.
- Tab from the top right corner of the display A.

- The below screen appears.

| Tool Description | |
| CEC Tap to enable | le or disable the CEC. The Consumer Electronics Control (CEC) allows for control of devices connected through HDMI ports to communicate with each other and makes the control of these devices using one remote control device possible. This setting is enabled by default. |
| Scaler Up Tap to | enable or disable the Scaler Up. The scaler up automatically scales the resolution of a 1080p source up to 4K. For a list of supported upscaling resolutions, see Specifications, page 103. |
| Auto Switching (Plugged) | Tap to configure automatic switching of sources when a new source is plugged into the VP1420 / VP1421.♦ Disabled: Disable automatic switching.♦ Next: Automatically switch the display to the newly plugged-in source. |
| Auto Switching (Unplugged) | Tap to configure automatic switching of sources when a displayed source is unplugged.♦ Disabled: Disable automatic switching.♦ Next: Automatically switch the display to the next available source.♦ Last: Automatically switch the display to the previous available source based on the order of source connection.For example, if sources are connected to the VP1420 / VP1421 in the order of port 2, port 3, port 4 and then port 1, and that Display A is switched to port 3, when the source (port 3) is unplugged, Display A will automatically switch to port 2. |
Display B Settings
To configure display settings for the display B, follow the steps below.
- Tab from the top right corner of the display B.

- The below screen appears.

| Tool Description | |
| CEC Tap to | enable or disable the CEC. The Consumer Electronics Control (CEC) allows for control of devices connected through HDMI ports to communicate with each other and makes the control of these devices using one remote control device possible. This setting is enabled by default. |
| Scaler Down Tap | to enable or disable the Scaler Down. The scaler down automatically scales the resolution of a 4K source down to 1080p. For a list of supported downscaling resolutions, see Specifications, page 103. |
| Mirror Mode Tap | to enable or disable the Mirror Mode. The mirror mode allows display B to show identical video content as display A. |
Audio Panel
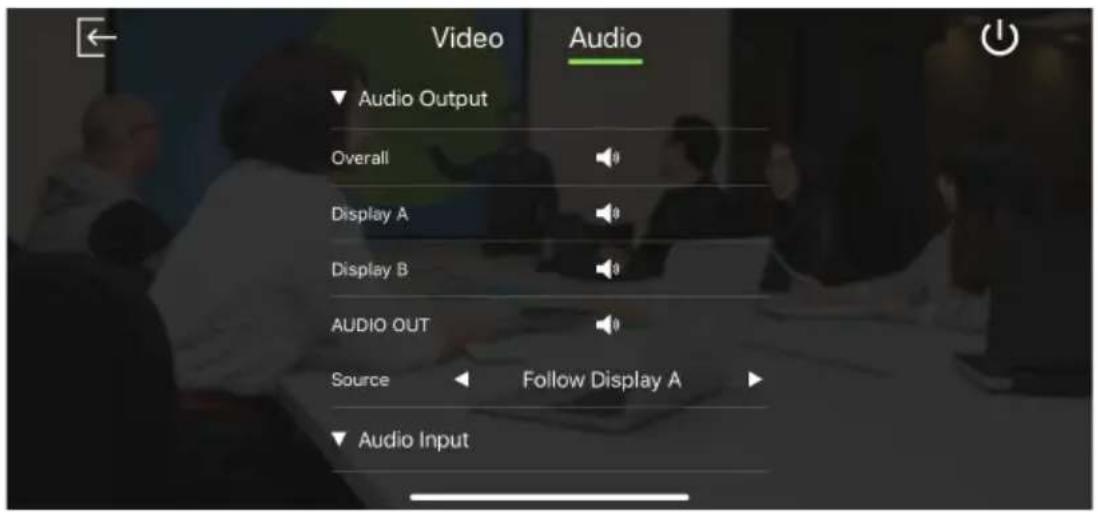
VP1420 Audio Output Settings
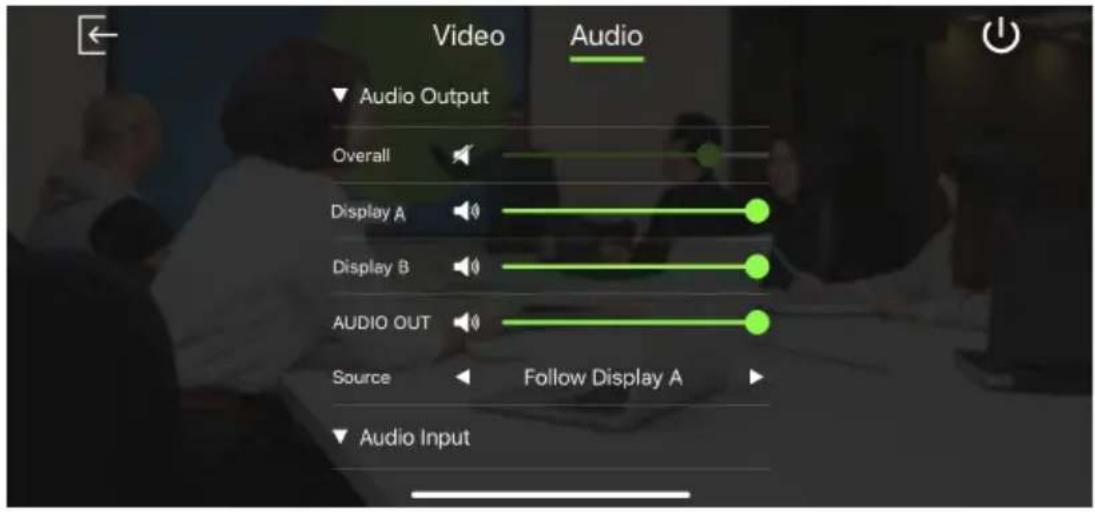
VP1421 Audio Output Settings

| System Settings | Description | ||
| Note: Default settings are indicated in bold. | |||
| Audio Output | Overall | ◆ Increase (+)◆ Decrease (-)◆ Mute | ◆ VP1420: Tap to mute or unmute the volume of the speaker connected to the VP1420.◆ VP1421: Sets the volume of the speaker connected to the VP1421 and tap to mute or unmute. |
| Display A | ◆ Increase (+)◆ Decrease (-)◆ Mute | VP1420: Tap to mute or unmute the volume of the display A connected to the VP1420.VP1421: Sets the volume of the display A connected to the VP1421 and tap to mute or unmute. | |
| Display B | ◆ Increase (+)◆ Decrease (-)◆ Mute | VP1420: Tap to mute or unmute the volume of the display B connected to the VP1420.VP1421: Sets the volume of the display B connected to the VP1421 and tap to mute or unmute. | |
| AUDIO OUT | ◆ Increase (+)◆ Decrease (-)◆ Mute | VP1420: Tap to mute or unmute the volume of the independent speaker connected to the Audio Out port on the VP1420.VP1421: Sets the volume of the independent speaker connected to the Audio Out port on the VP1421 and tap to mute or unmute. | |
| Source | ◆ Follow Display A◆ Follow Display B◆ Audio In | Sets the audio source for the independent speaker connected to the Audio Out port of the VP1420 / VP1421. | |
VP1420 Audio Input Settings
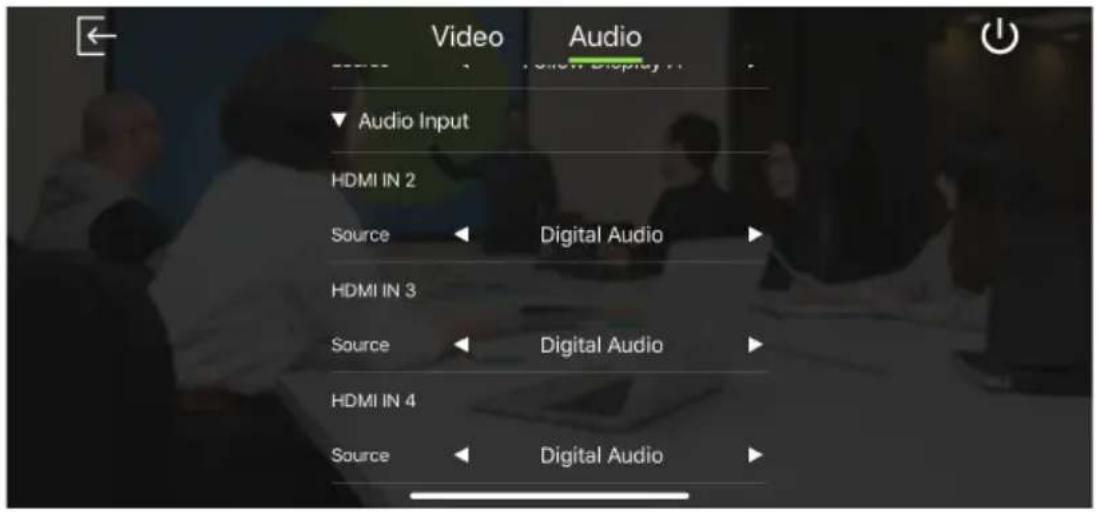
VP1421 Audio Input Settings

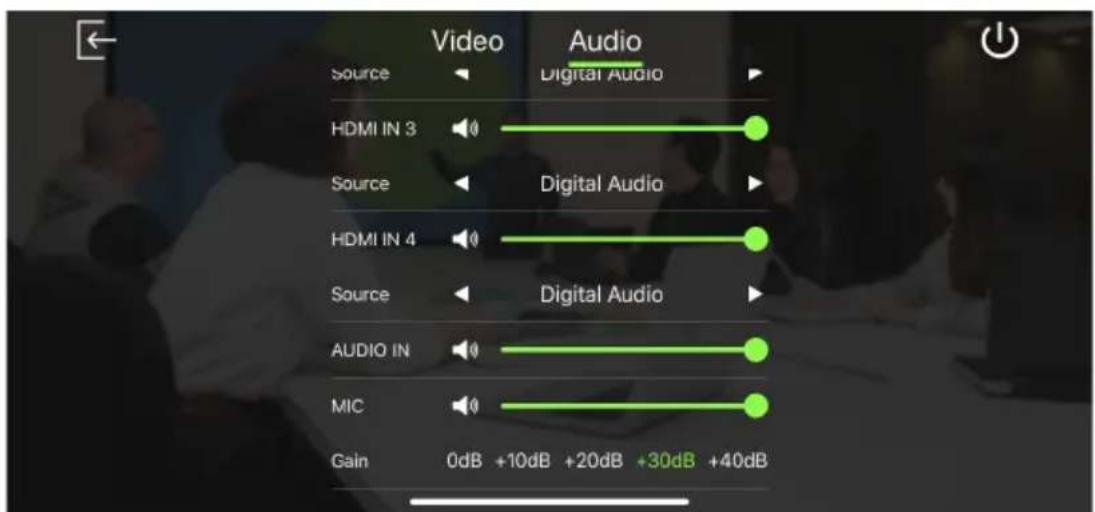
| System Settings | Description | ||
| Note: Default settings are indicated in bold. | |||
| Audio Input VGA IN 1 | ◆ Increase (+)◆ Decrease (-)◆ Mute | VP1421 only: Sets the volume of the VGA source connected to the VP1421 and tapto mute or unmute. | |
| HDBaseT IN 2 | ◆ Increase (+)◆ Decrease (-)◆ Mute | VP1421 only: Sets the volume of the HDBaseT source connected to the VP1421 and tapto mute or unmute. | |
| Source | ◆ Digital Audio◆ Embedded Audio In | VP1421 only: Sets the audio source for the HDBaseT source connected to the VP1421.To use the audio source that comes along with the video, selectDigital Audio. To use the audio source from the independent audio source (connected to the Audio In port). selectEmbedded Audio In. | |
| HDMI IN 2 | ◆ Increase (+)◆ Decrease (-)◆ Mute | VP1420 only: Sets the volume of the HDMI 2 source connected to the VP1420 and tapto mute or unmute. | |
| Source | ◆ Digital Audio◆ Embedded Audio In | VP1420 only: Sets the audio source for the HDMI 2 source connected to the VP1420.To use the audio source that comes along with the video, selectDigital Audio. To use the audio source from the independent audio source (connected to the Audio In port). selectEmbedded Audio In. | |
| HDMI IN 3 | ◆ Increase (+)◆ Decrease (-)◆ Mute | VP1420: N/A.VP1421: Sets the volume of the HDMI 3 source connected to the VP1421 and tap  mute or unmute. mute or unmute. | |
| Source | ◆ Digital Audio◆ Embedded Audio In | VP1420: Sets the audio source for the HDMI 3 source connected to the VP1420.VP1421: Sets the audio source for the HDMI 3 source connected to the VP1421.To use the audio source that comes along with the video, selectDigital Audio. To use the audio source from the independent audio source (connected to the Audio In port). selectEmbedded Audio In. | |
| HDMI IN 4 | ◆ Increase (+)◆ Decrease (-)◆ Mute | VP1420: N/A.VP1421: Sets the volume of the HDMI 4 source connected to the VP1421 and tap  mute or unmute. mute or unmute. | |
| SourceAUDIO In | ◆ Digital Audio◆ Embedded Audio In◆ Increase (+)◆ Decrease (-)◆ Mute | VP1420: Sets the audio source for the HDMI 4 source connected to the VP1420.VP1421: Sets the audio source for the HDMI 4 source connected to the VP1421.To use the audio source that comes along with the video, selectDigital Audio. To use the audio source from the independent audio source (connected to the Audio In port). selectEmbedded Audio In.VP1421 only: Sets the volume of the independent audio source connected to the Audio In port on the VP1421 and tap   or unmute. or unmute. | |
| MIC | ◆ Increase (+)◆ Decrease (-)◆ Mute | VP1421 only: Sets the volume of the microphone connected to the MIC port on VP1421 and tap  to mute or unmute. to mute or unmute. | |
| Gain | ◆ +0dB◆ +10dB◆ +20dB◆ +30dB | VP1421 only: Sets the MIC gain of the microphone connected to the VP1421. | |
Android Version
Main Page
When logged in, the ATEN Video Presentation Control App defaults to the scanning page. Refer to the table below for an overview of the functions on each tab.
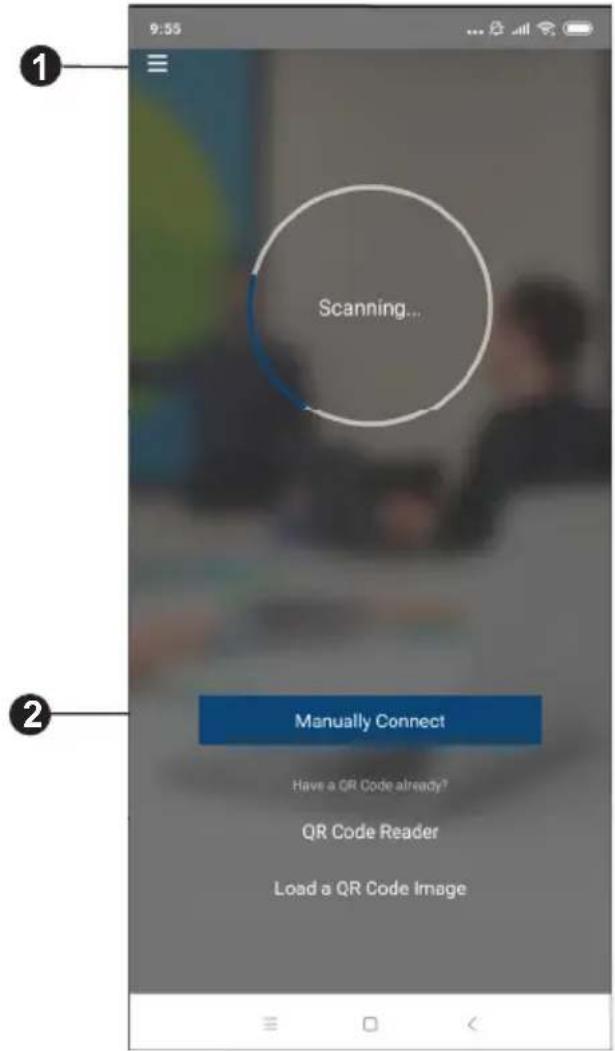
| No. | Component Description | |
| 1 | Info  | Tap the info icon to show information such as version, privacy policy, and contact us. |
| 2 | Manually Connect | Tap this icon to manually connect and log in to the control panel by entering its IP address and password. |
| 3 | QR Code Reader | Tap this icon to scan a QR codes to join a meeting. |
| No. | Component Description |
| 4 | Load a QR code Image |
Info
Below screen is what the info page looks like, it shows the version, privacy policy and contact us. Tap on the Contact Us and it takes you straight to our ATEN's official website.

Logging in to the Control Panel
There are three ways to log in to the control panel through our ATEN Video Presentation Control App on VP1420 / VP1421. When the App is opened, it automatically scans for the device and available rooms to access. Or you can manually type in the IP address and password to log in to the control panel. Each methods are described below.
Logging in to the Control Panel Automatically
To automatically scan and log in to the control panel, follow the steps below.
- Open the ATEN Video Presentation Control App and wait for the scanning process to finish.

- When the scanning finishes, the Room List page appears. Tap on a room to log in to the control panel.

3. Enter the username and password, then tap Log in.
Note: For security purposes, it is required to change the password from the VP1420 / VP1421 web console if you are logging in for the first time. For details, see General Settings, page 35.

- Now you have successfully logged in to the control panel.

Logging in to the Control Panel via Manually Connect
To manually connect and log in to the control panel, follow the steps below.
- Open the ATEN Video Presentation Control App and tap Manually Connect.
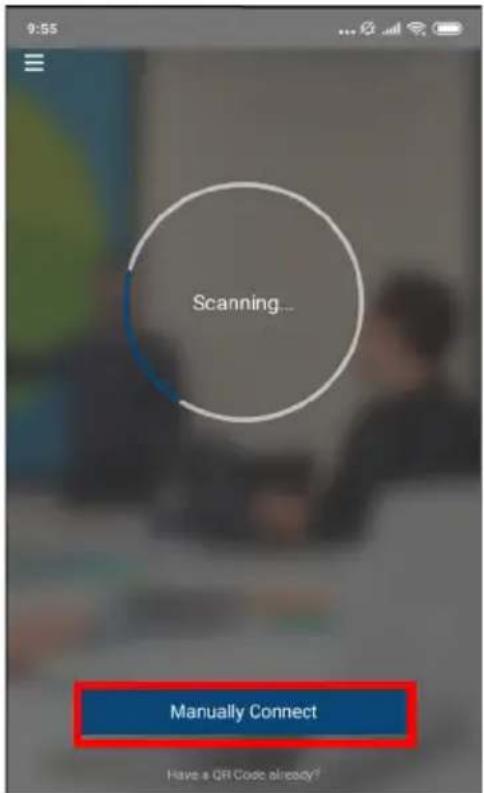
- Enter the IP address of the VP1420 / VP1421 and tap Connect.

3. Enter the username and password, then tap Log in.
Note: For security purposes, it is required to change the password from the VP1420 / VP1421 web console if you are logging in for the first time. For details, see General Settings, page 35.

- Now you have successfully logged in to the control panel.
Or,
- From the Room List page, tap Manually Connect.

- Enter the IP address of the VP1420 / VP1421 and tap Connect.

- Enter the username and password, then tap Log in.
Note: For security purposes, it is required to change the password from the VP1420 / VP1421 web console if you are logging in for the first time. For details, see General Settings, page 35.

- Now you have successfully logged in to the control panel.
Leaving the Meeting
To leave the control panel, follow the steps below.
1. Press the

your main screen.

2. A warning screen appears, then tap Leave.

Enabling Standby Mode
To enable standby mode, follow the steps below.
1. Press the

your main screen.
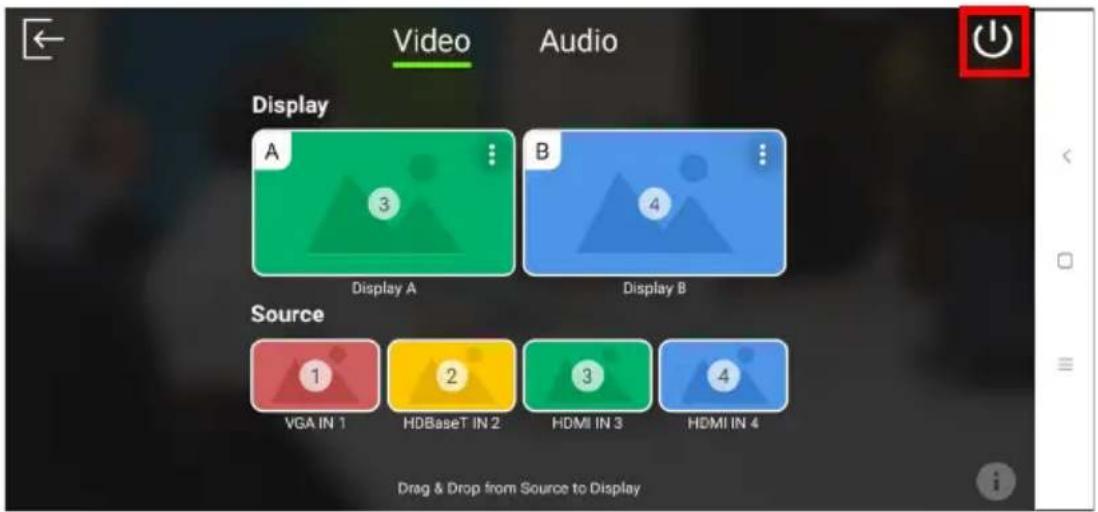
2. A warning screen appears, then tap OK.

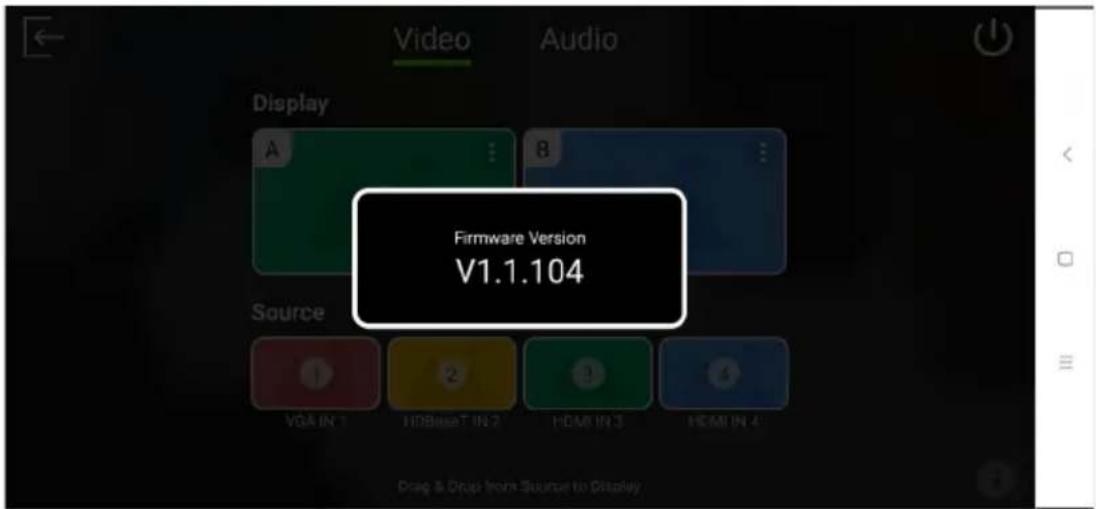
Checking the Firmware Version
To check the firmware version, follow the steps below.
- press the from your main screen.
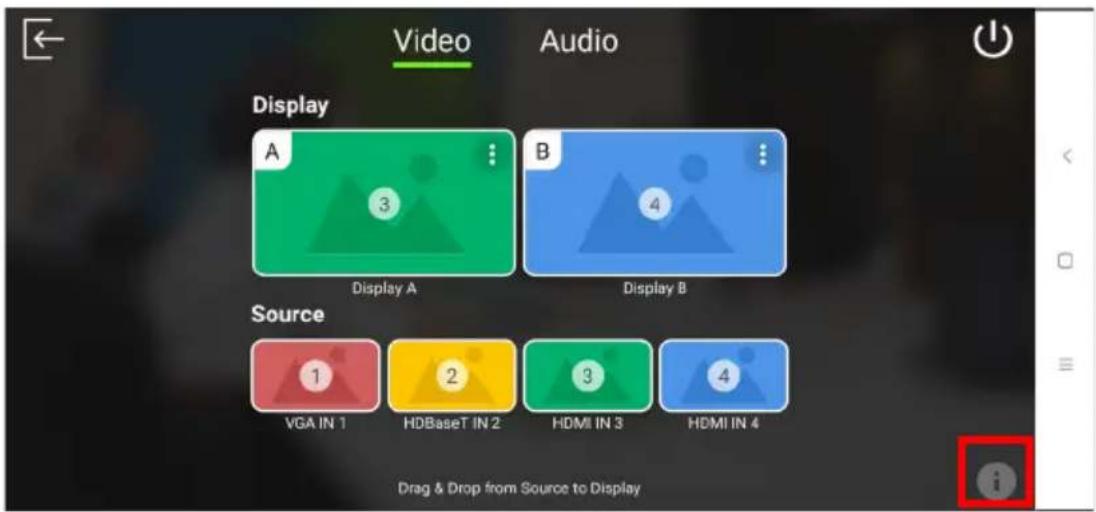
- Below screen appears.
Video Panel

Switching a Source for a Display
To switch a source for a display, follow the steps below.
- To switch Source 2 to Display A. From the display page, drag the Source to Display A.

flowchart
graph TD
    A["Source"] --> B["VGA IN 1"]
    A --> C["HDBaseT IN 2"]
    A --> D["HDMI IN 3"]
    A --> E["HDMI IN 4"]
    F["Display A"] --> G["3"]
    H["Display B"] --> I["4"]
    style A fill:#f9f,stroke:#333
    style B fill:#bbf,stroke:#333
    style C fill:#bfb,stroke:#333
    style D fill:#bfb,stroke:#333
    style E fill:#bfb,stroke:#333
    note right of F: "Drag & Drop from Source to Display"
- The Display A is now displaying content from Source 2.

Display A Settings
To configure display settings for the display A, follow the steps below.
- Tab from the top right corner of the display A.
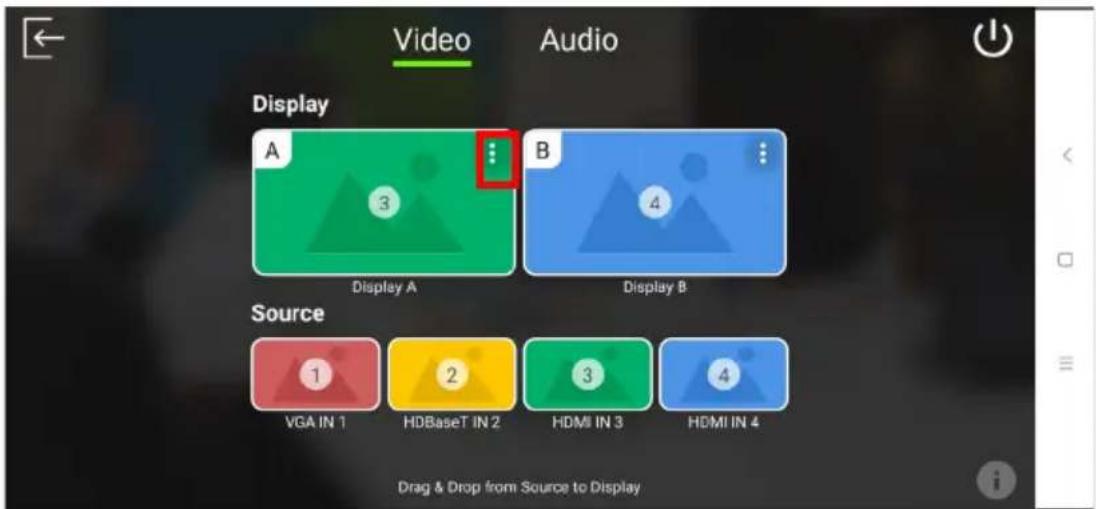
- The below screen appears.
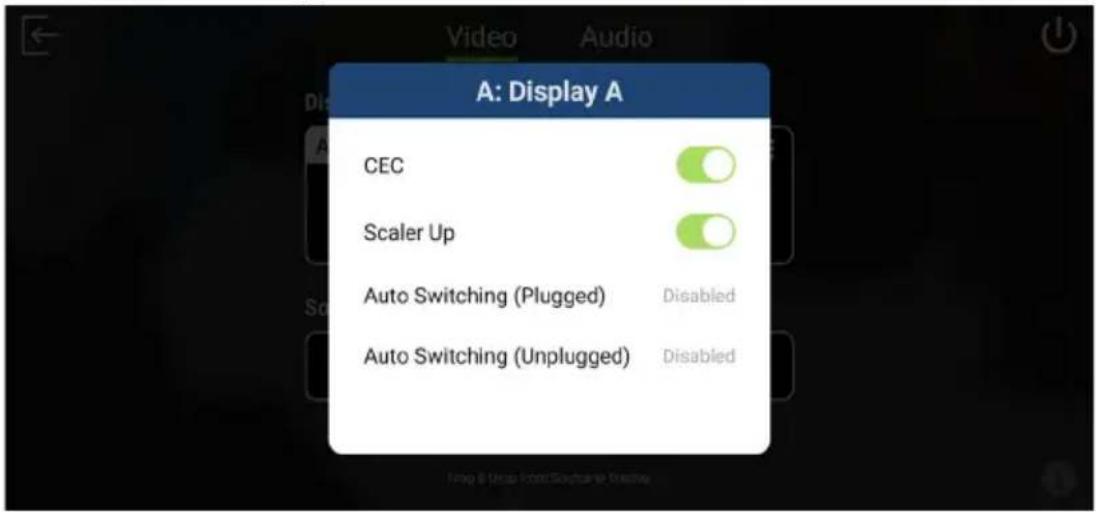
| Tool Description | |
| CEC Tap to enable | or disable the CEC. The Consumer Electronics Control (CEC) allows for control of devices connected through HDMI ports to communicate with each other and makes the control of these devices using one remote control device possible. This setting is enabled by default. |
| Scaler Up Tap to enable | or disable the Scaler Up. The scaler up automatically scales the resolution of a 1080p source up to 4K. For a list of supported upscaling resolutions, see Specifications, page 103. |
| Auto Switching (Plugged) | Tap to configure automatic switching of sources when a new source is plugged into the VP1420 / VP1421.◆ Disabled: Disable automatic switching.◆ Next: Automatically switch the display to the newly plugged-in source. |
| Auto Switching (Unplugged) | Tap to configure automatic switching of sources when a displayed source is unplugged.◆ Disabled: Disable automatic switching.◆ Next: Automatically switch the display to the next available source.◆ Last: Automatically switch the display to the previous available source based on the order of source connection.For example, if sources are connected to the VP1420 / VP1421 in the order of port 2, port 3, port 4 and then port 1, and that Display A is switched to port 3, when the source (port 3) is unplugged, Display A will automatically switch to port 2. |
Auto Switching
To enable or disable auto switching for newly detected source, tap on the Auto Switching, and the screen below appears.

Display B Settings
To configure display settings for the display B, follow the steps below.
- Tab from the top right corner of the display B.
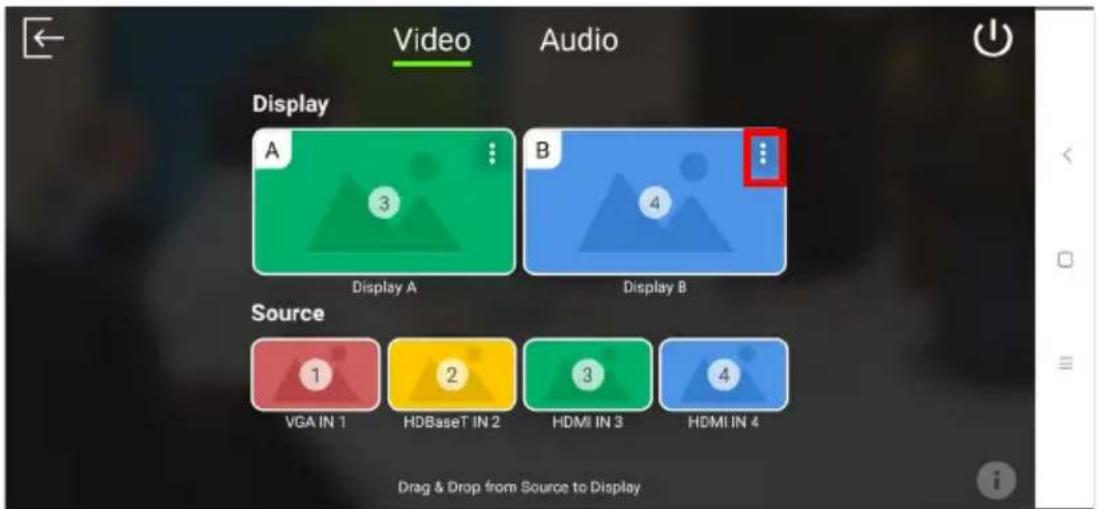
2. The below screen appears.

| Tool Description | |
| CEC Tap to | enable or disable the CEC. The Consumer Electronics Control (CEC) allows for control of devices connected through HDMI ports to communicate with each other and makes the control of these devices using one remote control device possible. This setting is enabled by default. |
| Scaler Down Tap | to enable or disable the Scaler Down. The scaler down automatically scales the resolution of a 4K source down to 1080p. For a list of supported downscaling resolutions, see Specifications, page 103. |
| Mirror Mode Tap | to enable or disable the Mirror Mode. The mirror mode allows display B to show identical video content as display A. |
Audio Panel
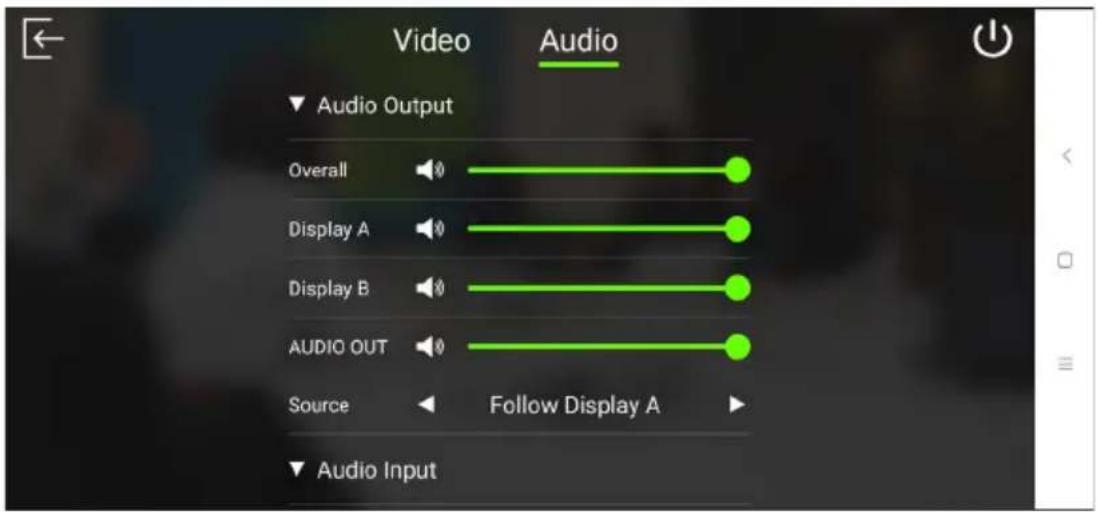
VP1420 Audio Output Settings

VP1421 Audio Output Settings

| System Settings Description | |||
| Note: Default settings are indicated in bold. | |||
| Audio Output | Overall | ◆ Increase (+)◆ Decrease (-)◆ Mute | ◆ VP1420: Tap to mute or unmute the volume of the speaker connected to the VP1420.◆ VP1421: Sets the volume of the speaker connected to the VP1421 and tap [TYSX] mute or unmute. |
| Display A | ◆ Increase (+)◆ Decrease (-)◆ Mute | VP1420: Tap to mute or unmute the volume of the display A connected to the VP1420.VP1421: Sets the volume of the display A connected to the VP1421 and tap  mute or unmute. mute or unmute. | |
| Display B | ◆ Increase (+)◆ Decrease (-)◆ Mute | VP1420: Tap to mute or unmute the volume of the display B connected to the VP1420.VP1421: Sets the volume of the display B connected to the VP1421 and tap  mute or unmute. mute or unmute. | |
| AUDIO OUT | ◆ Increase (+)◆ Decrease (-)◆ Mute | VP1420: Tap to mute or unmute the volume of the independent speaker connected to the Audio Out port on the VP1420.VP1421: Sets the volume of the independent speaker connected to the Audio Out port on the VP1421 and tap  mute or unmute. mute or unmute. | |
| Source | ♦ Follow Display A♦ Follow Display B♦ Audio In | Sets the audio source for the independent speaker connected to the Audio Out port of the VP1420 / VP1421. | |
VP1420 Audio Input Settings

VP1421 Audio Input Settings


| System Settings Description | |||
| Note: Default settings are indicated in bold. | |||
| Audio Input VGA IN 1 | ◆ Increase (+)◆ Decrease (-)◆ Mute | VP1421 only: Sets the volume of the VGA source connected to the VP1421 and tap [DSSD] mute or unmute. | |
| HDBaseT IN 2 | ◆ Increase (+)◆ Decrease (-)◆ Mute | VP1421 only: Sets the volume of the HDBaseT source connected to the VP1421 and tap  mute or unmute. mute or unmute. | |
| Source | ◆ Digital Audio◆ Embedded Audio In | VP1421 only: Sets the audio source for the HDBaseT source connected to the VP1421.To use the audio source that comes along with the video, selectDigital Audio. To use the audio source from the independent audio source (connected to the Audio In port). selectEmbedded Audio In. | |
| HDMI IN 2 | ◆ Increase (+)◆ Decrease (-)◆ Mute | VP1420 only: Sets the volume of the HDMI 2 source connected to the VP1420 and tap [to] mute or unmute. | |
| Source | ♦ Digital Audio♦ Embedded Audio In | VP1420 only: Sets the audio source for the HDMI 2 source connected to the VP1420.To use the audio source that comes along with the video, selectDigital Audio. To use the audio source from the independent audio source (connected to the Audio In port). selectEmbedded Audio In. | |
| HDMI IN 3 | ♦ Increase (+)♦ Decrease (-)♦ Mute | VP1420: N/A.VP1421: Sets the volume of the HDMI 3 source connected to the VP1421 and tap  mute or unmute. mute or unmute. | |
| Source | ♦ Digital Audio♦ Embedded Audio In | VP1420: Sets the audio source for the HDMI 3 source connected to the VP1420.VP1421: Sets the audio source for the HDMI 3 source connected to the VP1421.To use the audio source that comes along with the video, selectDigital Audio. To use the audio source from the independent audio source (connected to the Audio In port). selectEmbedded Audio In. | |
| HDMI IN 4 | ♦ Increase (+)♦ Decrease (-)♦ Mute | VP1420: N/A.VP1421: Sets the volume of the HDMI 4 source connected to the VP1421 and tap  mute or unmute. mute or unmute. | |
| Source | ◆ Digital Audio◆ Embedded Audio In | VP1420: Sets the audio source for the HDMI 4 source connected to the VP1420.VP1421: Sets the audio source for the HDMI 4 source connected to the VP1421.To use the audio source that comes along with the video, selectDigital Audio. To use the audio source from the independent audio source (connected to the Audio In port). selectEmbedded Audio In. | |
| AUDIO In | ◆ Increase (+)◆ Decrease (-)◆ Mute | VP1421 only: Sets the volume of the independent audio source connected to the Audio In port on the VP1421 and tapto mute or unmute. | |
| MIC | ◆ Increase (+)◆ Decrease (-)◆ Mute | VP1421 only: Sets the volume of the microphone connected to the MIC port on VP1421 and tapto mute or unmute. | |
| Gain | ◆ +0dB◆ +10dB◆ +20dB◆ +30dB | VP1421 only: Sets the MIC gain of the microphone connected to the VP1421. | |
This Page Intentionally Left Blank
Safety Instructions
General
- This product is for indoor use only.
◆ Read all of these instructions. Save them for future reference.
◆ Follow all warnings and instructions marked on the device. - Do not place the device on any unstable surface (cart, stand, table, etc.). If the device falls, serious damage will result.
- Do not use the device near water.
Do not place the device near, or over, radiators or heat registers. - The device cabinet is provided with slots and openings to allow for adequate ventilation. To ensure reliable operation, and to protect against overheating, these openings must never be blocked or covered.
- The device should never be placed on a soft surface (bed, sofa, rug, etc.) as this will block its ventilation openings. Likewise, the device should not be placed in a built-in enclosure unless adequate ventilation has been provided.
- Never spill liquid of any kind on the device.
- Unplug the device from the wall outlet before cleaning. Do not use liquid or aerosol cleaners. Use a damp cloth for cleaning.
- The device should be operated from the type of power source indicated on the marking label. If you are not sure of the type of power available, consult your dealer or local power company.
- To prevent damage to your installation it is important that all devices are properly grounded.
- Do not allow anything to rest on the power cord or cables. Route the power cord and cables so that they cannot be stepped on or tripped over.
- Position system cables and power cables carefully; Be sure that nothing rests on any cables.
-
Never push objects of any kind into or through cabinet slots. They may touch dangerous voltage points or short out parts resulting in a risk of fire or electrical shock.
-
Do not attempt to service the device yourself. Refer all servicing to qualified service personnel.
-
If the following conditions occur, unplug the device from the wall outlet and bring it to qualified service personnel for repair.
-
The power cord or plug has become damaged or frayed.
◆ Liquid has been spilled into the device. - The device has been exposed to rain or water.
- The device has been dropped, or the cabinet has been damaged.
- The device exhibits a distinct change in performance, indicating a need for service.
- The device does not operate normally when the operating instructions are followed.
- Only adjust those controls that are covered in the operating instructions. Improper adjustment of other controls may result in damage that will require extensive work by a qualified technician to repair.
Rack Mounting
Before working on the rack, make sure that the stabilizers are secured to the rack, extended to the floor, and that the full weight of the rack rests on the floor. Install front and side stabilizers on a single rack or front stabilizers for joined multiple racks before working on the rack.
- Always load the rack from the bottom up, and load the heaviest item in the rack first.
- Make sure that the rack is level and stable before extending a device from the rack.
- Use caution when pressing the device rail release latches and sliding a device into or out of a rack; the slide rails can pinch your fingers.
- Do not overload the AC supply branch circuit that provides power to the rack. The total rack load should not exceed 80 percent of the branch circuit rating.
- Make sure that all equipment used on the rack – including power strips and other electrical connectors – is properly grounded.
- Ensure that proper airflow is provided to devices in the rack.
- Ensure that the operating ambient temperature of the rack environment does not exceed the maximum ambient temperature specified for the equipment by the manufacturer.
- Do not step on or stand on any device when servicing other devices in a rack.
Technical Support
International
- For online technical support – including troubleshooting, documentation, and software updates: http://support.aten.com
- For telephone support, call this number:
| International 886-2 | 8692-6959 |
| China 86-400-810-0 | 810 |
| Japan 81-3-5615-5811 | |
| Korea 82-2-467-6789 | |
| North America 1-888 | 8-999-ATEN ext 4988 |
| 1-949-428-1111 | |
North America
| Email Support support@aten-usa.com | ||
| Online Technical Support | Troubleshooting Documentation Software Updates | http://www.aten-usa.com/support |
| Telephone Support 1-888-999-ATEN ext 4988 | ||
When you contact us, please have the following information ready beforehand:
Product model number, serial number, and date of purchase
- Your computer configuration, including operating system, revision level, expansion cards, and software
◆ Any error messages displayed at the time the error occurred
◆ The sequence of operations that led up to the error
◆ Any other information you feel may be of help
Specifications
VP1420
| Video Input | |
| Interfaces 3 x HDMI Type | -A female (Black)1 x VGA (HDB-15) female (Blue) |
| Max. Distance HDMI: | ◆ 4K@60Hz (4:4:4) up to 3m◆ 4K@30Hz up to 10m◆ 1080p@60Hz up to 15mVGA:◆ 1080p@60Hz up to 15m |
| Video Output | |
| Interfaces 2 x HDMI Type | -A female (Black)HDBaseT: 1 x RJ-45 female (Silver) |
| Max. Distance HDMI: | ◆ 4K@60Hz (4:4:4) up to 3m◆ 4K@30Hz up to 10m◆ 1080p@60Hz up to 15m |
| Video | |
| Max. Resolution | HDMI: Up to 4096 x 2160 / 3840 x 2160 @ 60Hz (4:4:4)VGA: Up to 1080p @60Hz |
| Supported Upscaling & Downscaling Resolutions | Upscaling resolutions:◆ 1080p 60Hz to 4K 60Hz◆ 1080p 50Hz to 4K 50Hz◆ 1080p 24Hz to 4K 24Hz◆ 1080p 25Hz to 4K 25Hz◆ 1080p 30Hz to 4K 30HzDownscaling resolutions:◆ 4K 60Hz to 1080p 60Hz◆ 4K 50Hz to 1080p 50Hz◆ 4K 24Hz to 1080p 24Hz◆ 4K 25Hz to 1080p 25Hz◆ 4K 30Hz to 1080p 30HzNote: When videos of 4096 x 2160 in resolution are downscaled, the output will be cropped by 128 pixels in width on both the left and right. |
| Compliance | HDMI (3D, Deep Color, 4K); 4K HDRHDCP 2.2 compatible; Consumer Electronics Control (CEC) |
| Audio | |
| Input | Stereo audio (VGA): 1 x mini stereo jack female (Green)Stereo audio (HDMI): 1 x mini stereo jack female (Green) |
| Output Line Out (Unbalanced): 1 x captive screw connector, 3-pole | |
| Control | |
| RS-232 1 x captive screw | connector, 3-pole |
| IR 1 x mini stereo jack female (Black) | |
| Ethernet 1 x RJ-45 female (Silver) | |
| Contact In 1 x captive screw connector, 5-pole | |
| LED Out 1 x captive screw | connector, 5-pole; LED out power: +5VDC, 0.2 A |
| Switches | |
| Power 1 x Pushbutton (LED: Green/Orange) | |
| Video Input PortSelection | 4 x Pushbuttons (LED: Green) |
| Video Output PortSelection | 2 x Pushbuttons (LED: Orange) |
| Selection Mute: 1 x Pushbutton | |
| EDID Mode ATEN Default, Display A, Remix | |
| Connectors | |
| Power 1 x DC jack (Black) | |
| Power Consumption DC 5V, 7.21W | |
| Environmental | |
| Operating Temperature 0 | -40°C |
| Storage Temperature -20 | -60°C |
| Humidity | 0 x 80% RH, Non-Condensing |
| Physical Properties | |
| Housing | Metal |
| Weight | 1.09 kg (2.40 lb) |
| Dimensions (L x W x H) | 20.00 x 16.05 x 4.40 cm (7.87 x 6.30 x 1.73 in) |
VP1421
| Video Input | |
| Interfaces 2 x HDMI Type-A female (Black)1 x VGA (HDB-15) female (Blue)1 x HDBaseT (RJ-45) female (Silver) with selectable PoH | |
| Max. Distance HDMI: | ◆ 4K@60Hz (4:4:4) up to 3m◆ 4K@30Hz up to 10m◆ 1080p@60Hz up to 15mVGA:◆ Up to 1080p @60Hz up to 15mHDBaseT:◆ 4K@30Hz (4:4:4) up to 35m (Cat 5e/6)◆ 4K@30Hz (4:4:4) up to 40m (Cat 6a or ATEN 2L-2910 Cat 6)◆ 1080p @60Hz up to 60m (Cat 5e/6)◆ 1080p @60Hz up to 70m (Cat 6a or ATEN 2L-2910 Cat 6) |
| Video Output | |
| Interfaces 1 x HDMI Type-A female (Black)1 x HDBaseT (RJ-45) female (Silver) with selectable PoH | |
| Max. Distance HDMI: | ◆ 4K@60Hz (4:4:4) up to 3m◆ 4K@30Hz up to 10m◆ 1080p@60Hz up to 15mHDBaseT:◆ 4K@30Hz up to 35m (Cat 5e/6)◆ 4K@30Hz up to 40m (Cat 6a or ATEN 2L-2910 Cat 6)◆ 1080p @60Hz up to 60m (Cat 5e/6)◆ 1080p @60Hz up to 70m (Cat 6a or ATEN 2L-2910 Cat 6) |
| Video | |
| Max. Resolution | HDMI: Up to 4096 x 2160 / 3840 x 2160 @ 60Hz (4:4:4)VGA: Up to 1080p@60HzHDBaseT:◆ Up to 4096 x 2160 / 3840 x 2160 @60Hz (4:2:0)◆ Up to 4096 x 2160 / 3840 x 2160 @30Hz (4:4:4) |
| Supported Upscaling & Downscaling Resolutions | Upscaling resolutions:◆ 1080p 60Hz to 4K 60Hz◆ 1080p 50Hz to 4K 50Hz◆ 1080p 24Hz to 4K 24Hz◆ 1080p 25Hz to 4K 25Hz◆ 1080p 30Hz to 4K 30HzDownscaling resolutions:◆ 4K 60Hz to 1080p 60Hz◆ 4K 50Hz to 1080p 50Hz◆ 4K 24Hz to 1080p 24Hz◆ 4K 25Hz to 1080p 25Hz◆ 4K 30Hz to 1080p 30HzNote:When videos of 4096 x 2160 in resolution are downscaled, the output will be cropped by 128 pixels in width on both the left and right. |
| Compliance | HDMI (3D, Deep Color, 4K); 4K HDRHDCP 2.2 compatible; Consumer Electronics Control (CEC) |
| Audio | |
| General | Frequency Response: 20Hz ~ 20KHz, + / - dB (1Vrms @ 0dBV)THD + Noise: < -65dB (0.056%) (1KHz, 1Vrms @ -3dBVS/N: >85dB (1KHz, 1Vrms @ 0dBVCross Talk: < -60dB (15KHz, 1Vrms @ 0dBV) |
| Audio Input | |
| Input | Stereo audio (HDMI/HDBT): 1 x mini stereo jack female (Green)Stereo audio (VGA): 1 x mini stereo jack female (Green)Microphone: 1 x 6.3mm jack connector (with selectable phantom power) |
| Impedance Line in: Analog inputs, 25k ohms unbalanced, 50k ohms balancedMic in: Analog inputs, 6.8k ohms unbalanced, 13.6k ohms balanced | |
| Maximum Level Line in: 0dBVMic in: 60dBV | |
| Mic Preamp Level Mic in: 0dB to +40dB balanced, adjustable, in 10dB steps | |
| Phantom Power +48V, 10mA | |
| Audio Output | |
| Output Line Out (Unbalanced): 1 x captive screw connector, 3-poleOptical audio: 1 x TOSLINK (Black) | |
| Maximum Level RCA | out: 1Vrms + / - 5% |
| Output Impedance Digital coaxial: 75 ohms | |
| Load Impedance RCA | out: 2k ohms, minimux |
| Control | |
| RS-232 1 x captive screw connector, 3-pole | |
| IR 1 x mini stereo jack female (Black) | |
| Ethernet 1 x RJ-45 female (Silver) | |
| Contact In 1 x captive screw connector, 5-pole | |
| LED Out 1 x captive screw connector, 5-pole; LED out power: +5 VDC,0.2 A | |
| IR Channel HDBaseT | In: 1 x mini stereo jack female (Black)HDBaseT Out: 1 x mini stereo jack female (Black) |
| RS-232 Channel HDBaseT In: 1 x captive screw connector, 3-poleHDBaseT Out: 1 x captive screw connector, 3-pole | |
| Switches | |
| Power 1 x pushbutton | (LED: Green/Orange), 1 x slide switch (+48phantom power), 1 x slide switch (PoH) |
| Video Input Port Selection | 4 x pushbuttons (LED: Green) |
| Video Output Port Selection | 2 x pushbuttons (LED: Orange) |
| Selection Mic: 1 x knob | Volume: 1 x knobMode/Unlock: 1 x pushbutton |
| EDID Modes ATEN | Default, Display A, Remix |
| Connectors | |
| Power 1 x DC jack (Black) | |
| Power Consumption | DC 12V: 14.93W |
| Environmental | |
| Operating Temperature | 0 - 40°C |
| Storage Temperature | -20 - 60°C |
| Humidity | 0 x 80% RH, Non-Condensing |
| Physical Properties | |
| Housing Metal | |
| Weight 1.16 kg (2.56 lb) | |
| Dimensions(L x W x H) | 20.00 x 17.01 x 4.40 cm (7.87 x 6.70 x 1.73 in) |
CAD Drawings

ATEN
VPK104

ATEN
VPK104

ATEN
VPK104
Panel Mount Cutout
![Width of faceplate = 7.4 cm [2.92"] Height of faceplate = 11.9 cm [4.69"] 5.4 cm [2.13"] 7.2 cm [2.83"] Cutout Area](/content/2026/05/928313/images/50bed5c353baaf2be32a0a7edecf6f55b977d42c490ced3c1c7d5dc863849f9e.jpg)
Note: ATEN recommends a 1-gang wall box with a depth of at least 5 cm (1.97 inches) to accommodate the connectors and cables.
ATEN
VPK104
Limited Warranty
ATEN warrants its hardware in the country of purchase against flaws in materials and workmanship for a Warranty Period of two [2] years (warranty period may vary in certain regions/countries) commencing on the date of original purchase. This warranty period includes the LCD panel of ATEN LCD KVM switches. Select products are warranted for an additional year (see A+ Warranty for further details). Cables and accessories are not covered by the Standard Warranty.
What is covered by the Limited Hardware Warranty
ATEN will provide a repair service, without charge, during the Warranty Period. If a product is detective, ATEN will, at its discretion, have the option to (1) repair said product with new or repaired components, or (2) replace the entire product with an identical product or with a similar product which fulfills the same function as the defective product. Replaced products assume the warranty of the original product for the remaining period or a period of 90 days, whichever is longer. When the products or components are replaced, the replacing articles shall become customer property and the replaced articles shall become the property of ATEN.
To learn more about our warranty policies, please visit our website: http://www.aten.com/global/en/legal/policies/warranty-policy/
© Copyright 2021 ATEN® International Co., Ltd.
Released: 2021-04-13
ATEN and the ATEN logo are registered trademarks of ATEN International Co., Ltd. All rights reserved.
All other brand names and trademarks are the registered property of their respective owners.



- Compliance Statements
- FEDERAL COMMUNICATIONS COMMISSION INTERFERENCE STATEMENT
- FCC Caution
- Warning
- Achtung
- RoHS
- About this Manual
- Note:
- Package Contents
- VP1420
- VP1421
- VPK104
- User Information
- Online Registration
- Telephone Support
- User Notice
- Conventions
- Product Information
- Table of Contents
- Introduction
- Hardware Setup
- Local Operation
- Remote Operation
- CLI Commands
- Command List ....50
- Video Presentation Control App
- Overview 57
- iOS Version....58
- Android Version 78
- Video Panel 88
- Appendix
- Chapter 1
- Introduction
- Overview
- Features
- Analog/Digital AV Matrix
- High-definition Video with Optimum Output
- Versatile, Streamlined Operation
- Extended Transmission over One Cable
- Planning the Installation
- Required Equipment
- Optional Equipment
- Chapter 2
- Hardware Setup
- Hardware Overview
- Front View
- Rear View
- IR Remote Control
- Side View
- Mounting
- Rack Mount
- Under Desk Mount
- Installation
- Operation Considerations
- Switching Sources
- Display Mode
- Understanding Display Mode
- Configuration
- Panel Lock
- Power LED Indication
- Chapter 4
- Remote Operation
- Default Network and Login Settings
- Supported Web Browsers
- Logging In the Web Console
- The Main Screen
- General Settings
- General
- Basic
- ♦ EDID
- - Change Password
- Audio & Video Settings
- Audio Control
- Audio Output
- Overall volume:
- ◆ Display A
- ◆ Display B
- Audio Out
- Audio Input (VP1420)
- ♦ HDMI In 2 / HDMI In 3 / HDMI In 4: N/A.
- Audio Input (VP1421)
- Apply vs. Auto Apply
- Video Control
- System Settings
- Maintenance
- Upgrading the System Firmware
- Backing Up System Settings
- Restoring System Settings
- Reseting the Default Settings
- Network Settings
- IP Settings
- Browser
- Connecting to the VP1420 / VP1421 via Telnet
- Connecting to the VP1420 / VP1421 via RS-232
- Command Syntax
- Command List
- Port Numbers
- cec
- Example
- displaymode
- ◆ Function
- - Syntax
- - Parameters
- echo
- edid
- mute
- ◆ Functions and Syntax
- read
- reset
- scaling
- standby
- SW
- Examples
- swmode
- volume
- Chapter 6
- Video Presentation Control App
- Supported Systems
- Installing and Configuring the App
- iOS Version
- Main Page
- Info
- Logging in to the Control Panel
- Logging in to the Control Panel Automatically
- Enter the username and password, then tap Login.
- Logging in to the Control Panel via Manually Connect
- Enter the username and password, then tap Log in.
- Leaving the Meeting
- Press the
- A warning screen appears, then tap Leave.
- Enabling Standby Mode
- A warning screen appears, then tap OK.
- Checking the Firmware Version
- Video Panel
- Switching a Source for a Display
- Display A Settings
- Display B Settings
- Audio Panel
- VP1420 Audio Output Settings
- VP1421 Audio Output Settings
- Android Version
- Auto Switching
- The below screen appears.
- Safety Instructions
- Rack Mounting
- Technical Support
- International
- North America
- Specifications
- Limited Warranty
- What is covered by the Limited Hardware Warranty
Brand : ATEN
Model : VPK104
Category : Video switch