
CAMLIVE PRO UC3430 - Uncategorized ATEN - Free user manual and instructions
Find the device manual for free CAMLIVE PRO UC3430 ATEN in PDF.


| Product Type | HDMI Video Capture Device |
| Model | CAMLIVE PRO UC3430 |
| Brand | ATEN |
| Input | HDMI (up to 4K@30Hz) |
| Output | USB-C (USB 3.1 Gen 1) |
| Maximum Capture Resolution | 3840 x 2160 @ 30 fps |
| Passthrough Resolution | 4K@60Hz (HDMI loop-out) |
| Supported Video Formats | YUY2, NV12, MJPEG, RGB24 |
| Latency | Low latency (approximately 60ms) |
| Audio | HDMI embedded audio (2-channel PCM) |
| Compatibility | Windows, macOS, Linux (UVC/UAC compliant) |
| Power Supply | Bus-powered via USB-C |
| Dimensions (W x D x H) | 100 x 60 x 20 mm |
| Weight | 55 g |
| Operating Temperature | 0°C to 40°C |
| Storage Temperature | -20°C to 60°C |
| Maintenance | Wipe gently with a dry microfiber cloth. Avoid liquids. |
| Safety | Use only with certified HDMI and USB cables. Do not expose to moisture. |
| Spare Parts & Repairability | Not user-serviceable. Contact ATEN support for repairs. |
| Package Contents | CAMLIVE PRO UC3430, USB-C cable, HDMI cable, carrying pouch |
Frequently Asked Questions - CAMLIVE PRO UC3430 ATEN
User questions about CAMLIVE PRO UC3430 ATEN
0 question about this device. Answer the ones you know or ask your own.
Ask a new question about this device
Download the instructions for your Uncategorized in PDF format for free! Find your manual CAMLIVE PRO UC3430 - ATEN and take your electronic device back in hand. On this page are published all the documents necessary for the use of your device. CAMLIVE PRO UC3430 by ATEN.
USER MANUAL CAMLIVE PRO UC3430 ATEN
Compliance Statements
FEDERAL COMMUNICATIONS COMMISSION INTERFERENCE STATEMENT
This equipment has been tested and found to comply with the limits for a Class B digital service, pursuant to Part 15 of the FCC rules. These limits are designed to provide reasonable protection against harmful interference in a residential installation. Any changes or modifications made to this equipment may void the user's authority to operate this equipment. This equipment generates, uses, and can radiate radio frequency energy. If not installed and used in accordance with the instructions, may cause harmful interference to radio communications. However, there is no guarantee that interference will not occur in a particular installation. If this equipment does cause harmful interference to radio or television reception, which can be determined by turning the equipment off and on, the user is encouraged to try to correct the interference by one or more of the following measures:
◆ Reorient or relocate the receiving antenna.
- Increase the separation between the equipment and receiver.
- Connect the equipment into an outlet on a circuit different from that to which the receiver is connected.
- Consult the dealer or an experienced radio/TV technician for help.
The device complies with Part 15 of the FCC Rules. Operation is subject to the following two conditions: (1) this device may not cause harmful interference, and (2) this device must accept any interference received, including interference that may cause undesired operation.
FCC Caution: Any changes or modifications not expressly approved by the party responsible for compliance could void the user's authority to operate this equipment.

KCC Statement
Industry Canada Statement
This Class B digital apparatus complies with Canadian ICES-003.
CAN ICES-003 (B) / NMB-003 (B)
HDMI Trademark Statement
The terms HDMI, HDMI High-Definition Multimedia Interface, and the HDMI Logo are trademarks or registered trademarks of HDMI Licensing Administrator, Inc.

RoHS
This product is RoHS compliant.

ATENジャパン 株式会社
User Information
Online Registration
Be sure to register your product at our online support center:
International http://eservice.aten.com
Telephone Support
For telephone support, call this number:
| International 886-2-86 | 92-6959 |
| China 86-400-810-0-8 | 10 |
| Japan 81-3-5615-5811 | |
| Korea 82-2-467-6789 | |
| North America 1-888-999-ATEN ext 4988 | |
| 1-949-428-1111 | |
User Notice
All information, documentation, and specifications contained in this manual are subject to change without prior notification by the manufacturer. The manufacturer makes no representations or warranties, either expressed or implied, with respect to the contents hereof and specifically disclaims any warranties as to merchantability or fitness for any particular purpose. Any of the manufacturer's software described in this manual is sold or licensed as is. Should the programs prove defective following their purchase, the buyer (and not the manufacturer, its distributor, or its dealer), assumes the entire cost of all necessary servicing, repair and any incidental or consequential damages resulting from any defect in the software.
The manufacturer of this system is not responsible for any radio and/or TV interference caused by unauthorized modifications to this device. It is the responsibility of the user to correct such interference.
The manufacturer is not responsible for any damage incurred in the operation of this system if the correct operational voltage setting was not selected prior to operation. PLEASE VERIFY THAT THE VOLTAGE SETTING IS CORRECT BEFORE USE.
Product Information
For information about all ATEN products and how they can help you connect without limits, visit ATEN on the Web or contact an ATEN Authorized Reseller. Visit ATEN on the Web for a list of locations and telephone numbers:
| International http://www.aten.com |
| North America http://www.aten-usa.com |
Package Contents
Check to make sure that all the components are in working order. If you encounter any problem, please contact your dealer.
1 UC3430 CAMLIVE PRO 4K 4-Input HDMI to USB Video Switcher
1 USB-C to USB-C cable
1 USB Type-A to USB-C cable
1 power adapter and power cord
1 user instructions
Table of Contents
Compliance Statements ...... ii
User Information iv
Online Registration iv
Telephone Support iv
User Notice iv
Product Information v
Package Contents ...... vi
Table of Contents ...... vii
About this Manual ix
Conventions x
1. Introduction
Overview 1
Features 2
Planning the Installation 3
Requirements 3
Supported Operating System and Requirements .... 3
Components 4
2. Hardware Setup
Connecting the CAMLIVE PRO 4K Unit. 7
Selecting a Layout and Output Source(s) 8
Full Screen Layout....8
PiP Layout 9
PbP Layout 9
HDMI Loop Out ....10
Software 11
PC 11
3. Livestream / Record Setup
Livestream / Record Platform 13
Discovering CAMLIVE on your System. 13
Windows Operating System 13
Video and Audio Setup 16
Using the USB Cables 20
Serial Adapter Pin Assignments 22
RS-232 Operation 23
4. ATEN OnAir Lite App
ATEN OnAir Lite Application. 25
Supported Systems ....25
Installing the ATEN OnAir Lite App 25
Page Components .....27
Project Settings 28
Device Settings 28
Help 29
System Information 29
Video Mixer 30
Scene Editor 31
Resize 33
Crop 34
Overlay Button....35
Reset Scene Button 36
Audio Mixer 37
Settings Panel 40
General 40
Chroma Key 41
Appendix
Safety Instructions 43
General 43
Technical Support 45
International 45
North America 45
Specifications 46
ATEN Standard Warranty Policy 48
About this Manual
This user manual is provided to help you get the most out of your CAMLIVE PRO 4K unit. It covers all aspects of the device, including installation, configuration, and operation.
The model covered in this manual is:
| Model Product Name |
| UC3430 CAMLIVE ^TM PRO 4K 4-Input HDMI to USB Video Switcher |
An overview of the information found in the manual is provided below.
Chapter 1, Introduction, introduces you to the CAMLIVE PRO 4K, its purpose, features, installation considerations, with its panel components described.
Chapter 2, Hardware Setup, describes the steps that are necessary to quickly and safely set up your CAMLIVE PRO 4K.
Chapter 3, Livestream / Record Setup, explains how to find CAMLIVE on your system and guides you to set up video and audio sources using an example (live-stream / record software / platform).
Chapter 4, ATEN OnAir Lite App explains how to download and configure the CAMLIVE PRO 4K's OnAir Lite app.
Appendix, provides a list of safety instructions and precautions, and other product specifications and technical information of the product.
Note:
- Read this manual thoroughly and follow the installation and operation procedures carefully to prevent any damage to the unit or any connected devices.
- The product may be updated, with features and functions added, improved or removed since the release of this manual. For an up-to-date user manual, visit http://www.aten.com/global/en/
Conventions
This manual uses the following conventions:
Monospaced Indicates text that you should key in.
[] Indicates keys you should press. For example, [Enter] means to press the Enter key. If keys need to be chorded, they appear together in the same bracket with a plus sign between them: [Ctrl+Alt].
- Numbered lists represent procedures with sequential steps.
◆ Bullet lists provide information, but do not involve sequential steps.
Indicates selecting consecutive options (such as on a menu or dialog box). For example, Start > Run means to open the Start menu, and then select Run.
Indicates critical information.

Overview
The CAMLIVE PRO 4K (UC3430) 4-Input HDMI to USB Video Switcher captures up to four 4K @ 60 HDM inputs, enabling users to mix dual video signals into one single stream while supporting multiple output options, including 4K @ 60 HDMI PGM / Loop-through for multiview screen purposes and 4K @ 30 USB-C output for live broadcast on the Internet. The USB-C output supports popular streaming software including Zoom, Microsoft Teams, Youtube, Facebook, GoToWebinar, Open Broadcaster, XSplit Broadcaster, and Twitch on Windows and Mac. Plus, the CAMLIVE PRO 4K features audio mixer functionalities to mix up to 4 HDMI audios and 1 line-level audio for users to add live narration / music to the content, boosting the production value of your creation.
When working with the intuitive ATEN OnAir Lite app, users can remotely control device settings in real-time, from multiple AV source switching / mixing, content cropping / resizing, layout to transitions. Apart from the versatile transition effects, the PiP / PbP / PoP functions and the support for Chroma Key help users create a dynamic presentation that will never bore the audience. In order to amplify brand identity, users are allowed to add logos in PNG / BMP / JPG format to the content. Apart from the app, the CAMLIVE PRO 4K is also controllable through its front panel pushbuttons and RJ-45 port for serial control via ATEN VK Control System.
The CAMLIVE PRO 4K works with a rack mount kit (sold separately) to give installation flexibility in media cabinets or DIT stations. With the switcher's one-stop programming and streaming functionalities that work on Windows / Mac platforms, multi-camera streaming in scenarios in need of sharp, vivid UHD quality such as multi-cam studios, corporate conferences, lecture halls, houses of worship, and live events, has never been so easy.
Features
- Captures 4 channels of 4K @ 60 HDMI, mixes and switches the streams while providing audio mixer functionalities and seamless transition for pro-level broadcasting
◆ Multiple output options:
♦ HDMI PGM / Loop-through at 4K @ 60 for multiview screen purposes
USB-C output 4K @ 30 for live broadcast on the Internet
◆ Built-in audio mixer - mixes up to 4 HDMI audios and 1 line-level audio for adding live narration / music to the content
♦ Versatile control methods via the front panel pushbuttons, RJ-45 port for serial control via ATEN VK Control System, and ATEN OnAir Lite app - ATEN OnAir Lite app — users can remotely control device settings in real-time, including multiple AV source switching / mixing, content cropping / resizing, layout options (full screen / PiP / PbP / PoP), transitions, Chroma Key, and logo adding
- Compatible with popular streaming software including Zoom, Microsoft Teams, Youtube, Facebook, GoToWebinar, Open Broadcaster, XSplit Broadcaster, and Twitch
◆ Supports UVC / UAC v1.1
♦ Plug-and-Play functionality with USB-C 3.2 Gen 1 compliance
◆ Works with major operating systems: Windows ^® and Mac OS X ^®
Planning the Installation
Requirements
Prepare the following before installing the CAMLIVE PRO 4K unit:
◆ 4 HDMI source devices
◆ 2 HDMI displays
◆ 1 hardware / software controller
◆ 1 audio input source
◆ 1 audio output source
◆ 1 USB-C enabled computer
Supported Operating System and Requirements
| Operating System Minimum Hardware | Requirement |
| Windows 10 or above CPU: Intel® i3 Dual | Core 2.8Ghz or higherRAM: 4GB or moreOne USB-C Interface or USB-A Interface |
Components
flowchart
graph TD
    A["1"] --> B[" "]
    A --> C[" "]
    A --> D[" "]
    A --> E[" "]
    A --> F[" "]
    G["2"] --> H[" "]
    I["3"] --> J[" "]
    K["4"] --> L[" "]
| No. | Component Description |
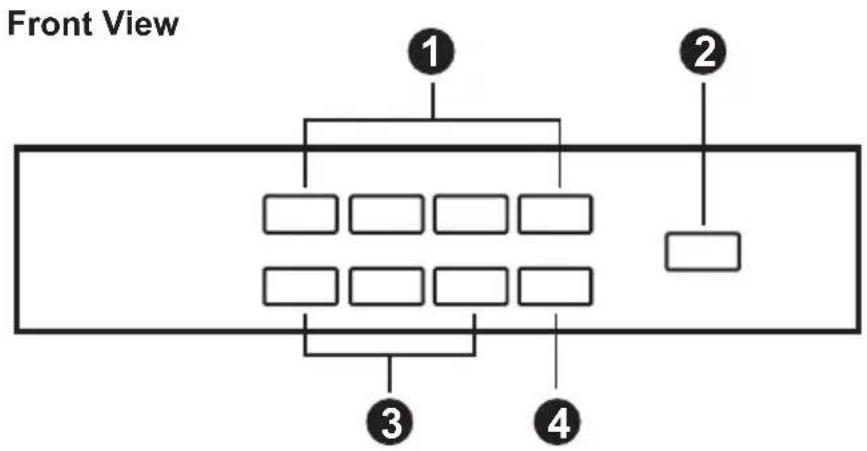
| 1 port selection pushbuttons | Press a port selection pushbutton to bring the video and audio focus to the HDMI source attached to its corresponding port. Please see Selecting a Layout and Output Source(s), page 8 for more information. |
| 2 on air pushbutton (USB video on / off control) | Press to broadcast the selected HDMI source. |
| 3 layout selection pushbuttons | Press to select a layout option between full screen, PiP (Picture in Picture), and PbP (Picture by Picture). Please see Selecting a Layout and Output Source(s), page 8 for more information. |
| 4 HDMI loop out pushbutton | Press to bring the selected HDMI source to the HDMI-enabled monitor connected to the HDMI loop out port. Please see Selecting a Layout and Output Source(s), page 8 for more information. |
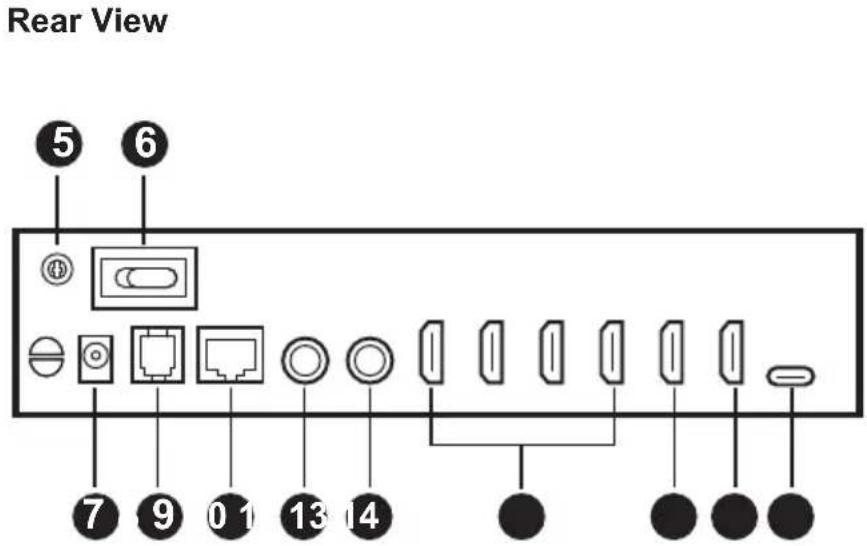
| 5 grounding terminal | The grounding wire used to ground the switch attaches here. |
| 6 power switch Switches | the unit's power on and off. |
| 7 power jack The power adapter plugs here. | |
| 8 RJ-11 port Not applicable for now, reserved for future expansion. | |
| 9 RJ-45 port (RS-232 control) | Connects to a control system (e.g., VK Control Box) via Cat 5 cable for control purposes. For more information, please see VK Control Box's user manual. |
| 10 line input port Connects to an audio input device, e.g., audio mixer. | |
| 11 line output port Connects to an audio output device, e.g., audio amplifier. | |
| 12 HDMI input ports Connect up to four HDMI input sources. | |
| 13 HDMI output port (PGM) | Connects to an HDMI-enabled display for programmed (PGM) video output. |
| 14 HDMI output port (loop out) | Connects to an HDMI-enabled display for HDMI loop out video output. |
| 15 USB-C port Connects to a host. | |
This Page Intentionally Left Blank
Chapter 2
Hardware Setup

Please review the safety information regarding the placement of this device in Safety Instructions, page 43.
Connecting the CAMLIVE PRO 4K Unit
Follow the steps below to connect the CAMLIVE PRO 4K.
flowchart
graph TD
    A["Control Device"] --> B["RJ-45"]
    B --> C["Power Adapter"]
    C --> D["Audio Mixer"]
    D --> E["Audio Amplifier"]
    E --> F["Video Recorder or Camera"]
    F --> G["USB Audio HDMI"]
    G --> H["Laptop"]
    I["Monitor"] --> J["HDMI"]
    K["Monitor"] --> L["HDMI"]
    M["1"] --> N["Ground"]
    O["2"] --> P["Back View"]
    Q["3"] --> R["Monitor"]
    S["4"] --> T["Monitor"]
    U["5"] --> V["Laptop"]
    W["6"] --> X["Audio Mixer"]
    Y["7"] --> Z["Audio Amplifier"]
    AA["8"] --> AB["Control Device"]
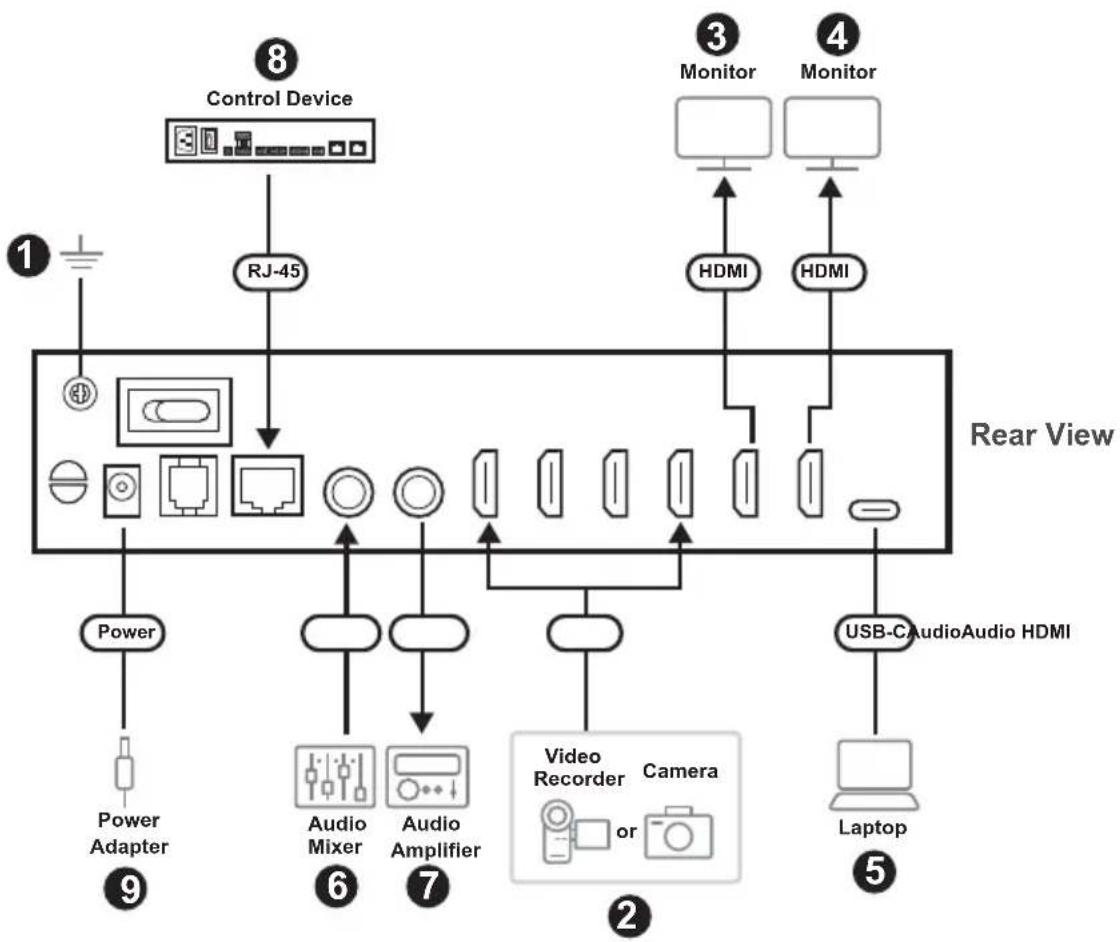
- Ground the unit.
- Connect up to 4 HDMI sources to the unit's HDMI input ports.
- Connect an HDMI-enabled display to the unit's HDMI output port (PGM).
-
Connect an HDMI-enabled display to the unit's HDMI output port (loop out).
-
Connect a USB-C computer to the unit's USB-C port for OnAir Lite app / live stream use.
- Connect an audio mixer to the unit's audio input port.
- Connect an audio amplifier to the unit's audio output port.
- Connect a control system (e.g., VK Control Box) to the unit's RJ-45 port via Cat 5 cable for control purposes. Please see Serial Adapter Pin Assignments, page 22 for more information.
- Connect the power adapter to the unit's power jack.
- Switch the power on.
Selecting a Layout and Output Source(s)
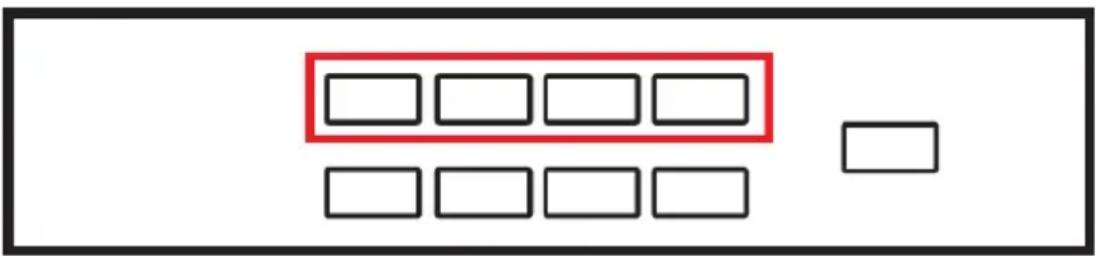
Please follow the steps below to select a desire layout and output source(s). Remember to first select a layout from the layout selection pushbuttons (full screen / PiP / PbP) or HDMI loop out pushbutton and then select output source(s).
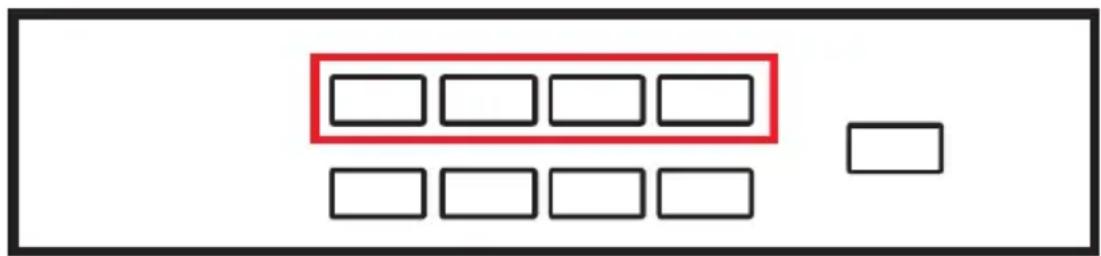
Full Screen Layout
- Press the full screen layout selection pushbutton.
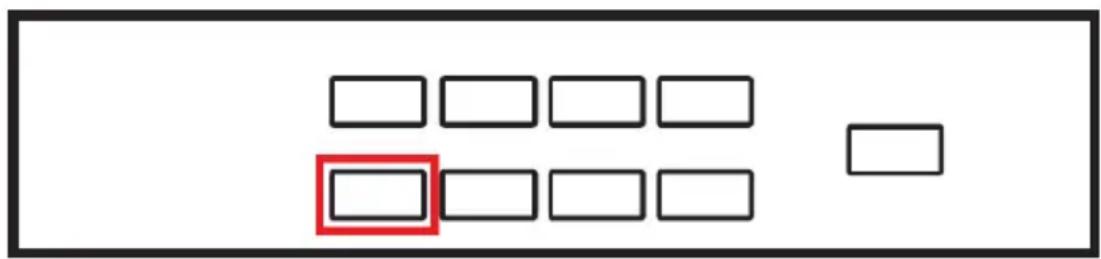
- Select an output source for the full screen layout.
PiP Layout
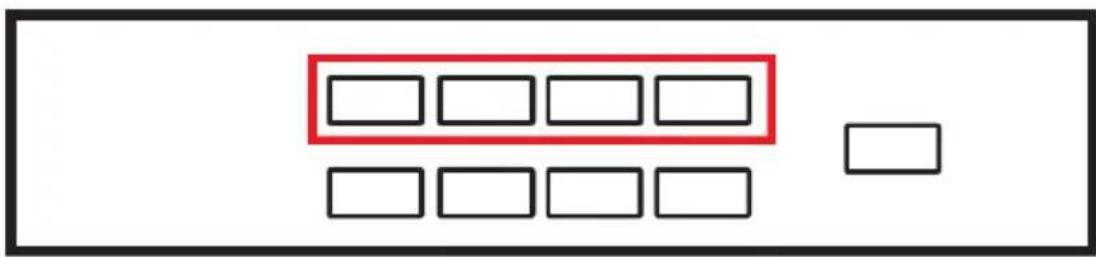
- Press the PiP layout selection pushbutton.
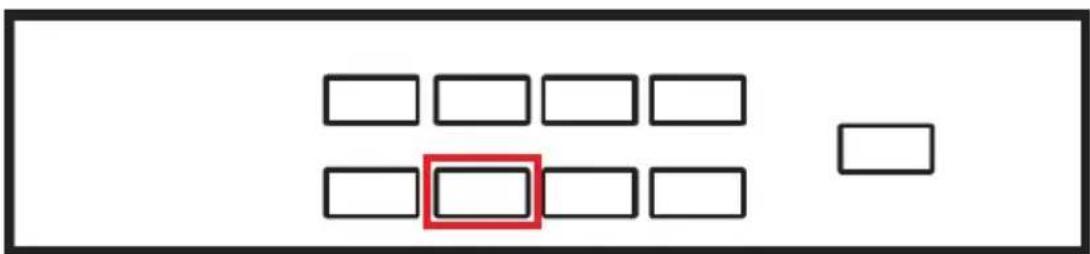
- Select a main output source and then select another output source for the PiP layout.
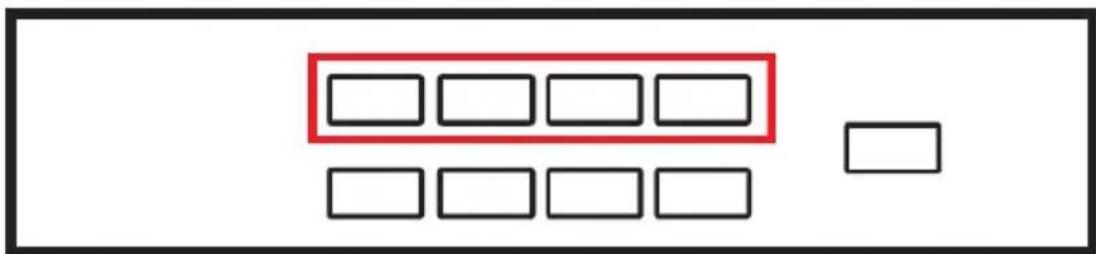
PbP Layout
- Press the PbP layout selection pushbutton.
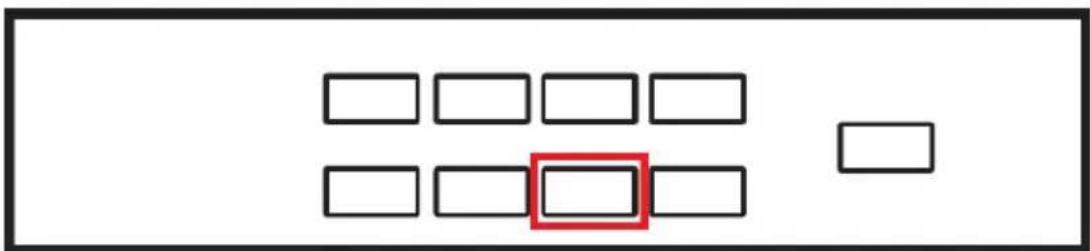
natural_image
Simple diagram with black rectangles and one red square, no text or symbols present- Select a main output source and then select another output source for the PbP layout.
HDMI Loop Out
- Press the HDMI loop out pushbutton.
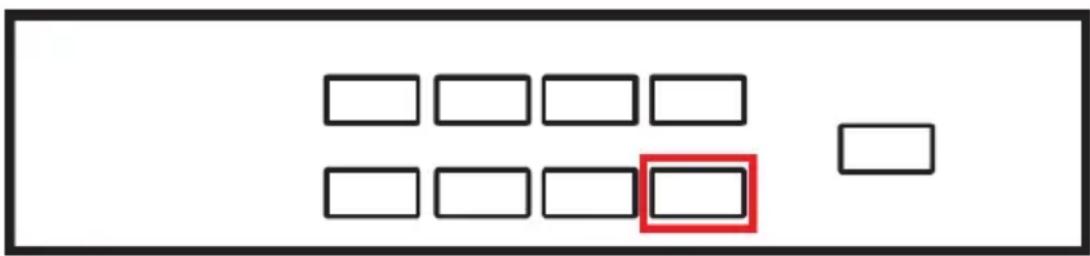
- Select an output source for the HDMI loop out.
Software
To enable CAMLIVE PRO 4K, please download and install a suitable video recording or live streaming software for your requirement.
PC
Below lists some examples of supported video recording / live streaming software for PC.
All trademarks are property of their respective owners.
OBS: https://obsproject.com
Xsplit: https://www.xsplit.com
https://www.youtube.com
https://www.facebook.com
https://www.zoom.com
https://www.skype.com
https://www.microsoft.com/en-us/microsoft-365
This Page Intentionally Left Blank
Chapter 3
Livestream / Record Setup
Livestream / Record Platform
Below lists a few of the available live-streaming or recording software/platforms:
OBS: https://obsproject.com
Xsplit: https://www.xsplit.com
https://www.youtube.com
https://www.facebook.com
https://www.zoom.com
https://www.skype.com
https://www.microsoft.com/en-us/microsoft-365
All trademarks are property of their respective owners.
Discovering CAMLIVE on your System
CAMLIVE PRO 4K is a plug-and-play device, please make sure your system is able to discover it. After connecting CAMLIVE PRO 4K as shown in Connecting the CAMLIVE PRO 4K Unit on page 7, refer to the examples below on how your system may discover CAMLIVE PRO 4K.
Windows Operating System
This is an example used in a Windows 10 Operating System.
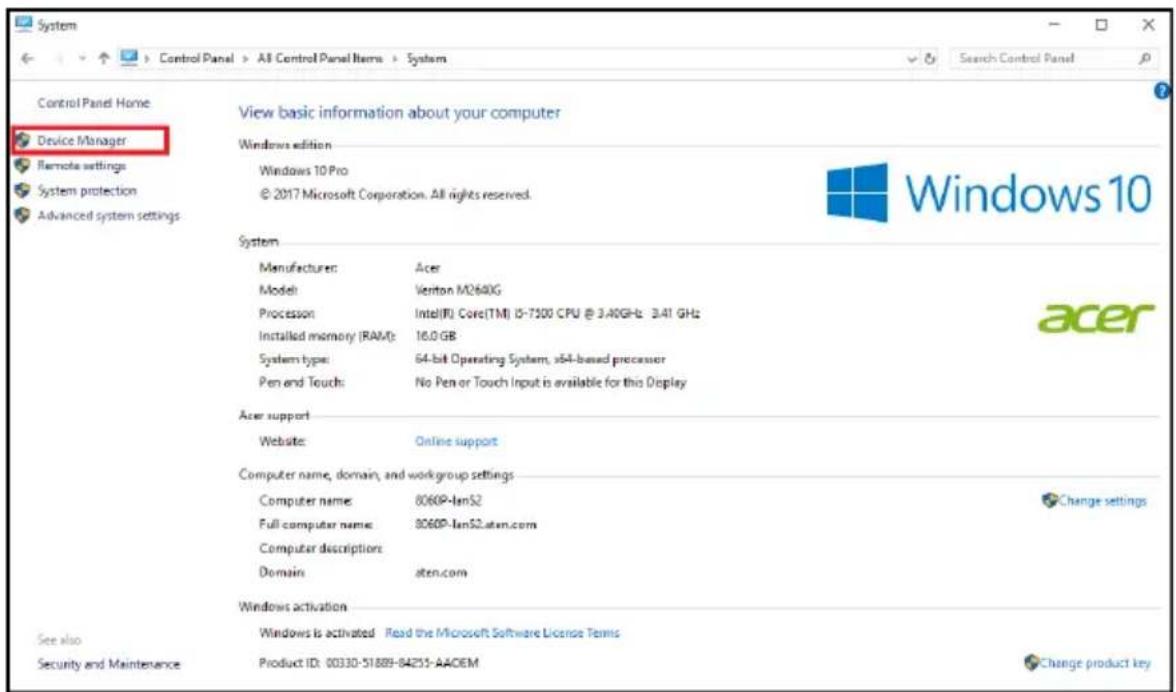
- On a Windows 10 desktop, go to Control Panel and select System.
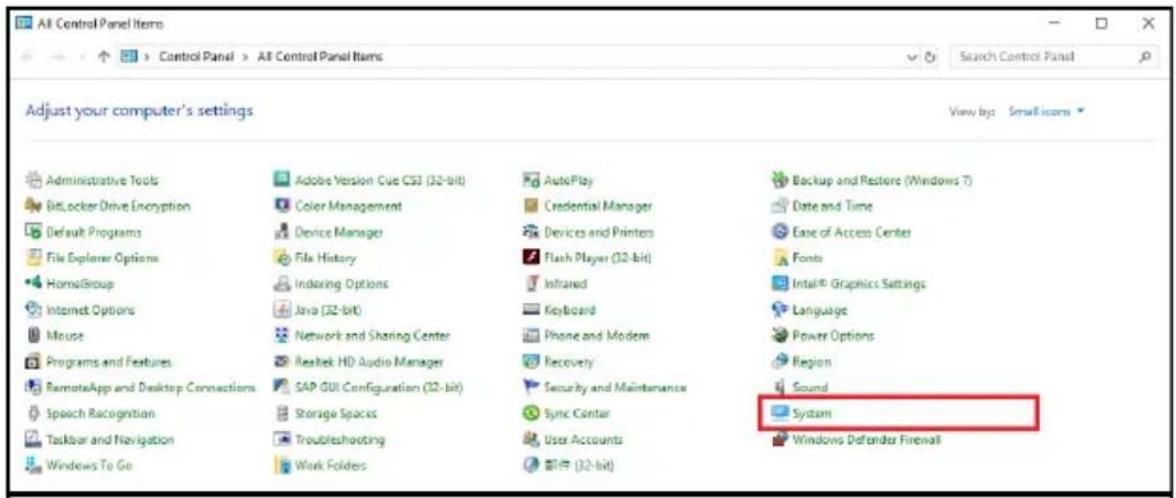
2. The System window appears, select Device Manager.
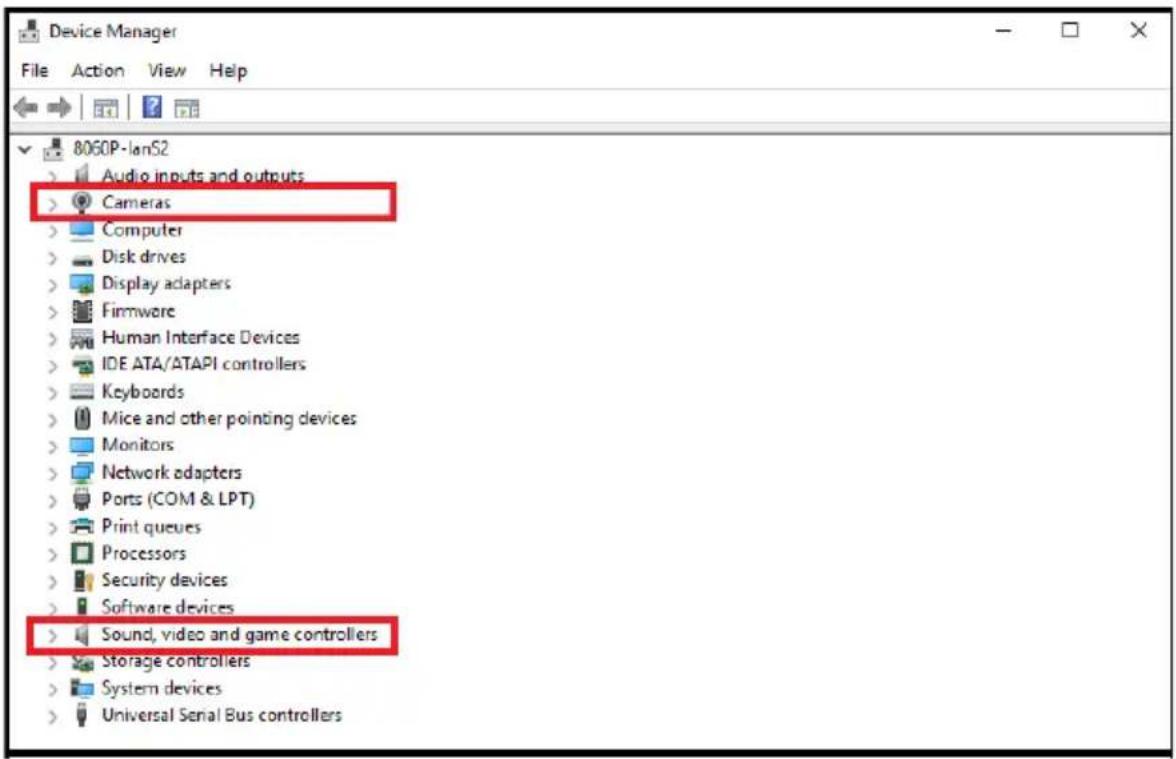
3. The Device Manager window appears. Click on Cameras and Sound, video and game controllers.
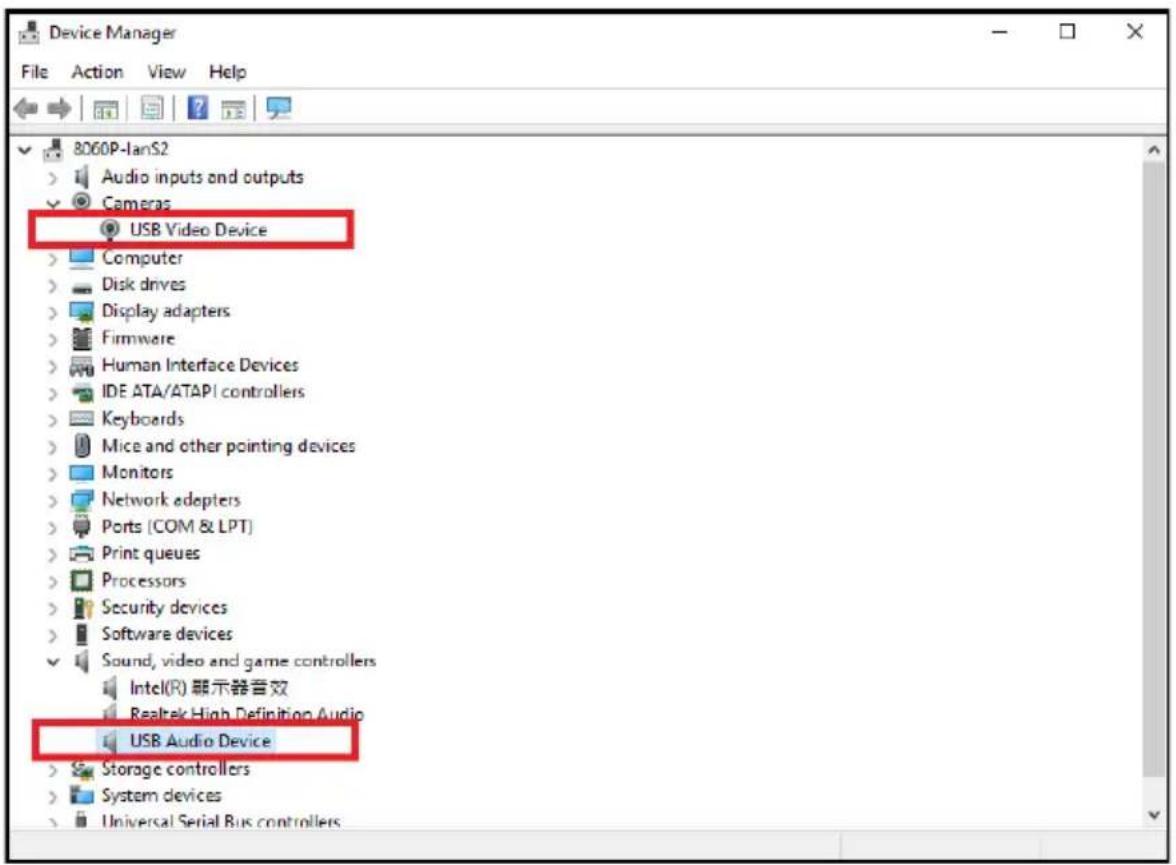
- You should see an “USB Video Device” in the Camera list, and an “USB Audio Device” in the Sound, video and game controllers list. This indicates that your system has successfully discovered CAMLIVE PRO 4K.
Video and Audio Setup
After your system discovers CAMLIVE PRO 4K, choose your livestream/record platform. You will need to setup the video and audio source coming from CAMLIVE PRO 4K.
Follow the steps below to setup your video and audio sources (separately).
Note: OBS software is the example used in the setup steps below.
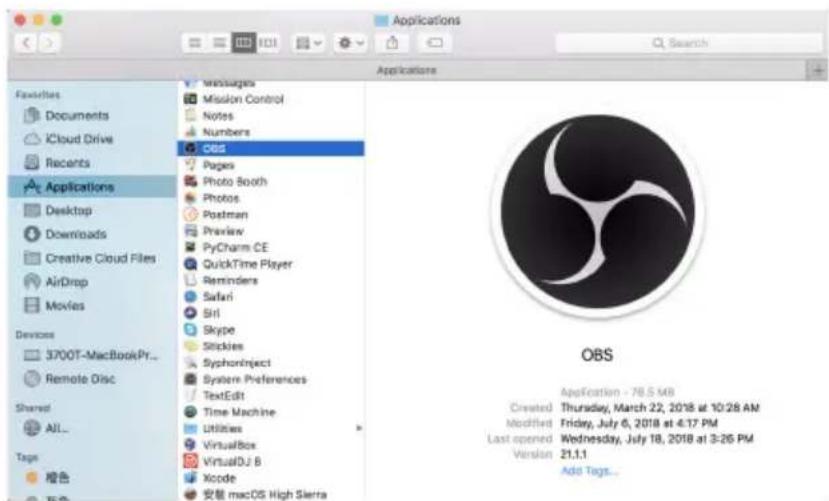
- On your system, open the OBS software.
![QBS Studio 21.1.13-modified [mac] - Profile: Unified - Scenes: QSG Transition Quick Transitions Scenes Sources Viber Scene Transitions Flake Duration 300ms Start Streaming Start Recording Studio Movie Settings Exit LIVE: 00:00:00 RTG: 00:00:00 CPU: 2.2%, 21.29 fps](/content/2026/05/1016007/images/151a3a1abd9da59504bf979166417f84dd12856cf7643ed9ceba51f8517205ae.jpg)
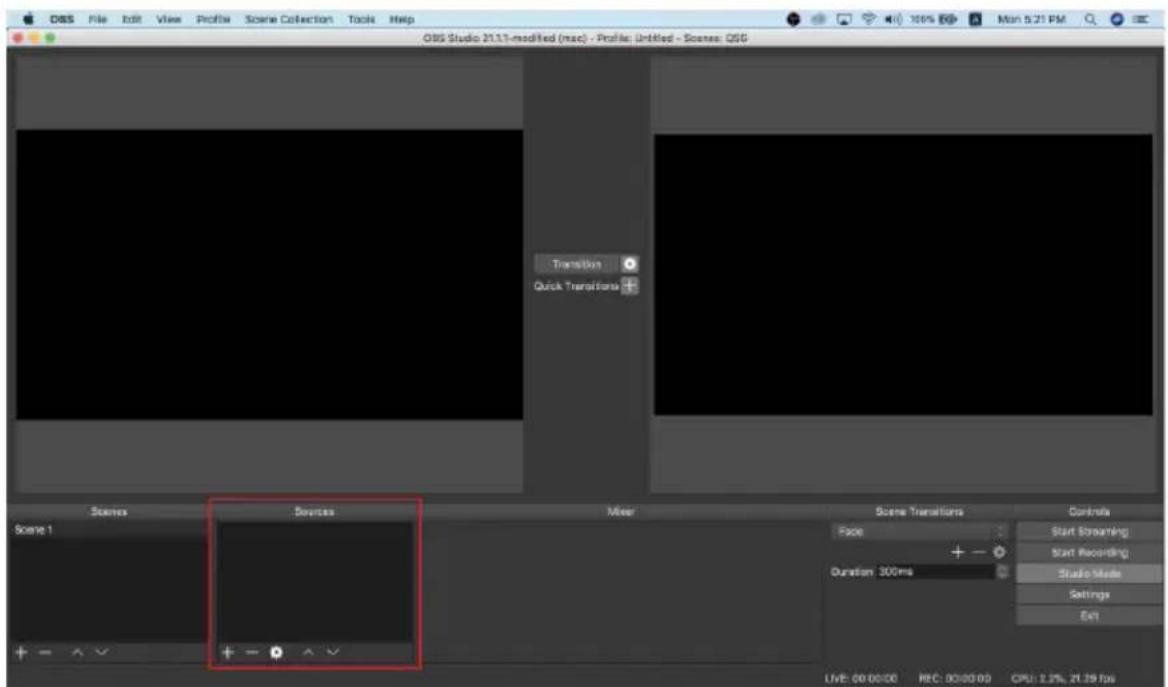
- Locate and click the “+” button on the bottom of the “Sources” pane (outlined in red in the picture below) to open the add source menu:
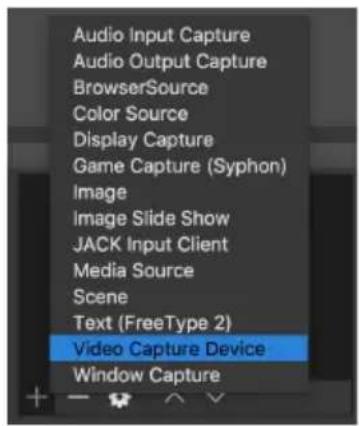
- Select "Video Capture Device" or "Audio Capture Device."
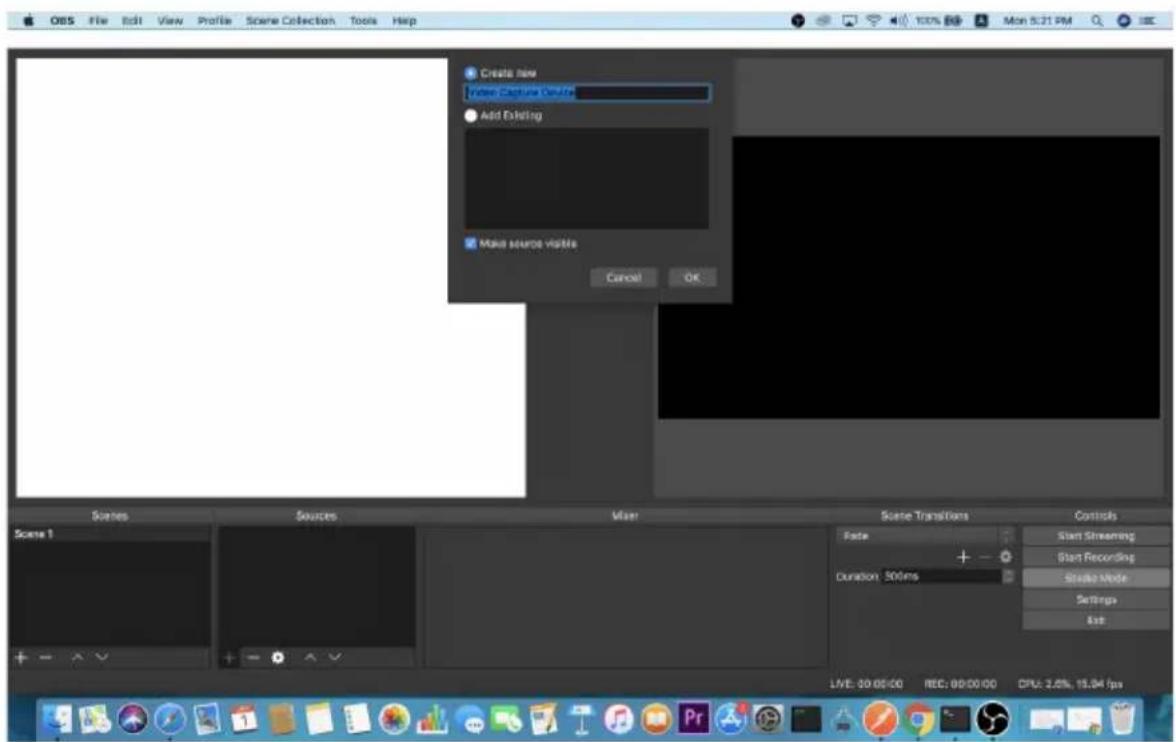
- A pop-up window will be shown for you to name the video/audio source. Click the "OK" button to continue.
It is recommended that “Make source visible” is checked.
- On the properties page, click the drop-down menu named “Device” to select CAMLIVE PRO 4K’s video/audio source. Both the video and audio sources of CAMLIVE PRO 4K have the name “HDMI to U3 capture”.
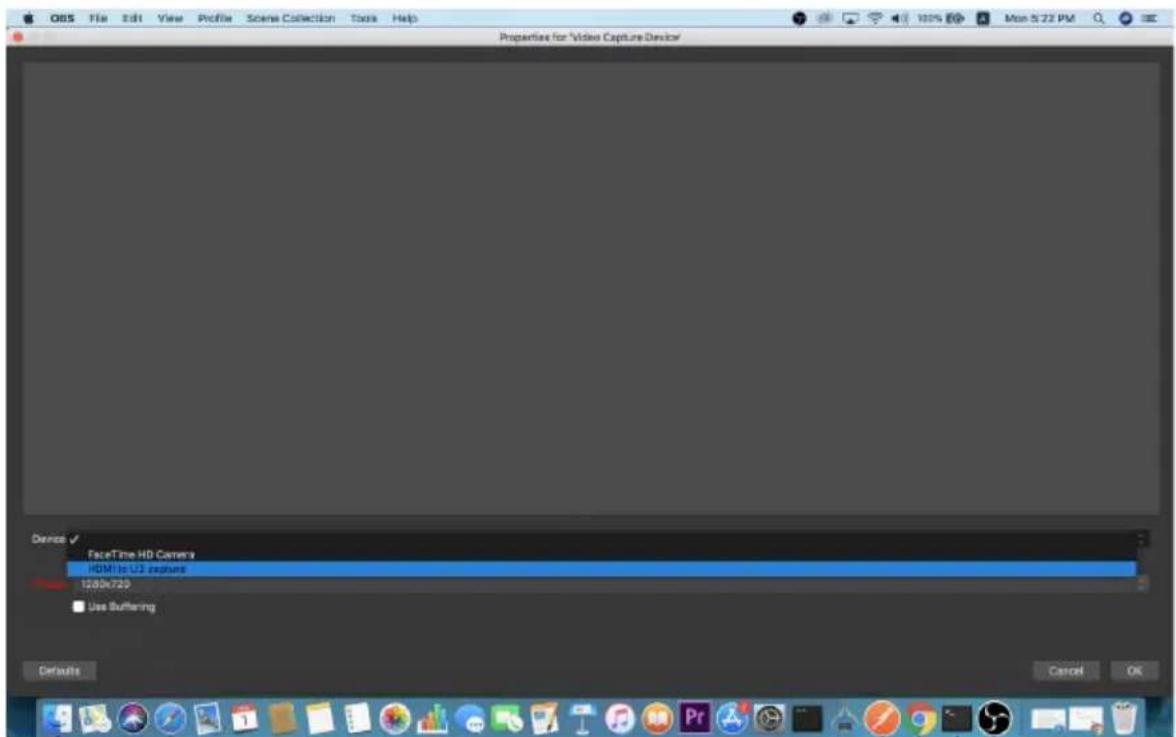
After selecting the video source, the image from CAMLIVE PRO 4K should be displayed as shown below.
Click the "OK" button to continue.
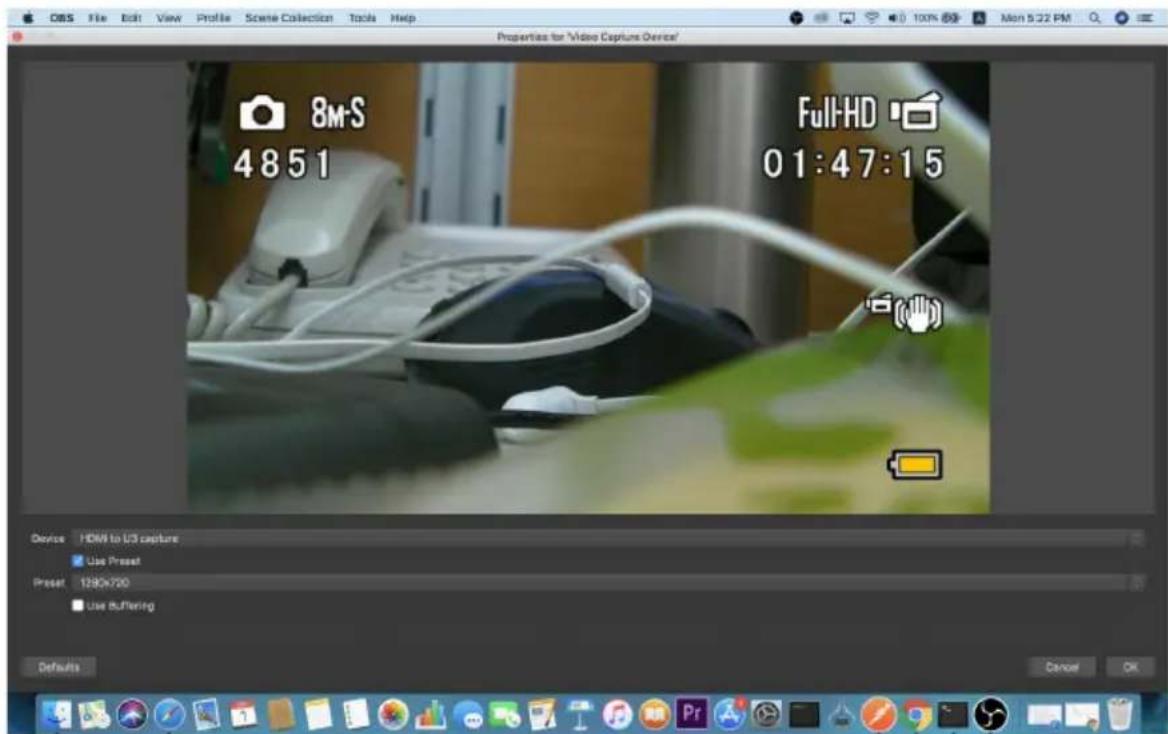
- For successful setup, the sources will be shown in the "Source" panel.
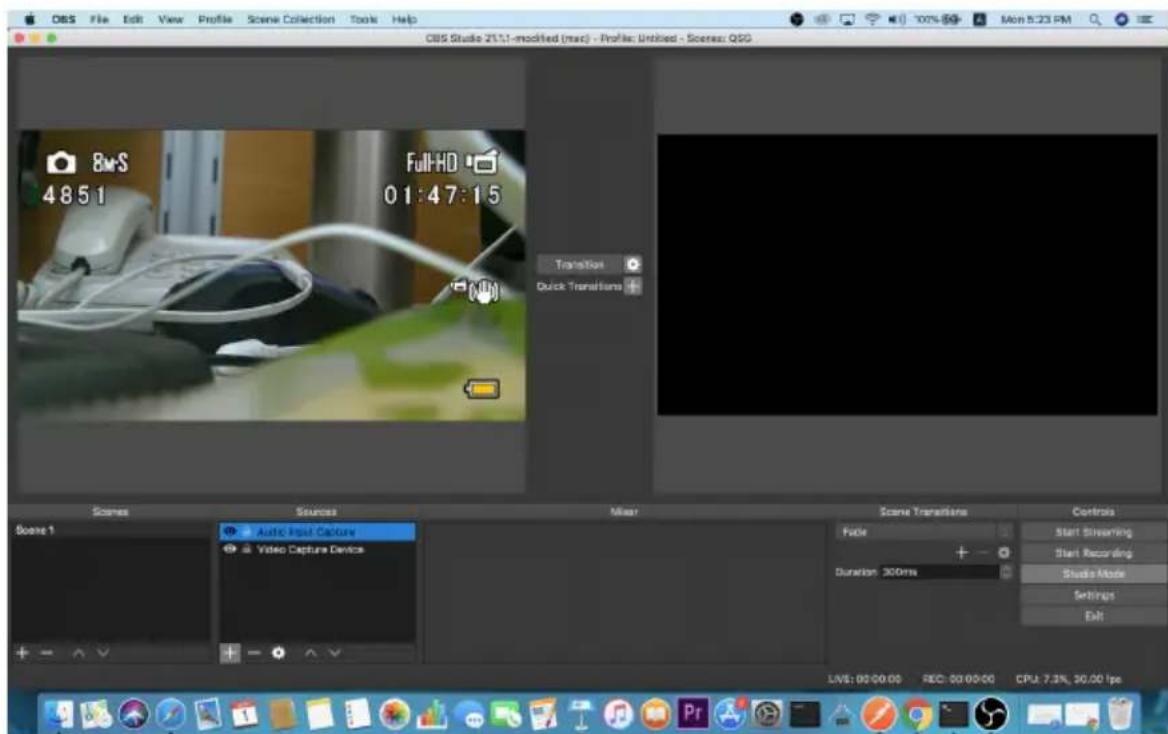
Setup of video and audio sources are complete, you can now start live-streaming/video recording.
Detailed configuration of your live-streaming/video recording software/platform is not within the scope of this user manual, please refer to the software/platform's instruction guides/manual.
Using the USB Cables
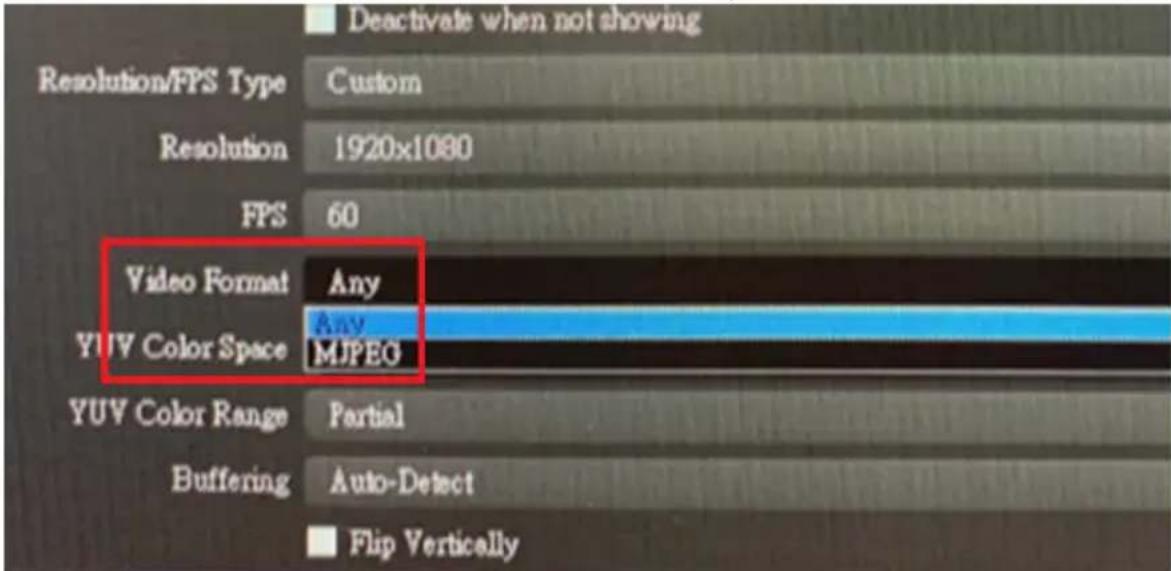
When connecting CAMLIVE PRO 4K on a PC with a USB 2.0 interface, it will automatically set the provided compressed video quality to the MJPEG compression mode to fit the data bandwidth. For better video quality, we strongly recommend to connect CAMLIVE™ PRO to a USB 3.1 Gen1 interface.
To make sure the result match your media output you wish to capture, please check the detected video format from your capture software first.
Capture device custom setting page examples displaying USB 3.1-RAW and USB 2.0-MJPEG on OBS software are shown below:
♦ USB 2.0 mode with MJPEG video format only
- USB 3.1 mode with RAW (YUY2) and MJPEG video formats
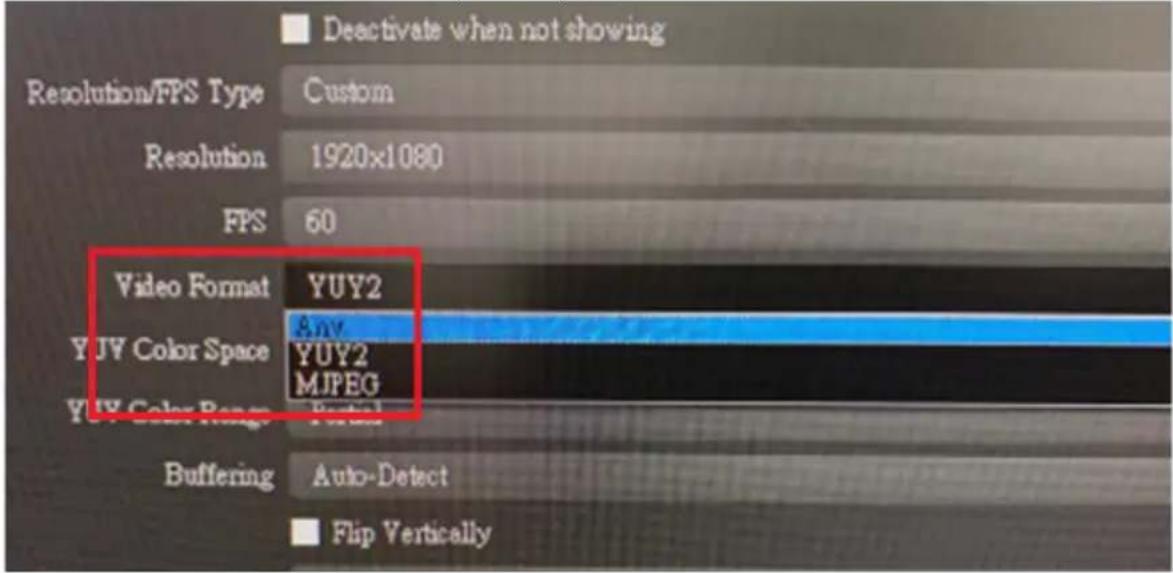
If you find that the captured media only has MJPEG format, simply flip the USB-C to USB-C cable connector connected to the CAMLIVE PRO 4K.
Serial Adapter Pin Assignments
To connect the CAMLIVE PRO 4K to a control system, we recommend to use UC232A / UC232A1 USB to RS-232 Adapter, UC232B USB to RJ-45 (RS-232) Console Adapter, or a third party RS232 adapter. Please see below for the serial adapter pin assignments.
Note: To purchase an UC232A / UC232A1 USB to RS-232 Adapter or UC232B USB to RJ-45 (RS-232) Console Adapter, contact your ATEN dealer for more information.
| CAMLIVE PRO 4K | UC232B RJ-45 Port | UC232A DB-9 Port | 3-Pin Terminal | |||
| Signal R | J-45 Pin Stra | ght-Cable Signal S | ignal DB-9 | Out Pin Out | ||
| 1 1 CTS | CTS 8 | |||||
| 2 2 DSR | DSR 6 | |||||
| TxD 3 | 3 RxD | RxD 2 | RxD | |||
| GND 4 | 4 | GND GND 5 | GND | |||
| GND 5 | 5 | GND GND 5 | ||||
| RxD | 6 | 6 | TxD | TxD | 3 | TxD |
| 7 7 DTR | DTR 4 | |||||
| 8 8 RTS | RTS 7 | |||||
RS-232 Operation
Once the CAMLIVE PRO 4K is connected to a control system, it can be managed by the control system via RS-232 serial operations. Please see the table below for the supported RS-232 commands.
| Command Variable Action | ||
| echo on / off Sets the echo off or off. | ||
| reboot Reboots | the CAMLIVE PRO 4K. | |
| reset Resets the CAMLIVE PRO 4K to its | default configuration. | |
| read Gets the current firmware version and | status. | |
| scene s00 / s01 | /s02 / s03 /s04 / s05 / s06 / s07 | Switches to a specified scene. |
| baud Baud Rate: | 2400 / 4800/ 9600 / 19200 / 38400 /57600 / 115200 /230400 / 460800 /921600Stop Bits: 1 / 2Data Bits: 7 / 8Flow Control: rtscts /xonoff / off | Sets the baud rate for the CAMLIVEPRO 4K.Note:The flow control variable has to beentered at last. |
| selfdiagnostic Performs a self diagnostic. | ||
This Page Intentionally Left Blank
ATEN OnAir Lite Application
ATEN OnAir Lite app acts as the central controller for CAMLIVE PRO 4K. The app's design is a control panel where you can monitor program results, edit scenes, setup video and audio settings, etc. Download the ATEN OnAir Lite app from the Microsoft and install it on your laptop and PC.
Note: 1. The maximum operating hour for the ATEN OnAir Lite app is 4 hours.
- Please make sure to enable the GPS function before you begin to use the ATEN OnAir Lite app.
Supported Systems
The ATEN OnAir Lite app supports the following mobile operating systems:
Mobile Operating System
Windows 10 or above
Installing the ATEN OnAir Lite App
- Install the ATEN OnAir Lite app on a Windows laptop or PC.
a) Go to Microsoft Store.
b) In the search box, type “CAMLIVE PRO 4K”.
c) Click the ATEN OnAir Lite to download the app.
-
From your downloads file, double-click the downloaded package and click Install.
-
Follow the on-screen instructions.
When you open the ATEN OnAir Lite app, the screen below appears.
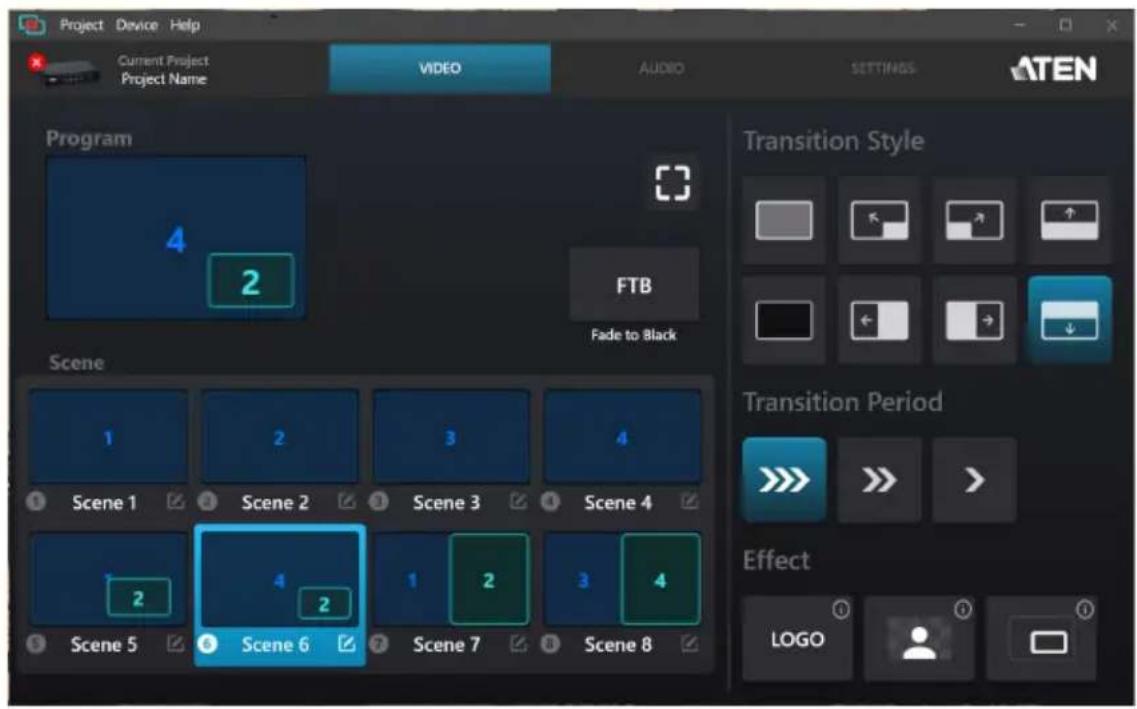
Page Components
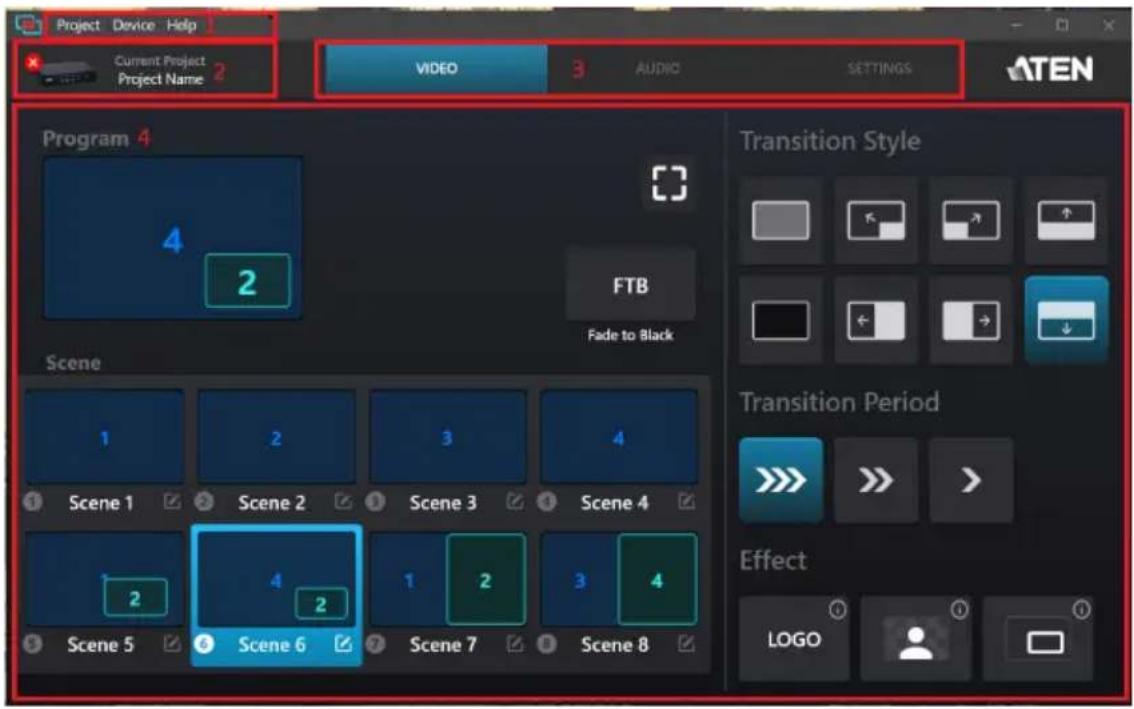
| No. | Component Description |
| 1 Project / Device / Help | ◆ Project: click to create new project, open, import, or export projects, see all projects, and rename current project. See Project Settings, page 28.◆ Device: click to disconnect the device, see or upgrade firmware and software version. See Device Settings, page 28.◆ Help: click to run the tutorial and to see firmware and software version. See Help, page 29. |
| 2 System Information | Click to see or upgrade the current software version and its information, or disconnect with the device. See System Information, page 29. |
| 3 Deck Selector Tap to | select the desired configuration deck.Three decks are available: Video Mixer, Audio Mixer, and Settings.Video Mixer: see Video Mixer, page 30.Audio Mixer: see Audio Mixer, page 37.Settings: see Settings Panel, page 40. |
| 4 Deck Content The content depends on the selected deck. | |
Project Settings
Click to modify your project name, create, open, import, or export a project, and see available projects.
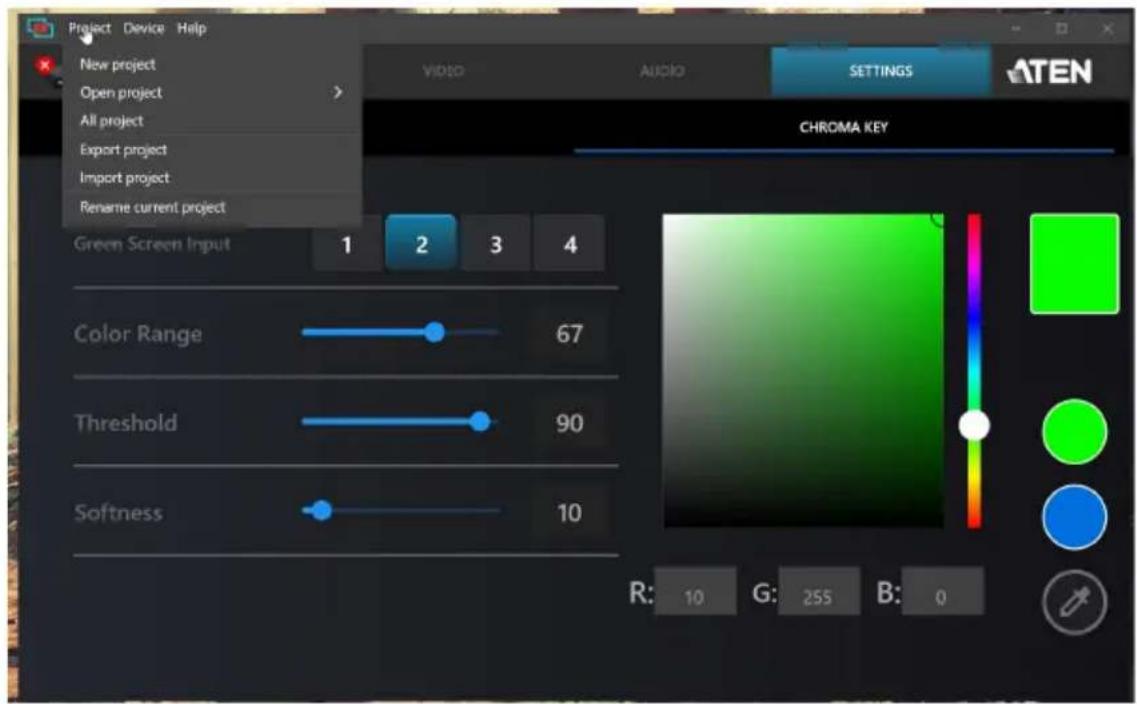
Device Settings
Click to browse or upgrade the current software and firmware version, or disconnect with the device.
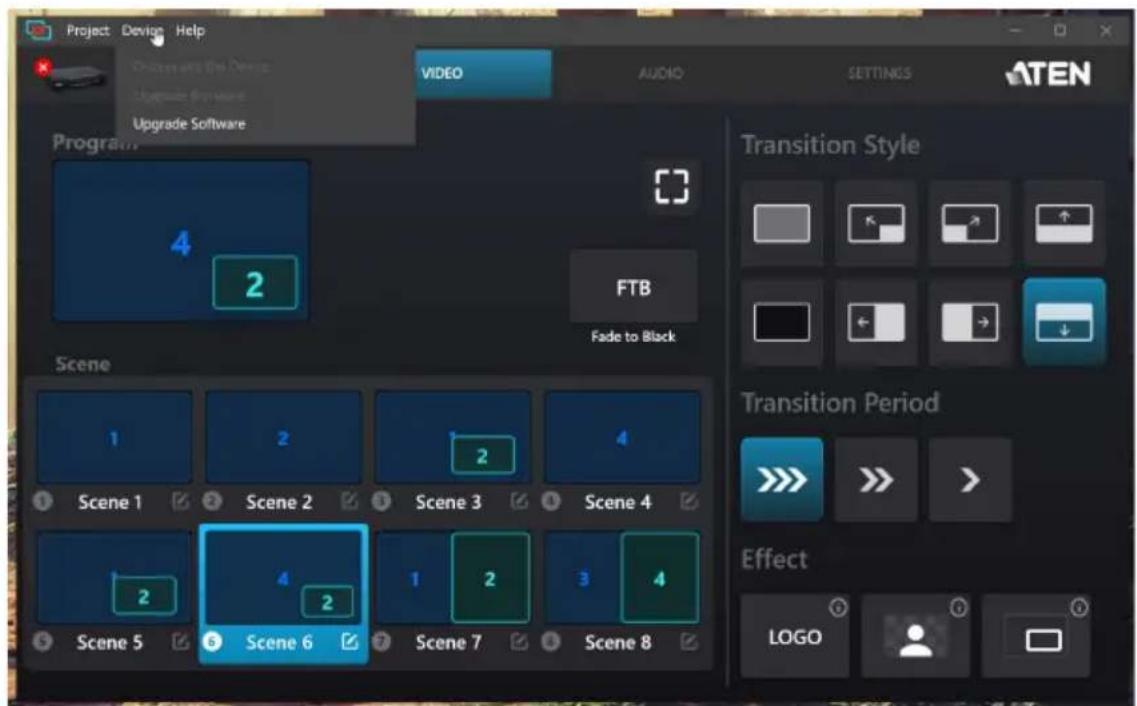
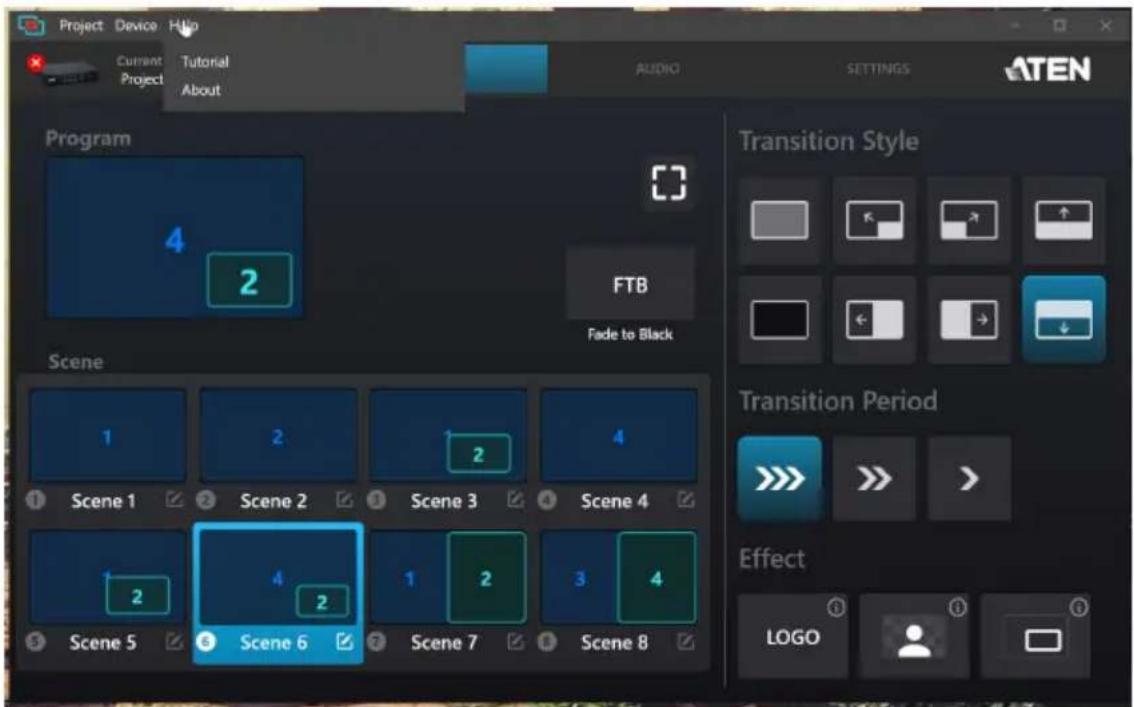
Help
Click to run the tutorial and to see the firmware and software version.
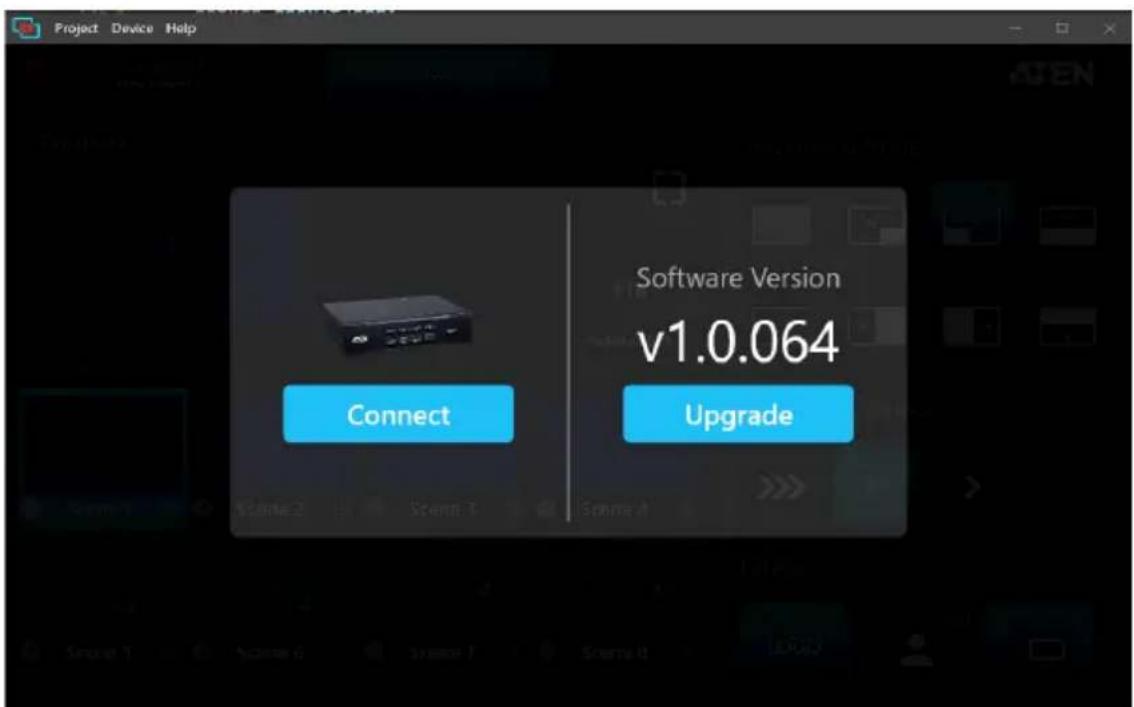
System Information
Click to connect or disconnect with the device, and to see or upgrade the current software version and its information.
Video Mixer
The Video Mixer deck page allows you to adjust effect on your video, scene selection and editing, and transition control.
The components of the page is shown below:
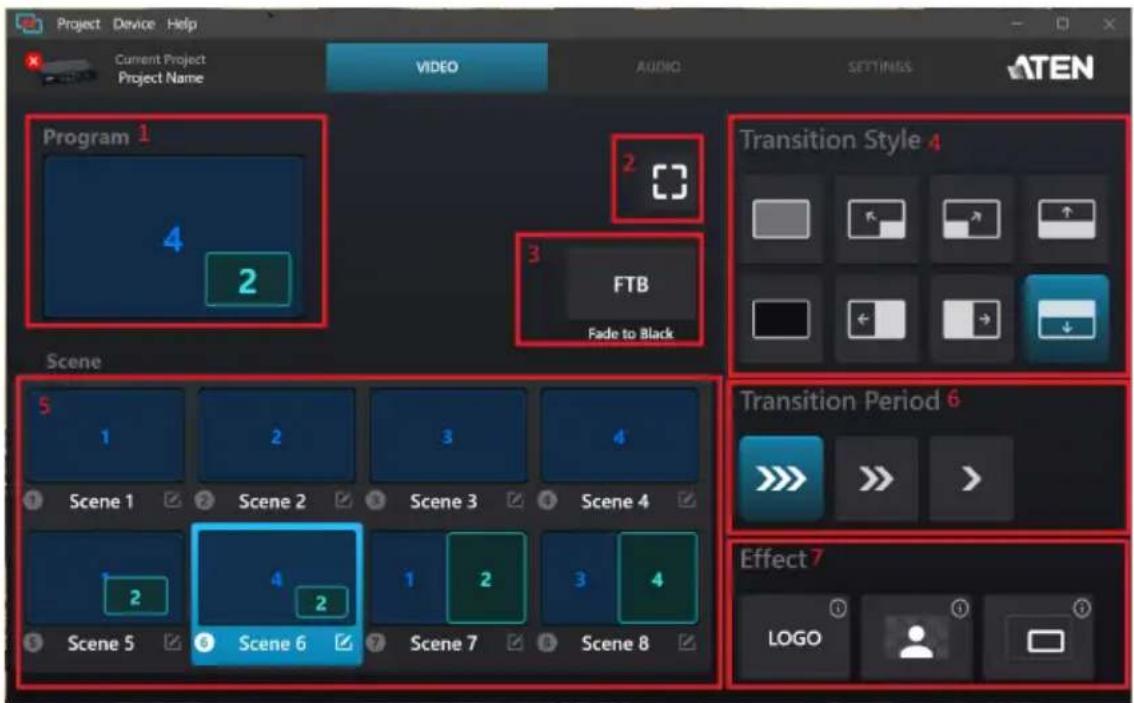
| No. | Component Description |
| 1 | Program The program scene, or the on-air video output of the system. |
| 2 | Enlarge Click to view the video source in full screen mode. |
| 3 | Fade to BlackClick to fade to video source to black screen. |
| 4 | Transition StyleSelects a transition style for the current stream (PGM). |
| 5 | Scene Selector8 scenes are shown here. Tap a scene to put the scene into the program scene. |
| 6 | Transition PeriodSpecifies a time to begin the transition after 1, 2, and 3 seconds. |
| No. | Component Description | |
| 7 Effect Control | Click | the logo effect on the HDMI display connected to the HDMI program output port. See LOGO Position, page 41 for more details. |
| Click | the chroma key effect on the HDMI display connected to the HDMI program output port. See Chroma Key, page 41 for more details. | |
| Click | video broader around the WGY8 selected scene to appear on the HDMI display connected to the HDMI program output port. | |
Scene Editor
To edit a scene, follow the steps below.
- Select a scene from the scene selector.
- Tap the button from the selected scene on the Video Mixer page.
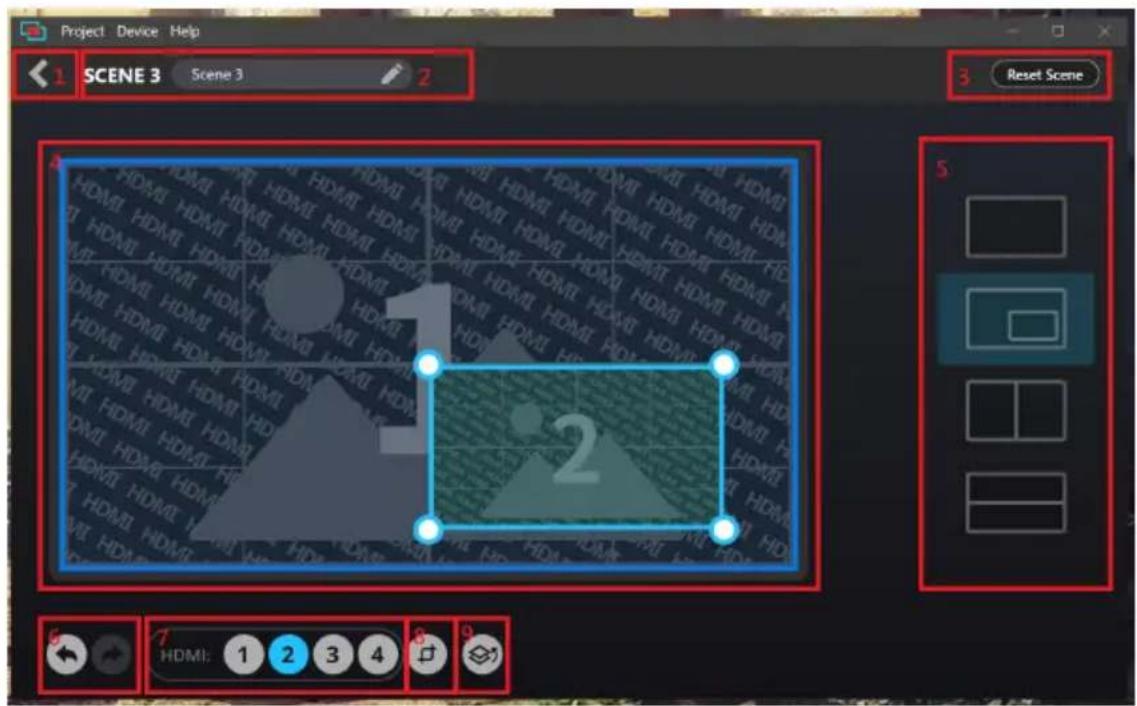
| No. | Component Description |
| 1 | Return Button Clicks to return to the Video Mixer page |
| 2 | Scene Name This region displays the scene name. Click to edit the scene name. |
| 3 | Reset Button Clicks to reset the current scene. |
| 4 | HDMI Display(s) and Resize Tool |
| 5 | Layout Selection |
| 6 | Undo / Redo |
| 7 | HDMI Sources Clicks to select an HDMI source for the selected display(s). |
| 8 | Crop Button Clicks to crop the HDMI display, see Crop, page 34. |
| 9 | Overlay Button Clicks to switch between main display and overlay display, see Reset Scene Button, page 36. You can also resize and crop the overlay scene. |
Resize
To resize HDMI display(s), select a scene and select an HDMI display. A resize tool will be visible on the selected HDMI display(s) in the scene editor page. Click and hold to drag the resize tool to resize the display(s).
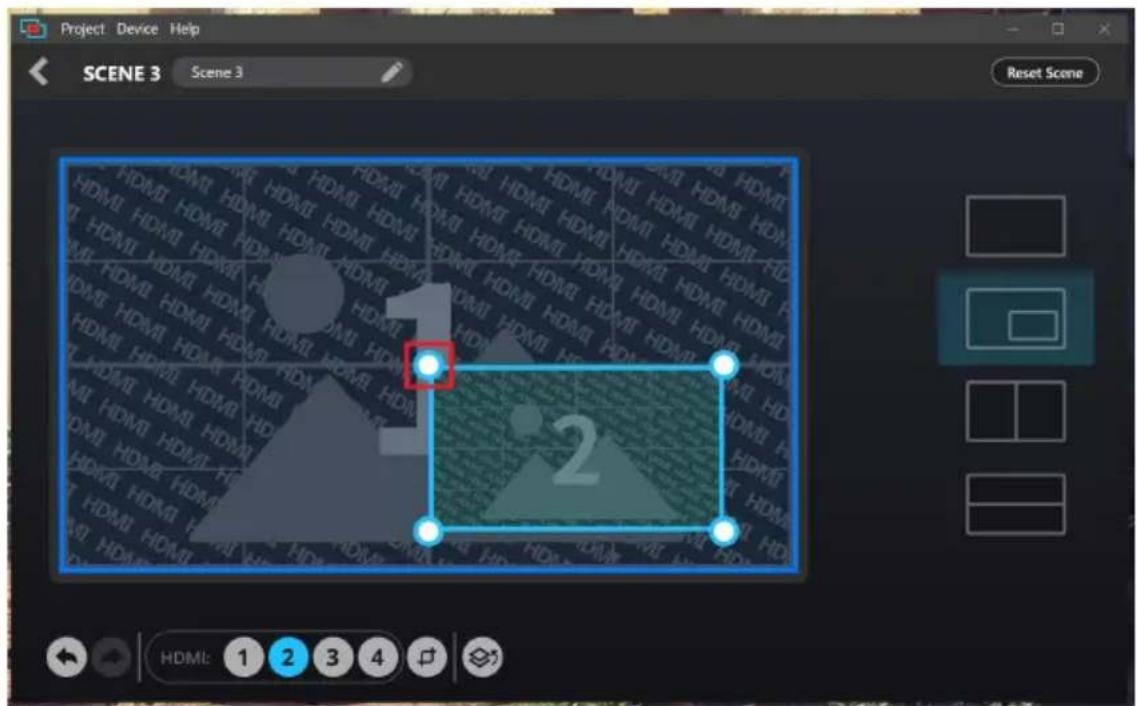
Crop
To crop HDMI display(s), select a scene and select an HDMI display. A crop tool will be visible on the selected HDMI display(s) in the scene editor page.
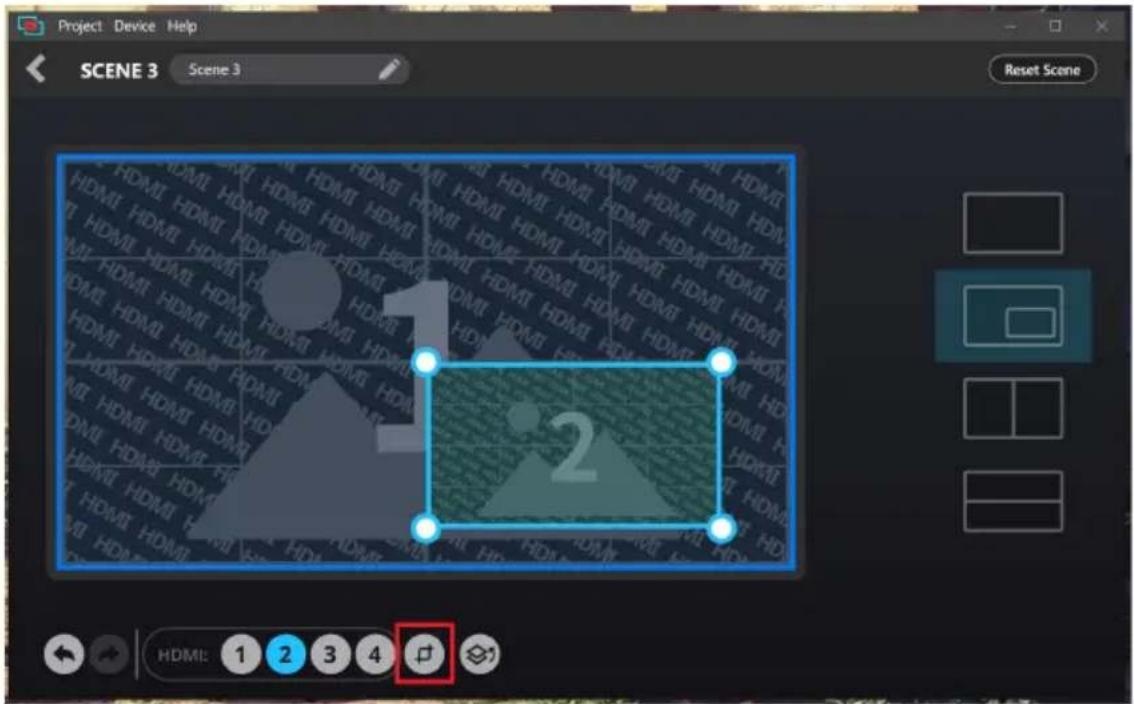
To crop the display(s), follow the steps below.
- Select an HDMI display, click the crop tool appears.
and the screen below
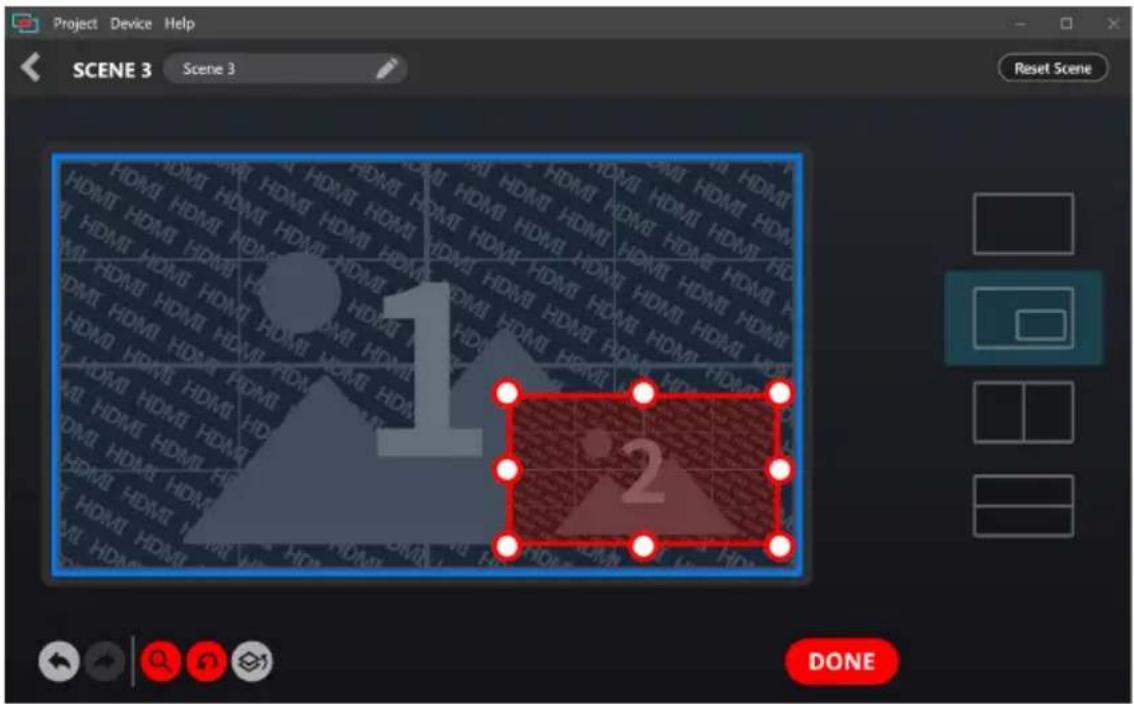
- Click and hold to drag the crop tool to adjust the cropping area.
- (Optional) Click to enlarge the crop display to help you easily adjust the cropping area.
- Click to relocate the cropping area.
- When completed, click Done.
Overlay Button
To view the overly display from a dual-view scene, tap from the Scene Editor page.
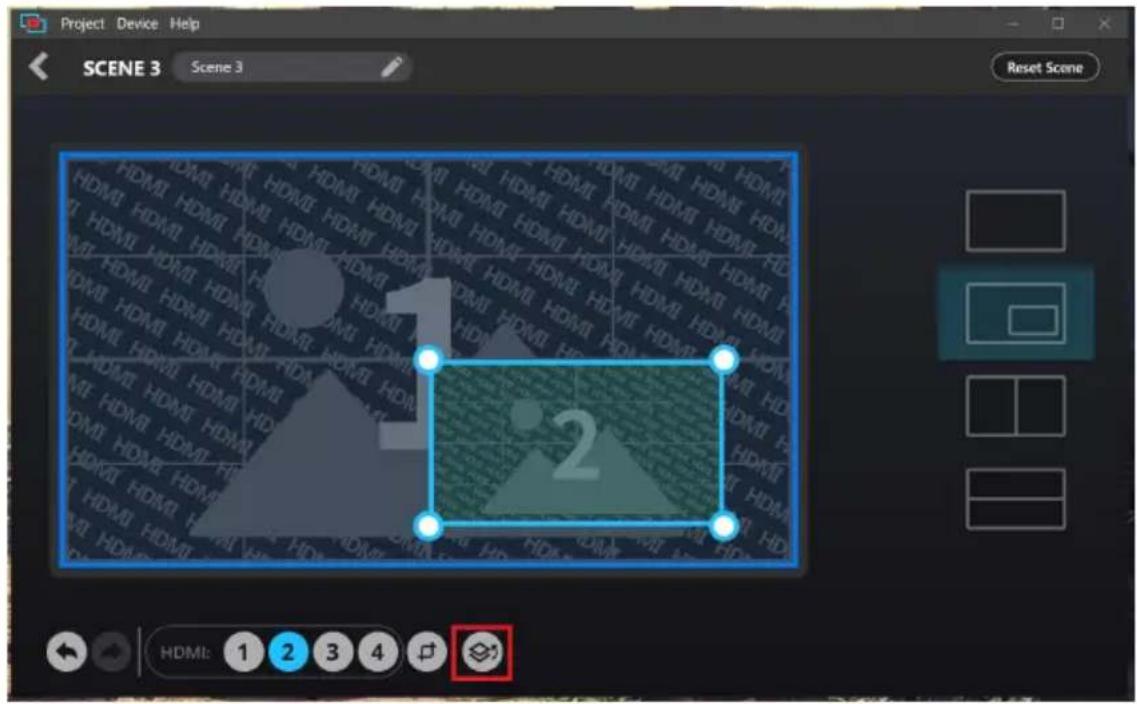
Reset Scene Button
To reset or undo any changes made to the selected scene, tap the Scene Editor page. A warning message appears, click OK.
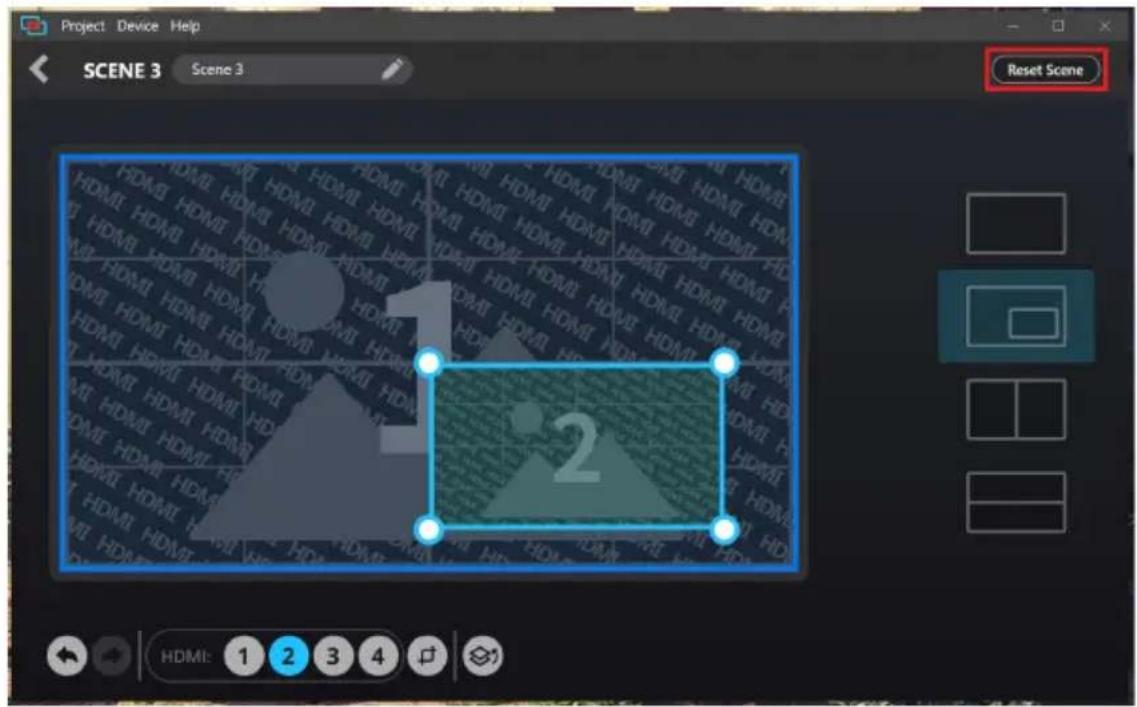
Audio Mixer
The components of the Audio Mixer deck page is shown below:
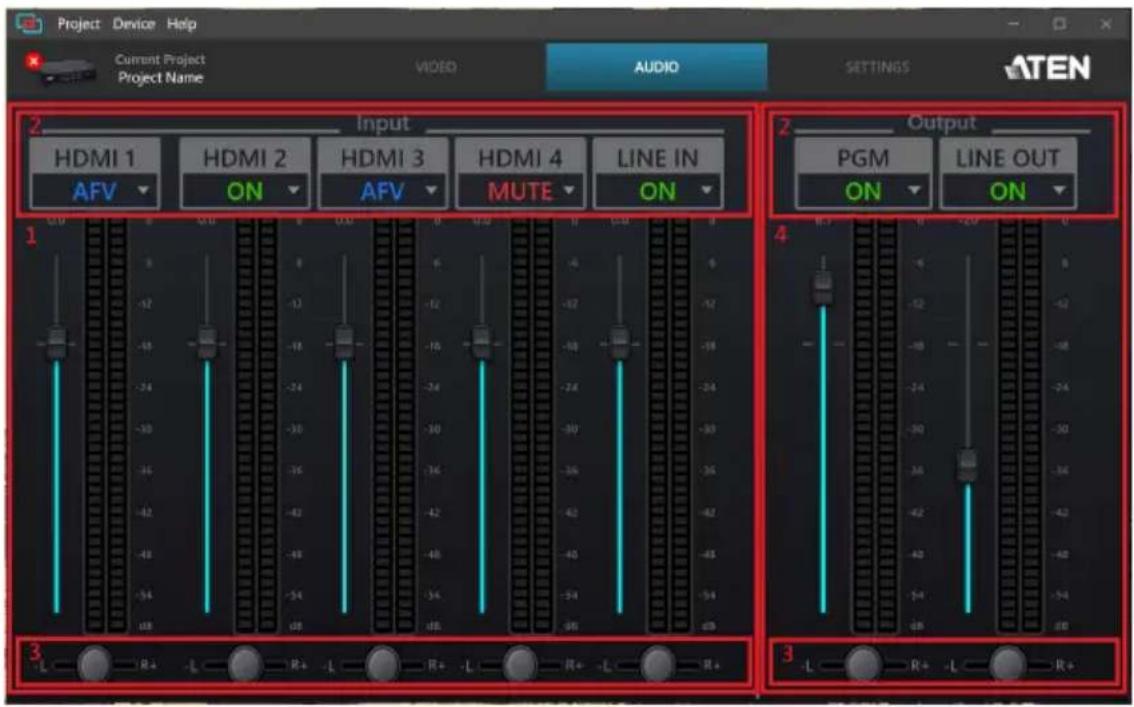
No. Component Description
1 Audio Level Control
Slides the volume slider to control the volume of each audio source.
No. Component Description
2 Audio Control Clicks to select and adjust audio control.
HDMI1 / HDMI2 / HDMI 3 / HDMI4:
Clicks to select an audio control for HDMI 1, HDMI 2, HDMI 3, and HDMI 4 between AFV, ON, and MUTE.
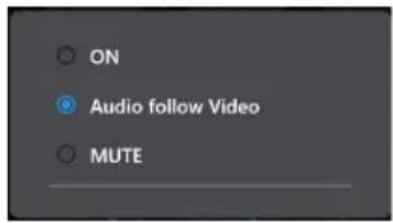
AFV (Audio-Follow-Video): Broadcasting the source's video and audio at the same time.
ON: The audio is turned on (unmuted).
MUTE: The audio is turned off (muted).
LINE IN:
Clicks to select an audio control for LINE IN between ON and MUTE, and audio type between stereo and mono.
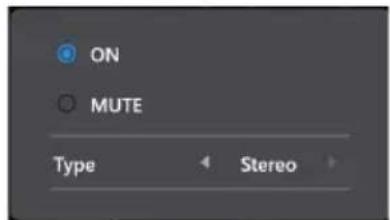
ON: The audio is turned on (unmuted).
MUTE: The audio is turned off (muted).
Type: Select between stereo and mono audio type.
PGM:
Clicks to select an audio control for PGM between ON and MUTE, and adjust compressor settings..
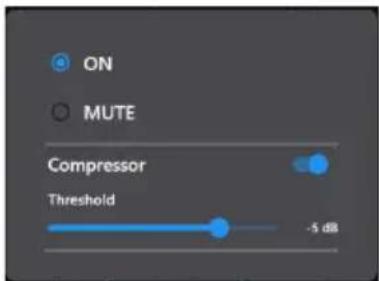
ON: The audio is turned on (unmuted).
MUTE: The audio is turned off (muted).
Compressor: Clicks to enable or disable the compressor function and drag the dial to adjust the threshold. The default setting is disabled.
| No. | Component Description |
| ON: The audio is turned on (unmuted).MUTE: The audio is turned off (muted).Audio Source: Selects and audio output options between PGM, LINE IN, HDMI-1, HDMI-2, HDMI-3, or HDMI-4.Compressor: Clicks to enable or disable the compressor function and drag the dial to adjust the threshold. The default setting is disabled. | |
| 3 L/R Balance Control | Clicks and hold to drag and control which side of the sound source is to be more emphasized. |
| 4 PGM and LINE OUT Level Control | Slides the volume slider to control the volume of PGM and LINE OUT. |
Settings Panel
The Settings deck page is shown below:
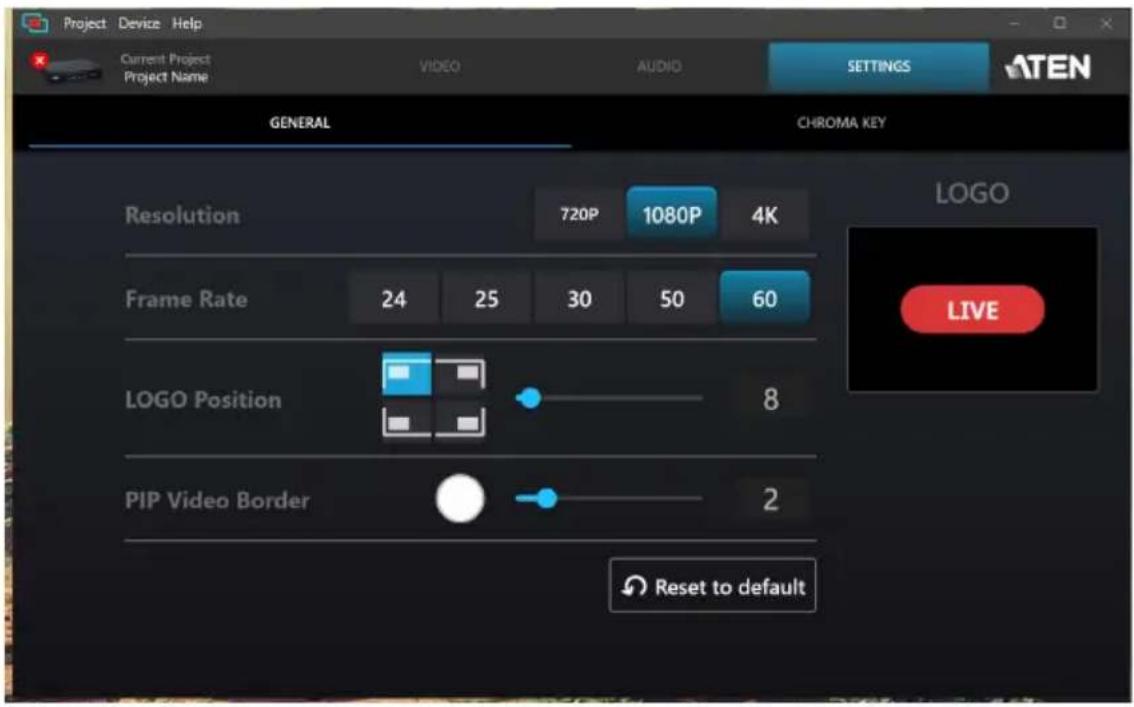
General
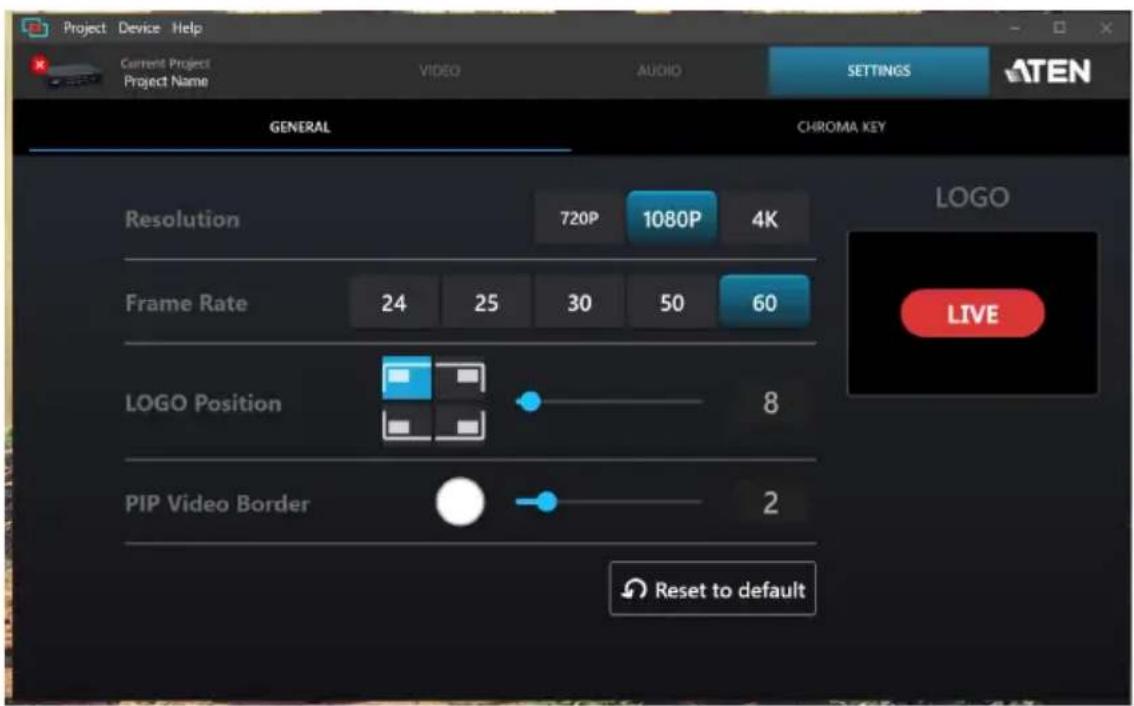
| Component Description | |
| Resolution Selects a | resolution for the HDMI display. |
| Frame Rate Selects a | frame rate for the HDMI display. |
| LOGO Position | ◆ Selects a logo position for the logo to be displayed on the HDMI-enabled display.◆ Adjusts the logo position close or further to the corner that you selected from the above logo position. |
| PiP Video Border | ◆ Selects a color for the video border to appear on the HDMI display connected to the HDMI program output port.◆ Adjusts the thickness of the video border. |
| Reset to Default Resets | the CAMLIVE PRO 4K back to the factory settings. A warning message appears, click OK. |
| LOGO Clicks to select | an image file for your logo.◆ The maximum logo size is 352 x 352 pixels, the image size will be proportionally scaled down automatically to fit the logo screen.◆ The supported image formats are PNG / BMP / JPG. |
Chroma Key
Chroma key allows user to composite two HDMI sources based on a color range, it usually goes hand-in-hand with a green screen. Our ATEN OnAir Lite app removes the color screen background and fill in the area with the HDMI sources.
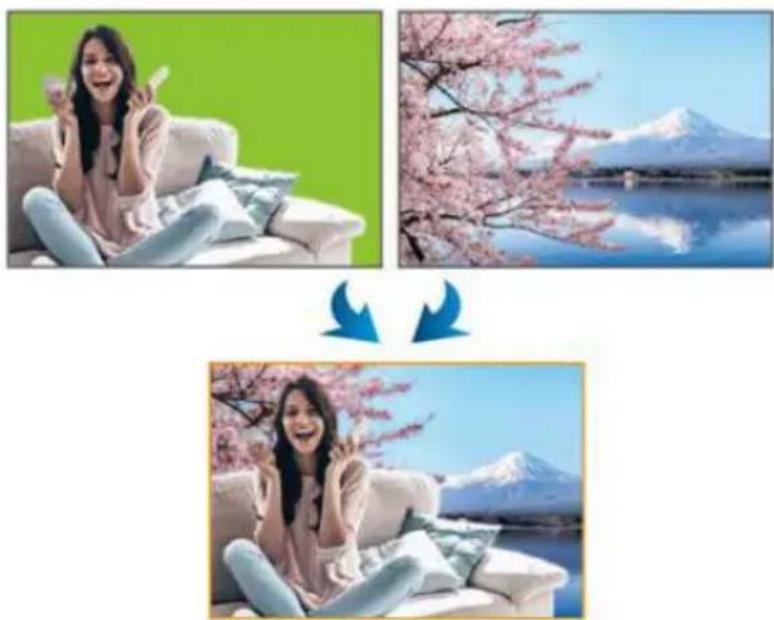
natural_image
Three-panel image sequence showing a smiling woman on a sofa, cherry blossoms in the background, and a mountain reflected in water; no text or symbols present.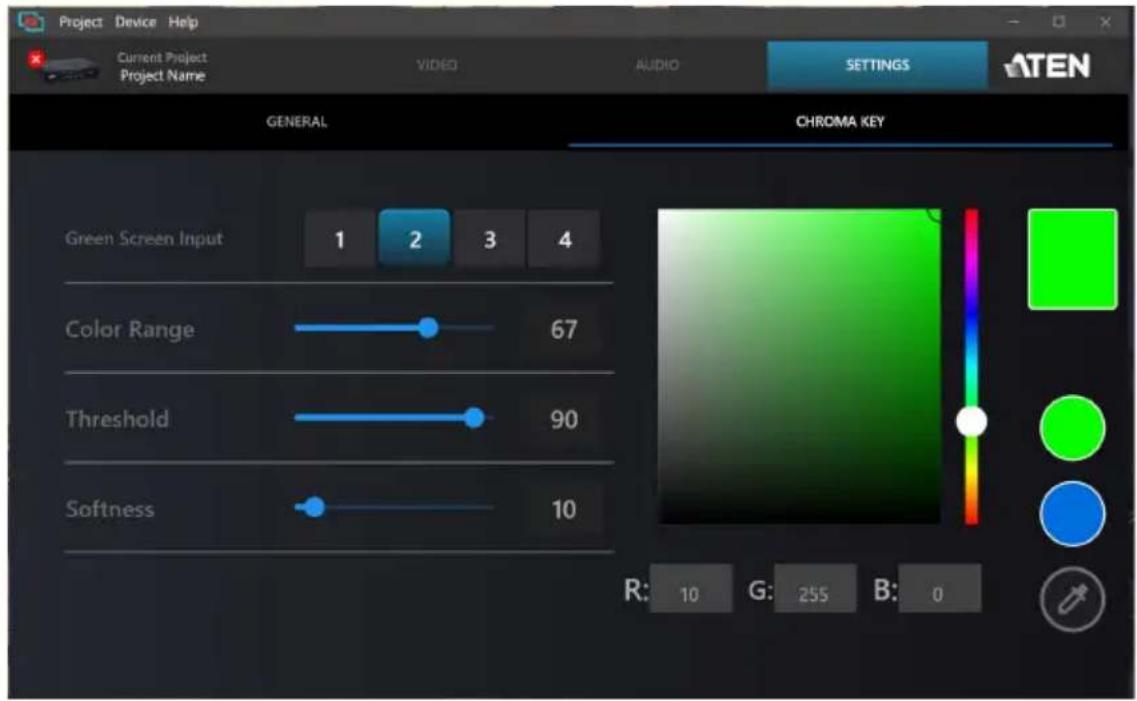
| Component Description |
| Green Screen Input Selects a target input for the Chroma Key. |
| Color Range Adjust the color range for the colored background. |
| Threshold Adjust the threshold for the colored background. |
| Softness Adjust the softness for the colored background. |
General
- This product is for indoor use only.
- Read all of these instructions. Save them for future reference.
◆ Follow all warnings and instructions marked on the device. - Do not place the device on any unstable surface (cart, stand, table, etc.). If the device falls, serious damage will result.
♦ Do not use the device near water. - Do not place the device near, or over, radiators or heat registers.
- The device cabinet is provided with slots and openings to allow for adequate ventilation. To ensure reliable operation, and to protect against overheating, these openings must never be blocked or covered.
- The device should never be placed on a soft surface (bed, sofa, rug, etc.) as this will block its ventilation openings. Likewise, the device should not be placed in a built-in enclosure unless adequate ventilation has been provided.
- Never spill liquid of any kind on the device.
- Unplug the device from the wall outlet before cleaning. Do not use liquid or aerosol cleaners. Use a damp cloth for cleaning.
- The device should be operated from the type of power source indicated on the marking label. If you are not sure of the type of power available, consult your dealer or local power company.
- To prevent damage to your installation it is important that all devices are properly grounded.
- Do not allow anything to rest on the power cord or cables. Route the power cord and cables so that they cannot be stepped on or tripped over.
- Position system cables and power cables carefully; Be sure that nothing rests on any cables.
- Never push objects of any kind into or through cabinet slots. They may touch dangerous voltage points or short out parts resulting in a risk of fire or electrical shock.
- Do not attempt to service the device yourself. Refer all servicing to qualified service personnel.
- If the following conditions occur, unplug the device from the wall outlet and bring it to qualified service personnel for repair.
- The power cord or plug has become damaged or frayed.
◆ Liquid has been spilled into the device. - The device has been exposed to rain or water.
- The device has been dropped, or the cabinet has been damaged.
- The device exhibits a distinct change in performance, indicating a need for service.
- The device does not operate normally when the operating instructions are followed.
- Only adjust those controls that are covered in the operating instructions. Improper adjustment of other controls may result in damage that will require extensive work by a qualified technician to repair.
Technical Support
International
- For online technical support – including troubleshooting, documentation, and software updates: http://support.aten.com
- For telephone support, see Telephone Support, page iv:
North America
| Email Support support@aten-usa.com | ||
| Online Technical Support | Troubleshooting Documentation Software Updates | http://www.aten-usa.com/support |
| Telephone Support 1-888-999-ATEN ext 4988 | 1-949-428-1111 | |
When you contact us, please have the following information ready beforehand:
- Product model number, serial number, and date of purchase
- Your computer configuration, including operating system, revision level, expansion cards, and software
◆ Any error messages displayed at the time the error occurred - The sequence of operations that led up to the error
◆ Any other information you feel may be of help
Specifications
| Function CAMLIVE PRO 4K | |
| Connectors | |
| Video In 4 x HDMI Type-A Female | (Black)(HDMI TMDS compatible and without the support of FRL/VRR/ALLM/eARC. Max. input video resolution up to 3840 x 2160p60 including stereo audio signals only) |
| USB Port 3.2 Gen1 USB-C Male (Black) | Note: USB Type-A to USB-C and USB-C to USB-C cables included in the package. |
| Video Output 1 x HDMI Type-A Female | (PGM Video, Black)1 x HDMI Type-A Female (Loop-Thru Video, Black) |
| Audio Inputs 1 x Unbalanced Audio via 6.35mm TRS Connector (Black) | |
| Audio Outputs 1x Unbalanced Audio via 6.35mm TRS Connector (Black) | |
| Video Resolution | |
| Video HDMI Input 720p50, 720p60, 1080p25, 1080p30, 1080p50, 1080p60, 40960 x 2160 25p/30p/60p, 3840 x 2160 25p/30p/60p, HDMI unencrypted | |
| PGM HDMI Video Output 720p: 1280 x 720 25p/30p/50p/60p1080p: 1920 x 1080 24p/25p/30p/50p/60p2160p: 3840 x 2160 24p/25p/30p/50p/60p HDMI unencrypted | |
| Uncompressed USB Video (UVC) Stream with Audio (UAC) | 720p: 1280 x 720 25p/30p/50p/60p1080p: 1920 x 1080 24p/25p/30p/50p/60p2160p: 3840 x 2160 24p/25p/30p |
| Audio Sampling 16-bit PCM Encoded Audio at 44.1KHz and 48KHz Sampling Rates | |
| Environmental | |
| Operating Temperature 0 - 40 °C | |
| Storage Temperature -20 – 60 °C | |
| Humidity 0 - 80% RH, Non-Condensing | |
| Minimum Hardware Requirement | PC/Mac:◆CPU: Intel®i3 Dual Core 2.8Ghz or above◆RAM: 4GB or above◆One USB-C Interface or USB Type-A Interface |
| Control | |
| Contact In RS-232 Connection via | RJ45 Interface |
| RS-232 Flow Control: RTS/CTS, XON/XOFFFIFO: 64 bytesBaud Rate: 50bps ~921.6KbpsStop Bit: 2 Stop Bits (9600 8N2) or 1 Stop Bit (1,1.5, 2)Parity: no paritySignal: TxD, RxD, RTS, CTS, DTR, DSR, GND | |
| USB Support ATEN OnAir Lite App, Appdownloadable from Microsoft Store | |
| OS Support Windows 10 or above | with UVC/UAC V1.1SupportMac OS X 10.13 or later with UVC/UAC Support |
| Physical Properties | |
| Housing Metal | |
| Weight 1.03 kg (2.27 lb) | |
| Dimensions (L x W x H) 20.00 x 16 | 46 x 4.40 cm (7.87 x 6.48 x 1.73 in) |
ATEN Standard Warranty Policy
Limited Hardware Warranty
ATEN warrants its hardware in the country of purchase against flaws in materials and workmanship for a Warranty Period of two [2] years (warranty period may vary in certain regions/countries) commencing on the date of original purchase. This warranty period includes the LCD panel of ATEN LCD KVM switches. For UPS products, the device warranty is two [2] years but battery is one [1] year. Select products are warranted for an additional year (see A+ Warranty for further details). Cables and accessories are not covered by the Standard Warranty.
What is covered by the Limited Hardware Warranty
ATEN will provide a repair service, without charge, during the Warranty Period. If a product is detective, ATEN will, at its discretion, have the option to (1) repair said product with new or repaired components, or (2) replace the entire product with an identical product or with a similar product which fulfills the same function as the defective product. Replaced products assume the warranty of the original product for the remaining period or a period of 90 days, whichever is longer. When the products or components are replaced, the replacing articles shall become customer property and the replaced articles shall become the property of ATEN.
To learn more about our warranty policies, please visit our website:
http://www.aten.com/global/en/legal/policies/warranty-policy/
© Copyright 2024 ATEN® International Co., Ltd.
Released: 2024-03-06
ATEN and the ATEN logo are registered trademarks of ATEN International Co., Ltd. All rights reserved. All other brand names and trademarks are the registered property of their respective owners.
- Compliance Statements
- FEDERAL COMMUNICATIONS COMMISSION INTERFERENCE STATEMENT
- KCC Statement
- Industry Canada Statement
- CAN ICES-003 (B) / NMB-003 (B)
- HDMI Trademark Statement
- RoHS
- User Information
- Online Registration
- Telephone Support
- User Notice
- Product Information
- Package Contents
- Table of Contents
- Introduction
- Hardware Setup
- Livestream / Record Setup
- ATEN OnAir Lite App
- Appendix
- About this Manual
- Note:
- Conventions
- Overview
- Features
- Planning the Installation
- Requirements
- Supported Operating System and Requirements
- Components
- Chapter 2
- Hardware Setup
- Connecting the CAMLIVE PRO 4K Unit
- Selecting a Layout and Output Source(s)
- Full Screen Layout
- PiP Layout
- PbP Layout
- HDMI Loop Out
- Software
- PC
- Chapter 3
- Livestream / Record Setup
- Livestream / Record Platform
- Discovering CAMLIVE on your System
- Windows Operating System
- The System window appears, select Device Manager.
- The Device Manager window appears. Click on Cameras and Sound, video and game controllers.
- Video and Audio Setup
- Using the USB Cables
- Serial Adapter Pin Assignments
- RS-232 Operation
- ATEN OnAir Lite Application
- Supported Systems
- Mobile Operating System
- Installing the ATEN OnAir Lite App
- Page Components
- Project Settings
- Device Settings
- Help
- System Information
- Video Mixer
- Scene Editor
- Resize
- Crop
- Overlay Button
- Reset Scene Button
- Audio Mixer
- No. Component Description
- HDMI1 / HDMI2 / HDMI 3 / HDMI4:
- LINE IN:
- PGM:
- Settings Panel
- Chroma Key
- General
- Technical Support
- International
- ATEN Standard Warranty Policy
- Limited Hardware Warranty
- What is covered by the Limited Hardware Warranty
Brand : ATEN
Model : CAMLIVE PRO UC3430
Category : Uncategorized