
Plaza HD-T2 - Receiver MANHATTAN - Free user manual and instructions
Find the device manual for free Plaza HD-T2 MANHATTAN in PDF.


| Product Type | Digital Terrestrial Receiver DVB-T2 |
| Brand | Manhattan |
| Model | Plaza HD-T2 |
| Dimensions (W x D x H) | 130 x 80 x 30 mm |
| Weight | 200 g |
| Power Supply | 5V DC, 1A (via USB adapter) |
| Power Consumption | < 5 W |
| Video Output | HDMI (1080p), Composite (RCA) |
| Audio Output | HDMI, Digital Coaxial, Analog Stereo |
| Tuner | DVB-T2/T, HEVC/H.265 |
| Media Playback | USB 2.0: MP4, AVI, MKV, MP3, JPEG |
| Channel Management | Automatic and manual scan, EPG, favorites |
| Recording | USB PVR (time shift, scheduled recording) |
| Antenna Input | F-type female, 75 Ohm |
| Remote Control | Infrared, included (batteries AAA) |
| Display | LED indicator (power, signal) |
| Operating Temperature | 0°C to 40°C |
| Safety Certifications | CE, RoHS |
| Spare Parts / Repairability | Remote control, power adapter, HDMI cable, fuse (internal) |
| Package Contents | Receiver, remote control, power adapter, HDMI cable, user manual |
Frequently Asked Questions - Plaza HD-T2 MANHATTAN
User questions about Plaza HD-T2 MANHATTAN
0 question about this device. Answer the ones you know or ask your own.
Ask a new question about this device
Download the instructions for your Receiver in PDF format for free! Find your manual Plaza HD-T2 - MANHATTAN and take your electronic device back in hand. On this page are published all the documents necessary for the use of your device. Plaza HD-T2 by MANHATTAN.
USER MANUAL Plaza HD-T2 MANHATTAN
Freeview HD Receiver with Apps
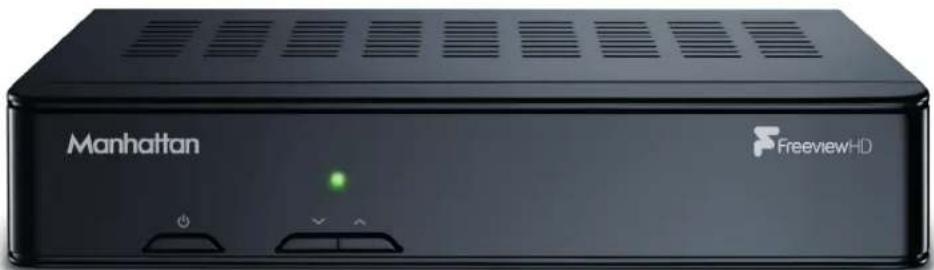
WELCOME
Thanks for buying this Manhattan Plaza HD•T2 Freeview receiver, designed to provide you with the best in digital TV, radio and apps.
Connect to a suitable HD-ready television using HDMI for breathtaking high definition digital pictures and digital sound. To help make watching TV even more enjoyable, the Plaza HD•T2 is flexible and customisable:
- Create lists of your favourite channels and then use them to see only the channels you want to in the Programme Guide (see p22).
- Add reminders in the Guide with just the press of a button so you never miss your favourite shows (see p20).
- Catch up with the best of the week's TV using iPlayer and explore the largest collection of online video with YouTube.
Please take the time to read this user guide carefully before installing or using the unit, and keep it for future reference.
If you experience any difficulties connecting or using the Plaza HD•T2, please see the Troubleshooting section at the end of this guide and then if you still need help, contact us.
FURTHER INFORMATION
FREEVIEW
You can get more information and help from the Freeview website at:
www.freeview.co.uk
MANHATTAN
Please visit our website or call us for more information and help. We recommend you sign up to our mailing list to receive the latest information about your product including news of software updates.
Web: www.manhattan-tv.com
Phone: 020 8450 0005

TV narration for people with sight problems


CONTENTS
In The Box 5
Your receiver 6
Remote control 8
Preparation 10
The aerial 10
Connecting your receiver 10
Switching on 11
Tuning in 12
Everyday Use 14
Turning on the receiver 14
Changing channels 14
Changing the volume 15
Browsing bar 15
Subtitles and Audio Description (AD) 16
Using the channel list 17
Searching for a channel 17
Using the programme guide 18
Using Apps 20
Interactive TV services 20
Advanced Use 21
Using the favourites lists 21
The lock PIN 23
Display mode 23
Changing the channel list 23
Using the setup menus 24
General menu section 24
- Subtitles 25
- Subtitle language 25
- Information 25
Picture menu section 25
- Screen type 26
- Display mode 26
- HDMI resolution 26
- SCART mode 26
Sound menu section 27
- Audio language 27
- Audio description 27
- Audio description volume 27
- Dolby digital 27
- Lip sync delay 28
- Balance 28
continued...
CONTENTS
Advanced Use (continued)
Time menu section 28
- Auto standby 28
- Sleep timer 28
- Auto turn on 28
- Auto turn off 28
System menu section 29
- Retune 29
- Manual scan 29
- Network configuration 30
- 5V antenna power 30
- RF loopthrough in standby 30
- Parental guidance 30
- Set lock PIN 30
- Software update via OAD 31
- OAD software manual scan 31
- Software update via USB 31
- Restore factory default 31
Connecting To Your Network 32
Automatic (DHCP) 32
Manual (Static) 33
Appendix A Safety 34
Appendix B Troubleshooting 36
Appendix C Specifications 39
Guarantee & Legal 40

In The Box
In your Plaza HD•T2 Freeview receiver pack you should find the following items:

Quick Start Guide

Main User Guide
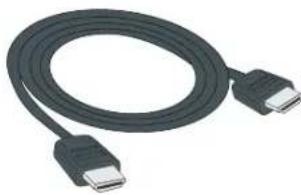
HDMI cable to connect to an HD-ready TV

Batteries for the remote control

Remote control

Plaza HD•T2 receiver
YOUR RECEIVER
Manhattan Plaza HD•T2
Front
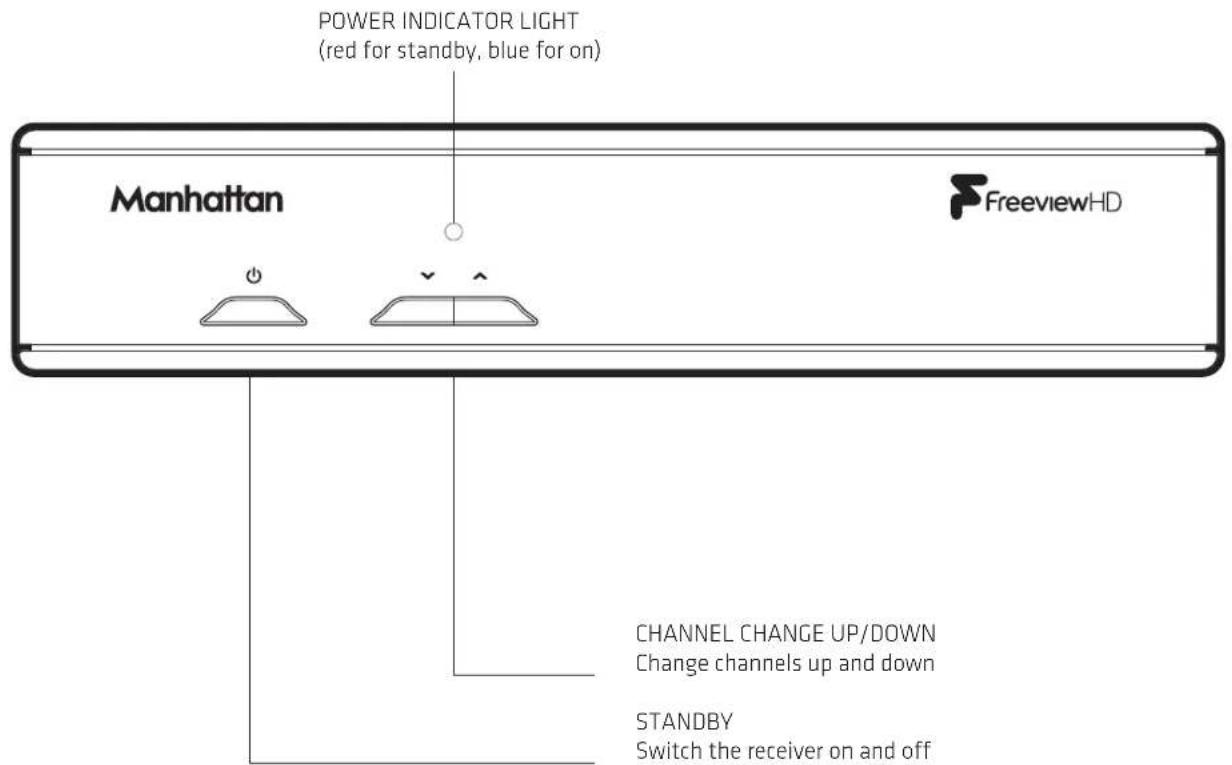
Manhattan Plaza HD•T2
Rear
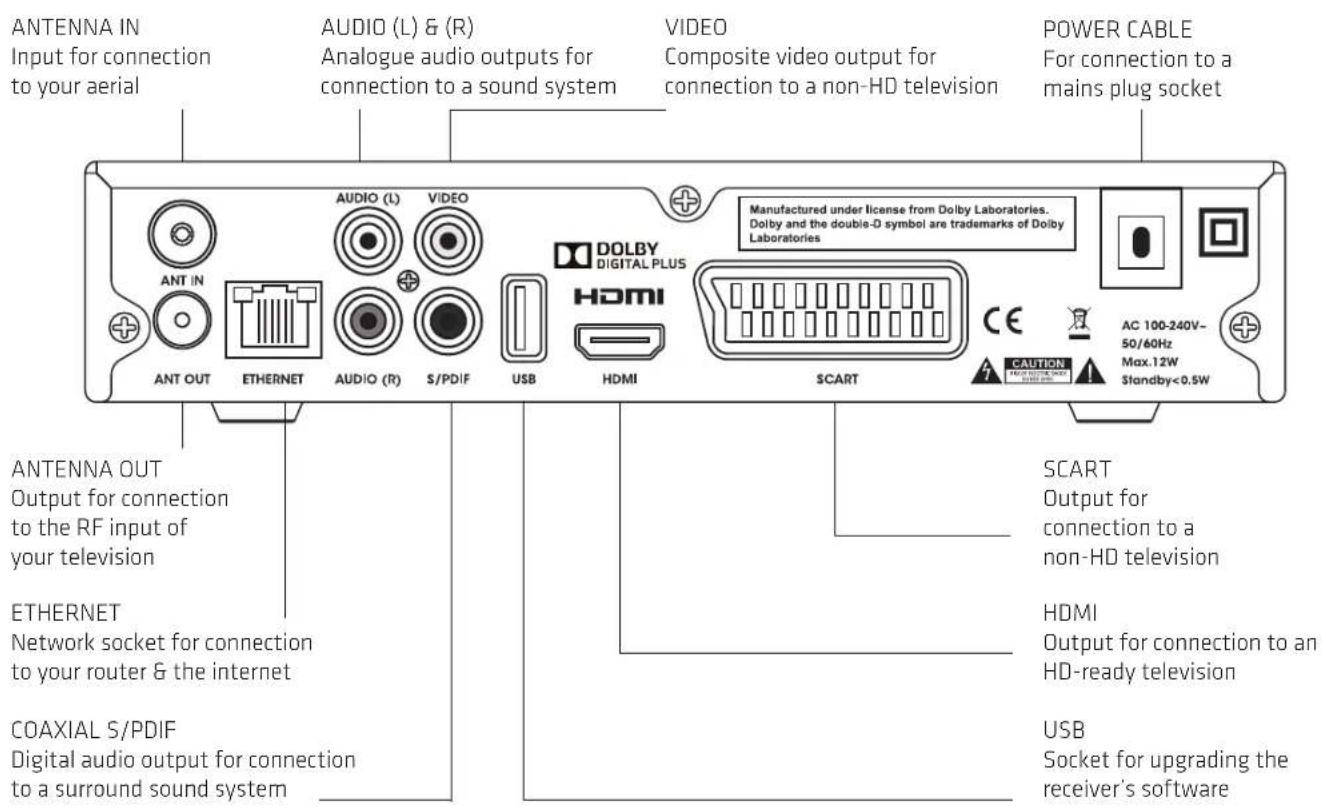
REMOTE CONTROL Plaza HD•T2
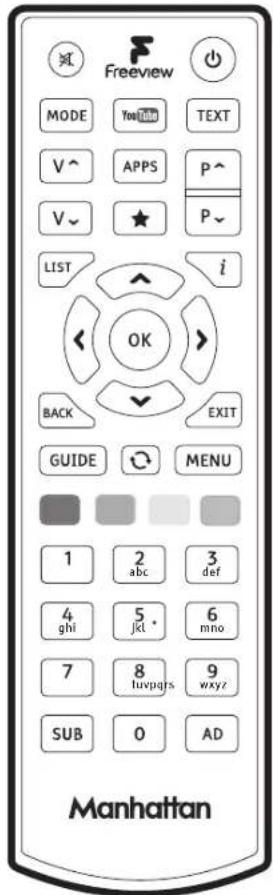
Standby - switches the receiver on and off.
Mute - silences the receiver's sound.
0, 1 ... 9 - buttons to directly select channels and enter numeric values in the set-up menus.
Switches back to the last channel watched.
★ Displays your favourites lists and adds channels to them in the channel list.
MENU Displays the main menu screen.
i Displays channel and programme information.
Up, down, left, right - move the highlight bar in menus and in the programme guide, and allow you to browse the channels and programmes.
OK Selects the option in a menu.
LIST Displays the channel list.
GUIDE Displays the programme guide.
BACK Exits a menu and returns to the main menu.
EXIT Exits a menu and returns to normal TV viewing.
YouTubens YouTube
APPS Open Apps menu.
V^ Turns the volume up.
V ∨ Turns the volume down.
P^ P_ Switches to the next or previous channel. Moves one page up or down in the channel list and programme guide.
AD Turns on or off audio description.
MODE Switches between available screen display modes.
SUB Turns on or off subtitles.
TEXT Displays interactive and digital text services (where available).
Red, green, yellow, blue - Chooses options within menus.

Preparation
This section explains how to set up your Plaza HD•T2 to receive Freeview channels.
THE AERIAL
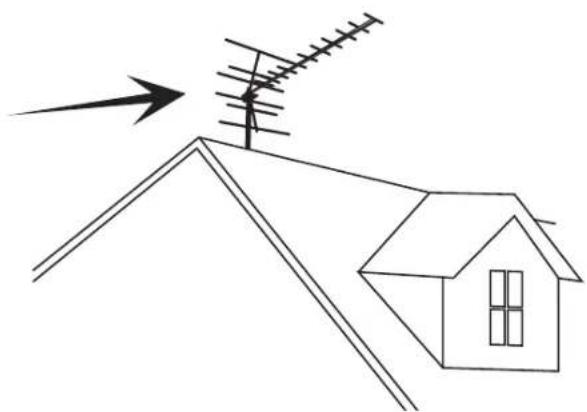
To receive Freeview, you must connect your Plaza HD•T2 receiver to an appropriate TV aerial that has been correctly installed. If your aerial is unable to provide adequate signal, it may need to be realigned. Please consult a professional.
CONNECTING YOUR RECEIVER
Place your Plaza HD•T2 receiver on a firm, level surface close to the television, a mains electricity socket, and the cable from the aerial. (See Appendix A - Safety.)
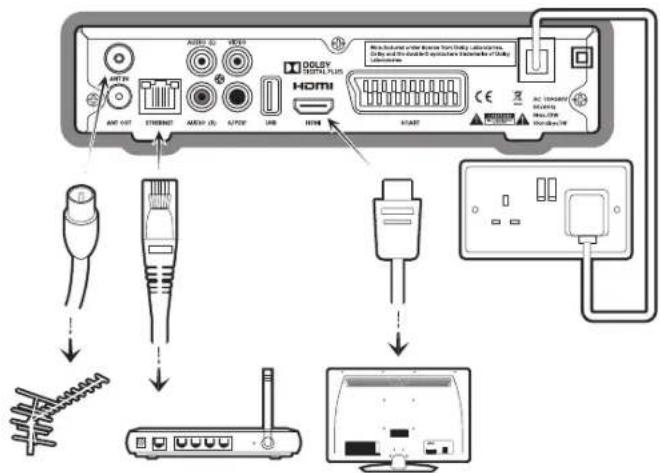
Connect the cable from your aerial to the ANT IN socket at the back of the Plaza HD•T2. If you also want to use your television's internal tuner, you can optionally connect a cable from the ANT OUT socket at the back of the Plaza HD•T2 to the appropriate input on your television. Please note that to conserve energy, by default this output is disabled when the Plaza HD•T2 is in standby. You can enable it in the System section of the Setup menu (please see page 30).
Ensure your television is turned off and connect the HDMI cable supplied between the HDMI socket at the back of your Plaza HD•T2 receiver and an HDMI socket on your television. There may be more than one HDMI socket on your television. If you are not sure which to use, check the television's manual.
HINT: If your television has no HDMI socket, then it must be connected to the receiver by SCART or RCA cable, and you will not be able to watch Freeview channels in high definition.
Plug the power cable from the rear of the Plaza HD•T2 into an available mains socket that is turned off.
You can also connect the Plaza HD•T2 receiver to a stereo or surround sound system, so that you can listen to the TV sound through the sound system instead of (or as well as) the television's speakers. If you connect a coaxial S/PDIF lead (not supplied) between the S/PDIF sockets on your receiver and digital sound system, you can listen to the TV sound in digital audio quality, or even in surround sound, depending on the broadcast and your sound system.
To use apps such as BBC iPlayer or YouTube, the Plaza HD•T2 must be connected to your internet router or hub using an ethernet cable (not supplied). Plug one end of the ethernet cable into the ETHERNET socket at the back of the Plaza HD•T2, and the other into your hub or router. Make sure the connections are fully pushed in - you'll hear a click as they lock into place. Consult your router or hub's documentation for further guidance.
If your receiver is not located near your hub or router, you could use HomePlug powerline adapters to extend your home network using the ring main of your house. Another option is to use a Wireless Ethernet Bridge to bridge the Ethernet socket of the Plaza HD•T2 to Wi-Fi, enabling it to connect wirelessly to your home network. For more information, please consult with your installer or retailer. If you require support for these devices, you will need to contact the manufacturer. The Plaza HD•T2 does not support USB Wi-Fi dongles.
SWITCHING ON

Take off the battery compartment cover from the back of the Plaza HD•T2 remote control by lifting it up while pushing the catch. Insert the two AAA batteries supplied, as shown on the inside of the compartment, and replace the compartment cover.
SWITCHING ON (continued)
Turn on your TV set and choose the HDMI input (see your television's manual for guidance).
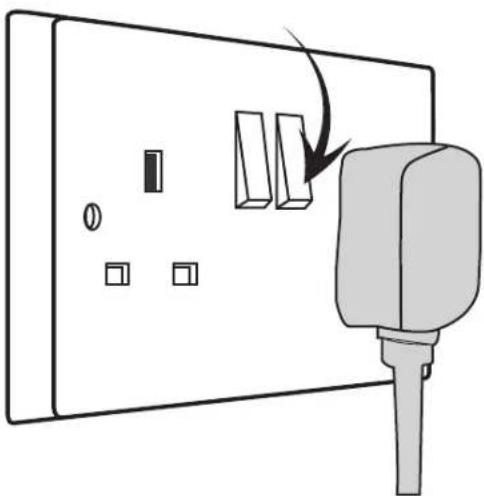
Switch on the mains socket the Plaza HD•T2 is connected to.
After a few seconds, the receiver's first Freeview installation screen shown below will appear on the television screen:

HINT: If you do not see this screen on your television, see 'Troubleshooting' on page 36.
TUNING IN
When the first installation step is displayed, use the >or <buttons to select the screen format of your television (16:9 Widescreen or the squarer 4:3 Traditional). Then press the
HINT: You should set the HDMI resolution to the highest that your television can display (see your television's manual). If in doubt, set the resolution to 720p.

Your Plaza HD•T2 receiver will scan for channels, displaying the total number of TV, radio and data channels found. When the scan is complete, press OK to proceed to the next step.
To use the receiver's parental guidance function, locked channels or restore to factory default, you need to create a PIN. Enter your choice of PIN by pressing the required number button 0, 1 ... 9 for each of the four PIN digits, then press OK to proceed.

The setup completion screen confirms the lock PIN you have set. Press the OK button and your Plaza HD•T2 receiver is now ready for you to watch Freeview digital TV.
3
Everyday Use
This section describes the day-to-day use of your Plaza HD•T2 receiver – how to select the channels that you want to watch, view the programme schedules, and control the basic features.
TURNING ON THE RECEIVER
Press the ⏻ button on the remote control or the ⏻ button on the front of the receiver. The power light on the front panel changes from red to blue when the receiver is powered up.
You can turn off the Plaza HD•T2, so it goes into standby, by pressing the ⏻ button on the remote control or the ⏻ button on the receiver. When the receiver is in standby, the power light on the front panel turns red. The Plaza HD•T2 uses less power when in standby.
HINT: You should leave the Plaza HD•T2 receiver plugged in with the socket switched on, at all times (except when there is lightning – see Appendix A). When you are not using the receiver, put it in standby by pressing the ⏻ button on the remote control or the ⏻ button on the front of the receiver.
HINT: To save power, the Plaza HD•T2 receiver will automatically switch to standby if it is not used for a long time. This feature can be disabled – see the Advanced Use section of this guide.
CHANGING CHANNELS
Step through the channels by pressing the P ∧ or P ∨ buttons on the remote control or the ∧ and buttons on the front of the Plaza HD•T2 receiver.
If you know the channel's number, you can switch directly to the channel you want by using the number buttons on the remote control. As you enter a channel number, each digit appears at the top left of the screen to show the number button you have pressed.
Press the ⬇ button to switch from the channel you are currently watching to the channel you were watching before.
HINT: There are some channel numbers missing in the channel list because spaces are left for future channels to join Freeview.
HINT: If you enter a number that does not exist, the channel will not change.
There are other ways to change channel:
- Use the browsing bar at the bottom of the screen (see below)
- Use the on-screen channel list (see page 17)
- Use the programme guide (see page 18)
CHANGING THE VOLUME
You can increase or decrease the volume by using the V^ and V^- buttons on the remote control. The sound is silenced by pressing the button and restored to its previous level by pressing the button again.
BROWSING BAR
Whenever you change channel, the Plaza HD•T2 briefl y displays a browsing bar at the bottom of the screen that contains information about the current channel and programme. You can press the i button at anytime to display the bar again.
It shows:
• the name and number of the channel
• the name of the programme you are watching
• the start and finish time of the programme
• the progress through the programme
• the date and time

HINT: You can also display the browsing bar by pressing or on the remote control while you are watching TV.
The information bar may also display symbols to indicate:
HD The programme is in High Definition.
SUB Subtitles are available.
AD→ Audio Description is available.
Dolby Digital audio is available.
6 Parental guidance is advised as the programme contains language or scenes that may not be suitable for children (press i for further details).
The channel is locked (see the Advanced Use section).
An HD version is available on another channel (press i for further details).
While the bar is displayed, press the ➤ button to see details of the next programme, and the ◆ button to go back again. To see what is on another channel, press the 🔔 or buttons. To change to this channel, press OK while the bar is still displayed. To remove the bar from the screen at anytime, press EXIT.
While the browsing bar is displayed, press i again to display more information about the selected programme, including a short summary. Pressing the i button once more removes the extra information from the screen.
i Never Mind the Buzzcocks
[Entertainment] 7/13. Hip-pop duo Rizzle Kicks host. Joining Phill and Noel are Huey Morgan, Lissie, Laura Whitmore and Paul Foot. Contains some strong language. Also in HD. [S]

HD Simulcast is available on BBC TWO HD

Contains some strong language.
HINT: When the extra programme information is displayed, you can still press or to see what is on now or next and and to see what is on other channels.
SUBTITLES AND AUDIO DESCRIPTION
Many Freeview programmes are broadcast with subtitles for people who are deaf or hard of hearing. Channels with subtitles available show the SUB symbol in the information bar.
To turn on subtitles, press the SUB button. If subtitles are available for the current programme, a notification will be displayed showing "Subtitles On". If subtitles are not available for the current programme, the notification will show "Subtitles On but unavailable with this programme". When the next programme you watch has subtitles, they will then be displayed. To turn subtitles off, press the SUB button.
Some programmes have an extra soundtrack to tell people who are blind or partially sighted what is happening on screen. Channels with this audio description available show the AP-9 symbol in the information bar.
To turn on audio description, press the AD button. If audio description is available for the current programme, a notification will be displayed showing "Audio Description On". If audio description is not available for the current programme, the notification will show "Audio Description On but unavailable with this programme". When the next programme you watch has audio description, it will then be heard. To turn audio description off, press the AD button.
USING THE CHANNEL LIST
Display the on-screen channel list by pressing the LIST button on the remote control. This lists the channels on the left-hand side of the screen, in number order, and displays a preview window of the currently selected channel on the right-hand side of the screen. You can return to watching TV at any time by pressing the EXIT button.
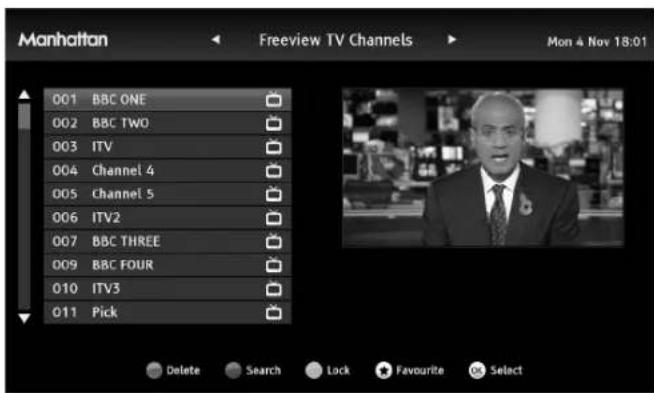
HINT: You can also display the channel list by pressing the OK button while watching TV.
Use the ▲ or ▼buttons on the remote control to highlight a channel then press OK to view it in the preview window. Press OK again to exit the channel list and watch the channel full-screen.
HINT: Move a page at a time through the channel list by using the P ^ and P ∨ buttons.
TV, radio and data channels are stored in separate lists. Switch between them by pressing the
SEARCHING FOR A CHANNEL
You can search for a channel by name, or a part of its name. Press the green button while on the channel list screen and enter the word that you want to search for using the on-screen keyboard.
The receiver shows a list of all channels with the search word within their name, for you to choose from in the normal way. You can press for to see the search results for the different channel lists. Press to clear the search.
USING THE PROGRAMME GUIDE
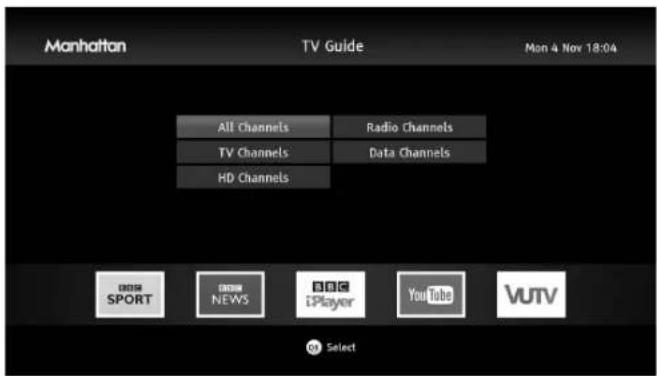
The Plaza HD•T2 guide is used to display details of all programmes on in the week ahead and to open Apps such as BBC iPlayer or YouTube.
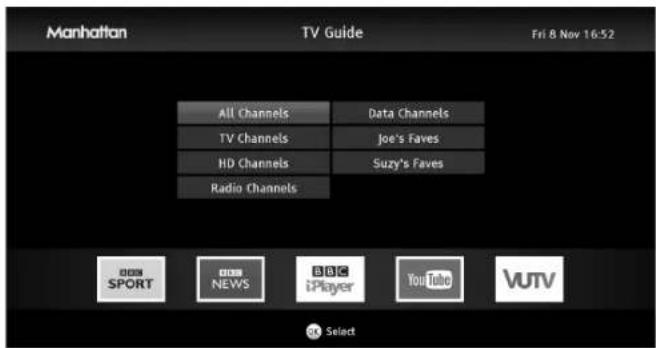
Open the guide selection screen by pressing the GUIDE button on the remote control. You will see available apps and lists for All, TV, HD, Radio and Data channels as well as any favourites lists that you have created (see p22 for more about favourites lists).
To view the programmes on a channel list or open an App, use ▲, ▼ to make your selection and then press OK.
HINT: Data channels are interactive channels that may require an Internet connection to function.
![Freeview All Channels Mon 4 Nov 18:03 1 BBC ONE - BBC News at Six [News and Factual] The latest national and international news stories from the BBC News team, followed by weather. Also in HD. [S] 18:00 18:50 Mon 4 Nov 18:00 18:30 19:00 19:30 1 BBC ONE BBC News at ... BBC London News The One Show Ca…](/content/2026/05/927996/images/f2f2676f54b28aa5a73d8812ec15e86f45867269a80ee0b299e1d840675de077.jpg)
HINT: You can skip straight to the programme guide for all channels by pressing the GUIDE button a second time.
The programme guide shows a table of the programmes, with each page showing eight channels over a two-hour period
Information on the highlighted programme is shown above the table and you can read a full summary by pressing the i button. Press i again to remove the summary box.
The current date and time is displayed at the top right of the screen and a red line at the top of the table shows the present time in the schedule.
You look through the scheduled programmes using the and buttons to move through the channels and the (and) buttons to highlight programmes showing at different times.
HINT: You can jump through the list more quickly using the P^ or P↓ buttons to move to the next or previous page. The green and red buttons move the highlight bar through the schedule two hours forward or back, and the blue and yellow buttons move a day forward or back.
As you move the highlight bar through the schedule, the programme summary shown above the list changes to reflect the programme highlighted.
Press OK to switch the receiver to the channel and programme highlighted. If the programme is on at the time, the receiver will switch to that channel immediately.
HINT: Programmes in standard definition that are also available on another channel in HD are labelled in the schedules with an HD symbol. You can see the time and channel that the HD version is broadcast by highlighting the programme and pressing i
If the programme is scheduled for later on, a reminder is set so that when the programme is about to start, a message is displayed on-screen and, after a few seconds, the receiver automatically switches to the relevant channel. In the programme guide a Ⓤ is shown next to a programme with a reminder set.
| 83 Al Jazeera Eng | Newshour | News Live | The Stream |
| 85 RT | SophieCo | Headline News | Cross Talk |
| 87 COMMUNITY | Broadcasting 2am-8am and 24-hours on... | ||
| 101 BBC ONE HD | This Is BBC One HD | The One Show | Caught Red Handed |
| 102 BBC TWO HD | Strictly Come Dan... | Celebrity Antiques Road Trip | |
| 103 ITV HD | ITV News & Weat... | Emmerdale | Coronation Street |
| -2 Hrs +2 Hrs -24 Hrs +24 Hrs Reminders | |||
You can see a list of all the programmes with reminders set by pressing the button, and you can cancel a reminder by highlighting it and pressing the red button. Pressing again or BACK leaves the reminder list and returns to the programme guide. You can also cancel a reminder by highlighting the programme in the programme guide and pressing OK again.
You can set as many reminders as you want but if you try to set a reminder on one channel for the same time as one you have already set on another channel, a warning is displayed on the screen.
You leave the programme guide and return to watching TV by pressing BACK or EXIT button.
HINT: If you have set a reminder for a program that comes on whilst you are using an App, the Plaza HD-T2 will exit the App and switch to that program automatically.
USING APPS
Your Plaza HD•T2 must have a working internet connection to use Apps (see pages 10 & 11 for how to connect the Plaza HD•T2 to your network). YouTube can be opened at anytime by pressing the YouTube on the remote control. To open other Apps, press the APPS or GUIDE button, highlight the App you want to open and press OK. To exit an App, press the EXIT button.
Apps, even those from the same provider such as the BBC, all work slightly differently, and can be updated and changed by the provider at any time. Section 7 "Use Apps" of the Quick Start Guide has some basic help for iPlayer and YouTube that is correct at the time of printing. For further assistance, please visit our website (www.manhattan-tv.com) or the provider of the App.
A great feature of YouTube on the Plaza HD•T2 is that it can be controlled by the YouTube App on your smartphone or tablet. When using the YouTube App on a device that is connected to the same network as the Plaza HD•T2, the "Send to TV" icon will be displayed.

"Send to TV" icon
If you tap this icon, videos will playback via the Plaza HD•T2 on your TV instead of your device and you can use the video controls on your device to play, pause, stop or seek within the video. Please note that if using an iPhone, you may need to install YouTube first from the App Store.
INTERACTIVE TV SERVICES
Several Freeview channels broadcast a range of digital text and interactive services, such as news, weather, games, sports information and video, alongside normal TV. If interactive services are available, they will be indicated by an on-screen prompt - usually a red button in the top right-hand corner of the screen.
You can use the interactive options by pressing TEXT or the red button while watching the TV channel. This will display a menu of the services available.
When you have fi nished with the interactive services, return to watching normal TV by pressing TEXT again or the EXIT button.


Advanced Use
This section explains how to get the most out of your Plaza HD•T2 receiver.
USING THE FAVOURITES LISTS
The favourites lists make it easier for you to choose the channel that you want to watch, by limiting the on-screen list to just a few channels, such as those of a particular type, or that one member of the family watches the most.
The Plaza HD•T2 provides five favourites lists, and it only takes a short time to set up the lists before they can be used. First, display the channel list, by pressing the LIST button.
Highlight the channel that you want to include in a favourites list, and press the ★ button to show the five lists available. Highlight the list that you want to include the channel in and press ★ add the channel to that list (a star will appear next to it). You can add a channel to as many lists as you like. Channels can be removed from favourites lists by highlighting a list and pressing the ★ button again. Press OK to store the changes to the lists, or press BACK to cancel.
You can rename the favourites lists to suit their contents (for example, the type of channels in the list, or the name of person who has chosen them). With the list highlighted, press the red button and enter the name that you want for that list using the on-screen keyboard.
Once favourites lists have had channels assigned to them, they can be used in three ways.

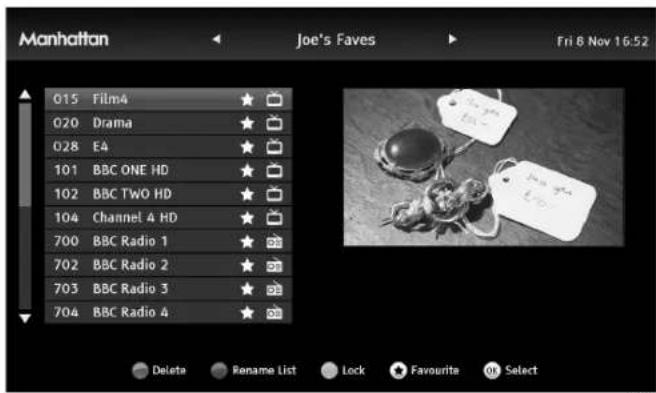
- In the channel list, favourites lists can be selected in the same way as the Freeview TV, radio and data channel lists, by pressing the
buttons. Press OK to view a selected channel, ★to change the favourites lists it is assigned to, or PIN lock it by pressing the yellow button. Red deletes the selected channel from the current favourites list and green renames the current list. - During normal TV viewing, you can quickly choose a channel from the favourites lists by pressing the button. Use
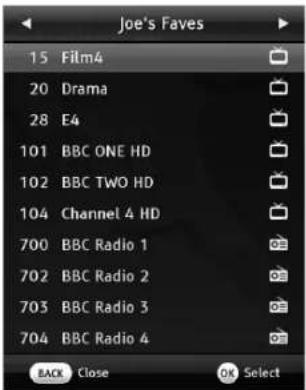
to switch to the other lists, highlight the channel you want to watch, then press OK.
- The programme guide can be filtered to only display the channels on a favourites list. Press GUIDE then highlight the list you want to choose, and press OK. Press BACK from the guide to choose a different list.
![Freeview Joe's Faves Fri 8 Nov 16:53 15 Film4 - They Who Dare [Movie] (1954) World War II drama. Dirk Bogarde leads a group of British soldiers on an undercover operation to destroy enemy airfields on the Nazi-occupied Gree... 14:40 18:50 Fri 8 Nov 16:30 17:00 17:30 18:00 15 Film4 No I... They Who D…](/content/2026/05/927996/images/2d1b0d88cfd1bad198edf5cb89d2e594487ab8324d1d0a90e298ddb6969d42d1.jpg)
HINT: The channels in a favourites list appear in the same order as in the normal channel list, regardless of the order you added them.
THE LOCK PIN
Some of the Plaza HD•T2's menu functions can be locked to avoid accidental changes to the receiver's setup, and you can lock particular channels to prevent some family members, such as children, from watching them.
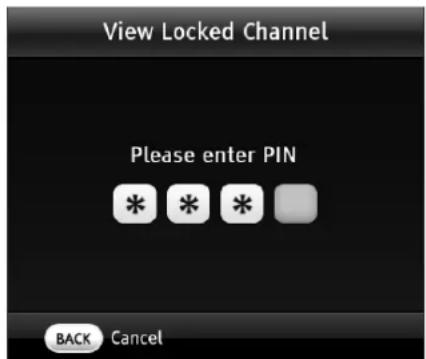
To use a locked menu function or watch a locked channel, you need to enter the four-digit PIN that you set when you first installed the Plaza HD•T2. You can change the lock PIN, without re-installing the receiver, as explained later in this section.
DISPLAY MODE
Most Freeview programmes are broadcast using a widescreen 16:9 format, designed for a widescreen TV. If you watch a widescreen broadcast on a squarer 4:3 television, or a 4:3 broadcast on a widescreen TV, the Plaza HD•T2 provides a choice of how the image is displayed. Pressing the MODE button will take you through the three available options.
If you have set up your receiver for a 16:9 Widescreen TV, the options are:
- Auto - the broadcaster chooses the best display format.
- Widescreen - a 4:3 broadcast is stretched to fill the 16:9 screen.
- Pillarbox – a 4:3 broadcast is shown unaltered with black bars on each side.
If you have set up your receiver for a 4:3 Traditional TV, the options are:
- Auto - the broadcaster chooses the best display format.
- Centre Cut-out - a 16:9 broadcast is cropped to show only the centre of the image.
- Letterbox - a 16:9 broadcast is shown unaltered with black bars above and below it.
CHANGING THE CHANNEL LIST
The channel list contains all the Freeview channels that the Plaza HD•T2 found when it was first installed, and may include some channels that you do not watch, do not want to include in the on-screen list, or do not want some members of your family to watch.
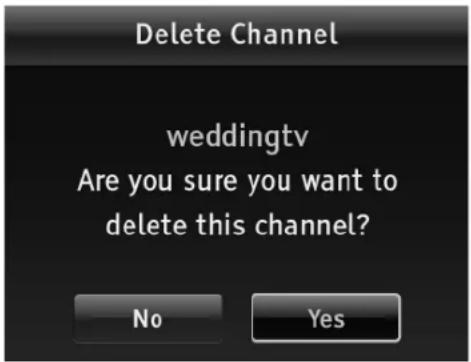
If you want to alter the channel list, first press the LIST button to display the channel list screen. To remove a channel, highlight it and press the red button to delete the channel. You need to confirm your choice to ensure you don't delete a channel accidentally.
You can lock a channel to prevent it being selected for viewing without first entering the lock PIN. Highlight the channel and press the yellow button to lock it. A padlock symbol is shown next to all locked channels in the channel list.
HINT: If you want to unlock a channel that you have locked before, highlight it in the channel list and press the yellow button. You will need to enter the PIN to complete the process.
USING THE SETUP MENUS
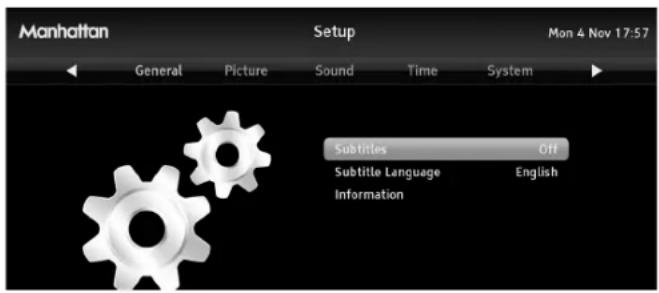
You display the Plaza HD•T2's setup menu by pressing the MENU button on the remote control. This shows the five sections in a bar across the top of the screen with the first section highlighted in red. The menu options for the highlighted section are listed below, along with a picture representing that section.
You can choose between the menu sections by pressing the
GENERAL MENU SECTION
Highlight the option you want to alter using the AND buttons. When you have finished making the changes you want, leave the menu system by pressing BACK or EXIT.
SUBTITLES
Press OK to switch on subtitles for all programmes that provide them. Switch subtitles off by pressing OK again.
You can toggle this setting quickly by pressing AD whilst watching TV.
SUBTITLE LANGUAGE
Programmes can be broadcast with subtitles available in a number of languages. The Plaza HD•T2 is set to English subtitles, but you can change this setting by pressing OK to show the subtitle language menu.
Use and to highlight the language you want for subtitles (if available) and press OK.
INFORMATION
Press OK to show technical information about your receiver, including the Helpline phone number, signal strength and quality readings.
HINT: We recommend that you have this screen displayed on your TV if you need to phone the Plaza HD•T2 helpline.
PICTURE MENU SECTION
Highlight the option you want to alter using the and buttons. When you have finished making the changes you want, leave the menu system by pressing BACK or EXIT.

SCREEN TYPE
Press OK to show the screen type menu and use the ▲ and √ buttons to choose between 16:9 Widescreen and 4:3 Traditional. Press OK to confirm your choice.
HINT: This setting overrides the screen type you selected when you first installed the receiver.
DISPLAY MODE
Press OK to show the display mode menu and use the ▲ and √ buttons to choose between Auto, Centre Cut-Out, and Letterbox, if the screen type is set to 4:3 Traditional, or between Auto, Widescreen, and Pillarbox if the screen type is set to 16:9 Widescreen. Press OK to confirm your choice. See Advanced Use - Display Mode (page 23) for more information.
HINT: This menu option has the same effect as the MODE button.
HDMI RESOLUTION
Press OK to show the HDMI resolution menu and use the ▲ and ▼ buttons to choose the correct resolution for your TV. You should set the HDMI resolution to the highest that your television can display (see your television's manual). If in doubt, set the resolution to 720p. Press OK to confirm your choice.
HINT: If you set an incompatible resolution or move your receiver to a different TV that doesn't support the active resolution, ensure the receiver is turned on and then press and hold the MODE button for 10 seconds. The resolution will be changed to 720p, which is supported by all HD televisions.
SCART MODE
Press OK to show the SCART mode menu and use the ▲ and ▼ buttons to choose between Composite and RGB for the correct output for a television connected to the receiver's TV SCART output. Press OK to confirm your choice.
HINT: The RGB setting will usually produce the best quality SCART picture but a few televisions cannot accept this signal (see your TV manual). This setting has no effect on the receiver's HDMI output.
SOUND MENU SECTION
Highlight the option you want to alter using the and buttons. When you have finished making the changes you want, leave the menu system by pressing BACK or EXIT.
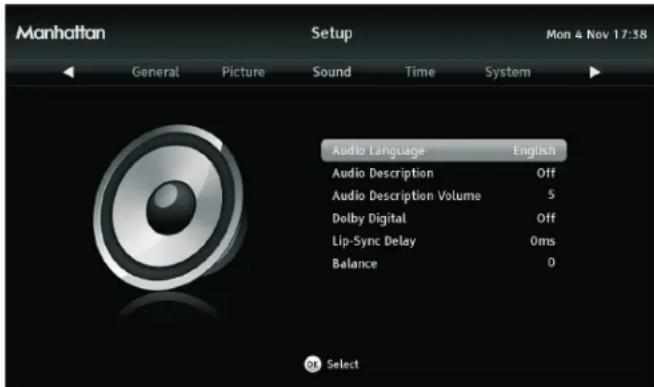
AUDIO LANGUAGE
The Freeview channels can broadcast in a number of languages. The Plaza HD•T2 is set to the English, but you can change this setting by pressing OK to show the audio language menu.
Use and to move the red highlight bar to the language you want for the soundtrack and press OK.
AUDIO DESCRIPTION
Press OK to switch on audio description for all programmes that provide it. Switch audio description off by pressing OK again.
You can toggle this setting quickly by pressing AD whilst watching TV.
AUDIO DESCRIPTION VOLUME
Press OK to show the audio description volume menu on top of the normal TV picture, then use the
DOLBY DIGITAL
Press OK to switch on the Dolby Digital surround sound output from the S/PDIF and HDMI sockets, for all programmes that provide it (channels with Dolby Digital sound available show the symbol in the information bar). Switch off Dolby Digital by pressing OK again. Only turn this on if you have connected your Plaza HD•T2 to a product that supports Dolby Digital.
Warning! If you switch Dolby Digital on and your TV or sound system does not support it, you will not hear any audio on HD channels.
HINT: The volume level of Dolby Digital is fi xed, therefore you cannot use the volume control buttons when you watch programming with Dolby Digital.
SOUND MENU SECTION (continued)
LIP-SYNC DELAY
If you are using the S/PDIF output with a sound system and find the sound and picture falling out of sync, you can delay the sound output by a small amount to compensate.
Press OK to show the lip-sync delay menu on top of the normal TV picture, then use the
BALANCE
You can alter the volume balance between the left and right stereo sound outputs by pressing OK to show the balance menu and using the
TIME MENU SECTION
Highlight the option you want to alter using the and buttons. When you have finished making the changes you want, leave the menu system by pressing BACK or EXIT.

AUTO STANDBY
To conserve power, the Plaza HD•T2 will switch to standby after three hours if no buttons are pressed on the remote control or front panel. The Auto standby function is normally turned on, and can be turn off by pressing the OK button.
SLEEP TIMER
Press OK to show the sleep timer menu and use the ▲ and ▼ buttons to choose a time up to 90 minutes after which the receiver automatically switches itself to standby. Press OK to confirm your choice.
AUTO TURN ON
You can set the Plaza HD•T2 to switch on automatically at a particular time. Press OK to show the auto turn on menu and use the < or > buttons to set the timer to turn the receiver on once, every day, each week, on weekdays, weekends, or particular days of the week. Then use the and buttons, along with the , < > and the number buttons to set the switch-on time, the channel source (Freeview TV or radio), the channel number and the sound volume. Press OK to confirm.
AUTO TURN OFF
You can set the receiver to switch off automatically at a particular time. Press OK to show the auto turn off menu and use the
SYSTEM MENU SECTION
Highlight the option you want to alter using the and buttons. When you have finished making the changes you want, leave the menu system by pressing BACK or EXIT.

RETUNE
Press OK to retune all the Freeview channels. If you retune Freeview, you will lose all channels from the favourites lists (but not the lists' names), remove any channel locks you have set, and restore channels deleted from the channel list.
MANUAL SCAN
During installation or retune, the Plaza HD•T2 scans the entire TV spectrum for channels, which can take a while. The Manual Scan functionality is much quicker as it scans only a specific part of the spectrum.
SYSTEM MENU SECTION (continued)
Press OK to display the Manual Scan menu. Enter the UHF channel (21 - 68), frequency (474Mhz - 850Mhz) and bandwidth (7MHz or 8MHz) to be scanned. You can use the number buttons (0-9) to enter the channel and frequency, or use ◀and ▶to enter the channel, frequency and bandwidth. When ready, press OK to start scanning.
The Plaza HD•T2 will take a few seconds to complete the scan. Whilst scanning, it displays the services found so far, and when finished a list of all services found.
You can view a service from this list by highlighting it and then pressing the OK button. Channels that are not part of the default Freeview channel list for your region are added at the end of the main Freeview lists in the 800-range.
Please note that when browsing channels in the EPG that are on a different platform (e.g. Saorview in Ireland), you may find that programme data is unavailable, or unavailable until you select a channel from that platform.
See the Connecting to Your Network section (page 32) for full details on how to set up your Plaza HD-T2 to use Apps.
5V ANTENNA POWER
Some antennas that are installed with a signal amplifi er need a power supply from the receiver because they do not have their own. If you have connected such a signal amplifi er, the Plaza HD•T2 can supply it with a +5V DC supply. Press OK to turn this on or off.
HINT: Almost all normal aerial installations will not require this to be turned on. Only do so if instructed to by your aerial's user guide or your installer.
RF LOOP THROUGH IN STANDBY
The ANT OUT output on the back of the Plaza HD•T2 is disabled in standby by default to reduce energy consumption. This means that if you have connected your TV to this output, it will not be able to get reception when the Plaza HD•T2 in standby. Press OK to turn on or off RF Loopthrough in Standby.
PARENTAL GUIDANCE
Press OK to turn on or off the parental guidance lock. This prevents watching any programme broadcast with a 6 parental guidance warning, or displaying the system menu, without fi rst entering the lock PIN.
SET LOCK PIN
Press OK to show the set lock PIN menu. Change your PIN by first entering your current PIN and then entering and confi rming your choice of new PIN.
SOFTWARE UPDATE VIA OAD
Press OK to turn on or off the automatic software update.
OAD SOFTWARE MANUAL SCAN
Press OK to immediately search for new software to download.
SOFTWARE UPDATE VIA USB
Press OK to load new software for the receiver from a storage device connected to the USB socket on the back of the receiver. The device must be formatted with the FAT32 file system. Please refer to the documentation from your operating system for more information.
We recommended you use a USB stick as many Hard Disks require more power than a single USB socket can provide. If using such a hard disk, please ensure it has an external power supply.
RESTORE FACTORY DEFAULT
Press OK to revert all the receiver settings to what they were when you first got your receiver and to start the installation procedure described in the Preparation section of this guide.
You must enter the lock PIN, and then confirm in another menu, to start the process because it will delete all channels, favourite channels, favourite channel list names, and the receiver configuration.
5
Connecting To Your Network
This section explains how to set up the Plaza HD•T2 to use Apps such as BBC iPlayer and YouTube. You must have a broadband Internet connection with a minimum sustained speed of 3Mbps for HD content.
AUTOMATIC (DHCP)
Ensure the ETHERNET socket at the back of the Plaza HD•T2 is connected to your router or hub. See the Connecting your receiver section (page 10) for more information.
HINT: If the receiver has made a connection with your modem or home network, one or both of the small green and orange lights immediately above the RJ-45 socket will light and/or flicker.
You can check that the receiver has successfully connected to the Internet from the information menu. Press MENU to display the General menu and use the button to highlight the "Information" option, then press OK.
If the IP address item shows a number in four sections separated by dots, then the receiver is connected to your local network. If online services still do not work, you should check your router's connection to the internet. If "Not Connected" is shown, you should carefully check the broadband connection and the Network Configuration.
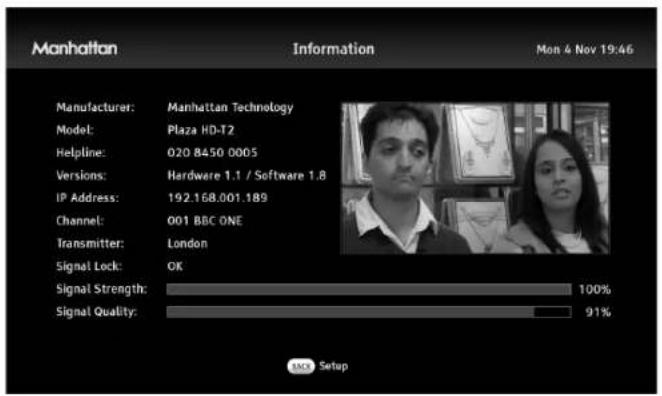
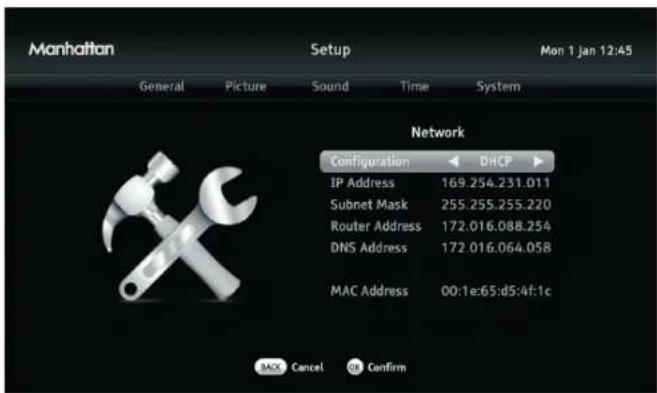
Press the MENU button on the remote control and then press < to display the System menu. You should check that the Network Configuration menu option shows "DHCP" to automatically configure the network connection.
HINT: Consult the manual or supplier for your modem/router or network for help choosing the correct addresses.
MANUAL (STATIC)
If your broadband modem/router is not compatible with DHCP (Dynamic Host Conf i guration Protocol), or you wish to manually confi gure the Network Conf i guration and IP address, press OK to select the Network Conf i guration option.
Use the
Highlight each of the four "octets" that is to be changed, enter the number required using the number buttons, and press OK to confirm that address. When all four addresses have been set correctly, press OK to set the configuration and return to the system menu page.
Appendix A - Safety
POWER
Your receiver requires a 100V to 240V AC \~ 50Hz mains supply and is fitted with a moulded plug. The mains plug is used as the disconnect device and shall remain readily operable. The USB port maximum load is 500mA under normal operation.
CABLES
Make sure all cables are positioned so they are not likely to be walked on, crushed or damaged by things placed on or against them. Pay particular attention to the power cable where it goes into the socket and where it comes out of the receiver. Do not connect or adjust cables to the receiver when it is plugged in.
TEMPERATURE AND MOISTURE
Use the apparatus only in moderate climates (not in tropical climates). Do not allow it to get wet as this is dangerous. Do not expose the apparatus to dripping or splashing. Do not place objects filled with liquids, such as vases, on the apparatus.
HEAT AND FLAMES
Do not place the apparatus near to naked flames or sources of intense heat, such as an electric fire. Do not place naked flame sources, such as lighted candles on the apparatus. Batteries shall not be exposed to excessive heat such as sunshine, fire or the like.
VENTILATION
Slots and openings in the receiver's cover are for ventilation. Ensure a minimum distance of 5cm around the apparatus for sufficient ventilation. Ensure the ventilation is not impeded by covering the ventilation opening with items such as newspapers, table-cloths, curtains, etc. Failure to follow these instructions could lead to the receiver overheating.
CLEANING
Unplug the receiver before you clean it with a lightly dampened cloth. Do not use liquid or aerosol cleaners.
LIGHTNING
If there is a storm or lightning, unplug the receiver.
SERVICING
Make sure that anyone who services your receiver is qualified to do so. Do not remove the cover yourself – you could get an electric shock.
REPLACEMENT PARTS
If your receiver needs repairing, make sure the person carrying out the repair uses parts which are specified by us or which have the same specifications as the original part. Other parts may cause a fire, electric shock or other dangers.
ELECTRICAL SAFETY
Your receiver requires a 100V to 240V AC \~ 50/60Hz mains supply and is fitted with a moulded plug. If the plug breaks or becomes damaged do not use it. If you change the fuse in the plug ensure you refit the fuse cover. If the plug requires replacement please follow these instructions. The wires in the mains lead are coloured in accordance with the following code:
BLUE - Neutral
BROWN - Live

As the colours in the mains lead of this appliance may not correspond with the coloured markings identifying the terminals in your plug, proceed as follows:
The wire which is coloured blue or black must be connected to the terminal which is marked with the letter N or coloured Black. The wire which is coloured brown or red must be connected to the terminal which is marked with the letter L or coloured Red. No connection is to be made to the Earth terminal of the plug as this product is double insulated.
If a 13 Amp (BS1363) Plug is used, fit an ASTA approved (BS1362) 3 Amp fuse only. Your product is fitted with a moulded plug. If it requires replacement please cut off and dispose of safely, then rewire as shown opposite.
PROTECTING THE ENVIRONMENT

If you one day find that your receiver or remote control needs replacing, or are of no further use to you, do not throw them out with your household waste. Under the Waste Electrical and Electronic Equipment (WEEE) regulations, your local council must provide a suitable recycling centre.
Do not throw batteries in the bin or on a fire. Make sure that you dispose of batteries safely at a local recycling centre. You can also recycle batteries at many supermarkets.
Appendix B - Troubleshooting
| PROBLEM POSSIBLE CAUSE WHAT TO DO | ||
| Power light off | Power supply cable disconnected. Check the power supply cable. | |
| No set up screen | Receiver not switched on. | Check the mains power cable is plugged in and mains socket is turned on. Turn on receiver. |
| HDMI/SCART cable disconnected. | Check HDMI/SCART cable connection to receiver and television. | |
| Television not switched to HDMI/SCART input. | Select television's HDMI/SCART input. | |
| ‘Signal lock failed’ or ‘No signal’ message | Cable from your aerial is disconnected. | Check the cable connections from your aerial. Consult a professional if necessary. |
| Inadequate signal. | Reinstall or re-align your TV aerial. Consult your installer if necessary. | |
| No channels were found when searching for channels, some channels are missing | Inadequate signal. | Your signal may be weak. Get a professional to check your installation; your aerial may provide a better signal if it is realigned or moved somewhere else. Please remember that older aerials and indoor aerials aren't as effective as new outdoor and roof aerials. As a last resort, try using a signal amplifier or booster to improve reception. |
| Some TV channels are not available in every area. | Use the postcode checker on www.freeview.co.uk. | |
| Full picture not visible | Mismatched screen format or that is how the programme is being broadcast. | Using the Picture menu, choose the correct screen type and display mode to suit your TV (see page 25). |
| No picture or sound | HDMI/SCART cable disconnected. | Check HDMI/SCART cable connections at receiver and television. |
| Television not switched to HDMI/SCART input. | Select television's HDMI/SCART input. | |
| No picture via HDMI | Selected an incompatible HDMI resolution - many TVs don't support 1080p or 1080i, but only 720p. | Whilst the receiver is on, press and hold the MODE button for 10 seconds and the resolution will be changed to 720p. |
| The picture and sound keeps breaking up | Inadequate signal. | Your signal may be weak. Get a professional to check your installation; your aerial may provide a better signal if it is realigned or moved somewhere else. Please remember that older aerials and indoor aerials aren't as effective as new outdoor and roof aerials. As a last resort, try using a signal amplifier or booster to improve reception. |
| Channels are not working after I moved the Plaza HD•T2 to a different house | The house is in a different Freeview area and needs to be retuned. | Follow the retuning steps on p29. |
| Cannot view a channel | Wrong channel number used. Choose the channel from Channel List. | |
| Channel locked. | Enter your PIN. If you have forgotten it, please contact us for the master PIN. | |
| TV picture not HD | Tuned to an SD channel. Tune to an HD channel. | |
| TV not capable of HD. Connect the receiver to an HD-Ready TV. | ||
| TV connected by SCART. Connect the TV with the HDMI lead. | ||
| No response with remote control | Receiver in standby. Switch on the receiver. | |
| Remote control not aimed at the receiver correctly. | Aim the remote control at the receiver. | |
| Remote sensor on the front of the receiver is obstructed. | Check for obstructions in front of the receiver. | |
| Receiver switches off after 3 Hrs | Auto Standby is on. Turn off the Auto Standby in the Time menu. | |
| No information for a channel in the programme guide | Information on the channel not downloaded. Wait for the download. | |
| No digital text or interactive services | Services not available on chosen channel. | Switch to a channel broadcasting interactive services. |
| Apps don't open | No connection to Internet. | Check broadband connection and network configuration in system menu. |
| Can't access System menu | You have forgotten your PIN. Please contact us for the Master PIN. | |
Appendix C - Specifications
| Tuner | Standard DVB T / T2 | |
| Input frequency 474~858 MHz | ||
| Signal input level -65dBm to -20 dBm | ||
| Input connector IEC 169-2 Female (PAL) | ||
| Loop out connector IEC 169-2 Male (PAL) | ||
| Video | HDMI output Resolution 576i / 576p / 720p / 1080i /1080p | |
| SCART output CVBS/RGB | ||
| RCA output | CVBS | |
| Aspect ratio | 4:3, 16:9 & Letterbox | |
| Audio | SCART & RCA Audio left and right | |
| Co-Axial S/PDIF output | Dolby Digital, Dolby Digital + & PCM | |
| USB | Host | 2.0 (5V@500mA max). For software upgrade only. |
| Internet Connectivity | Ethernet | RJ-45 10/100 Base-T |
| Power Requirements | Mains input voltage | 100-240V AC~ 50/60Hz |
| Power consumption | Max 12W (Standby Less than 0.5W) | |
| Dimensions | Width x Depth x Height | 210mm x 137mm x 41mm |
| Weight | Receiver only | 550 grams |
Appendix D - Guarantee & Legal
GUARANTEE
The product is guaranteed for 12 months from the date of original purchase. If there's any defect due to faulty materials or workmanship, please contact us and have your receipt of purchase available for reference. The guarantee is subject to the following provisions:
- It is only valid within the boundaries of the country of purchase.
- The product must be correctly installed and operated in accordance with the instructions contained in this user guide.
- The guarantee will be rendered invalid if the digital box is re-sold or has been damaged by inexpert repair.
- The manufacturer disclaims any liability for incidental or consequential damages.
- This guarantee is in addition to, and does not diminish, your statutory or legal rights.
DISCLAIMER
This product includes third party online services (“Apps”) such as iPlayer and YouTube. To enjoy these services you may need to create an account with the third party service or use additional equipment and membership fees may apply. Your use of these services, and the content made available through them, will be governed by the third party provider’s terms and conditions and privacy policy, so please make sure that you read them.
As we have no control over these services nor your Internet access, we cannot guarantee the availability of such services nor that your access to, or use of, such services will be uninterrupted or problem-free. We are neither responsible nor liable for any customer service or support relating to these third party services and any enquires should be made directly to the respective third party service providers.
Sometimes, these third parties may make changes to their Internet-based services which may require updates to the software installed in your product. Although we will make every effort to make these updates available during the life-cycle of this product, we may do so in a number of different ways e.g. they may be initiated automatically or require download from our website and manual installation by you.
EXCLUSIONS
In view of the above, there are certain things for which we exclude our liability and certain things for which we do not, as explained below.
We do not exclude or limit our liability for any of the following:
- death or personal injury caused by our negligence, fraud or fraudulent misrepresentation;
• defective products under the Consumer Protection Act 1987; or - any other matter for which it would be illegal or unlawful for us to limit, exclude or attempt to exclude our liability.
What we do exclude:
Except as set out in the preceding paragraph, we exclude all liability for any losses, whether in contract or tort, for any direct, indirect, incidental, special or consequential damages (including any legal fees and expenses you incur and for any lost data, opportunity, goodwill, revenue or profits) or any other damages arising out of or in connection with:
- any information or data contained in the product;
• the use of the product; or - any content or service accessed by you or any third party.
In view of the services which are outside our control as explained above, in particular we exclude all liability for any losses that you may suffer arising from any of the following:
- the availability (or unavailability), speed and quality of the Internet connection to your product;
- the availability (or unavailability), suspension, removal or termination of any third party content or service including of the language or the features supported by that service; and
- any change to third party content or services (including any associated APIs) that affects the functionality of the software installed in the product (e.g. Apps).
YOUR PRIVACY
We do not collect or process any of your personal data using this product nor do we store or access any 'cookies' on its hard drive. However, the third party services that you access using this product may collect, store and process personal information about you and may also use features such as cookies. Cookies are small data files sent to your product from a web server that are stored on your product's hard drive and can be read by the third party services that you access using the product.
We strongly recommend that you read the privacy and cookie policy of each service that you use as it will apply to the personal information collected and the cookies stored and accessed when you use those services through this product. The policies will also include details of the purposes for which your personal information and any cookies are used by the provider of the third party service you access.
Manhattan

FreeviewHD
For assistance, please call the
Manhattan helpline on
020 8450 0005
or visit our website at
www.manhattan-tv.com
- WELCOME
- FURTHER INFORMATION
- FREEVIEW
- MANHATTAN
- CONTENTS
- ADVANCED USE (CONTINUED)
- CONNECTING TO YOUR NETWORK 32
- IN THE BOX
- YOUR RECEIVER
- MANHATTAN PLAZA HD•T2
- REMOTE CONTROL PLAZA HD•T2
- PREPARATION
- CONNECTING YOUR RECEIVER
- SWITCHING ON (CONTINUED)
- TUNING IN
- 3
- EVERYDAY USE
- TURNING ON THE RECEIVER
- CHANGING CHANNELS
- CHANGING THE VOLUME
- BROWSING BAR
- I NEVER MIND THE BUZZCOCKS
- SUBTITLES AND AUDIO DESCRIPTION
- USING THE CHANNEL LIST
- SEARCHING FOR A CHANNEL
- USING THE PROGRAMME GUIDE
- USING APPS
- INTERACTIVE TV SERVICES
- ADVANCED USE
- USING THE FAVOURITES LISTS
- THE LOCK PIN
- DISPLAY MODE
- CHANGING THE CHANNEL LIST
- USING THE SETUP MENUS
- GENERAL MENU SECTION
- SUBTITLES
- SUBTITLE LANGUAGE
- INFORMATION
- PICTURE MENU SECTION
- SCREEN TYPE
- HDMI RESOLUTION
- SCART MODE
- SOUND MENU SECTION
- AUDIO LANGUAGE
- AUDIO DESCRIPTION
- AUDIO DESCRIPTION VOLUME
- DOLBY DIGITAL
- SOUND MENU SECTION (CONTINUED)
- LIP-SYNC DELAY
- BALANCE
- TIME MENU SECTION
- AUTO STANDBY
- SLEEP TIMER
- AUTO TURN ON
- AUTO TURN OFF
- SYSTEM MENU SECTION
- RETUNE
- MANUAL SCAN
- SYSTEM MENU SECTION (CONTINUED)
- 5V ANTENNA POWER
- RF LOOP THROUGH IN STANDBY
- PARENTAL GUIDANCE
- SET LOCK PIN
- SOFTWARE UPDATE VIA OAD
- OAD SOFTWARE MANUAL SCAN
- SOFTWARE UPDATE VIA USB
- RESTORE FACTORY DEFAULT
- 5
- CONNECTING TO YOUR NETWORK
- AUTOMATIC (DHCP)
- MANUAL (STATIC)
- APPENDIX A - SAFETY
- POWER
- CABLES
- TEMPERATURE AND MOISTURE
- HEAT AND FLAMES
- VENTILATION
- CLEANING
- LIGHTNING
- SERVICING
- REPLACEMENT PARTS
- ELECTRICAL SAFETY
- PROTECTING THE ENVIRONMENT
- APPENDIX D - GUARANTEE & LEGAL
- GUARANTEE
- DISCLAIMER
- EXCLUSIONS
- YOUR PRIVACY
Brand : MANHATTAN
Model : Plaza HD-T2
Category : Receiver