
Concerta B8 - Subwoofer Revel - Free user manual and instructions
Find the device manual for free Concerta B8 Revel in PDF.


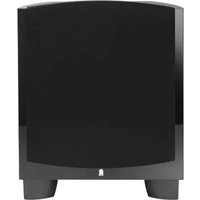
| Type | Powered subwoofer |
| Model | Concerta B8 |
| Brand | Revel |
| Low-Frequency Transducer | 8" (200mm) down-firing cone |
| Amplifier Power (Continuous) | 200 watts |
| Amplifier Power (Peak) | 400 watts |
| Frequency Response | 45 Hz – 200 Hz (-6 dB) |
| Enclosure Type | Sealed |
| Wireless Technology | 2.4 GHz, up to 4 selectable channels |
| Controls | Volume, Phase (Normal/Reverse), Bass Boost (On/Off), Power On Mode (On/Auto) |
| Input Connections | LFE (RCA), Line-Level L/R (RCA) |
| External Trigger Input | 3.5mm mini jack, 3-30V AC/DC |
| Power Requirement (Subwoofer) | 120V, 60Hz (USA) / 220-240V, 50/60Hz (EU) |
| Power Consumption (Standby) | < 0.5W |
| Power Consumption (Maximum) | 243W (120V) / 261W (230V) |
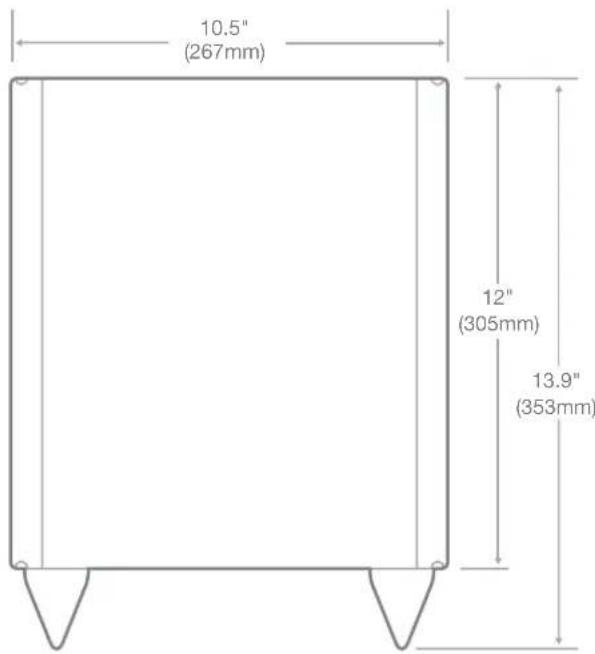
| Subwoofer Dimensions (H x W x D) | 13-29/32" x 10-1/2" x 10-1/2" (353 mm x 267 mm x 267 mm) |
| Subwoofer Weight | 19.8 lb (9 kg) |
| Transmitter Dimensions (H x W x D) | 1-3/8" x 5" x 3-1/2" (35 mm x 127 mm x 89 mm) |
| Transmitter Weight | 0.26 lb (117 g) |
| Transmitter Power Requirement | 100-240V AC, 50/60Hz |
| Transmitter Power Consumption | < 0.5W |
| Included Accessories | Wireless transmitter, transmitter power supply, AC cord, LFE/trigger cable |
Frequently Asked Questions - Concerta B8 Revel
User questions about Concerta B8 Revel
0 question about this device. Answer the ones you know or ask your own.
Ask a new question about this device
Download the instructions for your Subwoofer in PDF format for free! Find your manual Concerta B8 - Revel and take your electronic device back in hand. On this page are published all the documents necessary for the use of your device. Concerta B8 by Revel.
USER MANUAL Concerta B8 Revel
Revel B8 Wireless Subwoofer Owner's Manual

natural_image
Simple line drawing of a rectangular object with two side supports and a central label 'REVEL' (no other text or symbols)
natural_image
Simple line drawing of a rectangular object with a horizontal line and a small labeled component on the right side (no text or symbols)
IMPORTANT SAFETY INSTRUCTIONS
- Read these instructions.
- Keep these instructions.
- Heed all warnings.
- Follow all instructions.
- Do not use this apparatus near water.
- Clean only with a dry cloth.
- Do not block any ventilation openings. Install in accordance with the manufacturer's instructions.
- Do not install near any heat sources such as radiators, heat registers, stoves or other apparatus (including amplifiers) that produce heat.
- Do not defeat the safety purpose of the polarized or grounding-type plug. A polarized plug has two blades with one wider than the other. A grounding-type plug has two blades and a third grounding prong. The wide blade or the third prong is provided for your safety. If the provided plug does not fit into your outlet, consult an electrician for replacement of the obsolete outlet.
- Protect the power cord from being walked on or pinched, particularly at plugs, convenience receptacles and the point where they exit from the apparatus.
- Only use attachments/accessories specified by the manufacturer.
- Use only with the cart, stand, tripod, bracket or table specified by the manufacturer or sold with the apparatus. When a cart is used, use caution when moving the cart/apparatus combination to avoid injury from tip-over.
- Unplug this apparatus during lightning storms or when unused for long periods of time.
-
Refer all servicing to qualified service personnel. Servicing is required when the apparatus has been damaged in any way, such as power supply cord or plug is damaged, liquid has been spilled or objects have fallen into the apparatus, or the apparatus has been exposed to rain or moisture, does not operate normally or has been dropped.
-
Do not expose this apparatus to dripping or splashing and ensure that no objects filled with liquids, such as vases, are placed on the apparatus.
- The mains plug is used as disconnect device, the disconnect device shall remain readily operable.
- WARNING: Apparatus shall be connected to a MAINS socket outlet with a protective earthing connection.


The lightning flash with arrowhead symbol, within an equilateral triangle, is intended to alert the user to the presence of uninsulated "dangerous voltage" within the product's enclosure that may be of sufficient magnitude to constitute a risk of electric shock to persons.
Warning: To reduce the risk of electric shock, do not remove cover (or back) as there are no user-serviceable parts inside. Refer servicing to qualified personnel.

The exclamation point within an equilateral triangle is intended to alert the user to the presence of important operating and maintenance (servicing) instructions in the literature accompanying the product.
WARNING: To reduce the risk of fire or electric shock, do not expose this apparatus to rain or moisture. Operating Temperature 35irc C.
TABLE OF CONTENTS
About Revel 10 2
Introduction....3
Subwoofer and Transmitter Controls....3
Placing The Subwoofer 4
Connecting The Subwoofer....5
Operating Your Subwoofer....6
Specifications....7
Congratulations and Thank You for purchasing your new Revel 80 B8 Wireless Subwoofer.
Please take the time to read the following installation and setup information in order to optimize the performance of your wireless subwoofer.
ABOUT REVEL®
Since 1996, Revel ® has stood at the forefront of loudspeaker design and performance. Backed by Harman International's world leading research and design facilities, Revel ® loudspeakers benefit from cutting-edge resources such as:
- Multiple large anechoic chambers which allow for precise testing and measurements.
- A multi-channel listening lab for double-blind, position independent listening tests.
- A laser interferometer that enables detailed driver and cabinet analysis.
- Finite element analysis, utilized for advanced loudspeaker modeling.
- A stereo lithography apparatus, which rapidly "builds" tooled parts.
INTRODUCTION
THANK YOU FOR CHOOSING THIS REVEL PRODUCT!
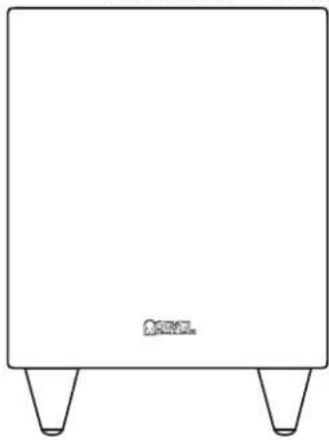
Your new Revel B8 200-watt powered wireless subwoofer incorporates an 8" (200mm) down-firing cone transducer and a built-in, high-performance, 200-watt amplifier that delivers the powerful, dynamic and accurate low-frequency performance that makes your film soundtracks and music come alive. The subwoofer receives its audio signal from the transmitter module via wireless technology, so you can place it anywhere in your room without having to run an audio cable. And to maximize connection flexibility, the subwoofer also features wired connections.
We're confident that this Revel subwoofer will provide every note of enjoyment that you expect—and that when you think about purchasing additional audio equipment, you will once again choose Revel products.
This owner's manual contains all the information you need to set up, connect and adjust your new subwoofer. For more in-depth information, go to our Web site: www.revelspeakers.com.
INCLUDED ITEMS
Wireless Subwoofer Transmitter Module
natural_image
Simple line drawing of a rectangular object with two side supports and a small label 'Q' at the base (no text or symbols on the object itself)
Transmitter Power Supply

Power Supply AC Cord (varies with region)


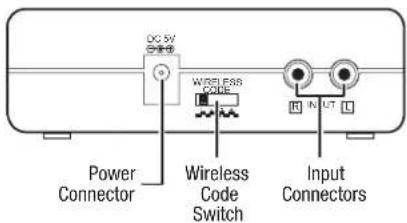
SUBWOOFER REAR-PANEL CONTROLS

TRANSMITTER UNIT
REAR-PANEL CONNECTIONS
AND CONTROLS
SUBWOOFER UNIT
Phase switch: This switch determines whether the subwoofer transducer's piston-like action moves in and out in phase with the satellite speakers. If the subwoofer were to play out of phase with the satellite speakers, the sound waves from the satellites could cancel out some of the subwoofer's sound waves, reducing bass performance and sonic impact. This phenomenon depends in part on the placement of all the speakers in the room. In most cases, the Phase switch should be left in the "Normal" position. However, it does no harm to experiment, and you can leave the Phase switch in the position that maximizes bass response and impact.
Bass Boost switch: Set this switch to "On" to enhance the subwoofer's low-frequency performance. Set this switch to "Off" for normal low-frequency performance.
Power On Mode switch: When this switch is set in the "Auto" position and when the Power switch is set to "On," the subwoofer will automatically turn itself on when it receives an audio signal and will enter the standby mode after it has received no audio signal for about 15 minutes. When this switch is set in the "On" position, the subwoofer will remain on whether or not it is receiving an audio signal. An LED on the subwoofer's top panel indicates whether the subwoofer is in the on or standby state:
- When the LED glows white, the subwoofer is turned on.
- When the LED is not illuminated, the subwoofer is in the standby mode. When the Power switch is set to "Off," the LED will not be illuminated, no matter what setting the Power On Mode switch is in.
Subwoofer Level control: Use this control to adjust the subwoofer's volume. Turn clockwise to increase the volume; turn counterclockwise to decrease the volume.
Input Mode switch: When this switch is in the "Normal" setting, the input signal from the Line-Level L/R In connectors is active. When this switch is in the "LFE" setting, the input signal from the Line-Level LFE In connector is active.
External Trigger Input connector: Use the mini plug of the supplied combination LFE and trigger cable to connect the External Trigger Input connector to the trigger output of another compatible component. Whenever the subwoofer detects a trigger signal between 3V and 30V (AC or DC), its amplifier will turn on. The amplifier will turn off after the trigger signal ceases, even when the Power On Mode switch is in the "Auto" position.
Line-Level LFE In connector: The signal from this connector bypasses the subwoofer's internal low-pass crossover. When you're connecting the subwoofer to the dedicated subwoofer output of a receiver/processor that has its own low-pass crossover network, use the Line-Level LFE In connector. You must also set the subwoofer's Input Mode switch in the "LFE" position.
Line-Level L/R In connectors: The signals from these connectors pass through the subwoofer's internal low-pass crossover. When you're connecting the subwoofer to the preamp or subwoofer outputs of a receiver/processor that does not have its own low-pass crossover network, use both Line-Level L/R In connectors. You must also set the Input Mode switch in the "Normal" position. If your receiver/processor has only one subwoofer output, you can use either the L or R connector.
Wireless Code switch: This switch selects between four different channels for the wireless subwoofer signal.
IMPORTANT: Be sure to set the subwoofer's Wireless Code switch to the same channel that you set the transmitter module's Wireless Code switch. See Wireless Code Switches, on page 7, for more information.
Power switch: Set this switch in the "On" position to turn the subwoofer on. The subwoofer will then be either on or in the standby mode, depending on the setting of the Power On Mode switch.
Power Cord (non-detachable): After you have made and verified all the connections described in this manual, plug this cord into an active, unswitched electrical outlet for proper operation of the subwoofer. DO NOT plug this cord into the accessory outlets found in some audio components.
TRANSMITTER UNIT
Power connector: Plug the transmitter power supply into this connector and into a working AC outlet.
Wireless Code switch: This switch selects between four different channels for the wireless signal.
IMPORTANT: Be sure to set the transmitter unit's Wireless Code switch to the same channel that you set the subwoofer's Wireless Code switch. See Wireless Code Settings, on page 7, for more information.
Input connectors: Connect the supplied LFE cable from your receiver's or processor's subwoofer output to either of the transmitter unit's Input connectors.
PLACING THE SUBWOOFER
The performance of a subwoofer is directly related to its placement in the listening room and its physical position relative to the other speakers in the system.
While it is true that in general our ears do not hear directional sounds at the low frequencies where subwoofers operate, when installing a subwoofer within the limited confines of a room, the reflections, standing waves and absorptions generated within the room will strongly influence the performance of any subwoofer system. As a result, the specific location of the subwoofer in the room does become important to the amount and quality of bass that is produced.
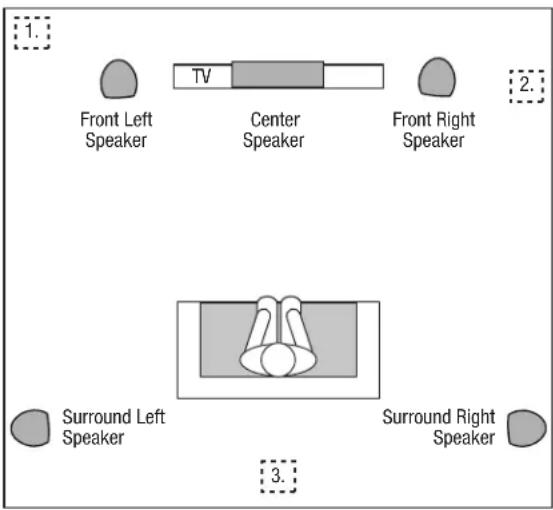
For example, placing the subwoofer next to a wall generally will increase the amount of bass in the room; placing it in a corner (1) generally will maximize amount of bass in the room. However, corner placement can also increase the destructive effect of standing waves on bass performance. This effect can vary depending on the listening position – some listening positions may yield very good results while others may have far too much (or too little) bass at certain frequencies.
In many rooms, placing the subwoofer along the same plane as the left and right speakers (2) can produce the best integration between the sound of the subwoofer and that of the left and right speakers. In some rooms, the best performance could even result from placing the subwoofer behind the listening position (3).
We strongly recommend that you experiment with placement before choosing a final location for your subwoofer. One way you can determine the best location for the subwoofer is by temporarily placing it in the listening position and playing music with strong bass content. Move around to various locations in the room while the system is playing (putting your ears where the subwoofer would be placed), and listen until you find the location where the bass performance is best. Place the subwoofer in that location.
CONNECTING THE SUBWOOFER
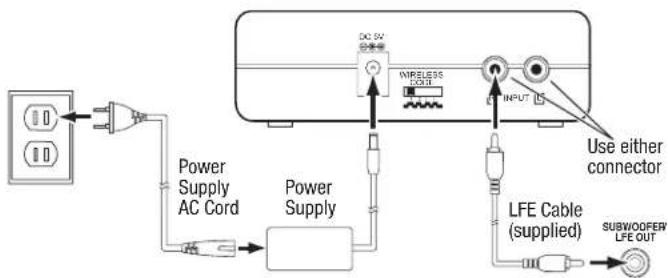
WIRELESS:
flowchart
graph TD
    A["DC 5V"] --> B["Wireless Circuit"]
    B --> C["Input"]
    C --> D["LFE Cable (supplied)"]
    D --> E["Subwoofer LFE OUT"]
    F["Power Supply AC Cord"] --> G["Power Supply"]
    G --> H["Ground"]
- Connect the supplied LFE cable from your receiver's or processor's subwoofer output to either of the transmitter unit's Input connectors.
If your receiver/processor does not have a dedicated subwoofer output but does have a set of preamp-level (volume-controlled) line outputs, use a stereo audio cable (not supplied) to connect them to both of the transmitter unit's Input connectors - Connect the transmitter power supply to the Power connector, and into a working AC outlet,
- Set the Wireless Code switches on the transmitter unit and subwoofer to the same position.
WIRED:
As an alternative to wireless operation, you can connect the subwoofer conventionally, using the supplied audio cable.
NOTE: You can use both the wireless and the wired methods to connect the subwoofer to two different sources. However, if you play both sources at the same time the subwoofer will play bass from them both.
CONNECTING THE SUBWOOFER TO A RECEIVER OR PREAMP/PROCESSOR WITH A DEDICATED SUBWOOFER OUTPUT
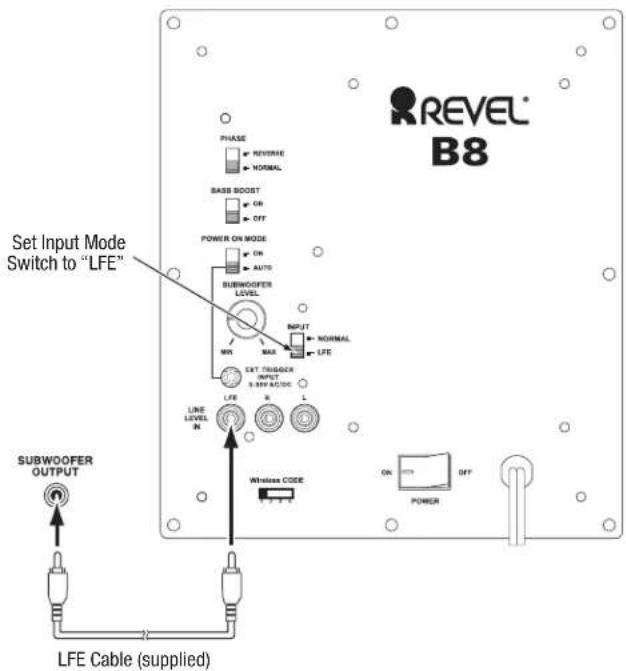
Use this installation method for receivers and preamps/processors that have a dedicated subwoofer output.
Use the supplied LFE cable to connect the subwoofer's Line-Level LFE In connector to the dedicated subwoofer output (or LFE output) of your audio/video receiver or preamp/processor. Set the subwoofer's Input Mode switch in the "LFE" position.
Configure your receiver or preamp/processor's setup menu for "Subwoofer On." After you have made and verified all connections, plug the subwoofer's AC Power Cord into a working AC outlet.
CONNECTING THE SUBWOOFER TO A RECEIVER OR PREAMP/PROCESSOR WITH LINE OUTPUTS

Use this installation method for receivers and preamp/processors that do not have a dedicated subwoofer output but do have preamp-level (volume-controlled) line outputs.
Connect one end of a stereo RCA cable (not supplied) to the receiver's or preamp's line outputs and the other end to the subwoofer's Line-Level L/R In connectors. Set the subwoofer's Input Mode switch in the "Normal" position.
After you have made and verified all connections, plug the subwoofer's AC Power Cord into a working AC outlet.
CONNECTING THE SUBWOOFER TO A TRIGGER VOLTAGE SOURCE

The subwoofer will automatically turn on if it receives a trigger voltage at its External Trigger Input connector and will enter the Standby mode when the voltage ceases.
If your preamp/processor or another audio/video component has a trigger-voltage connection that supplies between 3V and 30V (AC or DC), connect it to the subwoofer's External Trigger Input connector. If the component's trigger-voltage connection has a 3.5mm mini jack, you can use the supplied Trigger cable to make the connection.
NOTE: Do not connect the subwoofer's External Trigger input connector to a remote control output (IR Out) of your home cinema system or surround receiver. Doing so could lead to malfunction.
OPERATING YOUR SUBWOOFER
TURNING THE SUBWOOFER ON AND OFF
Set the subwoofer's Power switch to the "On" position.
If you set the Power On Mode switch to "Auto," the subwoofer will automatically turn itself on when it receives an audio signal, and it will go into the standby mode after it has received no audio signal for 15 minutes. The subwoofer's LED will glow white when the subwoofer is on and will not be illuminated when the subwoofer is in the standby mode.
If you set the Power On Mode switch to "On," the subwoofer will remain on at all times. The subwoofer's LED will glow white.
If you connect the subwoofer's External Trigger Input connector to a trigger-voltage source, the subwoofer will turn on whenever a trigger voltage is present and will enter the standby mode after the trigger voltage ceases, regardless of the position of the Power On Mode switch.
If you will be away from home for an extended period of time, or if you will not be using the subwoofer for an extended period, switch the Power switch to the "Off" position.
WIRELESS OPERATION
When the wireless transmitter receives an audio signal from the source, it will immediately turn on and the status LED will change to flashing green or solid green:
Green (flashing): Transmitter is on but has not established a link with the wireless subwoofer
Green (solid): Transmitter is on and has already established a link with the wireless subwoofer.
Red: Standby (no signal detected, transmitter off)
The transmitter will automatically enter the Standby mode after no audio signal is detected from the source for approximately 10 minutes.
WIRELESS CODE SETTINGS
The Wireless Code selectors on the transmitter unit and subwoofer must be set to the same position for the system to function correctly.
In the unlikely event that there is interference when operating the system, or if you have more than one Revel B8 operating, you may change the channel at which the system operates. Set the Wireless Code selectors on one subwoofer's transmitter module and subwoofer to one of the other three positions.
You can also set up a maximum of two subwoofers to receive audio from the a single transmitter by setting the Wireless Code selectors on the transmitter and both of the subwoofers to the same position.
SUBWOOFER ADJUSTMENTS: VOLUME
Use the Subwoofer Level Control to set the subwoofer's volume. Turn the knob clockwise to increase the subwoofer's volume; turn the knob counterclockwise to decrease the subwoofer's volume.
Notes on Setting Subwoofer Volume:
Sometimes the ideal subwoofer volume setting for music is too loud for films, while the ideal setting for films is too quiet for music. When setting the subwoofer volume, listen to both music and films with strong bass content and find a "middle ground" volume level that works for both.
If your subwoofer always seems too loud or too quiet, you may want to place it in a different location. See Placing the Subwoofer, on page 4, for more information.
SUBWOOFER ADJUSTMENTS: PHASE
The Phase switch determines whether the subwoofer's piston-like action moves in and out in phase with the satellite speakers. If the subwoofer were to play out of phase with the satellite speakers, the sound waves from the satellites could cancel out sound waves from the subwoofer, reducing bass performance and sonic impact. This phenomenon depends in part on the placement of all the speakers in the room.
Although in most cases the Phase switch should be left in the "Normal" position, there is no absolutely correct setting for the Phase switch. When the subwoofer is properly in phase with the satellite speakers, the audio will be clearer, have maximum impact and make percussive sounds like drums, piano and plucked strings sound more lifelike. The best way to set the Phase switch is to listen to music that you know well and set the switch in the position that gives drums and other percussive sounds maximum impact.
SUBWOOFER ADJUSTMENTS: BASS BOOST
When set to the "On" position, the Bass Boost switch enhances low-frequency performance, resulting in bass with more impact, which you may prefer while watching movies or listening to music. There is no harm in experimenting with this control. Setting the switch to the "Off" position will return normal low-frequency performance to your system.
SPECIFICATIONS
| Low-frequency transducer: 8" (200mm) down-firing cone | |
| Amplifier power: 200 watts (continuous), 400 watts (peak) | |
| Frequency response: 45Hz - 200Hz (-6dB) | |
| Controls: Volume, phase, bass boost | |
| Connections: LFE (RCA-type); left and right line-level (RCA-type) | |
| Enclosure type: Sealed | |
| External trigger input voltage: 3 - 30 volts, AC or DC | |
| Subwoofer power requirement: 120V, 60Hz (USA); 220V - 240V, 50/60Hz (EU) | |
| Subwoofer power consumption: <0.5W (standby); 243W (maximum, 120V); 261W (maximum, 230V) | |
| Subwoofer dimensions (H x W x D): 13-29/32" x 10-1/2" x 10-1/2" (353mm x 267mm x 267mm) | |
| Subwoofer weight: 19.8 lb (9kg) | |
| Transmitter power requirement: | 100 - 240V AC, 50/60Hz |
| Transmitter power consumption: | <0.5W |
| Transmitter unit dimensions (H x W x D): | 1-3/8" x 5" x 3-1/2" (35mm x 127mm x 89mm) |
| Transmitter unit weight: | 0.26 lb (117g) |
| Frequency range | 2403 - 2472MHz |
| Max transmitting power | 10dBm |
LIMITED WARRANTY
Revel loudspeakers are warranted against defects. The duration of a warranty depends on the laws in the country in which it was purchased. Your local Revel retailer can help you determine the duration and coverage of your warranty.
For more information please visit: REVELSPEAKERS.COM
Please visit REVELSPEAKERS.COM for additional language support on the user manual.
HARMAN International, Incorporated
8500 Balboa Boulevard, Northridge, CA 91329 USA
© 2017 HARMAN International, Incorporated. All rights reserved.
Revel and the Revel logo are trademarks of HARMAN International Industries, Incorporated,
registered in the United States and/or other countries.
Features, specifications and appearance are subject to change without notice.
For questions, assistance or additional information concerning any of our products,
call us at: (516) 594-0300 or (888) 691-4171. For technical support, submit your detailed inquiry

natural_image
Black Ravel audio device with four legs and a logo on the front (no visible text or symbols on body)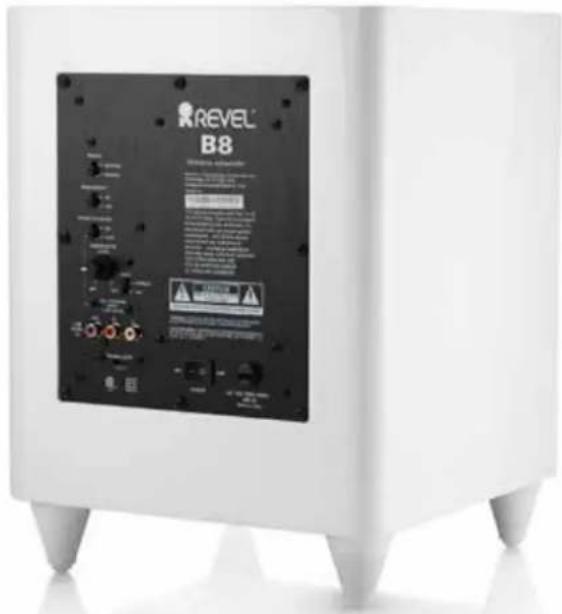
Features
• 8" down-firing cone transducer
• Built-in high-performance 200-watt RMS amplifier
• Wireless 2.4GHz audio signal transmission
- Two automotive-grade finishes available: high-gloss black and high-gloss white
Specifications
| REVEL B8 WIRELESS SUBWOOFER | |
| Low-frequency Transducer 8" (200mm) down-firing cone | |
| Amplifier Power 200 Watts (continuous),400 Watts (peak) | |
| Frequency Response 45Hz – 200Hz | |
| Controls Volume, Phase, Base Boost | |
| Connections LFE (RCA-type); left and right line-level(RCA-type) | |
| Enclosure Type Sealed | |
| External Trigger Input Voltage 3-30 Volts, AC or DC | |
| Subwoofer Power Requirement 1 | 20V, 60Hz (USA), 220V – 240V,50/60Hz (EU) |
| Subwoofer Power Consumption <0.5V | |
| Subwoofer Dimensions(H x W x D) | 1329/32" × 1012" × 1012" (353mm x 267mm x 267mm) |
| Subwoofer Weight 19.8 lbs (9kg) | |
| Transmitter Power Requirement 1 | 00 – 240V AC, 50/60Hz |
| Transmitter Power Consumption | <0.5W |
| Transmitter Unit Dimensions(H x W x D) | 138" × 5" × 312" (35mm x 127mm x 89mm) |
| Transmitter Unit Weight | 0.26 lbs (117g) |
| Frequency Range | 2403 – 2472MHz |
| Max Transmitting Power | 10dBm |


REVEL®
by HARMAN

IMPORTANT SAFETY INSTRUCTIONS
For all products:
- Read these instructions.
- Keep these instructions.
- Heed all warnings.
- Follow all instructions.
- Do not use this apparatus near water.
- Clean only with a dry cloth.
- Do not block any ventilation openings. Install this apparatus in accordance with the manufacturer's instructions.
- Do not install this apparatus near any heat sources such as radiators, heat registers, stoves or other apparatus (including amplifiers) that produce heat.
- Do not defeat the safety purpose of the polarized or grounding-type plug. A polarized plug has two blades with one wider than the other. A grounding-type plug has two blades and a third grounding prong. The wide blade or the third prong is provided for your safety. If the provided plug does not fit into your outlet, consult an electrician for replacement of the obsolete outlet.
-
Protect the power cord from being walked on or pinched, particularly at plugs, convenience receptacles and the point where they exit from the apparatus.
-
Use only attachments/accessories specified by the manufacturer.
- Use only with the cart, stand, tripod, bracket or table specified by the manufacturer or sold with the apparatus. When a cart is used, use caution when moving the cart/apparatus combination to avoid injury from tip-over.
- Unplug this apparatus during lightning storms or when unused for long periods of time.
- Refer all servicing to qualified service personnel. Servicing is required when the apparatus has been damaged in any way, such as when the power-supply cord or plug is damaged, liquid has been spilled or objects have fallen into the apparatus, or the apparatus has been exposed to rain or moisture, does not operate normally or has been dropped.
- Do not expose this apparatus to dripping or splashing, and ensure that no objects filled with liquids, such as vases, are placed on the apparatus.
- To disconnect this apparatus from the AC mains completely, disconnect the power-supply cord plug from the AC receptacle.
- The mains plug of the power-supply cord shall remain readily operable.
- Do not expose batteries to excessive heat such as sunshine, fire or the like.

CAUTION
RISK OF ELECTRIC SHOCK. DO NOT OPEN.

THE LIGHTNING FLASH WITH AN ARROWHEAD SYMBOL, WITHIN AN EQUILATERAL TRIANGLE, IS INTENDED TO ALERT THE USER TO THE PRESENCE OF UNINSULATED "DANGEROUS VOLTAGE" WITHIN THE PRODUCT'S ENCLOSURE THAT MAY BE OF SUFFICIENT MAGNITUDE TO CONSTITUTE A RISK OF ELECTRIC SHOCK TO PERSONS.

THE EXCLAMATION POINT WITHIN AN EQUILATERAL TRIANGLE IS INTENDED TO ALERT THE USER TO THE PRESENCE OF IMPORTANT OPERATING AND MAINTENANCE (SERVICING) INSTRUCTIONS IN THE LITERATURE ACCOMPANYING THE PRODUCT.
WARNING: TO REDUCE THE RISK OF FIRE OR ELECTRIC SHOCK, DO NOT EXPOSE THIS APPARATUS TO RAIN OR MOISTURE.
CAUTION FCC AND IC STATEMENT FOR USERS (USA AND CANADA ONLY)
This device complies with part 15 of the FCC Rules. Operation is subject to the following two conditions: (1) This device may not cause harmful interference, and (2) this device must accept any interference received, including interference that may cause undesired operation. CAN ICES-3(B)/NMB-3(B)
Federal Communication Commission Interference Statement
This equipment has been tested and found to comply with the limits for a Class B digital device, pursuant to Part 15 of the FCC Rules. These limits are designed to provide reasonable protection against harmful interference in a residential installation. This equipment generates, uses and can radiate radio frequency energy and, if not installed and used in accordance with the instructions, may cause harmful interference to radio communications. However, there is no guarantee that interference will not occur in a particular installation. If this equipment does cause harmful interference to radio or television reception, which can be determined by turning the equipment off and on, the user is encouraged to try to correct the interference by one or more of the following measures:
- Reorient or relocate the receiving antenna.
- Increase the separation between the equipment and receiver.
- Connect the equipment into an outlet on a circuit different from that to which the receiver is connected.
- Consult the dealer or an experienced radio/TV technician for help.
Caution: Changes or modifications not expressly approved by HARMAN could void the user's authority to operate the equipment.
For Products That Transmit RF Energy:
FCC AND IC INFORMATION FOR USERS
This device complies with Part 15 of the FCC rules and Industry Canada license-exempt RSS standard(s). Operation is subject to the following two conditions: (1) This device may not cause harmful interference; and (2) this device must accept any interference received, including interference that may cause undesired operation.
FCC/IC Radiation Exposure Statement
This equipment complies with FCC/IC RSS-102 radiation exposure limits set forth for an uncontrolled environment. This equipment should be installed and operated with minimum distance 20cm between the radiator & your body.
For Wi-Fi 5G device
FCC Caution:
High power radars are allocated as primary users of the 5.25 to 5.35 GHz and 5.65 to 5.85 GHz bands. These radar stations can cause interference with and/or damage this device. No configuration controls are provided for this wireless equipment allowing any change in the frequency of operations outside the FCC grant of authorization for US operation according to Part 15.407 of the FCC rules.
IC Caution:
User should also be advised that:
(i) The device for operation in the band 5150 - 5250 MHz is only for indoor use to reduce the potential for harmful interference to co-channel mobile satellite systems; (ii) the maximum antenna gain permitted for devices in the bands 5250 - 5350 MHz and 5470 - 5725 MHz shall comply with the e.i.r.p. limit: and
(iii) The maximum antenna gain permitted for devices in the band 5725 - 5825 MHz shall comply with the e.i.r.p. limits specified for point-to-point and non point-to-point operation as appropriate.
(iv) Users should also be advised that high-power radars are allocated as primary users (i.e. priority users) of the bands 5250 - 5350 MHz and 5650 - 5850 MHz and that these radars could cause interference and/or damage to LE-LAN devices.
Exposure of humans to RF fields (RSS-102)
The computers employ low gain integral antennas that do not emit RF field in excess of Health Canada limits for the general population; consult Safety Code 6, obtainable from Health Canada's Web site at http://www.hc-sc.gc.ca/
The radiated energy from the antennas connected to the wireless adapters conforms to the IC limit of the RF exposure requirement regarding IC RSS-102, Issue 5 clause 4. SAR tests are conducted using recommended operating positions accepted by the FCC/ RSS with the device transmitting at its highest certified power level in all tested frequency band without distance attaching away from the body. Non-compliance with the above restrictions may result in violation of FCC RF exposure guidelines.
Use Restriction Attention in France, operation is limited to indoor use within the band 5150-5350 MHz.
For Products with Radio Receivers That Can Use an External Antenna (USA ONLY):
CATV (Cable TV) or Antenna Grounding
If an outside antenna or cable system is connected to this product, be certain that it is grounded so as to provide some protection against voltage surges and static charges. Section 810 of the National Electrical Code (NEC), ANSI/NFPA No. 70-1984, provides information with respect to proper grounding of the mast and supporting structure, grounding of the lead-in wire to an antenna discharge unit, size of grounding conductors, location of antenna discharge unit, connection to grounding electrodes and requirements of the grounding electrode.
Note to CATV System Installer:
This reminder is provided to call the CATV (cable TV) system installer's attention to article 820-40 of the NEC, which provides guidelines for proper grounding and, in particular, specifies that the cable ground shall be connected to the grounding system of the building, as close to the point of cable entry as possible.
For CD/DVD/Blu-ray Disc™ Players:
Caution:
This product uses a laser system. To prevent direct exposure to the laser beam, do not open the cabinet enclosure or defeat any of the safety mechanisms provided for your protection. DO NOT STARE INTO THE LASER BEAM. To ensure proper use of this product, please read the owner's manual carefully and retain it for future use. Should the unit require maintenance or repair, please contact your local Revel service center. Refer servicing to qualified personnel only.

FOR ALL EU COUNTRIES:
For products that include audio out
Prevention of hearing loss
Caution: Permanent hearing loss may occur if earphones or headphones are used at high volume for prolonged periods of time.
For France, the products have been tested to comply with the Sound Pressure Level requirement laid down in the applicable NF EN 50332-1:2013 and/or EN 50332-2:2013 standards as required by French Article L.5232-1.
Note: To prevent possible hearing damage, do not listen at high volume levels for long periods.
WEEE Notice
The Directive on Waste Electrical and Electronic Equipment (WEEE), which entered into force as European law on 14/02/2014, resulted in a major change in the treatment of electrical equipment at end-of-life.
The purpose of this Directive is, as a first priority, the prevention of WEEE, and in addition, to promote the reuse, recycling and other forms of recovery of such wastes so as to reduce disposal. The WEEE logo on the product or on its box indicating collection for electrical and electronic equipment consists of the crossed-out wheeled bin, as shown below.

This product must not be disposed of or dumped with your other household waste. You are liable to dispose of all your electronic or electrical waste equipment by relocating over to the specified collection point for recycling of such hazardous waste. Isolated collection and proper recovery of your electronic and electrical waste equipment at the time of disposal will allow us to help conserving natural resources. Moreover, proper recycling of the electronic and electrical waste equipment will ensure safety of human health and environment. For more information about electronic and electrical waste equipment disposal, recovery, and collection points, please contact your local city center, household waste disposal service, shop from where you purchased the equipment, or manufacturer of the equipment.
RoHS Compliance
This product is in compliance with Directive 2011/65/EU of the European Parliament and of the Council of 8 June 2011 on the restriction of the use of certain hazardous substances in electrical and electronic equipment.
For Products That Include Batteries
EU Batteries Directive 2013/56/EU
A new battery directive 2013/56/EU on Battery and Accumulator replacing directive entered into force on the 01/07/2015. The directive applies to all types of batteries and accumulators (AA, AAA, button cells, lead acid, rechargeable packs) including those incorporated into appliances except for military, medical and power tool applications. The directive sets out rules for collection, treatment, recycling and disposal of batteries, and aims to prohibit certain hazardous substances and to improve environmental performance of batteries and all operators in the supply chain.
Instructions for Users on Removal, Recycling and Disposal of Used Batteries
To remove the batteries from your equipment or remote control, reverse the procedure described in the owner's manual for inserting batteries. For products with a built-in battery that lasts for the lifetime of the product, removal may not be possible for the user. In this case, recycling or recovery centers handle the dismantling of the product and the removal of the battery. If, for any reason, it becomes necessary to replace such a battery, this procedure must be performed by authorized service centers. In the European Union and other locations, it is illegal to dispose of any battery with household trash. All batteries must be disposed of in an environmentally sound manner. Contact your local waste-management officials for information regarding the environmentally sound collection, recycling and disposal of used batteries.
WARNING: Danger of explosion if battery is incorrectly replaced. To reduce risk of fire or burns, don't disassemble, crush, puncture, short external contacts, expose to temperature above 60°C
(140°F), or dispose of in fire or water. Replace only with specified batteries. The symbol indicating 'separate collection' for all batteries and accumulators shall be the crossed-out wheeled bin shown below:

In case of batteries, accumulators and button cells containing more than 0.0005 % mercury, more than 0.002 % cadmium or more than 0.004 % lead, shall be marked with the chemical symbol for the metal concerned: Hg, Cd or Pb respectively. Please Refer to the below symbol:

WARNING
DO NOT INGEST BATTERY, CHEMICAL BURN HAZARD [The remote control supplied with] This product contains a coin/button cell battery. If the coin/button cell battery is swallowed, it can cause severe internal burns in just 2 hours and can lead to death. Keep new and used batteries away from children. If the battery compartment does not close securely, stop using the product and keep it away from children. If you think batteries might have been swallowed or placed inside any part of the body, seek immediate medical attention.
For All Products Except Those with Wireless Operation:
HARMAN International hereby declares that this equipment is in compliance with the EMC 2014/30/EU Directive, LVD 2014/35/EU Directive, ErP 2012/27/EU Directive and RoHS 2011/65/EU Directive. The declaration of conformity may be consulted in the support section of our Web site, accessible from www.revelspeakers.com.
For All Products with Wireless Operation:
HARMAN International hereby declares that this equipment is in compliance with the essential requirements and other relevant provisions of Directive 2014/53/EU, ErP 2012/27/EU Directive and RoHS 2011/65/EU Directive The declaration of conformity may be consulted in the support section of our Web site, accessible from www.revelspeakers.com.
HARMAN
HARMAN International Industries, Incorporated 8500 Balboa Boulevard, Northridge, CA 91329 USA 516.594.0300 (USA only)
HARMAN International Industries, Incorporated. All rights reserved. Revel is a trademark of HARMAN International Industries, Incorporated, registered in the United States and/or other countries. Features, specifications and appearance are subject to change without notice.

www.revelspeakers.com

- Revel B8 Wireless Subwoofer Owner's Manual
- IMPORTANT SAFETY INSTRUCTIONS
- Warning: To reduce the risk of electric shock, do not remove cover (or back) as there are no user-serviceable parts inside. Refer servicing to qualified personnel.
- TABLE OF CONTENTS
- ABOUT REVEL®
- INTRODUCTION
- THANK YOU FOR CHOOSING THIS REVEL PRODUCT!
- INCLUDED ITEMS
- SUBWOOFER UNIT
- TRANSMITTER UNIT
- PLACING THE SUBWOOFER
- CONNECTING THE SUBWOOFER
- WIRED:
- OPERATING YOUR SUBWOOFER
- TURNING THE SUBWOOFER ON AND OFF
- WIRELESS OPERATION
- WIRELESS CODE SETTINGS
- SUBWOOFER ADJUSTMENTS: VOLUME
- Notes on Setting Subwoofer Volume:
- SUBWOOFER ADJUSTMENTS: PHASE
- SUBWOOFER ADJUSTMENTS: BASS BOOST
- LIMITED WARRANTY
- Features
- For all products:
- CAUTION
- RISK OF ELECTRIC SHOCK. DO NOT OPEN.
- CAUTION FCC AND IC STATEMENT FOR USERS (USA AND CANADA ONLY)
- Federal Communication Commission Interference Statement
- For Products That Transmit RF Energy:
- FCC AND IC INFORMATION FOR USERS
- FCC/IC Radiation Exposure Statement
- For Wi-Fi 5G device
- FCC Caution:
- IC Caution:
- Exposure of humans to RF fields (RSS-102)
- For Products with Radio Receivers That Can Use an External Antenna (USA ONLY):
- CATV (Cable TV) or Antenna Grounding
- Note to CATV System Installer:
- For CD/DVD/Blu-ray Disc™ Players:
- Caution:
- FOR ALL EU COUNTRIES:
- WEEE Notice
- RoHS Compliance
- For Products That Include Batteries
- EU Batteries Directive 2013/56/EU
- Instructions for Users on Removal, Recycling and Disposal of Used Batteries
- WARNING
- For All Products Except Those with Wireless Operation:
- For All Products with Wireless Operation:
- HARMAN
Brand : Revel
Model : Concerta B8
Category : Subwoofer