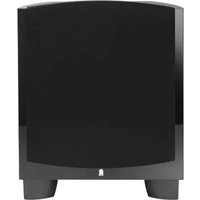
Performa3 B112v2 - Subwoofer Revel - Free user manual and instructions
Find the device manual for free Performa3 B112v2 Revel in PDF.


| Product Type | Powered Subwoofer |
| Brand | Revel |
| Model | Performa3 B112v2 |
| Category | Subwoofer |
| Woofer Size | 12 inches |
| Amplifier Power (RMS) | 500 Watts |
| Frequency Response | 20 Hz - 200 Hz |
| Dimensions (H x W x D) | 18.0 x 14.5 x 15.0 inches |
| Weight | 52 lbs (23.6 kg) |
| Power Supply | AC 100-240V, 50/60 Hz |
| Inputs | L/R Line Level RCA, LFE RCA, Speaker Level |
| Outputs | Speaker Level (pass-through) |
| Controls | Volume, Crossover Frequency, Phase Switch (0/180°), Auto On/Off |
| Main Features | Deep bass extension, low distortion, cabinet rigid construction, adjustable crossover |
| Placement | Floor, away from walls for optimal performance |
| Cleaning Instructions | Wipe with a dry, soft cloth. Do not use liquids or abrasive cleaners. |
| Safety | Do not expose to water or moisture. Ensure proper ventilation. Unplug during storms. |
| Spare Parts Availability | Contact Revel authorized service centers for spare parts. |
| Repairability | Serviceable by qualified technicians only. Refer to manual for troubleshooting. |
| Manual Format | PDF, 11 pages, English |
Frequently Asked Questions - Performa3 B112v2 Revel
User questions about Performa3 B112v2 Revel
0 question about this device. Answer the ones you know or ask your own.
Ask a new question about this device
Download the instructions for your Subwoofer in PDF format for free! Find your manual Performa3 B112v2 - Revel and take your electronic device back in hand. On this page are published all the documents necessary for the use of your device. Performa3 B112v2 by Revel.
USER MANUAL Performa3 B112v2 Revel
natural_image
Line drawing of a speaker or audio device with concentric circular components and mounting feet (no text or symbols)
natural_image
Line drawing of a speaker chamber with concentric circular components and mounting feet (no text or symbols)TABLE OF CONTENTS
About Revel Performa3V2 Subwoofers 2
B112V2/B110V2 Overview 3
Subwoofer Placement Considerations....4
Placing a Single Subwoofer, Placing Two Subwoofers, Placing Four Subwoofers
Making Connections 6
Connecting to a Surround Processor with an Internal Crossover, Connecting to a Stereo Preamplifier,
Connecting Multiple Subwoofers, Trigger and Power Connections
Caring for Your Subwoofer....9
Specifications....10
Warranty 10
ABOUT REVEL PERFORMA3 V2 SUBWOOFERS
Thank you for purchasing a Revel Performa3 V2 subwoofer. The B112V2 and B110V2 are powered by a 1,000-watt RMS (2,000-watt peak) internal amplifier and feature a custom-designed transducer that combines a new level of low frequency detail, musicality and refinement with unprecedented brute-force visceral impact. The internal amplifier's high power with an integrated Parametric Equalization (PEQ) system results in a new standard of high fidelity bass performance for home entertainment systems.
The B112V2 and B110V2 feature 12-inch and 10-inch versions, respectively, of a brand-new coated paper/pulp low-frequency transducer that has been designed specifically for use in these two subwoofer models. The primary design goal for this new driver was to produce very low frequencies at extremely high sound pressure level (SPL) while at the same time maintaining extremely low distortion – qualities that are usually mutually exclusive. This new unit maintains a precise engineering balance between the voice coil, spider and surround that produces linear motion of all three for lower distortion by incorporating Klippel-optimized, high-linearity motor geometry:
- The extremely long (50mm) two-layer copper voice coil wound on a high heat-tolerant fiberglass former gives this transducer a very large range of travel (Xmax) for dramatically increased output with low distortion.
- A high-temperature Nomex® spider features a progressive roll design that evenly distributes mechanical stress, helping keep the cone's motion linear during high-excursion operation.
- The over-sized SBR rubber surround allows greater linear excursion while providing enhanced moving-mass control. This material also withstands the physical breakdown typical of common foam surrounds.
The coated cellulose/pulp cone and dustcap assembly is vented to aid in the exchange of air, which reduces acoustic losses and increases output.
The transducer's massive Klippel-optimized magnet assembly (19.2 lb. in both the B112V2 and B110V2) features a double-stacked ceramic 5 magnet with a flared vent to improve airflow and reduce turbulence. The result is increased bass output and lower distortion. A thick motor shorting ring improves inductance linearity to further reduce distortion and increase output. Extra cooling vents in the back plate increase power handling and reduce power compression. Combined, these changes increase the linear excursion 82% from the previous version.
The cast aluminum frame is fully vented to minimize acoustic losses caused by excessive backpressure. This frame also maintains dimensional stability and precise mechanical tolerances, allowing the transducer to be assembled with a high degree of precision. The structure and mass of the frame make it very strong as well as help pull more heat away from the voice coil.
The B112V2 and B110V2 enclosures are formed with contiguous wood layers that prevent splitting. They feature strategically-oriented bracing that eliminates the possibility of vibration and coloration. The beautiful, modern enclosure is finished in high-gloss piano black, walnut or white in a process developed and overseen by Italian luxury cabinet makers that exceeds automotive finish quality.
During development, every Revel loudspeaker model is compared to competitive models in our unique position-independent double-blind listening lab. This process utilizes the latest psychoacoustic research to assure that these listening tests are valid, enabling us to verify that all Revel loudspeakers are superior to their competitors before they are allowed to go into production.
B112V2/B110V2 OVERVIEW (Note: B112V2 and B110V2 rear panels are identical)

Input connectors: Connect these to the outputs of a stereo preamp or connect a surround processor's subwoofer output to either the left or right input. Balanced (XLR) and unbalanced (RCA) connectors are available. The inputs are 0dBV nominal to +12dBV max unbal/+18dBV max bal. The XLR input is pin 2 hot.
Low Pass Crossover: The variable 50Hz – 150Hz crossover determines the frequency at which the subwoofer blends to the main speakers. When the control is turned to "LFE" the crossover is by-passed and all crossover settings are now set in the Processor or AVR menu.
NOTE: This control does not limit the frequency range of the main speakers in the system. Adjust the Low-Pass Crossover control to properly blend to the satellite speakers. When the blend is correct, notes of instruments and voice in the crossover region should sound correct in level; not too loud relative to the subwoofer frequencies or satellite frequencies, but also not too soft.
Subwoofer Gain control: Use this control to adjust the volume of the subwoofer relative to the system's other speakers.
Parametric Equalization (PEQ) controls: This set of equalization controls adjust for the dominant room mode at your listening position in your specific listening room. The parametric equalizer includes variable controls to adjust Frequency, Bandwidth, and EQ Level of one band of frequencies. To use these controls, you must first set the EQ switch to "ON".
NOTE: Specific measurement equipment is required to properly adjust the Equalization controls. Your authorized REVEL® dealer can make the appropriate measurements, using suitable equipment to ensure optimal results.
EQ Frequency control: selects the center frequency of the particular problem area. The range is from 32Hz to 100Hz.
EQ Bandwidth control: sets the range of frequencies over which the equalizer will have an effect. The range is from 0.1 octaves to 0.6 octaves; the higher the number the broader the range of frequencies that will be affected.
EQ Level control: Allows you to adjust how much boost or cut is applied to the selected frequency by the EQ Frequency Control. This control adjusts from -12dB to a maximum of +3dB.
EQ On/Off switch: Enables/Disables the parametric EQ controls (Frequency, Bandwidth, and EQ Level, but not Phase).
Extended On/Off switch: In the extended mode (ON), the -3 dB point is shifted from 29.5 Hz to 22.7 Hz in the B112V2 and from 32 Hz to 23.7 Hz in the B110V2.
NOTE: Using the extended setting will lower the maximum volume level the subwoofer can achieve. If you hear bass distortion during loud passages, discontinue use of the "extended" setting.
Phase switch: adjusts the phase of the subwoofer's output relative to the front speakers. Proper phase adjustment can also depend on variables such as the subwoofer placement and listener position. Set this switch for maximum mid-bass output at the primary listening position.
12V Trigger In/Out connectors: When the subwoofer's Power Mode Switch is set to "Trigger," the subwoofer will automatically turn on when 5V – 12V is present at the 12V Trigger In connection and will turn off when the voltage at this connection is removed. Whenever the subwoofer is on, a 12V trigger signal is available at its 12V Trigger Out connector for use with additional Performa3V2 subwoofers, or another triggerable device.
Power Mode switch: determines how the subwoofer will turn on and off:
- When this switch is set in the "Auto" position and the Power switch is set to "On," the subwoofer will automatically turn on when it first detects an audio signal at any of its inputs, and will automatically enter the standby mode after it has received no audio signal for ten (10) minutes.
- When this switch is set in the "On" position, the subwoofer will turn on when the Power switch is set to "On" and will remain on until the Power switch is set to "Off."
- When this switch is set in the "Trigger" position and the Power switch is set to "On," the subwoofer will automatically turn on when a voltage is present at the 12V Trigger In connection and will remain on as long as the voltage is present. When the voltage at the 12V Trigger In connection is removed the subwoofer will automatically turn off.
Power Mode indicator: The LED glows green when the power switch is set to On and there is signal at the input and/or a 12V trigger present. If the power switch is set to On but there is no signal after ten (10) minutes or there is no trigger voltage, then the LED will glow red. It will be unlit if the power switch is set to Off or the unit is receiving no power.
Power switch: When this switch is set to "On," the subwoofer's on/off status is dependent on the setting of the Power Mode switch (see above). When the Power switch is set to "Off" the subwoofer is turned off and cannot turn on automatically.
We suggest setting the Power switch in the "Off" position if you will not be using the subwoofer for a long period of time, such as when you're on vacation.
Power Cord connector: Plug the supplied power cord into this connector and into a working unswitched AC power outlet.
SUBWOOFER PLACEMENT CONSIDERATIONS
When using subwoofers within the limited confines of a typical home theater room, the reflections, standing waves and absorptions within the room will create peaks and dips in the bass response that can vary greatly depending on where the listeners are located in the room – a listener seated in one location may hear an overabundance of bass created by a response peak at that location, while another listener only a few feet away may hear far less bass due to a response dip at that location.
The subwoofers' locations within the room (along with the room's dimensions) also have a profound effect on the creation of these bass response peaks and dips. Careful subwoofer placement alone cannot compensate for all bass response peaks and dips throughout a room, but careful subwoofer placement can eliminate or significantly reduce the largest response dips.
It is important to reduce response dips throughout the room as much as possible via proper subwoofer placement because equalization cannot be used to compensate for large response dips. For example, using equalization in an attempt to restore a 13dB response dip requires that the subwoofer amplifier deliver twenty times the power at that frequency. This can quickly overdrive the subwoofer amplifier into clipping, which will significantly degrade audio quality.
In almost any room, placing the subwoofers in corners will produce the fewest large bass response dips and will also produce the most large bass response peaks. With the subwoofers so placed, you can then use the built-in Parametric Equalizer (PEQ) to compensate for the most problematic frequency response anomaly.
We strongly recommend that you install multiple subwoofers regardless of the room's size. A single subwoofer will result in the least consistent bass performance throughout the room. Using multiple subwoofers can cancel some room modes at the various listening locations, resulting in much more consistent low frequency sound quality throughout the listening area. Additionally, it is often impossible to locate a single subwoofer such that large response dips, which cannot usually be corrected via equalization, are not present. The use of two or more properly placed subwoofers almost always eliminate such response dips.
Since wall construction is almost never perfectly identical on opposite walls, common formulas such as placing the subs at 1/4 points rarely work in practice. The best solution is to make high-resolution measurements from the primary listening area while experimenting with speaker placement.
PLACING A SINGLE SUBWOOFER
When installing a single subwoofer, experiment with different locations to find the one that produces the best results throughout your room's seating area. As in the previous examples, placing the subwoofer in a corner will produce the fewest number of deep response dips, which cannot be corrected with equalization.

PLACING TWO SUBWOOFERS
Placement of two subwoofers will be determined by your room's seating arrangement.
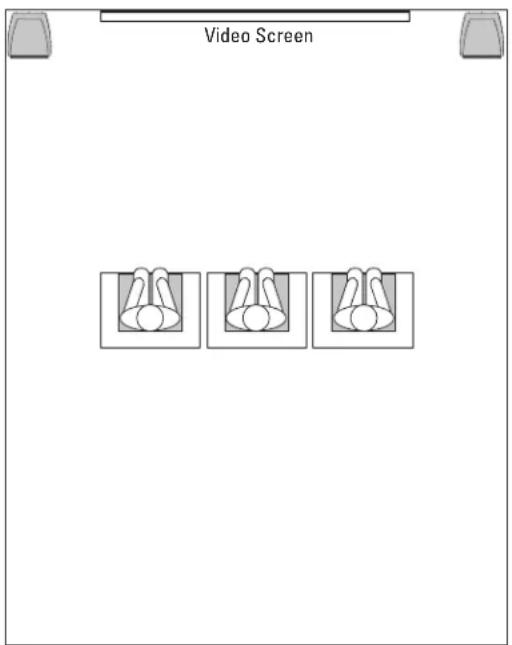
Rooms with a single row of seating
Placing the subwoofers in the two front corners will produce the most consistent bass performance throughout a single row of seating.
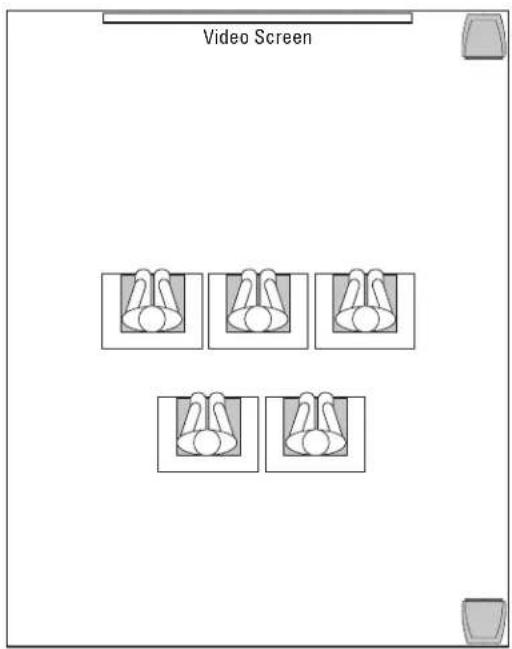
Rooms with multiple seating rows
Placing one subwoofer in a front corner and the other subwoofer in the rear corner on the same side will produce the most consistent bass performance throughout multiple seating rows.
PLACING FOUR SUBWOOFERS
When installing four subwoofers, place each one in a room corner. In rooms with more than four corners, use the four corners closest to the listening area.

MAKING CONNECTIONS
CAUTION: Never make or break connections unless all system components are powered off.
CONNECTING TO AN AV SURROUND RECEIVER OR PROCESSOR WITH AN INTERNAL CROSSOVER
If you are connecting to a surround processor with a low-pass filtered subwoofer output, connect the subwoofer as shown below. You can make either a balanced (XLR) or unbalanced (RCA) connection to either the subwoofer's left or right input connector. When connecting to surround processors with internal crossovers, set the Low Pass Crossover control knob to the "LFE" position.

CONNECTING TO A STEREO RECEIVER, AMPLIFIER OR PREAMPLIFIER
If you are connecting to a stereo device, connect the subwoofer as shown below. Stereo components rarely have subwoofer outputs. Use them if they are available; otherwise, be sure to use a Y-connector for the left output and one for the right output, connecting the subwoofer input to one side of each Y and the input for the left or right main speaker amplifier to the other side of the Y for proper main speaker operation. You can make either balanced (XLR) or unbalanced (RCA) connections between the device and the subwoofer.
Using this connection method, you must set the Low Pass Crossover knob to some frequency between 50 – 150Hz, NOT on the "LFE" setting.

flowchart
graph TD
    A["Input"] --> B["Subwoofer Gain"]
    B --> C["LOW PASS CROSSOVER"]
    C --> D["FREQUENCY"]
    D --> E["BANDWIDTH"]
    E --> F["EQ LEVEL"]
    F --> G["Output"]
    G --> H["Use Left and Right"]
    H --> I["Use either XLR or RCA connector"]
    I --> J["BALANCED"]
    I --> K["UNBALANCED"]
    style A fill:#f9f,stroke:#333
    style G fill:#ccf,stroke:#333
    style H fill:#cfc,stroke:#333
    style I fill:#fcc,stroke:#333
    style J fill:#ffc,stroke:#333
    style K fill:#fcc,stroke:#333
    note right of A: To amplifier for main speaker (Repeat for other Channel)
CONNECTING MULTIPLE SUBWOOFERS
When installing more than one Performa3V2 subwoofer, connect
"Y" connectors to the receiver or processor's outputs. If your source component has two subwoofer output jacks you can connect up to four subwoofers as illustrated on this page.
Be sure to set up and adjust each subwoofer PEQ separately, then adjust all of the subwoofer levels and crossover frequencies together to blend to the main speaker systems.

flowchart
graph TD
    A["OUTPUTS"] --> B["Sub 1"]
    A --> C["Sub 2"]
    B --> D["Use either XLR or RCA connector"]
    C --> D
    D --> E["Revel Subwoofer 1"]
    D --> F["Revel Subwoofer 2"]
    D --> G["Revel Subwoofer 3"]
    D --> H["Revel Subwoofer 4"]
TRIGGER AND POWER CONNECTIONS
Trigger In/Out Connectors
If you want your subwoofer(s) to turn on along with another component that supplies a trigger voltage, use a mono 3.5mm cable (not supplied) to connect the 12V DC Trigger In connector to the trigger voltage out connector of the other component.
To supply a trigger signal to an additional Performa3 subwoofer (or other triggerable device), use a mono 3.5mm cable (not supplied) to connect the 12V DC Trigger Out connector of the first Performa3 subwoofer to the 12V DC Trigger In connector of the next Performa3 subwoofer. Connect additional Performa3 subwoofers this way, in "daisy-chain" fashion.
NOTE: When using the 12V Trigger to control the subwoofer power status, make sure the Power Mode Switch on each subwoofer is set to the "Trigger" position.
Power Cord
After you have ensured that all connections have been correctly made, plug the supplied power cord into the subwoofer's Power Cord connector and into a working unswitched AC power outlet.
CARING FOR YOUR SUBWOOFER
The cabinet's wood veneer finish does not require routine maintenance. Cabinet surfaces that have been marked with dust, fingerprints, or other dirt can be cleaned using a soft cloth – preferably microfiber, and high-quality auto wax. Take care not to come in contact with the transducer.
- Do NOT use wax on the top trim piece. Doing so will make the flat-black lacquered trim piece glossy and the original finish cannot be restored. If cleaning this trim is necessary, wipe it with a clean dry soft cloth only – preferably microfiber.
To clean the grille, gently vacuum it using a soft-bristled brush vacuum attachment with the vacuum cleaner set to the lowest possible suction.
CAUTION: To prevent cabinet damage, do not use metal polish or a cloth made with steel wool to clean the cabinet. Do not spray furniture polish and cleaning fluids directly on to the cabinet; apply them to the cleaning cloth then wipe the cabinet. To prevent possible transducer damage, never touch or clean the transducers.
SPECIFICATIONS
B112V2/B110V2
| Type: Powered subwoofer | |
| Low-frequency transducer: Coated paper/pulp cone (12" - B112V2; 10" - B110V2) with 50mm two-layer copper voice coil, vented ceramic 5 magnet assembly and vented die-cast aluminum frame | |
| Amplifier power: 1,000 watts (RMS), 2,000 watts (peak) | |
| Input sensitivity/impedance: 400mV (full power)/20k ohms (balanced); 14k ohms (unbalanced) | |
| Crossover frequency: 50Hz - 150Hz low-pass filter with LFE bypass | |
| Low Frequency Extension (Normal mode): -3dB at 34.4Hz, -6dB at 30Hz, -10dB at 27Hz (B110V2)-3dB at 29.5Hz, -6dB at 27Hz, -10dB at 24Hz (B112V2) | |
| Low Frequency Extension (Extended mode): -3dB at 30Hz, -6dB at 27Hz, -10dB at 24Hz (B110V2)-3dB at 29Hz, -6dB at 26Hz, -10dB at 23Hz (B112V2) | |
| Enclosure type: Sealed | |
| Inputs: Balanced (XLR); unbalanced (RCA) | |
| Available finishes: High-gloss walnut, black and white | |
| Dimensions (H x W x D): | |
| B112V2: | 18-7/16" x 15-15/16" x 16-9/16" (468mm x 404mm x 420mm), with grille |
| B110V2: | 16-7/8" x 14-5/16" x 13-7/16" (428mm x 364mm x 342mm), with grille |
| Weight: | |
| B112V2: | 64.8 lb (29.4kg) |
| B110V2: | 53.8 lb (24.4kg) |
LIMITED WARRANTY
Revel loudspeakers are warranted against defects. The duration of a warranty depends on the laws in the country in which it was purchased. Your local Revel retailer can help you determine the duration and coverage of your warranty.
For more information please visit: REVELSPEAKERS.COM
Please visit REVELSPEAKERS.COM for additional language support on the user manual.
HARMAN International Industries, Incorporated
8500 Balboa Boulevard, Northridge, CA 91329 USA
© 2018 HARMAN International Industries, Incorporated. All rights reserved.
Revel and the Revel logo are trademarks of HARMAN International Industries, Incorporated, registered in the United States and/or other countries.
Nomex is a registered trademark of E. I. du Pont de Nemours and Company.
Features, specifications and appearance are subject to change without notice.
For questions, assistance or additional information concerning any of our products, call us at: (516) 594-0300 or (888) 691-4171. For technical support, submit your detailed inquiry to: csupport@harman.com.
Part No. 950-0555-001

REVEL by HARMAN
www.revelspeakers.com


- TABLE OF CONTENTS
- ABOUT REVEL PERFORMA3 V2 SUBWOOFERS
- SUBWOOFER PLACEMENT CONSIDERATIONS
- PLACING A SINGLE SUBWOOFER
- PLACING TWO SUBWOOFERS
- Rooms with a single row of seating
- Rooms with multiple seating rows
- PLACING FOUR SUBWOOFERS
- MAKING CONNECTIONS
- CONNECTING TO AN AV SURROUND RECEIVER OR PROCESSOR WITH AN INTERNAL CROSSOVER
- CONNECTING TO A STEREO RECEIVER, AMPLIFIER OR PREAMPLIFIER
- CONNECTING MULTIPLE SUBWOOFERS
- TRIGGER AND POWER CONNECTIONS
- Trigger In/Out Connectors
- Power Cord
- CARING FOR YOUR SUBWOOFER
- SPECIFICATIONS
- LIMITED WARRANTY
Brand : Revel
Model : Performa3 B112v2
Category : Subwoofer