004-907 - Saw Meec Tools - Free user manual and instructions
Find the device manual for free 004-907 Meec Tools in PDF.


| Product Type | Electric Chain Saw |
| Brand | Meec Tools |
| Model | 004-907 |
| Rated Voltage | 230 V ~ 50 Hz |
| Power Output | 1600 W |
| No-Load Speed | 7000 rpm |
| Cutting Speed | 13 m/s |
| Bar Length | 355 mm |
| Chain Pitch | 3/8" |
| Number of Drive Links | 53 |
| Drive Link Width | 1.3 mm |
| Oil Tank Volume | 340 ml |
| Weight | 4.9 kg |
| Sound Pressure Level (LpA) | 94 dB(A), K=3 dB |
| Measured Sound Power Level (LwA) | 104 dB(A), K=3 dB |
| Guaranteed Sound Power Level (LwA) | 107 dB(A), K=3 dB |
| Vibration Level | 7.38 m/s², K=1.5 m/s² |
| Safety Class | II |
| Chain Brake | Yes, manual activation via handle |
| Chain Catcher | Yes, catches chain if it derails |
| Hand Guard | Yes, protects hand from chain |
| Strain Relief | Yes, for power cord |
| Intended Use | Wood sawing only, not for commercial/industrial use |
| Recommended Lubricant | Biodegradable vegetable chain oil preferred |
Frequently Asked Questions - 004-907 Meec Tools
User questions about 004-907 Meec Tools
0 question about this device. Answer the ones you know or ask your own.
Ask a new question about this device
Download the instructions for your Saw in PDF format for free! Find your manual 004-907 - Meec Tools and take your electronic device back in hand. On this page are published all the documents necessary for the use of your device. 004-907 by Meec Tools.
USER MANUAL 004-907 Meec Tools
004907

natural_image
Red and black Meec chain-link electric saw with power cord (no visible text or symbols)
SE ELKEDJESÅG
Operating instructions (Translation of the original instructions) Important! Read the user instructions carefully before use. Save them for future reference.
Värna om miljön!
Care for the environment!
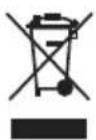
Must not be discarded with household waste! This product contains electrical or electronic components that should be recycled. Leave the product for recycling at the designated station e.g. the local authority's recycling station.
Jula reserves the right to make changes. In the event of problems, please contact our customer service.
www.jula.com
Tillverkare/ Produsent/ Producenci/ Manufacturer
Jula AB, Box 363, 532 24 SKARA
Distributör/ Distributør/ Dystrybutor/ Distributor
Jula Poland Sp. z o.o., ul.
EC DECLARATION OF CONFORMITY
EG FÖRSÄKRAN OM ÖVERENSSTÄMMELSE
EF SAMSVARSERKLÆRING
DEKLARACJA ZGODNOŚCI WE

Jula AB, Box 363, SE-532 24 SKARA, SWEDEN
certify that the design and manufacturing of this product
Machinery Directive 2006/42/EC
EN 60745-1:2009+A11, EN 60745-2-13:2009+A1
Electromagnetic Compatibility Directive 2014/30/EU
EN 55014-1:2006+A1+A2, EN 55014-2:2015
EN 61000-3-2:2014, EN 61000-3-3:2013
Outdoor Noise Directive 2000/14/EC, amended by 2005/88/EC
RoHS Directive 2011/65/EU
EN 50581:2012
Where applicable, name and address of the notified body involved:
Dår tillampbart, hamin och adress hos involverat kontrollorgan. Når det kreves, navn og adresse til det aktuelle meldte organet:
This product was CE marked in year -18
Name and address of the person authorised to compile the technical file:
3
4
natural_image
Mechanical assembly diagram showing a chain-link mechanism with labeled parts (no readable text or symbols)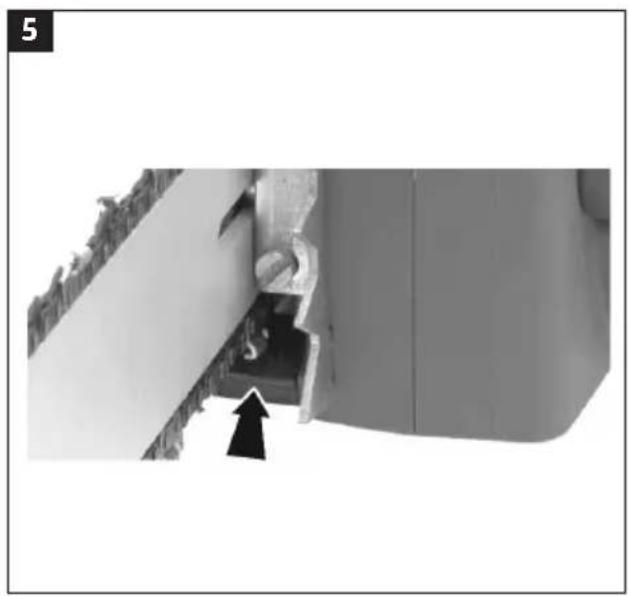
natural_image
Close-up of a mechanical component with a black arrow pointing to a small feature, no visible text or symbols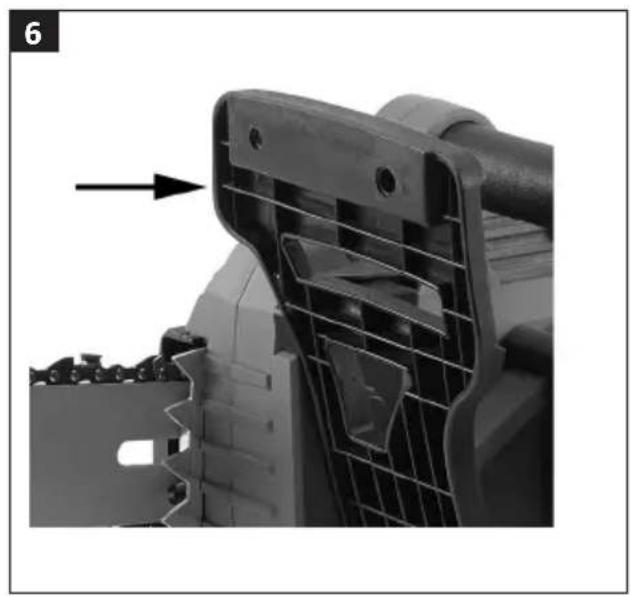
natural_image
Close-up of a mechanical component with internal structure and an arrow indicating a feature (no text or symbols visible)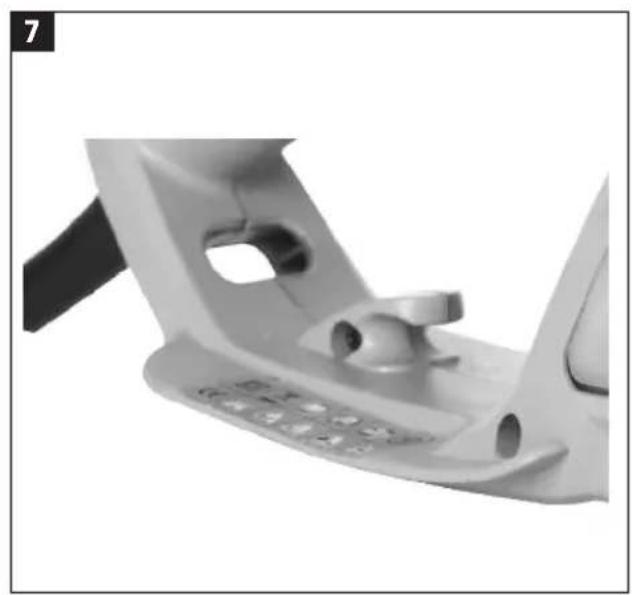
natural_image
Close-up of a white plastic mechanical device with a button and handle (no visible text or symbols)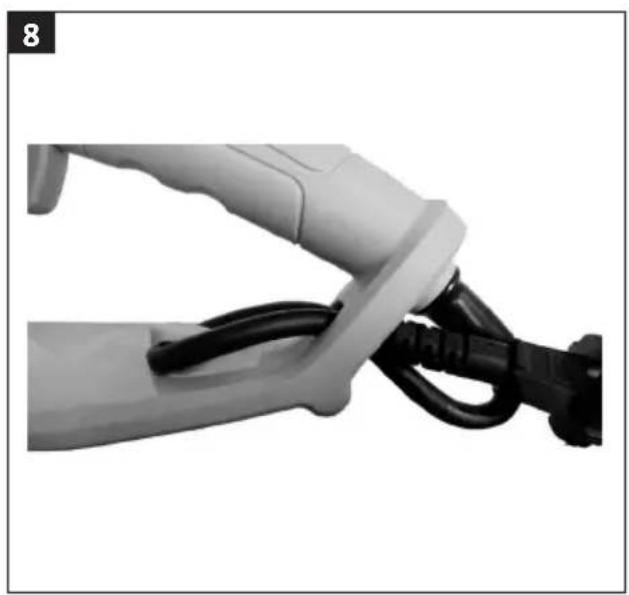
natural_image
Close-up of a white electric vehicle charging plug with black cable (no text or symbols visible)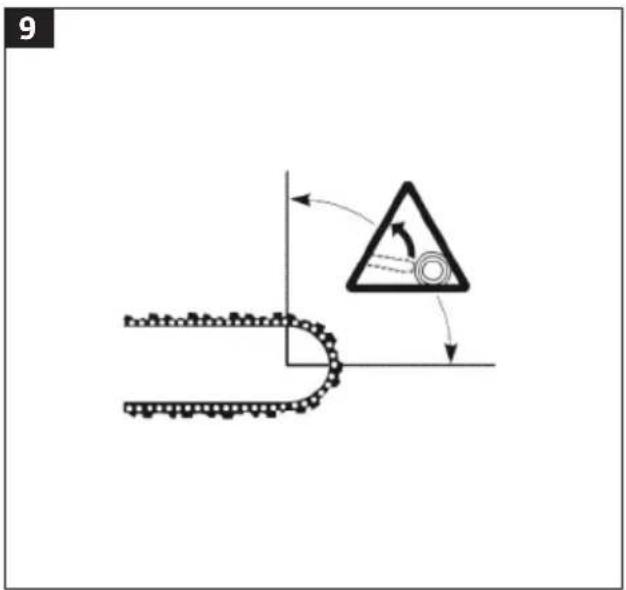
natural_image
Diagram showing a chain with circular patterns and directional arrows, no text or symbols present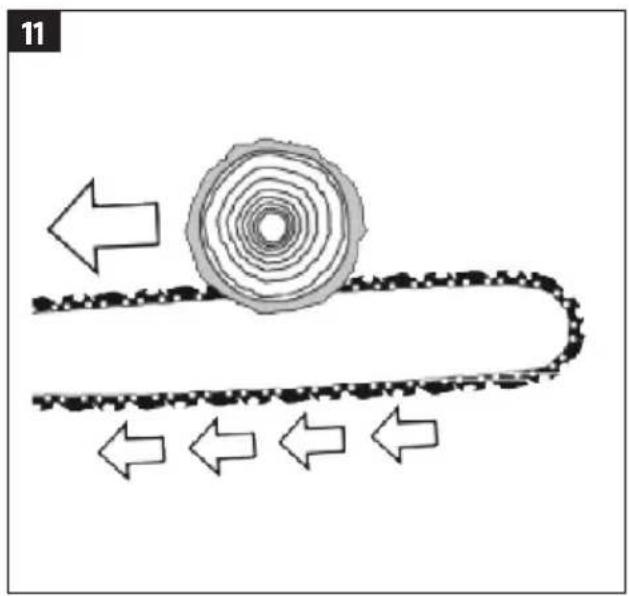
natural_image
Diagram of a mechanical conveyor belt system with directional arrows indicating flow or movement (no text or symbols)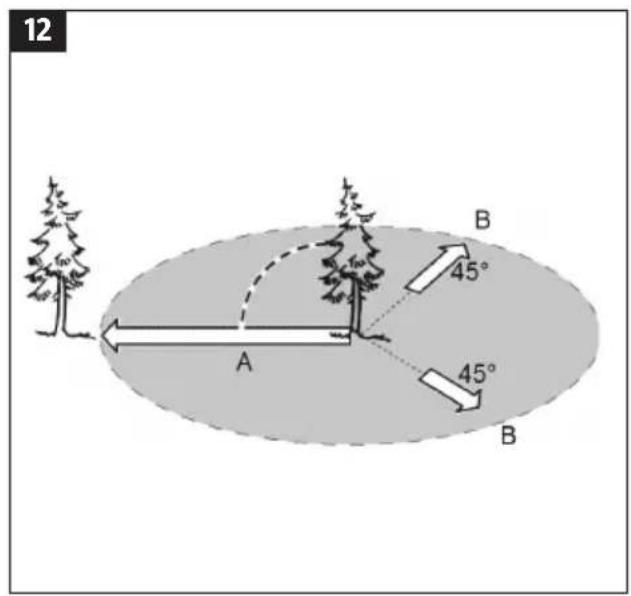
natural_image
Mechanical assembly diagram showing a gear-like component with internal components and a directional arrow (no text or symbols)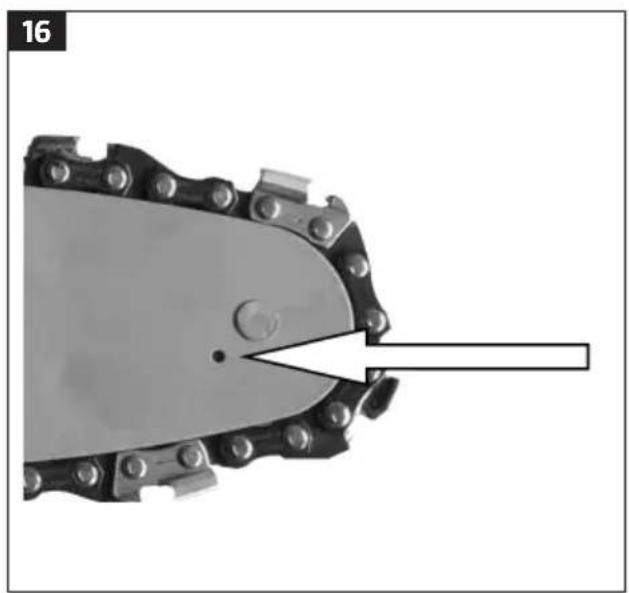
natural_image
Mechanical chain-link component with a pointed tip and a rectangular arrow pointing to it (no text or symbols)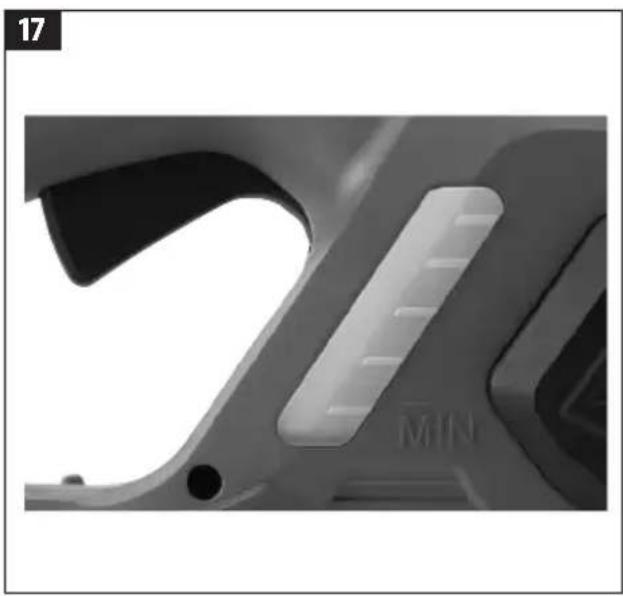
natural_image
Close-up of a mechanical component with a curved handle and a labeled 'MIN' (no readable text or symbols beyond the label)SÄKERHETSANVISNINGAR
FÖRVARING OCH TRANSPORT
Långvarig förvaring
KONTROLL AV SAGKJEDETS STRAMMING
STRAMMING AV SAGKJEDET
- These instructions should be enclosed with the machine if it is sold or passed on.
- Do not use the machine if it is not working properly. Take the machine to an authorised service centre, or other qualified personnel, to be checked and repaired.
- Do not use the machine in explosive environments, such as in the vicinity of flammable liquids, gases or dust.
- Make sure that the machine cannot be unintentionally started.
- Do not use the machine if it cannot be switched on and off with the power switch.
- Store the machine out of the reach of children and unauthorised persons.
- Do not overload the machine. Do not use the machine for any other purpose than the one it is designed for.
- Always wear appropriate personal safety equipment.
- Be careful. Never use power tools if you are tired or under the influence of drugs, alcohol or medication.
- The machine is not intended to be used by persons (children or adults) with any form of functional disorders, or by persons who do not have sufficient experience or knowledge on how to use it, unless they have received instructions concerning the use of the machine from someone who is responsible for their safety.
- Keep children under supervision to make sure they do not play with the machine.
- Always take basic safety precautions when using power tools.
IMPORTANT:
Risk of personal injury as a result of vibration.
• Vibrations can cause personal injury.
- Stop working immediately and seek medical attention if you experience numbness, itching, tingling or pain, or if your skin changes colour.
- Vibration levels can deviate from the declared value, depending on how the machine is used. The following factors can influence the level of vibrations:
- Incorrect use.
– Unsuitable accessories.
– Working with unsuitable materials.
- Inadequatemaintenance.
- The following measures will reduce the risk of personal injury:
- Use the machine in accordance with the instructions.
- Avoid working at low temperatures.
- Keep your body and especially your hands warm.
— Take regular pauses and move your hands to stimulate circulation.
Electrical safety
- The plug must be plugged into a correctly installed earthed power point.
- The machine must be connected to the mains supply with a residual current device with a maximum tripping current of 30 mA.
- Check that the mains voltage corresponds to the rated voltage on the type plate.
- Do not touch the plug or power cord with wet hands or other wet parts of your body. Do not pull the power cord to unplug the plug.
- Keep the power cord away from heat, oil, sharp edges and moving parts. Avoid bending, clenching, dragging or driving over the power cord.
- Do not carry or pull the machine by the power cord.
• Always check the power cord and plug before they are used.
- Pull out the plug immediately if the power cord or plug get damaged during the work. Do not use the machine if the power cord or plug are damaged.
- Pull out the plug when the machine is not in use.
- Check that the power switch is in the OFF position before plugging in the plug.
- Switch off the machine and pull out the plug before moving it.
Maintenance
- Switch off the machine, pull out the plug and wait until all moving parts have completely stopped before cleaning and/or maintenance.
- Do not carry out any maintenance or adjustments other than as described in these instructions. Any other repairs must be carried out by an authorised service centre or other qualified personnel.
- Only use spare parts recommended by the manufacturer. The use of other parts can result in personal injury, material damage, and/or damage to the environment. It will also invalidate the warranty.
Special safety instructions
- Never allow children, persons with functional disorders or persons who are unfamiliar with the machine and these instructions, to use it.
- Do not use the machine if it is not fully assembled and complies with all the instructions.
- Check that the machine is working properly. Double-check that the bar is correctly and firmly fitted, that the chain is correctly tensioned and that the chain brake is working.
- Check that all screw unions are properly tightened at regular intervals.
- Check that the work area is free from obstructions and foreign objects.
• Pay attention to the surroundings - Keep other people, especially children, and pets at a distance of at least 15 metres from the work area.
-
Do not use the machine in bad weather or in the dark.
-
Only use the machine to saw wood. Do not use the machine for any other purpose than the one it is designed for.
- Keep the handles clean, dry and free from oil and grease. Greasy handles make it difficult to hold the machine – risk of personal injury and/material damage.
- Do not saw bushes – thin branches can fasten in the chain and get thrown out.
- Always maintain a firm footing and good balance. Avoid unbalanced and awkward positions when working. Be careful when working on slopes.
- Hold the machine firmly with both hands. Hold the back handle in your right hand and the front handle in your left hand, even if you are left-handed. Keep a firm grip on both handles.
- Keep your hands and the rest of your body away from the chain when the machine is running. Check that the chain is not touching the ground or an object when starting the machine.
- Never saw above shoulder height. Do not lead forwards or backwards.
- Never use the machine from a ladder, tree or other unstable place. This could cause you to lose your balance or lose control of the machine.
- Do not overreach.
- Be careful to avoid slipping or falling, especially when walking backwards.
• Always work with the chain at top speed. - Do not saw wood under tension.
- Do not work alone. Always make sure there is another person nearby who can come and help if necessary.
- Switch off the machine and apply the chain brake before moving away. Carry the machine with the bar pointing behind you and the guard in place.
- Do not expose the machine to rain or moisture.
-
Keep the power cord away from the work area. Always keep the power cord behind you.
-
If the machine is used outdoors, only use an extension cord approved for outdoor use. If an extension cord is used the cross-sectional area of the wires must be dimensioned for the power supply to the machine.
- Do not remove or cover the symbols and markings on the machine. Replace any stickers that have become illegible or lost.
- Do not expose the machine to rain or moisture. Store in a dry place.
- Pull out the plug from the power point immediately if the power cord gets damaged.
- Personal safety equipment and suitable clothes
• Use the following safety equipment:
– Helmet with visor.
- Approved ear protection.
– Safety glasses or visor.
- Non-slip safety shoes with protection for the lower part of the leg.
- Heavy-duty safety gloves.
- Overalls and jacket with saw protection.
- Do not wear loose-fitting clothing as these can get caught in moving parts.
- Do not wear jewellery, or a watch, etc.
- Wear a hair net if you have long hair.
Remaining risks
- Risk of personal injury from contact with chain.
- Risk of personal injury from ejected parts of the chain.
- Risk of personal injury from ejected pieces of the wood being sawn.
- Risk of hearing impairment if ear protection is not used.
- Risk of personal injury as a result of inhaling particles of the sawn wood.
- Risk of personal injury from contact with oil.
• To reduce these risks, always use the recommended personal safety equipment.
Reduction of noise and vibrations
- To reduce noise and vibrations when in use, limit the time in use and use suitable safety equipment.
-
Plan the work so that exposure to heavy vibrations is spread over a longer period.
• Take the following precautions to minimise the risks of exposure to vibrations and/or noise: -
Only use the tool in accordance with these instructions.
- Check that the tool is in good condition.
- Use accessories in good condition and suitable for the purpose.
- Keep a firm grip on the handles/grips.
- Maintain and lubricate the tool in accordance with these instructions.
Symbols
 | WARNING: |
 | Read the instructions before use. |
 | Wear safety glasses. |
 | Use ear protection. |
 | Keep dry. Store in a dry place. |
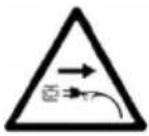 | Pull out the plug if the power cord is damaged or cut. |
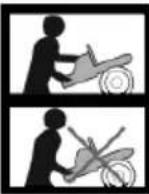 | Always hold the electric chain saw with two hands. |
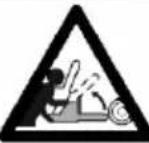 | Watch out for kickback. |
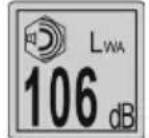 | Sound power level. |
 | Safety class II. |
 | Approved as per applicable directives. |
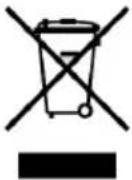 | Recycle discarded product as electrical waste. |
TECHNICAL DATA
| Rated voltage 230 V | ~50 Hz |
| Output | 1600 W |
| Safety class II | |
| Speed, no load 7000 rpm | |
| Cutting speed 13 m/s | |
| Volume, oil tank 340 ml | |
| Bar length 355 mm | |
| Drive links 53 | |
| Drive link width 1.3 mm | |
| Pitch | 3/8" |
| Weight 4.9 kg | |
| Sound pressure level, LpA 94 dB(A), K = 3 dB | |
| Measured sound power level, LwA 104 dB(A), K = 3 dB | |
| Guaranteed sound power level, LwA 107 dB(A), K = 3 dB | |
| Vibration level 7.38 m/s ^2 , K = 1.5 m/s ^2 | |
Always wear ear protection.
The declared vibration value, which has been measured by a standardised test method, can be used to compare different tools with each other and for a preliminary assessment of exposure. The measurement values have been determined in accordance with EN 60745-2-13:2009+A1.
WARNING: The actual vibration level when using power tools may differ from the specified maximum value, depending on how the tool is used. It is therefore necessary to determine which safety precautions are required to protect the user, based on an estimate of exposure in actual operating conditions (taking into account all stages of the work cycle, e.g. the time when the tool is switched off and when it is idling, in addition to the start-up time).
DESCRIPTION
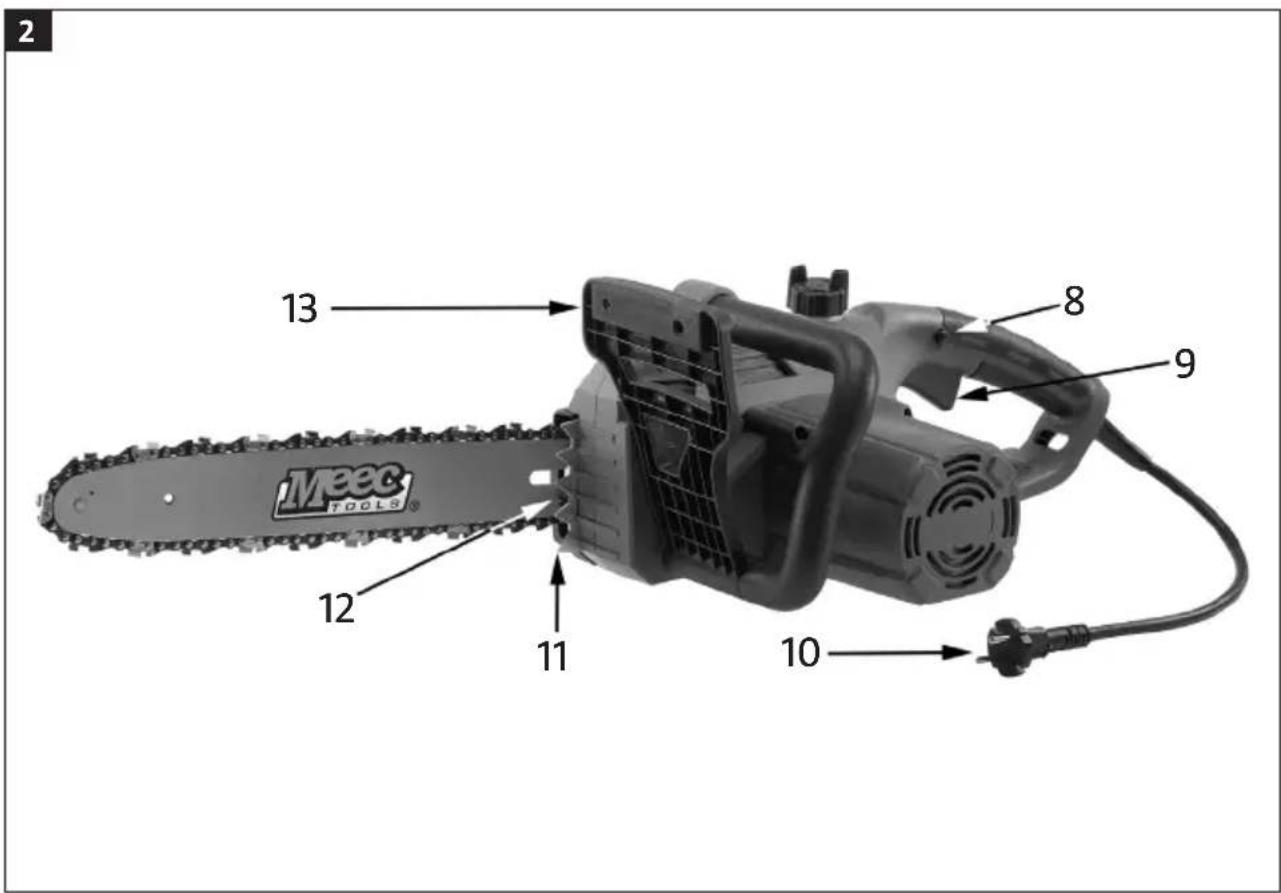
- Bar
- Chain
- Lock nut for bar
- Cover
- Sight glass for chain oil level
- Strain reliever
- Filler cap for chain oil
- Start inhibitor
- Power switch
- Plug
- Bumper spike
- Screw chain tension
- Chain brake handle
FIG. 1
FIG. 2
ASSEMBLY
WARNING!
Incorrect assembly of the parts for the electric chain saw can result in the risk of fatal and/or serious personal injury. Do not use the chain saw if it has not been completely assembled and all parts have been correctly fitted and tightened.
Fitting the bar and chain
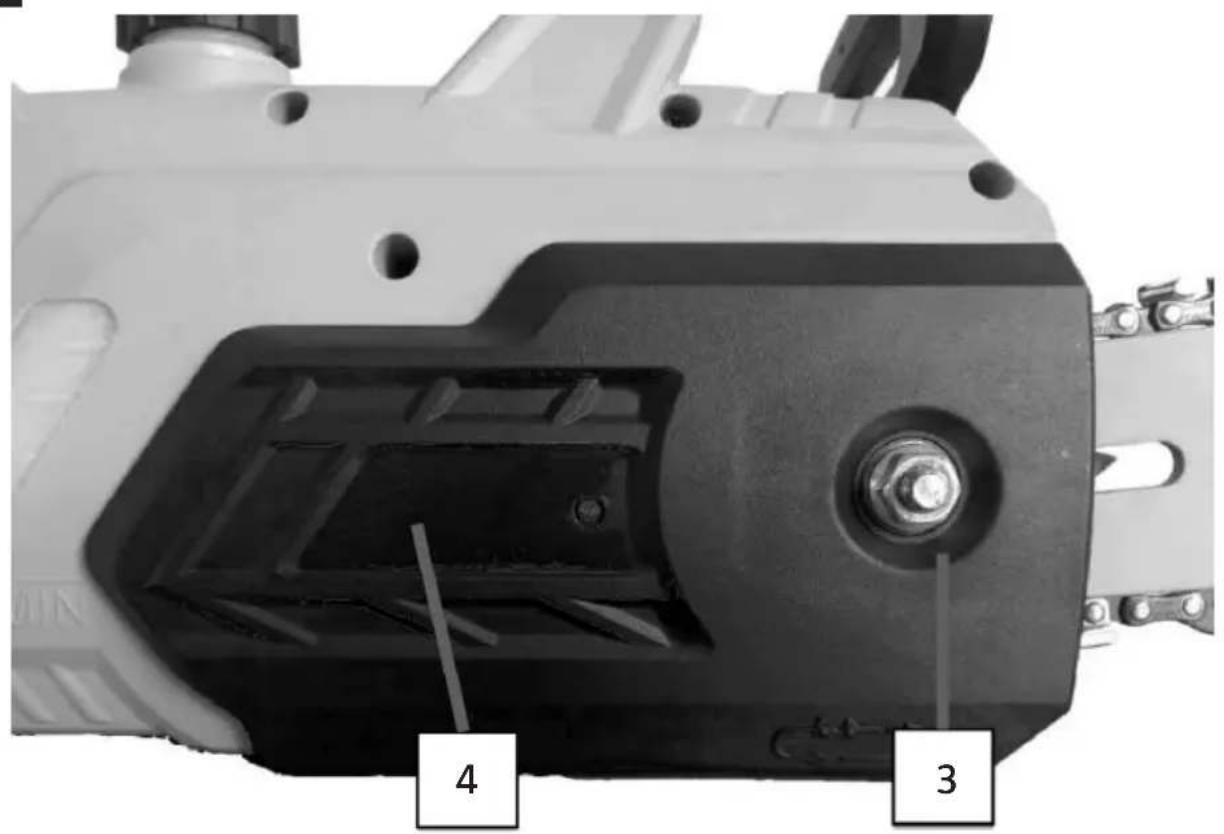
- Undo the nut (3) on the cover (4) and remove the cover.
FIG. 3
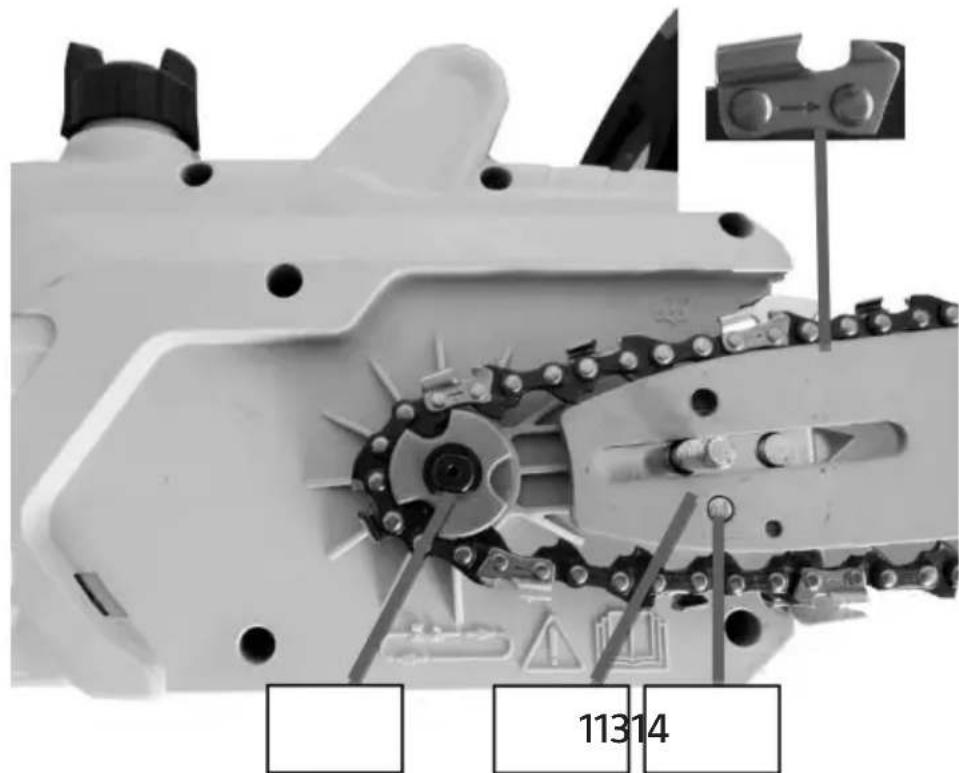
- Turn the chain tensioning screw forwards.
- Place the bar (1) with the slot over the guide (13).
- Put the chain round the sprocket (14). Check the direction of rotation.
- Put the chain round the bar.
FIG. 4
- Fit the cover.
- Tighten the nut loosely.
NOTE:
Note the positioning of the guide when fitting the chain.
USE
INTENDED USE
- The electric chain saw must only be used to saw wood, with a chain of the recommended type.
- The saw is not intended for commercial or industrial use.
- Do not use the saw for any other purpose.
- Never modify the saw in any way and do not use parts that are not approved by the manufacturer. This can result in material damage.
- The electric chain saw must only be used for its intended purpose and in accordance with these instructions. All other use is considered to be unsuitable.
SAFETY DEVICES
The electric chain saw has several safety devices to reduce the risk of personal injury when in use.
Chain catcher
The chain catcher catches the chain if it comes off or jumps out from the slot on the bar. Correct maintenance of the bar and correct and regular tensioning of the chain prevent such problems.
FIG. 5
Chain brake handle
To reduce the risk of personal injury in the event of kickback the saw has a chain brake, which triggers on contact and stops the chain immediately.
FIG. 6
Hand guard
The hand guard protects the hand from branches and from the chain if it comes off or loose.
FIG. 7
Strain reliever
The strain reliever protects the power cord from unnecessary strain.
FIG. 8
CHECK BEFORE STARTING
IMPORTANT:
Do not use the chain saw if it is damaged or not working properly, or if the power cord or plug are damaged. Damaged parts must be repaired or replaced before using the chain saw.
- Check that the chain brake is working properly.
- Check that the hand guard is undamaged.
- Check that the power switch and its lock button are working properly.
- Check that the handles are clean, dry and free from oil and grease.
- Check that all parts are correctly fitted and undamaged.
- Check that the chain catcher is in good condition and undamaged.
- Check the chain tension.
- Put the power cord through the stress reliever as shown in the diagram.
The chain brake stops the chain immediately in the event of kickback. Always check before use that the chain brake is working properly.
- Put the chain saw on the ground.
- Start the chain saw.
- Push the chain brake handle forwards. The chain should stop immediately.
IMPORTANT:
Do not use the chain saw if the chain brake is not working properly. Take the saw to an authorised service centre, or other qualified personnel, to be checked and repaired.
STARTING
- The chain brake handle must be in its pulled back position.
- Hold the saw firmly with both hands.
- Press the start inhibitor.
- Press the power switch.
- The chain saw starts.
USE
Study the technique for working with the chain chain. This information is readily available in the literature on the subject. We recommend that you undertake a suitable training course.
The information in this document is only intended as a supplement.
CORRECT WORKING POSTURE
NOTE:
- Always maintain a firm footing and good balance.
- Never saw above shoulder height.
- Never use the chain saw from a ladder, tree or other unstable place.
- Do not overreach.
- Do not use the chain saw in bad weather or in the dark.
- Stand with both feet firmly on the ground.
- Pay attention to any obstructions in the work area.
- Hold the chain saw firmly with both hands when working.
RISK OF KICKBACK
WARNING!
Kickback can occur if the tip or topside of the bar comes into contact with wood or other solid objects. The saw then kicks back, which can cause fatal and/or serious personal injury.
• Always check before use that the chain brake is working properly.
- Do not allow the tip of the bar to make contact with wood or other solid objects.
FIG. 9
- The chain brake may not be applied automatically in the event of minor kickback. For this reason, always hold the chain saw firmly with both hands.
- The correct and careful way of working is the only reliable method of reducing the risk of kickback.
SAWING TECHNIQUE
Sawing with a pulling chain
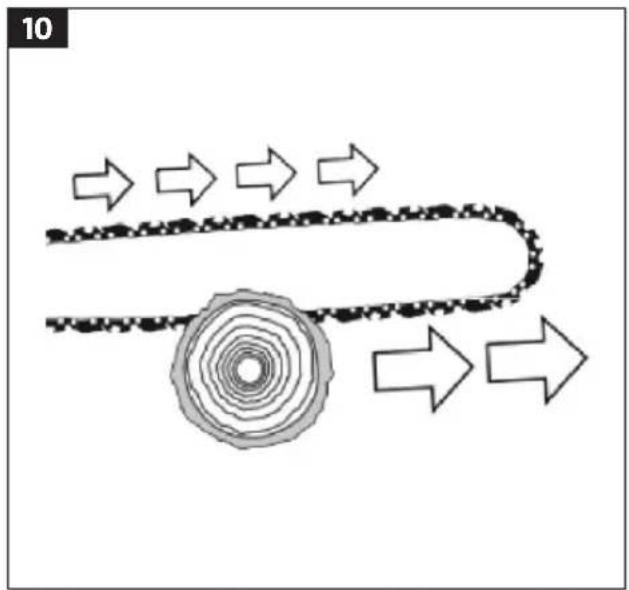
- With this technique sawing takes place with the underside of the bar, from up and down, so that the chain pulls the saw forwards away from the user. This allows the front of the saw to provide support and absorb the force from the wood being sawn.
FIG. 10
- When sawing with a pulling chain the user has much better control over the saw and can more easily avoid kickback. This is the preferred technique.
Sawing with a pushing chain
- With this technique sawing takes place with the topside of the bar, from down and up, so that the chain pushes the saw backwards towards the user. If bar twists the chain saw can throw back towards the user with great force.
FIG. 11
- If the user does not withstand the pushing force of the saw there is a risk of the tip of the bar coming into contact with the wood, which can cause kickback.
Felling trees
WARNING!
- Risk of personal injury.
- Felling and limbing should only be carried out by qualified personnel – risk of fatal and/or serious personal injury.
- Always stand to the side of the tree being felled – risk of fatal and/or serious personal injury.
Check the following points before tree felling.
- Check that there are no people or animals in the work area.
- Check that everyone involved in the work has a clear retreat from the felling area. Retreat (B) should run at an angle to the direction of felling (A).
FIG. 12
- Check that the area around the tree is free from obstructions that can be tripped over.
- Check that the nearest workplace is at least 2.5 tree heights away. Check the direction in which the tree is going to fall and make sure there are no people, animals or obstacles within at least 2.5 tree heights.
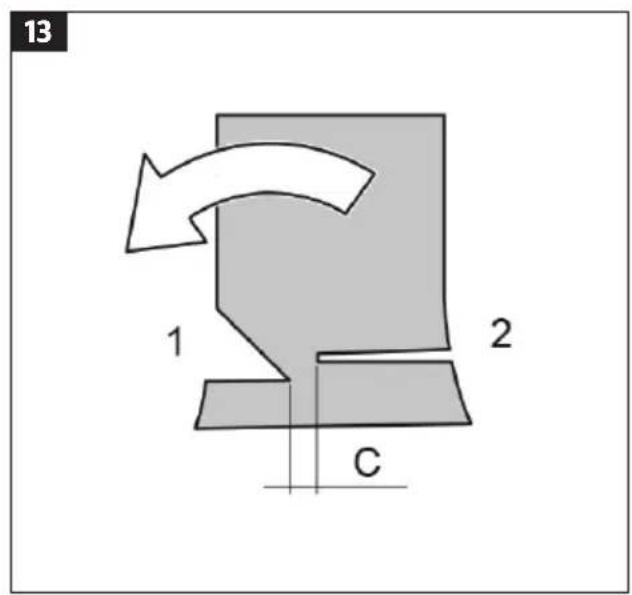
Tree felling takes place in two steps.
- Make a notch cut (1) through about 1/3 of the diameter of the tree, on the side in which the tree is to fall.
- Saw the felling cut (2) from the other side of the tree, 3–5 cm above the bottom of the notch cut. Always leave holding wood (C), which acts as a hinge.
FIG. 13
IMPORTANT:
Never saw all the way through the trunk.
Sawing lying logs
Saw half way through the log, turn it over and saw through from the other side.
NOTE:
Be careful not to let the bar and the chain come into contact with the ground.
Sawing supported logs
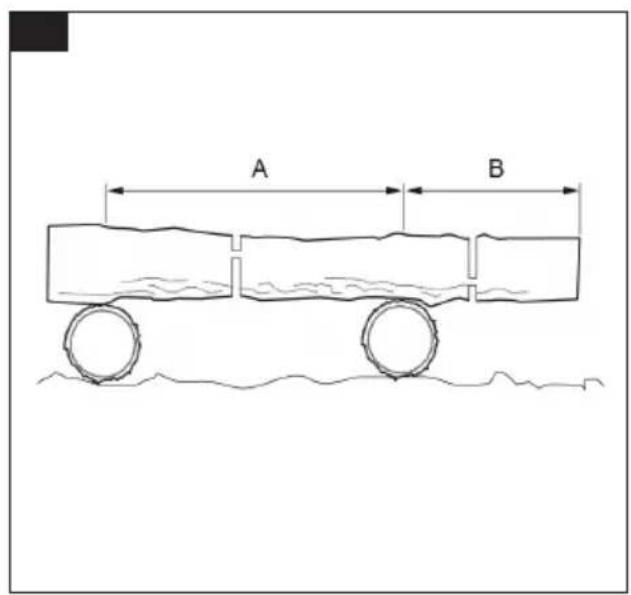
- We recommend cutting up logs on a sawbuck. If this is not possible the log should be lifted up and blocked up.
- In area A, first saw through about 1/3 of the diameter of the log from above and then saw through the rest from underneath. In area B, first saw through about 1/3 of the diameter of the log from underneath and then saw through the rest from above.
FIG. 14
WARNING!
Do not saw wood under tension. If the wood splits or if the bar is twisted there is risk of fatal and/or serious personal injury.
Limbing
• Always stand on the opposite side of the trunk from the branch to be cut.
- Start from the root end, and work up.
• Always saw from underneath and up.
- When limbing lying logs, cut the branches sticking up first. Branches bearing the weight of the trunk are cut after sawing up the log into pieces.
WARNING!
High branches or branches under tension can cause the chain to pinch.
MAINTENANCE
- Switch off the chain saw, pull out the plug and wait until all moving parts have completely stopped and the saw has cooled before cleaning and/or maintenance.
- Do not carry out any other maintenance or adjustments than those described in these instructions.
- Maintenance and repairs not described in these instructions should be carried out by an authorised service centre or other qualified personnel. Incorrect maintenance can result in the risk of personal injury and/or material damage.
CLEANING THE CHAIN SAW
- Remove any debris.
- Wipe the chain saw with a damp cloth.
CLEANING BAR LUBRICATION SLOT
- Remove the bar.
- Clear the lubrication slot in the bar with a suitable tool.
- Fit the bar.
IMPORTANT:
Clean the bar with plastic tools.
Never use metal tools.
CHECKING THE CHAIN TENSION
- A new chain must be tensioned after no more than 5 cuts. Once the chain has been run in it does not need to be tensioned as often.
- The chain is correctly tensioned when it rests against the underside of the bar, but can still be easily pulled along by hand.
- Adjust the tension of the chain when necessary.
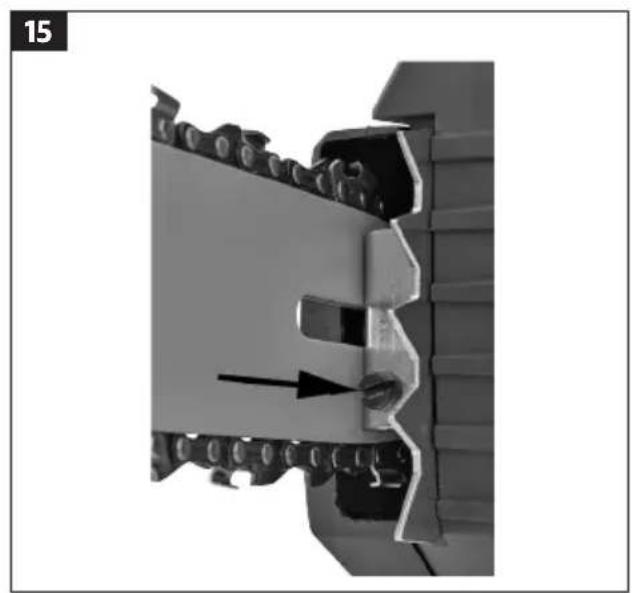
TENSIONING THE CHAIN
- Unscrew the nuts about 1 turn.
- Lift the tip of the bar a little.
- Tension the chain with the screw until the chain is flush with the underside of the bar.
FIG. 15
- Tighten the nut.
CHECKING THE CHAIN LUBRICATION
Do not use the chain saw without adequate lubrication of the chain, this will wear out the chain quicker.
- Check the oil level in the tank.
- Start the chain saw.
- Run the chain when holding the bar about 15 cm over a suitable surface for 15 seconds. If the chain lubrication is working properly there should be splashing of oil on the surface.
LUBRICATING THE SPROCKET
IMPORTANT:
- Wear heavy-duty safety gloves when handling the bar and chain.
- Switch off the saw, pull out the plug and wait until all moving parts have completely stopped before lubricating it.
The bar sprocket should be lubricated at intervals of 25 working hours, or once a week during intensive use.
- Clean the sprocket.
- Press grease from the nozzle of the grease gun into the lubrication hole until it comes out by the edge of the bar. A grease gun with a slim nozzle simplifies effective lubrication.
FIG. 16
- Pull round the chain by hand. Repeat until all the sprocket has been lubricated.
FILLING CHAIN OIL
NOTE:
Preferably use biodegradable, vegetable chain oil to minimise the environmental impact.
- Place the chain saw on a stable surface with the filler cap facing up.
- Clean the cap are the area around it, if necessary.
- Open the filler cap slowly and take it off.
- Carefully fill with chain oil. Avoid spilling.
- Check the oil level in the sight glass. The oil level should be between the MAX and MIN markings.
FIG. 17
-
Tighten the filler cap by hand.
-
Wipe up any spilled oil.
SHARPENING THE CHAIN
WARNING!
- A worn or incorrectly filed chain can cause kickback, which can result in fatal and/or serious personal injury.
- Wear heavy-duty safety gloves when handling the bar and chain.
- The filing should be done with a special tool to ensure that the chain has the right angles and height.
- All the drive links should have the same height. Different heights of the drive links will cause the chain to run out of balance and damage it.
- The minimum height of the drive links is 4 mm. Discard the chain if they are less. The angles of the cutting edges must be maintained. File with 2 or 3 strokes from inside and out.
- File the chain with a round file. Always file the cutting edges from inside and out. Pay attention to the values given in the diagrams. After filing all the drive links should have the same width and height.
- The height of the rakers should be checked after 3 – 4 filings. If necessary, file down the rakers with a file template and flat file.
BAR
- Turn the bar round every 8 working hours to ensure that it wears uniformly.
- Use a cleaning tool to keep the slot and lubrication holes clean.
- Check the bar at regular intervals for wear and damage, and replace if necessary.
- Clean the oil channels on the bar to ensure proper lubrication of the bar and chain.
WARNING!
Never fit a new chain on a worn sprocket or worn guide ring.
STORAGE AND TRANSPORT
Long-term storage
- Store the chain saw out of reach of unauthorised persons.
- Allow the chain saw to cool before putting away.
• Store the chain saw horizontally. - Remove the chain if the saw is not going to be used for a long time.
• Store the chain saw in a dry place.
Transport
Follow the instructions below when transporting in a vehicle:
- Make sure the guard is fitted over the bar.
- Secure the chain saw so that it cannot move.
- If possible, transport the chain saw in its original pack.
- SE ELKEDJESÅG
- EC DECLARATION OF CONFORMITY
- EG FÖRSÄKRAN OM ÖVERENSSTÄMMELSE
- EF SAMSVARSERKLÆRING
- DEKLARACJA ZGODNOŚCI WE
- SÄKERHETSANVISNINGAR
- FÖRVARING OCH TRANSPORT
- Långvarig förvaring
- KONTROLL AV SAGKJEDETS STRAMMING
- STRAMMING AV SAGKJEDET
- IMPORTANT:
- Risk of personal injury as a result of vibration.
- Electrical safety
- Maintenance
- Special safety instructions
- Remaining risks
- Reduction of noise and vibrations
- Always wear ear protection.
- DESCRIPTION
- ASSEMBLY
- WARNING!
- Fitting the bar and chain
- NOTE:
- USE
- INTENDED USE
- SAFETY DEVICES
- Chain catcher
- Chain brake handle
- Hand guard
- Strain reliever
- CHECK BEFORE STARTING
- STARTING
- CORRECT WORKING POSTURE
- RISK OF KICKBACK
- 9
- SAWING TECHNIQUE
- Sawing with a pulling chain
- 10
- Sawing with a pushing chain
- 11
- Felling trees
- Check the following points before tree felling.
- 12
- Tree felling takes place in two steps.
- 13
- Never saw all the way through the trunk.
- Sawing lying logs
- Be careful not to let the bar and the chain come into contact with the ground.
- Sawing supported logs
- 14
- Do not saw wood under tension. If the wood splits or if the bar is twisted there is risk of fatal and/or serious personal injury.
- Limbing
- High branches or branches under tension can cause the chain to pinch.
- CLEANING THE CHAIN SAW
- CLEANING BAR LUBRICATION SLOT
- Clean the bar with plastic tools.
- Never use metal tools.
- CHECKING THE CHAIN TENSION
- TENSIONING THE CHAIN
- 15
- CHECKING THE CHAIN LUBRICATION
- LUBRICATING THE SPROCKET
- 16
- FILLING CHAIN OIL
- Preferably use biodegradable, vegetable chain oil to minimise the environmental impact.
- 17
- SHARPENING THE CHAIN
- BAR
- STORAGE AND TRANSPORT
- Long-term storage
- Transport
Brand : Meec Tools
Model : 004-907
Category : Saw