
ACMT 5131 - Cooker WHIRLPOOL - Free user manual and instructions
Find the device manual for free ACMT 5131 WHIRLPOOL in PDF.


| Product Type | Free-standing gas cooker |
| Brand | Whirlpool |
| Model | ACMT 5131 |
| Oven Capacity | 60 L |
| Oven Dimensions (W x D x H) | 410 x 424 x 340 mm |
| Lower Compartment Dimensions (W x D x H) | 420 x 440 x 230 mm |
| Number of Gas Burners | 4 (Fast, Semi Fast, Auxiliary, Auxiliary) |
| Ignition Type | Electronic ignition with flame failure safety device |
| Safety Feature | Anti-tip safety chain included |
| Oven Cooking Modes | Convection, Baking, Pizza, Fan Assisted, Grill, Double Grill, Fan Assisted Double Grill, Defrosting, Bottom, Bottom Ventilated |
| Temperature Range | 40°C to 250°C |
| Oven Timer | Electronic programmer with clock, minute minder, and delayed start |
| Oven Light | Yes, interior light |
| Door Design | Removable glass door for easy cleaning |
| Steam Cleaning | Yes, using 300ml water at 100°C for 15 minutes |
| Leveling Feet | Yes, adjustable at each corner |
| Power Supply | 230 V, 50/60 Hz (refer to data plate) |
| Gas Connection | Flexible hose or rigid metal pipe; adaptable to natural or LPG |
| Accessories Included | Sliding grill rack, dripping pan, adjustable feet |
| Oven Bulb Replacement | 230 V, 25 W, E14 cap |
Frequently Asked Questions - ACMT 5131 WHIRLPOOL
User questions about ACMT 5131 WHIRLPOOL
0 question about this device. Answer the ones you know or ask your own.
Ask a new question about this device
Download the instructions for your Cooker in PDF format for free! Find your manual ACMT 5131 - WHIRLPOOL and take your electronic device back in hand. On this page are published all the documents necessary for the use of your device. ACMT 5131 by WHIRLPOOL.
USER MANUAL ACMT 5131 WHIRLPOOL
Instructions for use
Mode d'emploi
Gebruiksaanwijzing
natural_image
Close-up of wooden clothespins and clips (no text or symbols visible)Brugsanvisning
Bruksanvisning
Käyttöohje
natural_image
Black and white photo of multiple empty glass bottles with black lids, no visible text or symbols
natural_image
Close-up of frothy glass glasses with subtle reflections (no text or symbols visible)Οδηγίες χρήσης
natural_image
Close-up of a metallic industrial device with perforated ventilation slots and a handle (no visible text or symbols)Návod k použití
Návod na použitie
SENSING THE DIFFERENCE
ACMT 5131/WHACMT 5131/WHACMT 5131/WI
ACMT 5131/IXACMT 5131/IXACMT 5131/IXACMT
GB
English
Operating Instructions COOKER AND OVEN
Contents
Operating Instructions,1
SAFETY INSTRUCTIONS,3
Description of the appliance-Overall view,23
Description of the appliance-Control Panel,24
Installation,25
Start-up and use,30
Cooking modes,31
Clock/Minute Minder Operation ,34
Care and maintenance,36
PL
Polski
Instrukcja obsługi
KUCHENKA I PIEKARNIK
Spis treści
Before using the appliance carefully read Health and Safety and Use and Care guides.
Keep these instructions close at hand for future reference.
These instructions shall also be available on website: www.whirlpool.eu
YOUR SAFETY ANDSAFETY OF OTHERS IS VERY IMPORTANT
This manual and the appliance itself provide important safety warnings, to be read and observed at all times.

This is the safety alert symbol.
This symbol alerts you to potential hazards that can kill or hurt you and others.
All safety messages will follow the safety alert symbol or the word "DANGER" or "WARNING." These words mean:

DANGER
Indicates a hazardous situation which, if not avoided, will cause serious injury.

WARNING
Indicates a hazardous situation which, if not avoided, could cause serious injury.
All safety warnings give specific details of the potential risk presented and indicate how to reduce risk of injury, damage and electric shock resulting from improper use of the appliance. Carefully observe the following instructions.
Failure to observe these instructions may lead to risks. The Manufacturer declines any liability for injury to persons or animals or damage to property if these advices and precautions are not respected.
- Very young (0-3 years) and young children (3-8 years) shall be kept away unless continuously supervised.
- Children from 8 years old and above and persons with reduced physical, sensory or mental capabilities or lack of experience and knowledge can use this appliance only if they are supervised or have been given instructions on safe appliance use and if they understand the hazards involved. Children shall not play with the appliance. Cleaning and user maintenance shall not be made by children without supervision.
- The appliance and its accessible parts become hot during use, young children should be kept away. Do not allow the appliance to come into contact with cloths or other flammable materials until all the components have cooled down completely.
- During and after use, do not touch the heating elements or interior surface of the appliance - risk of burns.
- Overheated oils and fats catch fire easily. Always remain vigilant when cooking foods rich in fat, oil or alcohol (e.g. rum, cognac, wine).
- Never leave the appliance unattended during food drying.
- WARNING : Do not heat or cook with sealed jars or containers in the appliance.
- The pressure that builds up inside might cause them to explode, damaging the appliance.
- If alcoholic beverages are used when cooking foods (e.g. rum, cognac, wine), remember that alcohol evaporates at high temperatures. As a result, there is a risk that vapours released by the alcohol catch fire if coming in contact with the electrical heating element.
- If the appliance is suitable for probe usage, Only use the temperature probe recommended for this oven.
- DANGER OF FIRE : Do not store items on the cooking surfaces since they can catch fire.
- CAUTION : In case of hotplate glass breakage:-shut immediately off all burners and any electrical heating element and isolate the appliance from the power supply; - do not touch the appliance surface; -do not use the appliance
- These instructions are valid if the country symbol appears on the appliance. If the symbol doesn't appear on the appliance, it is necessary to refer to the technical instructions which will provide the necessary instructions concerning modification of the appliance to the conditions of use of the country
The glass lid can break in if it is heated up. Turn off all the burners and the electric plates before closing the lid. Do not shout down lid when burner alight - If the information in this manual is not followed exactly, a fire or explosion, may result causing property damage or injury.
INTENDED USE OF THE PRODUCT
- This appliance is designed solely for domestic usage. No other use is permitted (e.g. heating rooms). To aim the appliance as professional use is forbidden. The manufacturer declines all responsibility for inappropriate use or incorrect setting of the controls.
- This appliance is intended to be used in household and similar applications such as :
- Staff kitchen areas in shops, offices and other working environments;
- Farm houses;
- By clients in hotels, motels and other residential environments;
- Bed and breakfast type environments.
- CAUTION : The appliance is not intended to be operated by means of an external timer or separate remote controlled supply system.
- Do not use the appliance outdoors.
- Do not store explosive or flammable substances such as aerosol cans and do not place or use gasoline or other flammable materials in or near the appliance: a fire may break out if the appliance is inadvertently switched on.
INSTALLATION
- Installation and repairs must be carried out by a qualified technician, in compliance with the manufacturer's instructions and local safety regulations. Do not repair or replace any part of the appliance unless specifically stated in the user manual.
- The electrical and gas connections must comply with local regulation.
- Children should not perform installation operations. Keep children away during installation of the appliance. Keep the packaging materials (plastic bags, polystyrene parts, etc.) out of reach of children, during and after the installation of the appliance.
WARNING : Modification of the appliance and its method of installation are essential in order to use the appliance safely and correctly in all the additional countries
- Use protective gloves to perform all unpacking and installation operations.
- After unpacking the appliance, make sure that the appliance door closes properly. In the event of problems, contact the dealer or your nearest After-sales Service. To prevent any damage, only remove the oven from its polystyrene foam base at the time of installation.
- The appliance must be handled and installed by two or more persons.
- The appliance must be disconnected from the power supply before carrying out any installation operation.
- During installation, make sure the appliance does not damage the power cable.
- Only activate the appliance when the installation procedure has been completed.
- Kitchen units in contact with the appliance must be heat resistant (min 90°C).
GAS CONNECTION
WARNING : Prior to installation, ensure that the local gas delivery conditions (nature or pressure) are compatible with the setting of the hob (see the rating plate and injector table).
- Use pressure regulators suitable for the gas pressure indicated in the instruction.
- WARNING : The adjustment conditions for this appliance are stated on the lable (or data plate).
-
WARNING : This appliance is not connected to a combustion products evacuation device. It shall be installed and connected in accordance with current installation regulations. Particulat attention shall be given to the relevant requirements regarding ventilation.
-
WARNING : These operations must be performed by a qualified technician.
- If the appliances is connected to liquid gas, the regulation screw must be fastned as tightly as possible.
- When gas cylinder is adopted, the gas cylinder or gas container must be properly settled (vertical orientation).
- Use only flexible or rigid metal hose for gas connection.
- IMPORTANT : If a staineless steel hose is used, it must be installed so as not touch any mobile part of the furniture (e.g. drawer). It must pass thorough an area where there are no obstructions and where it is possible to inspect it on all its length.
- After connection to the gas supply, check for leaks with soapy water. Light up the burners and turn
ELECTRICAL WARNINGS
- Make sure the voltage specified on the rating plate corresponds to that of your home.
- For installation to comply with current safety regulations, an omnipolar switch with minimum contact gap of 3mm is required.
- Regulation require that the appliance is earthed.
- For appliances with fitted plug, if the plug is not suitable for you socket outlet, contact a qualified technician.
- Do not use extension leads, multiple sockets or adapters. Do not connect the appliance to a socket which can be operated by remote control.
- The power cable must be long enough for connecting the appliance, once fitted in its housing, to the main power supply.
- Do not pull the power supply cable.
- If the power cable is damaged it must be replaced with an identical one. The power cable must only be replaced by a qualified technician in compliance with the manufacturer instruction and current safety regulations. Contact an authorized service center.
- Do not operate this appliance if it has a damaged mains cord or plug, if it is not working properly, or if it has been damaged or dropped. Do not immerse the mains cord or plug in water. Keep the cord away from hot surfaces.
- The electrical components must not be accessible to the user after installation.
- Do not touch the appliance with any wet part of the body and do not operate it when barefoot.
- It must be possible to disconnect the appliance from the power supply by unplugging it if plug is accessible, or by means of an accessible multi-pole switch installed upstream of the socket in conformity with national electrical safety standards.
CORRECT USE
CAUTION : The cooking process has to be supervised. A short cooking process has to be supervised continuously.
- Do not use the hob as a work surface or support.
WARNING : Unattended cooking on a hob with fat or oil can be dangerous and may result in fire.
Never try to extinguish a fire with water, but switch off the appliance and then cover flame e.g. with a lid or a fire blanket.
- Use oven gloves to remove pans and accessories, taking care not to touch the heating elements.
- IMPORTANT : Should you experience difficulty in turning the burners knobs, please contact After Sales Service for replacement of the burner tap if found to be faulty.
- The openings use for the ventilation and dispersion of heat must never be covered.
- Use pots and pans with bottoms the same width as that of the burners or slightly larger (see specific table). Make sure pots on the grates do not protrude beyond the edge of the hob.
- WARNING : Do not let the burner flame extend beyond the edge of the pan
- IMPORTANT : Improper use of the grids can result in damage to the hob: do not position the grids upside down or slide them across the hob.
- Do not use : Cast iron griddles, ollar stones, terracotta pots and pans.
- Heat diffusers such as metal mesh, or any other types.
- Note : should particular local conditions of the delivered gas make the ignition of burner difficult, it is advisable to repeat the operation with the knob turned to small flame setting.
- Note : In case of installation of a hood above the cooktop, please refer to the hood instructions for the correct distance.
- WARNING : The protective rubber feet on the grids represent a chocking hazard for young children. After removing the grids, please ensure that all the feet are correctly fitted.
- Remove any liquid from the lid before opening it
CLEANING AND MAINTANCE
- The appliance must be disconnected from the power supply before carrying out any cleaning or maintenance operation.
- Never use steam cleaning equipment.
- Ensure that the appliance is switched off before replacing the lamp to avoid the possibility of electric shock.
- Do not use harsh abrasive cleaners or sharp metal scrapers to clean the appliance door glass since they can scratch the surface, which may result in shattering of the glass.
- Do not use abrasive or corrosive products, chlorine-based cleaners or pan scourers.
- To avoid damaging the electric ignition device, do not use it when the burners are not in their housing.
SAFEGUARDING THE ENVIRONMENT
DISPOSAL OF PACKAGING MATERIALS
- The packaging material is 100% recyclable and is marked with the recycle symbol. The various parts of the packaging must therefore be disposed of responsibility and in full compliance with local authority regulations governing waste disposal.
SCRAPPING OF HOUSEHOLD APPLIANCES
- When scrapping the appliance, make it unusable by cutting off the power cable and removing the doors and shelves (if present) so that children cannot easily climb inside and become trapped.
- This appliance is manufactured with recyclable or reusable materials. Dispose of it in accordance with local waste disposal regulations.
- For further information on the treatment, recovery and recycling of household electrical appliances, contact your competent local authority, the collection service for household waste or the store where you purchase the appliance.
- This appliance is marked in compliance with European Directive 2012/19/EU, Waste Electrical and Electronic Equipment (WEEE).
- By ensuring this product is disposed of correctly, you will help prevent potential negative consequences for the environment and human health, which could otherwise be caused by inappropriate waste handling of this product.
- The symbol 📋 on the product or on the accompanying documentation indicates that it should not be treated as domestic waste but must be taken to an appropriate collection center for the recycling of electrical and electronic equipment.
ENERGY SAVING TIPS
- Only preheat the oven if specified in the cooking table or your recipe.
- Use dark lacquered or enamelled baking moduls as they absorb heat far better.
- Switch the oven off 10/15 minutes before the set cooking time. Food requiring prolonged cooking will continue to cook even once the oven is switched off."
DECLARATION OF CONFORMITY
- This appliance has been designed, constructed and distributed in compliance with the safety requirements of European Directives :
° 2006/95/EC Low Voltage Directive
° 2004/108/EC Electromagnetic Compatibility Directive"
- This appliance, which is intended to come into contact with foodstuffs, complies with European Regulation (LOGO CE) n. 1935/2004.
- This appliance meets the Eco Design requirements of European Regulations n. 65/2014, and n. 66/2014 in conformity to the European standard EN 60350-1.
| TABLE OF CHARACTERISTSICS | |
| Dimensions | width 410 mmheight 340 mmdepth 424 mm |
| Volume | 60l |
| Dimensions of the lower compartment | width 42 cmheight 23 cmdepth 44 cm |
| Burners | may be adapted for use with any type of gas shown on the data plate, which is located inside the flap or, after the oven compartment has been opened, on the left-hand wall inside the oven. |
| Voltage and frequency | see data plate |
| ENERGY LABEL and ECODESIGN | Energy consumption for Natural convection – heating mode: [IMAGE]Convection;Declared energy consumption for Forced convection Class – heating mode: Baking [IMAGE] |
Data plate, is located inside the flap or, after the oven compartment has been opened, on the left-hand wall inside the oven.
AFTER-SALES SERVICE
Before calling the After-Sales Service
- See if you can eliminate the problem on your own (see "Troubleshooting Guide").
- Switch the appliance off and on again to see if the problem persists.
If the fault persists after the above checks, contact your nearest After-Sales Service.
Specify: the type of fault;
- exact type and model of oven;
- the After-Sales Service number (the number given after the word "Service" on the dataplate) located inside the storage compartment flap. The service number is also given in the warranty booklet;
- your full address;
- your telephone number.
For repairs, contact an Authorised After-Sales Service, indicated in the warranty.
If any work is carried out by technicians not belonging to the Manufacturer's authorised After-Sales Service centres, request a receipt specifying the work performed and make sure the replacement parts are original.
Failure to comply with these instructions can compromise the safety and quality of the product.
SERVICE
00 0000 00000

GB
BEZPEČNOSTNÉ POKYNY
DÔLEŽITÉ INFORMÁCIE A POKYNY
Pred použitím zariadenia si pozorne prečítajte Pokyny pre ochranu zdravia a bezpečnosti a sprievodcu Použitím a starostlivosti. Uchovajte si tieto pokyny pre budúce použitie.
BEZPIECZEŃSTWO TWOJE I INNYCH OSÓB JEST BARDZO WAŻNE
pasukite rankeneles is maks. ELEKTROS [SPEJIMAI
Description of the appliance Overall view
1.Hob burner
2.Hob Grid
3. Control panel
4.Sliding grill rack
5.DRIPPING pan
6..Adjustable foot
7. Containment surface for spills
8.GUIDE RAILS for the sliding racks
9.position 5
10.position 4
11.position 3
12.position 2
13.position 1
14.Glass Cover *
*Available only on certain models
PL
Description of the appliance Control panel
- Electronic cooking programmer
2.THERMOSTAT knob - SELECTOR knob
4.THERMOSTAT indicator light
5.Hob BURNER control knob

The appliance may only be installed in permanently-ventilated rooms, according to current national legislation. The room in which the appliance is installed must be ventilated adequately so as to provide as much air as is needed by the normal gas combustion process (the flow of air must not be lower than 2 m^3/h per kW of installed power).
The air inlets, protected by grilles, should have a duct with an inner cross section of at least 100 cm^2 and should be positioned so that they are not liable to even partial obstruction (see figure A).
These inlets should be enlarged by 100% - with a minimum of 200 cm ^2 - whenever the surface of the hob is not equipped with a flame failure safety device. When the flow of air is provided in an indirect manner from adjacent rooms (see figure B), provided that these are not communal parts of a building, areas with increased fire hazards or bedrooms, the inlets should be fitted with a ventilation duct leading outside as described above.
A
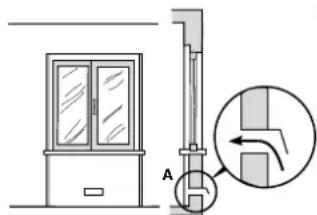
Ventilation opening for comburent air
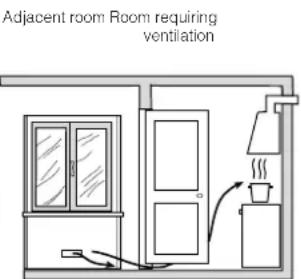
Increase in the gap between the door and the flooring
After prolonged use of the appliance, it is advisable to open a window or increase the speed of any fans used.
Disposing of combustion fumes
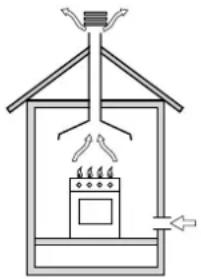
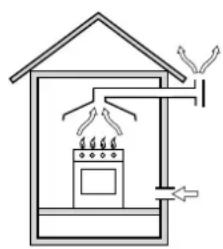
The disposal of combustion fumes should be guaranteed using a hood connected to a safe and efficient natural suction chimney, or using an electric fan that begins to operate automatically every time the appliance is switched on (see figure).
natural_image
Simple line drawing of a house interior with a stove, roof, and air duct (no text or symbols)Fumes channelled straight outside
natural_image
Simple line drawing of a house with steam rising from a chimney, enclosed in an enclosure (no text or symbols)Fumes channelled through a chimney or a branched flue system (reserved for cooking appliances)
The liquefied petroleum gases are heavier than air and collect by the floor, therefore all rooms containing LPG cylinders must have openings leading outside so that any leaked gas can escape easily.
LPG cylinders, therefore, whether partially or completely full, must not be installed or stored in rooms or storage areas that are below ground level (cellars, etc.). Only the cylinder being used should be stored in the room; this should also be kept well away from sources of heat (ovens, chimneys, stoves) that may cause the temperature of the cylinder to rise above 50^ C.
Positioning and levelling
It is possible to install the appliance alongside cupboards whose height does not exceed that of the hob surface.
Make sure that the wall in contact with the back of the appliance is made from a non-flammable, heat-resistant material (T 90°C).
To install the appliance correctly:
- Place it in the kitchen, dining room or the bed-sit (not in the bathroom).
- If the top of the hob is higher than the cupboards, the appliance must be installed at least 200 mm away from them.
- If the cooker is installed underneath a wall cabinet, there must be a minimum distance of 420 mm between this cabinet and the top of the hob.
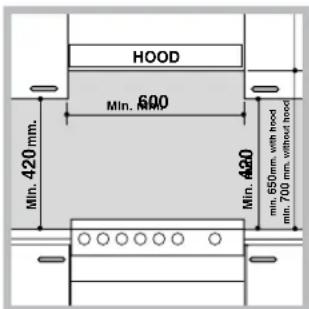
- If the cooker is installed underneath a wall cabinet, there must be a minimum distance of 420mm between this cabinet and the top of the hob. This distance should be increased to 700mm if the wall cabinets are flammable (see figure).
- Do not position blinds behind the cooker or less than 200 mm away from its sides.
- Any hoods must be installed according to the instructions listed in the relevant operating manual.
Levelling
natural_image
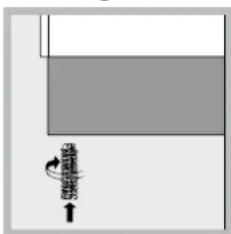
Simple diagram showing a gray rectangle with a black arrow pointing to it and a small upward arrow below (no text or symbols)If it is necessary to level the appliance, screw the adjustable feet into the places provided on each corner of the base of the cooker (see figure).
natural_image
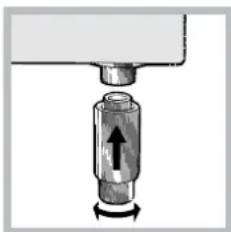
Mechanical component diagram showing a cylindrical assembly with an arrow indicating rotation (no text or symbols)The legs* fit into the slots on the underside of the base of the cooker.
The appliance must not be installed behind a decorative door in order to avoid overheating
Electrical connection
Install a standardised plug corresponding to the load indicated on the appliance data plate (see Technical data table).
The appliance must be directly connected to the mains using an omnipolar circuit-breaker with a minimum contact opening of 3 mm installed between the appliance and the mains. The circuit-breaker must be suitable for the charge indicated and must comply with NFC 15-100 regulations (the earthing wire must not be interrupted by the circuit-breaker). The supply cable must be positioned so that it does not come into contact with temperatures higher than 50°C at any point.
Before connecting the appliance to the power supply, make sure that:
- The appliance is earthed and the plug is compliant with the law.
-
The socket can withstand the maximum power of the appliance, which is indicated by the data plate.
-
The voltage is in the range between the values indicated on the data plate.
- The socket is compatible with the plug of the appliance. If the socket is incompatible with the plug, ask an authorised technician to replace it. Do not use extension cords or multiple sockets.
Once the appliance has been installed, the power supply cable and the electrical socket must be easily accessible.
The cable must not be bent or compressed.
The cable must be checked regularly and replaced by authorised technicians only.
The manufacturer declines any liability should these safety measures not be observed.
Gas connection
Connection to the gas network or to the gas cylinder may be carried out using a flexible rubber or steel hose, in accordance with current national legislation and after making sure that the appliance is suited to the type of gas with which it will be supplied (see the rating sticker on the cover: if this is not the case see below). When using liquid gas from a cylinder, install a pressure regulator which complies with current national regulations. To make connection easier, the gas supply may be turned sideways*: reverse the position of the hose holder with that of the cap and replace the gasket that is supplied with the appliance.
Check that the pressure of the gas supply is consistent with the values indicated in the Table of burner and nozzle specifications (see below). This will ensure the safe operation and durability of your appliance while maintaining efficient energy consumption.
Gas connection using a flexible rubber hose
Make sure that the hose complies with current national legislation. The internal diameter of the hose must measure: 8 mm for liquid gas supply; 13 mm for methane gas supply.
Once the connection has been performed, make sure that the hose:
- Does not come into contact with any parts that reach temperatures of over 50°C.
- Is not subject to any pulling or twisting forces and that it is not kinked or bent.
-
Does not come into contact with blades, sharp corners or moving parts and that it is not compressed.
-
Is easy to inspect along its whole length so that its condition may be checked.
• Is shorter than 1500 mm. - Fits firmly into place at both ends, where it will be fixed using clamps that comply with current regulations.
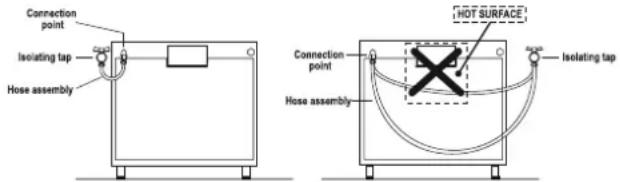
If one or more of these conditions is not fulfilled or if the cooker must be installed according to the conditions listed for class 2 - subclass 1 appliances (installed between two cupboards), the flexible steel hose must be used instead (see below).
Connecting a flexible jointless stainless steel pipe to a threaded attachment
Make sure that the hose and gaskets comply with current national legislation.
To begin using the hose, remove the hose holder on the appliance (the gas supply inlet on the appliance is a cylindrical threaded 1/2 gas male attachment).
Perform the connection in such a way that the hose length does not exceed a maximum of 2 metres, making sure that the hose is not compressed and does not come into contact with moving parts.
Checking the tightness of the connection
When the installation process is complete, check the hose fittings for leaks using a soapy solution. Never use a flame.
Adapting to different types of gas
It is possible to adapt the appliance to a type of gas other than the default type (this is indicated on the rating label on the cover).
Adapting the hob
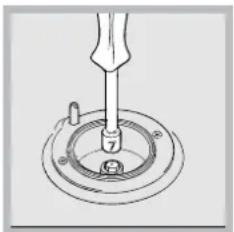
Replacing the nozzles for the hob burners:
- Remove the hob grids and slide the burners off their seats.
natural_image
Technical line drawing of a mechanical assembly with a tool inserted into a circular component (no text or symbols)instructions in reverse.
-
Unscrew the nozzles using a 7 mm socket spanner (see figure), and replace them with nozzles suited to the new type of gas (see Burner and nozzle specifications table).
-
Replace all the components by following the above
Adjusting the hob burners' minimum setting:
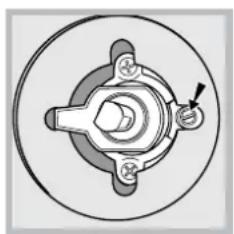
- Turn the tap to the minimum position.
- Remove the knob and adjust the regulatory screw, which is positioned inside or next to the tap pin, until the flame is small but steady.
If the appliance is connected to a liquid gas supply, the regulatory screw must be fastened as tightly as possible.
natural_image
Mechanical component diagram showing a central hub with mounting holes and a pointer (no text or symbols)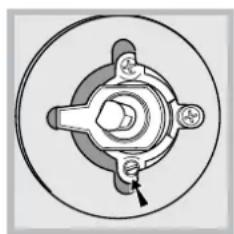
natural_image
Mechanical component diagram showing a central hub with four surrounding holes and a bolted end (no text or symbols)- While the burner is alight, quickly change the position of the knob from minimum to maximum and vice versa several times, checking that the flame is not extinguished.
The hob burners do not require primary air adjustment.
After adjusting the appliance so it may be used with a different type of gas, replace the old rating label with a new one that corresponds to the new type of gas (these labels are available from Authorised Technical Assistance Centres).
Should the gas pressure used be different (or vary slightly) from the recommended pressure, a suitable pressure regulator must be fitted to the inlet hose in accordance with current national regulations relating to "regulators for channelled gas".
Safety Chain
natural_image
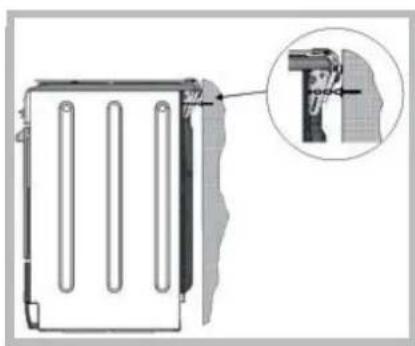
Technical diagram of a mechanical component with an inset close-up showing a detail (no text or symbols)! In order to prevent accidental tipping of the appliance, for example by a child climbing onto the oven door, the supplied safety chain MUST be installed!
The cooker is fitted with a safety chain to be fixed by means of a screw (not supplied with the cooker) to the wall behind the appliance, at the same height as the chain is attached to the appliance.
Choose the screw and the screw anchor according to the type of material of the wall behind the appliance. If the head of the screw has a diameter smaller than 9mm, a washer should be used. Concrete wall requires the screw of at least 8mm of diameter, and 60mm of length.
Ensure that the chain is fixed to the rear wall of the cooker and to the wall, as shown in figure, so that after installation it is tensioned and parallel to the ground level.
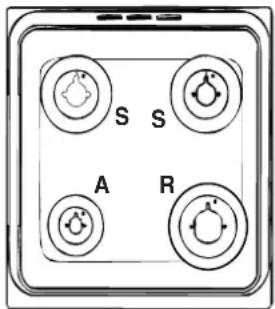
Table of burner and nozzle specifications
THERMOSTAT indicator light
When this is illuminated, the oven is generating heat. It switches off when the inside of the oven reaches the selected temperature. At this point the light illuminates and switches off alternately, indicating that the thermostat is working and is maintaining the temperature at a constant level.
Oven light
This is switched on by turning the SELECTOR knob to any position other than "0". It remains lit as long as the oven is operating. By selecting with the knob, the light is switched on without any of the heating elements being activated.
Timer\*
To activate the Timer proceed as follows:
- Turn the TIMER knob in a clockwise direction for almost one complete revolution to set the buzzer.
- Turn the TIMER knob in an anticlockwise direction to set the desired length of time.
| Table 1 Liquid Gas Natural Gas | |||||||||
| Burner Diameter(mm) | Thermal PowerkW (p.c.s.)*Nominal Reduced (mm) (mm) *** (mm) | By-Pass1/100 | Nozzle1/100 | Flow*g/h | Nozzle1/100 | Flow*l/h | |||
| Fast(Large)(R) | 100 | 3.00 | 0.7 | 41 | 87 | 218 | 214 | 128 | 286 |
| Semi Fast(Medium)(S) | 75 | 1.90 | 0.4 | 30 | 69 | 138 | 136 | 104 | 181 |
| Auxiliary(Small)(A) | 51 | 1.00 | 0.4 | 30 | 50 | 73 | 71 | 78 | 95 |
| SupplyPressures | Nominal (mbar)Minimum (mbar)Maximum (mbar) | 302035 | 302035 | 201725 | |||||
Table 1 for Poland
| Burner | Diameter (mm) | Thermal Power kW (p.c.s.*) Min. | Thermal Power kW (p.c.s.*) Nominal | G20 (GZ50) | G2.350 (GZ35) | Thermal Power kW (p.c.s.*) Nominal | G30 (GPB) | |||
| Nozzle 1/100 (mm) | Flow* l/h | Nozzle 1/100 (mm) | Flow* l/h | Nozzle 1/100 (mm) | Flow* g/h | |||||
| Fast (Large)(R) | 100 | 0,70 | 3,00 | 128 | 285 | 170 | 397 | 3,30 | 87 | 247 |
| Semi Fast (Medium)(S) | 75 | 0,40 | 1,90 | 104 | 181 | 120 | 251 | 2,10 | 69 | 160 |
| Auxiliary (Small)(A) | 51 | 0,40 | 1,00 | 78 | 95 | 102 | 132 | 1,10 | 50 | 95 |
| Supply Pressures | Minimum (mbar) | 16 | 10 | 29 | ||||||
| Nominal (mbar) | 20 | 13 | 37 | |||||||
| Maximum (mbar) | 25 | 16 | 44 | |||||||
* At 15°C and 1013 mbar- dry gas
** Propane P.C.S. = 50,37 MJ/Kg

Butane
P.C.S. = 49,47 MJ/Kg
Natural
P.C.S. = 37,78 MJ/m ^4
Using the hob
Lighting the burners
For each BURNER knob there is a full ring showing the strength of the flame for the relevant burner. To light one of the burners on the hob:
- Bring a flame or gas lighter close to the burner.
- Press the BURNER knob and turn it in an anticlockwise direction so that it is pointing to the maximum flame setting ⬆.
- Adjust the intensity of the flame to the desired level by turning the BURNER knob in an anticlockwise direction. This may be the minimum setting ♠, the maximum setting ♦ or any position in between the two.
If the appliance is fitted with an electronic lighting
natural_image
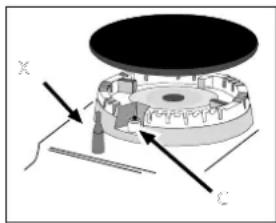
Mechanical assembly diagram showing a rotating component with labeled axes X and C (no text or symbols beyond labels)device* (C), press the BURNER knob and turn it in an anticlockwise direction, towards the minimum flame setting, until the burner is lit. The burner may be extinguished when the knob is released. If this occurs,
repeat the operation, holding the knob down for a longer period of time.
f the appliance is equipped with a flame failure safety device (X), press and hold the BURNER knob for approximately 3-7 seconds to keep the flame alight and to activate the device.
If the flame is accidentally extinguished, switch off the burner and wait for at least 1 minute before attempting to relight it.
To switch the burner off, turn the knob until it reaches the stop position •.
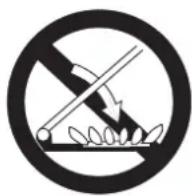
WARNING! The glass lid can break in if it is heated up. Turn off all the burners and the electric plates before closing the lid.
Flame adjustment according to levels
 | Ideal for gentle cooking (e.g: rice, sauces, roasts, sh) with liquids (water, wine, broth, milk) |
 | Ideal for stewing (for a long period of me) and thickening. Creaming pasta, |
 | Ideal for sautéing. |
 | Cooking on a high ame and browning (roast, steaks, escalopes, sh llets, fried eggs.) |
 | Ideal for grilling and browning, starng to cook, frying deep frozen products. |
 | Ideal for rapidly increasing the temperature of food to fast boiling in the case of water or rapidly heang cooking liquids. |
Advice when using burners
For the burners to work in the most efficient way possible and to save on the amount of gas consumed, it is recommended that only pans that have a lid and a flat base are used. They should also be suited to the size of the burner:
| Burner Cookware diameter (cm) | |
| Fast (R) 24 - 26 | |
| Semi Fast (S) 16 - 20 | |
| Auxiliary (A) 10 - 14 | |
To identify the type of burner, please refer to the diagrams contained in the "Burner and nozzle specifications".
Using the oven
The first time you use your appliance, heat the empty oven with its door closed at its maximum temperature for at least half an hour. Ensure that the room is well ventilated before switching the oven off and opening the oven door. The appliance may emit a slightly unpleasant odour caused by protective substances used during the manufacturing process burning away.
Before operating the product, remove all plastic film from the sides of the appliance.
Never put objects directly on the bottom of the oven; this will avoid the enamel coating being damaged.
- Select the desired cooking mode by turning the SELECTOR knob.
- Select the recommended temperature for the cooking mode or the desired temperature by turning the THERMOSTAT knob.
A list detailing cooking modes and suggested cooking temperatures can be found in the relevant table (see Oven cooking advice table).
During cooking it is always possible to:
- Change the cooking mode by turning the SELECTOR knob.
- Change the temperature by turning the THERMOSTAT knob.
- Stop cooking by turning the SELECTOR knob to the "0" position.
Always place cookware on the rack(s) provided.
Cooking modes
All cooking modes have a default cooking temperature which may be adjusted manually to a value between 40^ C and 250^ C as desired.
| Cooking modes | Function | Description |
 | CONVECTION MODE | Temperature: any temperature between 50°C and Max. On this setting, the top and bottom heating elements come on. This is the classic, traditional type of oven which has been perfected, with exceptional heat distribution and reduced energy consumption. The convection oven is still unequalled when it comes to cooking dishes made up of several ingredients, e.g. cabbage with ribs, Spanish style cod, Ancona style stockfish, tender veal strips with rice, etc. Excellent results are achieved when preparing veal or beef- based dishes as well (braised meats, stew, goulash, wild game, ham etc.) which need to cook slowly and require basting or the addition of liquid. It nonetheless remains the best system for baking cakes as well as fruit and cooking using covered casserole dishes for oven baking. When cooking in convection mode, only use one dripping pan or cooking rack at a time, otherwise the heat distribution will be uneven. Using the different rack heights available, you can balance the amount of heat between the top and the bottom of the oven. Select from among the various rack heights based on whether the dish needs more or less heat from the top. |
 | BAKING MODE | Temperature: any temperature between 50°C and Max. The rear heating element and the fan come on, guaranteeing delicate heat distributed uniformly throughout the oven. This mode is ideal for baking and cooking delicate foods - especially cakes that need to rise - and for the preparation of certain tartlets on 3 shelves at the same time. Here are a few examples: cream puffs, sweet and savoury biscuits, savoury puffs, Swiss rolls and small portions of vegetables au gratin, etc..... |
 | PIZZA MODE | The circular heating elements and the elements at the bottom of the oven are switched on and the fan is activated. This combination heats the oven rapidly by producing a considerable amount of heat, particularly from the element at the bottom. If you use more than one rack at a time, switch the position of the dishes halfway through the cooking process. |
 | FAN ASSISTED MODE | Temperature: any temperature between 50°C and Max. The heating elements, as well as the fan, will come on. Since the heat remains constant and uniform throughout the oven, the air cooks and browns food uniformly over its entire surface. With this mode, you can also cook various dishes at the same time, as long as their respective cooking temperatures are the same. A maximum of 2 racks can be used at the same time, following the instructions in the section entitled: "Cooking On More Than One Rack". This fan assisted mode is particularly recommended for dishes requiring a gratin finish or for those requiring considerably prolonged cooking times, such as for example: lasagne, pasta bakes, roast chicken and potatoes, etc... Moreover, the excellent heat distribution makes it possible to use lower temperatures when cooking roasts. This results in less loss of juices, meat which is more tender and a decrease in the loss of weight for the roast. The fan assisted mode is especially suited for cooking fish, which can be prepared with the addition of a limited amount of condiments, thus maintaining their flavour and appearance. Desserts: the fan assisted mode is also perfect for baking leavened cakes. Moreover, this mode can also be used to thaw quickly white or red meat and bread by setting the temperature to 80 °C. To thaw more delicate foods, set the thermostat to 60°C or use only the cold air circulation feature by setting the thermostat to 0°C. |
 | OVEN TOP MODE | The central part of the top heating element is switched on. The high and direct temperature of the grill is recommended for food that requires a high surface temperature (veal and beef steaks, fillet steak and entrecôte). This cooking mode uses a limited amount of energy and is ideal for grilling small dishes. Place the food in the centre of the rack, as it will not be cooked properly if it is placed in the corners. |
 | DOUBLE GRILL MODE | The top heating element and the rotisserie spit will be activated. The provides a larger grill setting and has an innovative design the improves cooking efficiency by 50 % and eliminates the cooler corner areas. Use this grilling mode to achieve a uniform browning on top of the food. |
 | FAN ASSISTED DOUBLE GRILL MODE | The top heating element and the turnspit are activated and the fan begins to operate. This combination of features increases the effectiveness of the unidirectional thermal radiation of the heating elements through forced circulation of the air throughout the oven. This prevents the food from burning on top by enabling heat to penetratento the food more effectively; it is therefore an ideal way of cooking food quickly under the grill or for grilling large pieces of meat without having to use the turnspit.The GRILL, DOUBLE GRILL and FAN-ASSISTED DOUBLE GRILL cooking modes must be performed withthe oven door shut.When using the GRILL and DOUBLE GRILL cooking modes, place the rack in position 5 and the dripping pan in position 1 to collect cooking residues (fat and/or grease). When using the FAN-ASSISTED DOUBLE GRILL cooking mode, place the rack in position 2 or 3 and the dripping pan in position 1 to collect cooking residues. |
 | DEFROSTING | The fan located on the bottom of the oven makes the air circulate at room temperature around the food. This is recommended for the defrosting of all types of food, but in particular for delicate types of food which do not require heat, such as for example: ice cream cakes, cream or custard desserts, fruit cakes. By using the fan, the defrosting time is approximately halved. In the case of meat, fish and bread, it is possible to accelerate the process using the “multi-cooking” mode and setting the temperature to 80° - 100°C |
 | BOTTOM MODE | The lower heating element is activated. This position is recommended for perfecting the cooking of dishes (in baking trays) which are already cooked on the surface but require further cooking in the centre, or for desserts with a covering of fruit or jam, which only require moderate colouring on the surface. It should be noted that this function does not allow the maximum temperature to be reached inside the oven (250°C) and it is therefore not recommended that foods are cooked using only this setting, unless you are baking cakes (which should be baked at a temperature of 180°C or lower). |
 | BOTTOM VENTILATED | The bottom heating element and the fan is activated, which allows for the heat distribution within the whole cavity of the oven. This combination is useful for light cooking of vegetables and fish |
Practical cooking advice
Cooking on several shelves simultaneously
If it is necessary to use two racks, use the FAN ASSITED mode, as this is the only cooking mode suited to this type of cooking. We also recommend that:
- Positions 1 and 5 are not used. This is because excessive direct heat can burn temperature sensitive foods.
- Positions 2 and 4 are used and that food that requires more heat is placed on the rack in position 2.
- When cooking foods that require different cooking times and temperatures, set a temperature that is halfway between the two recommended temperatures (see Oven cooking advice table) and place the more delicate food on the rack in position 4. Remove the food that requires a shorter cooking time first.
- When cooking pizzas on several racks with the temperature set to 220^ C, the oven is preheated for 15 minutes. Generally speaking, cooking on the rack in position 4 takes longer: we recommend that the pizza cooked on the lowest rack position is removed first, followed by the pizza cooked in position 4 a few minutes later.
- Place the dripping pan on the bottom and the rack on top.
Lower oven compartment\*
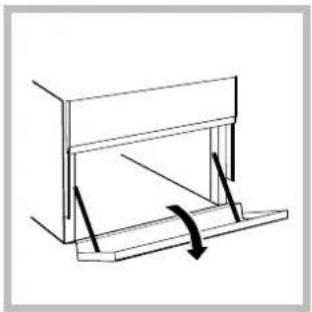
There is a compartment underneath the oven that may be used to storeoven accessories or deep dishes. To open the door pull it downwards (see figure).
natural_image
Simple line drawing of a mechanical or architectural component with no text, numbers, or symbolsDo not place flammable materials in the lower oven compartment.
The internal surfaces of the compartment (where present) may become hot.
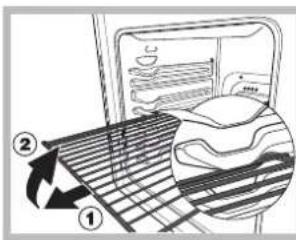
WARNING! The oven is provided with a stop system to extract the racks and prevent them from coming out of the oven.(1) As shown in the drawing, to extract them completely, simply lift the racks, holding them on the front
part, and pull (2).
Oven shelf supports
The shelf supports are removable and dishwasher safe.
To remove hold the support at the front and pull away from the oven side, this can then be cleaned in a sink or a dishwasher.
When removed it allows access to the oven side, which can be cleaned with warm soapy water.
To refit the support, insert the longer leg into the rear fixing hole and push in the front leg.
Setting the clock
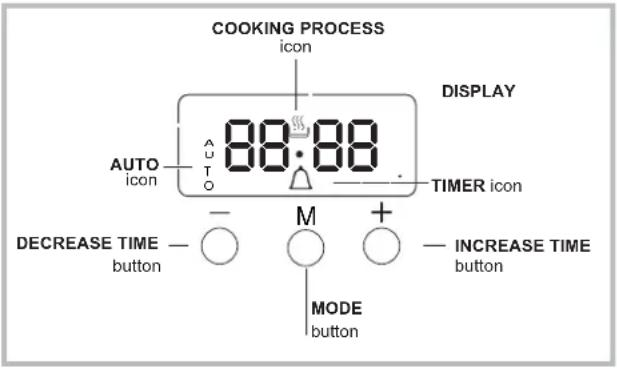
The clock may be set when the oven is switched off or when it is switched on, provided that the end time of a cooking cycle has not been programmed previously. After the appliance has been connected to the mains,
or after a blackout, the 00:00
digits on the DISPLAY will begin to flash.
- Press the "+" and "-" button simultaneously Than the colon between hours and minutes is flashing.
- Use the "+" and "-" buttons to adjust the time; if you press and hold either button, the display will scroll through the values more quickly, making it quicker and easier to set the desired value.
Changing the buzzer frequency
- First press "+" and "-" button simultaneously and than press the ⏻ button for selecting the menu for changing the buzzer frequency. While the text tonX is visible the buzzer signal frequency can be changed by touching the "-" repeatedly.
Setting the minute minder
This function does not interrupt cooking and does not affect the oven; it is simply used to activate the buzzer when the set amount of time has elapsed.
- Press the ⏻ button several times until the 🔊 icon and the three digits on the display begin to flash.
- Use the "+" and "-" buttons to set the desired time; if you press and hold either button, the display will scroll through the values more quickly, making it quicker and easier to set the value.
- Wait for 5 seconds, If you press the bottom one more time the display will then show the time as it counts down.
When this period of time has elapsed the buzzer will be activated.
Programming cooking
A cooking mode must be selected before programming can take place.
Programming the cooking duration
Programming the cooking duration
1. Press the M button several times until icon T₀ and the DUR digits on the DISPLAY begin to flash.
2. Use the "+" and "-" buttons to set the desired duration; if you press and hold either button, the display will scroll through the values more quickly, making it quicker and easier to set the value.
3. Wait for 5 seconds, after that the icon will be visible on the display.
4. When the set time has elapsed and the oven will stop cooking you will hear a buzzer sounds. Press any button to stop the buzzer.
- For example: it is 9:00 a.m. and a time of 1 hour and 15 minutes is programmed. The programme will stop automatically at 10:15 a.m.
Setting the end time for a cooking mode
- Follow steps 1 to 3 to set the duration as detailed above.
- Next, press the ⏻ button until the text END on the display begin to flash.
- use the "+" and "-" buttons to adjust the cooking end time; if you press and hold either button, the display will scroll through the values more quickly, making it quicker and easier to set the desired value.
- Wait for 5 seconds or press the 📄 button again, When the cooking process start, the symbol 🔊 is visible on the display.
- When the set time has elapsed, the oven will stop cooking and a buzzer sounds. Press any button to stop it. Programming has been set when the icon is illuminated.
- For example: It is 9:00 a.m. and a duration of 1 hour has been programmed. 12:30 is scheduled as the end time. The programme will start automatically at 11:30 a.m.
Cancelling a programme
To cancel a programme:
- press the 📂 button until the icon corresponding to the setting you wish to cancel and the digits on the display are flashing. Press the “-” button until the digits 00:00 appear on the display.
- Press and hold the “+” and “-” buttons; this will cancel all the settings selected previously, including timer settings.
Oven cooking advice table
| Selector knob setting | Food to be cooked Weight (in kg) | Cooking rack position from bottom | Preheating time (minutes) | Thermostat knob setting | Cooking time (minutes) | |
| Baking | Tarts | 0.5 | 3 | 15 | 180 | 20-30 |
| Fruit cakes | 1 | 2/3 | 15 | 180 | 40-45 | |
| Plum cake | 0.7 | 3 | 15 | 180 | 40-50 | |
| Sponge cake | 0.5 | 3 | 15 | 160 | 25-30 | |
| Stuffed pancakes (on 2 racks) | 1.2 | 2-4 | 15 | 200 | 30-35 | |
| Small cakes (on 2 racks) | 0.6 | 2-4 | 15 | 190 | 20-25 | |
| Cheese puffs (on 2 racks) | 0.4 | 2-4 | 15 | 210 | 15-20 | |
| Cream puffs (on 3 racks) | 0.7 | 1-3-5 | 15 | 180 | 20-25 | |
| Biscuits (on 3 racks) | 0.7 | 1-3-5 | 15 | 180 | 20-25 | |
| Meringues (on 3 racks) | 0.5 | 1-3-5 | 15 | 90 | 180 | |
| Convection | Duck | 1 | 3 | 15 | 200 | 65-75 |
| Roast veal or beef | 1 | 3 | 15 | 200 | 70-75 | |
| Pork roast | 1 | 3 | 15 | 200 | 70-80 | |
| Biscuits (short pastry) | - | 3 | 15 | 180 | 15-20 | |
| Tarts | 1 | 3 | 15 | 180 | 30-35 | |
| Fan assisted | Pizza (on 2 racks) | 1 | 2-4 | 15 | 220 | 15-20 |
| Lasagne | 1 | 3 | 10 | 200 | 30-35 | |
| Lamb | 1 | 2 | 10 | 180 | 50-60 | |
| Roast chicken + potatoes Mackerel | 1 | 2-4 | 10 | 180 | 60-75 | |
| Plum-cake | 1 | 2 | 10 | 180 | 30-35 | |
| Cream puffs (on 2 racks) | 0.5 | 2-4 | 10 | 170 | 40-50 | |
| Biscuits (on 2 racks) | 0.5 | 2-4 | 10 | 190 | 20-25 | |
| Sponge cake (on 1 rack) | 0.5 | 2 | 10 | 180 | 10-15 | |
| Sponge cake (on 2 racks) | 1.0 | 2-4 | 10 | 170 | 15-20 | |
| Savoury pies | 1.5 | 3 | 15 | 200 | 25-30 | |
| Top Oven | Browning food to perfect cooking | -3/4 | 15 220 - | |||
| Pizza Mode | Pizza | 0.5 | 3 | 15 | 220 | 15-20 |
| Roast veal or beef | 1 | 2 | 10 | 220 | 25-30 | |
| Chicken | 1 | 2 or 3 | 10 | 180 | 60-70 | |
| Grill | Soles and cuttlefish | 1 | 4 | 5 | Max | 8-10 |
| Squid and prawn kebabs | 1 | 4 | 5 | Max | 6-8 | |
| Cod filet | 1 | 4 | 5 | Max | 10 | |
| Grilled vegetables | 1 | 3/4 | 5 | Max | 10-15 | |
| Veal steak | 1 | 4 | 5 | Max | 15-20 | |
| Cutlets | 1 | 4 | 5 | Max | 15-20 | |
| Hamburgers | 1 | 4 | 5 | Max | 7-10 | |
| Mackerels | 1 | 4 | 5 | Max | 15-20 | |
| Toasted sandwiches | n.° 4 | 4 | 5 | Max | 2-3 | |
| Fan assisted grill | Grilled chicken | 1.5 | 3 | 5 | 200 | 55-60 |
| Cuttlefish | 1.5 | 3 | 5 | 200 | 30-35 | |
| Bottom Ventilated | Bream | 0.5 | 3 | 18 | 170-180 | 25-35 |
| Codf sh fi llet | 0.5 | 3 | 16 | 160-170 | 15-20 | |
| Sea bass in foil | 0.5 | 3 | 24 | 200-210 | 35-45 | |
| Mixed vegetables (Ratatouille type) | 0.8 – 1,0 | 3 | 21 | 190 -200 | 50 - 60 | |
| Well-done vegetables | 1,5 – 2,0 | 3 | 20 | 180 - 190 | 55 - 60 | |
| Bottom Mode | For perfectioning cooking | |||||
cooking times are approximate and may vary according to personal taste. When cooking using the grill or fan assisted grill, the dripping pan must always be placed on the 1st oven rack from the bottom.
Switching the appliance off
Disconnect your appliance from the electricity supply before carrying out any work on it.
Cleaning the appliance
Never use steam cleaners or pressure cleaners on the appliance.
- The stainless steel or enamel-coated external parts and the rubber seals may be cleaned using a sponge that has been soaked in lukewarm water and neutral soap. Use specialised products for the removal of stubborn stains. After cleaning, rinse well and dry thoroughly. Do not use abrasive powders or corrosive substances.
- The hob grids, burner caps, flame spreader rings and burners may be removed to make cleaning easier; wash them in hot water and non-abrasive detergent, making sure all burnt-on residue is removed before drying them thoroughly.
- For hobs with electronic ignition, the terminal part of the electronic lighting devices should be cleaned frequently and the gas outlet holes should be checked for blockages.
- The inside of the oven should ideally be cleaned after each use, while it is still lukewarm. Use hot water and detergent, then rinse well and dry with a soft cloth. Do not use abrasive products.
- Clean the glass part of the oven door using a sponge and a non-abrasive cleaning product, then dry thoroughly with a soft cloth. Do not use rough abrasive material or sharp metal scrapers as these could scratch the surface and cause the glass to crack.
- The accessories can be washed like everyday crockery, and are even dishwasher safe.
- Do not close the cover when the burners are alight or when they are still hot.
Remove any liquid from the lid before opening it.
Inspecting the oven seals
Check the door seals around the oven regularly. If the seals are damaged, please contact your nearest Authorised After-sales Service Centre. We recommend that the oven is not used until the seals have been replaced.
Replacing the oven light bulb
- After disconnecting the oven from the electricity
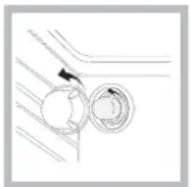
mains, remove the glass lid covering the lamp socket (see figure).
- Remove the light bulb and replace it with a similar one: voltage 230 V, wattage 25 W, cap E 14.
- Replace the lid and reconnect the oven to the electricity supply.
Do not use the oven lamp as/for ambient lighting.
Gas tap maintenance
Over time, the taps may become jammed or difficult to turn. If this occurs, the tap must be replaced.
This procedure must be performed by a qualified technician who has been authorised by the manufacturer.
The cover*
natural_image
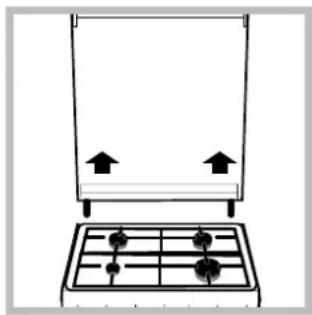
Simple line drawing of a kitchen appliance with a grater and two upward arrows (no text or symbols)If the cooker is fitted with a glass cover, this cover should be cleaned using lukewarm water. Do not use abrasive products. It is possible to remove the cover in order to make cleaning the area behind the hob easier. Open the cover fully and pull it upwards (see figure).
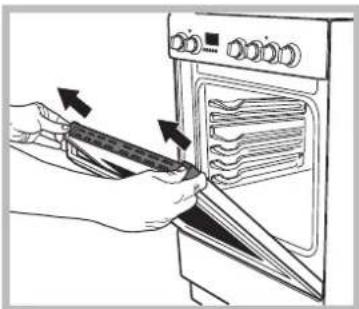
Removing and fitting the oven door:
- Open the door
natural_image
Technical line drawing of a mechanical bracket or clamp assembly (no text or symbols)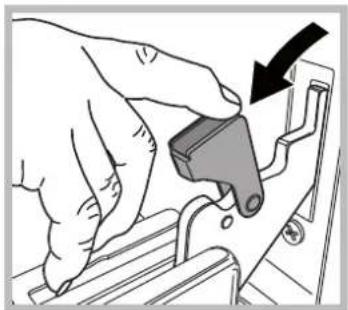
natural_image
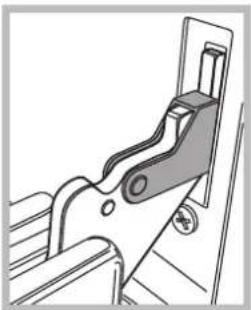
Illustration of a hand using a tool to adjust or install a mechanical component (no text or symbols visible)- Make the hinge clamps of the oven door rotate backwards completely (see photo)
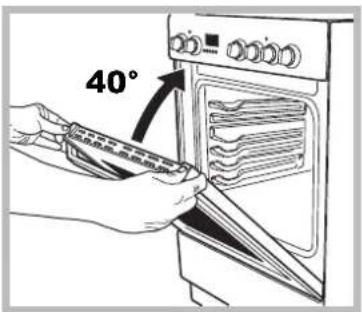
- Close the door until the clamps stop (the door will remain open for 40^ approx.) (see photo)
natural_image
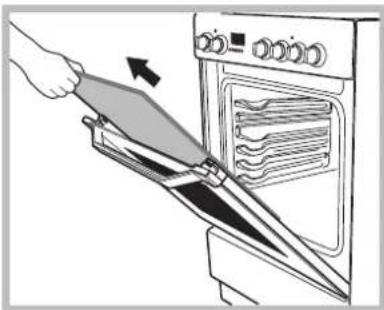
Illustration of hands installing or adjusting a stove oven with a tool (no text or symbols visible)- Press the two buttons on the upper profile and
natural_image
Illustration of a hand using a spatula to clean or adjust the oven with a rack inside (no text or symbols)extract the profile (see photo)
-
Remove the glass sheet and do the cleaning as indicated in chapter: "Care and maintenance".
-
Replace the glass.
WARNING! Oven must not be operated with inner door glass removed! WARNING! When reassembling the inner door glass insert the glass panel correctly so that the text written on the panel is not reversed and can be easily legible.
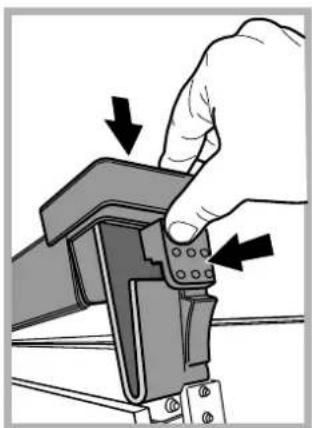
- Replace the profile, a click will indicate that the part is positioned correctly.
8.Open the door completely. - Close the supports (see photo).
natural_image
Hand holding a mechanical component with arrows indicating force or movement (no text or symbols)- Now the door can be completely closed and the oven can be started for normal use.
This method of cleaning is recommended especially after cooking very fatty (roasted)meats.
This cleaning process allows to facilitate the removal of dirt of the walls of the oven by the generation of steam that is created inside the oven cavity for easier cleaning.
! Important! Before you start steam -cleaning:
-Remove any food residue and grease from the bottom of the oven.
- Remove any oven accessories (grids and drip pans).
Perform the above operations according to the following procedure:
- pour 300ml of water into the baking tray in the oven, placing it in the bottom shelf. In the models where the drip pan is not present, use a baking sheet and place it on the grill at the bottom shelf;
- select the function of the oven and set the temperature to 100^ C;
- keep it in the oven for 15min;
- turn off the oven;
- Once cooled the oven, you can open the door to complete the cleaning with water and a damp cloth;
- eliminate any residual water from the cavity after finishing cleaning
When the steam -cleaning is done, after cooking especially fatty foods, or when grease is difficult to remove, you may need to complete the cleaning with the traditional method, described in the previous paragraph.
Perform cleaning only in the cold oven!
SK
natural_image
Diagram of a greenhouse with a chimney, air ducts, and a stove inside (no text or labels)natural_image
Simple line drawing of a house with an oven, air ducts, and ventilation system (no text or symbols)Priamo do exteriéru
natural_image
Simple line drawing of a room interior with window, door, and heating unit (no text or symbols)Obr. B
Zväcšenie priestoru medzi dverami a podlahou
natural_image
Simple diagram showing a vertical stack of weights with an arrow pointing downward (no text or labels)natural_image
Mechanical component diagram showing a cylindrical assembly with a rotating arrow indicating motion (no text or symbols)natural_image
Technical line drawing of a mechanical assembly with a tool inserted into a circular component (no text or symbols)natural_image
Mechanical component diagram showing a central hub with four arms and a pointer indicating a specific part (no text or symbols present)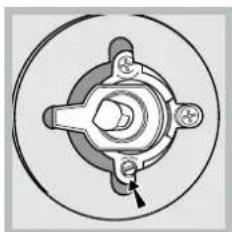
natural_image
Mechanical component diagram showing a central hub with four surrounding components and a small arrow pointing to a specific part (no text or labels)natural_image
Technical diagram of a mechanical component with an inset close-up showing a detail (no text or symbols)natural_image
Simple line drawing of a kitchen appliance with a grater and two upward arrows (no text or symbols)natural_image
Simple line drawing of a mechanical device with a lever and base, no text or symbols presentnatural_image
Simple line drawing of a rectangular frame with internal grid and two small arrows, no text or symbols present.natural_image
Technical line drawing of a mechanical bracket or lever mechanism (no text or symbols)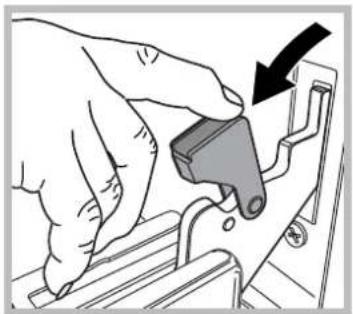
natural_image
Illustration of a hand using a tool to adjust or install a mechanical component (no text or symbols visible)natural_image
Illustration of hands using a tool to adjust or install a oven with a rack inside (no text or symbols visible)natural_image
Illustration of a hand using a spatula to clean or adjust the oven with a rack inside (no text or symbols)- Umiestnite spät' sklo.
natural_image
Hand holding a mechanical component with arrows indicating force or movement (no text or symbols)natural_image
Simple line drawing of a room with windows, doors, and a chimney (no text or symbols)natural_image
Diagram of a house interior with a stove, air conditioner unit, and cooling system (no text or labels)natural_image
Simple line drawing of an outdoor heating setup with a stove, air ducts, and power lines (no text or symbols)natural_image
Simple diagram showing a gray rectangle with a black arrow pointing to it and a small upward arrow below (no text or symbols)Wypoziomowanie
natural_image
Mechanical component diagram showing a cylindrical assembly with an arrow indicating rotation (no text or symbols)natural_image
Technical line drawing of a mechanical assembly with a tool inserted into a circular component (no text or symbols)natural_image
Mechanical component diagram showing a central hub with four arms and a pointer indicating a specific section (no text or labels present)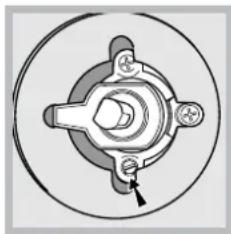
natural_image
Mechanical component diagram showing a central hub with four arms and a bolt, enclosed in a circular housing (no text or symbols)natural_image
Technical diagram of a mechanical component with an inset close-up showing a detail (no text or symbols)natural_image
Simple line drawing of a mechanical or architectural component with a curved arrow indicating rotation (no text or symbols)natural_image
3D mechanical assembly diagram showing a central component with labeled axes X and C (no text or symbols beyond labels)natural_image
Simple line drawing of a portable stove with two upward arrows indicating top-down orientation (no text or symbols)natural_image
Technical line drawing of a mechanical bracket or lever mechanism (no text or symbols)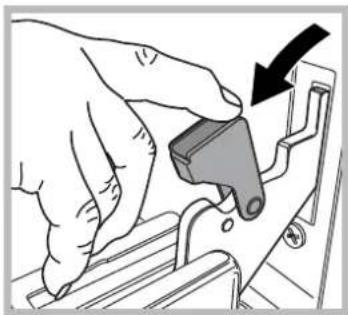
natural_image
Hand holding a mechanical component with an arrow indicating direction (no text or symbols visible)natural_image
Illustration of hands using a tool to adjust or install a oven with a handle (no text or symbols visible)natural_image
Illustration of a hand using a tool to clean or operate an oven (no text or symbols visible)natural_image
Hand holding a mechanical clamp or bracket with arrows indicating force application (no text or symbols)natural_image
Simple line drawing of a room with a door, cabinet, and chimney (no text or symbols)natural_image
Simple line drawing of a house interior with a stove and roof, no text or symbols presentnatural_image
Simple line drawing of a house with steam rising from a stove, showing airflow and electrical connections (no text or symbols)natural_image
Simple diagram showing a gray rectangle with a small arrow pointing downward and an arrow labeled 'F' pointing upward (no text or symbols)Idlyginimas
natural_image
Mechanical component diagram showing a cylindrical shaft with a directional arrow indicating motion (no text or symbols)natural_image
Technical line drawing of a mechanical assembly with a tool inserted into a circular component (no text or symbols)Kaitlentës pritaikymas
Kaitlentës degikliï antgaliï keitimas:
natural_image
Mechanical component diagram showing a central hub with four arms and a pointer indicating rotation (no text or symbols)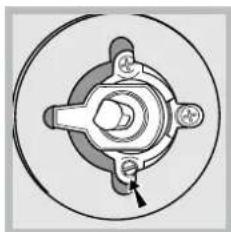
natural_image
Mechanical component diagram showing a central hub with four surrounding ports and a bolted end (no text or symbols)Kaitlentës degikliams nereikia pirminio oro sureguliavimo. Sureguliavć prietaisí taip, kad já bűtř galima naudoti su skirtingř tipř dujomis, pakeiskite sení etiketć nauja, kuri atitiktř naujř dujř tipř (dias etiketes galima ásigyti iđ ágalioto techninës prietiúros centro).
natural_image
Technical diagram of a mechanical component with an inset close-up showing a detail (no text or symbols)natural_image
Simple line drawing of a mechanical assembly with a lever and base (no text or symbols)Po orkaite yra skyrius, kuriame galima laikyti orkaitës priedus ar gilias lëkëtes. Norëdami atidaryti dureles, stumtelëkite jas temyn (tr. pav.).
Nedëkite degiř medtiagř á apatiná orkaitës skyriř.
natural_image
Simple line drawing of a portable stove with four wheels and an open lid, no text or symbols present.Stiklinis viryklës gaubtas valomas diltu vandeniu. Nevalykite braitomaisiais valikliais.
Norint palengvinti valymí uṭ kaitlentës galo, gaubtr galima nuimti. Já visidkai atidarykite ir pakelkite aukdtyn (tr. pav.).
Neutdarykite gaubto, kai degikliai ájungti arba vis dar kardti.
natural_image
Technical line drawing of a mechanical bracket or clamp assembly (no text or symbols)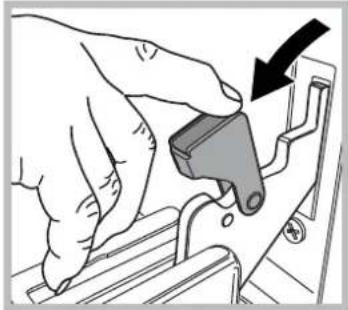
natural_image
Illustration of a hand using a tool to adjust or install a mechanical component, with no visible text or symbols.natural_image
Illustration of hands using a tool to adjust or install a oven with a tray (no text or symbols visible)natural_image
Illustration of a hand using a spatula to clean food from an oven (no text or symbols visible)natural_image
Hand holding a mechanical component with arrows indicating force or movement (no text or symbols)- Mode d'emploi
- Brugsanvisning
- Käyttöohje
- Návod k použití
- GB
- English
- Operating Instructions COOKER AND OVEN
- Contents
- PL
- Polski
- YOUR SAFETY ANDSAFETY OF OTHERS IS VERY IMPORTANT
- DANGER
- Indicates a hazardous situation which, if not avoided, will cause serious injury.
- WARNING
- Indicates a hazardous situation which, if not avoided, could cause serious injury.
- INTENDED USE OF THE PRODUCT
- INSTALLATION
- GAS CONNECTION
- ELECTRICAL WARNINGS
- CORRECT USE
- CLEANING AND MAINTANCE
- SAFEGUARDING THE ENVIRONMENT
- DISPOSAL OF PACKAGING MATERIALS
- SCRAPPING OF HOUSEHOLD APPLIANCES
- ENERGY SAVING TIPS
- DECLARATION OF CONFORMITY
- AFTER-SALES SERVICE
- Before calling the After-Sales Service
- BEZPEČNOSTNÉ POKYNY
- DÔLEŽITÉ INFORMÁCIE A POKYNY
- BEZPIECZEŃSTWO TWOJE I INNYCH OSÓB JEST BARDZO WAŻNE
- pasukite rankeneles is maks. ELEKTROS [SPEJIMAI
- Description of the appliance Overall view
- Description of the appliance Control panel
- Disposing of combustion fumes
- Positioning and levelling
- Levelling
- The appliance must not be installed behind a decorative door in order to avoid overheating
- Electrical connection
- The manufacturer declines any liability should these safety measures not be observed.
- Gas connection using a flexible rubber hose
- Connecting a flexible jointless stainless steel pipe to a threaded attachment
- Checking the tightness of the connection
- Adapting to different types of gas
- Adapting the hob
- Safety Chain
- Table of burner and nozzle specifications
- THERMOSTAT indicator light
- Oven light
- Timer\*
- Using the hob
- Lighting the burners
- Advice when using burners
- Using the oven
- Cooking modes
- Practical cooking advice
- Cooking on several shelves simultaneously
- Lower oven compartment\*
- Oven shelf supports
- Setting the clock
- Changing the buzzer frequency
- Setting the minute minder
- Programming cooking
- Programming the cooking duration
- Setting the end time for a cooking mode
- Cancelling a programme
- Switching the appliance off
- Cleaning the appliance
- Inspecting the oven seals
- Replacing the oven light bulb
- Gas tap maintenance
- Removing and fitting the oven door:
- SK
- Wypoziomowanie
- Idlyginimas
- Kaitlentës pritaikymas
Brand : WHIRLPOOL
Model : ACMT 5131
Category : Cooker