
AC1100SC - Payment terminal Genie - Free user manual and instructions
Find the device manual for free AC1100SC Genie in PDF.


| Product Type | Payment Terminal / Access Control Terminal |
| Display | 4.0 inch Touch LCD (480x800) |
| Processor | 1GHz Single Core CPU |
| Memory (Flash) | eMMc 8GB |
| Memory (RAM) | 512MB |
| Camera | Still Image Color (320x480) with Flash and Daylight Sensor |
| Card Reader | RF (125 kHz) and Smart Card (13.56 MHz) optional |
| Authentication Methods | Card, Password, Mobile Key, Card OR Password, Card AND Password, Face Detection |
| User Capacity | 200,000 Users / 200,000 Cards / 35,000 Images |
| Log Capacity | 10,000,000 Events / 15,000 Image Logs |
| Network | TCP/IP (10/100Mbps), optional WiFi |
| Wiegand Interface | Input and Output (26/34 bit, custom) |
| I/O Ports | 4 Inputs (1 Exit, 3 Monitor), 2 Outputs (Lock Control) |
| Lock Control | EM, Strike, Motor Lock, Auto Door |
| Power Supply | DC 12V (optional 24V), AC Adapter Input 100-250V |
| Operating Temperature | -20°C to 45°C |
| Operating Humidity | Less than 90% RH |
| Certifications | UL, CSA, CE Approved |
| Standards Compliance | TCP/IP, Wiegand, RS485 (OSDP), Bluetooth (Mobile Key) |
| Cleaning | Do not use water, benzene, thinner or alcohol; keep away from direct sunlight, high humidity, dust |
| Safety Precautions | Do not disassemble, modify, or place near fire; keep out of reach of children |
| Data Backup | USB/SD support for export/import of users, logs, settings, firmware update |
Frequently Asked Questions - AC1100SC Genie
User questions about AC1100SC Genie
0 question about this device. Answer the ones you know or ask your own.
Ask a new question about this device
Download the instructions for your Payment terminal in PDF format for free! Find your manual AC1100SC - Genie and take your electronic device back in hand. On this page are published all the documents necessary for the use of your device. AC1100SC by Genie.
USER MANUAL AC1100SC Genie
AC1100 User guide 2
| Version | Date | Description | Firmware Version |
| 1.00 | 2016-04-24 | Initial Release | V1.00.000-010 |
| 1.01 | 2016-05-10 | Update | |
| 1.02/3 | 2016-05-31 | Update Images | V1.00.000-013 |
AC1100 User guide 3
< Glossary>
- Admin, Administrator
- A user who can enter into the terminal menu mode, he/she can register/modify/delete terminal users and change the operating environment by changing settings.
- If there is no administrator for a terminal, anyone can change the settings. In this regard, it is recommended to register at least one administrator.
- Caution is required with registration and operation because an administrator has the right to change critical environmental settings of the terminal.
- Authentication Method
- This represents the various types of authentication, including Mobile authentication, Password authentication, RF (card) authentication or a combination of these methods. Example: Card or Password: Authentication with Card or Password
AC1100 User guide 4
Contents
< Glossary>......3
Contents 4
- Before use....6
1.1. Safety precautions....6
1.2. Specific names of the terminal....7
1.3. Normal Window Display ....8
1.3.1. Icons....8
1.3.2. Window Messaging....10
1.4. Voices in the operation....17
1.5. Beep or sound effect in the operation....17
- Product introduction....18
2.1. Product characteristics .... 18
2.2. Product components ...... 19
2.2.1. Stand-alone (entrance) 19
2.2.2. Connected with PC server 20
2.3. Product specification....21
- Environment setting....22
3.1. Checks before setting the environment 22
3.1.1. Entering the admin menu....22
3.1.2. Administrator authorization 23
3.1.3. How to enter the menu without administrator authorization....23
3.1.4. How to save the set values....24
3.2. Menu composition 25
3.3.User management....28
3.3.1. Adding User 29
3.3.1.1. Photo registration 30
3.3.1.5. Password registration.... 31
3.3.1.6. Card registration.... 32
3.3.1.8. Authorization method.... 33
3.3.1.9. Save 34
AC1100 User guide 5
3.7.3.Terminal Input 59
3.7.4.TerminalLock 61
3.7.5.Terminal Wiegand 62
3.7.6.Terminal External 63
3.8. Display settings 65
3.8.1. Theme 65
3.8.2. Camera....66
3.8.2.1 Camera Flash Option....66
3.8.3. Language 67
3.8.4. LCD option 67
3.8.5. Message time settings....68
3.9. Terminal information....70
3.9.1. System information....70
3.9.2.Terminal information 71
3.9.3. Network information....72
3.9.4.User information 73
3.9.5. Log information....74
3.9.6.About 75
3.10. SD USB 76
3.20. Language Translations/Customizing Text Items....82
- How to use terminal....84
4.1. Authorization mode change 84
4.2. ID input 85
4.3. Authorization....86
4.3.3. Card authorization 86
4.3.4. Password authorization 86
AC1100 User guide 6
1. Before use
1.1. Safety precautions
- Warning
| Handling with wet hands or allowing liquid to flow into it is prohibited.-> It may cause an electric shock or damage. |  | Do not place a fire source near the terminal.-> It may cause a fire. |  |
| Do not disassemble, repair, or modify the terminal at discretion.-> It may cause an electric shock, fire or damage. |  | Keep out of reach of children.-> It may cause an accident or damage. |  |
-
If the above warning is ignored, it may result in death or serious injury.
-
Cautions
| Keep away from direct sunlight-> It may cause deformation or color change. |  | Avoid high humidity or dust-> The terminal may be damaged. |  |
| Avoid using water, benzene, thinner, or alcohol for cleaning-> It may cause an electric shock or fire. |  | Do not place a magnet close to the terminal.-> The terminal may break down or malfunction. |  |
AC1100 User guide 7
1.2. Specific names of the terminal
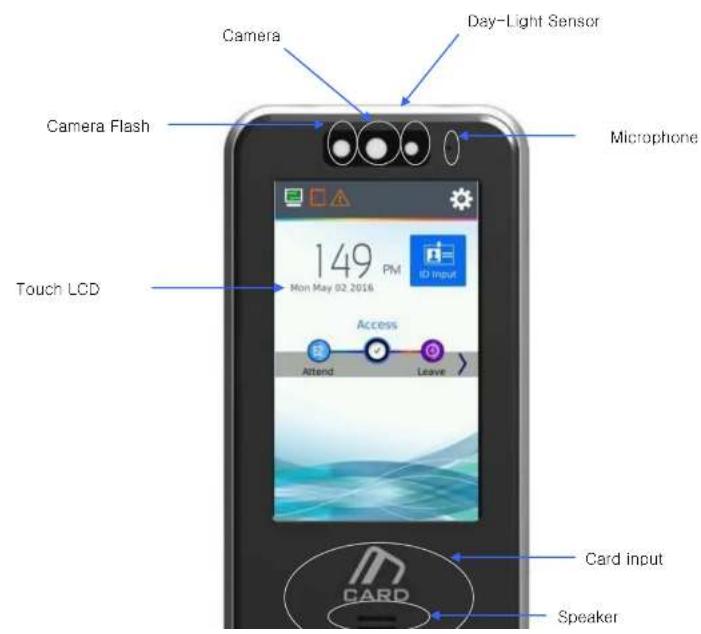
AC1100 User guide 8
1.3. Normal Window Display

AC1100 User guide 9
WiFi Connection State

: WiFi Dongle Connected to device – not connected to network
: WiFi Dongle Connected and successfully connected to AP
AC1100 User guide
10
1.3.2. Window Messaging

- Standard window
- Screen Saver window
AC1100 User guide
11

All Function Keys disabled
- No Status Text/ Status Text Background
- No Extended Key
VoiP Function

VoIP enabled, not registered.

VoIP enabled, registered on iPBX network
AC1100 User guide
12


flowchart
graph LR
    A["Attend"] --> B["Receive"]
    B --> C["Leave"]

Touch the 'status touch area' along the top of the display
to see detail status information. See 1.3 Main window display. This will appear for 10 seconds.
Top pop up is a 'custom user message'. In UNIS use management you can make a custom message for every user during the users authentication period.
If camera setting for Display Current Picture or Display User picture is set and registered card is used. Picture will be displayed on the top. See Section 3.8.2
If card, mobile key, password is successful, the general Success message will be displayed.
AC1100 User guide
13

Failed!
- When authorization is failed.

Unregistered!
- When unregistered user ID is entered.

Unregistered Card!
- When unregistered card is entered

Passback error!
- Passback error when using anti-passback function.
AC1100 User guide
14


- Registration without authorization right or authorization attempt when the entrance is not permitted.
- When the user is designated in the blacklist
- When the terminal is set locked
- When it is not the meal time when set in the meal personnel management.
AC1100 User guide
15
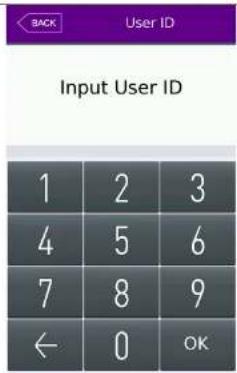
- Waiting for User ID Input

If more than 2 function keys are enabled from the function k
setting menu, in administrator mode, the button will appear on the main window. If this button is selected the extended function keys can be seen. Select the mode button - blue, or scroll down/up until you can see the mode you would like to select Select back or the blue button mode. Timeout after 5 seconds of no activity.
AC1100 User guide
16

- Waiting for Password Input

Place Your Card
- Waiting for Card

-When the terminal program is being upgraded
AC1100 User guide
17
1.4. Voices in the operation
| Operation type | Voice |
| When the authorization was successful | You are authorized. |
| When the authorization was failed. | Please try again. |
| Waiting for Card | Please enter your card |
| ID Input | Enter your ID |
1.5. Beep or sound effect in the operation
| Beep | Card Reading | When the card was read |
| ErrorTone wave sound | When failed | When the authorization has failed and Voice disabled |
| Trilling sound | When success | When the authorization was successful and Voice disabled |
| Key Press | Sound during number entry | |
| Tick | Function Key | Sound during function key selection |
AC1100 User guide
18
2. Product introduction
2.1. Product characteristics
- Multi-Modal product with card, password or mobile key authentication methods.
- Face Detection requires the current authenticating user to present their face during card, password or Mobile Key authentication. This requires a user to be in front of the card reader so the device can take a picture of the person who authenticated.
● Built in camera flash allows pictures a T nd face detection during dark conditions.
● Daylight Sensor automatically turns the flash on during dark conditions.
● RF (125 kHz) Type (optional)
● Smart card (13.56MHz) Type (optional)
- Entrance management system using TCP/IP or WiFi (optional) connected to a server database.
● Various registration and authorization methods
| Card | Card registrationCard authorization |
| Password | Password registrationPassword authorization |
| Mobile Key | Mobile Key Temporary key registrationMobile Key User key registration |
| Card or password | Card, password registrationCard or password authorization |
| Card and password | Card, password registrationPassword authorization after card authorization |
AC1100 User guide
19
2.2. Product components
2.2.1. Stand-alone (entrance)

AC1100 User guide
20
2.2.2. Connected with PC server
(Entrance, attendance, meal personnel management)

flowchart
graph TD
    A["Top Device"] --> B["TCP/IP"]
    C["Mid Device"] --> B
    D["Bottom Device"] --> B
    style A fill:#f9f,stroke:#333
    style C fill:#f9f,stroke:#333
    style D fill:#f9f,stroke:#333
AC1100 User guide
21
2.3. Product specification
| Types | SPEC | REMARK |
| CPU | 1GHz Single Core CPU | |
| LCD | 4.0 inch Touch LCD(480*800) | |
| MEMORY | eMMc 8G Bytes Flash | |
| 512mb RAM | ||
| External USB support | Data backup / FW upgrade | |
| Camera | Still Image Color (320x480) | |
| Camera Flash Sensor | Daylight sensor will turn on flash when needed | |
| User number | 200,000 User / 200,000 Card / 35000 Image10,000,000 Log / 15,000 Image Log | |
| Temperature / Humidity | -20 ~ 45 / Lower than 90% RH | |
| AC / DC Adapter | INPUT : Universal AC100 ~ 250V | |
| OUTPUT : DC 12V (Option : DC 24V) | ||
| UL, CSA, CE Approved | ||
| Lock Control | EM, Strike, Motor Lock, Auto Door | |
| I/O | 4 In (1 Exit, 3 Monitor)2 Out (Also for Lock Control) | |
| TCP/IP (10/100Mbps) | Authorization server |
AC1100 User guide
22
3. Environment setting
3.1. Checks before setting the environment
3.1.1. Entering the admin menu
If you press the icon at the main window, you can enter the administrator menu as follows.

You can enter the subdivision menu by selecting each button.
Once in the administrator menu, if you need to soft reboot the device, touch the RED circled area, and then select the reboot icon in the
AC1100 User guide
23
3.1.2. Administrator authorization
If the administrator is registered, the following administrator authorization window appears first.

▶ Administrator authorization
If you enter the administrator ID, the administrator authorization is fulfilled along with the authorization method of the administrator such as card, or password.
The administrator authorization only appears when the registered administrator exists. The authorization is fulfilled only once when entering the menu mode and you can access to the entire menu until you quit the main menu.
3.1.3. How to enter the menu without administrator authorization
In cases where the administrator is lost you can enter a special ID and password to view the network settings of the card reader. This will allow you to connect using UNIS to reset or add a new administrator.


AC1100 User guide
24

The server IP and network information will be displayed. You can now connect your card reader terminal directly to your PC. Setup your PC network card with the same Server IP and Gateway settings. After you successfully connect with UNIS you can change/delete the administer user as needed.
Method #2
Entering admin mode when you have lost the administrator ID
1) On USB device, create folder /CR/
2) On your PC create an empty file with no extension and name it 'factory'
3) Copy 'factory' file from PC to USB /CR/ folder
4) Plug USB into the card reader
5) Card Reader tamper must be Open (Cover open and off)
6) Successful user must authenticate and open the door, during the door open period, press the admin icon and it will bypass admin entry requirements.
3.1.5. How to save the set values
AC1100 User guide
25
3.2. Menu composition
| 1.User management | 1. Add2. Modify3. Delete4. Delete All5. View | |
| 2. Network | Terminal IP address | Static IP / DHCP▶ Terminal IP address▶ Subnet mask▶ Gateway |
| DNS server | ||
| Server IP address | ▶ Server IP address▶ Port | |
| Terminal ID | ▶ Terminal ID | |
| Timeout | ▶ Server timeout | |
| 3.Application | 1. Application | ▶ Access▶ Attendance management▶ Meal management1. ▶ Schedule settingAttend (F1) timeLeaving (F2) timeGoing out(F3) timeReturning(F4) timeNormal Access timeBlocking Time |
AC1100 User guide
26
| 4. System | 1. System | ►User ID Length (2-9)►Authentication Type(Server/Terminal)(Terminal/Server)(Server Only)(Terminal Only)►Job Code enable/disable |
| 2.Mobile | ►Enable Mobile Key►Mobile Key Name►Mobile Register Device | |
| 3. Face Detection | ►Card use►Mobile use►Password use►Detection LevelLevel 1Level 2 | |
| 4. Date / time | ►Time Sync type►Display format►Date Setting►Time Setting | |
| 6. Database | ►Delete all Users►Clear Settings►Clear Log Data►Clear Picture Logs |
AC1100 User guide
27
| 4. Lock setting | ▸Lock1 options▸Lock2 options▸Lock1 time (ms)▸Lock2 time (ms) | |
| 5. Wiegand | ▸WiegandSite codeWiegand OutputWiegand Output TypeWiegand Input | |
| 6. External | ▸Printer option▸RS485 option | |
| 6.Display | 1. Theme | ▸Main background screenBackground cycle period (seconds) |
| 2. Camera | ▸Display option▸Save optionSave when authorization was successfulSave when authorization was failed▸Flash optionDisabled/Low/Medium/HighDelay (milliseconds) | |
| 3. Language | ▸Language | |
| 4. LCD option | ▸Screen saver setting▸User display option▸Touchscreen recalibrate |
AC1100 User guide
28
| 5. Log | ►Log informationView Log | |
| 6. About | ►AboutLegal | |
| 8. SD card | 1. Export | ►User data►Event log►System option►Export All►Picture data |
| 2. Import | ►User data►System option | |
| 3. Other | ►ThemeBackground importLanguage file import►F/W upgrade |
3.3. User management
When you select the [User Settings] at the main menu, the following window appears.
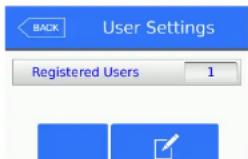
The number of all the users is shown at the top of screen including administrators.
Select [Add] button to add the new user, [Modify] button to modify the user, [Delete] button to delete the spec user, [Delete All] button to delete all the users, and [View]
AC1100 User guide
29
3.3.1. Adding User
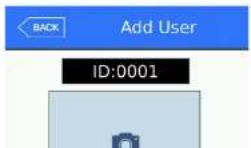
If you select [User Settings]->[Add] in the main menu, the following screen appears
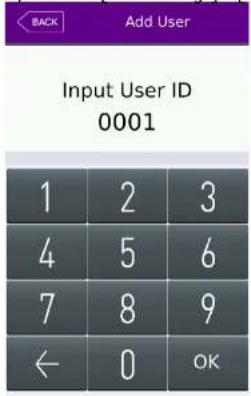
Input the user ID to be registered and select [OK] button.
In this case, the ID which can be registered is shown on the screen automatically, so you can register conveniently. If you want to change ID, delete the
previous value by selecting the button and input the new value.
Click [Back] button to cancel and go back.
If you enter ID which is already registered, a failure message appears, and if the ID is not already registered, the following screen appears.
The icons in the left side mean as follows.
:Password Registration (X: none, O: Registered)
: Card Registration (X: none,1\~5)
ID:0001 : User ID to be registered
User Type: This selection will NOT appear until a card
AC1100 User guide
30
You can register a card with [Card] button, a password with the [Password] button, and change the authentication type. The default user will be a standard user and not an administrator.
※ Users who are only registered as an administrator can change the settings of the terminal and can register/modify/delete the information of all the saved users. Take caution when registering an administrator.
3.3.1.1. Photo registration
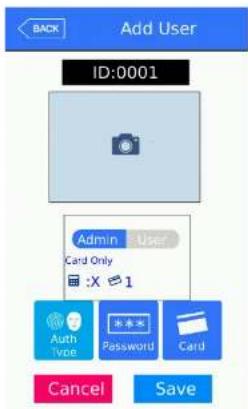
Take a picture by selecting 📄 button at the [Add user] screen. Keep selecting the picture image until you are satisfied with the current picture that has been taken.
AC1100 User guide
31
3.3.1.5. Password registration
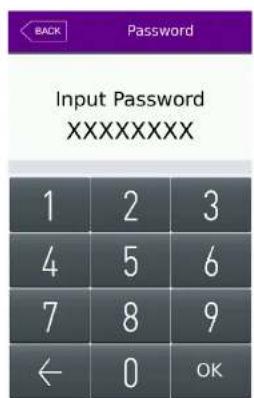
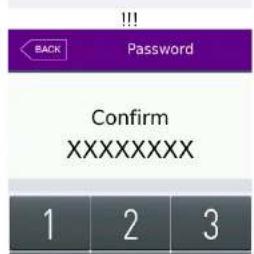
Enter a password up to 8 digits in length. Once you are finished select the OK button, after a confirmation window will appear.
Enter the same digits to confirm your password is correct. Select the OK button to continue. If password is has not matched an error message v appear.

AC1100 User guide
32
3.3.1.6. Card registration
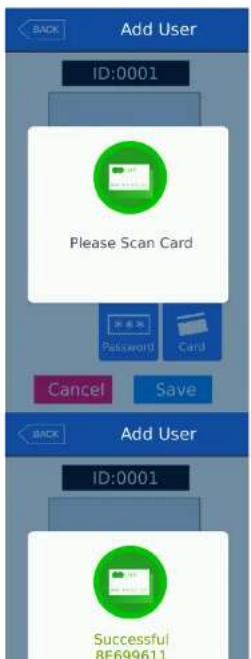
Select the Card Icon to register a card. A popu message will appear waiting for you to scan your card.
If successful the card number message will appear indicating successful.
You can register up to 5 cards per user. If a same card number is attempted to register again, an error message will occur.
AC1100 User guide
33
3.3.1.8. Authorization method

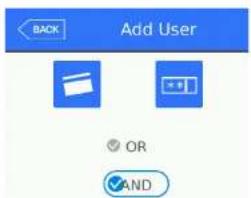
Select the Auth Type icon to change the authentication type of the user. If only card is registered, only a card icon will appear the same as password. If both are registered you can select a combination of both type using OR and AND.

By selecting the BACK button the current selection is saved.

AC1100 User guide
34


3.3.1.9.Save
AC1100 User guide
35
3.3.2. Deleting User
The following window appears if you select [User Settings]->[Delete] at the main menu.

Input the user ID to be deleted and select [OK] button.
Select [BACK] button to cancel and return.
If you entered an invalid/unregistered ID, an error message will appear.
If you entered a valid/registered ID a confirmation window will appear.
Please note if connected to the server, the user is not deleted from the server. You should synchronize and make sure the user is deleted in the server and the terminal.
Once the user is deleted it cannot be recovered.

Confirmation Window.
Select YES to continue to delete.
Select NO to cancel the deletion.
AC1100 User guide
36

When unregistered ID was entered

When user is deleted successfully.
AC1100 User guide
37
3.3.3. Modify User
The following window appears if you select the [User Setting] -> [Modify] in the main menu.

Input the user ID to be modified and Select [OK] button.
Select [BACK] button to cancel and return.
If you entered an invalid/unregistered ID, an error message will appear.
.
If you entered a valid/registered ID, the same menu as 'add user' will appear. Follow the same steps in the 'add user' section to change any current user settings

The icons in the left side mean as follows.
Password Registration (X: none, O: Registered)
: Card Registration (X: none,1\~5)
ID:0001 : User ID to be registered
AC1100 User guide
38
3.3.4. Delete all Users
If you select the [User Settings] ->[Delete all] in the main menu, the following window appears.
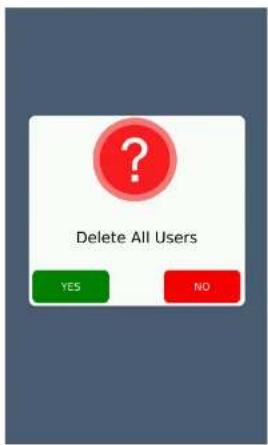
Confirmation Window.
Select YES to continue to delete all users
Select NO to cancel the deletion.
AC1100 User guide
39
3.3.5. View
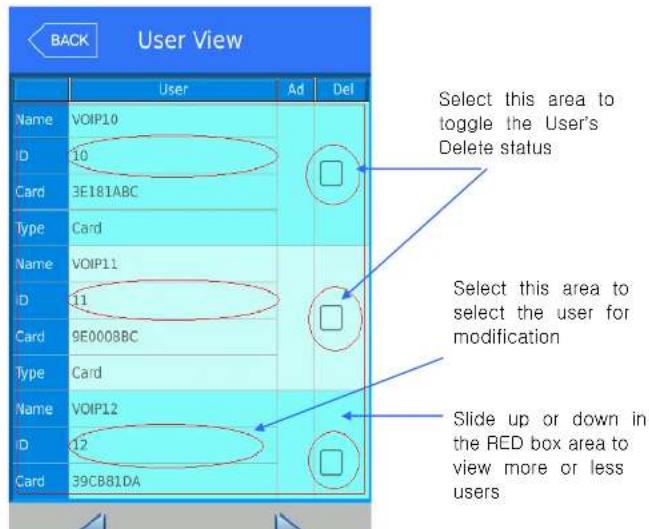
If you select the [User management] -> [View] from the main menu, all the registered users can be viewed. User view area will show you a summary list of the users. User name, ID, Card number and authentication type will appear for each user. You can select a user for modification or deletion.
AC1100 User guide
40

The maximum amount of users displayed is 50. You can slide up or down in the box area (see above) to move up and down the list. If more than
50 users (maximum display) a forward icon will appear. If you select this, the next 50 users will display. Select to move to the previous 50 users.
▶ [ID]: Select the user ID area to move directly to the specific user's modification window. See above picture
▶ [Del]: If you select this area, a checkbox will appear. Select the 'Delete' button to delete the selected users. If you wish to delete all users see section 'Delete All Users'
▶ [Delete Button]: Once you select all the users you wish to delete, select the 'Delete' button to delete the selected users
If you select [BACK] button on the top, you can move to the previous '3.3 User management' menu.
▶ If you input the User ID by clicking [ID search] button, the user is searched like in the left picture.
If you select the [BACK] button in this window,

AC1100 User guide
41
3.4. Network Settings
The networks settings area allows you to setup IP addresses, gateways, subnet mask, DHCP or static settings, Terminal ID Number or wireless settings. When selecting DHCP ensure that your network has a properly enabled DHCP server available. Also you should give time for the terminal to acquire the DHCP address; usually this can take from 1-60 seconds. While in this menu if you press the DONE button the server will be disconnected and the link will be reconnected to the server. You can re-initiate the network connection by entering this menu and pressing done.
Ethernet Setup Procedure:
1) Setup Static OR DHCP
2) If Static then set the terminal IP/Subnet Mask and Default Gateway.
3) Set the Server IP Address, PORT and Terminal ID
4) If using Wireless go to Wireless Options and Press "Available Networks" until your router appears in the available network window.
5) Press/Select the station you wish to connect to, it should be highlighted.
6) Go to wireless advance settings to set the Security Level/Rate or Channel.
7) Press OK.
Pressing OK will disconnect the current connection and then try to re-establish a new link from the setup parameters that were just entered. At anytime select the Back button to cancel and not save any changes.

▶ Basic setting: Same with the window at the le side.
Select the method [Static IP] if the static IP is
AC1100 User guide
42
the value, you should change the server program with the same value, so be cautious.
▶ [Terminal ID]: The terminal ID number uniquely identifies the terminal on the server program network. For every terminal on the server network you should program a different terminal number. This value should be 1-8 digits in length.
Note: If mobile key is enabled and the terminal is registered, the terminal ID can not be changed. Terminal ID is changed by the UNIS-B Plus administrator app when registering the device.
▶ [Timeout]: The default timeout is 5 seconds. When using server authentication, this period is the time in which the terminal will wait for a response from the server before timing out. The value is from 5 to 30 seconds.
For static IP usage you must program the Terminal IP, Subnet Mask and Default Gateway. If DHCP is selected, these values cannot be programmed and will be grayed out. The port number must match the port number that is programmed in the Authentication Server.

If you touch the item you want to change, the keypad appears at the bottom.
Select the button to backspace/return to delete the current entry.
Select the OK button when finished the entry in the field.
If you want to apply the changes, select [OK] button, and return to the previous menu by selecting [BACK] button.
AC1100 User guide
43
3.5. Application
3.5.1. Application mode
If you select the [Application] in the main menu, the following window appears. In the application mode, you can select the [Access Control/ Attendance management/ Meal management] according to the purpose.
3.5.1.1. Modes
Normal Access Mode
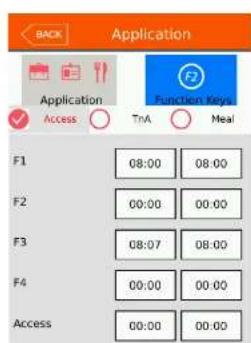
It is the screen appearing when you select the Access.
Select [OK] button to apply the changes, or select [BACK] button to cancel and return.
An Access Control application is normally used for providing access to a secure area, function keys are not needed unless extra tracking of the user is needed. the system is setup for Access Control and Function keys are used for authentication the user is required to touch the mode function key before entering their ID or card.
AC1100 User guide
44
Time and Attendance
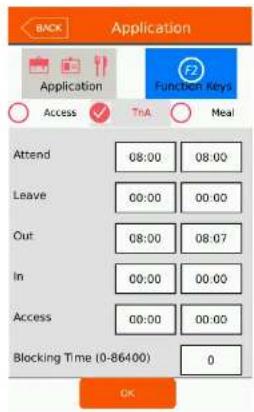
Select [OK] button to apply the changes, or select [BACK] button to cancel and return.
Time schedules should be programmed when using this mode. Time and Attendance Application is for systems that require tracking of employee's work time. If the system is setup for Time and Attendance, for authentication the user is required to touch the function key before entering their ID or Card.
Meal Management

It is the screen appearing when selecting the meal management.
You can set the time period of each meal type. And if the setting is not needed, set '00:00-00:00'.
AC1100 User guide
45
During the set time periods, the mode will change automatically to the time period setting. If a function key is pressed during the time period, the function key will change to the new mode, after 15 seconds the system will revert back to the current time setting mode.
i.e, if Period mode = Leaving mode, Function key -> Enter mode is pressed, after 15 seconds the mode will change back to Leaving mode.
The time periods should not be overlapped, but if they are overlapped, the application order is Attend->Leave->Out->In->Access. If the time is set between 23:00\~01:00, it means from 23:00 to the 01:00 the following day.
▶Blocking time: This function prevents the same user to authorize again in the set time. There is no restriction if it is set 0, but if it is set larger than 0, the user can authorize again when the set time (sec) is passed from the previous authorization. It can be set up to 86,400 seconds (24 hours).
3.5.2. Function keys
The following window appears if you select the [Application] -> [Function key] in the main menu.
AC1100 User guide
46

▶ Basic setting : Same with the window at the left side
▶ F1-F4 Key
Access button used to change the authorization mode such as attendance and leaving, and if you select the F1-F4 Key, the authorization mode is changed to th mode. Only the checked buttons will appear on th main window. Note: Only maximum 2 function key will appear on the main window, any additional function keys will appear in the extended key window.
In some cases additional function keys are needed in addition to the four main function keys. The administrators will setup the terminal for this operation. Up to 60 additional function keys are available. The extra function keys will appear in the extended view window from the main window. 4 – 60 extended keys can be selected.
Select the [OK] button to save the value or select [BACK] button to cancel and return.
AC1100 User guide
47
3.6. System
3.6.1. System
The following window appears if you select the [System] -> [System] in the main menu.
AC1100 User guide
48

▶ User ID Length
The user ID length can be 2 to 8 digits in length. The user ID length will be the length of the user ID required to authenticate. The user ID length should be the same value that is programmed in the server software. Any place that requires the entry of a user ID will be restricted to the length that is programmed in this area. This value should reflect the amount of users in your terminal. For example, if you have fewer than 100 users than enter 3. If your have more than 10000 users, then program a 6 digit length.
Note: When changing the ID length shorter than the previous programmed value; be aware that an administrator may not be authenticated properly to enter administrator programming if their ID length was longer than the current length. It is recommended this value be changed at the time of setting up the terminal, and not during regular usage.
▶ Authentication
One of Four options is available for the authentication mode. This setting determines where the user authentication is done, In the server or locally at the terminal, or both. Change this setting when there is high network traffic, many users, or authentication is too slow. The default setting is Terminal/Server
Terminal/Server - If the local terminal is properly connected to the network server, the authentication is done at the local terminal and the result is sent to the server in real time. However, if the user ID entered does not exist in the local terminal the authentication is requested at the server.
AC1100 User guide
49
3.6.2.Mobile Key
The following window appears if you select the [System] -> [Mobile] in the main menu.
Basic system setup can be used to setup the card reader using smart phone administrator application or when using mobile key authentication with the smart phone user application.
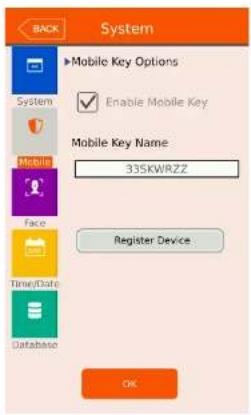
By default mobile key is enabled. If you do not require any Bluetooth mobile function you can select to disable.
Mobile Key Name – this is read-only field and is created automatically after registering the card terminal with the administrator smartphone application.
Registering Bluetooth Device
1) Select Add terminal (admin mobile app)
2) Select the terminal (admin mobile app)
3) Select Register Device button - this menu
4) Select login id or password if enabled. (mobile app)
5) Select terminal id (admin mobile app)
6) Complete.

If mobile key is disabled, all mobile options will not be visible.
AC1100 User guide
50

Confirm Bluetooth Registration Select YES

Waiting Bluetooth Registration Administrator Mobile App requires login before continuing.
AC1100 User guide
51
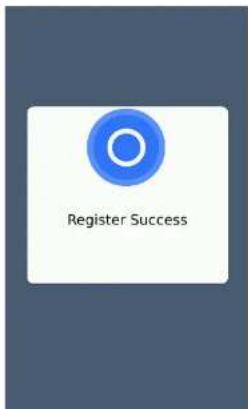
After Administrator Mobile App enters a terminal ID, the registration process is complete.
3.6.3. Face Detection
This feature is for detection of a face only, the terminal will not recognize a specific user's
AC1100 User guide
52

Select the checkbox for authentication types required for a picture during authentication.
Card, Mobile Key, Password.
By default this feature is disabled.
Detection Level
When one of the checkboxes above is selected, this defines the detail of facial detection.
1) Level 1 - Basic face, faster
2) Level 2 - Detail face , may take slightly longer
Select the [OK] button to save the value or select [BACK] button to cancel and return.
AC1100 User guide
53
3.6.5. Time/Date
If you select the [System] -> [Date/Time] in the main menu, the following window appears.
▶ Time Sync:
This is how terminal time/date is updated.
- Auto/Server – updated from the server. No need to set Date/Time below.
- Manual – set the time/date from this menu and the server will not update the time/date.

Note: When connecting with the Bluetooth/mobile key application, the terminal time/date is always updated.
▶ Time Format:
The Date/Time Display Format will change the way the date and time is displayed on the main screen. Only English Language allows the selection of different formats. All other languages will only have Enable/disable, and the date will appear in their locale format. There are six choices:
1) Short form day (three letters), Short form month (three letters), DD, YYYY, HH:MM AM/PM (Thu, Mar 24 2009 08:19AM – no 24hour time, use AM/PM)
2) Short form day(three letters), same as 1, except use 2 hour time display
3) MM-DD-YY HH:MM AM/PM (03-24-09 08:19AM)
4) MM-DD-YY HH:MM (24 hour time) (03-24-09 23:44)
5) YYYY-MM-DD HH:MM AM/PM (2009-04-24 08:19AM)
6) YYYY-MM-DD HH:MM (24 hour time) (2009-04-24 23:44)
AC1100 User guide
54
3.6.6. Database
If you select the [System]->[Database] in the main menu, the following window appears.

▶ Delete All Users: This option will allow you to delete users in the system.
▶ Clear Settings: This option will clear/delete all the terminal settings. The factory settings will be used. User, log data and pictures will not be deleted.
▶ Clear Log Data: This option will clear/delete all the log data in the terminal. This will not delete picture log data or terminal settings.
▶ Clear Picture Logs: This option will clear/delete all the picture log data. The terminal can hold up to 70,000 pictures (user pictures + log pictures). If you need more user database pictures you can delete the picture logs.
▶ Factory Init: This option will reset the terminal setting delete all the picture logs, delete all users and all log information.
Select the [OK] button to save the value or select [BACK] button to cancel and return.
AC1100 User guide
55
3.6.6.1. Database Confirmation
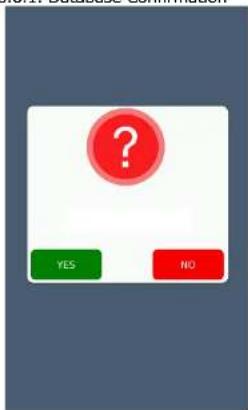
▶ A confirmation window will appear after selecting one of the selections from above.
Select YES to continue to delete or NO to cancel.
Note: A backup of the user, system settings, pictures or logs should be done before erasing the data. Backup from USB device or system Server device.
AC1100 User guide
56
3.7. Terminal settings
3.7.1. Sounds
If you select the [Terminal] -> [Sound] in the main menu, the following window appears.
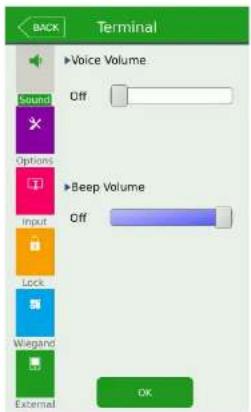
▶ Voice volume
Scroll from side to side in to select the appropriate voice setting. A voice will be played after releasing the selector to determine the volume. Slide all the way to the left to disable voice prompts. Default is OFF.
4 Voices are used
1) You are authorized (Success)
2) Please Try Again (Failed)
3) Enter your Card
4) Enter your ID
This value determines sound level of:
- Error tone wave
- Success tone wave
- KeyPress tone wave
- Other sound effect tones
If Voice volume if OFF, then all sound effect tones v follow beep volume setting value
▶ Beep volume
Scroll from side to side to select the beep volume.
Selectable area from 4 types. Default is 2
0 (off)
1 (low)
2 (medium)
3 (high)
AC1100 User guide
3.7.2. Terminal option
If you select the [Terminal]->[Terminal option] in the main menu, the following window appears.
▶ Card Reader

If you scan/touch your card to the terminal, the terminal will beep and display the card number. The card number depends on the card format selected from the Card Format option below. Default is Standard
▶ Warn door open (sec) 0-99
Default 0 - disabled
This function will produce a warning tone after the set time when the door remains open after an access to the terminal.
To use the function, the lock must be able to be monitored if it is opened or closed, and the monitoring pin of the lock also should be connected with M0, and set for Door Monitor NO or NC.
▶ Case Tamper
If this option is enabled and the case tamper on the back of the terminal is 'opened' (terminal removed from the wall), an error sound will be heard every 5 seconds when the main window is displayed. During administrator
programming this sound does not occur. Also if a race
AC1100 User guide
58
▶ Card format
Card format determines how the card data is converted once it is read from the terminal. Note: If you change the card format, you must re-register all card users in the device. When registering a user in the terminal, this value should be set, considered first. Also we registering a user from the server, the card format at the server must match the terminal format.
The card number is converted according to the following settings.
RFcard EX) Card number (5byte): 08h 01h 16h 1Dh D6h
| Card format | Card number | Expression |
| Standard | 02207638 | (3+5)digits decimal[022(16h)+07638(1DD6h)] |
| Hexadecimal | 0801161DD6 | 10digits hexadecimal |
| 10 Digit Decimal | 0018226646 | Posterior 4byte: 10digits decimal(01161DD6h) |
| 3,5 Digit Decimal | 02207638 | Same with [Standard] |
SCcard example) card number(4byte): 52h 9Dh 06h E3h
| Card format | Card number | Expression |
| Standard | 529D06E3 | 8 digits hexadecimal |
| Hexadecimal | E3069D52 | 8 digits hexadecimal with changing the order of byte |
| 10 Digit Decimal | 1386022627 | hexadecimal 529D06E3: 10 digits decimal |
AC1100 User guide
59
3.7.3. Terminal Input
If you select the [Terminal] -> [Input] in the main menu, the following window appears.
The Terminal has the ability to monitor the physical lock and/or door state when the door is open and closed, or terminal can be used to monitor status of another external device. See the installation guide for details how to connect.
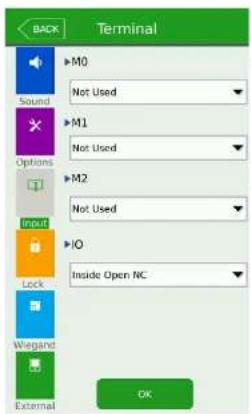
▶ Default Setting : M0-M2 not used, IO (Inside Open)
The inputs accept a relay input either Normally Closed or Normally Open. You should program the Input according to your relay activation type. (NC or NO). It is recommended that not more than one of the same option is used. For example do not program M0 for Door Monitoring and M for Door Monitoring.
Normal Connection
M0 - door monitor
M1 - lock monitor open
M2 - lock monitor closed
These are the available types of monitoring options
AC1100 User guide
master terminal, when the guard approves the access, then the output will trigger the card reader to allow authentication.
- Fire Monitor (NC/NO) – If you have an external device that has a fire output, the terminal will monitor when the device detects a fire alarm. The terminal will show a fire icon and give an audible warning tone; if any doors are connected to the terminal the terminal will open the doors. When this signal is activated, the server software will also be notified of the fire signal to alert other terminals connected on the network.
- Wiegand Mode (NC/NO) – If using wiegand output, this input can be used to verify the external controller acknowledged the card data that was sent on the wiegand output.
i.e Card Scanned at terminal, card data sent to external controller using standard wiegand output, the terminal will wait until the external controller sets this input high or low to acknowledge the card was accepted by the controller.
Select the [OK] button to save the value or select [BACK] button to cancel and return.
AC1100 User guide
61
3.7.4. Terminal Lock
If you select the [Terminal] -> [Lock settings] in the main menu, the following windows appear. See the installation guide for details how to connect a lock to the terminal.

▶ Default Setting: Same as the window on the left.
▶ Lock 1 and Lock 2 Open Time (milliseconds)
Lock activation times can be programmed from 300ms to 999999ms. (maximum is 99.999=100 seconds)
Lock 1 and Lock 2 Options
- Not Used – select this option if not using the lock outputs
- Authorized – select this option if you want to provide an output signal when a user is authorized. i.e. Lamp Signal
- Unauthorized – select this option if you want to provide an output signal when a user is unauthorized. i.e. Lamp Signal
- Trouble – select this option if you want to provide an output signal when the terminal has a
AC1100 User guide
62
3.7.5. Terminal Wiegand
If you select the [Terminal]->[External device] in the main menu, the following window appears.

▶ Default Setting: Same as the window on the left.
▶ Site code
It sets the sitecode value sent in Wiegand output below.
When the authorization is successful, the data of the following format is sent to the Wiegand port of the terminal.
▶ Wiegand Input
Standard wiegand is 26 or 34 bit. The terminal is always waiting for wiegand input, up to 34 bits.
Use Terminal option, card reading to view the card number received at the wiegand input. If the format of the data is incorrect it must be setup using the server program.
▶ Wiegand Output
This is only used when connecting the terminal to an external controller to notify the controller with card data or user id that was used. Standard wiegand output is 26 or 34 bit If any other
AC1100 User guide
63
| Custom | When the server program sets the wiegand output to other value than the standard 26/34 bit, this is displayed. This type can only be selected and setup using the server program. |
Select the [OK] button to save the value or select [BACK] button to cancel and return.
3.7.6. Terminal External
If you select the [Terminal]->[External device] in the main menu, the following window appears.

▶ Default Setting: Same as the window on the left.
See Installation Guide Section 11 for connecting a serial printer.
▶ Printer Option
Disabled - select this if not using
T/A Ticket – if using Time and Attendance mode and
require a printout every time authorization occurs.
Meal Ticket – if using Meal Mode and require a printout every time authorization occurs.
The printing format differs as per each setting. The final result (time/date, mode type, etc) will be printed.
The printer used must be only SRP-350 serial type model.
See Installation Guide Section 12 for connecting ar RS485 bus.
▶RS485 Option
AC1100 User guide
64
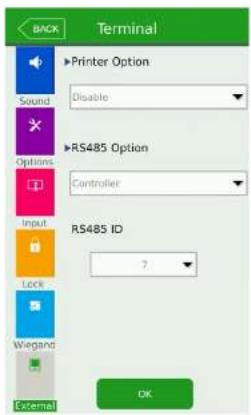
▶RS485 Option
If 'controller' is selected for the RS485 Option, a RS485 is required to connect to a RS485 protocol bus. You should select an appropriate id from 0-7,.
Controller selection will work with a standard protocol called 'OSDP'; this is a SIA Industry standard protocol.
Select the [OK] button to save the value or select [BACK] button to cancel and return.
AC1100 User guide
65
3.8. Display settings
3.8.1. Theme
If you select [Display] -> [Theme] in the main menu, the following window appears.
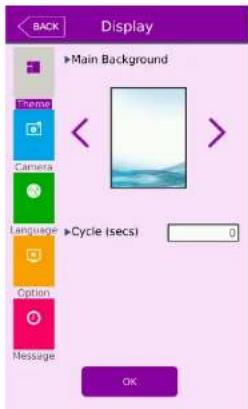
▶ Default Setting: Same as the window on the left.
▶ The main background.
Main background is displayed on the main window or when screen saver mode is enabled.
Cycle forward or back through the available backgrounds. 15 factory set backgrounds are available to choose from. If you import your own background it will also be selectable from this area. See USB->Theme import.
▶ Cycle (seconds)
Values from 0-255. This time in seconds is the interval which the background will change to a new background. If 0 is programmed, then the background will remain at the current picture. If 255 is programmed the background picture will change everyday at midnight. Anytime between 0 and 255 is the number of seconds the background w change. If you have user background images, the terminal will cycle through only these images. If no user background images are in the terminal, the factory background images will be used.
Select the [OK] button to save the value or select [BACK] button to cancel and return. If you would like to select another items, select the menu you want to change on the left side.
AC1100 User guide
66
3.8.2. Camera
If you select the [Display] -> [Camera] in the main menu, the following window appears.

▶ Default Setting: Same as the window on the left
▶ Display option
- None ( no user picture is shown on result window)
- Current Picture ( current user picture is taken and displayed on result window)
- User Picture (Registered database photo is displayed) If no registered photo, or the authentication is unsuccessful, no picture result is displayed.
▶ Save success log
If it is checked ☑, the camera image is captured as image log when the authorization was successful.
▶ Save failed log
When it is checked ( ), the camera image is captured as image log when the authorization was failed.
Select the [OK] button to save the value or select [BACK] button to cancel and return.
3.8.2.1 Camera Flash Option
The camera used for still pictures or face detection also has an optional flash to use during
AC1100 User guide
67
3.8.3. Language
If you select the [Display]->[Language] in the main menu, the following window appears.

▶ Default Setting: 'English'
▶ Language
If you change the language and select 'OK' button,
the voice message and language are changed to
the set language.
Select [OK] button to apply the changes, or select
[BACK] button to cancel and return.
※Supporting languages
English, Korean, Japanese, Thai, Spanish-Portugal
Spanish-Spain, Farsi(Persian), Deutsch, Chinese,
Taiwanese, Polish, Slovenian.
3.8.4. LCD option
If you select [Display] -> [LCD option] in the main menu, the following window appears.
AC1100 User guide
68
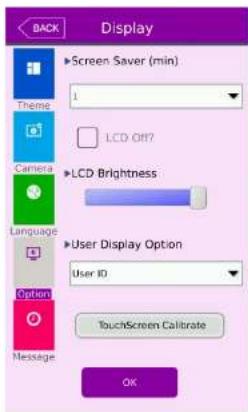
▶ Default Setting: Same as the window on the left
▶ Screen saver (min) (1 minute \~ 30minutes) Select the appropriate timeout you wish to use. If you not want a screen saver after a timeout select 'off'.
▶ If screen saver is not set to 'off', when this option is unchecked the normal background image will show with the time & date only when the screen saver timeout occurs. When this option is checked the LCD will turn off after the screen saver timeout.
▶ LCD Brightness Adjust the brightness of the LCD with this setting.
▶ User display option When a successful user is granted access this will be displayed on the main window, popup.
- None
- User ID
- Key ID (Employee ID entered from the server program)
- User Name
▶ TouchScreen Calibrate - if the Touchscreen seems misaligned or not exactly to the users alignment you can readjust the calibration, a reboot will occur and guid you through the instructions.
Select the [OK] button to save the value or select [BACK] button to cancel and return.
3.8.5. Message time settings
If you select the [Display]->[Message time setting] in the main menu, the following
AC1100 User guide
69

▶ Default Setting: Same as the window on the left
▶ Message display (ms unit)
It sets the time for which the authorization result window to be displayed.
0\~5000 is available for the value, and the authorization result window appeared and disappear for the duration.
Because it is set in ms unit, if you want to set seconds, you should set 2000
From the UNIS server program you can send a message to the main display. The message will flash on and off depending on the values for the ON time/OFF time. Message will be displayed from the time period set in the UNIS program.
Select the [OK] button to save the value or select [BACK] button to cancel and return.
AC1100 User guide
70
3.9. Terminal information
3.9.1. System information
If you select the [Terminal info] -> [System] in the main menu, the following window appears.

▶ System info
The hardware and firmware version of the terminal is shown.
Card Reader status
Camera status
Bluetooth status
BLE serial number
▶ System Storage (using/all)
Usage of system data.
▶ Ram (use/total)
Usage of DDRAM.
Select another selection on the left side or CLOSE, BACK button to return to previous window.
AC1100 User guide
71
3.9.2. Terminal information
If you select the [Terminal information] -> [Terminal] in the main menu, the following window appears.

▶ Terminal information
Displaying basic information about terminal setup
Select another selection on the left side or CLOSE, BACK button to return to previous window.
AC1100 User guide
72
3.9.3. Network information
If you select the [Terminal information]->[Network] in the main menu, the following window appears.

▶ Network information
Displaying basic information about network information.
Select another selection on the left side or CLOSE, BACK button to return to previous window.
AC1100 User guide
73
3.9.4. User information
If you select the [Terminal information]->[User] in the main menu, the following window appears.

▶ User information
- Registered Users: The number of users registered (including administrator)
-Administrator Users: The number of the administrators registered.
- Card: The number of cards registered
Capacity: (Max means the maximum number)
Select another selection on the left side or CLOSE, BACK button to return to previous window.
AC1100 User guide
74
3.9.5. Log information
If you select the [Terminal information] -> [Log] in the main menu, the following window appears.
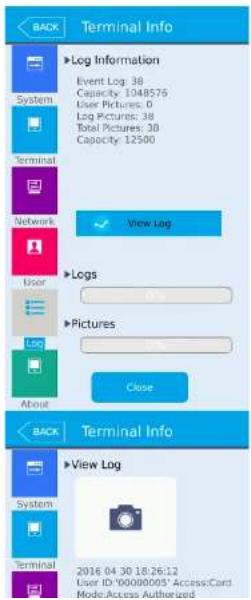
▶ Log
Event Log: The number of logs saved in the terminal
User Pictures: Number of registered user pictures
Log Pictures: Number of log pictures
Total Pictures: User and Log picture total
Capacity: (Max means the maximum number)
▶ View Log
Displays log time and authentication result
Select 'View Log' to find search results.
▶ Log Search result
Log search result shows the information such as the date, time, ID and access result (success or failure).
If a picture is saved with the log, the picture is also shown.
Select OR button to see the search
Information
AC1100 User guide
75
3.9.6. About
If you select the [Terminal information] -> [About] in the main menu, the following window appears.

▶ About
Display legal information about software and firmware
Select the text area and scroll up or down to view more
Select another selection on the left side or CLOSE, BACK button to return to previous window.
AC1100 User guide
76
3.10. SD USB
SD (Storage Device) USB on-The-Go function is supported in the card reader terminal. You will need a cable as shown below. USB storage function will allow you to import and export files to and from the terminal.
User data, log data, pictures, images and firmware upgrading can be performed. It is recommended that your USB has at least 1GB available for storage. You cannot select any options in the USB-SD menu until a USB device is connected. The USB device can be connected at anytime before or after entering this area. Once you connect your device you must wait up to 10 seconds before the terminal will recognize it and a 'detected' message will appear. The USB should be formatted as FAT/FAT32 file system type. NTFS is not supported.

natural_image
Close-up of a black USB port connector with a USB cable (no text or symbols visible)1) Prepare your USB device by formatting for FAT/FAT32 File system type 2) On the USB device from your PC create a directory in the root called 'CR'
AC1100 User guide
77

AC1100 User guide
78
Filenames maybe in the format.
(XXXXXXXX_YYYYMMDDHHMM_logdata.tar.gz)
(XXXXXXXX_YYYYMMDDHHMM.csv)
(XXXXXXXX_YYYYMMDDHHMM_piclogdata.tar.gz)
XXXXXXXXX = terminal ID
YYYYDDMMDDHHMM – Year, Month, Date and Time of export.
Note: .tar.gz are tarballed compressed zipped files. If you are using windows PC you may need to download a utility program to extract the files. If you are only saving, and importing to another terminal, you should not rename the file.
'CR/languages' directory – Card Reader language files are in this folder. Only .qm file extensions supported. Card Reader language files are in the format lang_en_US.qm (For example English)
A separate program is used to create the language translation file for each language.
'CR/languages/mp3/' directory – Card Reader mp3 voice files can be updated by USB. There are 4 voice files that can be upgraded and they must be named as follows:
1) E02_PleaseTryAgain.mp3 (Failure voice)
2) E03_YouAreAuthorized.mp3 (Success voice)
3) E04_InputYourID.mp3 (Enter ID voice)
4) E05_PleaseEnterYourCard.mp3 (Enter Card voice)
'CR/firmware' directory – Store all firmware files needed for upgrade in this folder. From time to time the factory will release new firmware versions for bug fixing or feature enhancements. These binary images can be upgraded from this folder. Correct file names should have a '.umgz' extension.
- resource.umgz
- app.umgz
AC1100 User guide
79
'CR/unisuser' directory – This directory is created by the card reader terminal when selecting Export User Data. Files in this directory will be named 0000.dat\~9999.dat.
These files can be used to import from another device or import to the server program on a PC.
AC1100 User guide
80
If you select the [SD USB] from the admin menu, the following screen appears.

No USB device Connected

USB Device Connected with brand name

USB Function
Import is used to importing user data or system options from another device.
AC1100 User guide
81
3.11. Background screen change
If you select 'download customized file' from the UNIS server program you will be able to select 'All File'. UNIS 4.0 and above only.

Select
.jpg, .bmp, .png Images only
The file name should not exceed 15 letters (English).
The file name should be in the format user1-user9.xxx - (xxx=jpg, png, bmp)
The file format MUST be an appropriate size to fit the screen 480 x 800.
If you select the file type as 'All File (.*)', Select 'Find', the select the image file and select the 'OK' button, the terminal selection window appears. If you select the terminal in the terminal list window and click the 'Send' button again, the file is sent and the downloaded to the terminal.
AC1100 User guide
82
3.20. Language Translations/Customizing Text Items
Mostly all text on the user interface can be changed or customized to your customer's choice.
Language must be in the ISO639 format naming is required.
xx_YY - xx = Language
YY = Region/Country
lang_en_US // English/US
lang_ko_KR // Korean
lang_ja_JP // Japan
lang_zh_CN // Chinese
lang_zh_TW // Chinese (Taiwan)
lang_de_DE // German (dutch)
lang_it_IT // Italian
lang_zh_TW // Taiwan
lang_fr_FR // French
lang_fa_IR // Farsi - Iran ( persian )
lang_ar_EG // Arabic - Egypt
lang_es_ES // Spanish Spain
lang_es_EC // Spanish Equador
lang_pt_BR // Portuguese Brazil
lang_pl_PL // Polish
lang_th_TH // Thai, Thailand
TS File = from the factory, given to the customer for translations
QM File = created by the application program. Used by the card reader terminal.
Example:
lang_en_US.ts – supplied by the factory
AC1100 User guide
83
If you select 'download customized file' from the UNIS server program you will be able to select 'All File'. UNIS 4.0 and above only.
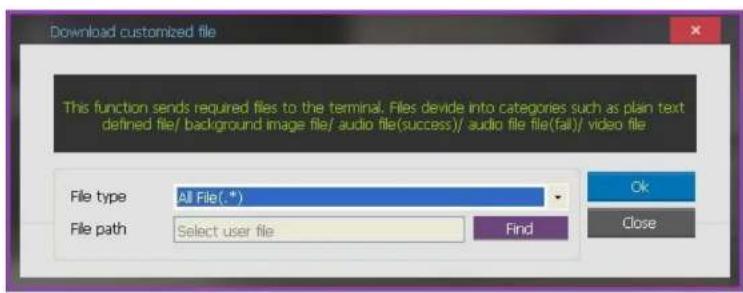
You can upgrade the new .qm file using the following two ways:
1) USB - see section 3.10. SD USB for updating using USB
2) UNIS – from UNIS, select 'download customized file', the select 'All File(.*)', browse to the language file and select it. Select OK, and then select the terminal to send to.
Language files must be in the naming format 'lang_xx_YY.qm'.
Note: Some languages not on the list above require special fonts to be imported. You must contact your sales representative if you wish use use a
AC1100 User guide
84
- How to use terminal
The background image and composition of the main window can be changed according to the administrator's setting. In addition, if the administrator set the screen saver time, the LCD screen will show only the background image with the time and date. Entering a card, touching the screen will change back to the main window.
4.1. Authorization mode change

AC1100 User guide
85
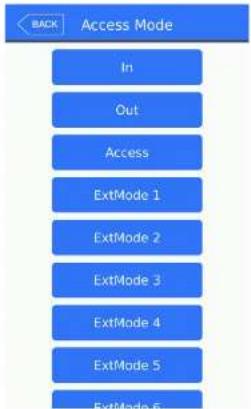
In the access mode selection screen, as shown in the left select the preferable access mode button, which the scree will move to the selected access mode.
4.2. ID input
If you select the [ID input] button on the main window, the following ID input window appears.
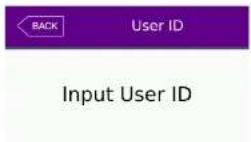
Enter the user ID to be certified and select [OK] button, and then scan your card or enter your password according to the authorization method of the user.
AC1100 User guide
86
4.3. Authorization
4.3.3. Card authorization
Touch/Scan the card on the area of the card reader as shown in
4.3.4. Password authorization
Input your ID by selecting [ID input] button as follows and input password when the password input window appears.
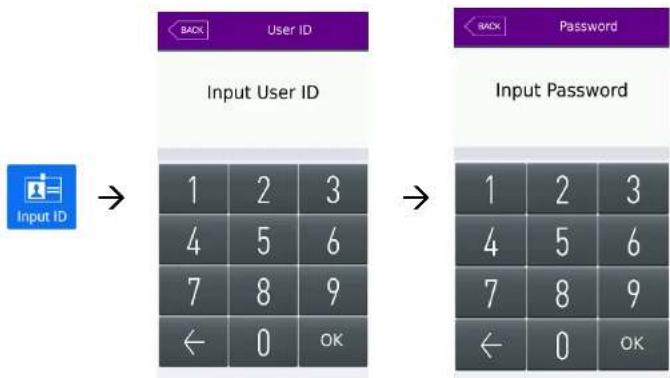
flowchart
graph LR
    A["Input ID"] --> B["Input User ID"]
    B --> C["1 2 3"]
    B --> D["4 5 6"]
    B --> E["7 8 9"]
    B --> F["← 0 OK"]
    C --> G["Input Password"]
    D --> G
    E --> G
    F --> G
    G --> H["1 2 3"]
    G --> I["4 5 6"]
    G --> J["7 8 9"]
    G --> K["← 0 OK"]



- < Glossary>
- Contents
- AC1100 User guide 5
- Before use
- Safety precautions
- AC1100 User guide 8
- Normal Window Display
- AC1100 User guide 9
- AC1100 User guide
- Product introduction
- Product characteristics
- ● Various registration and authorization methods
- Connected with PC server
- Environment setting
- Checks before setting the environment
- Entering the admin menu
- Administrator authorization
- How to enter the menu without administrator authorization
- Method #2
- How to save the set values
- User management
- Authorization method
- Deleting User
- Modify User
- View
- Network Settings
- Application
- Application mode
- Modes
- Function keys
- 3.6.2.Mobile Key
- Face Detection
- Time/Date
- Database Confirmation
- Terminal settings
- Sounds
- ▶ Voice volume
- ▶ Beep volume
- Terminal option
- Terminal Input
- Terminal Lock
- Lock 1 and Lock 2 Options
- Terminal Wiegand
- ▶ Wiegand Output
- Terminal External
- Display settings
- Theme
- Camera
- Camera Flash Option
- Language
- LCD option
- Message time settings
- Terminal information
- System information
- Terminal information
- Network information
- User information
- 74
- Log information
- ▶ Log
- ▶ View Log
- ▶ Log Search result
- About
- ▶ About
- SD USB
- Background screen change
- Language Translations/Customizing Text Items
- ID input
- Authorization
- Card authorization
- Password authorization
Brand : Genie
Model : AC1100SC
Category : Payment terminal