
AC2000SC - Payment terminal Genie - Free user manual and instructions
Find the device manual for free AC2000SC Genie in PDF.


| Product Type | Payment Terminal |
| Brand | Genie |
| Model | AC2000SC |
| Dimensions (approx.) | 150 x 80 x 50 mm |
| Weight (approx.) | 300 g |
| Power Supply | 5V DC via USB or power adapter |
| Display | Monochrome LCD, 128x64 pixels |
| Keypad | Numeric keypad with function keys |
| Card Reader | Magnetic stripe, EMV chip, NFC contactless |
| Connectivity | Ethernet, Wi-Fi, Bluetooth (optional) |
| Printing | Thermal receipt printer, 58 mm paper |
| Operating System | Proprietary embedded OS |
| Supported Cards | Visa, Mastercard, American Express, Discover, etc. |
| Security Standards | PCI PTS compliant, end-to-end encryption |
| Languages Supported | Multiple (selectable in settings) |
| Battery Backup | Rechargeable lithium-ion, 7.4V 2000mAh |
| Operating Temperature | 0°C to 40°C |
| Storage Temperature | -20°C to 60°C |
| Maintenance | Clean with dry cloth; avoid liquids |
| Spare Parts | Power adapter, USB cable, thermal paper rolls |
| Repairability | Serviceable by authorized technicians only |
Frequently Asked Questions - AC2000SC Genie
User questions about AC2000SC Genie
0 question about this device. Answer the ones you know or ask your own.
Ask a new question about this device
Download the instructions for your Payment terminal in PDF format for free! Find your manual AC2000SC - Genie and take your electronic device back in hand. On this page are published all the documents necessary for the use of your device. AC2000SC by Genie.
USER MANUAL AC2000SC Genie
- Admin (Administrator)
- The administrator can access to the terminal menu mode. He/she has the authority to add/modify/delete terminal users and to change the operating environment by changing settings.
- If there is no registered administrator in the terminal, anybody can access to the terminal menu and change settings. It is recommended that more than one administrator will be necessarily registered in the terminal.
- The administrator has the authority to change critical environmental settings of the fingerprint reader. So, special attention is required to its registration and operation.
● 1:1 Authentication (1 to 1 Verification)
- The user fingerprint is verified after entering User ID or Card.
- Only User ID or the user fingerprint registered to the card is compared. This is called 1:1 Authentication.
● 1:N Authentication (1 to N Identification)
- The user is identified only by the fingerprint.
- The same fingerprint as the input fingerprint is identified among the registered fingerprints without User ID or Card entered. This is called One-to-N Identification.
● Authentication Level
- As a level used for fingerprint authentication, it is displayed in Step 1 to 9. Authentication cannot be allowed before the degree of match between two fingerprints is higher than the set authorization level.
- The higher authentication level may ensure the higher security. But it requires the relatively high concordance rate. So it high likely to deny authentication when trying to authenticate.
- 1:1 Level: Authentication level used for 1:1 authentication
- 1:N Level: Authentication level used for 1:N authentication
● Authentication Method
- This refers to various types of authentication methods composed of each combination of FP(Fingerprint) and RF(Card) and so forth.
Ex) Card or FP: Authenticated by either card or fingerprint
Table of Contents
Table of Contents......4
- Before Getting Started .... 5
1.1. Safety Notes....5
1.2. Product Details 6
1.3. LED signals displayed during operation 6
1.4. Buzzer guide announced during operation....7
1.5. How to register and enter correct fingerprint 7
- Product Description 9
2.1. Product Features....9
2.2. Configuration Diagram ...... 11
2.2.1. Standalone Use (Access) 11
2.2.2. Connecting the PC server (Access, T&A, Food Service Control) ..... 11
2.3. Product Specification....12
- Environment Setting 13
3.1. Checkpoints before environment setting.... 13
3.1.1. Run UNIS-B Plus (Mobile App).... 13
3.1.2.Add Terminal 14
3.1.3.Administrator Menu Entry 15
3.2.User Management 16
3.2.1.Add User 16
3.2.2. Delete User 16
3.2.3.Modify User 17
3.3.Terminal Configuration 18
3.3.1. Settings via UNIS-B Plus.... 18
3.3.2. Terminal IP settings via Terminal Finder 20
- How to use the terminal....23
4.1. Authentication 23
4.1.1. Fingerprint authentication 23
4.1.2. Card authentication 23
4.1.3.Multi authentication....23
- Problem solution 24
5.1. When Fingerprint Authentication has failed or pended 24
5.2. When fingerprint input fails 24
5.3. When the network connection fails 24
5.4. Successful Authentication but access denied....24
1. Before Getting Started
1.1. Safety Notes
- Warning
| Do not operate the terminal with wet hands, and pay attention not to let any liquid such as water enter inside the terminal.→ Otherwise, malfunction or electric shock may be caused. |  | Keep the terminal away from inflammables.→ Otherwise, it may cause a fire. |  |
| Do not disassemble, repair or remodel the terminal at your disposal.→ Otherwise, it may cause malfunction, electric shock, or a fire. |  | Do not allow children to touch the terminal carelessly.→ Otherwise, it may cause safety accidents of children or malfunction. |  |
- Non-compliance of safety notes may cause death or serious injury for users.
- Cautions
| Do not install the terminal in a place exposed to direct sunlight.→ Otherwise, it may cause malfunction, deformation and discoloration. |  | Do not install the terminal in humid or dusty places.→ Otherwise, it may cause malfunction. |  |
| Do not clean this terminal by sprinkling water, nor wipe it with benzene, thinner, and alcohol.→ Otherwise, it may cause electric shock or a fire. |  | Keep the terminal away from magnets.→ Otherwise, it may cause failure and malfunction. |  |
| Keep the fingerprint input section clean.→ Otherwise, the fingerprint cannot be recognized correctly. |  | Do not spray insecticides or inflammables on the terminal.→ Otherwise, it may cause deformation and discoloration. |  |
| Keep the terminal away from shock or sharp objects.→ Otherwise, it may damage the terminal and result in malfunction. |  | Do not install the terminal in a place where there is a severe change in temperature.→ Otherwise, it may cause malfunction. |  |
- Non-compliance of safety notes may cause personal injury or property damage for users.
※ We are not responsible for any accidents and damage that may arise from non-compliance of the information in this manual.
1.2. Product Details

1.3. LED signals displayed during operation
| Blue | Power Blue | On: NormalFlickering: Under Bluetooth communication | |
| Green | Door Green | On: Door OpenOff: Door Close | |
| Red | Alarm Red | Off: NormalFlickering: Case Open or Pending register the Mobile Admin App |
※ The LED may light on simultaneously in some cases. (Ex. Red and Blue flicker)
1.4. Buzzer guide announced during operation
| Ppik | When button or card is operated | - If the button is pressed or if the terminal reads the card- If your finger may be released because your fingerprint has been successfully entered |
| Ppibik | When failure | If authentication fails or the user's input is wrong |
| Ppiririk | When success | If authentication is successful or if the current user finishes settings |
1.5. How to register and enter correct fingerprint
- Correct fingerprint input method
Enter your fingerprint as if you take a thumbprint by using your forefinger if possible.
The fingerprint cannot be correctly registered and entered only by your fingertips. The center of the fingerprint should be touched with the fingerprint input section.

- Enter the fingerprint of your forefinger if possible.
When using your forefinger, you can enter your fingerprint correctly and safely.
● Make sure that the fingerprint is unclear or wounded.
Too dry, wet, blurry or wounded fingerprints are difficult to recognize. In this case, the fingerprint of another finger should be registered.

● Precautions subject to your fingerprint status
The availability of the fingerprint may vary depending on your fingerprint status.
This product consists of a fingerprint recognition system and cannot recognize the damaged or unclear fingerprints. They should be registered using a password.
If your hands are dry, you can blow your breath on the system to operate it more smoothly.
For children, too small or unclear fingerprints may be difficult or impossible to use. They need to register a new fingerprint every six months.
For seniors, the fingerprint with too many lines may not be registered.
It is recommended that you will register more than two fingerprints if possible.
In order to increase the fingerprint authentication rate, it is recommended to use six of the ten fingers as illustrated above. (Both thumbs, forefingers, middle fingers)
2. Product Description
2.1. Product Features
- Access control system using the network (LAN)
- The fingerprint reader communicates with the authentication server using a UTP cable and TCP/IP protocol. This terminal can be applied to the existing LAN network and has easy expandability. It ensures a fast speed by 10/100 Mbps Auto Detect and facilitates management and monitoring via the network.
- Convenient Auto Sensing function
- The authentication function can be simply operated by entering the fingerprint without separate keys entered.
- Easy to verify your ID via fingerprint
- The use of the fingerprint recognition technology (Biometrics) can prevent forgetting your password, losing your card or key, or avoid the risk of their theft. The use of personal fingerprints enhances the security of authentication.
- Diverse and flexible access control function
- Easy to use it without the risk of rental, counterfeit and loss of your key or card.
- Provide the complete access control function by granting access authority according to user groups.
- Provide the flexibility of access control by allowing the access time restrictedly.
- Economical maintenance and development costs compared to other access control devices.
- Remove the inconvenience that visitors are registered in the management office and then separate cards are issued.
- Diverse utilization for operating systems such as security, access, T&A, and food service
- Various operating methods can be supported depending on how the terminal menu is set.
● Large processing capacity of server
- When the information is managed using the server, it can be processed almost infinitely.
- Mobile interlocking function
- By using mobile Bluetooth, the terminal can be set to Admin App (UNIS-B Plus).
- By using mobile Bluetooth, the user can be authenticated to User App (imkey).
● Various registration and authentication methods
There are a total of four registration and authentication methods for general users. Before registering users or administrators, you should determine how to register and authenticate.
| FP | Fingerprint RegistrationFingerprint Authentication |
| Card | Card RegistrationCard Authentication |
| M.Key | Mobile Key RegistrationMobile Key Authentication |
| Card or FP | Card or Fingerprint RegistrationCard or Fingerprint Authentication |
| Card and FP | Card and Fingerprint RegistrationCard Authentication and then Fingerprint Authentication |
2.2. Configuration Diagram
2.2.1. Standalone Use (Access)
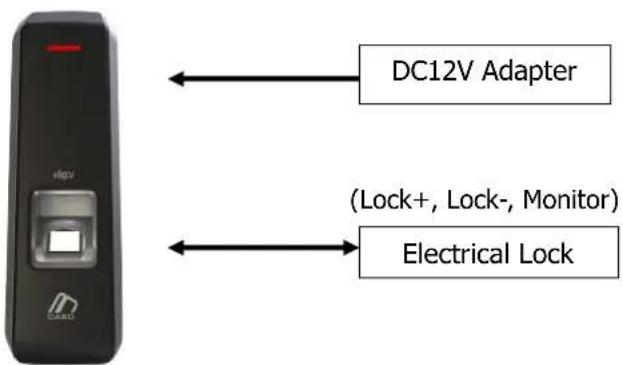
2.2.2. Connecting the PC server (Access, T&A, Food Service Control)
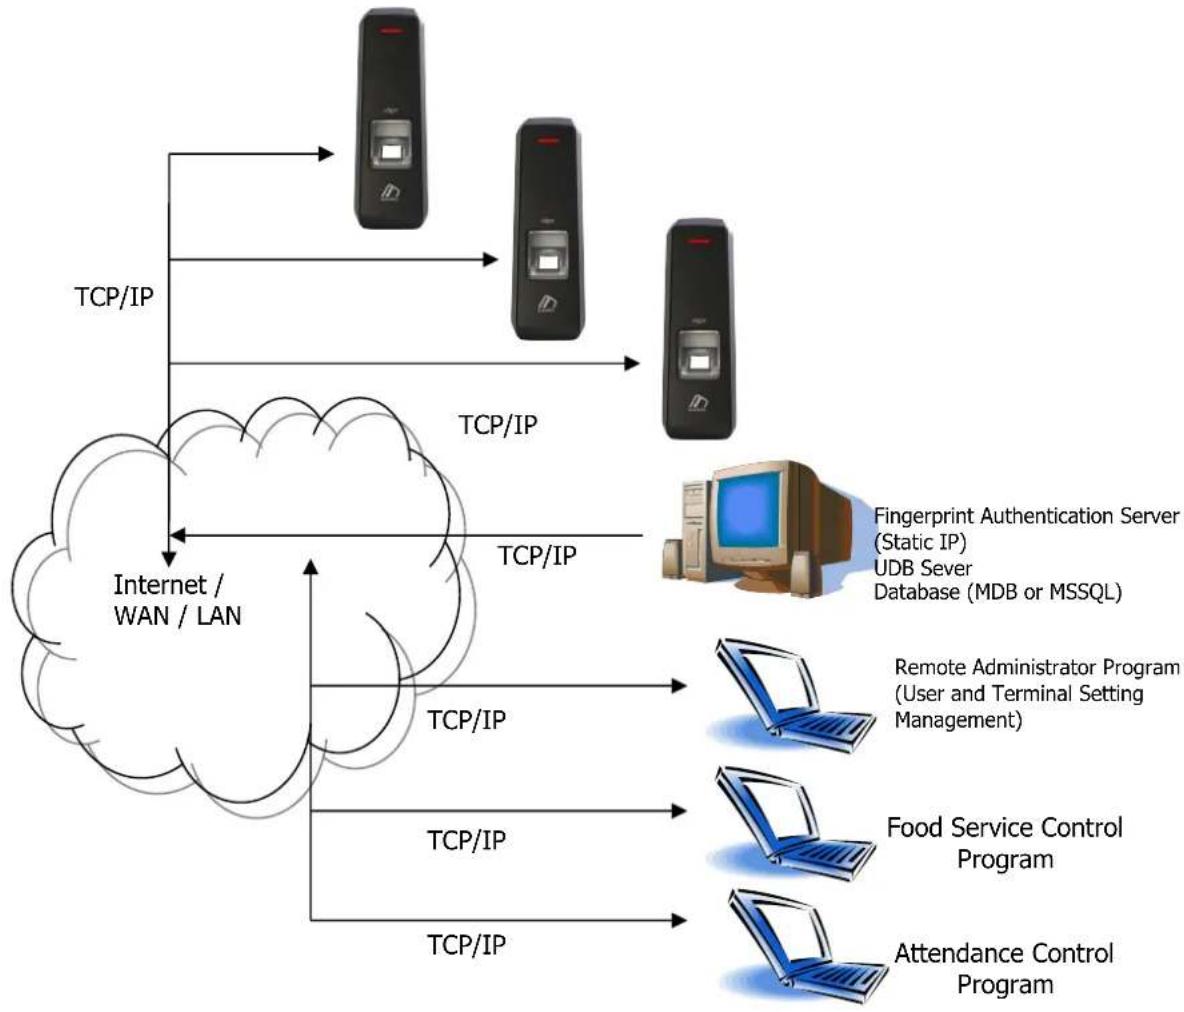
flowchart
graph TD
    A["TCP/IP"] --> B["Fingerprint Authentication Server (Static IP)"]
    A --> C["UDB Sever Database (MDB or MSSQL)"]
    D["Internet / WAN / LAN"] --> E["Remote Administrator Program (User and Terminal Setting Management)"]
    D --> F["Food Service Control Program"]
    D --> G["Attendance Control Program"]
    style A fill:#f9f,stroke:#333
    style B fill:#ccf,stroke:#333
    style C fill:#ccf,stroke:#333
    style D fill:#cfc,stroke:#333
    style E fill:#fcc,stroke:#333
    style F fill:#fcc,stroke:#333
    style G fill:#fcc,stroke:#333
2.3. Product Specification
| ITEM SPEC REMARK | ||
| CPU 32Bit RISC | CPU(400MHz) | |
| MEMORY | 64M DDR2 RAM | |
| 32M NOR FLASH | 1,500 User1,500 Finger100,000 Log | |
| Fingerprint Sensor Optical | ||
| Authentication Speed Less than 1 second | ||
| Scan Area / Resolution 14.8 * 17.9mm / 500 DPI | ||
| FRR / FAR | 0.1% / 0.0001% | |
| Communication Port | TCP/IP | AuthenticationServerCommunication |
| Bluetooth | MobileInterlocking | |
| RS-485 | External DeviceCommunication | |
| Wiegand In/Out | Card Reader orExternal DeviceCommunication | |
| Temperature / Humidity | -20 ~ 60 /Lower than 90% RH | |
| SIZE 58mm(W) | * 191mm(H) * 62mm(D) | |
| AC / DC Adapter | INPUT : Universal AC 100 ~ 250V | |
| OUTPUT: DC 12V (Option : DC 24V) | ||
| UL, CSA, CE Approved | ||
| Card Reader | Smart Card Reader | 14443A type,13.56MHz |
3. Environment Setting
3.1. Checkpoints before environment setting
3.1.1. Run UNIS-B Plus (Mobile App)
Visit the App store on your Smartphone and install the Mobile App 'UNIS-B Plus'.
And click on the UNIS-B Plus icon installed to run program.
After initializing for more than 2 seconds, the intro menu screen will automatically be displayed.

3.1.2. Add Terminal
When selecting [Add] in the upper right corner of [Terminal List], the Terminal Select screen will be displayed.
![Terminal List Terminal Edit Add 00000001 [2M9C50F8] Mobile card 00000022 [2M9C5ZZH] View Mobile card 00002200 Mobile card Terminal List Mobile card renewal Select a terminal FMD-10 AC-2200 AC-5000/AC-5100 AC-1100 AC-2000](/content/2026/05/791125/images/1cfbb204ffbbb66e040afa6048ac737a67d03aaba5fc662934070f17f9bbc65a.jpg)
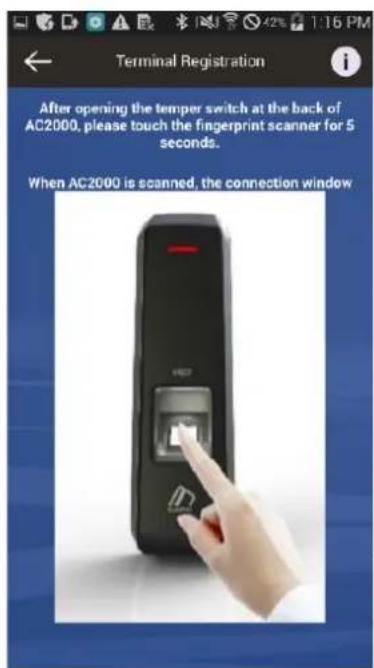
Select the Terminal you want to register then go to the Terminal Search screen to find out the Terminal Registration Guide.
When you opened the Temper Switch on the back of device, place your finger on the fingerprint input window and wait for about 5 seconds to operate and register the Terminal.
3.1.3. Administrator Menu Entry
When pressing the [View] button on the screen [Terminal List], and the following screen will appear to ask the User ID and Password.

Even if there is no registered administrator in the terminal, user can access device without input ID and Password.
If there is registered administrator in the terminal, user can access device by attempting authentication methods pre-defined.
If there is any user ID input, the 1:1 authentication is performed, but 1:N authentication is performed if the user ID is not registered.
After successful authentication, the screen will go to the User Management Menu.
3.2.User Management
3.2.1. Add User
When pressing the [Add] button on the main screen [User Management], and the following screen will appear.

Enter the user information to register on [Add User] screen.
When you complete input the user information, select [Save] button in the upper right corner.
If the user information is normally entered, the terminal will be ready for card or fingerprint input.
When the set authentication method is completed, it returns to [User Management] screen.
3.2.2. Delete User
When pressing the [Edit] button on the main screen [User Management], the following screen will appear.

Select the ID of the user you want to delete from the registered users of the terminal and press [Delete] button or if you want to delete all the information registered, press [Delete All] button.
(If the Mode is set to 'Network', the [Delete All] button will be deactivated.)
3.2.3. Modify User
Select the user you want to modify on [User Management] screen, and the screen goes to the User Detail.

After changing the user information except for ID, press [Save] button on the screen to save the changes, and also the screen may show the waiting status for the additional authentication when it is required.
When the modification is completed, the screen returns to [User Management] screen.
3.3. Terminal Configuration
3.3.1. Settings via UNIS-B Plus
When pressing [Setting] button in the lower right corner of screen, the following screen will appear.


To modify the existing Terminal setting, press [Edit] button in the upper-right corner of screen to enter the edit mode. When the modification of terminal setting is completed, press the [Save] button to save changed values and return to the main screen.
▶ Buzzer volume
Set the buzzer sound volume of the terminal.
▶ Lock Controller
485 controllers can be selected.
You can select LC-010, BLC-015 and MCP040.
And they will perform authentication, lock control, and log processing.
▶ Card Format
If set to Hexa, hexadecimal is displayed. When set to Decimal, it is displayed in decimal. If you select [4. Format 5] with the installed RF (low frequency) card reader, the authenticity of the EM card is displayed in decimal notation.
▶ 1: N Level
Set the verification level from 5 to 9 when 1: N authentication is in progress.
▶ 1: 1 Level
Set the verification level from 1 to 9 when 1: N authentication is in progress.
▶ DHCP Use
Set whether to use static IP.
▶ Terminal IP
Set the terminal IP.
▶ Server IP
Set the server IP when used in conjunction with a UNIS server.
▶ Subnet mask
Set the subnet mask value of the terminal.
▶ Gateway
Set the gateway value of the terminal.
▶ Port Number
Set the port of the UNIS server. (Default: 9870)
▶ Firmware version
The device's firmware version and BLE firmware version are displayed.
▶ Time synchronization
Set the time of the terminal and the time of the cellphone to match.
▶ Initialize setting
Initialize all data except logs and user information.
▶ Factory reset
Reset the setting of the terminal.
※ After saving the setting, the terminal will be rebooted, so it is recommended to connect with 30 \~ 60 seconds interval.
3.3.2. Terminal IP settings via Terminal Finder
Before connecting AC2000 to UNIS server program, you may want to change it to another IP or other terminal ID. In this case, you need a separate program. The location is Program Files -> UNIS -> Patch folder and it is called Terminal Finder Program. With this program, you can search all the buddy devices in the same network and change the network settings (Terminal IP, Server IP, and Terminal ID etc.)
1) Add terminal ID of AC2000 from [Terminal Management] -> [Add Terminal] in UNIS and click [Add] button
2) Connect AC2000 to the network by using standard UTP cable.
3) Open the Terminal Finder program.
4) Click [Search] button - A list of all buddy devices on the network is displayed.

5) Select the device to change the setting. It is highlighted and the current setting value is displayed.

6) Modify the network value

7) To enhance security, you can change the password before clicking the [Apply] button. The default password is 0842650. This password can be changed.
You can also use the lock option if you do not want to change the network settings again by the UDP search method.
If Warning and lock options are set, it may not be possible to configure by using Terminal Finder program.
8) Click [Apply] button and 'configuration settings success' will be displayed at the bottom of the screen.
4. How to use the terminal
4.1. Authentication
4.1.1. Fingerprint authentication
When you place a fingerprint on the fingerprint sensor, the sensor lights up and the fingerprint is input. Do not remove your finger until the fingerprint sensor is completely turned off.
4.1.2. Card authentication
Place the card on the card input of the terminal.
4.1.3. Multi authentication
Authentication method for users who need to authenticate two or more authentication methods together, such as card & fingerprint authentication, proceeds with the remaining authentication if the entered authentication method is successful.
5. Problem solution
5.1. When Fingerprint Authentication has failed or pended
If the terminal operates 1: N (server) authentication in network mode and the server is used for business or personal use, the recognition rate and authentication time may take a long time due to the server load. Please build a private server.
▶ Check your fingers or sensor for scratches or foreign objects, and wipe them off any foreign objects. If the scar is large, re-register another fingerprint through the administrator.
▶ If the fingerprint status is not good, please lower the personal security level in the user information and try 1: 1 authentication.
5.2. When fingerprint input fails
If the fingerprint is very dry or wet, it may not be input properly. If it is damp, wipe it with a dry towel. If it is dry, please blow your fingers or put oil on it and try again.
5.3. When the network connection fails
▶ Check whether the terminal is registered in the terminal management item in the information management menu of the UNIS program.
▶ In the case of unregistered terminal, check your device settings on Terminal Finder program.
- Server IP with UNIS program installed.
- Make sure if the device ID is set correctly.
- If DHCP is not used, check the relevant information.
5.4. Successful Authentication but access denied
Make sure if the time zone is not the time limit for access.




- Table of Contents
- Before Getting Started
- Safety Notes
- - Warning
- - Cautions
- Product Details
- LED signals displayed during operation
- Buzzer guide announced during operation
- How to register and enter correct fingerprint
- Product Description
- Product Features
- - Access control system using the network (LAN)
- - Convenient Auto Sensing function
- - Easy to verify your ID via fingerprint
- - Diverse and flexible access control function
- - Diverse utilization for operating systems such as security, access, T&A, and food service
- ● Large processing capacity of server
- - Mobile interlocking function
- ● Various registration and authentication methods
- Configuration Diagram
- Standalone Use (Access)
- Connecting the PC server (Access, T&A, Food Service Control)
- Product Specification
- Environment Setting
- Checkpoints before environment setting
- Run UNIS-B Plus (Mobile App)
- Add Terminal
- Administrator Menu Entry
- 3.2.User Management
- Add User
- Delete User
- Modify User
- Terminal Configuration
- Settings via UNIS-B Plus
- Terminal IP settings via Terminal Finder
- 6) Modify the network value
- How to use the terminal
- Authentication
- Fingerprint authentication
- Card authentication
- Multi authentication
- Problem solution
Brand : Genie
Model : AC2000SC
Category : Payment terminal