
BOSE609T - Oven BLANCO - Free user manual and instructions
Find the device manual for free BOSE609T BLANCO in PDF.


| Product Type | Electric Oven |
| Brand | BLANCO |
| Model | BOSE609T |
| Dimensions (H x W x D) | 595 x 595 x 550 mm |
| Power Supply | 15 Amp, 230V (hardwired) |
| Number of Cooking Functions | 9 |
| Cooking Functions | Conventional (top/bottom), Lower Element, Half Grill, Full Grill, Fan Grill, Fan Forced, Fan Assist, Oven Light, Demo Mode |
| Temperature Range | 50°C to 250°C |
| Oven Rack Positions | 5 levels |
| Oven Light | Replaceable, 230V 15/25W |
| Self-Cleaning | Catalytic liners on rear and sides (self-clean at >200°C) |
| Child Lock | Yes, press Power button for 5 seconds |
| Clock Functions | Minute-counter, cooking duration, end cooking, delayed cooking |
| Accessories Included | 2 safety anti-tip shelves, grill pan, grill pan insert, grill handle, metal tray, 2 partially extendable telescopic runners, catalytic liners |
| Door Removal | Yes, removable for cleaning |
| Installation | Built-in, requires cutout; electrical hardwiring by qualified electrician |
| Cleaning | Do not use steam cleaner; avoid abrasive cleaners; use soft cloth |
| Safety Features | Residual heat indication, automatic buzzer at end of cooking, child lock |
Frequently Asked Questions - BOSE609T BLANCO
User questions about BOSE609T BLANCO
0 question about this device. Answer the ones you know or ask your own.
Ask a new question about this device
Download the instructions for your Oven in PDF format for free! Find your manual BOSE609T - BLANCO and take your electronic device back in hand. On this page are published all the documents necessary for the use of your device. BOSE609T by BLANCO.
USER MANUAL BOSE609T BLANCO
Instruction Manual for Electric Oven
BOSE609T
Dear Customer,
Thank you for buying a BLANCO oven.
Before we continue telling you about this oven, we cordially invite you to become part of the Blanco family by subscribing online. Please visit our website where you can easily register for product/cooking demonstrations, and request Blanco's gourmet recipes. Go to www.blanco-australia.com and fill in the subscription details in the contact us/showrooms section.
You will find that the clean lines and modern look of your Blanco oven blends in perfectly with your kitchen décor. It is easy to use and performs to a high standard.
Blanco also makes a range of products that will enhance your kitchen such as cooktops, rangehoods, dishwashers, microwaves, sinks and taps. There are models to complement your new Blanco oven.
Of course, we make every effort to ensure that our products meet all your requirements, and our Customer Relations department is at your disposal,
Table of Contents
| Safety Instructions | 4 | |
| Warnings | 4 | |
| Use | 4 | |
| Maintenance and cleaning | 5 |
| Installation of your Oven | 6 |
| Electrical Installation | 8 |
| Oven Racks | 9 |
| Accessories | 10 |
| Oven Presentation | 11 |
| Cooking Functions | 13 |
| Instructions for Use | 15 |
| Functions of the Clock | 16 |
| Safety Lock Function | 17 |
| Oven Door Removal | 18 |
| Replacement of the Oven Light | 19 |
| Self-Cleaning Catalytic Liners | 20 |
| Guidance Temperature and Time Temperature for Cooling | 04 |
Safety Instructions

Important
- When you receive the appliance, unpack it or have it unpacked immediately.
Give it an overall inspection. Make note of any concerns or reservations on the delivery slip and make sure to keep a copy of this form. Keep this user guide with your appliance.
If the appliance is ever sold or transferred to another person, ensure that the new owner receives the user guide. Please become familiar with these recommendations before installing and using your oven. They were written for your safety and the safety of others.
WARNING
- The Appliance is not intended for use by persons (including Children) with reduced physical, sensory or mental capabilities, or lack of experience and knowledge, unless they have been given supervised instruction concerning use of the appliance by a responsible person for their safety.
- Cleaning and maintenance operations must not be carried out by children without supervision.
- Children must be supervised to prevent them from playing with the appliance.
WARNING
- During use the appliance becomes hot. Care should be taken to avoid touching heating elements inside the oven.
- Accessible parts will become hot when in use. To avoid burns and scalds, young children should be kept away.
Use
- Before using your oven for the first time, heat it while empty for approximately 15 minutes.
You should ensure you heat each element in the oven before use. Make sure that the room is sufficiently ventilated. You may notice a particular odour, or a small release of smoke. All of this is normal.
Your appliance is intended for standard household use. Do not use it for commercial or industrial purposes or for any other purpose than that for which it was designed.
Maintenance and cleaning
- Do not use a steam cleaner.
- For any cleaning operation inside the oven cavity, the oven must be switched off.
- Before unclipping the door, allow the appliance to cool.
- Before removing the back, ensure that the appliance is powered down. After cleaning, the back should be replaced.
- Do not use harsh abrasive cleaners or sharp metal scrapers to clean the oven glass door since they can scratch the surface, which may result in shattering of the glass.
- To clean both the electronic programmer window and the oven door, use a soft cloth.
- Do not use cleaning products, abrasive creams, or scouring sponges.
WARNING
- Make sure the appliance is disconnected from the power before replacing the lamp in order to avoid the risk of electric shock.
- Change the lamp only when the appliance has cooled down. To unscrew the view port and the light, use a rubber glove, which will make disassembly easier.
WARNING
- Installation should only be performed by qualified installers and technicians.
WARNING
- If the electrical supply is restricted, means of all-pole disconnection must be accessible and incorporated in the fixed wiring in accordance with the wiring rules.
- If the power cable is damaged, it should be replaced by the manufacturer, its after-sales service department or by a similarly qualified person in order to avoid danger.
PACKAGING
Installation of your oven
To install the oven into the kitchen a cut out should be made in accordance with the dimensions shown in below. Please allow for 3/4mm of a difference in the dimensions provided below. Please measure the original product to ensure that the cut out details are correct.
The apparatus is to be fastened to the top by means of the two screws provided in the kit through the holes made on the oven uprights.
The cabinet in which the apparatus is installed shall be open on the back side to ensure a sufficient air circulation and prevent overheating.
Leave a gap of at least 20 cm2 for air circulation if the oven is installed in a column; this is not necessary if the oven is installed under the work top.
WARNING
As the apparatus is to be fitted in your kitchen furniture, make sure that all surfaces in contact with the oven can resist a temperature of approx 90° C.
| Overall product Dimensions | 595 mm | Height |
| 595 mm | Width | |
| 550 mm | Depth |
Cabinetry preparation BOSE609T

Electrical Installation
BOSE609T is 15 Amp with a cable supplied. Please note that no plug is supplied. It requires hard wiring by a qualified electrician.
WARNING
This apparatus must be earthed.
The oven is only for domestic use.
The feed voltage and the absorbed power are as indicated on the data plate attached to the left-hand side upright, which can be seen when the oven door is open.
Connecting must be carried out by qualified personnel and in accordance with the regulations currently in force.
The manufacturer cannot be held responsible for any damages to persons or objects caused by failure to observe these instructions.
If the supply cord is damaged, it must be replaced by the manufacturer, its service agent or similarly qualified persons in order to avoid a hazard.
The oven must be connected to the mains through a multiple circuit breaker with a contact-to-contact gap of at least 3mm , making sure that the earth wire is not disconnected.
For connecting use a flexible cable of the H05V2V2-F 3x1,5 mm2 type remembering to make it long enough to allow the oven to be removed from its housing unit when maintenance work is required.
To connect the cable to the oven, proceed as follows:
- Remove the lid by unfastening the three screws.
- Unfasten the two screws for the cable holder and feed the cable through the opening immediately below the cover.
- Remove about 12cm of the outside insulation from the cable and shorten the two active wires (live and neutral) to 6cm , leaving long the one to be connected to the main earth terminal on the terminal box; remove about 1cm of the main insulation from the three wires and connect them correctly to the terminal box, Remembering to respect the polarities.
- Tighten the two screws of the cable holder and put the lid back on with the three screws.
Oven Racks
WARNING
Never use aluminum foil to cover the oven racks or to line the oven. It can cause damage to the oven liner if heat is trapped under the foil.
WARNING
Make sure you do not force it to avoid damage to the enamel.
The oven has rack guides at five levels as per the below image.

natural_image
Close-up of a metallic shelf with visible internal structure (no text or symbols)Rack positions are numbered from the bottom rack guide (#1) to the top (#5). Check cooking charts for best rack positions to use when cooking. Each level guide consists of paired supports formed in the walls on each side of the oven cavity. Always be sure to position the oven racks before turning on the oven. Make sure that the racks are level once they are in position. The racks are designed to stop when pulled forward to their limit.
Accessories
Accessories which are provided with this oven are as follows:
- 2 x safety anti tip shelves
- 1 x grill pan
- 1 x grill pan insert
- 1 x grill handle
- 1 x metal tray
- 2 x partially extendable telescopic runner
- Catalytic liners – rear and sides
Oven Presentation
This new oven is managed by an electronic card which constantly monitors its operation in order to improve its all-round performance. (Please note that the below panel images are not exact replicas of your oven the icons have a slightly different look)
It is a state-of-the-art, reliable and precise touch control system.
The elegant, orderly and discreet interface is more user-friendly than ever before.
Installation and hook-up
This oven is a sophisticated electronic appliance, classified as a durable good. Its installation requires qualified professionals for both the hook-up of the power line and its placement in the kitchen counter.
Demo mode
This is the name of the mode usually implemented by the oven every time the electricity supply fails and also when the oven is first connected.
The aim is to display all the control potentials with a recorded sequence of commands.
Important
In this mode the oven is NEVER really activated, as the heating elements are not switched on.
The control panel is NOTACTIVE so the oven does not respond to commands.
To exit from this mode, press the oven's scroll functions button, for 5 seconds and use the "+" and "-" buttons of the clock to set the exact time. The new time is accepted 3 seconds after the "+" or "-" button is pressed and the digits stop flashing.
Setting the clock (first power-on)
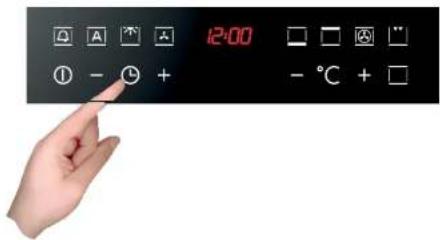
With the oven off, press the oven mode.

time button for 3 seconds. This takes you to Clock Setting
The time will flash on the display (at the first power-on, it displays "12:00"). Use the "+" and "-" buttons to set the time. The time set is automatically accepted if you press the oven timer button or if no keys are pressed for 3 seconds: in the latter case, the digits stop flashing.
Switching on the oven

Cooking Functions
Please note the following symbols when using this oven. Also please note that the below images of the control panel are not the final panel look these images can only be used for understanding the working of the oven.
Active buttons from left to right:

| Symbol | Description |
| Power on/off with a simple touch (pressing it for 5 seconds activates the key or “Child lock” function) | |
| Decrease the time and temperature | |
| Increase the time and temperature |
Control panel functions
The control provides 9 different specific cooking functions.
- Oven Light (this turns on whenever you power on the oven)
-
- (Top and bottom elements) pre-set to 190 °C (can be set from 50 to 250 °C)
-
Lower heating element pre-set to 50 °C (can be set from 50 to 250 °C)
-
Half grill pre-set to 250 °C (can be set from 50 to 250 °C)
-
Full grill pre-set from 250 °C (can be set from 50 to 250 °C)
-
- ☐ (Fan grill) pre-set to 165 °C (can be set from 50 to 250 °C)
-
-
- (Fan assist) pre-set to 165 °C (can be set from 50 to 250 °C)
-
Instructions for Use
Top and bottom elements
A classic system also known as conventional cooking that uses upper and lower heat suitable for cooking a single dish. It is a good idea to insert the food when the oven has reached the pre-set temperature, i.e., when the ° C symbol stops flashing. If you need to increase the temperature towards the end of cooking, use the + temperature regulation button. We recommend opening the door as little as possible during cooking. It is best to use a single layer in the oven preferably keeping the food item in the centre of the oven

Fan forced cooking
For this type of cooking a fan positioned at the back allows the circulation of hot air inside the oven, creating uniform heat. In this way cooking is more rapid than conventional cooking. It is a suitable method for cooking dishes on more than one shelf, especially when the food is of different types (fish, meat etc.).
Grill Cooking
Use this function to grill or brown foods. Some ovens may be equipped with an electric motor, spit and skewers for turning on the spit. Place the shelf with the food to be cooked in the 1st or 2nd position from the top. Pre-heat the oven for 5 minutes.
During heating, the centigrade degree (°) symbol flashes to indicate that the oven is heating.
When the pre-set temperature is reached, the buzzer sounds and the symbol (°) remains on.
Residual Heat
While cooking food, the structure of the oven stores heat. This heat is kept isolated from the rest of the kitchen thanks to an excellent insulation system and certain construction details.
The heat is gradually dispersed and can be used as a further cooking resource if managed appropriately: the control indicates the interior temperature, after the oven has been switched off, until it reaches 50° C

Important
Use this feature to keep food warm or to gently complete the cooking process.
Oven Light Control
In order to achieve the best results in terms of performance and energy consumption, this function is automatically managed by the oven during its functioning. If you want to turn it on at any time, just touch any active button on the control panel.
Functioning of the Clock
Minute-counter

Start
When the button
[05] is pruned the

symbol turns on (flanking) and "00.00" appears on
Confirm - The time set is automatically accepted after no buttons are pressed for 3 seconds: in this case, the digits and the dot stop flashing. The relative symbol remains lit. The display alternatively shows the time and the temperature with the centigrade degree symbol flashing.
Cooking duration – The relative symbol remains lit as long as the function is active. Once the cooking duration function is activated, it remains on as long as the cooking selected remains the one on which the cooking duration was set.
End cooking - When cooking is finished, the programmed cooking symbol flashes until another active button is touched and the buzzer sounds for 3 minutes.
Delayed Cooking
Start – Enter the oven function and confirm.
Press two times, lights up and the letters 'Dur' intermittently appear on the display.
Set cooking duration – The cooking duration time can be regulated using the two "+" and "-" buttons.
Press [G] again. The symbol continues to flash and the letters End (end cooking time) appear on the display.
Set end cooking time – The end cooking time can be regulated using the two “+” and “-” buttons.
Confirm - The time set is automatically accepted if you press the oven Timer button or if no keys are pressed for 3 seconds: in this case, the digits and the dot stop flashing. The relative symbol remains lit. The display alternatively shows the time.
On the world. The countries are at the desired time (and selection times minus selection duration), so less as
Oven Door Removal
WARNING
Make sure that:
- The oven is cool and power to the oven has been turned off before removing the door. Failure to do so could result in electrical shock or burns.
- The oven door is heavy and fragile. Use both hands to remove the oven door. The door front is Glass. Handle carefully to avoid breakage.
- Grasp only the sides of the oven door. Do not grasp the handle as it may swing in your hand and cause damage or injury.
- Failure to grasp the oven door firmly and properly could result in personal injury or product damage.
To remove the oven door (See below image):
- Open the door completely.
- Lift up the hinge bracket (1) into the slot (2) on both sides.
- Hold the door firmly on both sides using both hands and close the door as far as it will go.
- Whilst holding the door with both hands, force the door closed a little more and lift it out of the housing.
- Place the door in a convenient location.
To replace the oven door (See below image):
- Insert the upper arms (3) of both hinges into the upper slots (6) and the lower arms (4) into the lower slots (7). The recesses (5) must hook on the lips (8).
- Move the hinge brackets (1) back down into position.
Replacement of the Oven Light
WARNING
Make sure that:
- The oven and lights are cool and power to the oven has been turned off before replacing the light bulb(s). Failure to do so could result in electrical shock or burns.
- The lenses must be in place when using the oven.
- The lenses serve to protect the light bulb from breaking.
- The lenses are made of glass. Handle carefully to avoid breakage. Broken glass could cause an injury.

natural_image
Diagram of a front view of a microwave oven with ventilation grille and cooling unit (no text or symbols)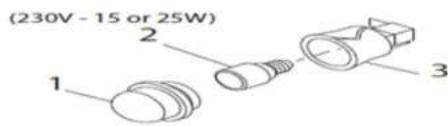
Self-Cleaning Catalytic Liners
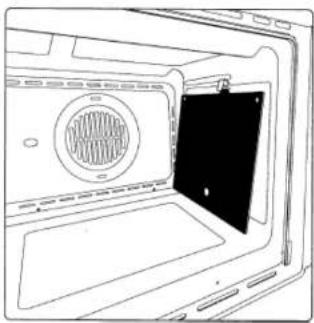
Our smooth walled ovens are fitted with self cleaning panels to cover the walls on the rear and sides. These special panels are simply hooked on to the walls before the side frames are fitted. They are coated in a special, micro-porous catalytic enamel which oxidises and gradually vaporises splashes of grease and oil at cooking temperatures above 200° C. If the oven is not clean after cooking fatty foods, operate the empty oven for 60 minutes(max.) at maximum temperature on function fan forced or fan assist. Never wash or clean self cleaning panels with abrasive, acid, or alkaline products.
natural_image
Line drawing of an open oven with a ventilation grille and door, showing no text or symbolsGuidance Temperature and Time Temperature for Cooking
Every function has a set temperature chosen on the basis of cooking tests using frequently used recipes and can easily be adjusted to suit personal preference.
The following table contains the results of the cooking tests carried out in our laboratories by a professional chef. However, this is merely a guide and the values indicated are simply to help you get started.
| Dish | Temperature in degrees centigrade | Approximate cooking time in minutes |
| Sweets | 175 160 | 55-65 |
| Short pastry flan base | 200 190 | 8-10 |
| Fruit pie/tart | 200 190 | 25-35 |
| White leavened bread per 1 kg flour | 200 190 | 30-50 |
| Shortcake biscuits | 200 190 | 10-15 |
| Savoury biscuits | 200 190 | 15-20 |
| Lasagne | 225 210 | 40-50 |
| Meat (cooking time based on thickness) | ||
| Slow roast | 175 170 | 12-15 |
| Quick roast | 200 190 | 12-15 |
| Meat loaf | 200 190 | 30-40 |
| Poultry | ||
| Duck 1.5 -2 kg | 200 170 | 120-180 |
| Goose 3 kg | 200 180 | 150-210 |
| Roast chicken | 200 190 | 60-90 |
| Turkey 5 kg | 175 150 | 240 ca. |
| Game | ||
| Horse | 200 180 | 60-90 |
COOKING TABLE FOR TOP OVEN - CONVENTIONAL COOKING
IN HEATING SYSTEM WITH TOP AND BOTTOM HEATERS OPERATING. It is recommended to preheat the oven 10 min.
| DISHES | LEVEL | TEMPERATURE | COOKING TIME |
| Yorkshire Puddin | 1 | 225°C | 30 - 40 min |
| Fatless Sponge Cake | 1 | 180°C | 25 - 30 min |
| Small Cakes | 2 | 190°C | 15 - 20 min |
| Fruit Plate Tart | 1 | 200°C | 40 - 45 min |
| Scones | 2 | 220°C | 10 - 15 min |
| Rich Fruit Cake | 1 | 140°C | 2 - 3 hours |
Grilling is carried out at the door closed. 5 minutes oven preheating is recommended. Setting possibility from 50 - max (250)°C. Food is placed on the backing pan grid.
| DISHES | LEVEL | TEMPERATURE | COOKING TIME | |
| Side 1 | Side 2 | |||
| Pork steaks, Chops (4 pcs) | 3 | 250°C | 12 min | 10 min |
| Grilled Sausages (6 pcs) | 3 | 250°C | 6 min | 5 min |
Cooking Recipes
Beef Wellington
Preheat oven to 180-190°C on Fan Assist or 200°C on Fan Forced
Ingredients:
2 tablespoons extra virgin olive oil
4 pieces of beef fillet (150g each)
2 tablespoons brandy
150g mushrooms, finely chopped
2 tablespoons chopped spring onion
4 sheets puff pastry
4 tablespoons fresh breadcrumbs
50g chicken liver pate- Optional
1egg yolk, beaten, to brush
Method:
- Heat olive oil in frying pan over high heat, add beef fillet and sear quickly on both sides, pour brandy over beef and quickly light for flaming effect.
- Once extinguished transfer beef to plate lined with paper towel and set aside to cool.
- Heat remaining oil in pan and add mushrooms and spring onions. Cook over medium heat for 1-2 minutes.
- Lay out pastry sheets and sprinkle some breadcrumbs in the centre of each. Place the beef on top of pastry; the breadcrumbs absorb any excess juice. Top the beef with a slice of pate and some
Berry and Ricotta Tart
Preheat oven 170-180 °C on Bottom Element and Fan.
Ingredients:
Pastry Filling
125g butter, chilled and cubed 200g fresh ricotta
1 egg lightly beaten 1/2 cup cream
1/3 cup icing sugar 2 eggs
1/2 cup group almonds 2/3 cup castor sugar
1 ½ cup plain flour ½ cup raspberries
1/2 cup blueberries
1 teaspoon vanilla extract
Method:
- Grease a 26cm tart tin
- Place flour, icing sugar, almonds and butter into a food processor and process until mixture just comes together. Alternately rub the butter into the dry ingredients until it resembles fine breadcrumbs, add egg and stir until the mixture comes together.
• Turn onto a floured surface and gather into a ball. Wrap in plastic wrap and refrigerate for 30 minutes. - Roll out the pastry between two pieces of baking paper. Roll out to fit the base and sides of the tin. Trim away any excess pastry and refrigerate pastry case for 30 minutes.
- Mix ricotta, vanilla, egg, sugar and cream in a food processor until smooth.
- Fill chilled pastry case with ricotta mixture and sprinkle berries gently over filling.
- Place in preheated oven for 30-35 minutes
• Cool and dust with icing sugar to serve.
NOTE: Pastry will make enough for two cases. Either bake both cases and leave in an airtight container for up to a week, or freeze half the uncooked dough for up to two months.
Mediterranean Pizza
Preheat oven to 180°C on Fan Forced.
Method: Bake for 15-20 min
Ingredients:
| 1 uncooked Pizza Base | Marinated artichokes |
| 2 tablespoons of pasta sauce | Kalamata olives |
| Chargrilled eggplant | Sundried tomatoes |
| Chargrilled capsicum | Zucchini diced |
| 1 cup pizza cheese | Mushrooms sliced |
| 2 tablespoons parmesan cheese | Onion diced |
| 2 tablespoons fresh rosemary | Roma tomato diced |
Method:
- Start with placing the sauce on base pizza and then add the cheese.
- Layer vegetables on the pizza base.
- Sprinkle cheese and herbs on top of the vegetables.
• Cook for approximately 15-20 minutes or until base is crisp and cheese has melted. - Serve with fries or salad.
Spinach, Ricotta and Goats Cheese Muffins
Pre heat oven to 170° C on Fan Forced.
Ingredients:
30g butter
1 cup milk
70g baby spinach
1 ½ cups plain flour
1 tablespoon baking powder
1 tablespoon chopped rosemary
1 tablespoon chopped chives
1 garlic clove crushed
2 tablespoon parmesan cheese (finely grated)
150g goats cheese fetta
1 egg, lightly whisked
1/4 cup olive oil
8 Cherry tomatoes
Salt and Pepper to taste
Method:
- Line a muffin tray with 8 muffin paper cup holders and lightly spray with cooking oil
- In a medium size fry pan, melt butter and add baby spinach, garlic, fresh herbs, salt and pepper and milk.
- Cook on a medium heat until baby spinach has wilted and set aside to cool, once cooled, blend spinach mixture until spinach leaves are finely chopped
- Mix ricotta, goats cheese and parmesan until combined.
- Add all cheeses, whisked egg, olive oil and spinach mixture to flour and stir until combined
- Fill muffin cups to 3/4 full, slightly push a cherry tomato in the centre and place in oven for approximately 16 minutes
- Serve warm
- In a large bowl sift flour, bicarb-soda and baking powder together and set aside
We appreciate your feedback.
Please review our products on www.blanco-australia.com

- Table of Contents
- Safety Instructions
- Important
- WARNING
- Use
- Maintenance and cleaning
- PACKAGING
- Installation of your oven
- Cabinetry preparation BOSE609T
- Electrical Installation
- This apparatus must be earthed.
- Oven Racks
- Accessories
- Oven Presentation
- Installation and hook-up
- Demo mode
- Cooking Functions
- Control panel functions
- Instructions for Use
- Top and bottom elements
- Fan forced cooking
- Grill Cooking
- Residual Heat
- Oven Light Control
- Functioning of the Clock
- Delayed Cooking
- Oven Door Removal
- To remove the oven door (See below image):
- To replace the oven door (See below image):
- Replacement of the Oven Light
- Self-Cleaning Catalytic Liners
- Guidance Temperature and Time Temperature for Cooking
- COOKING TABLE FOR TOP OVEN - CONVENTIONAL COOKING
- Cooking Recipes
- Beef Wellington
- Ingredients:
- Method:
- Berry and Ricotta Tart
- Pastry Filling
- Mediterranean Pizza
- Spinach, Ricotta and Goats Cheese Muffins
Brand : BLANCO
Model : BOSE609T
Category : Oven