
BOSE6511X - Oven BLANCO - Free user manual and instructions
Find the device manual for free BOSE6511X BLANCO in PDF.


| Brand | BLANCO |
| Model | BOSE6511X |
| Product Type | Built-in Electric Oven |
| Overall Dimensions (H x W x D) | 595 mm x 595 mm x 550 mm |
| Electrical Connection | 10 A, 3-pin plug, 230-240 V ~50 Hz |
| Power Rating | Approx. 2400 W |
| Cooking Functions | Fan Forced, Defrost, Full Grill, Fan with Full Grill, Light |
| Oven Timer | 60-minute mechanical timer with audible alarm |
| Temperature Range | 50 °C to 250 °C (max) |
| Number of Oven Rack Levels | 5 levels |
| Included Accessories | 2 shelves, 1 grill pan, 2 telescopic runners, 1 grill pan insert |
| Oven Light | Replaceable bulb (accessible after removing lens) |
| Door Removal | Yes, for cleaning (with hinge brackets and lift-off) |
| Safety Features | Child supervision warning, hot surface caution, anti-tip door restraint |
| Cleaning Instructions | Avoid steam cleaners; use soft cloths; no harsh abrasives on glass |
| Installation Requirements | Cut-out dimensions provided; minimum 20 cm² air gap if in column; cabinet must resist 90°C |
| Warranty Registration | Online at blanco-australia.com/warranty/ |
| Energy Type | Electric |
| Weight | Not specified (typical ~35 kg) |
Frequently Asked Questions - BOSE6511X BLANCO
User questions about BOSE6511X BLANCO
0 question about this device. Answer the ones you know or ask your own.
Ask a new question about this device
Download the instructions for your Oven in PDF format for free! Find your manual BOSE6511X - BLANCO and take your electronic device back in hand. On this page are published all the documents necessary for the use of your device. BOSE6511X by BLANCO.
USER MANUAL BOSE6511X BLANCO
Thank you for your choosing Blanco. You will find that the clean lines and modern look of your Blanco appliance blends perfectly with your kitchen décor. It is easy to use and performs to a high standard. Blanco is committed to providing increasingly efficient products that are attractive, reliable, easy to use and respect the environment.
Of course we make every effort to ensure that our products meet all your requirements, and our Customer Relations department is at your disposal, to answer your questions and to listen to all your suggestions (see back cover of manual).
For important information such as instruction manuals and catalogues, please visit our website blanco-australia.com/support/instruction_manuals or blanco-australia.com/support/catalogues.
Please make sure you activate your product warranty by registering your warranty online at blanco-australia.com/warranty/ and retain all documents relating to the purchase of this product.
We value your opinion, so please let us know your thoughts about your new appliance. Simply go to the relevant appliance page of our website blanco-australia.com and click on "Write a Review".
Table of Contents
Safety Instructions 4
Warnings 4
Use 4
Maintenance and cleaning 5
Installation of your Oven 6
Electrical Installation 8
Oven Racks 9
Accessories 10
Oven Presentation 11
Cooking Functions 12
Instructions for Use 13
Oven Door Removal 14
Replacement of the Oven Light 15
Guidance Temperature and Time Temperature for Cooking 16
Cooking Recipes 18
Safety Instructions

Important
- When you receive the appliance, unpack it or have it unpacked immediately.
- Give it an overall inspection. Make note of any concerns or reservations on the delivery slip and make sure to keep a copy of this form. Keep this user guide with your appliance.
- If the appliance is ever sold or transferred to another person, ensure that the new owner receives the user guide. Please become familiar with these recommendations before installing and using your oven. They were written for your safety and the safety of others.
WARNING
- The Appliance is not intended for use by persons (including Children) with reduced physical, sensory or mental capabilities, or lack of experience and knowledge, unless they have been given supervised instruction concerning use of the appliance by a responsible person for their safety.
- Cleaning and maintenance operations must not be carried out by children without supervision.
- Children must be supervised to prevent them from playing with the appliance.
WARNING
- During use the appliance becomes hot. Care should be taken to avoid touching heating elements inside the oven.
-
Accessible parts will become hot when in use. To avoid burns and scalds, young children should be kept away.
-
Never place aluminium foil directly in contact with the floor of the oven, as accumulated heat may cause deterioration of the enamel.
- Do not place heavy weights on the open oven door, and make sure that children are able neither to climb nor sit on it.
- Do not use your oven as a larder or to store any items after use.
- After using your oven, make sure that all the controls are in their stop position.
- In addition to the accessories supplied with your oven, only use dishes capable of withstanding high temperatures.
Maintenance and cleaning
- Do not use a steam cleaner.
- For any cleaning operation inside the oven cavity, the oven must be switched off.
- Before unclipping the door, allow the appliance to cool.
- Before removing the back, ensure that the appliance is powered down. After cleaning, the back should be replaced.
- Do not use harsh abrasive cleaners or sharp metal scrapers to clean the oven glass door since they can scratch the surface, which may result in shattering of the glass.
- To clean both the electronic programmer window and the oven door, use a soft cloth.
- Do not use cleaning products, abrasive creams, or scouring sponges.
WARNING
- Make sure the appliance is disconnected from the power before replacing the lamp in order to avoid the risk of electric shock.
- Change the lamp only when the appliance has cooled down. To unscrew the view port and the light, use a rubber glove, which will make disassembly easier.
Installation of your oven
To install the oven into the kitchen a cut out should be made in accordance with the dimensions shown in below. Please allow for 3/4mm of a difference in the dimensions provided below. Please measure the original product to ensure that the cut out details are correct.
The apparatus is to be fastened to the top by means of the two screws provided in the kit through the holes made on the oven uprights.
The cabinet in which the apparatus is installed shall be open on the back side to ensure a sufficient air circulation and prevent overheating.
Leave a gap of at least 20 cm2 for air circulation if the oven is installed in a column; this is not necessary if the oven is installed under the work top.
WARNING
As the apparatus is to be fitted in your kitchen furniture, make sure that all surfaces in contact with the oven can resist a temperature of approx 90° C.
| Overall product Dimensions | ||
| 595 mm | Height | |
| 595 mm | Width | |
| 550 mm | Depth |
Cabinetry preparation BOSE6511X

Electrical Installation
BOSE6511X has a 10 Amp 3 pin plug attached.
WARNING
This apparatus must be earthed.
The oven is only for domestic use.
The feed voltage and the absorbed power are as indicated on the data plate attached to the left-hand side upright, which can be seen when the oven door is open.
Connecting must be carried out by qualified personnel and in accordance with the regulations currently in force.
The manufacturer cannot be held responsible for any damages to persons or objects caused by failure to observe these instructions.
If the supply cord is damaged, it must be replaced by the manufacturer, its service agent or similarly qualified persons in order to avoid a hazard.
The oven must be connected to the mains through a multiple circuit breaker with a contact-to-contact gap of at least 3 mm, making sure that the earth wire is not disconnected.
For connecting use a flexible cable of the H05V2V2-F 3x1,5 mm2 type remembering to make it long enough to allow the oven to be removed from its housing unit when maintenance work is required.
To connect the cable to the oven, proceed as follows:
- Remove the lid by unfastening the three screws.
- Unfasten the two screws for the cable holder and feed the cable through the opening immediately below the cover.
- Remove about 12 cm of the outside insulation from the cable and shorten the two active wires (live and neutral) to 6 cm, leaving long the one to be connected to the main earth terminal on the terminal box; remove about 1 cm of the main insulation from the three wires and connect them correctly to the terminal box, Remembering to respect the polarities.
Oven Racks
WARNING
Never use aluminum foil to cover the oven racks or to line the oven. It can cause damage to the oven liner if heat is trapped under the foil.
WARNING
Make sure you do not force it to avoid damage to the enamel.
The oven has rack guides at five levels as per the below image.

natural_image
Close-up of a mechanical component with no visible text or symbolsRack positions are numbered from the bottom rack guide (#1) to the top (#5). Check cooking charts for best rack positions to use when cooking. Each level guide consists of paired supports formed in the walls on each side of the square cavity. Always be sure to position the even rack before turning on the
Accessories
BOSE6511X
Accessories which are provided with this oven are as follows:
- 2 x shelves
- 1 x grill pan
- 2 x telescopic runners
- 1 x grill pan insert
Oven Presentation
The oven control panel is made up of 3 knobs.
- 1 knob for the temperature control
- 1 knob for the oven functions
- 1 knob for the oven timer.
1) Functions
There are 5 cooking functions in this oven as explained below.

flowchart
graph TD
    A["+"] --> B(( ))
    C["+"] --> B
    D["+"] --> B
    E["+"] --> B
    F["+"] --> B
    G["+"] --> B
2) Timer
It is a 60 minute timer. Simply turn to required time and the timer will beep when it reaches 0.

Cooking Functions
BOSE6511X
This oven has 5 specific cooking functions as follows:

Instructions for use
Fan forced cooking
For this type of cooking a fan positioned at the back allows the circulation of hot air inside the oven, creating uniform heat. In this way cooking is more rapid than conventional cooking. It is a suitable method for cooking dishes on more than one shelf, especially when the food is of different types (fish, meat etc.).
Defrosting
When you select the 'defrost' function, the fan will circulate room-temperature air inside the oven to quickly defrost frozen food.

Grill Cooking
Use this function to grill or brown foods. Some ovens may be equipped with an electric motor, spit and skewers for turning on the spit. Place the shelf with the food to be cooked in the 1st or 2nd position from the top. Pre-heat the oven for 5 minutes.
Temperature Regulation
Use the thermostat to set the temperature you require. The temperature can
Oven Door Removal
WARNING
Make sure that:
- The oven is cool and power to the oven has been turned off before removing the door. Failure to do so could result in electrical shock or burns.
- The oven door is heavy and fragile. Use both hands to remove the oven door. The door front is Glass. Handle carefully to avoid breakage.
- Grasp only the sides of the oven door. Do not grasp the handle as it may swing in your hand and cause damage or injury.
- Failure to grasp the oven door firmly and properly could result in personal injury or product damage.
To remove the oven door (see Fig. 10):
- Open the door completely.
- Lift up the hinge bracket (1) into the slot (2) on both sides.
- Hold the door firmly on both sides using both hands and close the door as far as it will go.
- Whilst holding the door with both hands, force the door closed a little more and lift it out of the housing.
- Place the door in a convenient location.
To replace the oven door (see Fig. 10):
- Insert the upper arms (3) of both hinges into the upper slots (6) and the lower arms (4) into
Replacement of the Oven Light
WARNING
Make sure that:
- The oven and lights are cool and power to the oven has been turned off before replacing the light bulb(s). Failure to do so could result in electrical shock or burns.
The lenses must be in place when using the oven. - The lenses serve to protect the light bulb from breaking.
- The lenses are made of glass. Handle carefully to avoid breakage. Broken glass could cause an injury.

natural_image
Technical line drawing of a microwave oven with ventilation grilles and control panel (no text or symbols)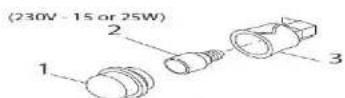
Fig. 11
- Turn off power at the main power supply (fuse or breaker box).
- Remove the lens (1) by unscrewing it.
- Remove the light bulb (2) from its socket (3).
- Replace the bulb (2) with a new one. Avoid touching the bulb with fingers, as oils from hands can damage the bulb when it becomes hot.
Guidance Temperature and Time Temperature for Cooking
Every function has a set temperature chosen on the basis of cooking tests using frequently used recipes and can easily be adjusted to suit personal preference.
The following table contains the results of the cooking tests carried out in our laboratories by a professional chef. However, this is merely a guide and the values indicated are simply to help you get started.
| Dish | Temperature in degrees centigrade | Approximate cooking time in minutes |
| Sweets | 175 160 | 55-65 |
| Short pastry flan base | 200 190 | 8-10 |
| Fruit pie/tart | 200 190 | 25-35 |
| White leavened bread per 1 kg flour | 200 190 | 30-50 |
| Shortcake biscuits | 200 190 | 10-15 |
| Savoury biscuits | 200 190 | 15-20 |
| Lasagne | 225 210 | 40-50 |
| Meat (cooking time based on thickness) | ||
| Slow roast | 175 170 | 12-15 |
| Quick roast | 200 190 | 12-15 |
| Meat loaf | 200 190 | 30-40 |
| Poultry | ||
| Duck 1.5 -2 kg | 200 170 | 120-180 |
| Goose 3 kg | 200 180 | 150-210 |
| Roast chicken | 200 190 | 60-90 |
| Turkey 5 kg | 175 150 | 240 ca. |
| Game | ||
| Hare | 200 180 | 60-90 |
COOKING TABLE FOR TOP OVEN - CONVENTIONAL COOKING
IN HEATING SYSTEM WITH TOP AND BOTTOM HEATERS OPERATING. It is recommended to preheat the oven 10 min.
| DISHES | LEVEL | TEMPERATURE | COOKING TIME |
| Yorkshire Puddin | 1 | 225°C | 30 - 40 min |
| Fatless Sponge Cake | 1 | 180°C | 25 - 30 min |
| Small Cakes | 2 | 190°C | 15 - 20 min |
| Fruit Plate Tart | 1 | 200°C | 40 - 45 min |
| Scones | 2 | 220°C | 10 - 15 min |
| Rich Fruit Cake | 1 | 140°C | 2 - 3 hours |
Grilling is carried out at the door closed. 5 minutes oven preheating is recommended. Setting possibility from 50 - max (250)°C. Food is placed on the backing pan grid.
| DISHES | LEVEL | TEMPERATURE | COOKING TIME | |
| Side 1 | Side 2 | |||
| Pork steaks, Chops (4 pes) | 3 | 250°C | 12 min | 10min |
| Grilled Sausages (6 pes) | 3 | 250°C | 6min | 5 min |
| Toast (6 pes) | 3 | 250°C | 1 min/25 sec. | 1 min/10 sec |
Cooking Recipes
Beef Wellington
Preheat oven to 180-190°C on Fan Assist or 200°C on Fan Forced
Ingredients:
2 tablespoons extra virgin olive oil
4 pieces of beef fillet (150g each)
2 tablespoons brandy
150g mushrooms, finely chopped
2 tablespoons chopped spring onion
4 sheets puff pastry
4 tablespoons fresh breadcrumbs
50g chicken liver pate- Optional
1egg yolk, beaten, to brush
Method:
- Heat olive oil in frying pan over high heat, add beef fillet and sear quickly on both sides, pour brandy over beef and quickly light for flaming effect.
• Once extinguished transfer beef to plate lined with paper towel and set aside to cool. - Heat remaining oil in pan and add mushrooms and spring onions. Cook over medium heat for 1-2 minutes.
- Lay out pastry sheets and sprinkle some breadcrumbs in the centre of each. Place the beef on top of pastry; the breadcrumbs absorb any excess juice. Top the beef with a slice of pate
Mediterranean Pizza
Preheat oven to 180°C on Fan Forced.
Method: Bake for 15-20 min
Ingredients:
| 1 uncooked Pizza Base | Marinated artichokes |
| 2 tablespoons of pasta sauce | Kalamata olives |
| Chargrilled eggplant | Sundried tomatoes |
| Chargrilled capsicum | Zucchini diced |
| 1 cup pizza cheese | Mushrooms sliced |
| 2 tablespoons parmesan cheese | Onion diced |
| 2 tablespoons fresh rosemary | Roma tomato diced |
Method:
- Start with placing the sauce on base pizza and then add the cheese.
• Layer vegetables on the pizza base. - Sprinkle cheese and herbs on top of the vegetables.
• Cook for approximately 15-20 minutes or until base is crisp and cheese has melted. - Serve with fries or salad.
Spinach, Ricotta and Goats Cheese Muffins
Preheat oven to 170° C on Fan Forced.
Ingredients:
30g butter
1 cup milk
70g baby spinach
1 ½ cups plain flour
1 tablespoon baking powder
1 tablespoon chopped rosemary
1 tablespoon chopped chives
1 garlic clove crushed
2 tablespoons parmesan cheese (finely grated)
150g goats cheese fetta
1 egg, lightly whisked
1/4 cup olive oil
8 Cherry tomatoes
Salt and Pepper to taste
Method:
• Line a muffin tray with 8 muffin paper cup holders and lightly spray with cooking oil
• In a large bowl sift flour, bicarb-soda and baking powder together and set aside
- In a medium size fry pan, melt butter and add baby spinach, garlic, fresh herbs, salt and pepper and milk.
- Cook on a medium heat until baby spinach has wilted and set aside to cool, once cooled, blend spinach mixture until spinach leaves are finely chopped
• Mix ricotta, goats cheese and parmesan until combined.
- Add all cheeses, whisked egg, olive oil and spinach mixture to flour and stir until combined
- Fill muffin cups to 3/4 full, slightly push a cherry tomato in the centre and place in oven for approximately 16 minutes
-

- Table of Contents
- Safety Instructions
- Important
- WARNING
- Maintenance and cleaning
- Installation of your oven
- Cabinetry preparation BOSE6511X
- Electrical Installation
- This apparatus must be earthed.
- Oven Racks
- Accessories
- BOSE6511X
- Oven Presentation
- 1) Functions
- 2) Timer
- Cooking Functions
- Instructions for use
- Fan forced cooking
- Defrosting
- Grill Cooking
- Temperature Regulation
- Oven Door Removal
- Replacement of the Oven Light
- Guidance Temperature and Time Temperature for Cooking
- COOKING TABLE FOR TOP OVEN - CONVENTIONAL COOKING
- Cooking Recipes
- Beef Wellington
- Ingredients:
- Method:
- Mediterranean Pizza
- Spinach, Ricotta and Goats Cheese Muffins
Brand : BLANCO
Model : BOSE6511X
Category : Oven