
BOSE69PX - Oven BLANCO - Free user manual and instructions
Find the device manual for free BOSE69PX BLANCO in PDF.


| Product Type | Built-in Electric Oven |
| Brand | BLANCO |
| Model | BOSE69PX |
| Dimensions (H x W x D) | 59.5 x 59.5 x 54.8 cm |
| Weight | Approx. 30 kg |
| Power Supply | 220-240 V, 50/60 Hz, 3.5 kW |
| Energy Class | A |
| Capacity | 70 L |
| Oven Functions | Conventional, Grill, Fan-assisted, Defrost, Pizza, Roast |
| Temperature Range | 50 - 250 °C |
| Control Type | Touch + Rotary knobs |
| Display | Digital LED |
| Cleaning Type | Catalytic self-cleaning liners |
| Interior Light | Yes, halogen |
| Safety Features | Child lock, Cool door, Automatic shut-off |
| Spare Parts Availability | Available from BLANCO service centers |
| Repairability Index | 7.5 / 10 |
| Installation Type | Built-in |
| Color | Stainless steel / Black |
Frequently Asked Questions - BOSE69PX BLANCO
User questions about BOSE69PX BLANCO
0 question about this device. Answer the ones you know or ask your own.
Ask a new question about this device
Download the instructions for your Oven in PDF format for free! Find your manual BOSE69PX - BLANCO and take your electronic device back in hand. On this page are published all the documents necessary for the use of your device. BOSE69PX by BLANCO.
USER MANUAL BOSE69PX BLANCO
GUIDE TO INSTALLATION
Oven
BOSE 69PX
Dear Customer,
Thank you for buying a BLANCO oven.
Before we continue telling you about this oven, we cordially invite you to become part of the Blanco family by subscribing online. Please visit our website where you can easily subscribe and request such things as 'invitations to future cooking classes' and gourmet recipes. Go to www.blanco-australia.com and fill in the subscription details.
You will find that the clean lines and modern look of your Blanco oven blends in perfectly with your kitchen décor. It is easy to use and performs to a high standard.
Blanco also makes a range of products that will enhance your kitchen such as cooktops, rangehoods, dishwashers and microwaves, sinks and taps. There are models to complement your new Blanco oven.
Of course, we make every effort to ensure that our products meet all your requirements, and our Customer Relations department is at your disposal, to answer all your questions and to listen to all your suggestions.
Please complete the warranty card and keep your receipt as proof of purchase. Retain all documents relating to the purchase of this product.
Blanco is committed to providing increasingly efficient products that are easy to use.
CONTENTS EN
1 / SAFETY INSTRUCTIONS
- Packaging 04
- Child safety 07
2/ INSTALLING YOUR APPLIANCE
- Build-in 09
- Electrical connection 10
3/DESCRIPTION OF YOUR APPLIANCE
- Presentation of the oven 12
- Presentation of the programmer 13
- Accessories 14
4/USING OF YOUR APPLIANCE
- Using the programmer 15
a Instant cooking 16
Programmed cooking 17
a Using the time switch function 19
a Adjusting the display brightness 19
15
5/ OVEN COOKING MODES 20
6/ CARING FOR AND CLEANING YOUR APPLIANCE
- Cleaning the outer surfaces 22
- Cleaning the door 22
- What is pyrolytic 24
- Instant pyrolytic cleaning 25
• End of cleaning 25
7/ TROUBLESHOOTING 26
- Changing the bulb 27
8/ TIPS AND HINTS RECIPES
- Tips 28
- Recipes 29
EN
/ SAFETY INSTRUCTIONS
IMPORTANT SAFETY INSTRUCTIONS - READ CAREFULLY AND RETAIN FOR FUTURE USE.

Important
When you receive the appliance, unpack it or have it unpacked immediately. Give it an overall inspection. Make note of any concerns or reservations on the delivery slip and make sure to keep a copy of this form. Keep this user guide with your appliance. If the appliance is ever sold or transferred to another person, ensure that the new owner receives the user guide. Please become familiar with these recommendations before installing and using your oven. They were written for your safety and the safety of others.
WARNING:
- The Appliance is not intended for use by persons (including Children) with reduced physical, sensory or mental capabilities, or lack of experience and knowledge, unless they have been given supervised instruction concerning use of the appliance by a responsible person for their safety. Cleaning and maintenance operations must not be carried out by children without supervision.
– Children must be supervised to prevent them from playing with the appliance.
WARNING:
- The appliance and the accessible parts of it will become hot during use. Be careful not to touch the heated elements. Children must not be allowed to touch the appliance, unless they are supervised continually.
Use
— Before using your oven for the first time, heat it while empty for approximately 15 minutes. You should ensure you heat each element in the oven before use. Make sure that the room is sufficiently ventilated. You may notice a particular odour, or a small release of
1 / SAFETY INSTRUCTIONS EN
- This oven was designed for use by private individuals in their homes. It is intended solely for cooking foodstuffs. This oven does not contain any asbestos-based components.
- Do not modify or attempt to modify any of the characteristics of this appliance. This would be dangerous to your safety.
- Never pull your appliance by the door handle.
- When placing dishes inside or removing them from the oven, do not place your hands close to the upper heating elements and use heat-protective kitchen gloves.
- At the end of cooking, do not pick up oven or grill items (grid, ro-tisserie,...) with your bare hands.
- Never place aluminium foil directly in contact with the floor of the oven (see the chapter on ovendescription), as accumulated heat may cause deterioration of the enamel.
- Do not place heavy weights on the open oven door, and make sure that children are able neither to climb nor sit on it.
- Do not use youroven as a larder or to store any items after use.
- After using your oven, make sure that all the controls are in their stop position.
- In addition to the accessories supplied with your oven, only use dishes capable of withstanding high temperatures (follow the manufacturer's instructions).
Cleaning by pyrolysis
– Before beginning a pyrolysis cleaning cycle in your oven, remove all parts of your grids, trays and accessories and remove major spill residue.
- During cleaning, the surfaces may become warmer than under normal conditions of use. It is advisable to keep small children away from the appliance.
Maintenance and cleaning
- Do not use asteam cleaner.
- For any cleaning operation inside the oven cavity, the oven must be switched off.
Before unclipping the glass, allow the appliance to cool
EN
1 / SAFETY INSTRUCTIONS
- Do not use abrasive cleaning products or hard metal scrapers for cleaning the oven's glass door, as they could scratch the surface and cause the glass to shatter.
- To clean both the electronic programmer window and the oven door, use a soft cloth.
- Do not use cleaning products, abrasive creams or scouring sponges.

Warning:
Make sure the appliance is disconnected from the power before replacing the lamp in order to avoid the risk of electric shock. Change the lamp only when the appliance has cooled down. To unscrew the view port and the light, use a rubber glove, which will make disassembly easier.

Warning :
Installation should only be performed by qualified installers and technicians.

Warning :
The electrical plug must remain accessible after installation.
It must be possible to disconnect the appliance from the power supply, either using a plug or by fitting a switch on the fixed wiring system in accordance with installation rules.
If the power cable is damaged, it should be replaced by the manufacturer, its after-sales service department or by a similarly qualified person in order to avoid danger.
1 / SAFETY INSTRUCTIONS EN
- PACKAGING
- This appliance's packing materials are recyclable. Recycle them by depositing them in local authority containers provided for this purpose.
- Your appliance also contains many recyclable materials. It is therefore marked with this logo to indicate that used appliances must not be
mixed with other waste.
- CHILD SAFETY (depending on model)
- SAFETY ACTIVATION
- Open the door.
- Locate the small lug/switch and gently press
downward. - Close the oven door and door will be locked.
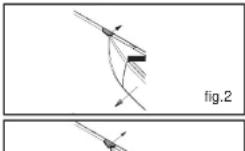
- OPEN WITH SAFETY ENGAGED
Press the lever (gently) 1 position to the right to releasethe door. This means that next time you close the door it will lock again. This is provided the lug/switch is still in the downward position (fig.2).

The above diagrams show the dimensions of a cabinet that will be able to hold your oven.
This appliance may be installed either under a worktop or in a cabinet column, as indicated on the installation diagram. If the cabinet is open, its opening must be 70 mm maximum.
Your oven has optimised air circulation that allows it to achieve remarkable cooking and cleaning results if the following guidelines are followed:
- Centre the oven in the unit so as to ensure a minimum distance of 10mm between the appliance and the surrounding unit.
The material of the unit supporting the appliance must be heat-resistant (or covered with a heat-resistant material). For greater stability, attach the oven to the unit with 2 screws through the holes provided on the sidepanels (fig.1).
2 / INSTALLING YOUR APPLICANCE
EN
- BUILD-IN
1) Drill a hole ∅ 2 mm in the cabinet panel to avoid splitting the wood.
2) Attach the oven with the 2 screws.

Tip
To be certain that you have properly installed your appli-
ance, do not hesitate to call on a household appliance spe-
cialist.
CABINETRY PREPARATION

PYROLYSIS OVENS:
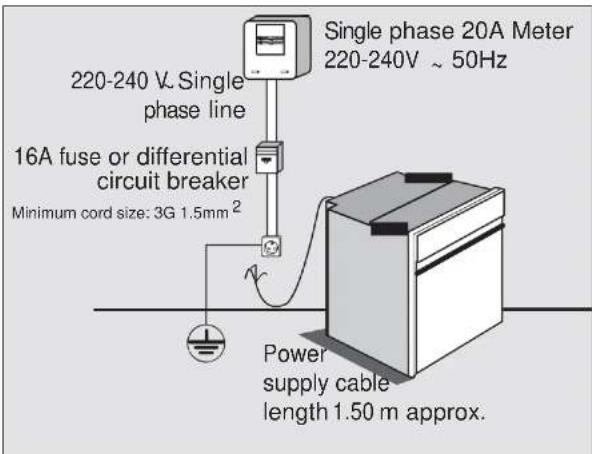
- ELECTRICAL CONNECTION
The appliance must be fitted correctly to guarantee electrical safe-
ty.
The electrical connections are made before the appliance is installed in its housing.
Ensure that
- the electrical installation has sufficient voltage,
- the electrical wires are in good condition,
- the diameter of the wires complies with the installation requirements.
2 / INSTALLING YOUR APPLIANCE
EN
Warning :
If the electrical installation in your residence requires any changes in order to hook up your appliance, contact a professional electrician.
If the oven malfunctions in any way, unplug the appliance or remove the fuse corresponding to the sector where the oven is hooked up.

EN
3 / DESCRIPTION OF YOUR APPLIANG E
• PRESENTATION OF THE OVEN
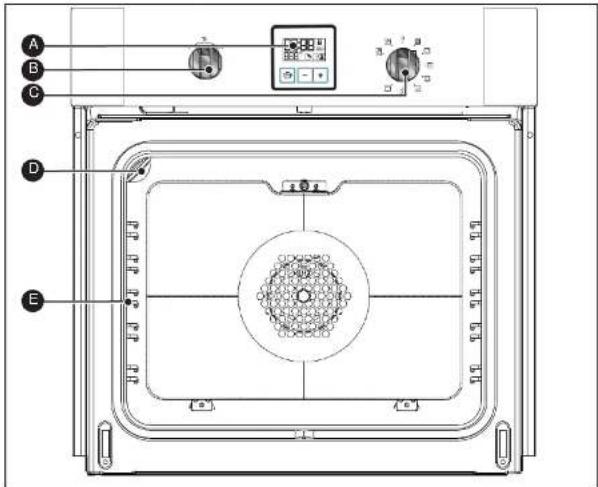
A Programmer
B Temperature selector
C Function selector
D Lamp
E Shelf support indicator
3 / DESCRIPTION OF YOUR APPLIANCE EN
• PRESENTATION OF THE PROGRAMMER
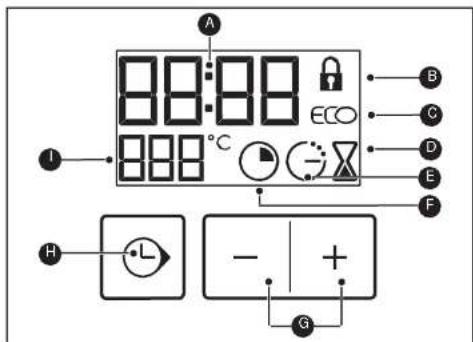
A Time and duration display
B Locked door indicator
© ECO cooking indicator
D Timer Indicator
E End of cooking Indicator
F Cooking time indicator
G Touch controls for setting time
Selection touch control(duration and time)
Digital temperature display
- ACCESSORIES
- Anti-tipping safety grid (fig.1)
The grid can be used to hold all dishes and moulds containing foodstuffs to be cooked or browned.
It can be used for barbecues (to be placed directly on the grid).
- Multi-purpose dish (fig.2)
Inserted under the grid. It catches barbecue juices and grease. It can also be used half-full of water for double-boiler cooking methods. Avoid placing roasts or meats directly in the dish because you are certain to have major spattering on the oven walls.
- Baking sheet(fig.3)
It serves as a cake dish and has a sloped edge. It is used for cooking pastries such as cream puffs, meringues, madeleines, puffpastry, etc.
- Hollow dish fitted with a special barbecue support grid (fig.4)
It is used to collect juices and grease from cooking with the high grill or the pulsed grill. It can be used as a cooking dish when suitable for the size of the item to be cooked (e.g. whole poultry surrounded with vegetables, at moderate temperature).
Never place this dish directly on the base, except in GRILL position.
- Handle for deep dishes (fig.5)


• USING THE PROGRAMMER
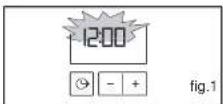
- Setting the time.
- When the appliance is started up:
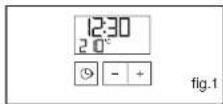
12:00 will flash on the display (fig.1)
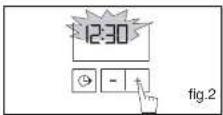
Adjust the time bypassing the + or - adjustment buttons (if you hold them down, the time will count upquickly) (fig.2). Example: 12:30
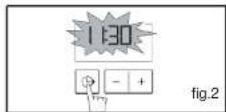
Press the "→" touch control to enter. The display stops flashing.
- To reset the clock time
The function selector must be in the 0 position (fig.1).
Press and hold the "💡" touch control for a few seconds until the display is flashing (fig.2), then release. Beeps are sounded to indicate that it is now possible to set.
Adjust the clock setting with the and -touch controls (fig.3).
Press the “○” touch control to confirm (fig.4).


Important
- Instant cooking
- The programmer should display only the time.
It should not beflashing (fig.1).
Turn the function selector to the position of your choice.
Example: position (11g.2).
Your oven suggests the optimal temperature for this type of cooking.
It is, however, possible to adjust the temperature by turning the temperature selection knob toward+ or - (fig.3)
Example: temperature setting: 210°C (fig. 4).
Place your dish in the oven based on the recommendations provided by the cooking guide.
Alter these actions the oven heats up and the temperature indicator flashes.
A series of beeps will beemitted when the oven reachestheselected temperature. The temperature stopflashing.


Important After a cook
Important
• PROGRAMMED COOKING
Cooking with immediate start and programmed duration
- Select the desired cooking mode and adjust the temperature (flg.1).
- Press the " 🔍" touch control until the cooking time indicator begins flashing 🔍
The display flashes 0:00 to Indicate that you can now adjust the setting (fig.2).
- Press the + or - touch controls to set the desired time.
Example: 30 minutes of cooking (fig.3).
The cooking time is automatically recorded after a few seconds.
The cooking time stops flashing. The countdown of the duration begins immediately after it has been set.
After these three steps, the oven heats up:
A series of beeps will be emitted when the oven reaches the selected temperature.
At the end of cooking (end of time programmed),
- The oven switches off,
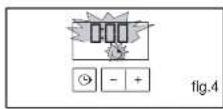
- 0:00 flashes on the display (fig.4).
- A series of beeps sound for several minutes. These beeps can be stopped bypassing any buttons.
The displays once again shows the time of day when the function selector is returned to



- Cooking with delayed start and selected end of cooking time.
- After setting the cooking time, press the " 🔒" touch control until the " 🔒 " end of cooking indicator flashes
The display flashes 0:00 to indicate that you can now adjust the setting (fig.1).
- Press the + or - touch control to set the desired cooking end time. Example: end of cooking at 13:00 (fig.2).
recorded after a few seconds or when you press the " 🔒" touch control. The end of cooking time display stops flashing.
After these three steps, the oven heating is delayed so that cooking ends at 13:00.
At the end of cooking (the end of the time programmed),
- The oven switches off, - 0:00 flashes on the display (fig.3). - a series of beeps sound for several minutes. These beeps can be stopped bypassing any button.*
The displays once again shows the time of day when the function selector is returned to 0 (fig.4).


• USING THE TIME SWITCH FUNCTION
- Your oven's programmer can be used as an independent timer that allows you to count down a time without operating the oven. In this case, the timer display has priority over the clock display.
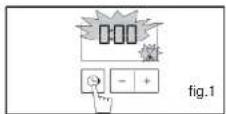
- Press the "L" TOUCH CONTROL (fig.1) until the timer symbol flashes
-> 0.00 and asmall hourglass flashes.
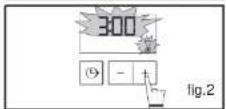
- Set the desired time by pressing the + or - buttons until the desired duration is shown (max.60 minutes). (fig.2).
- Press on the "L" touch control to confirm or wait a few seconds.
Wait for a few seconds. The display will stop flashing and the time switch will start up, counting down the time in seconds. When the time has elapsed, a series of warning beeps will sound. These beeps can be stopped bypassing any button, or they will stop automatically after a few seconds
Important
The time switch programming can be altered or cancelled at any time.
The brightness of the display is adjustable. To change it:
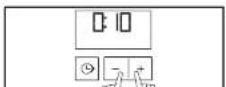
Set the programmer time to 00:10 and confirm (fig.1).
- Press simultaneously on the + and - touch controls for 10 seconds until "CO" is displayed; you are not in configuration mode (fig.2).
- Press the + and - touch controls to obtain the


FAN FORCED
Pre-set temperature 180°C (Min. 35°C - Max. 235°C)
- Cooking is controlled by the heating element located at the back of the oven and bythe
tan. - Preheating unnecessary except for cooking programmes requiring very short times (biscuits on several levels).

FAN ASSIST
Pre-set temperature 240°C (Min 35°C Max -275°C)
— Cooking is controlled by the lower and upper elements and by the fan.
- Quick temperature increase: Some dishes can be placed in the oven while is still cold.
— Recommended for meats, fish and vegetables.

FAN AND ROTISSERIE
Pre-set temperature 200°C (Min. 180°C - Max. 230°C)
- Cooking is controlled alternately by the upper element and the fan. Rotisserie function
is also activated.
- Preheating unnecessary. Roasts and poultry that are juicy crispy and all over.
- Recommended for all poultry, beef, lamb, fish, etc.

TRADITIONAL ECO
Pre-set temperature 200°C (Min 35°CMax - 275. C)
- Cooking controlled by the upper and lower heating elements with no fan.
- You will save energy throughout the cooking cycle, but the cooking time may be slower.

BOTTOM ELEMENT AND FAN
Pre-set temperature 205°C (Min 35°C Max - 275. C)
- Cooking is controlled by the bottomelement combined with a slight dose of the grill and with the fan.
- Cooking heat from the bottom with a small amount of heat from the top. Place the grid on the lowest shelf support.
- Recommended for moist dishes (quiches, juicy fruit tarts, etc.). Recommended for dishes that rise (cake, brioche, kouglof, etc.) and for soufflés.
Cooking multiple items on up to three levels.

WARM KEEPING
Pre-set temperature 80°C (Min 35°C Max -100°C)
- Heat regulated by the upper and lower elements with use of fan.
- Recommended for rising dough for bread, brioche, kouglof, etc. while not exceeding
40° (plate heating, defrosting).

FULL GRILL
Pre-set temperature 275°C (Min 180°C Max - 275°C)
Use only for foods that need cooking for no longer than 5 minutes. Forexample toast,
grilled cheese on toast. Preheat oven for 5 minutes.
• CLEANING THE OUTER SURFACES
To clean both the electronic programmer window and the oven door, use a soft cloth. Do not use abrasive creams or scouring sponges.
- CLEANING THE DOOR
- Removing the door

Warning
Do not use abrasive cleaning products or hard metal scrapers for cleaning the glass oven door, as they could scratch the surface and cause the glass to shatter.

Warning
Before unclipping the glass, allow the appliance to cool.
• Disassembling the door (depending on the model)
- Open the door completely and block it open using the red stop (fig.1). It is supplied with your machine in the plastic pack.
- Remove the first attached window as follows: Use the metal part as a lever at the points marked A on one side then the other to unclip the glass (fig. 2).
Clear the glass using a soft sponge (fig.3). Do not immerse the glass in water. Do not use abrasive creams or scouring


- If necessary, remove all the door's inner glass panels.
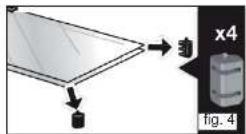
This unit is made up of one or two glass panels depending on the model, with a black rubber buffer in each corner
(fig.4).
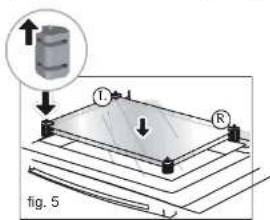
- After cleaning, replace the four rubber comers, taking cards to follow the markings on the glass:
top left:L
top right:R
Placethe interior glass unit in the door, so that L and R are on the hinge side
(fig.6).
- If your oven has just one interior glass, this wide found nextb the clip-orglass.
- Clip in the final glass by placing the 'P.Y.R.O.L.Y.S.E' marking towards you (fig.6).
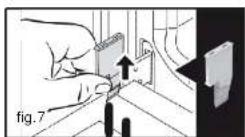
- Remove the red plastic stop(fig. 7).
Your appliance is now readpr use again.

WHAT IS PYROLYSIS?

Tip
Your oven is equipped with namelled wire shelf supports: these need to be removed before running the pyrolysis cycle.

Warning
Remove any cookware, grids and trays from the oven and clean any major spill residue before carrying out the pyrolysis. Interior glass must be wiped clean prior to running the pyrolysis cycle.
- Pyrolysis is a cycle during which the oven cavity is heated to a very high temperature in order to eliminate spatters and spills. Smoke and odours released during pyrolysis are destroyed by moving through a catalyzer.
- Pyrolysis is not necessary after each cooking cycle, simply when the degree of soiling warrants it.
- As a safety measure, the cleaning operation only begins after the door has automatically locked. As soon as the internal temperature of the oven exceeds cooking temperatures, it is impossible to unlock the door even if the "function selector" is set to 0.
- IN WHAT SITUATIONS SHOULD PYROLYSIS BE USED?
If your oven emits smoke during preheating or releases large amounts of smoke during cooking.
If your oven releases an unpleasant odour when cooled after various types of cooking (lamb, fish, grills, etc...).
| Relatively clean cooking operations | Biscuits, vegetables, pastry, quiches, soufflés... | Splatter-free cooking: pyrolysis is not warranted. |
| Mossy cooking operations | Meat, fish (in adish), stuffed veg- etables. | Pyrolysis may be warranted after every 3 cooking cycles. |
| Very messy cooking operations | Large cuts of meat on the spit. | Pyrolysis can be performed after one cooking application of this kind, as there is a lot of splatter-ing. |
- INSTANT PYROLYTIC CLEANING
To take advantage of the volume of heat already built up in the oven and thus save energy:
Start a pyrolysis cycle after a cooking programme.
Remove the accessories from the oven and clean any major spill residue.
Ensure that the programmer displays the time of day and that it is not flashing (fig.1).
Simply position your cooking selector on the "Pyrolysis" position or on the "ECO Pyrolysis" (fig.1). The Pyron the display will tell you that you are in asell-cleaning cycleor P-E in an ECO self cleaningcycle.
During the self-cleaning cycle, a padlock symbol appears on the display, to tell you that the door is locked.
When the padlock has disappeared from the display, the door can be opened.
The oven is unavailable for 2.5 hours (two hours of pyrolysis and 30 minutes of cooling) during "Pyrolysis" or for two hours (1.5 hours of pyrolysis and 30 minutes of cooling) during "ECO Pyrolysis" (this duration is not modifiable).
This time includes the cooling time until the door can be unlocked.
- END OF CLEANING
Pyrolysis stops automatically; it is then possible to open the door.
At the end of the pyrolysis cycle, the display indicates 0:00.
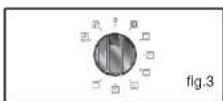
Return the function selector to the 0 position. (fig.3).
When the oven is cool, use a damp cloth to remove the white ashes. The oven is clean and once again ready for the cooking application of


If you have a doubt about the functioning of your oven, this does not necessarily mean that there is a malfunction. In any event, check the following items:
| YOU OBSERVE THAT... | POSSIBLE CAUSES | WHAT SHOULD YOU DO? |
| The oven is not heating | - The oven Is not connected.- Your fuse Is out of order.- The selected temperature is too low. | ■ Plug in your oven.■ Replace the fuse and check its value (16A).■ Increase the selected temperature. |
| The padlock is flashing | - Problem with the door's locking mechanism. | ■ Call the After-Sales Service Department. |
| The light in your oven is no longer working. | - The light is out of order.- The oven Is not connected or the fuse Is not working. | ■ Replace the bulb.■ Plug in your oven or replace the fuse. |
| The pyrolysis cleaning cycle does not begin. | - The door is not properly closed.- The locking system is defective. | ■ Make sure the door is closed.■ Call the After-Sales Service Department. |
| Your oven starts beeping. | - During cooking.- At the end of cooking. | ■ The recommended temperature of your choice has been reached.■ Yourprogrammed cooking cycle is finished. |

Warning
- Repairs to your appliance must be made only by authorised service centres. Repairs not carried out according to guidelines can be a source of danger to the user.

Tip
In all circumstances, if your efforts are not sufficient, contact the After-Sales Service Department without delay on 1300739033 number.

Warning
- Disconnect your oven before performing any task on the bulb to avoid the risk of electric shock and, if necessary, let the appliance cool down.

Tip
To unscrew the view port and the light, use a rubber glove, which will make disassembly easier.
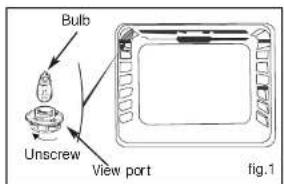
- CHANGING THE BULB
The bulb is located on the ceiling of your oven's cavity.
a) Disconnect the oven.
b) Unscrew the view port (fig.1).
c) Unscrew the bulb in the same direction.
Bulb specifications:
15 W
-220-240 V\~
-300°C
- E 14 cap
d) Replace the bulb then reposition the view port and reconnect your oven.
EN
TIPS
VEGETABLES
For a smoother potato gratin, pre-cook the potatoes sliced into roundsin milk or milk + cream for about twentyminutes.
To prepare stuffed tomatoes: after cutting off the topsemove the seeds, sprinkle some salt inside them and put them upside down on a mesh so they drain before stuffing them.
FISH
When buying it, it should smell pleasant and not too "fishy".
The body should be firm and rigid and the scales should be firmly stuck to the skin; the eyes should be bright and rounded and gills should appear shiny and moist.
CHICKEN
Choose a dishsize suitable for the chicken so the faldoes not burn. For tadier chicken rub marinate underthe skin. Do not use fresh chopped herds when roasting chicken as they will burn.
MEAT INGENERAL
Cuts for Roasting:
BEEF: Fillet, rump, topside, sirloin, rlb roast
LAMB: Rack of lamb, rolled loin, shoulderleg
PORK: Shoulder, belly, loin, rib roast, loinblade
Cuts for Braising/Slow cooking:
BEEF: Chuck/blade, brisket, shin, veashank
LAMB: Shank, shoulder, chuckpliced lamb
PORK: Spare ribs, hocks, shin
PIZZA
To prevent cheese or tomato sauce from dripping in the oven, you can place a piece of parchment paper between the grid and the pizza. Alternatively, you can use a pizza stone in the oven to enhance the texture. Note: Pizza stone must be preheated for best results.
TARTS/QUICHES
Avoid glass and porcelain dishes: because they ateo thick, they extend the cooking time and the bottom of the crust is not crispy.
With fruit, the bottom of the tart risks becoming soggy: just add a few spoonfuls of fine semolina, crushed biscuit crumbs, almond powder or taploca, which will absorb the juice during cooking.
BISCUITS:
make sure that biscuits are placed even and spacialously on the tray as they will spread during cooking. Do not place cookiedough too close to the edges of the tray.
SOME RECIPES
EN
VEGETABLES
Tomatoes stuffed with goat's cheese.
8 tomatoes
300g of fresh goat'scheese
4 soup spoons of olive oil
1 small bunch of fine herbs(chives or basil)
salt, pepper.
Wash the tomatoes, take off the top and carefully take out the pulp.
Turn them over to let them drain well
With a fork, mix the cheese and olive oil, add the finely chopped herbs, salt and pepper.
Replace the tops and arrange them on aplate. Put them in the oven.
Serve hot on a bed of green salad.
FISH
Black sea bream with dry cider: 1 x 1.5 kg sea bream.
500 g button mushrooms.
2 sour apples.
2 shallots
2 tablespoons heavy cream.
100 g butter
1/2 litre cider.Salt, pepper.
Gut and scale the fish. Place it in a buttered dish on the finely minced shallots and
sliced mushrooms. Add the cider, salt and pepper and some cubes of butter. Put it in the oven.
In the butter cook the unpeeled quartered apples. When cooking is complete, transfer the fish to
a warm dish, strain the juice and deglaze the dish with the cream
Add the cream to the juice, serve with apples and mushrooms.
ROAST BEEF Sauces
PARSLEY SAUTERNES with ROQUEFORT Sauce:
Cook two tablespoons of snipped shallots in butter until translucent.
Add 10 clSauternes, let it evaporate
Add 100g Roquefort, let it melt slowly
Add 20 cl liquidcream, salt, pepper. Bring to a boil.
COGNAC with PINK PEPPERCORN Sauce:
Cook 2 tablespoons of sliced shallots in butter until translucent.
Add 15 clSauternes, let it evaporate.
Add 1 egg yolk, 1 spoon ketchup, 200g butter. Salt, pepper.
While whisking, add 3 spoonsCognac and 1 teaspoon of crushed pink peppercoms.
PEAR with CRESS Sauce
Cook 1 pear, covered in white white. Drain, maxh/liquidise.
Scald 1/2 bunch ofcress, drain, chop.
Cook 1 tablespoon of chopped shallots in butter until translucent.
Moisten with the cookingwin. Allow to evaporate
Add the pear, the cress and 20 cl of pouring cream.
1.2.3.4.5.6.7.8.9.10.11.12.13.14.15.16.17.18.19.20.21.22.23.24.25.26.27.28.29.30.31.32.33.34.35.36.37.38.39.40.41.42.43.44.45.46.47.48.49.50.51.52.53.54.55.56.57.58.59.60.61.62.63.64.65.66.67.68.69.70.71.72.73.74.75.76.77.78.79.80.81.82.83.84.85.86.87.88.89.90.91.92.93.94.95.96.97.98.99.100

SOME RECIPES
CHICKEN
Stuff it with a good bouquet of fresh tarragon or rub it with a mixture of 6 crushed cloves of garlic with a pinch of coarse salt, and some peppercorns.
PIZZA
Base: 1 pizza crust
with vegetables: 6 tablespoons tomato sauce + 100 g diced zucchini + 50 g diced bell peppers + 50 g sliced eggplant +2 small sliced tomatoes + 50 g shredded gruyere + oregano + salt + pepper.
*with roquefort and smoked bacon: 6 tablespoons tomato sauce + 100 g smoked bacon + 100 g roquefort in small chunks + 50 g walnuts + 60 g shredded gruyere.
*with sausage and cottage cheese: 200 g drained farm cheese spread on the crust + 4 sausages, sliced + 150 g ham, slivered + 5 olives + 50 g shredded gruyere + cregano + salt + pepper.
TARTS/QUICHES Nonstick
aluminium mould 30 cm diameter.
Flaky praline apple tart:
1 flaky pastry crust rolled and pricked with a fork.
200 ml cream brought to a boil with avanilla bean.
2 beaten eggs with 30 g sugar, add the cooled cream.
2 apples cut into cubes rolled in 70 gcrushed pralines.
Add cream and apples to crust. Place in the oven.
QUICHES
Base: 1 aluminium mould, diameter 27 to 30 cm.
1 ready-to-use short crust.
3 beaten eggs + 50 cl heavy cream.
salt. pepper, nutmeg.
Various garnishes:
200 g precooked larding bacon.
or - 1 kg cookedendives + 200 g shredded gouda.
or - 200 g broccoli + 100 g small bacon pieces + 50 g blue cheese.
or - 200 g salmon + 100 g spinach, cooked and drained.
INDIVIDUAL CHOCOLATE CAKES
12 individual aluminium ramekins
60 g butter
200 g bitter chocolate (more than 50% cocoa)
100 g caster sugar
4 eggs
1 packet of baking powder
70 g sifted flour.
Melt the chocolate with the butter over very low heat. Work the egg yolks into the sugar until the mixture becomes smooth. Add the flour, melted chocolate with butter and finish with the baking powder. Beat the egg whites into stiff peaks and gently fold them into the mixture.
SOME RECIPES
EN
POUND CAKE WITH CITRUS FRUIT
Caramel: 20 lumps of sugar (200 g).
Cake: 4 eggs -200g granulated sugar-200g flour-200g good butter.
2 teaspoons baking powder.
Fruits: 1 smalltin of citrus fruits in syrup.
Drain the fruit. Prepare a caramel icing. When it has taken on colour, turn it out into awake pan; tip it around to distribute the caramel. Let cool. In the bowl of an electric blender, mix the softened butter with the sugar. Add the whole eggs one at a time, then the silted flour. Add the baking powder last. Place the citrus sections in a flower pattern on the caramel icing. Pour in the batter. Place in the oven on the "CAKES" setting. Unmould in a pretty dish and serve cold. Other fruits can be used, such as apples, pears or apricots.

- CONTENTS EN
- / SAFETY INSTRUCTIONS
- 2/ INSTALLING YOUR APPLIANCE
- 3/DESCRIPTION OF YOUR APPLIANCE
- 4/USING OF YOUR APPLIANCE
- 5/ OVEN COOKING MODES 20
- 6/ CARING FOR AND CLEANING YOUR APPLIANCE
- 7/ TROUBLESHOOTING 26
- 8/ TIPS AND HINTS RECIPES
- Important
- WARNING:
- Use
- / SAFETY INSTRUCTIONS EN
- Cleaning by pyrolysis
- Maintenance and cleaning
- Warning :
- - PACKAGING
- - CHILD SAFETY (depending on model)
- / INSTALLING YOUR APPLICANCE
- - BUILD-IN
- Tip
- CABINETRY PREPARATION
- - ELECTRICAL CONNECTION
- / INSTALLING YOUR APPLIANCE
- / DESCRIPTION OF YOUR APPLIANCE EN
- - ACCESSORIES
- • USING THE PROGRAMMER
- • PROGRAMMED COOKING
- • USING THE TIME SWITCH FUNCTION
- FAN FORCED
- FAN ASSIST
- FAN AND ROTISSERIE
- TRADITIONAL ECO
- BOTTOM ELEMENT AND FAN
- WARM KEEPING
- FULL GRILL
- • CLEANING THE OUTER SURFACES
- - CLEANING THE DOOR
- Warning
- WHAT IS PYROLYSIS?
- - IN WHAT SITUATIONS SHOULD PYROLYSIS BE USED?
- - INSTANT PYROLYTIC CLEANING
- - END OF CLEANING
- - CHANGING THE BULB
- TIPS
- VEGETABLES
- FISH
- CHICKEN
- MEAT INGENERAL
- PIZZA
- TARTS/QUICHES
- BISCUITS:
- SOME RECIPES
- EN
- ROAST BEEF Sauces
- TARTS/QUICHES Nonstick
- QUICHES
- Various garnishes:
- INDIVIDUAL CHOCOLATE CAKES
- POUND CAKE WITH CITRUS FRUIT
Brand : BLANCO
Model : BOSE69PX
Category : Oven