
KSV70HRG - Air Conditioning KELVINATOR - Free user manual and instructions
Find the device manual for free KSV70HRG KELVINATOR in PDF.


| Product Type | Portable Air Conditioner |
| Model | KSV70HRG |
| Brand | Kelvinator |
| Cooling Capacity | 7000 BTU/h |
| Heating Capacity | Not applicable (cooling only) |
| Airflow Rate | 250 m³/h |
| Noise Level | 52 dB(A) (max) |
| Energy Efficiency Ratio (EER) | 2.6 W/W |
| Power Supply | 220-240 V ~ 50 Hz |
| Power Consumption (Cooling) | 1050 W |
| Refrigerant | R410A |
| Dimensions (W x H x D) | 45 cm x 70 cm x 38 cm |
| Weight | 25 kg |
| Modes | Cool, Fan, Dehumidify |
| Fan Speeds | 3 speeds (Low, Medium, High) |
| Thermostat Control | Electronic, 16-30°C |
| Timer | 24-hour programmable |
| Remote Control | Included |
| Air Filter | Washable mesh filter |
| Condensate Drain | Self-evaporating (no bucket) |
| Safety Features | Auto shut-off, overload protection |
| Maintenance | Clean filter every 2 weeks |
| Warranty | 2 years |
Frequently Asked Questions - KSV70HRG KELVINATOR
User questions about KSV70HRG KELVINATOR
0 question about this device. Answer the ones you know or ask your own.
Ask a new question about this device
Download the instructions for your Air Conditioning in PDF format for free! Find your manual KSV70HRG - KELVINATOR and take your electronic device back in hand. On this page are published all the documents necessary for the use of your device. KSV70HRG by KELVINATOR.
USER MANUAL KSV70HRG KELVINATOR
Congratulations Contents
Congratulations and thank you for choosing our Inverter split system room air conditioner. We are sure you will find your new air conditioner a pleasure to use. Before you use the air conditioner, we recommend that you read through the entire user manual, which provides the description of the air conditioner and its functions.
To avoid the risks that are always present when you use an electrical appliance, it is important that the air conditioner is installed correctly and that you read the safety instructions carefully to avoid misuse and hazards.
We recommend that you keep this instruction booklet for future reference and pass it on to any future owners.
Conditions of use
This appliance is intended to be used in household and similar applications such as :
• staff kitchen areas in shops, offices and other working environments.
- farm houses.
- by clients in hotels, motels and other residential type environments.
• bed and breakfast type environments.
This air conditioner is designed for and intended to be used in normal domestic applications only.
Record model and serial number here:
Model number:
Serial number

environment
Safety Instructions
Warnings 3
Product description
Installation drawing....5
Remote control specifications....6
Operating instructions
Using the remote control 6
Indoor unit display....7
Indicators on LCD 10
How to use the buttons....11
Timer operation 12
Special functions 14
Airflow directional control 15
Care and maintenance
Before maintenance....17
Cleaning the unit....17
Cleaning the air filter and air freshening filter 17
Preparation for extended non-operation....18
Pre season inspection....18
Troubleshooting tips
Troubleshooting tips....19
Warranty 23
Safety instructions
Meanings of symbols used in this manual are shown below:

warning
This symbol indicates information concerning your personal safety or information on how to avoid damaging the air conditioner

important
This symbol indicates tips and information about use of the appliance

environment
This symbol indicates tips and information about economical and ecological use of the appliance

important
- Contact an authorised installer for installation of this unit
• Installation work must be performed in accordance with the national wiring standards by authorised personnel only. - This air conditioner may need to be installed on it's own separate circuit. Please refer to AS/NZS3000 and local wiring regulations for requirements.
- Contact an authorised service technician for repair or maintenance of this unit.
- This appliance is not intended for use by persons (including children) with reduced physical, sensory or mental capabilities, or lack of experience and knowledge, unless they have been given supervision or instruction concerning use of the appliance by a person responsible for their safety.
- Children should be supervised to ensure that they do not play with the six condition or

warning
- Do not use means to accelerate the defrosting process or to clean, other than those recommended by the manufacturer.
- Do not store the appliance in a room with continuously operating ignition sources (for example open flames, an operating electric heater or an operating gas appliance with a continuously lit pilot flame).
- Do not pierce or burn any part of the air conditioner.
- Be aware that the refrigerant is odourless and any gas leak is not detectable by smell.
- Ensure the unit is properly connected to the power. Excess heat generation caused by incorrect connection may result in an electric shock or fire.
- Do not operate or stop the unit by switching on or off at the power source. This may cause an electric shock or fire due to excess heat generation.
- Do not operate with wet hands or in damp environment. This may cause an electric shock.
- Always ensure that the unit is correctly earthed. No earthing may cause electric shock.
- Do not allow water to run into electric parts. It may cause failure of the unit or electric shock.
- Use a correctly rated circuit breaker or fuse. There is risk of fire or electric shock.
- Disconnect the power if strange sounds, smells, or smoke come from the unit. It may cause fire and electric shock.
- Do not drink water drained from the air conditioner. It may contain contaminants that could make you sick.
- Do not exercise the unit of pine anestine. It was also
Safety instructions
警告
- Do not place obstacles around air inlets or inside of air outlet. It may cause failure of appliance or accident.
- Turn off at the main power switch if the unit will not be used for a long period of time. It may cause failure of the unit or fire.
- Do not use strong chemical cleaners such as detergents, abrasive cleaners or thinners, as they may damage the appliance causing scratches, discolouration or deteriorate the surface finish. Use a soft cloth for cleaning.
- Where the airconditioned is installed on an external wall bracket ensure that the installation bracket of the outdoor appliance is not damaged due to prolonged exposure. If bracket is damaged, the unit may fall and damage may occur.
- Use caution when unpacking and installing. Sharp edges could cause injury.
- If water enters the unit, turn the unit off and disconnect the power, contact a qualified service technician.
Troubleshooting
You'll find many answers to common problems in the chart of troubleshooting tips on page 21. If you review the chart of Troubleshooting Tips first, you may not need to call for service.
Service
For repair and maintenance, contact your authorised service dealer.
Refer to the contact numbers in the warranty section on the back page of this manual.
Installation drawing
Fig.1

Remote control specifications Using the remote control
Rated voltage 3.0V (2x 1.5V AAA)
Signal receiving range 8m


Location of the remote controller
- Use the remote controller within a distance of 8 meters from the appliance, pointing it towards the receiver. Reception is confirmed by a bosp.
! caution
- The air conditioner will not operate if curtains, doors or other materials block the signals from the remote controller to the indoor unit.
- Prevent any liquid from falling into the remote controller. Do not expose the remote controller to direct sunlight or heat.
- If the infrared signal receiver on the indoor unit is exposed to direct sunlight, the air conditioner may not function properly.
- Use curtains to prevent the sunlight from falling on the receiver.
- If other electrical appliances react to the remote controller, either move these appliances or consult your local dealer.
- Do not drop the remote controller. Handle with care.
- Do not place heavy objects on the remote controller, or step on it.
Indoor unit display

Replacing batteries
The following cases signify exhausted batteries.
Replace old batteries with new ones.
- Receiving beep is not omitted when a signal is transmitted.
- Indicator fades away.
The remote controller is powered by two dry batteries (2x AAA
1.5V housed in the back rear part and protected by a cover.
-
Remove the cover in the rear part of the remote controller.
-
Remove the old batteries and insert the new batteries, placing the(+) and (-) ends correctly.
3 Put the cover back on
NOTE: When the batteries are removed, the remote controller erases all programming. After inserting new batteries, the remote controller must be reprogrammed.
警告 warning
- Do not mix old and new batteries or batteries of different types.
- Do not leave the batteries in the remote controller if they are not going to be used for 7 or 3 months.
日日
Digital display
- Displays the temperature settings when the air conditioner is operational.
• Displays the room temperature in FAN mode.
- Displays the self-diagnostic codes.
• Displays' ON for three seconds when Timer ON, Swing, Turbo or Silence feature is activated.
• Displays' OF for three seconds when Timer OFF is set.
- Displays' OF for three seconds when Swing, Turbo or Silence feature is cancelled.
• Displays! dF under defrosting operation.
• Displays' eF when anti-cold air feature is activated under heating mode.
• Displays' •F during self clean operation (if applicable).
• Displays' SC during self clean operation (if applicable)
- Displays 'FP' under 8°C heating operation (if applicable).
- If you want to turn off the indoor unit display (for example to make the room dark for sleeping), press the LED button on the remote control.
Operation of buttons
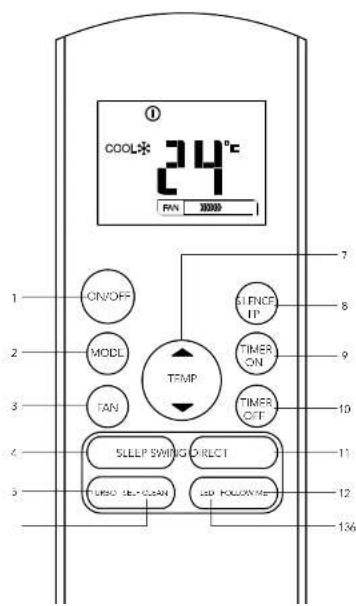
1.ON/OFFButton
This button turns the air conditioner ON and OFF.
- MODE Button
Press this button to modify the air conditioner mode in a sequence of following:
$$ \text { AUTO } > \text { COOL } > \text { DRY } > \text { HEAT } > \text { FAN } $$
NOTE: Please do not select HEAT mode if the machine you purchased is cooling only type. Heat mode is not supported by the cooling only appliance.
- FAN Button
Used to select the fan speed in four steps:
$$ \text { AUTO } > \text { LOW } > \text { MED } > \text { HIGH } $$
NOTE: You can not switch the fan speed in AUTO
or DRY mode.
4 SLEEP Button
■Active/Disable sleep function. It can maintain the most comfortable temperature and save energy. This function is available on COOL, HEAT or AUTO mode only.
- For the detail, see sleep operation on page.
NOTE. While the unit is running under SLEEP mode, it will be cancelled if MODE, FAN SPEED or ON/OFF button is pressed.
5.TURBOButton
Active/Disable Turbo function. Turbo function enables the unit to reach the preset temperature at cooling or heating operation in the shortest time.
- SELF CLEAN Button
Active/Disable Self Clean function
- UP Button (
Push this button to increase the indoor temperature setting in 1°C increments to 30°C.
DOWN Button ( ▼)
Operation of buttons
- TIMER ON Button
Press this button to initiate the auto-on time sequence. Each press will increase the auto-timed setting in 30 minute increments. When the setting time displays 10.0, each press will increase the auto-timed setting by 60 minute increments. To cancel the auto-timed program, simply adjust the auto-on time to 0.0.
- TIMER OFF Button
Press this button to initiate the auto-off time sequence. Each press will increase the auto-timed setting in 30 minute increments. When the setting time displays 10.0, each press will increase the auto-timed setting 60 minute increments. To cancel the auto timed program, simply adjust the auto-off time to 0.0
11.SwingButton

Used to stop or start horizontal louver auto swing feature.
DIRECTButton
Used to change the louver movement and set the desired up/down air flow direction. The louver changes ^a in angle for each press.
- FOLLOW ME Button
Push this button to initiate the Follow Me feature, the remote display is actual temperature at its location. The remote control will send this signal to the air conditioner every 3 minutes interval until press the Follow Me button again. The air conditioner will cancel the Follow Me feature automatically if it does not receive the signal during any 7 minutes interval.
13.LEDButton
Disable/Active indoor screen Display. When pushing the button, the indoor screen display is cleared, press it again to light the display. NOTE: pressing LED button also disables the beep sound.
Indicators on LCD
Information are displayed when the remote controller is powered up.

Mode display
AUTO COOL DRY
HEAT


Icon Function
| Displayed when data transmitted | |
| 1 | Displayed when remote controller is ON |
| Battery display (low battery detection) | |
| ON | Displayed when TIMER ON time is set |
| OFF | Displayed when TIMER OFF time is set |
| Show set temperature or room temperature, or time under TIMER setting | |
| Displayed in Sleep Mode operation | |
| Indicated that the air conditioner is operating in follow me mode | |
| Displayed when silence feature is activated |
Fan speed indication

Low speed

Medium speed
How to use the buttons

Auto operation
Ensure the unit is plugged in and power is available. The OPERATION indicator on the display panel of the indoor unit starts flashing.
- Press the MODE button to select Auto.
- Press the UP/DOWN button to set the desired temperature. The temperature can be set within a range of 17°C–30°C in 1°C increments.
- Press the ON/OFF button to start the air conditioner.
- In the Auto mode, the air conditioner can logically choose the mode of Cooling, Fan, and Heating by sensing the difference between the actual ambient room temperature and the setting temperature on the remote controller.
2 In the Auto mode, you can not adjust the far speed. It has already been automatically controlled. - If the Auto mode is not comfortable for you, the desired mode can be selected manually.
NOTE:
NOTE. In the FAN mode, the setting temperature is not displayed in the remote controller and you are not able to control the room temperature either. In this case, only step 1, 3 and 4 may be performed.

Dehumidifying operation
Ensure the unit is plugged in and power is available. The OPERATION indicator on the display panel of the indoor unit starts flashing.
- Press the MODE button to select DRY mode.
- Press the UP/DOWN buttons to set the desired temperature. The temperature can be set within a range of 17°C-30°C in 1°C increments
- Press the ON/OFF button to start the air conditioner.
NOTE: In the Dehumidifying mode, you can not adjust the fan speed. It has already been automatically controlled.
Timer operation
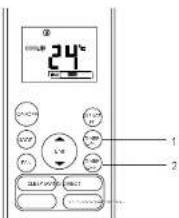
Press the TIMER ON button can set the auto-on time of the unit. Press the TIMER OFF button can set the auto-off time of the unit.
To set the Auto-ON time
- Press the TIMER ON button. The remote controller shows TIMER ON, the last Auto on setting time and the signal "H" will be shown on the LCD display area. Now it is ready to reset the Auto on time to START the operation.
- Push the TIMER ON button again to set desired Auto-on time. Each time you press the button, the time increases by half an hour between 0 and 10 hours and by one hour between 10 and 24 hours.
- After setting the TIMER ON, there will be a one second delay before the remote controller transmits the signal to the air conditioner. Then, after approximately another 2 seconds, the signal "H" will disappear and the set temperature will re-appear on the LCD display window.
To set the Auto-OFF time
- Press the TIMER OFF button. The remote controller shows TIMER OFF, the last Auto offsetting time and the signal 'U'.
! caution
- When you select the timer operation, the remote controller automatically transmits the timer signal to the indoor unit for the specified time. Therefore, keep the remote controller in a location where it can transmit the signal to the indoor unit properly.
- Timer setting is in half hourly intervals up to 10 hours then hourly intervals to 24 hours
Examples of timer operation
Timer on (Auto-on Operation)
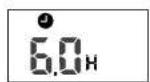

Set 6 hours later
The TIMER ON feature is useful when you want the unit to turn on automatically before you return home. The air conditioner will automatically start operating at the set time.
Example
To start the air conditioner in 6 hours.
- Press the TIMER ON button, the last setting of starting operation time and the signal "H" will show on the display area.
- Press the TIMER ON button to display '6.0H' on the TIMER ON display of the remote controller.
- Wait for 3 seconds and the digital display area will show the temperature again. The 'TIMER ON' indicator remains on and this function is activated.
Timer off (Auto-off Operation)

Combined timer
(Setting both ON and OFF timers simultaneously)
Timer off/Timer on (On/Stop/Start operation)


Set 2 hours later 10 hours later after setting after setting
This feature is useful when you want to stop the air conditioner after you go to bed, and start it again in the morning when you wake up or when you return home.
Example
To stop the air conditioner 2 hours after setting and start it again 10 hours after setting.
1. Press the TIMER OFF button.
2. Press the TIMER OFF button again to display 2.0H on the TIMER OFF display.
3. Press the TIMER ON button.
4. Press the TIMER ON button again to display 10H on the TIMER ON display.
5. Wait for 3 seconds and the digital display area will show the temperature again. The "TIMER ON OFF" indicator remains on and this function is activated.
Special functions
SLEEP operation

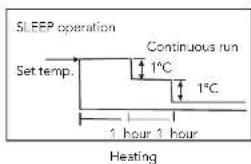
When selected, the set temperature will increase (cooling) or decrease (heating) by 1°C per hour for the first 2 hours. Until now settings are entered or the air conditioner is shut down. Sleep function saves energy and improves night time by optimising sleeping temperature.
Refrigerant leakage detection
When refrigerant leakage is detected, the indoor unit will display EC code.
Louvre angle memory function
Within the scope of safety angle, the horizontal louver angle is memorised and will return to the position last selected by user. If it exceeds, it will memorize the boundary of safety angle. This will not happen when Turbo or manual control buttons are pressed or after a power interruption. So we strongly suggest that the open angle of the horizontal louver should not be set too small, in case the condensed water forms and drips from the horizontal louver.
SELF CLEAN function
- Airborne bacteria use the moisture on the indoor heat exchanger to grow. Regular drying of the exchanger prevents this growth. By simply pressing the SELF CLEAN button, the system will automatically manage the process. This cleaning action may be done as frequently as desired.
- For cooling models, only the indoor fan is active in low speed for 30 minutes and the unit turns off automatically.
- For cooling & heating models, the unit will operate as in the following sequence: FAN mode at Low fan speed—Heating operation with LOW fan speed—FAN operation—Stop Operation—Turn off.
NOTE:
- Activating self-clean function does not replace the need to clean the filters. The filters must be cleaned at least every 3 months, or as required to maintain good cleanliness and performance of this air conditioner.
• This function is only activated in COOLING or DRY mode. - Before activation the air conditioner, it is recommended to run the air conditioner under cooling operation for about 30 minutes.
- Pressing the SELF CLEAN or ON/OFF button again during the cleaning cycle will cancel the operation and turn the unit off.
Airflow directional control
The direction of airflow can be adjusted for maximum comfort.


caution
- Do not operate the air conditioner for long periods with the air flow direction set downward in cooling or dehumidifying mode. Otherwise, condensation may occur on the surface of the horizontal louver causing moisture to drop on to the floor or on furnishings.
- After a quick restart, the horizontal louver may remain static for approximately 10 seconds.
- Open angle of the horizontal louver should not be set too small, as COOLING or HEATING performance may be reduced due to too restricted air flow area.
- Do not move the vertical (up/down) louver manually, otherwise the vertical louver will be out of sync. But if this happens, please cease operating, switch off power for a few seconds, then restart the air conditioner.
Optimal operation
To achieve optimal performance, please note the following:
- Adjust the air flow direction correctly so that it is not towards people.
- Adjust the temperature to achieve moderate comfort levels. Excessively low or high temperature waste energy.
- Improve performance by keeping windows and doors closed.
- Limit energy usage (run time) by using the TIMER function.
- Do not put any object near air inlet or air outlet, as the efficiency of the air conditioner may be reduced and may cause the air conditioner to stop running.
- Inspect and clean the filters every 3 months or as required. Ensure that the filters are correctly inserted after cleaning.
Adjusting vertical air flow (Up/Down)
Operating temperature
Mode
Temperature Cooling operation Heating operation
Room temperature 17°C - 48°C 0°C - 30°C
Outdoor temperature 0°C - 48°C - 15°C - 30°C
The Air conditioner temperature can be set between the range of 17°C to 30°C.
NOTE:
- Optimum performance will be achieved within these operating temperatures. If air conditioner is used outside of the above conditions, certain safety protection features might come into operation and cause the unit to function abnormally.
- If the air conditioner runs for a long time in cooling mode and the humidity is high (over 80%), condensed water may drip out of the unit. Please set the vertical airflow louvre to its maximum angle (vertically to the floor), and set HIGH fan mode.
Low temperature protection
This air conditioner incorporates an automatic electric heater to prevent the outdoor unit temperature dropping below 0°C and freezing. It is strongly recommended to keep the power supply connected to the air conditioner to prevent freezing.
Manual operation

caution
- This switch is used for testing purposes only. Please do not use it unless necessary.
- To restore the remote controller operation, use the remote controller directly.
This air conditioner is equipped with a manual switch to allow operation should the remote control fail to work. It can be accessed by opening the front panel.

NOTE: The unit must be turned off before operating the manual control button. If the unit is operational, continue pressing the manual control button until the unit is off.
- Open the front panel until it locks. There is a 'click' when the mechanism engages.
- One press of the manual control switch will lead to the forced AUTO operation. Press the switch twice within 5 seconds to operate in COOL mode.
- Close the panel after manual operation has been started
Care and maintenance

natural_image
Diagram of hands holding a partially open cylindrical device with internal components (no text or symbols)

natural_image
Simple line drawing of a door with a handle and patterned interior (no text or symbols)Before maintenance
- Turn the system off before cleaning. To clean, wipe with a soft, dry cloth. Do not use bleach or abrasives.
NOTE: Power supply must be disconnected before attempting to clean or service.
! warning
Servicing shall only be performed as recommended by the equipment manufacturer. Maintenance and repair requiring the assistance of other skilled personnel shall be carried out under the supervision of the person competent in the use of flammable refrigerants. For more details, please refer to the Information on servicing on installation manual.
- Do not use a chemically treated cloth or duster to clean the unit.
- Do not use benzine, thinner, polishing powder, or similar solvents for cleaning. These may cause the plastic surface to crack or deform.
- Never use water hotter than 40°C to clean the front panel, it could cause deformation or discoloration.
Cleaning the unit
Wipe the unit with a soft dry cloth only. If the unit is very dirty, wipe it with a cloth soaked in warm water.
Cleaning the air filter and air freshening filter
A clogged air filter reduces the efficiency of this unit. Please clean the filter every 3 months, or as required..
- Open the front panel by carefully lifting both ends at the same time. At a certain angle, a clicking sound is heard and it becomes self-supporting. For some models, please use the
Care and maintenance
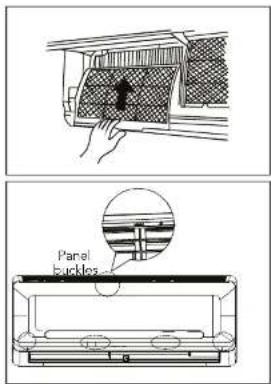
- After the filters are dry, refit the small filters onto the large air filter.
- Re-insert the filters back into the unit following the reverse order as described in steps 1 & 2.
- Close the front panel. Make sure the buckles are fully fit and the panel is completely closed.
Preparation for extended non-operation
If you plan not to use unit for a long time, perform the following:
- Clean the indoor unit and filters.
- Operate the fan for about half a day to dry the inside of the unit.
- Stop the air conditioner and disconnect power.
4 Remove the batteries from the remote controller. The outdoor unit requires periodic maintenance and cleaning. Do not attempt to do this yourself. Contact your dealer or service provider.
Pre-season inspection
• Damaged or disconnected wires.
- Clean the indoor unit and filters.
- Check water or oil leaks.
- Check that the outdoor unit is clear of leaves, rubbish and other objects that may block the air inlet or outlet.
- Check if the remote control batteries are flat, replace as required.

- Do not touch the metal parts of the unit when removing the
Troubleshooting
Troubleshooting tips
The following events may occur during normal operation, and may not indicate malfunction
| Symptom Cause | |
| Operation is delayed after restart To prevent blowout of the fuse, the compressor will not operate while the protection circuit is working for about 3 minutes after sudden OFF/ON operation of the power supply, this is normal operation and designed to protect the compressor. | |
| Fan speed changes from off, to vary slow and then normal | Automatically happens in heating mode:prevents cold air blowing onto occupants when the heating operation is start,perform automatic defrosting operation,perform low temperature heating operation. |
| Heating operation stops suddenly and defrost-light blinks | In HEAT mode, the indoor unit temporarily stops for maximum of 10 minutes to perform the automatic defrosting operation. |
| Mist coming out of the indoor unit In COOL mode, a mist generated by condensation formed with sudden cooling process may be emitted.Mist may generate due to moisture generated from defrosting process when the air conditioner restarts in HEAT mode operation after defrosting | |
| Low volume sounds are emitted by the air conditioner | Hissing sound-- during operation or immediately after stopping the air conditioner, refrigerant flowing sound may be head.Squeaking sound-- normal expansion and contraction of plastic and metal parts caused by temperature change during the operation.Rushing air-- when lower resets its position. |
| Dust discharges from the unit May occur when air conditioner is used for the first time or has not been used for a long time. | |
Troubleshooting
Before you call for or request servicing, troubleshoot a problem by performing following checks:
| Symptom | Diagnostic |
| Unit will not operate | Is there a power failure?Has a switch been turned off, a circuit breaker tripped or a fuse blown?Is the timer operating?Are the batteries used in the remote controller exhausted?Are the batteries used in the remote controller loaded properly? |
| Poor cooling or heating performance | Are the air filters dirty?Is air flow unrestricted in & out of indoor & outdoor units?Are the temperature and mode settings correct?Are the windows or doors left opened?Is fan speed on high and louvers allowing maximum flow?Is direct or strong sunlight shining into the room in cooling operation?Are there other heating apparatus or computers operating, or too many people in the room in cooling operation?Is the SILENCE function is activated? Under SILENCE operation, noise reduction is prioritized and the air-conditioning performance may become lower. |
| Indicator lamps continue flashing | The unit may stop operation or continue to run in a safety condition (depending on models).Waiting for about 10 minutes, the fault may be recovered automatically, if not, disconnect the power and then connect it in again. If the problem still exists, disconnect the power and contact the nearest customer service center. |
| Error code appears in the indoor unit, such as: E0,E1,E2...P1,P2,P3....or F1; F2,F3.... |
If the problem persists even if you perform these checks or diagnostics, immediately stop operation and contact the authorized service center. Be sure to inform them of the detailed malfunctions and unit model number.
Notes
Notes

Electrolux Warranty
FOR SALES IN AUSTRALIA AND NEW ZEALAND
APPLIANCE: KELVINATOR SPLIT SYSTEM AIR CONDITIONER
This document sets out the terms and conditions of the product warranties for Kelvinator Appliances. It is an important document. Please keep it with your proof of purchase documents in a safe place for future reference should there be a manufacturing defect in your Appliance. This warranty is in addition to other rights you may have under the Australian Consumer Law.
1. In this warranty:
(a) 'ACL' or 'Australian Consumer Law' means Schedule 2 to the Competition and Consumer Act 2010;
(b) 'Appliance' means any Electrolux product purchased by you and accompanied by this document;
(c) 'ASC' means Electrolux's authorised serviced centres;
(c) 'Kevinator' is the brand controlled by Electrolux Home Products Pty Ltd of 163 O'Riordan Street. Mascot NSW 2020, ABN 51 004 762 341 in respect of Appliances purchased in Australia and Electrolux (NZ) Limited (collectively "Electrolux") of 3-5 Nall Burgess Road, Mount Wellington, in respect of Appliances purchased in New Zealand;
(c) "Warranty Condition" means:
(i) evidence by the customer that the Appliance was installed by a licensed air conditioner installer and in accordance with Electrolux installation guidelines as set out in the installation manual;
(i) the Appliance rating is correct for the size and thermal characteristics of the room;
(ii) the Appliance has been regularly maintained in accordance with Electrolux guidelines as set out in the user manual;
(iv) the Appliance is designed for providing human comfort and should be used under ambient conditions as set out in the product specifications and general air quality conditions.
(f) "Warranty Period" means the period specified in clause 3 of this warranty;
(g) 'you' means the purchaser of the Appliance not having purchased the Appliance for re-sale, and 'your' has a corresponding meaning
-
Application: This warranty only applies to new Appliances, purchased and used in Australia or New Zealand and is in addition to (and does not exclude, restrict, or modify in any way) other rights and remedies under a law to which the Appliances or services relate, including any non-excludable statutory guarantees in Australia and New Zealand.
-
Warranty Period: Subject to these terms and conditions, this warranty continues for in Australia for a period of 60 months and in New Zealand for a period of 60 months. Following the date of original or above of the
-
Exclusions: You may not make a claim under this warranty unless the defect claimed is due to faulty or defective parts or workmanship. This warranty does not cover:
(a) light globes, batteries, filters or similar perishable parts;
(b) parts and Appliances not supplied by Electrolux;
(c) cosmetic damage which does not affect the operation of the Appliance;
(d) damage to the Appliance caused by:
(i) negligence or accident;
(i) misuse or abuse, including failure to properly maintain or service;
(ii) improper, negligent or faulty servicing or repair works done by anyone other than an Electrolux authorised repairer or ASC;
(N) normal wear and tear;
(v) power surges, electrical storm damage or incorrect power supply;
(M) incomplete or improper installation;
(vi) incorrect, improper or inappropriate operation;
(Mii) insect or vermin infestation;
(x) failure to comply with any additional instructions supplied with the Appliance; and
(x) a breach of the Warranty Conditions.
In addition, Electrolux is not liable under this warranty if:
(a) the Appliance has been, or Electrolux reasonably believes that the Appliance has been, used for purposes other than those for which the Appliance was intended, including where the Appliance has been used for any non-domestic purpose;
(b) the Appliance is modified without authority from Electrolux in writing;
(c) the Appliance's serial number or warranty seal has been removed or defaced.
- How to claim under this warranty: To enquire about claiming under this warranty, please follow these steps:
(a) carefully check the operating instructions, user manual and the terms of this warranty;
(b) have the model and serial number of the Appliance available;
(c) have the proof of purchase (e.g. an invoice) available;
(d) telephone the numbers shown below.
- Australia: For Appliances and services provided by Electrolux in Australia: Electrolux goods come with guarantees that cannot be excluded under the Australian Consumer Law. You are entitled to a
Kelvinator

For more information on all Kelvinator appliances, or for dimension and installation information, call into your retailer, phone or email our customer care team or visit our website:
AUSTRALIA
phone: 1300 363 640
fax: 1800 350 067
email: customercare@electrolux.com.au
web: kelvinator.com.au
NEW ZEALAND
phone: 0800 436 245
fax: 0800 225 088
email: customercare@electrolux.co.nz
web: kelvinator.co.nz
Kelvinator. We are part of the Electrolux Family.
To add a touch of professional inspiration to
your home, visit electrolux.com.au
- Congratulations Contents
- Conditions of use
- Safety Instructions
- Product description
- Operating instructions
- Care and maintenance
- Troubleshooting tips
- warning
- important
- environment
- 警告
- Troubleshooting
- Service
- Location of the remote controller
- ! caution
- Replacing batteries
- 警告 warning
- Digital display
- Operation of buttons
- Indicators on LCD
- Mode display
- Fan speed indication
- Auto operation
- NOTE:
- Dehumidifying operation
- Timer operation
- To set the Auto-ON time
- To set the Auto-OFF time
- Special functions
- SLEEP operation
- Refrigerant leakage detection
- Louvre angle memory function
- SELF CLEAN function
- Airflow directional control
- caution
- Optimal operation
- Operating temperature
- Mode
- Low temperature protection
- Manual operation
- Before maintenance
- ! warning
- Cleaning the unit
- Cleaning the air filter and air freshening filter
- Preparation for extended non-operation
- Pre-season inspection
- Electrolux Warranty
- In this warranty:
- Kelvinator
- AUSTRALIA
- NEW ZEALAND
Brand : KELVINATOR
Model : KSV70HRG
Category : Air Conditioning