KSV80HRE - Air Conditioning KELVINATOR - Free user manual and instructions
Find the device manual for free KSV80HRE KELVINATOR in PDF.


| Product Type | Split System Air Conditioner (Inverter) |
| Brand | Kelvinator |
| Model | KSV80HRE |
| Refrigerant | R32 |
| Power Supply | 220-240V, 50Hz |
| Operating Modes | Auto, Cool, Heat (reverse cycle), Dehumidify, Fan only |
| Timer | 24-hour On/Off timer |
| I Feel Function | Yes (remote control senses temperature) |
| Eco Function | Yes (gradually adjusts temperature for energy saving) |
| X-Fan Function | Yes (dries indoor unit after shutdown) |
| Swing Function | Yes (automatic vertical louvre movement) |
| Turbo Function | Yes (rapid heating/cooling) |
| Filter | Washable dust filter; optional healthy filters (active carbon, etc.) |
| Filter Cleaning Frequency | Monthly (dust filter); every 3 months (healthy filters) |
| Remote Control | Yes, with LCD display |
| Emergency Operation | Manual switch on indoor unit |
| Smart Restart | Yes (resumes after power failure) |
| Self-Diagnosis | Yes (error codes displayed) |
| Operating Temperature (Cooling) | Indoor: 21°C-32°C DB/WB; Outdoor: 21°C-43°C DB/WB |
| Operating Temperature (Heating) | Indoor: 20°C-27°C DB; Outdoor: -7°C-24°C DB/WB |
| Warranty | 60 months (conditional, requires professional installation and maintenance) |
Frequently Asked Questions - KSV80HRE KELVINATOR
User questions about KSV80HRE KELVINATOR
0 question about this device. Answer the ones you know or ask your own.
Ask a new question about this device
Download the instructions for your Air Conditioning in PDF format for free! Find your manual KSV80HRE - KELVINATOR and take your electronic device back in hand. On this page are published all the documents necessary for the use of your device. KSV80HRE by KELVINATOR.
USER MANUAL KSV80HRE KELVINATOR
natural_image
Black-and-white photo of a woman in profile wearing a floral blouse, looking upward with closed eyes (no text or symbols visible)Congratulations Contents
Congratulations and thank you for choosing our Inverter split system room air conditioner. We are sure you will find your new air conditioner a pleasure to use. Before you use the air conditioner, we recommend that you read through the entire user manual, which provides the description of the air conditioner and its functions.
To avoid the risks that are always present when you use an electrical appliance, it is important that the air conditioner is installed correctly and that you read the safety instructions carefully to avoid misuse and hazards.
We recommend that you keep this instruction booklet for future reference and pass it on to any future owners.
After unpacking the air conditioner please check it is not damaged. If in doubt, do not use the air conditioner but contact your local Electrolux Customer Care Centre.

environmental tip
Information on disposal for users
- Most of the packing materials are recyclable. Please dispose of those materials through your local recycling depot or by placing them in appropriate collection containers.
- If you wish to discard this air conditioner, please contact your local authorities and ask for the correct method of disposal.

refrigerant warning
This unit uses refrigerant R32 and must be disposed of by a licensed refrigeration mechanic with knowledge of appropriate gas reclamation methods.
Safety Instructions
Warnings 3
Prior to operation....4
Product description
Diagram 5
Indoor display unit 6
Remote control 7
First use....9
How to operate the air conditioner
Automatic operation....10
Cooling/Heating/Fan only operation 10
Dehumidifying operation....10
Setting the clock....11
Timer operation 12
Eco operation....13
Emergency operation....15
Operating temperature....15
Maintenance
Cleaning the filters....16
Operating tips
Operation tips....18
Troubleshooting tips....19
Warranty
Warranty instructions 23
Safety instructions
- Contact an authorised installer for installation of this unit.
- Contact an authorised service technician for repair or maintenance of this unit.
• The socket outlet required to supply power must be connected and commissioned by a licensed contractor. - This appliance is not intended for use by persons (including children) with reduced physical, sensory or mental capabilities, or lack of experience and knowledge, unless they have been given supervision or instruction concerning use of the appliance by a person responsible for their safety.
- Young children should be supervised to ensure that they do not play with the air conditioner.
- If the power cord is to be replaced, replacement work shall be performed by authorised personnel only.
• Installation work must be performed in accordance with the national wiring standards and the electricity suppliers service rules by authorised personnel only. - If the system is to be moved to another location or disposed of, only a suitably qualified person is permitted to undertake such work.
Take care not to catch fingers on the fan blade when adjusting vertical louvres.
• This air conditioner uses R32 refrigerant.
How to properly use and maintain your air conditioner
Just a little preventative care on your part can save you a great deal of time and money over the life of your air conditioner. You'll find many answers to common problems in the chart of troubleshooting tips. If you review the chart of Troubleshooting Tips first, you may not need to call for service.

warning

Do not use means to accelerate the defrosting process or to clean, other than those recommended by the manufacturer.

Do not store the appliance in a room with continuously operating ignition sources (for example open flames, an operating electric heater or an operating gas appliance with a continuously lit pilot flame).

Do not pierce or burn.

Be aware that the refrigerant may be odourless.

Ensure the unit is properly connected to the power. Excess heat generation caused by incorrect connection may result in an electric shock or fire.

Do not operate or stop the unit by switching on or off at the power source. This may cause an electric shock or fire due to excess heat generation.

Do not damage or use an unspecified power cord. This may cause an electric shock or fire.

Do not modify power cord length or share the outlet with other appliances. This may cause an electric shock or fire due to excess heat generation.

Do not operate with wet hands or in damp environment. This may cause an electric shock.

Do not direct airflow at room occupants only. This could damage your health.

Always ensure that the unit is correctly earthed. No earthing may cause electric shock.
Safety instructions

caution

When the air filter is to be removed, do not touch the metal parts of the unit. It may cause an injury.

Do not clean the air conditioner with water. Water may enter the unit and degrade the insulation. It may cause an electric shock.

Ventilate the room well when used together with a stove, etc. An oxygen shortage may occur

Do not put a pet or house plant where it will be exposed to direct air flow. This could injure the pet or plant.

Do not use for special purposes. Do not use this air conditioner to preserve precision devices, food, pets, plants, and art objects. It may cause deterioration of quality, etc.

Stop operation and close the window in storm or hurricane. Operation with windows open may allow rain inside, soaking carpets and furniture

Do not place obstacles around air-inlets or inside of air-outlet. It may cause failure of appliance or accident.

Turn off at the main power switch if the unit will not be used for a long period of time. It may cause failure of the unit or fire.

Do not use strong detergent such as wax or thinner. Use a soft cloth for cleaning. Appearance may be deteriorated due to change of product colour or scratching of its surface
Prior to Operation
1 Contact an installation specialist for installation.
2 Plug in the power plug properly.
3 Do not use a damaged or non-standard power cord.
4 Do not share the same outlet with other appliances.
5 Do not use an extension cord.
6 Do not start/stop operation by plugging /unplugging the power cord
Usage
1 Exposure to direct airflow to occupants, pets or plants for an extended period of time could be hazardous to your health.
2 Due to the possibility of oxygen deficiency, ventilate the room when used together with stoves or other heating devices.
3 Do not use this air conditioner for non-specified special purposes (e.g. preserving precision devices, food, pets, plants, and art objects). Usage in such a manner could harm your property.
Cleaning and maintenance
1 Do not touch the metal parts of the unit when removing the filter. Injuries can occur when handling sharp metal edges.
2 Do not use water to clean inside the air conditioner. Exposure to water can destroy the insulation, leading to possible electric shock.
3 When cleaning the unit, first make sure that the power and circuit breaker are turned off.
Product Description

Indoor display unit
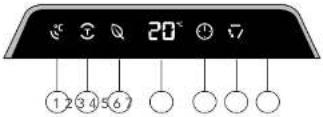
1 I feel indicator
Lights when the 'I feel' function is activated.
2 Turbo indicator
Lights when the 'TURBO' function is activated.
3 Eco (economy) indicator
Lights when the 'ECO' function is activated.
4 Temperature indicator
Displays the temperature settings when the air conditioner is in operation.
5 Timer indicator
Lights when the 'TIMER' function is set to ON or OFF.
6 Swing indicator
Lights when the 'SWING' function is activated.
7 Signal receiver
Receives signal from the remote control.
Remote control
Location of the remote control
- When the remote control sends out a signal, the symbol will blink for about 1 second on the display of the remote control.

caution
- The air conditioner will not operate if curtains, doors or other materials block the signals from the remote control to the indoor unit.
- Prevent any liquid from entering the remote control. Do not expose the remote control to direct sunlight or heat.
- If the infrared signal receiver on the indoor unit is exposed to direct sunlight, the air conditioner may not function properly. Use curtains to prevent the sunlight from falling on the receiver.
- If other electrical appliances react to the remote control, either move these appliances or consult your local dealer.
Replacing batteries
The remote control uses two AAA dry cell batteries.
1 Slide the cover of the battery compartment off according to the arrow direction, then replace the old batteries with new ones.
2 Insert the new batteries making sure that the (1) and (-) of the batteries are installed correctly.
3 Reattach the cover by sliding it back into position. The remote control clock will need to be reset after replacing the batteries.
NOTE Do not dispose batteries as unsorted municipal waste. Collection of such waste separately for special treatment is necessary.
Remote control


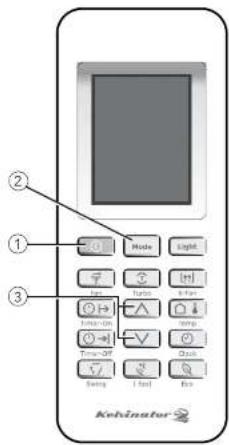
Button
Push this button to start or stop operation.
2 Mode MODE Select Button
Each time you push the button, a mode is selected in a sequence that goes from AUTO, DEHUMIDIFY, FAN, COOL and HEAT, as the following figure indicates:

6 X-FAN Function
Press the function. [m] X-FAN button to activate the X-FAN
After the unit is turned off, the indoor fan will continue to operate for 10 minutes to remove all moisture from the indoor unit and prevent bacteria and mildew from growing.
7 ↕ TIMER ON Button
Press this button to set the start time.
8 TIMER OFF Button
Press this button to set the start time.
9 SWING Button
Press this button to change the swing angle of the louvre. The angle of the horizontal louvre will adjust by 6 degrees with each press of the button. If you keep pressing the button for 2 or more seconds, the louvre will swing up and down automatically.
10 I FEEL Button
Push this button to initiate the I FEEL feature, the remote displays the temperature at its location. The remote control will send this signal to the air conditioner in 3 minute intervals until you press the I FEEL button again. The air conditioner will automatically cancel the I FEEL feature if it does not receive the signal during any / minute interval.
NOTE: The I FEEL feature is not available under
DRY and FAN mode. Shifting the operating mode or turning off the unit will cancel the I FEEL feature automatically. The remote control needs to be within 8m reach of the indoor unit for the I FEEL mode to work appropriately.
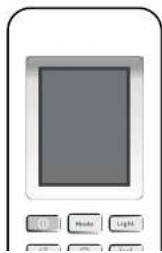
Remote control display indicator
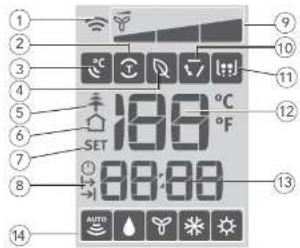
1 TRANSMISSION Indicator
Displays when the remote control transmits signals to the indoor unit.
2 TURBO Display
Displays when TURBO function is active.
3 I FEEL Display
Displays when the I FEEL function is active,
4 ECO Display
Displays when ECO function is active.
5 ACTIVE PLASMA Display (Active Plasma models only) Displays when ACTIVE PLASMA function is selected. This function is not available for this range of air conditioners.
6 Room Temperature Display
Displays when the temperature shown on the LCD screen is room temperature. It can be switched on/off by pressing the TEMP button.
8 TIMER ON/OFF Display
Displays when the Timer On/Off function is activated.
9 FAN SPEED Display
Displays the selected fan speed in the following sequence:

LOW MEDIUM HIGH
and AUTO. In Auto speed, only the symbol
is displayed.
10 SWING Display
Displays when the SWING function is selected.
11 X-FAN Display
Displays when the X-Fan function is activated by pressing Turbo and Healthy buttons at the same time (for models with active plasma function) or by pressing X-Fan button (for models without active plasma function).
12 TEMPERATURE Display
Displays the room or set temperature in °C or °F. No display in Fan mode.
13 TIME Display
Displays the Clock time (must be set) and/or the on/off time of the timer.
14 MODE Display
Displays the current operation mode, including Auto (☐), Dehumidify (☐) and (☐), Ctrl (☐) and Heat (☐).
NOTE: The Cool model does not offer a Heating option.
First use
1 Ensure the unit is plugged in and power is available.
2 Be sure the batteries are inserted correctly in the remote control (the lights on the remote control will be on).
3 Set the time with the CONTROL buttons and confirm by pressing the CLOCK button.
4 Point the remote control at the indoor unit and press ON/OFF button to turn the unit on.
The default operating mode is AUTO. Once you select the operating mode with the remote control, the operating conditions will be saved in the indoor unit's memory. The next time the air conditioner will start operating under the same conditions when you simply push the ON/OFF button of the remote control.
i tips and information
In case of a power cut, the unit being switched off at the powerpoint, or when changing the remote control batteries, the microprocessor will return to AUTO mode.
Using the remote control
Automatic operation
When you set the air conditioner to AUTO mode, it will automatically select cooling, heating (only for reverse cycle models), or fan only operation depending on which temperature you have selected and the ambient room temperature. Once you have selected the operating mode, the operating conditions are saved into the unit's memory. Thereafter, the air conditioner will start operating under the same conditions when you simply push the ON/OFF button on the remote control.
F
Stop
1 ON/OFF Button Press this button again to turn the air conditioner off. The horizontal louvre returns to the closed position upon shut down.

If the AUTO mode is not achieving the temperature you require, the desired conditions can be selected manually.
i tips and information
Dehumidifying operation Fan operation
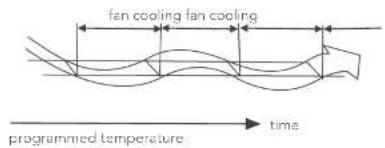
The DEHUMIDIFY mode works based on the difference between the set temperature and the actual room temperature. The temperature is regulated while dehumidifying through repeatedly turning on/off of the COOLING operation on or off, or by turning the FAN only operation on or off.
Start
Ensure the unit is plugged in and power is available.
The OPERATION indicator on the display panel of the indoor unit starts flashing.
1 ON/OFF Button
Press this button to turn the air conditioner on. The
temperature indicator on the indoor unit display lights up.
2 MODE Button
Press to select DEHUMIDIFY.
3 CONTROL Buttons
Set the desired temperature (normally, set between
21°C to 28°C

When you select the FAN operating mode the air conditioner will recirculate the indoor air.
1 ON/OFF Button
Press this button to turn the air conditioner on. The
temperature indicator on the indoor unit display lights up.
2 MODE Button
Press to select FAN.
3 FAN Button
Press to select the desired fan speed at: Auto, Low,
Medium and High. The default fan speed is Auto.
Cooling and heating operation
Setting the clock
Start
Ensure the unit is plugged in and power is available.
The OPERATION indicator on the display panel of the indoor unit starts flashing
1 ON/OFF Button
Press this button to turn the air conditioner on. The
temperature indicator on the indoor display unit lights up.
2 MODE Button
Press to select to COOL or HEAT (where applicable).
3 CONTROL Buttons
Set the desired temperature (normally, set between
21°C to 28°C.
4 FAN
Press to select the desired fan speed at AUTO, LOW, MEDIUM and HIGH. The default fan speed is AUTO.


Before you start operating the air conditioner, set the clock on the remote control using the following instructions. The clock panel on the remote control will display the time regardless of whether the air conditioner is in operation or not.
After batteries are inserted in the remote control, 1200 will display and begin to flash.
1CONTROLbuttons
Set the desired time by pressing the CONTROL buttons:
A Forward Backward
Each time you press the buttons the time will move
Timer settings
Timer-On Operation
- Press the TIMER-ON button.
800 will flash on the display of the remote control the very first time the TIMER-ON operation is used. With all subsequent uses, the last set time will flash.
2 Set the desired time by pressing the CONTROL buttons: A Forward Backward
Each time you press the buttons, the time will move forward or backward by 1 minute. Holding the button down will scroll more rapidly through the time display.
- Point the remote control to the indoor unit, confirm the set time by pressing the TIMER-OFF button.
① symbol will stay on the remote control's display. Check that the Timer indicator on the display panel of indoor unit is illuminated.
Cancelling the Settings
Point the remote control at the indoor unit and press the TIMER-OFF button. Make sure the symbol ⏻ on the remote control is turned off.
i tips and information
- The timer function set by the remote control depends on the clock time. Check that the clock on the remote control is set correctly in order to prevent error.
- The effective operation time set by the remote control is limited to 24 hours.
Examples of Timer Settings
Timer-On Operation (Timer Start Operation)
This function is recommended when you want the unit to be turned on automatically before returning home. The air condition will automatically start occurring at the next time
Timer-Off Operation (Timer Stop Operation)
This function is recommended when you want the unit to be turned off automatically (e.g. bedtime). The air conditioner will automatically stop operating at the set time. Example: It is 6:00 PM and you want the air conditioner to turn off at 11:55 PM.
- Press the TIMER-OFF button.
B 800 will flash on the display of the remote control the very first time the TIMER-ON operation is used. With all subsequent uses, the last set time will flash.
2 Set the desired time by pressing repeatedly or holding down the CONTROL buttons until 23:55 shows in the display of the remote control.

3 Confirm the set time by pointing the remote control at the indoor unit and pressing the TIMER-ON button again.
① symbol will stay on the remote control's display. The Timer indicator on the display panel of indoor unit will be illuminated.
Combined Timer
Timer-On → Timer-Off
(Off Start Stop operation)
This function is recommended when you want to turn the air conditioner on before waking up and turn it off after leaving the house.
Example: It is 10-00 PM and you want to start the air
Economy (Eco) operation
6 Confirm the set time by pointing the remote control at the indoor unit and pressing the TIMER-ON button again.
① symbol will stay on the remote control display and the function is activated.
Timer-Off → Timer-On
This function is recommended when you want to turn the air conditioner off after going to bed and start it again before waking up in the morning or returning home.
Example: It is 8:00 AM and you want to stop the air conditioner at 9:30AM and restart at 6:00PM.
- Press the TIMER-OFF button.
2 Set the desired time by pressing repeatedly or holding down the Control buttons until 09:30 shows in the display of the remote control.

3 Confirm the set time by pointing the remote control at the indoor unit and pressing the TIMER-OFF button again
4 Press the TIMER-ON button.
5. Set the desired time by pressing repeatedly or holding down the Control buttons until 18:00 shows in the display of the remote control.


Press ECO button in COOL or HEAT (if applicable) mode, the air conditioner will automatically increase (in COOL mode) or decrease (in HEAT mode) 1°C per hour for 2 hours. The set temperature will be steady for the next 5 hours then the unit will stop.
This function saves energy and is recommended for maintaining a comfortable sleeping temperature.
Cooling

Heating

I FEEL function
When the I FEEL function is activated, the remote control
How to use the indoor unit
Additional options
1 Smart restart function
The air conditioner automatically resumes the previous settings after a power failure.
2 Removable panel
The front panel of indoor unit can be easily removed for cleaning and maintenance.
3 Self diagnosis and auto protection
This air conditioner can detect malfunctions, showing the diagnosis on the display of the indoor unit with an error code. The air conditioner will change operation automatically for self-protection.
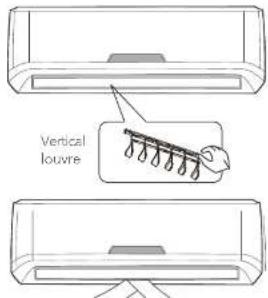
Airflow direction control
- Adjusting the air flow correctly can prevent discomfort or uneven room temperatures.
- Adjust the horizontal louvres with the remote control.
• Adjust the vertical louvres manually.
natural_image
Illustration of a handheld device with a screen and control buttons (no text or symbols)
To adjust the horizontal (left/right) airflow direction manually
• Always perform these adjustments while the unit is turned off as fingers coming into contact with the fan may be injured.
- Adjust the vertical louvres manually by means of the Left/Right lever of the vertical louvre arm.
Emergency operation
When the remote control is lost or fails to operate, please use the manual switch on the indoor unit. The air conditioner will operate in AUTO mode and the temperature setting or fan speed cannot be changed.

- Press the Manual Control button to enter AUTO mode. The air conditioner will select the mode COOL, HEAT (heat pump model only) and FAN automatically according to the room temperature for reaching the best comfort.
- Press the Manual Control button again to turn the air.
Operating Temperature
| Operating temperature ranges | ||
| Indoor side DB/WB°C | Outdoor side DB/WB°C | |
| Maximum Cooling 32/23 43/26 | ||
| Minimum Cooling 21/15 21/- | ||
| Maximum Heating 27/- 24/18 | ||
| Minimum Heating 20/- -7/8 | ||
The operating temperature range (outdoor temperature) for cooling only model is 21°C-43°C, for reverse cycle (heat pump) models is -7°C-43°C.
If the air conditioner is used outside of the above conditions, certain control features may come into operation and cause the unit to function abnormally.
Optimal Operation
To achieve optimal performance, please note:
- Adjust the airflow direction so that it is not aimed directly at people or pets.
- Adjust the temperature to achieve the highest comfort level. Do not adjust the unit to excessive temperature levels.
- Close doors and windows when using COOL or HEAT mode, otherwise, product performance will be reduced.
- Use the Timer-On and Timer-Off buttons on the remote control to select the desired time for start-up and shut-down.
- Do not place any object close to the air inlets or outlets,
Maintenance Cleaning the filters
The following maintenance operations must be performed regularly.
| Item | Maintenance operations | Recommended frequency |
| Air filters Clean | Every month or more often if necessary | |
| Air freshening filter | Change/replace a new one | Every 4 months |
| Unit casing Clean | Every month or more often if necessary | |
| Water tray and evacuation piping | Clean and check for obstructions | Each season before start up* |
| Indoor/outdoor coils Clean | Each season before start up* |
• This operation must be performed by qualified personnel only.
! warning
Stop the air conditioner and disconnect the power supply before cleaning.
Indoor unit and remote control cleaning
- Use a dry cloth to wipe the indoor unit and remote control.
- A cloth dampered with cold water may be used on the indoor unit if it is extremely dirty.
- The front panel of the indoor unit can be removed
A clogged air filter reduces the cooling efficiency of this unit. Please clean the filter every month or more often if necessary.
1 Lift the front panel of the indoor unit until it stops with full support of the bracket.
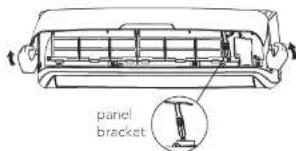
- Hold the dust filter handle and lift it up slightly to take it out of the filter holder.

3 Pull the dust filter downwards out of the indoor unit

4 The healthy air freshening filters (if applicable) like Active carbon filter / BIO filter / Vitamin C filter / Silver ion filter are fixed on the dust filter.
Remove the healthy air filters from the support frame of the dust filter.
Clean the healthy air filters at least every three (3) months and replace every 6 months.
Clean with vacuum cleaner if possible.

5 Install the healthy air filters back in position.
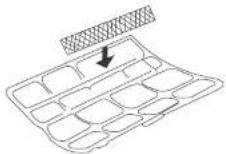
6 Install the upper portion of the dust filters back into the unit, taking care that the left and right edges line up correctly and place dust filters into position.

General maintenance
If the air conditioner is not going to be used for a long period of time:
- Operate in FAN only mode for 3-4 hours to allow the unit to completely dry out.
- Switch off the unit and pull out the power plug.
- Remove the batteries from the remote control.
- The outdoor unit requires periodic maintenance and cleaning. Do not attempt to do this yourself. Contact your dealer or service technician.
Checks before operation
- Check that the wiring is not broken or disconnected
- Check that the dust filter is installed.
- Check if the air outlet or inlet is blocked if the air conditioner has not been used for a long time.
! warning
Do not touch the metal parts of the unit when removing the filter. Injuries can occur when handling sharp metal edges.
Do not use water to clean inside the air conditioner. Exposure to water can destroy the insulation, leading to possible electric shock.
When cleaning the unit, first make sure that the power and circuit breaker are turned off.
Operating tips
The following events may occur during normal operation.
1 Protection of the air conditioner
Compressor protection
• The compressor will not restart for 3 minutes after it stops.
Anti-freezing
- If the unit is operating in COOL mode in a low ambient temperature, frost may be formed on the heat exchanger. When the indoor heat exchanger temperature decreases below 0°C, the compressor will stop operation to protect the unit.
Defrosting
- Frost may form on the outdoor unit in heating mode when the outdoor temperature is low but humidity is high, resulting in low heating efficiency.
When this occurs, the air conditioner will stop heating and start defrosting automatically. The defrosting time may vary from 3 to 12 minutes.
During defrosting, the fan motors of the indoor unit and outdoor unit will stop. The indoor indicator flashes "H1" and the outdoor unit may emit a vapour. This is not a malfunction. After defrosting is finished, the heating operation will resume automatically.
Anti-cold air
- In HEAT mode, the indoor fan will not operate for up to 5 minutes if the indoor heat exchanger does not reach a minimum temperature for the following reasons:
1 Heating operation has just started.
2 Auto defrosting is just finished.
3 Heating at a low temperature.
This is in order to prevent cold air being blown into the
Noises coming from the air conditioner
- You may hear a low hissing sound when the compressor is running or has just stopped running. This is the sound of the refrigerant flowing or coming to a stop.
- You also may hear a low "squeak" sound when the compressor is running or just stopped running. This is caused by heat expansion and cold contraction of the plastic parts in the unit when the temperature is changing.
- A noise may be heard due to louvre restoring to its original position when power is first turned on.
Dust is blown out from the indoor unit
- This is a normal condition when the air conditioner has not been used for a long time or during first use of the unit.
A peculiar smell comes out from the indoor unit
- This is caused by the indoor unit giving off smells permeated from building material, furniture or smoke.
The air conditioner turns to FAN only mode from COOL or HEAT mode
- When the indoor temperature reaches the setting value, the compressor will stop automatically, and the air conditioner turns to FAN mode.
The compressor will start again when the indoor temperature rises in COOL mode or falls in HEAT mode to the set point.
Condensation
- Water droplets are likely to form at the air outlet if cooling or drying for a long time when the relative humidity is more than 80% (with doors and windows open).
Set the vertical louse to its maximum angle (to the floor)
Troubleshooting
The air conditioner is not user serviceable. Incorrect repair may cause electric shock or fire.
Please contact an authorised service centre for professional repair.

warning
If one of the following situations occur, immediately stop the air conditioner, disconnect the power, and contact the authorised service centre.
- If an error code appears on the display window of the indoor unit.
- Power indicator or other indicators flash rapidly and this flashing cannot be stopped by disconnecting the power and then connecting it again.
- Fuse blows frequently or circuit breaker often trips.
• Water or other liquid is splashed into the unit.
• Water is leaking from the unit.
• There is a harsh sound during operation
• Strong odours are emitted during operation.
• Power cord and power plug are overheating.
• Other abnormal situations.
The pressure in the refrigeration system is low and could result in the unit breaking down.
Ask a certified installer to adjust the pressure.
If the trouble has not been corrected, please contact a local dealer or the nearest customer service centre. Be sure to
inform them of the detailed malfunctions and unit model.
| Problem Possible cause | Solution | |
| The unit does not start | Power cut Wait for power to be restored | |
| The unit may have become unplugged Check that the plug is securely in wall receptacle | ||
| Fuse may have blown Replace the fuse | ||
| Voltage is too high or too low Have a Certified Electrician test the voltage | ||
| Batteries in remote control may have been exhausted | Replace the batteries | |
| The Time you have set with timer is incorrect Wait or cancel timer setting | ||
| The unit does not cool or heat (if applicable) the room very well while air | Inappropriate temperature setting | Set the temperature correctly. For details please refer to "Using Remote Control" section |
| Air filter is blocked Clean the air filter | ||
| Doors or windows are open Close the doors and windows | ||
| Air shield can list of window measurements with | ||
Troubleshooting
Please check the following prior to contacting your Electrolux Service Centre.
| Problem Cause | |
| The unit does not operate | The unit does not operate if it is turned on immediately after it is turned off. This is to protect the unit compressor. Please wait for about 3 minutes before turning the unit on again. |
| Odours are emitted | Some odours may be emitted from the indoor unit. This is the result of room smells (such as furniture, tobacco, etc) which have been taken into the unit.Consult your authorised service centre for cleaning if the odours persist. |
| "Water flowing" noise | The switching noise like water flowing is the refrigerant flowing inside the unit. |
| Mist is emitted in COOL mode | During cooling operation, a thin mist may be seen emitted from the indoor unit due to high room temperature and humidity. After a period of time, the mist will disappear as the room temperature and humidity decrease. |
| Cracking noise | This is the sound of friction caused by expansion and/or contraction of panel or other parts due to the change of temperature. |
| The unit cannot be started up | • Is the power cut off?• Is the power plug loose?• Is the circuit protection device trapped off?• Is voltage higher or lower? (tested by professionals)• Is the TIMER correctly need?• Are the batteries exhausted? |
| Cooling/Heating effect is poor | • Is the temperature setting appropriate?• Is the air inlet/outlet blocked?• Is the filter dirty?• Is the door or window open?• Is low fan spend set?• Are there heat sources in the room? |
| Water leakage of indoor unit | • The humidity is high.• Condensing water overflows.• Drain hose is loose or obstructed. |
| Water leakage of outdoor unit | • During cooling operation, water condenses around the pipes and connection joints.• During defrosting operation, thawed water flows out.• During heating operation, water on the heat exchanger drips out. |
Notes
Notes

Electrolux Warranty
FOR SALES IN AUSTRALIA AND NEW ZEALAND
APPLIANCE: KELVINATOR SPLIT SYSTEM AIR CONDITIONER
This document sets out the terms and conditions of the product warranties for Electrolux Appliances. It is an important document. Please keep it with your proof of purchase documents in a safe place for future reference should you require service for your Appliance.
- In this warranty:
(a) 'acceptable quality' as referred to in clause 10 of this warranty has the same meaning referred to in the ACL;
(b) 'ACL' means Schedule 2 to the Competition and Consumer Act 2010;
(c) 'Appliance' means any Electrolux product purchased by you and accompanied by this document;
(d) 'ASC' means Electrolux authorised service centres;
(e) 'Electrolux' means Electrolux Home Products Pty Ltd of 163 O'Rordan Street, Mascot NSW 2020, ABN 51 004 782 341 in respect of Appliances purchased in Australia and Electrolux (NZ) Limited (collectively 'Electrolux') of 3-5 Nail Burgess Road, Mount Wellington, In respect of Appliances purchased in New Zealand;
(i) 'major failure' as referred to in clause 10 of this warranty has the same meaning referred to in the ACL and includes a situation when an Appliance cannot be repaired or it is uneconomic for Electrolux, at its discretion, to repair an Appliance during the Warranty Period:
(i) 'Warranty Period' means the Appliance is warranted against manufacturing defects in Australia and New Zealand for the period of 60 months, subject to this warranty and to the customer meeting the Warranty Condition.
(h) 'Warranty Condition' means:
(i) evidence by the customer that the Appliance was installed by a licensed air conditioner installer in Australia and in accordance with Electrolux installation guidelines as set out in the installation manual;
(i) the Appliance rating is correct for the size and thermal characteristics of the room;
(ii) the Appliance has been regularly maintained in accordance with Electrolux guidelines set out in the user manual;
(IV) the Appliance is designed for providing human comfort and should be used under ambient conditions as set out in the product specifications and general air quality conditions.
(i) 'you' means the purchaser of the Appliance not having purchased the Appliance for re-sale, and 'your' has a corresponding meaning.
- This warranty only applies to Appliances purchased and used in Australia or New Zealand in normal domestic applications and is in addition to (and does not exclude, restrict, or modify in any way) any non-exlcutable statutory
In all instances, unless the Appliance is transported by Electrolux or an Electrolux authorised representative, the Appliance is transported at the owner's cost and risk while in transit to and from Electrolux or its ASC.
-
Proof of purchase is required before you can make a claim under this warranty.
-
You may not make a claim under this warranty unless the defect claimed is due to faulty or defective parts or workmanship. Electrolux is not liable in the following situations (which are not exhaustive):
(a) the Appliance is damaged by:
(i) accident
(1) misuse or abuse, including failure to properly maintain or service
(iii) normal wear and tear
(iv) power surges, electrical storm damage or incorrect power supply
(V) incomplete or improper installation
(VI) Incorrect, improper or inappropriate operation
(vii) insect or vermin infestation
(VII) failure to comply with any additional instructions supplied with the Appliance;
(b) the Appliance is modified without authority from Electrolux in writing;
(c) the Appliance's serial number or warranty seal has been removed or defaced;
(d) the Appliance was serviced or repaired by anyone other than Electrolux, an authorised repairer or ASC.
-
This warranty, the contract to which it relates and the relationship between you and Electrolux are governed by the law applicable where the Appliance was purchased. Where the Appliance was purchased in New Zealand for commercial purposes the Consumer Guarantee Act does not apply.
-
To the extent permitted by law and subject to your non-excludable statutory rights and warranties, Electrolux excludes all warranties and liabilities (other than as contained in this document) including liability for any loss or damage whether direct or indirect arising from your purchase, use or non use of the Appliance.
-
For Appliances and services provided by Electrolux in Australia, the Appliances come with a guarantee of Electrolux that cannot be excluded under the ACL. You are entitled to a replacement or refund for a major failure and for compensation for any other reasonably foreseeable loss or damage. You are also entitled to have the Appliance repaired or replaced if the Appliance fails to be of acceptable quality and the failure does not amount to a major failure. The benefits to you given by this warranty are in addition to your other rights and remedies under a law in relation to the Appliances or services to which the warranty relies.
Kelvinator

If you'd like further information about Kelvinator appliances, please visit your retailer, phone or email our Customer Care team or visit our website.
telephone: 1300 363 640
fax: 1800 350 067
email: customercare@electrolux.com.au
web: www.kelvinator.com.au
Kelvinator. We are part of the Electrolux family.
Share more of our thinking at www.electrolux.com.au
- Congratulations Contents
- environmental tip
- Information on disposal for users
- refrigerant warning
- Safety Instructions
- Product description
- How to operate the air conditioner
- Maintenance
- Operating tips
- Warranty
- How to properly use and maintain your air conditioner
- warning
- caution
- Prior to Operation
- Usage
- Cleaning and maintenance
- Indoor display unit
- Remote control
- Replacing batteries
- Remote control display indicator
- LOW MEDIUM HIGH
- First use
- i tips and information
- Using the remote control
- Automatic operation
- Stop
- Dehumidifying operation Fan operation
- Start
- Cooling and heating operation
- Setting the clock
- Timer settings
- Timer-On Operation
- Cancelling the Settings
- Examples of Timer Settings
- Combined Timer
- Economy (Eco) operation
- I FEEL function
- How to use the indoor unit
- Additional options
- Airflow direction control
- Emergency operation
- Operating Temperature
- Optimal Operation
- Maintenance Cleaning the filters
- ! warning
- Indoor unit and remote control cleaning
- General maintenance
- Checks before operation
- Protection of the air conditioner
- Compressor protection
- Anti-freezing
- Defrosting
- Anti-cold air
- Noises coming from the air conditioner
- Dust is blown out from the indoor unit
- A peculiar smell comes out from the indoor unit
- The air conditioner turns to FAN only mode from COOL or HEAT mode
- Condensation
- Troubleshooting
- Kelvinator
Brand : KELVINATOR
Model : KSV80HRE
Category : Air Conditioning