DP-6200 - Uncategorized Yamato - Free user manual and instructions
Find the device manual for free DP-6200 Yamato in PDF.


| Product Type | Digital Printer/Label Maker |
| Brand | Yamato |
| Model | DP-6200 |
| Dimensions (W x D x H) | Approx. 300 x 200 x 150 mm |
| Weight | Approx. 1.5 kg |
| Power Supply | AC 100-240V, 50/60Hz |
| Power Consumption | Max 30W (printing) |
| Print Technology | Thermal Transfer / Direct Thermal |
| Print Resolution | 203 dpi |
| Max Print Width | 108 mm |
| Max Print Speed | Up to 100 mm/s |
| Media Types | Labels, tags, receipt paper |
| Interface | USB 2.0, Ethernet (optional) |
| Display | LCD, 2-line, 16 characters |
| Memory | 256 KB flash, 256 KB RAM |
| Supported Barcodes | Code 128, Code 39, EAN-13, UPC-A, etc. |
| Operating Temperature | 5°C to 40°C |
| Humidity Range | 20% to 80% (non-condensing) |
| Included Accessories | USB cable, power adapter, quick start guide |
| Intended Use | Indoor, office or light industrial |
Frequently Asked Questions - DP-6200 Yamato
User questions about DP-6200 Yamato
0 question about this device. Answer the ones you know or ask your own.
Ask a new question about this device
Download the instructions for your Uncategorized in PDF format for free! Find your manual DP-6200 - Yamato and take your electronic device back in hand. On this page are published all the documents necessary for the use of your device. DP-6200 by Yamato.
USER MANUAL DP-6200 Yamato
DP-6200 Operation Manual
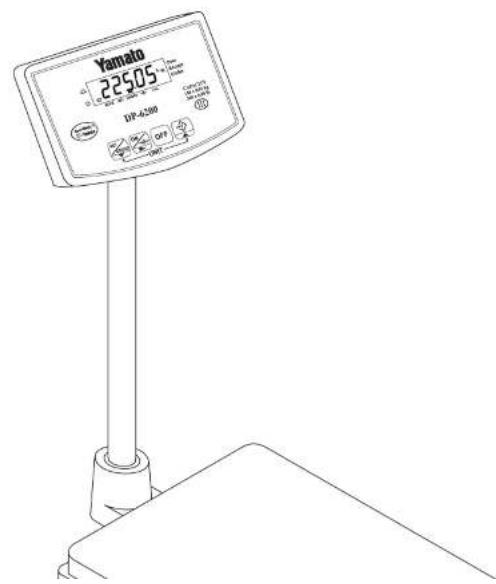
DP-6200 Operation Manual
Table of Contents
I. Safety Instructions 1
II. Description 2
Name and Function of Parts
Specifications
III. Setup 5
Assembling the Scale
Adjusting the Indicator Angle
Leveling the Scale
Installing Batteries or AC Adaptor
IV. Directions for Use 7
Turning the Scale On and Off
Checking the Battery Level
Zero the Display
Switching Units
The CAL Indicator
Setting the Over/Under Indicator
V. Weighing 9
Using the Over/Under Indicator
Gross Weighing
Net Weighing
DP-6200 Operation Manual
I Safety Instructions
Before using the scale, carefully read, understand, and follow the "Safety Instructions" described in this manual. Observe the advice given in the "Directions for Use" section to ensure proper operation. Keep this operation manual handy for reference.
To prevent injury
1) DO NOT SHOCK LOAD the scale, Never step on or sit on the scale. Not only will the scale be damaged, but you may also be injured.
2) DO NOT APPLY DIRECT WATER SPRAY to the scale if it is powered by an AC adaptor!! You could receive a shock. The scale is not washdown unless the AC jack is plugged with a water-tight seal.
4) Do not operate the scale if there is smoke or a burnt smell coming from the scale. Remove the batteries or unplug the AC adaptor immediately. After making sure that there is no danger, consult your dealer. Never try to repair the scale by yourself.
5) This scale is not an explosion-proof model. Do not use the scale in an atmosphere containing flammable gases or explosive fumes. A fire or an explosion can result.
6) Place the item to be weighed in the center of the platform. Items placed on the edge of the platform may fall off and cause injury.
7) When weighing a heavy, large or unbalanced item, make sure the item is stable on the platform, otherwise an accident may occur.
8) When carrying or moving the scale, be sure to hold it by the bottom of the weighing platform with both hands. If you hold it by the column, the column may become detached causing the scale to fall. This will damage the scale and could cause injury.
9) Do not insert your finger into the gap or holes in the scale. You may be injured.
10) The DP-6200 uses a liquid crystal display. If the LCD breaks and the liquid leaks from the LCD, do not touch it with your fingers. The liquid is toxic if ingested. Be especially careful around small children.
To prevent damage to the scale
1) Do not push the indicator or keys with sharp objects. They may break or puncture the switch membrane panel.
2) Use the specified power supply and choose a suitable environment. If you do not, the weight readings may be inaccurate and the scale may be damaged.
3) The scale is a sensitive weighing instrument, avoid physical shocks. If you drop something on the scale, overload the scale, step on the platform, or drop the scale, the scale may be damaged and lose accuracy.
4) If the scale becomes dirty, wipe it with a soft cloth. For stubborn stains, apply a little neutral detergent and then wipe the scale with a dry cloth. Do not use thinner, benzene, hot water, or chemical agents, all of which can cause deformation, discoloration, or deterioration of the scale.
5) Never remove the case. The fine adjustment section may be damaged and you may be injured by sharp edges on the
DP-6200 Operation Manual
| II Description | |
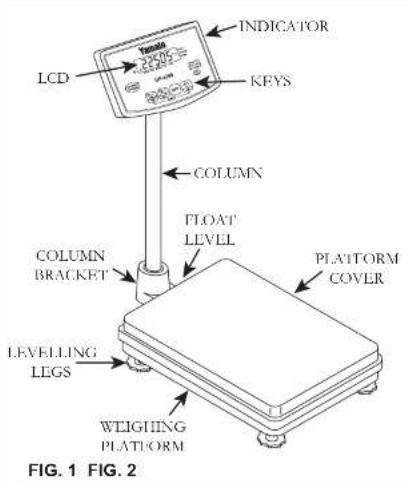
| Name and Function of Parts | |
 |  |
 | |
DP-6200 Operation Manual
II Description
Name and Function of Parts
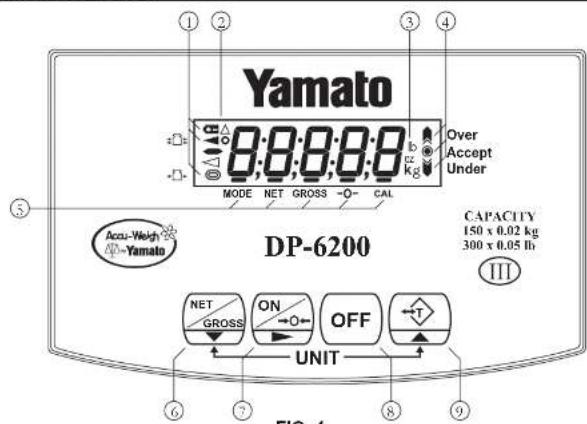
FIG. 4
1) Low Battery Indicator Time to replace the batteries.
Hold indicator The scale is in Hold mode (not legal-for-trade).
Test/Cal Mode Indicator The scale is in Test or Calibration Mode.
Stable Indicator Indicates the weight indication is stabilized.
2) LCD Display Shows all scale indications and weight readings.
3) Unit Indication KG, LB, OZ and LB-OZ (not legal-for-trade).
DP-6200 Operation Manual
II Description
Specifications
Weighing system: Strain-gauge load cell
Platform: 13.8" x 19.7" (350 x 500 mm), stainless steel
Weight display: Single face display
Type: 7 segment LCD
Character size, etc.: 0.5" (12 mm) (W) x 0.9" (23 mm) (H), 5 digits
Optional equipment: Batteries, AC adaptor, RS-232C communications (the scale is not
washdown with the RS-232C option installed.)
Power supply: 9V DC - six "D" size batteries or AC adaptor (the scale is not
washdown unless the AC jack is plugged with a water-tight seal).
Consumption: 0.12 W (max.)
Battery life: 600 hours of continuous use with alkaline batteries. Using the RS-
232C option will substantially reduce battery life.
Operating temperature: 23°F to 95°F (-5°C to 35°C)
Operating humidity: 25% to 85% RH
Waterproof classification: Complies with NEMA 4 (washdown) when the AC jack is plugged with a water-tight seal. Is not washdown with the RS-232C option installed.
Capacities and divisions:
| Kilogram | Pound | Ounce | Pound-Ounce* |
| 30 kg x 0.01 kg | 60 lb x 0.02 | 960 oz x 0.5 oz | 60 lb x 0.5 oz |
| 60 kg x 0.02 kg | 150 lb x 0.05 lb | 2400 oz x 1 oz | 150 lb x 1 oz |
| 150 kg x 0.05 kg | 300 lb x 0.1 lb | 4800 oz x 2 oz | 300 lb x 2 oz |
* Combined units, such as pound-ounce, are not legal-for-trade
DP-6200 Operation Manual
III Setup
Assembling the Scale
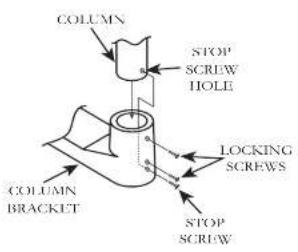
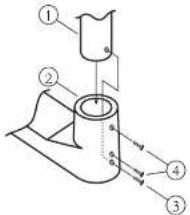
Seat the column (1) firmly in the column bracket (2). It may be necessary to loosen the stop (3) and locking (4) screws. Align the stop screw hole in the column with the stop screw and tighten. The stop screw must enter the stop screw hole for a secure column mount. Tighten the two locking screws.
Adjusting the Indicator Angle
Loosen the indicator set screw, rotate the indicator right or left to the desired position and tighten the set screw. Press the angle adjustment button, tilt the indicator up or down to the desired position and release the button.
Leveling the Scale
Place the scale on a flat and level surface. There is a bubble level indicator next to the column bracket. The bubble should be in the center of the circle. Adjust the trim by turning the feet in or out to lower or raise the corner of the scale the foot is on. When the scale is level, lighten the lock nuts on each foot and recheck the level. If the scale is not level, the readings may not be accurate.
Bubble Level
DP-6200 Operation Manual
III Setup
Connecting the RS-232C Option
With the DP-6200 and the device it is being connected to both powered off, connect the DB-9 (F) end of the cable to the DB-9 (M) port on the back of the indicator housing. Connect the other end of the cable to the serial port on the other device (i.e. - computer, printer, etc.) To connect the DP-6200 to a PC, use a DB-9 (F/F) straight thru cable. Do NOT use a null modem cable. Power on the DP-6200 and configure User Parameters 03 to 08 as desired for your serial communications (see section VII User Parameters.) Configure the connecting device to the same serial settings according to the manufacturer's instructions. The default RS-232 settings for the DP-6200 are:
| Keyword | Default Function Description | ||
| 03 001 | Communication Specified commands acceptable | ||
| 04 000 | Communication Data Net weight (1 batch) | ||
| 05 000 | Communication Speed 9600 bps | ||
| 06 000 | Character Length | 8 bits | |
| 07 002 | Parity | Even | |
| 08 001 | Stop Bit Length | 2 bits | |
\*\*\* WARNING \*\*\*
RS-232 is not a hot swappable connection. Connecting or disconnecting the serial cable while the DP-6200 and/or the serial device are powered on can damage the circuits of either device. Power off both the DP-6200 and the serial device before connecting or disconnecting the serial cable.
DP-6200 Operation Manual
IV Directions for Use
Turning the Scale On and Off
Remove everything from the platform surface and press the √-0- key. The display will briefly flash all segments of the LCD. After approximately 5 seconds, the display will stop flashing and automatically set to zero. Press the OFF key to turn the scale off.
Checking the Battery Level
Turn the scale on and push the key while the display is flashing. The remaining battery life will be displayed. The more "o"s that appear, the more life there is left in the batteries. After a few seconds, the scale will start normally.
Zero the Display
The scale will zero automatically when turned on. If a value is displayed when the platform is empty, push the ON key to zero the display. The maximum zero range during power up is approximately ± 1.9% of the scale capacity.
Switching Units
To switch between kilogram and either pound, ounce or pound-ounce units, press and hold the key and press the key.
The CAL Indicator
If the CAL indicator is visible, the DP-6200 has not been configured to be sealed for legal for trade use. System parameter 40 must be set to 003 for all legal for trade applications. For instructions on changing the system parameters, please see section IV Changing the Scale Setup in the DP-6200
DP-6200 Operation Manual
IV Directions for Use
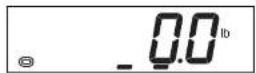
Setting the Over/Under Indicator
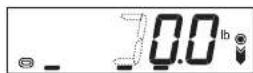
1) Place the scale in normal weighing mode.


2) Press and hold the ▶ key and push the ▼ key (yellow tabs).

3) Press the ▶ key to select the digit you want to change. The flashing underscore will advance to the right.
4) Press the up and down arrows to select the desired value.
5) Repeat steps 3 and 4 until all digits are set. All values below this setpoint will be indicated as under.


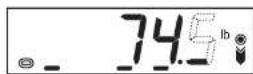
6) Press and hold the ▶ key and push the ▽ key (yellow tabs). This saves the lower limit and moves to the upper limit.

7) Press the ▶ key to select the digit you want to change.
DP-6200 Operation Manual
V Weighing
Using the Over/Under Indicator
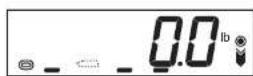
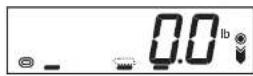
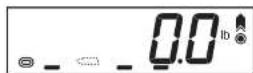
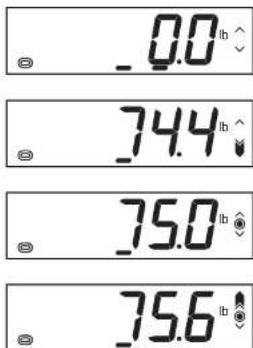
1) Begin with no load on the scale, the display reading zero, and the center of zero and stable indicators lit. The small up and down arrowheads on the right side of the display indicate that the over and under setpoints, respectively, have been set.
2) Place the item(s) to be weighed on the scale platform. If the item weighs less than the under setpoint, the large under arrow will appear.
3) If the item weighs from the lower setpoint to the upper setpoint, inclusive, the accept bullseye will appear.
4) If the item weighs more than the upper setpoint, the large over arrow will appear.
Gross Weighing
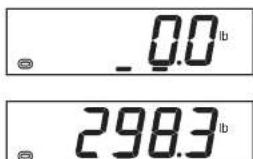
1) Begin with no load on the scale, the display reading zero, and the center of zero, stable and gross indicators lit.
2) Place the item(s) to weighed on the scale platform and wait for stable indication. The weight displayed will be the gross weight.
DP-6200 Operation Manual
V Weighing
Net Weighing (cont'd.)
4) To display the gross weight, press the ☑ key. The gross indicator will light and the weight displayed will be the gross weight of the item(s) and the container. Press the ☑ key again to return to the net weight.
5) To return to gross weighing mode, remove all items from the scale platform and press the key.
Batching
1) Begin with no load on the scale, the display reading zero, and the center of zero, stable and gross indicators lit.
2) Place an empty container on the scale platform and press the key. The weight of the container will be deducted automatically, the display will read zero and the net indicator will light.
3) Place the first item in the container until the desired weight is reached.
298.3 ^lb
0.0 lb
0.0 lb
186.5lb
DP-6200 Operation Manual
| VI Troubleshooting and Error Messages | |
| The scale can check various functions automatically. When a problem is detected, the following messages will be displayed. If you take the steps described below but the problem is not fixed, the scale needs to be calibrated or serviced by a qualified scale technician. Please contact your scale dealer. | |
| The batteries are running low. When the batteries are running low, this indicator will come on. Replace all of the batteries with new ones. | 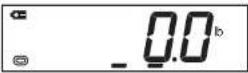 |
| The batteries are low. When the batteries are too low for accurate operation, this indication will be displayed and the scale may automatically power off. The batteries must be replaced to use the scale. | 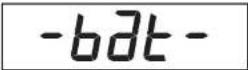 |
| Weight out of range high. When the weighed value is 6 or more divisions heavier than the scale's capacity this message will be displayed. Remove the excess weight from the scale platform. | 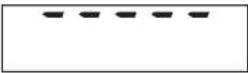 |
| Weight out of range low. When the weighed value is a few divisions below calibrated zero, this message will be displayed. It is usually displayed when the platform is removed or has something wedged under it. Place the platform on the platform support or remove any objects wedged under the platform | 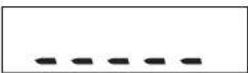 |
| Initial error on startup, high. When the initial weight is heavier than the permissible zeroing range and the [IMAGE] key is pressed, this message will be displayed. Remove whatever is | 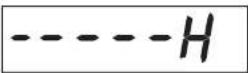 |
DP-6200 Operation Manual
VI Troubleshooting and Error Messages
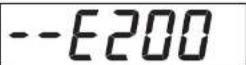
Electronic circuitry error. When the operating circuitry registers an error, this message may be displayed. Turn the power off and then on again.
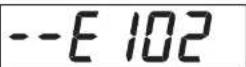
Electromagnetic disturbance error. This indication is occasionally displayed due to strong static electricity and/or electromagnetic disturbance. Move the scale away from any sources of electromagnetic radiation (motors, generators, power cables, transmitters, etc.) Turn the power off and then on again. If an AC adapter is being used, try using a different power circuit or AC adapter.
DP-6200 Operation Manual
VII User Parameters
Setting the User Parameters
The DP-6200 user parameters can be changed in user setup mode to disable or change the duration of the auto-off function, to set which units (metric or standard) the scale defaults to when turned on, to set the RS-232C communications parameters and to set the display hold. The User Parameter Table lists the nine keywords, their function and their default values.
If the DP-6200 is configured for legal for trade use (system parameter 40 set to 003, CAL indicator is off), then keypad entry to user paramater mode will be disabled. When the DP-6200 is configured for legal for trade use, then entry to all parameter setting modes requires the scale to be opened and the test jumpers to be shorted to enter Test Mode.
System parameter 40 must be set to 000 or 002 to enable keypad entry to user parameter mode. This will also activate the CAL annunciator, indicating that the scale is not properly configured for legal for trade operation. For more information on setting system parameters and entering Test Mode, please see the DP-6200 Technical Manual.
1) With the scale on, press the ON→0 and ↑T keys to enter the user setup mode. The scale will indicate a keyword followed by a value.
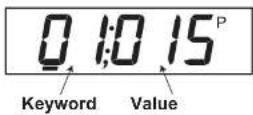
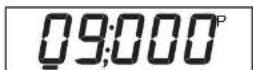
2) To select the desired keyword, use the keys as follows:

- increase keyword by one

- decrease keyword by one
DP-6200 Operation Manual
VII User Parameters
3) To change a parameter value, use the keys as follows:
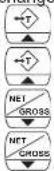
- increase value by one

- increase value by ten

- decrease value by one

- decrease value by ten
Example: To select the metric mode as default on power up,


key to change the value from 000 to 001.
4) Press ON to save changes and and advance to the next keyword. Press OFF to exit the user setup mode.
09:00 1
DP-6200 Operation Manual
| VII User Parameters | |||
| User Parameter Table | |||
| Key Std Word | Function Value | Description | |
| 01 015 | Auto-off timer 000 | Disables auto-off.001-240 | Number of minutes unused to activate auto-off. |
| 02 000 | Display hold | timer 000 No display hold for changes less than four divisions.001-030 Display hold duration, in seconds, for changes less than four divisions.031 No display hold. | |
| 03 001 | Communication 000 No serial interface.001 Specified commands acceptable.002 Sends zero detection.003 Sends motion detection.004 Sends continuously. | ||
| 04 000 | Communication data | 000 Net weight (1 batch)001 Net weight, tare weight, gross weight (1 batch)002 Net weight, tare weight, gross weight (3 batches)003 Display content (1 batch)004 Serial printer format (1 batch) | |
| 05 000 | Communication speed | 000 9600 bps001 600 bps002 1200 bps003 2400 bps004 4800 bps005 9600 bps006 19200 bps007 38400 bps | |
| 06 000 | Character length 000 8 bits001 7 bits | ||
| 07 002 | Parity 000 Non | ||
- DP-6200 Operation Manual
- Table of Contents
- I Safety Instructions
- To prevent injury
- To prevent damage to the scale
- II Description
- Name and Function of Parts
- Specifications
- III Setup
- Assembling the Scale
- Adjusting the Indicator Angle
- Leveling the Scale
- Connecting the RS-232C Option
- \*\*\* WARNING \*\*\*
- IV Directions for Use
- Turning the Scale On and Off
- Checking the Battery Level
- Zero the Display
- Switching Units
- The CAL Indicator
- Setting the Over/Under Indicator
- V Weighing
- Using the Over/Under Indicator
- Gross Weighing
- Net Weighing (cont'd.)
- Batching
- VI Troubleshooting and Error Messages
- VII User Parameters
- Setting the User Parameters
Brand : Yamato
Model : DP-6200
Category : Uncategorized