
NW930 - Computer accessory TARGUS - Free user manual and instructions
Find the device manual for free NW930 TARGUS in PDF.


| Product Type | Notebook Stand |
| Brand | Targus |
| Model | NW930 |
| Material | Aluminum and ABS plastic |
| Dimensions (open) | 10.2 x 8.7 x 0.6 inches (259 x 221 x 15 mm) |
| Weight | 1.1 lbs (0.5 kg) |
| Color | Silver |
| Foldable | Yes |
| Compatibility | Laptops up to 15.6 inches |
| Adjustable Height | Yes, multiple tilt angles |
| Cooling | Ventilated design for air circulation |
| Non-slip Pads | Yes, on base and laptop rest |
| Cable Management | Integrated cable organizer |
| Power Supply | None (passive stand) |
| Maintenance | Wipe with a dry, lint-free cloth |
| Safety | Stable base with slip-resistant feet |
| Spare Parts | Not available (integrated design) |
| Repairability | Not user-serviceable |
| Warranty | Limited Lifetime Warranty |
| Package Contents | Stand, user manual |
Frequently Asked Questions - NW930 TARGUS
User questions about NW930 TARGUS
0 question about this device. Answer the ones you know or ask your own.
Ask a new question about this device
Download the instructions for your Computer accessory in PDF format for free! Find your manual NW930 - TARGUS and take your electronic device back in hand. On this page are published all the documents necessary for the use of your device. NW930 by TARGUS.
USER MANUAL NW930 TARGUS
Contents
External Drive....4
Introduction....4
System Requirements....5
Connecting the External Drive to Your Computer 6
Installing the Driver Software....7
Windows® 98 Operating System....7
Windows® Me Operating System 8
Windows® 2000/XP Operating System 8
Windows NT® 4.0 Operating System 9
Using the External Drive .... 10
Inserting and Removing a Disc....10
Playing Audio CDs 11
Reading Data DVDs 11
Playing DVD Movies....12
Hot Swapping....12
Writing and Rewriting CDs (Model NW930 Only)....12
Things to Remember....13
Operating Hints 13
Safety Measures 13
Specifications....14
Troubleshooting.... 16
Solving General Problems 16
Changing the Drive Letter Assignment 17
Writing and Rewriting Problems 17
Technical Support 17
Product Registration 19
Warranty 19
Regulatory Compliance 19
FCC (Federal Communications Commission)....19
External Drive
Introduction
Thank you for purchasing a Targus Noteworthy External Drive. Light weight and ultra-portable, the external DVD-ROM and Combo DVD/CD-RW-ROM drives run off your computer's power supply, eliminating the need for an AC adapter. After installing an external drive, you can use it at any time by inserting the PC Card cable into your computer's Type II PC Card slot.
This user's guide describes how to connect the external drive to your computer, install default and enhanced performance drivers (Windows® 2000 operating system only) and how to operate the drive for the following models:
• NW930 Combo DVD/CD-RW-ROM Drive
• NWDVD03 - DVD-ROM Drive
In addition to this user's guide, depending on the model that you purchased, this package contains:
NW930 NWDVD03
- Combo DVD/CD-RW-ROM drive - DVD-ROM drive
- PC Card cable - PC Card cable
• AC adapter • AC adapter
- Driver software CD • Driver software CD
• DVD Player CD • DVD Player CD
• Easy CD Creator™ software CD-ROM
System Requirements
To use the external drive, your computer must meet the following hardware requirements and run one of the operating systems listed in the table below.
Hardware Operating System
- PC with a® Pentium® processor or equivalent and a hard disk drive
- Wind & @Me/2000/XP
- 64 MB RAM or higher, depending on the operating system
- Windows NT ^ 4.0
• PCMCIA Card interface (type II or higher) - CD-ROM drive
NOTES: The external drive receives its power from your computer's PC Card slot, which must be in full compliance with PC Card specifications and supply a minimum of 5V/1A of power.
For the DVD movie playback feature to work, you must have a DVD-ROM decoder installed in your computer or a player application, such as DVDExpress or Power DVD, set up under the Windows® 98/Me/2000/XP operating system. DVD movie playback is not available with the Windows NT ® operating system.
Connecting the External Drive to Your Computer
1 Turn off your computer and any devices connected to it.
2 Attach the connector end of the PC Card cable to the external drive's PC Card cable port.
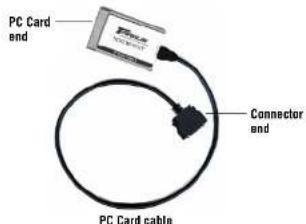
3 Plug the PC Card end of the cable into any Type II PC Card slot on your computer.
4 Connect the supplied AC adapter to the AC power jack on the external drive and plug the adapter into a working power outlet.
NOTE: For the best results, charge the drive using the supplied AC adapter for at least one hour before connecting it to your computer and installing the driver software.
You can now begin installing the driver software.
Installing the Driver Software
After connecting the external drive to your computer, you can now install the driver software for your operating system.

NOTES: Installing the external drive may change internal drive letter assignments. To keep the original drive letter assignments, you can change the letter for the combo drive. See "Changing the Drive Letter Assignment" on page 17.
To write and rewrite CDs, if you are running the Windows ^19 98/Me/2000 operating systems, you must also install the supplied CD-writing software. See "Writing and Rewriting CDs (Model MW930 Only)" on page 12.
Windows® 98 Operating System
1 Turn on your computer.
2 Insert the driver software CD into your computer's CD-ROM drive.
The Add New Hardware Wizard appears.
3 C | Nekt. c k
The locate driver screen appears.
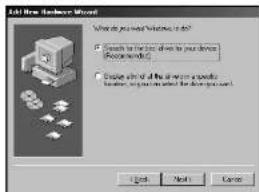
Sample New Hardware Wizard locate driver screen
4 Select "Search for the best driver for your device (Recommended)," and click Next. The search driver location screen appears.
5 Select "CD-ROM drive" and click Next.
6 C Next to confirm selection of the driver.
The ready to install screen appears.
7 C | Next. c k
The driver loads from the CD-ROM.
8 C I Finish to complete the driver installation.
You are now ready to begin using your external drive.
Windows\* Me Operating System
1 Turn on your computer.
2 Insert the driver software CD into your computer's CD-ROM drive.
The Add New Hardware Wizard appears.
3 Select "Automatic search for a better driver (Recommended)" and click Next.
The driver loads from the CD-ROM.
4 C 1 Finish to complete the driver installation.
You are now ready to begin using your external drive.
Windows® 2000/XP Operating System
Installing the Default Driver
Installing the default driver from your operating system allows for instant access to your drive and
uses fewer resources, such as memory and drive space, allowing your computer to run more
efficiently
To install the default drivers:
1 Turn on your computer.
2 Insert the driver software CD into your computer's CD-ROM drive.
The Found New Hardware Wizard appears and the operating system installs the drivers
automatically. No other steps are necessary.
You are now ready to begin using your external drive.
Upgrading to the Enhanced Performance Driver
Upgrading to the enhanced driver from the supplied CID enables you to view DVD movies and increases DVD performance. To do this:
1 From your desktop, right-click the My Computer icon and click Properties.
2 Select the Hardware tab and click Device Manager.
3 L. o IDE ATA/ATAPI Controller and click + to expand the list.
4 Double-click PCMCIA IDE/ATAPI Controller, select the Driver tab and click Update Driver. The Upgrade Device Driver Wizard appears.
5 C 1Neck. c k
The Install Hardware Device Drivers screen appears.
6 Select "Search for a suitable driver from my device (recommended)" and click Next. The Locate Driver Files screen appears.
7 Insert the driver software CD into your computer's CD-ROM drive, select CD-ROM drives so that a check mark appears in the check box and click Next.
8 C | Next again to confirm selection of the driver.
9 If the Digital Signature Not Found dialoguc box appears, click Yes to continue.
The enhanced performance driver loads from the CD-ROM.
10 Click Finish to complete the driver installation.
Windows NT ^00 4.0 Operating System
1 Turn on your computer.
2 Insert the driver software CD into your computer's CD-ROM drive.
3 C: I Start. Run then enter D:\DOS_NT40\SETUP.EXE (where D: is the path of your CD-ROM
drive) and click OK
The driver software agreement screen appears.
4 C 1OK to accept the agreement and continue setup, or Cancel to exit setup. If you choose to continue setup, the Choose Destination Location screen appears.
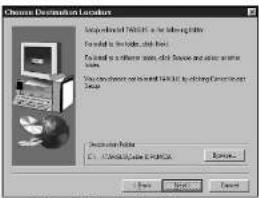
Choose Destination Location screen
5 Click Next to keep "C:\Program Files\TARGUS\Cable II PCMCIA" as the destination folder. To copy the files into a different directory, click Browse and locate the desired path name, then click Continue to confirm the new destination folder. To complete the installation, follow the onscreen instructions. You are now ready to begin using your external drive.
Using the External Drive
Inserting and Removing a Disc
1 Turn on your computer and press the eject button to open the tray.
2 To insert a disc, hold it by the edges and place it in the tray with the readable (plain) side down. If you are using a high capacity disc, place the side of the disc you want the drive to read facing down. Then, gently press down on the disc until it snaps into place.
3 To remove a disc, grasp it by the edges and gently pull up until the disc is released.
CAUTION: Avoid touching the readable (plain) side(s) of a disc. Touching the readable side of the disc may cause read errors, poor performance or failed operation.
4 Close the media tray by gently pushing it until it "clicks" into place.
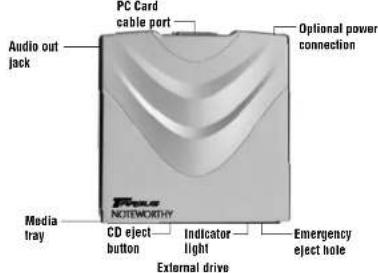
Removing a Disc Using Emergency Eject
If you need to remove a disc when there is no power to your computer, you can open the tray manually. To do this, gently insert a slim, straight object, such as a bent-open paper clip, into the emergency eject hole until you feel some resistance. Remove the paper clip and carefully open the tray by hand.
Playing Audio CDs
You can play audio CDs on your external drive by using the CD Player application included in the
operating system. To hear the audio, you can either:
- Connect headphones or external speakers to the Audio Out jack on the external drive.
- Connect an audio cable from the Audio Out jack on the external drive to the Line In jack on your computer.
Reading Data DVDs
You can read data DVDs without installing any special software.
Playing DVD Movies
To play back movies, you must have a DVD-ROM decoder installed in your computer or have a DVD player application set up under the Windows® operating system.

NOTE: The Windows NT® operating system does not support DVD movie playback.
Hot Swapping
You can connect and disconnect the external drive while the computer is running. To attach the external drive, just insert the PC Card cable into your computer's Type II PC Card slot.

NOTE: If you are running the Windows NT ^® operating system, you must have the Softex Card Executive 2.0 card and socket services software installed on your computer in order to hot swap the drive.
To remove the PC Card cable while the computer is turned on:
1 Double-click the PC Card icon in the system tray or click Start, Settings, and Control Panel.
2 Double-click PC Card (PCMCIA).
3 Highlight the PC Card cable and click Stop
The message "You may now safely remove the card" appears.
4 Remove the PC Card cable from your computer.
Writing and Rewriting CDs (Model NW930 Only)
To write and rewrite CDs, if you are running the Windows® 98/Me/2000/XP operating systems, you must install writing software. For your convenience, the Easy CD Creator software is supplied. To install the Easy CD Creator software:
1 Insert the supplied CD-ROM into the external drive (or your computer's internal CD-ROM drive if it has one).
2 If setup does not begin automatically, click Start, then Run, and enter D'setup.oxa (where D: is the path of the CD-ROM or combo drive) and then click OK.
3 Follow the on-screen instructions to complete installation.
For more information on how to use the Easy CD Creator application, refer to the documentation on the CD-ROM.
Things to Remember
Operating Hints
- Use the emergency eject mechanism only if the external drive is not connected to your computer or if the computer's battery is flat and there is no power available for the eject button. Excessive use of the emergency eject mechanism may damage it and cause the mechanism to stop working.
- Never press the eject button while the drive is accessing a disc.
- The external drive operates in either an upright or horizontal position. To prevent possible damage, avoid changing the drive's position while it is in use.
- Avoid using or storing the external drive in extreme temperatures. The environmental specifications while operating are 50-113 F (10-45 C).
- After transporting the external drive, allow it to reach room temperature before using it.

CAUTION: Changes in temperature during transport, particularly from a cool to a warmer temperature, can cause condensation to form in the drive and may result in operating problems. Allowing the drive to reach room temperature helps to prevent this.
- Avoid using the external drive in dusty or humid surroundings.
- A short delay is normal before the external drive reads an audio CD, CD-ROM, DVD or DVD-ROM.

WARNING: Never clean the external drive with a commercially available CD or CD-ROM cleaning set as doing so may cause damage to the drive.
Safety Measures
- Any attempt to disassemble, adjust or repair the external drive may result in exposure to laser light or other safety hazards.
- This is a Class I Laser Product. This product complies with all applicable safety standards, DIIIS Rules 21 CFR Chapter 1, Sub chapter J. The laser beam generated is totally enclosed during all modes of normal operation, and no hazardous laser light is emitted from the drive.
Specifications

NOTE: Specifications are for all models unless indicated otherwise.
Models
NW930
NWDVD03
Dimensions
Length: 6.81 inches (17.3 cm)
Width: 5.35 inches (13.6 cm)
Height: 0.78 inches (2 cm)
Weight
0.9 pounds (450 g)
Connection to the computer
PC Card cable via PC Card slot (PCMCIA, Type II)
Voltage
DC + 5V = 5%
Media Formats
The external drive reads formats according to the following CD (compact disc) and DVD (digital
versatile disc) standards:
• M S - D @operating system data • Kodak Photo CDs (single- and • CDI, CDI-Ready, CD-Midi,
CDs (High Sierra, Mode 1 & Mode multi-session) CD-R, CD-RW, CD Plus
2 complying with ISO 9660)
• Data-CDs (Joliet) • UDF (Universal Disc Format) • CD-TEXT, CD-EXTRA
• CD-ROM XA • Audio CDs • Video CDs
• Mixed Mode CDs • CD-Digital Audio • DVD-ROM, DVD-R
- Enhanced CD • i-trax CD • DVD-Video
Storage Capacity
| DVD-ROM type description DVD-5 | DVD-9 DVD-10 | DVD-18 | ||
| Capacity according to the manufacturer | 4.7 GB | 8.5 GB | 9.4 GB | 17 GB |
| Actual capacity | 4.38 GB | 7.96 GB | 8.75 GB | 15.92 GB |
| Written sides | 1 | 1 | 2 | 2 |
| Layers per side (referring to the information-carrying layer of the disc) | 1 | 2 | 1 | 2 |
Data Buffer
NW930 DVD: 512 kB
: 128 kB
NWDVD03 512 kB
Access Time
NW930 CD-Mode: 24x CD speed (3,600 KB/s)
8x CD-R write speed
4x CD-RW overwrite speed
DVD-Mode: 8x DVD speed (8,112 KB/s)
NWDVD03 CD-Mode: 24x CD speed (3,600 KB/s)
DVD-Mode: 8x DVD speed (10.816 KB/s)
Supported Disc Sizes (Model NW930 Only)
Write: 12 cm (4.72 inches)
Read: 8 cm (3.15 inches)
12 cm (4.72 inches)
Disc Write Modes (Model NW930 Only)
DAO, SAO, TAO
Variable and Fixed Packet Writing
Troubleshooting
To view Frequently Asked Questions and download Driver updates, visit our Web site at: http://www.targus.com/support
Solving General Problems
If the external drive is not functioning:
- Verify that your system meets the hardware requirements. See "System Requirements" on page 5.
- Check that the drive is turned on and getting power.
- Make sure the cable is firmly attached to the drive and that the PC Card is fully inserted into the PC Card slot of your computer.
- Remove the driver software and reinstall it. To do this:
1 Insert the driver software CD into your computer's CD-ROM drive.
2 From your desktop, double-click the My Computer icon.
3 Select the CD-ROM drive, double-click the DriverRemove.exe file and follow the on-screen
instructions.
If there is no sound when using the external drive, check that:
• The disc you are using is an audio disc or supplies audio output.
• The headphones/speakers are correctly connected.
• The cable is in good condition.
• The volume is turned up.
• The audio software is installed.
Changing the Drive Letter Assignment
The following steps describe how to change the drive letter for the external drive under the Windows ^4
95/98/Me operating system.
1 C 1 Start, Settings, and then Control Panel.
2 C | System and select the Device Manager tab.
3 Click either DVD-ROM or Drive, then external drive
4 C | Properties,hen Settings.
The current drive letter assignment and the reserved drive letters appear.
5 Under Reserved Drive Letter enter the letter you want to represent the external drive.
6 C 10K c k

NOTE: You must restart your computer for the changes to take effect.
Writing and Rewriting Problems
If the external drive is not writing or rewriting data properly, try the following:
- Reduce the write/rewrite speed from 4x to 2x.
- Disable all Advanced Power Management (APM) functions.
- Remove or disable all Terminate and Stay Resident (TSR) programs, such as your anti-virus program.
- Detragment your hard disk drive.
Technical Support
In the unlikely event that you encounter a problem with your Targus accessory, please contact our technical support team at:
Email: techsupport@targus.com
Internet: http://www.targus.com/support.asp
Have the following information available:
- The serial number of your external drive (located on the back of the drive).
• The name and model of your computer and details of its hardware specification
- The name and version number of your operating system and of the software that has the problem.
- A detailed description of the problem including exact error messages and when these errors occur.
• What you do to replicate the problem. - If this is a new problem, whether you have recently changed your system configuration and in what way.
Our knowledgeable staff is also available to answer your questions through one of the following telephone numbers.
US
Monday through Friday, 8:00 a.m. (08:00) to 8:00 p.m. (20:00) Eastern time: 800-283-6325
Canada
Monday through Friday, 9:00 a.m. (09:00) to 5:00 p.m. (17:00) Eastern time: 888-827-4877
Europe
Belgium +32 0 02-717-2451
Denmark +45 0 35-25-8751
France +33 0 1-64-53-9151
Germany |49 0 21-16-579-1151
Italy +39 0 24-827-1151
Netherlands 131 0 53-484-9470
Spain +34 0 91-745-6221
Sweden +46 0 8-751-4058
Switzerland | 41 0 1-212-0007
United Kingdom +44 0 20-7744-0330
Eastern Europe & others -31 0 53-484-9479
Product Registration
For more efficient customer service and to activate the product's warranty, Targus recommends that you register your Targus accessory shortly after purchasing it.
To register your Targus accessory, go to: http://www.targus.com/registration.asp
You will need to provide your full name, email address, phone number, and company information (if applicable).
Warranty
Targus warrants this product to be free from defects in materials and workmanship for one year. If your Targus accessory is found to be defective within that time, we will promptly repair or replace it. This warranty does not cover accidental damage, wear and tear, or consequential or incidental loss. Under no conditions is Targus liable for loss of, or damage to, a computer; nor loss of, or damage to, programs, records, or data; nor any consequential or incidental damage, nor any Targus has been informed of their own position. This warranty does not affect any structure rights.
Warranty Registration at http://www.tarpus.com/registration.asp
Regulatory Compliance
This device complies with Part 15 of the FCC Rules. Operation is subject to the following two conditions: (1) This device may not cause harmful interference, and (2) This device must accept any interference received, including interference that may cause undesired operation.
FCC (Federal Communications Commission)
Declaration of Conformity
This equipment has been tested and found to comply with the limits of a Class B digital device, pursuant to Part 15 of the FCC Rules, and RS 210 Regulations (Canada). These limits are designed to provide reasonable protection against harmful interference in a residential installation. This equipment generates, uses, and can radiate radio frequency energy and if not installed and used in accordance with the instructions, may cause harmful interference to radio communications. However, there is no guarantee that interference will not occur in a particular installation.
If this equipment does cause harmful interference to radio or television reception, which can be determined by turning the equipment off and on, the user is encouraged to try to correct the interference by one or more of the following measures:
- Reorient or relocate the receiving antenna
• Increase the separation between the equipment and receiver
- Move the computer away from the receiver
- Connect the equipment into an outlet on a circuit different from that to which the receiver is connected
- Consult the dealer or an experienced radio technician for help
MS-DOS. Windows and Windows 'N' are registered trademarks of Microsoft Corporation. Easy CI Creator is a trademark of Phoenix, Inc. Meclamardica is a trademark of National Semiconductor Corp. All other trademarks are the property of their respective owners.
- Contents
- External Drive
- Introduction
- NW930 NWDVD03
- System Requirements
- Hardware Operating System
- Connecting the External Drive to Your Computer
- Installing the Driver Software
- Windows® 98 Operating System
- Windows\* Me Operating System
- Windows® 2000/XP Operating System
- Installing the Default Driver
- Upgrading to the Enhanced Performance Driver
- Windows NT 00 4.0 Operating System
- Using the External Drive
- Inserting and Removing a Disc
- Playing Audio CDs
- Reading Data DVDs
- Playing DVD Movies
- Hot Swapping
- Writing and Rewriting CDs (Model NW930 Only)
- Things to Remember
- Operating Hints
- Safety Measures
- Specifications
- Models
- Dimensions
- Weight
- Connection to the computer
- Voltage
- Media Formats
- Data Buffer
- Access Time
- Supported Disc Sizes (Model NW930 Only)
- Troubleshooting
- Solving General Problems
- Changing the Drive Letter Assignment
- Writing and Rewriting Problems
- Technical Support
- Product Registration
- Warranty
- Regulatory Compliance
- FCC (Federal Communications Commission)
- Declaration of Conformity
Brand : TARGUS
Model : NW930
Category : Computer accessory