P 6122-14 - Uncategorized Pentagram - Free user manual and instructions
Find the device manual for free P 6122-14 Pentagram in PDF.


| Product Type | Wi-Fi USB Adapter |
| Model | P 6122-14 |
| Brand | Pentagram |
| Standards | IEEE 802.11g, IEEE 802.11b |
| Max Data Rate | 54 Mbps |
| Frequency Band | 2.4 GHz (2.4–2.4835 GHz) |
| Interface | USB 2.0 |
| Chipset | Realtek RTL8187B |
| Security | WEP 64/128-bit, WPA/WPA2, WPA-PSK/WPA2-PSK, 802.1X |
| Antenna | Internal |
| LED Indicator | LNK/ACT (blinks when searching/transferring) |
| Dimensions | Approx. 75 x 25 x 10 mm |
| Weight | Approx. 20 g |
| Power | USB bus powered (5V, up to 500 mA) |
| Operating Temperature | 0°C to 40°C |
| Storage Temperature | -20°C to 70°C |
| Operating Humidity | 10% to 85% (non-condensing) |
| Storage Humidity | 5% to 90% (non-condensing) |
| Supported Operating Systems | Windows 98SE, ME, 2000, XP |
| Package Contents | USB adapter, CD with drivers and manual, Quick Installation Guide |
| Operating Modes | Infrastructure (Access Point/Router) and Ad-Hoc (Peer-to-Peer) |
| Maintenance | Clean with a dry, soft cloth; avoid liquids. No user-serviceable parts. |
| Safety Precautions | Do not expose to moisture or extreme temperatures; use in dry environment. |
| Spare Parts / Repairability | Not available; contact reseller for support. |
Frequently Asked Questions - P 6122-14 Pentagram
User questions about P 6122-14 Pentagram
0 question about this device. Answer the ones you know or ask your own.
Ask a new question about this device
Download the instructions for your Uncategorized in PDF format for free! Find your manual P 6122-14 - Pentagram and take your electronic device back in hand. On this page are published all the documents necessary for the use of your device. P 6122-14 by Pentagram.
USER MANUAL P 6122-14 Pentagram
Installation and Operation Manual
PENTAGRAM horNET
Wi-Fi PCI (P6121-L6)
Wi-Fi USB (P6122-14)

PENTAGRAM
THE PERFECT SIMPLICITY
PENTAGRAM horNET P6121-L6 / P6122-14
INDEX
INTRODUCTION 5
PACKAGE CONTENTS....5
OVERVIEW 6
PCI ADAPTER 6
USB ADAPTER....6
INSTALL WIRELESS ADAPTER....7
PCI ADAPTER....7
USB ADAPTER....7
INSTALL DRIVER AND UTILITY 8
WIRELESS ADAPTER CONFIGURATION 8
CONFIGURATION APPLICATION 9
[STATION] GENERAL TAB 10
[STATION] PROFILE TAB 11
[STATION] AVAILABLE NETWORK TAB 14
[STATION] ADVANCED TAB....15
[STATION] STATUS TAB 16
[STATION] STATISTICS TAB....17
[ACCESS POINT] GENERAL TAB 18
[ACCESS POINT] ADVANCED TAB....20
[ACCESS POINT] STATISTICS TAB....21
[ACCESS POINT] SOFT AP TAB 22
TROUBLESHOOTING....23
SPECIFICATION 24
PENTAGRAM horNET P6121-L6 / P6122-14
Introduction
Pentagram horNET wireless network adapter is a powerful 32-bit PCI/USB Adapter that installs quickly and easily into PCs. The Adapter can be used in Ad-Hoc mode to connect directly with other cards for peer-to-peer file sharing or in Infrastructure mode to connect with a wireless access point or router for access to the Internet in your office or home network.
Wireless access point or found for access to the internet in your office of home networks. Pentagram horNET wireless PCI/USB adapter connects you with 802.11g networks at up to a 54M/lps. And for added versatility, it can also interoperate with all the up to 11Mbps 802.11b products found in homes, businesses, and public wireless hotspots around the country. And in either mode, your wireless communications are protected by industrial-strength WPA, so your data stays secure.
This Manual contains information on how to install and configure your wireless adapter to get your network started accessing the Internet. It will guide you through the correct configuration steps to get your device up and running.
Package Contents
- Wireless PCI (P 6121-L6) / USB (P 6122-14) adapter
- Manual, Drivers and Utility on CD
- Quick Installation Guide
- External RP-SMA antenna (only for PCI version)
If any of the above items are missing, please contact your reseller.
Before you begin
You must have at least the following:
- A laptop computer/desktop PC with an available 32-bit PCI/USB slot
- At least a 300MHz processor and 32MB of memory
• Windows 98SE, ME, 2000, XP
• A CD-ROM Drive
- PCI/USB controller properly installed and working in the laptop computer
- An 802.11g or 802.11b Access Point (for infrastructure Mode) or another 802.11g or 802.11b wireless adapter (for Ad-Hoc; Peer-to-Peer networking mode.)
PENTAGRAM horNET P6121-L6 / P6122-14
Overview
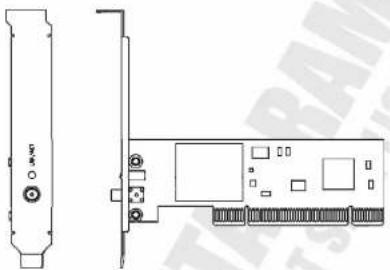
PCI adapter
natural_image
Technical line drawing of a computer RAM card with connector and drive slots (no text or symbols)The status LED indicators of the PCI wireless adapter are described in the following.
| LED | State | Action |
| LNK/ACT | Lit | Connected |
| LNK/ACT | Blinking | Searching for wireless network / Data transfer |
USB adapter

The status LED indicators of the PCI wireless adapter are described in the following.
| LED | State | Action |
| LNK/ACT | Blinking | Searching for wireless network / Data transfer |
PENTAGRAM horNET P6121-L6 / P6122-14
Install Wireless Adapter
PCI Adapter
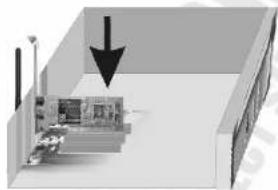
- Open your PC case and locate an available PCI on the motherboard.
- Slide the PCI Adapter into the PCI slot. Make sure that all of its pins are touching the slot's contacts. You may have to apply a bit of pressure to slide the adapter all the way in, after the adapter is firmly in place, secure its fastening Tab to your PC's chassis with a mounting screw. Then close your PC.
- Attach the external antenna to the adapter's antenna port.
- Power on the PC.
- If the Found New Hardware Wizard displays, click Cancel button and follow instructions in next section.
natural_image
3D diagram of a room interior with a wall-mounted device and a black arrow pointing to a component (no text or symbols)USB Adapter
- Power on your PC, let the operating system boot up completely, and log in as needed.
-
Hold the adapter and insert it into a USB slot.
-
If the Found New Hardware Wizard displays, click Cancel button and follow instructions in next section.

natural_image
Illustration of a laptop computer with visible keyboard and mouse (no text or symbols)PENTAGRAM horNET P6121-L6 / P6122-14
Install Driver and Utility
- Insert the driver and utility CD into the CD-ROM drive. The setup wizard will launch automatically (under Windows Vista, you may additionally need to select Run: Autorun.exe in the Autorun window). If the CD-ROM autorun feature is disabled, run Autorun.exe in the CD's root directory.

- Select Install, to start driver installation.
- Select the Installer language from the list and click Next >
- Click Next >, to install drivers and application.
- In some cases there is a need to restart computer after driver installation. Select Yes, I want to restart my computer now., to restart computer after installation or No, I will restart my computer later. if you plan to restart computer at later time.
- Click Finish, to complete installation process.
Wireless adapter configuration
A configuration application is installed with adapter drivers. The application's icon is displayed in the system tray (next to the clock), and its appearance depends on the adapter and/or connection status.

– adapter is not connected to computer.
- adapter is connected, but not ready.
– adapter is not connected to any wireless network or radio is turned off.
– adapter is connected to wireless network. Amount and color of bars depend on signal strength.
- adapter is working in Access Point mode.
PENTAGRAM horNET P6121-L6 / P6122-14
Configuration application
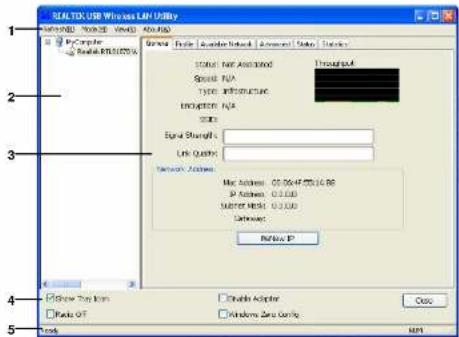
Configuration application window is divided into few main parts:
- Menu:
Refresh(R) – refreshes available adapters list.
Mode(M) – change of adapter work mode between wireless Station and Access Point.
View(V) – show or hide Status Bar(S).
About(A) – displays information about application.
-
Available adapters list – on this list all installed and supported wireless adapters are
-
Main panel - in this part of the application window you can find all options needed to configure adapter and wireless connection parameters. Tabs described in this manual are in this panel.
-
General options:
Show Tray Icon – when this option is enabled, application tray icon will be visible.
Disable Adapter – when this option is enabled, adapter selected in available adapters list is disabled.
Radio Off – when this option is enabled, adapter selected in available adapters list has disabled radio.
Windows Zero Config – when this option is enabled, adapters configuration is done via default system application
- Status bar – displays short info about adapter/connection state.
Below you can find descriptions of all tabs available in main panel of the application window.
PENTAGRAM horNET P6121-L6 / P6122-14
[Station] General Tab
This Tab allows you to check current state of active network connection.
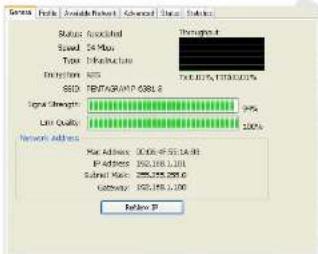
Status – status of wireless connection:
• Radio is Off – radio transmission is turned off.
- Not Associated – no wireless connection is established.
- Associated – wireless connection is established.
Throughput - current throughput of wireless network.
Speed - connection speed.
Type - type of active network:
- Ad hoc – point-point (peer-to-peer) connection with another wireless adapter.
• Infrastructure - connection with wireless network based on Access Point or wireless
router.
Encryption - encryption method used by connected network.
SSID - SSID of connected network.
Signal Strength – signal strength of connected network.
Link Quality – quality of connected network.
Network Address – information on adapter and connection IP settings:
- Mac Address - MAC address of adapter.
- IP Address – IP address of adapter acquired from DHCP server.
- Subnet Mask – subnet mask acquired from DHCP server.
- Gateway – IP address of default gateway acquired from DHCP server.
ReNew IP – renew all addresses from DHCP server.
PENTAGRAM horNET P6121-L6 / P6122-14
[Station] Profile Tab
This Tab allows you to create profiles for the most frequently used wireless networks. i.e. home network, company network or public hotspots. The profiles can be activated as required.
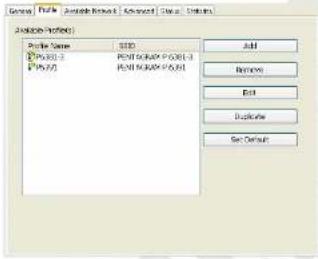
Available Profile(s) – list containing configured profiles. Profile name is in first column, and network SSID in second. Active connections icon has red circle.
Add - click. to open Wireless Network Properties window with new profile configuration.
Delete – click, to delete selected profile.
Edit – click, to open Wireless Network Properties Window with selected profile configuration.
Set Default – click, to set selected profile as default.
PENTAGRAM horNET P6121-L6 / P6122-14
Wireless Network Properties Window
This window allows you to configure network properties which will be stored in profile.
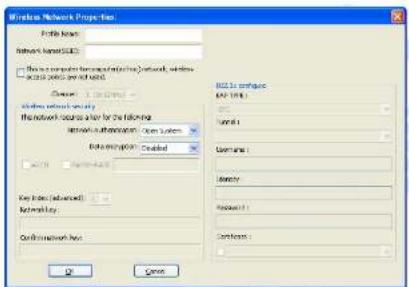
General options
Profile Name – enter a name to identify your profile.
SSID – enter a network Service Set Identifier (SSID). II SSID Broadcast function of AP is disabled, SSID must be entered by hand. SSID is case sensitive, which means that pentagram and Pentagram are two different networks.
This is a computer-to-computer(ad hoc)... - select this field if network you wish to connect to is a Ad Hoc type network (point-point (peer-to-peer) with another adapter without Access Point).
Channel – Select the channel to be used when establishing an Ad hoc network.
Wireless network security frame
This frame contains all Authentication and Encryption settings. All information can be obtained from wireless network administrator. Appearance of this frame depends on options selected from Network Authentication and Data encryption lists.
Authentication – method to authenticate wireless stations:
- Open System – with this method, every wireless station can request authentication. If open network uses WEP encryption, you may need to input WEP key in order to connect to this network.
- Shared – with this authentication, the station requesting authentication must provide a secret WEP key (which can be obtained from the network administrator) using a secure channel (independent of the 802.11 wireless communications channel).
- WPA PSK and WPA2 PSK – station requesting authentication must provide a WPA Preshared Key, AES or TKIP are used for encryption.
WPA 802.1x and WPA2 802.1x – IEEE 802.1x protocol is used for authentication and ΔES or TKIP for exception
PENTAGRAM horNET P6121-L6 / P6122-14
- WEP (Open System, Shared Key) – first and least safe method of securing wireless network.
- TKIP (WPA PSK, WPA2 PSK) – base data encryption algorithm in WPA and WPA2 standards.
- AES (WPA PSK, WPA2 PSK) – newest and safest data encryption algorithm used in wireless networks.
ASCII – if acquired WEP key is ASCII characters string (instead of hex), select this option and enter key in field on the right side of PASSPHRASE option.
PASSPHRASE – selecting this box allows you to enter passphrase, based on which proper WEP key will be generated. Passphrase can be acquired from wireless network administrator.
Key Length – length of key generated from passphrase.
Key Index (advanced) – select WEP key index which will be used.
Network key – enter encryption key for wireless network.
Confirm network key – reenter encryption key for wireless network.
802.1x configure frame
Settings in this frame allow to configure IEEE 802.1x protocol. All information can be obtained from wireless network administrator. Appearance of this frame depends on option selected from EAP TYPE list.
EAP TYPE – change EAP authentication method.
Tunnel Authentication – change tunnel authentication method.
Username – enter username for the EAP authentication
Identity – enter Identity for the EAP authentication
Password - enter Password for the EAP authentication.
Certificate – enable this option to use Client certificate for server authentication and then select certificate from drop-down list.
OK – closes profile configuration window and saves settings.
Cancel – closes profile configuration window without saving settings.
PENTAGRAM horNET P6121-L6 / P6122-14
[Station] Available Network Tab
This Tab enables searching for and connecting to active wireless networks.
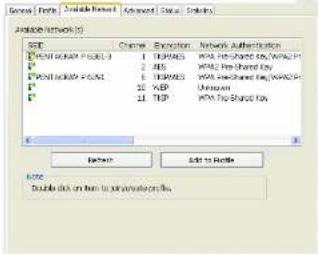
Column headers on the list means:
SSID - Service Set Identifier of network (network name)
Channel – channel (frequency), on which wireless network operates.
Encryption - encryption method used by wireless network
Network Authentication – authentication method used by wireless network.
Signal - wireless network signal strength.
Type - wireless network type: Infrastructure or Ad-hoc.
BSSID - Basic Service Set Identifier of network (MAC Address of the Access Point).
Supported Rate(s) – data rates supported by network.
Mode - wireless standard supported by network.
Refresh – click this button, to rescan for available wireless networks.
Add to Profile – click this button, to open Wireless Network Properties window in which you
can create a profile for selected network. You can find detailed information on profile configuration in previous section.
PENTAGRAM horNET P6121-L6 / P6122-14
[Station] Advanced Tab
This Tab can be used to change advanced wireless network adapter options.
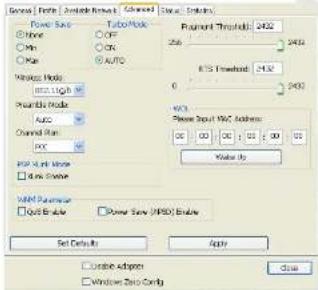
Power Save – select Power save mode. In some cases enabling power saving may result in problems with constant network reconnecting.
Turbo Mode – selecting this mode may accelerate frame transmission. Turbo mode may not be compatible with all network devices.
Wireless Mode – select wireless stations to which the adapter can connect: 802.11g/b (802.11b and 802.11g stations) or 802.11b (802.11b stations only).
Preamble mode – select preamble length (must be identical with network setting).
Channel Plan – select authority regulating radio broadcasting in your country or region. Item selected in this field determines the channels (frequencies) available. Using frequency from other country or region may be against the local law.
PSP XLink mode – select this option if you wish to use XLink Kai application with PSP (Playstation Portable).
WMM Parameter:
• QoS Enable – select this option to use packet prioritization.
• Power Save (APSD) Enable – select this option to use APSD power save mode.
Fragment Threshold - enter or use slider to set Fragment Threshold value. This is only required in some cases and you should receive correct value from network administrator.
RTS Threshold - enter or use slider to set RTS Threshold value. This is only required in some cases and you should receive correct value from network administrator.
WOL – allows to send wake-up frame to other network device, currently in Power saving mode. Enter MAC Address of this device and click Wake Up button, to sent wake-up frame.
Set Defaults – click this button, to revert all advanced settings to default values.
Apply - click this button, to apply changes.
PENTAGRAM horNET P6121-L6 / P6122-14
[Station] Status Tab
This Tab shows basic information on adapter and connection state.
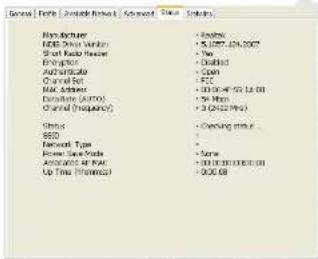
Manufacturer - manufacturer of adapter's processor unit.
NDIS Driver Version – driver version.
Short Radio Header – Info on radio header length.
Encryption – currently used encryption.
Channel Set – currently used channel set.
MAC Address - MAC address of ada
Data Rate (AUTO) – current data rate
Channel (Frequency) – currently used channel (frequency).
Status – state of wireless connection.
SSID - SSID of connected wireless network.
Network Type - type of connected wireless network.
Power Save Mode – currently used power saving mode.
Associated AP MAC - MAC address of connected Access Point.
Up Time (hh:mm:ss) – time since last adapter power up.
PENTAGRAM horNET P6121-L6 / P6122-14
[Station] Statistics Tab
This Tab shows transmit (Tx) and receive (Rx) statistics.
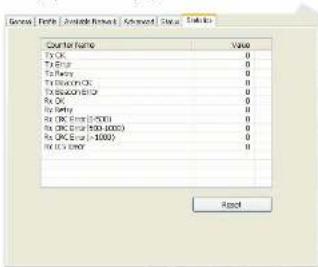
Tx OK – shows the number of frames transmitted without errors.
Tx Error - shows the number of frames transmitted with CRC errors.
Tx Retry - shows the number of frames transmitted successfully after retrying.
Tx Beacon OK - shows the number of Beacon frames transmitted without errors.
Tx Error - shows the number of Beacon frames transmitted with errors.
Rx OK - shows the number of frames received without errors
Rx Retry – shows the number of frames received successfully after retrying.
Rx CRC Error – shows the number of frames received with CRC errors.
Rx ICV Error – shows the number of frames received with ICV errors.
Reset - click this button to reset all statistics.
PENTAGRAM horNET P6121-L6 / P6122-14
[Access Point] General Tab
This Tab allows you to check current state of active network connection.
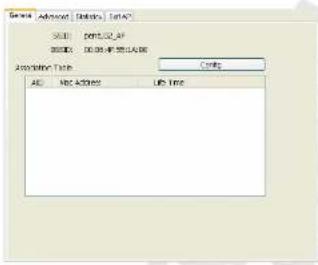
SSID - SSID of wireless network created by adapter.
BSSID – BSSID of wireless network created by adapter (adapter's MAC address).
Associacion Table – list of connected wireless stations:
- AID – identifier of connected wireless station.
• Mac Address – MAC address of connected wireless station.
Config – click this button, to open Wireless Network Properties window with configuration of wireless network created by adapter.
PENTAGRAM horNET P6121-L6 / P6122-14
Wireless Network Properties Window
This window allows you to configure created network properties.
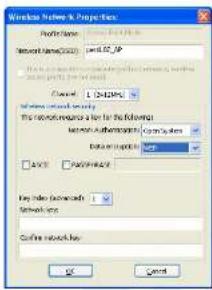
General options
Profile Name – not available in Access Point Mode.
Network Name(SSID) - enter SSID for created by adapter wireless network. This SSID will be
required in order to connect to this network.
This is a computer-to-computer(ad hoc)... - not available in Access Point Mode.
Channel – channel (frequency) on which wireless network will operate.
Wireless network security frame
This frame contains all Authentication and Encryption settings, required to connect to this network. Appearance of this frame depends on options selected from Network Authentication and Data encryption lists.
Authentication – method to authenticate wireless stations:
- Open System – with this method, every wireless station can request authentication. If open network uses WEP encryption, you may need to input WEP key in order to connect to this network.
- Shared – with this authentication, the station requesting authentication must provide a secret WEP key (which can be obtained from the network administrator) using a secure channel (independent of the 802.11 wireless communications channel).
- WPA PSK and WPA2 PSK – station requesting authentication must provide a WPA Preshared Key. AES or TKIP are used for encryption.
Data encryption – data encryption algorithm used by wireless network:
- Disabled (Open System) – network doesn't use encryption and any wireless station can
- connect to it. - WEP (Open System, Shared Key) – first and least safe method of securing wireless network.
PENTAGRAM horNET P6121-L6 : P6122-14
ASCII – select this option and enter key in field on the right side of PASSPHRASE option, if you want to use as key ASCII characters string (instead of hex). To connect to this network this method of key input will be required.
PASSPHRASE – selecting this box and enter passphrase, based on which proper WEP key will be generated. To connect to this network this method of key input will be required. Key Length – length of key generated from passphrase
Key Index (advanced) – select WEP key index which will be used.
Network key – enter encryption key for wireless network. Confirm network key – reenter encryption key for wireless network.
OK - closes configuration window and saves settings.
Cancel - closes configuration window without saving settings.
[Access Point] Advanced Tab
This Tab can be used to change advanced options for Access Point mode.
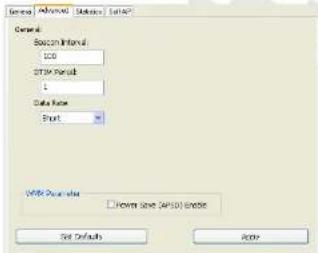
Beacon Interval – time interval in which beacon packets are sent.
DTIM Period – time period in which DTIM (Delivery Traffic Indication Message) packets are sent.
Data Rate – select preamble length (must be identical with network setting).
WMM Parameter:
• Power Save (APSD) Enable – select this option to use APSD power save mode.
Set Defaults – click this button, to revert all advanced settings to default values.
Apply - click this button, to apply changes.
PENTAGRAM horNET P6121-L6 / P6122-14
[Access Point] Statistics Tab
This Tab shows transmit (Tx) and receive (Rx) statistics.
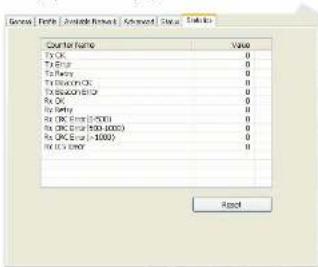
Tx OK – shows the number of frames transmitted without errors.
Tx Error - shows the number of frames transmitted with CRC errors.
Tx Retry – shows the number of frames transmitted successfully after retrying.
Tx Beacon OK - shows the number of Beacon frames transmitted without errors.
Tx Error - shows the number of Beacon frames transmitted with errors.
Rx OK - shows the number of frames received without errors
Rx Retry – shows the number of frames received successfully after retrying.
Rx CRC Error – shows the number of frames received with CRC errors.
Rx ICV Error – shows the number of frames received with ICV errors.
Reset - click this button to reset all statistics.
PENTAGRAM horNET P6121-L6 / P6122-14
[Access Point] Soft AP Tab
This Tab can be used to configure Internet Connection Sharing.
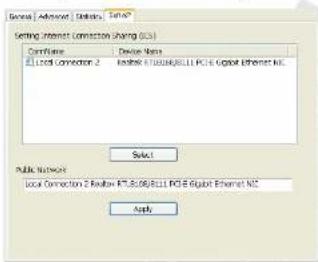
To share Internet connection to wireless stations connected to adapter's wireless network, select on list computer connection with access to the Internet, click on Select button, and then on Apply button. Internet Connection Sharing for selected connection will be automatically configured. Caution: This operation may also disable system Firewall for this connection.
Troubleshooting
This chapter provides solutions to problems that may occur during the installation and operation of the Wireless PCI/USB Adapter. Read the descriptions below to solve your problems.
1. The Wireless PCI/USB Adapter does not work properly.
• Reinsert the Wireless PCI/USB Adapter into your PC's PCI / USB slot.
- Right click on My Computer and select Properties. Select the device manager and click on the Network Adapter. You will find the Adapter if it is installed successfully. If you see the yellow exclamation mark, the resources are conflicting. You will see the status of the Adapter. If there is a yellow question mark, please check the following:
- Make sure that your PC has a free IRQ (Interrupt ReQuest, a hardware interrupt on a PC.)
- Make sure that you have inserted the right adapter and installed the proper driver. If the Adapter does not function after attempting the above steps, remove the adapter and do the following:
- Uninstall the driver software from your PC.
- Restart your PC and repeat the hardware and software installation as specified in this User Guide.
2. I cannot communicate with the other computers linked via Ethernet in the Infrastructure configuration.
- Make sure that the PC to which the Adapter is associated is powered on.
- Make sure that your Adapter is configured on the same channel and with the same security options as with the other computers in the Infrastructure configuration.
3. What should I do when the computer with the Adapter installed is unable to connect to the wireless network and/or the Internet?
- Check that the LED indicators for the broadband modem are indicating normal activity. If not, there may be a problem with the broadband connection.
- Check that the LED indicators on the wireless router are functioning properly. If not, check that the AC power and Ethernet cables are firmly connected.
- Check that the IP address, subnet mask, gateway, and DNS settings are correctly entered for the network.
- In Infrastructure mode, make sure the same Service Set Identifier (SSID) is specified on the settings for the wireless clients and access points.
- In Ad-Hoc mode, both wireless clients will need to have the same SSID. Please note that it might be necessary to set up one client to establish a BSS (Basic Service Set) and wait briefly before setting up other clients. This prevents several clients from trying to establish a BSS at the same time, which can result in multiple singular BSSs being established, rather than a single BSS with multiple clients associated to
- Check that the Network Connection for the wireless client is configured properly.
- If Security is enabled, make sure that the correct encryption keys are entered on both the Adapter and the access point.
PENTAGRAM horNET P6121-L6 / P6122-14
Specification
Standards: IEEE 802.11g, IEEE 802.11b
Chipset:
Realtek RTL8185L
USB: Realtek RTL8187B
Channels (in parenthesis Channel Set from configuration application):
11 (FCC, IC)
1 – 13 (ETSI, Spain, France, Israel)
1-14 (MKK, MKK 1, Tele
Frequencies: 2.4-2.4835GHz
Interface:
PCI/USB
Antenna: 3dBi / 18dBm, (for PCI version on RP-SMA connector)
LED:
Security: WPA/WPA2, WPA-PSK/WPA2-PSK, WEP 64/128bit, 802.1X
Operating Temp.: 0°C to 40%
Storage Temp.: -20°C to 70°C
Operating Humidity: 10% to 85%, Non-Condensing
Storage Humidity: 5% to 90%, Non-Condensing
- INDEX
- Introduction
- Package Contents
- Before you begin
- Overview
- PCI adapter
- USB adapter
- Install Wireless Adapter
- Install Driver and Utility
- Wireless adapter configuration
- [Station] General Tab
- [Station] Profile Tab
- Wireless Network Properties Window
- General options
- Wireless network security frame
- PENTAGRAM horNET P6121-L6 / P6122-14
- 802.1x configure frame
- [Station] Available Network Tab
- [Station] Advanced Tab
- WMM Parameter:
- [Station] Status Tab
- [Station] Statistics Tab
- [Access Point] General Tab
- PENTAGRAM horNET P6121-L6 : P6122-14
- [Access Point] Advanced Tab
- [Access Point] Statistics Tab
- [Access Point] Soft AP Tab
- Troubleshooting
- The Wireless PCI/USB Adapter does not work properly.
- I cannot communicate with the other computers linked via Ethernet in the Infrastructure configuration.
- What should I do when the computer with the Adapter installed is unable to connect to the wireless network and/or the Internet?
- Specification
Brand : Pentagram
Model : P 6122-14
Category : Uncategorized