P 6121-L3 - Uncategorized Pentagram - Free user manual and instructions
Find the device manual for free P 6121-L3 Pentagram in PDF.


| Product Type | Digital TV Receiver (DVB-T2) |
| Brand | Pentagram |
| Model | P 6121-L3 |
| Dimensions (W x H x D) | 150 mm x 30 mm x 100 mm |
| Weight | 200 g |
| Power Supply | 5V DC, 1A (via USB or adapter) |
| Power Consumption | 5 W (typical) |
| Input Voltage | 100-240V AC (via adapter) |
| Video Output | HDMI, Composite (RCA) |
| Audio Output | HDMI, Digital Optical (SPDIF), Analog (RCA) |
| Supported Standards | DVB-T/T2, MPEG-2/4, H.264, H.265 |
| Remote Control | Included (infrared) |
| USB Port | 1 x USB 2.0 (for media playback) |
| Memory Card Slot | SD/MMC |
| Main Functions | Digital TV reception, Electronic Program Guide (EPG), time shift, USB media playback, subtitle support |
| Cleaning and Maintenance | Unplug before cleaning; wipe with a dry, soft cloth; avoid liquids |
| Safety Precautions | Do not expose to water, extreme temperatures, or direct sunlight; keep ventilation slots clear |
| Spare Parts and Repairability | Remote control, power adapter, AV cable; repair by qualified personnel only |
| General Information | Product designed for indoor use; operating temperature: 0°C to 40°C; humidity: 5-90% |
Frequently Asked Questions - P 6121-L3 Pentagram
User questions about P 6121-L3 Pentagram
0 question about this device. Answer the ones you know or ask your own.
Ask a new question about this device
Download the instructions for your Uncategorized in PDF format for free! Find your manual P 6121-L3 - Pentagram and take your electronic device back in hand. On this page are published all the documents necessary for the use of your device. P 6121-L3 by Pentagram.
USER MANUAL P 6121-L3 Pentagram
Installation and Operation Manual
PENTAGRAM horNET
Wi-Fi PCI 11g (P6121-L3)
Wi-Fi USB 11g (P6122-11)

PENTAGRAM
THE PERFECT SIMPLICITY

horNET P 6121-L3 / P 6122-11
CONTENTS
INTRODUCTION 5
PACKAGE CONTENTS....5
DEVICE DIAGRAM....6
PCI 6
INSTALLING THE ADAPTER....7
PCI ADAPTER....7
USB ADAPTER....7
WIRELESS ADAPTER CONFIGURATION 9
MAIN MENU 9
CURRENT STATUS TAB 10
PROFILE MANAGEMENT TAB....11 DIAGNOSTIC TAB....15
TROUBLESHOOTING....17
SPECIFICATIONS....18
horNET P 6121-L3 / P 6122-11
Introduction
PENTAGRAM horNET is a high-performance, easy-to-install PCI or USB 32 bit wireless network adapter. The adapter can be used in ad-hoc mode to establish peer-to-peer connections with other adapters for file sharing, or in infrastructure mode to provide Internet access on home or office networks using an access point or a router.
PENTAGRAM horNET PCI/USB supports 802.11g connectivity with a maximum data rate of 54 Mbps (or up to 108 Mbps when connecting to other Super G-compliant devices). With a rich feature set, it can also interoperate with 802.11b (11 Mbps) products in home or office environments, and with public hotspots. Additionally, support for eXtended Range enables increased coverage for networks based on this technology. Regardless of the mode, your data remains secure due to robust WPA encryption.
This manual contains information required to install and configure the adapter, and use your network for Internet access. Step-by-step instructions will guide you through the steps required to operate the device.
Package contents
- PCI (P 6122-11) or USB (P 6121-L3) network adapter
- Manual, drivers and utilities on CD
- Quick installation instructions
If any of the package contents are missing, please contact your vendor.
Prerequisites
Before operating the device, make sure your system meets the following minimum requirements:
- PC with a 32-bit PCI slot or USB port
- 300 MHz CPU and 32 MB RAM
- Windows 98SE, ME, 2000 or XP
CD-ROM - Correctly installed PCI/USB controller
- 802.11g/802.11b-compliant access point (for infrastructure mode) or 802.11g/802.11b-compliant wireless adapter (for ad-hoc/peer-to-peer mode)
horNET P 6121-L3 / P 6122-11
Device diagram
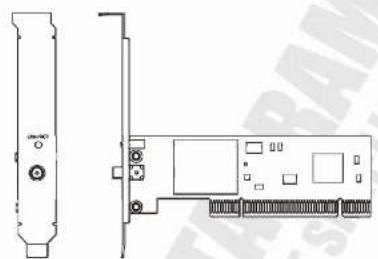
PCI
natural_image
Technical line drawing of a device rear panel and internal circuit board (no text or symbols)The following LED indicators show the adapter's status:
- LNK/ACT on — connection established; - LNK/ACT flashing — the device is transmitting or receiving data.
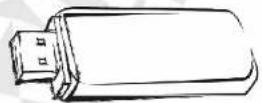
USB
The following LED indicators show the adapter's status:
- LNK/ACT on — connection established; - LNK/ACT flashing — the device is transmitting or receiving data.
horNET P 6121-L3 / P 6122-11
Installing the adapter
PCI adapter
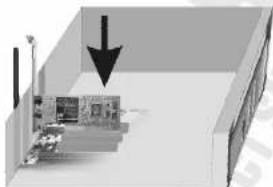
- Open the computer case and locate an available PCI slot on the motherboard.
- Insert the adapter into the PCI slot. Ensure that the card's connector is placed securely in the slot. It may be necessary to apply force to the card to ensure it is firmly seated. Attach the adapter to the computer chassis with a screw. Close the case.
- Attach the external antenna to the adapter's antenna connector.
- Turn the computer on.
- If the Add New Hardware Wizard appears, click Cancel and follow the instructions provided in the next section.
natural_image
3D architectural rendering of a room with a black arrow pointing to a wall-mounted room (no text or symbols visible)USB adapter
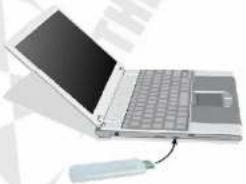
- Turn the computer on and wait for the operating system to launch. Log on, if necessary.
- Plug the adapter into an USB port.
- If the Add New Hardware Wizard appears, click Cancel and follow the instructions provided in the next section.
natural_image
Illustration of a laptop with a USB cable inserted, showing its front screen and keyboard (no text or symbols visible)horNET P 6121-L3 / P 6122-11
Installing drivers and utilities
-
Insert the driver and utility CD into the CD-ROM drive.
-
The setup wizard should launch automatically, and the following window should appear. If the wizard does not start automatically, click Start and then select Run. In the box that appears, type X:autorun.exe (where X is the letter assigned to your CD-ROM drive).
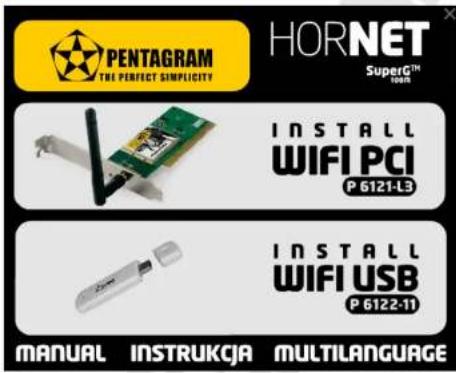
- Select Install WIFI PCI / Install WIFI USB to run the driver installer.
- Select Install Client Utilities and Driver (recommended) and click Next >
- Click Yes in the box that appears.
- Click Next > to install drivers and utilities to the default directory, or click Browse... to select a different directory.
- Select the name for the Start menu group where applications shortcuts will be located.
- Click Next >
- Select Wireless Client Utility (WCU) and Supplicant and click Next >
- Click OK in the box that appears.
- After the setup completes, check Yes, I want to restart my computer now to restart the computer after installation or No, I will restart my computer later to restart the computer manually at a later time. Click Finish.
- When the computer restarts, the adapter is ready for use.
horNET P 6121-L3 / P 6122-11
Wireless adapter configuration
After drivers are installed correctly and the adapter is connected to the computer, the Wireless Configuration Utility will be launched automatically with the system, and its icon will appear in the notification area (next to the clock). The icon's appearance changes depending on connection status and RSSI (received signal strength indication).

(All bars gray): no connection

(One red bar): very weak signal, RSSI below 5 dB

(Two yellow bars): weak signal, RSSI between 5 dB and 10 dB

(Three green bars): good signal, RSSI between 10 dB and 20 dB

(All bars green): very good signal, RSSI above 20 dB
Double-clicking the icon opens the main window of the configuration utility with the Current Status tab.
Main menu
Action > Disable / Enable Radio: Enables or disables the network adapter.
Action > Disable / Enable Tray Icon: Disables or enables the configuration utility icon in the notification area.
Action > Manual Login: Allows manual wireless network login.
Action > Reauthenticate: Reauthenticates the user to the wireless network.
Action > Exit: Closes the main window of the configuration utility.
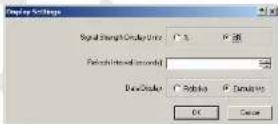
Options > Display Settings... Opens the Display Settings window
Help > Wireless Client Utility Help: Opens help for the configuration utility.
Help > About Wireless Client Utility: Displays a box containing information on the configuration utility.
Display Settings window
This window allows you to change the way in which the connection status and statistics are displayed.
horNET P 6121-L3 / P 6122-11
Current Status tab
This tab shows basic parameters of the wireless connection.
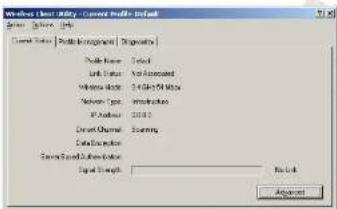
Profile Name: Shows the active profile name.
Link Status: Shows the name (SSID) of the wireless network assigned to the active profile.
Wireless Mode: Shows the radio frequency and maximum speed used by the connection in the active profile.
Network Type: Shows the wireless network type in the active profile (Ad-hoc or Infrastructure).
IP Address: Shows the IP address assigned to the adapter for the connection in the active profile.
Current Channel: Shows the channel on which the adapter operates in the active profile.
Data Encryption: Shows the data encryption algorithm used in the active profile.
Server Based Authentication: Shows the server authentication method used by the active profile.
Signal Strength: Shows the signal strength for the connection in the active profile.
Advanced: Opens the Advanced Status window which contains the following information:
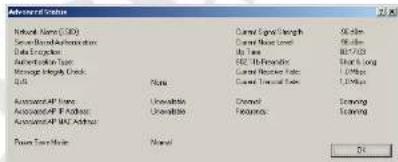
Network Name (SSID): Shows the name of the wireless network to which the adapter is connected.
Server Based Authentication: Shows the server authentication method used by the active
horNET P 6121-L3 / P 6122-11
Associated AP Name: Shows the name of the access point assigned to the profile.
Associated AP IP Address: Shows the IP address of the access point assigned to the profile.
Associated AP MAC Address: Shows the MAC address of the access point assigned to the
profile.
Power Save Mode: Shows the power saving mode.
Current Signal Strength: Shows the current wireless network signal strength.
Current Noise Level: Shows the current noise level.
Up Time: Shows the adapter's operating time (since last launch).
802.11b Preamble: Shows the 802.11b network preamble.
Current Receive Rate: Shows the current rate at which data is received.
Current Transmit Rate: Shows the current rate at which data is transmitted.
Channel: Shows the Wi-Fi channel used by the current wireless network.
Frequency: Shows the Wi-Fi frequency used by the current wireless network.
Profile Management tab
Use this tab to manage profiles in which settings for different wireless networks can be saved. For example, one profile may contain configuration for a wireless network in the workplace, while another one may contain home network settings. Whenever you move to a different place, you can select a profile which matches the network that covers your new location from the list, without having to reset all connection parameters. All configured profiles are listed on this tab.
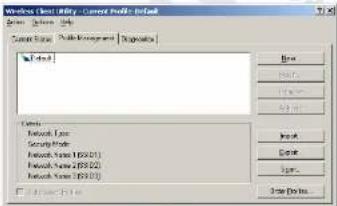
Details: Shows details of the selected profile.
New...: Opens the Profile Management window and allows you to configure a new profile.
Modify...: Opens the Profile Management window and allows you to configure an existing
profile selected from the list.
Remove: Removes the selected profile
Activate: Activates the selected profile.
Import...: Loads profile settings from a file.
Export...: Saves profile settings to a fi
Scan...:Opens the Available Infrastructure and Ad Hoc Networks window.
Order Profiles...: Opens the Auto Profile Selection Management window.
horNET P 6121-L3 / P 6122-11
Profile Management window, General tab
This tab contains basic profile settings.
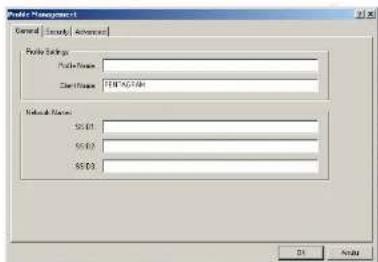
Profile Name: Enter a profile name to be displayed in the profile list.
Client Name: Enter a client name for easy identification on the wireless network.
SSIDx: Enter names for the wireless networks to which the adapter will connect in the selected profile.
Profile Management window, Security tab
This tab contains security settings used by the wireless network in the profile. Security details required to connect to the wireless network can be obtained from the network's administrator.
![Profile Management General Profile [Advanced] Profile Options MFC-Scale MFC-Scale (Fast Type) 802.5% B21-In-DF Type B21-In-DF B21-In-DF B21-In-DF B21-In-DF B21-In-DF B21-In-DF B21-In-DF B21-In-DF B21-In-DF B21-In-DF B21-In-DF B21-In-DF B21-In-DF B21-In-DF B21-In-DF C:\Users\In-DF\In-DF\In-DF\In-DF\In-DF\In-DF\In-DF\In-DF\In-DF\In-DF\In-DF\In-DF\In-DF\In-DF\In-DF\In-DF\In-DF\In-DF\In-DF\In-DF\In-DF\In-DF\In-DF\In-DF\In-DF\In-DC B21-In-DF B21-In-DF B21-In-DF B21-In-DF B21-In-DF B21-In-DF B21-In-DF B21-In-DF B21-In-DF B21-In-DF B21-In-DF B21-In-DF B21-In-DF B21-In-DF D:\Users\In-DF\In-DF\In-DF\In-DF\In-DF\In-DF\In-DF\In-DF\In-DF\In-DF\In-DF\In-DF\In-DF\In-DF\In-DF\In-DF\In-DF\In-DF\In-DF\In-DF\In-DF\In-DF\In-DF\In-DF\in- B21-In-DF](/content/2026/05/925208/images/3882fa677885ffbbbe7bc3e0d385ea5a24a9106bb3e19c34bf4f17f618afb831.jpg)
horNET P 6121-L3 / P 6122-11
WPA/WPA2 Passphrase (Pre-Shared Key): Select this option and then click Configure... to enter the authentication key used by the wireless network.
802.1x: Select this option and then select the EAP authentication protocol used by the network from the 802.1x list. Click Configure... to set up the protocol.
Pre-Shared Key (Static WEP): Select this option and then click Configure... to enter the authentication key(s) used to secure the wireless network.
None: Select this option when connecting to an insecure wireless network.
Profile Management window, Advanced tab
This tab contains advanced connection settings for the profile.
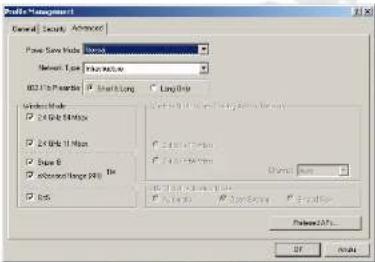
Power Save Mode: Select the power saving mode.
802.11b Preamble: Select the preamble for connection to 802.11b networks.
Wireless Mode: Set up additional connection parameters:
2.4 GHz 54 Mbps: Select this for a 54 Mbps connection.
2.4 GHz 11 Mbps: Select this for a 11 Mbps connection.
Super G: Select this to use Super G for the connection.
- eXtended Range (XR)™: Select this to use eXtended Range for the connection.
- QoS: Select this to use QoS settings for the connection.
Wireless Mode When Starting Ad Hoc Network: Set up additional connection parameters when establishing an ad-hoc network:
2.4 GHz 54 Mbps / 2.4 GHz 11 Mbps: Select the speed at which the ad-hoc network will
Channel: Select the channel on which the ad-hoc network will operate
802.11 Authentication Method: Configure the authentication method for an ad-hoc connection:
• Automatic: Select this for automatic configuration.
- Open System: Select this for an insecure network.
horNET P 6121-L3 / P 6122-11
Available Infrastructure and Ad Hoc Networks window
This window contains information on available wireless networks.
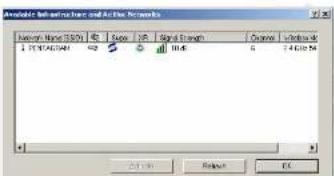
Activate: Connects to the selected network, or opens a new profile dialog if no profile has been created for the selected network.
Refresh: Refreshes the list of available wireless networks.
OK: Closes the window.
Auto Profile Selection Management window
This window allows you to configure profiles which will be launched automatically to connect to a wireless network.
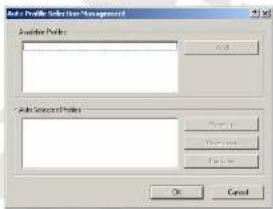
Available Profiles: Shows a list of configured profiles.
Add: Adds a profile selected from the Available Profiles list to the Auto Selected Profiles list.
Auto Selected Profiles: Shows a list of profiles which the adapter will attempt to launch automatically (to connect to an appropriate wireless network). Profiles will be launched in the order in which they are listed.
Move up: Moves the selected profile up on the Auto Selected Profiles.
horNET P 6121-L3 / P 6122-11
Diagnostics tab
The Diagnostics tab provides the information required to control adapter operation.
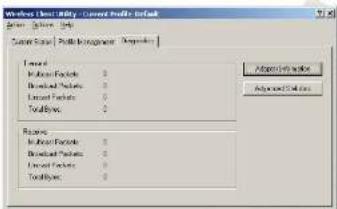
Transmit: Shows information regarding transmitted packages.
Receive: Shows information regarding received packages.
Multicast packets: Shows the number of transmitted or received multicast packets.
Broadcast packets: Shows the number of transmitted or received broadcast packets.
Unicast packets: Shows the number of transmitted or received unicast packets.
Total Bytes: Shows the total volume of transmitted or received data (in bytes).
Adapter Information: Shows network adapter information.
Advanced Statistics: Shows advanced connection statistics.
Adapter Information window
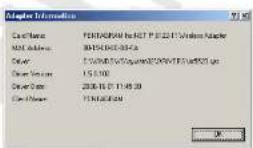
Card Name: Shows the wireless network adapter model.
MAC Address: Shows the adapter's physical address (MAC).
Driver: Shows the driver file
Driver Version: Shows the current driver version.
Driver Data: Show the current driver data
horNET P 6121-L3 / P 6122-11
Advanced Statistics window
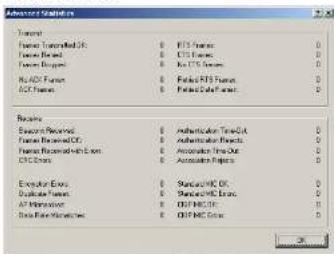
Transmit: Shows information regarding outbound data:
- Frames Transmitted OK: Shows the number of frames transmitted without errors.
- Frames Retried: Shows the number of frames transmitted again.
- Frames Dropped: Shows the number of frames dropped.
- No ACK: Shows the number of frames transmitted without acknowledgement.
■ ACK Frames: Shows the number of frames transmitted with acknowledgement.
- RTS Frames: Shows the number of RTS (Request To Send) frames.
- CTS Frames: Shows the number of CTS (Clear To Send) frames sent in response to RTS frames.
- No CTS Frames: Shows the number of frames without CTS reply.
- Retried RTS Frames: Shows the number of RTS frames transmitted again.
- Retrled Data Frames: Shows the number of data frames transmitted again.
Receive: Shows information regarding inbound data.
Beacons Received: Shows the number of beacon frames received (to support the connection).
Frames Received OK: Shows the number of frames received without errors.
Frames Received with Errors: Shows the number of frames received with errors.
CRC Errors: Shows the number of CRC (checksum) errors.
Encryption Errors: Shows the number of encryption errors.
Duplicate Frames: Shows the number of duplicated frames.
AP Mismatches: Shows the number of mismatches related to access points.
Data Rate Mismatches: Shows the number of mismatches related to data rate.
Authentication Time-Out: Shows the number of authentication attempts timed out.
Authentication Rejects: Shows the number of authentication attempts rejected.
Association Time-Out: Shows the number of connection attempts timed out.
Association Rejects: Shows the number of connection attempts rejected.
Standard MIC OK: Shows the number of correct standard MIC (Message Integrity Code)
values.
Standard MIC Errors: Shows the number of incorrect standard MIC (Moscana Intensity Code)
Troubleshooting
This section describes methods which can be used to solve problems which may appear during the installation and operation of the PCI/USB wireless network adapter. Please read the description below for troubleshooting.
1. The PCI/USB adapter does not operate correctly.
- Replace the adapter in the computer's PCI slot or USB port.
- Right-click the My Computer icon and select Properties. Select Device Manager and locate the network adapter. Verify whether the adapter is installed correctly in the system. A yellow exclamation mark means that a resource conflict has occurred. Check the adapter's status. If you notice a yellow exclamation mark, do the following:
- Make sure that your computer has an available IRQ (Interrupt Request) number.
- Make sure you have installed the right adapter and driver. If the adapter does not work properly despite completing the above steps, remove it and proceed as follows:
- Uninstall the adapter's driver from the computer.
- Restart the computer, and then reinstall the hardware and software as described in this manual.
2. No communications with other computers over Ethernet in infrastructure mode.
- Make sure that the computer with which the adapter is associated is switched on. - Make sure that the card is configured to operate on the same channel and with the same security options as other computers using infrastructure made.
3. The computer with the adapter cannot connect to a wireless network and/or the Internet.
- Check whether LEDs on the broadband modem indicate normal operation. If not, a problem with the modem may have occurred.
- Check whether LEDs on the router indicate normal operation. If not, make sure the router is connected to ports and that Ethernet ports are properly attached.
- Verify whether the IP address, subnet mask, gateway and DNS settings are configured correctly for the network.
- When using the infrastructure mode, check whether the network ID (SSID) is identical for clients and access points
- In ad-hoc mode, both computers must have the same SSID. Please note that it may be necessary for one of the clients to establish a BSS (Basic Service Set). Wait for the settings to be synchronized between all clients. This will allow you to avoid multiple BSSs being set by different computers at the same time, which may cause several independent BSSs to exist instead of a single BSS containing multiple clients.
- Check whether the wireless network connection is configured correctly.
- If data encryption is enabled, make sure appropriate keys are provided in both the adapter's and the access point's configurations.
horNET P 6121-L3 / P 6122-11
Specifications
Standards supported: IEEE 802.11g, IEEE 802.11b
Modulation:
802.11b: CCK (11 Mbps)
DQPSK
(2
Mbps)
DBPSK
1
Channels:
802.11g
OF
m = 311
11
channels
(USA)
13
channels
(Europe
IS
NDIS 5
(caplan)
Network protocols: TCP/IP, IPX, NDIS 4, NDIS 5, NDIS 5.1, NetBEUI
PCVUSB
Transmitter power:
dBm
Sensitivity:
-
(No text)
LED:
PWR,
WEP keys: 64-bit and 128-bit
Dimensions:
PCI: 120×40 mm (4.7×1.6 in) PCB
USB: 85.5 × 28 × 10 mm (3.4×1.1×0.4 in)
Weight:
PCI: 50 g (1.8 oz)
USB: 15 g (0.5 oz)
Power supply:
PCI:
5
。
USB:
5 V
FCC CE
Temperalu
erating:
0°C to 40°C (32°F to 104°F)
Storage: -20°C to 70°C (-4°F to 158°F)
Humidity:
10% to 85%, non-condensing
Storage: 5% to 90%, non-condensing
horNET P 6121-L3 / P 6122-11
NOTES

- CONTENTS
- Introduction
- Package contents
- Prerequisites
- Device diagram
- USB
- Installing the adapter
- PCI adapter
- USB adapter
- Installing drivers and utilities
- Wireless adapter configuration
- Main menu
- Display Settings window
- Current Status tab
- horNET P 6121-L3 / P 6122-11
- Profile Management tab
- Profile Management window, General tab
- Profile Management window, Security tab
- Profile Management window, Advanced tab
- Available Infrastructure and Ad Hoc Networks window
- Auto Profile Selection Management window
- Diagnostics tab
- Adapter Information window
- Advanced Statistics window
- Troubleshooting
- The PCI/USB adapter does not operate correctly.
- No communications with other computers over Ethernet in infrastructure mode.
- The computer with the adapter cannot connect to a wireless network and/or the Internet.
Brand : Pentagram
Model : P 6121-L3
Category : Uncategorized