P 6132-07 - Uncategorized Pentagram - Free user manual and instructions
Find the device manual for free P 6132-07 Pentagram in PDF.


| Product Type | Wireless USB Adapter |
| Model | P 6132-07 |
| Brand | Pentagram |
| Wireless Standards | IEEE 802.11b, 802.11g, 802.11n (Draft 2) |
| Frequency Band | 2.4 GHz |
| Data Transfer Rate | Up to 300 Mbps (with 40 MHz BW) |
| Interface | USB 2.0 |
| Antenna | Two internal 2 dBi antennas |
| Security | WEP 64/128/152-bit, WPA, WPA2, WPA-PSK, WPA2-PSK, WPA-EAP, WPA2-EAP, PEAP |
| LED Indicator | LNK/ACT: Off (no connection), On (connected), Flashing (activity) |
| Power Source | Powered via USB port |
| Operating Temperature | 0°C to 40°C |
| Storage Temperature | -20°C to 70°C |
| Operating Humidity | 10% to 85% (non-condensing) |
| System Requirements | Windows 98SE, ME, 2000, XP; 300 MHz processor, 32 MB RAM |
| Package Contents | USB adapter, CD with drivers and manual, Quick Installation Guide |
| Dimensions | Approximately 75 x 25 x 12 mm (estimated) |
| Weight | Approximately 20 g (estimated) |
Frequently Asked Questions - P 6132-07 Pentagram
User questions about P 6132-07 Pentagram
0 question about this device. Answer the ones you know or ask your own.
Ask a new question about this device
Download the instructions for your Uncategorized in PDF format for free! Find your manual P 6132-07 - Pentagram and take your electronic device back in hand. On this page are published all the documents necessary for the use of your device. P 6132-07 by Pentagram.
USER MANUAL P 6132-07 Pentagram
Installation and Operation Manual
PENTAGRAM horNET
Wi-Fi PCI 11g (P6121-L5)
Wi-Fi USB 11g (P6132-07)
Wi-Fi Cardbus 11g (P6133-10)

PENTAGRAM
THE PERFECT SIMPLICITY
PENTAGRAM horNET P 6121-L5 / P 6132-07 / P 6139-10
INDEX
INTRODUCTION 5
PACKAGE CONTENTS....5
BEFORE YOU BEGIN 5
OVERVIEW 6
INSTALLING DRIVERS AND UTILITIES....6
INSTALLING THE ADAPTER....7
PCI ADAPTER....7
USB ADAPTER....8
CARDBUS ADAPTER 8
WIRELESS ADAPTER CONFIGURATION 9
RAUI APPLICATION....9
PROFILE TAB....10
NETWORK TAB....17
ADVANCED TAB 20
STATISTICS TAB 21
WMM TAB 22
WPS TAB 23
RADIO ON/OFF TAB 25
ABOUT TAB....25
TROUBLESHOOTING....26
SPECIFICATIONS....27
PENTAGRAM horNET P 6121-L5 / P 6132-07 / P 6139-10
Introduction
Pentagram horNET wireless network adapter is a powerful 32-bit PCI/USB/Cardbus Adapter that installs quickly and easily into PCs. The Adapter can be used in Ad-Hoc mode to connect directly with other cards for peer-to-peer file sharing or in Infrastructure mode to connect with a wireless access point or router for access to the Internet in your office or home network.
Pentagram horNET wireless PCI/USB/Cardbus adapter connects you with 802.11g networks at up to a 54Mbps. And for added versatility, it can also interoperate with all the up to 11Mbps 802.11b products found in homes, businesses, and public wireless hotspots around the country. And in either mode, your wireless communications are protected by industrial-strength WPA, so your data stays secure.
This Manual contains information on how to install and configure your wireless adapter to get your network started accessing the Internet. It will guide you through the correct configuration steps to get your device up and running.
Package Contents
-
Wireless PCI (P 6121-L5) / USB (P 6132-L5) / Cardbus (P 6133-10) adapter
-
Manual, Drivers and Utility on CD
-
Quick Installation Guide
-
External RP-SMA antenna (only P 6121-L5)
If any of the above items are missing, please contact your reseller.
Before you begin
You must have at least the following:
- A laptop computer/desktop PC with an available 32-bit PCI/USB/Cardbus slot
- At least a 300MHz processor and 32MB of memory
• Windows 98SE, ME, 2000, XP
• A CD-ROM Drive
- PCI/USB/Cardbus controller properly installed and working in the laptop computer
- An 802.11g or 802.11b Access Point (for infrastructure Mode) or another 802.11g or 802.11b wireless adapter (for Ad-Hoc; Peer-to-Peer networking mode.)
PENTAGRAM horNET P 6121-L5 / P 6132-07 / P 6139-10
Overview
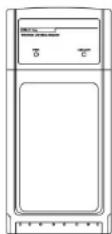
Cardbus

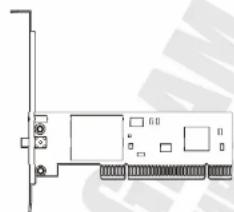
natural_image
Pure technical line drawing of a computer motherboard with no text, numbers, or symbolsPCI

USB
The status LED indicator of the wireless adapters is described in the following.
| LED | Status | Action |
| LNK/ACT | Off No wireless network connection. | |
| LNK/ACT | On Wireless network connection established. | |
| LNK/ACT | Flashing Looking for a wireless network/transmitting data. | |
Installing drivers and utilities
- Do not connect the adapter to your computer.
- Insert the driver and utility CD into the CD-ROM drive.
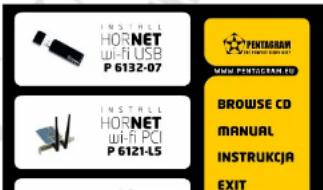
- The setup wizard will launch automatically (under Windows Vista, you may additionally need to select Run: Autorun.exe in the Autorun window). If the CD-ROM autorun feature is disabled, run Autorun.exe in the CD's root directory.
PENTAGRAM horNET P 6121-L5 / P 6132-07 / P 6139-10
- Click Install PENTAGRAM horNet for your adapter. If you are using Windows Vista, the User Account Control window may display. To proceed with the installation, click Continue (if you are performing the installation using an account that has no administrative privileges, you may also need to enter the user name and password for an administrative account).
- Select I accept the terms of the license agreement and click Next >.
- If you wish to install the driver with utility software (recommended), select Install driver and Ralink WLAN Utility. If you wish to install the driver only, click Install driver only. Click Next >.
- If you wish to use the software included with the adapter (recommended), select Ralink Configuration Tool and click Next >. If you wish to use your system's wireless network wizard, select Microsoft Zero Configuration Tool and click Next >.
- Click Install to install the driver and configuration utility.
- If a restart is required, select Yes, I want to restart my computer now to restart the computer after the installation or select No, I will restart my computer later to restart the computer at a later time. Click Finish to complete the setup wizard.
Installing the adapter
PCI adapter
- If your computer is powered on, shut down the operating system, then turn the computer off and disconnect it from mains.
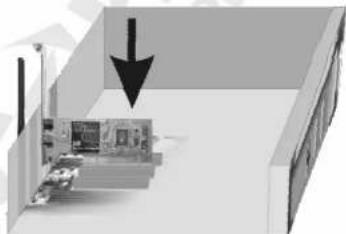
- Open the computer case and locate an available PCI slot on the motherboard.
- Insert the adapter into the PCI slot. Ensure that the card's connector is placed securely in the slot. It may be necessary to apply force to the card to ensure it is firmly seated. Attach the adapter to the computer chassis with a screw. Close the case.
- Attach the external antenna to the adapter's antenna connector.
- Turn the computer on and wait for the operating system to launch. Log on, if necessary.
- If the Found New Hardware Wizard window appears, select Install the software automatically (Recommended) and click Next. The driver will be installed automatically.
natural_image
3D diagram showing a device inside a storage unit with an arrow pointing to it (no text or symbols present)PENTAGRAM horNET P 6121-L5 / P 6132-07 / P 6139-10
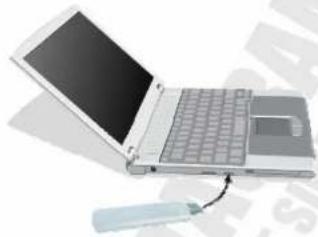
USB adapter
- Turn the computer on and wait for the operating system to launch. Log on, if necessary.
- Plug the adapter into an USB port.
- If the Found New Hardware Wizard window appears, select install the software automatically (Recommended) and click Next. The driver will be installed automatically.
natural_image
Illustration of a laptop with a keyboard and a USB cable inserted, no text or symbols visibleCardbus adapter
- Turn the computer on and wait for the operating system to launch. Log on, if necessary.
- Insert the adapter into a PCMCIA slot with the logo up.
- If the Found New Hardware Wizard window appears, select Install the software automatically (Recommended) and click Next. The driver will be installed automatically.

natural_image
Laptop with keyboard and remote control unit (no visible text or symbols)Wireless adapter configuration
A configuration application is installed with adapter drivers. The application's icon is displayed in the system tray (next to the clock), and its appearance depends on the adapter and/or connection status.
| The adapter is not attached to the PC or RF is off. | The adapter is not connected to a wireless network. | The adapter is connected to a wireless network. |
To launch the adapter's configuration application, double-click the application's icon (RaUI).
RaUI application
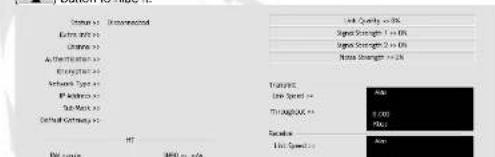
RaUI application window is divided into three parts:
- Tab bar – click on Tab to display its contents in the main pane. Active Tab is highlighted.

- Main pane – this pane displays contents of selected Tab.

- Secondary pane - this pane contains connection information or additional options for selected in main pane option. Click More (▼) button to show secondary pane or Less (▲) button to hide it.
PENTAGRAM horNET P 6121-L5 / P 6132-07 / P 6133-10
- [SSID] <-> [BSSID] - Connection established to network with displayed ID's.
Extra Info – Additional information about connection.
Channel – Channel (frequency) used by wireless network.
Authentication – Authentication method used by wireless network.
Encryption – Encryption method used by wireless network.
Network Type:
- Ad hoc – Connection point-point (peer-to-peer) with other wireless adapter.
- Infrastructure – Connection with wireless network via AP (Access Point) or wireless router.
Status – Wireless connection status.
IP Address – IP Address configured or obtained from DHCP server.
Sub Mask – Subnet Mask configured or obtained from DHCP server
Default Gateway – Gateway IP address configured or obtained from DHCP server.
Link Quality: Shows link quality as a percentage bar (0-100%).
Signal Strength: Shows signal strength as a percentage bar (0-100%).
Noise Level: Shows noise level as a percentage bar (0-100%).
Transmit / Receive - Transmit / receive parameters for active network.
Profile Tab
This Tab allows you to create profiles for the most frequently used wireless networks. i.e.
home network, company network or public hotspots. The profiles can be activated as required.
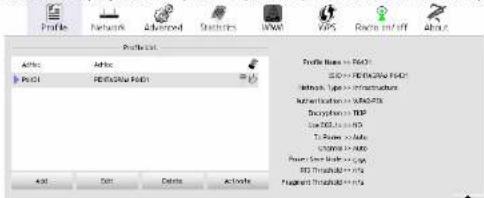
Profile List – This list contains configured profiles. First column contains profile name, second – network SSID and third – additional network information. Icons on the list means:
| Connection with activated profile established successfully | |
| Connection with activated profile not established | |
| ∅ | Infrastructure Type network |
| Ad hoc Type network | |
| Secured network |
Selected profile information is displayed on the right side of the list.
Add: Click Add to create a new profile. Profile configuration is opened in secondary pane.
Falls, Offs. Falls to choose versions for the selected route. Double alternatives is created in
PENTAGRAM horNET P 6121-L5 / P 6132-07 / P 6139-10
Profile configuration – System Config Tab
This Tab allows configuration of basic connection parameters.
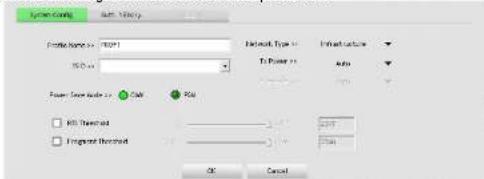
Profile Name – Enter a name to identify your profile. Default PROFx.
SSID – Enter a network service set identifier (SSID) or select from a list of active networks. If SSID Broadcast function of AP is disabled, SSID must be entered by hand. SSID is case sensitive, which means that pentagram and Pentagram are two different networks.
Network Type – You can select two wireless network types.
- The Infrastructure mode supports communications between a wireless network and a wired network using an access point.
- The Ad hoc mode supports peer-to-peer communications between two wireless network devices (without using an access point).
TX Power - Set the signal transmit power to be used by the radio transmitter. Choose the appropriate value from the drop-down list.
Preamble – Select the preamble length, i.e. Auto, Long or Short.
Channel – Select the channel to be used when establishing an Ad hoc network.
PSM - Select the power saving mode.
- Using CAM (Constantly Awake Mode), the network adapter will operate at full power when connected to mains.
• Using PSM (Power Saving Mode), the network adapter will enter power saving mode.
RTS Threshold - Use the slider or enter a value for the RTS threshold in the field provided. Default value: 2347.
Fragment Threshold - Use the slider or enter a value for the fragment threshold in the field provided. Default value: 2346.
OK – Closes profile configuration and saves settings
Cancel – Closes profile configuration without saving settings
PENTAGRAM horNET P 6121-L5 / P 6132-07 / P 6133-10
Profile configuration – Auth. \ Encry. Tab
This Tab contains all Authentication and Encryption settings Authentication:
- Open – With the Open method, every wireless station can request authentication.
- Shared – With Shared authentication, the station requesting authentication must provide a secret key (which can be obtained from the network administrator) using a secure channel (independent of the 802.11 wireless communications channel).
- LEAP – (Light Extensible Authentication Protocol) is an EAP authentication method used primarily on Cisco Aironet wireless networks. This protocol encrypts transmitted data using chemically generated WEP loans and expects two way authentication
- WPA and WPA2 – IEEE 802.1x protocol is used for authentication and AES or TKIP for encryption.
- WPA PSK and WPA2 PSK – Station requesting authentication must provide a WPA Preshared Key. AES or TKIP are used for encryption.
• Authentication: Open and Shared
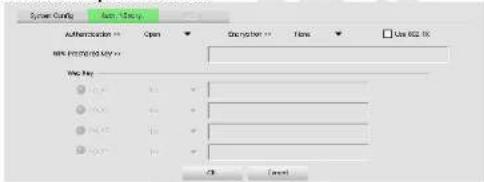
Authentication - Change authentication method.
Encryption - Select None or WEP
802.1X - Check this option to use IEEE 802.1x for authentication. IEEE 802.1x supports full user authentication and control. This will also enable 8021X Tab, where 802.1x can be configured.
WEP Key / Key#1 ... 4 - When you select WEP encryption or Shared authentication without 802.1x, you need to enter a correct WEP key.
- If a 64-bit WEP key is used, enter 10 Hexadecimal characters or 5 ASCII characters.
- If a 128-bit WEP key is used, enter 26 Hexadecimal characters or 13 ASCII characters.
OK - Closes profile configuration and saves settings.
Cancel - Closes profile configuration without saving settings.
PENTAGRAM horNET P 6121-L5 / P 6132-07 / P 6133-10
• Authentication: LEAP
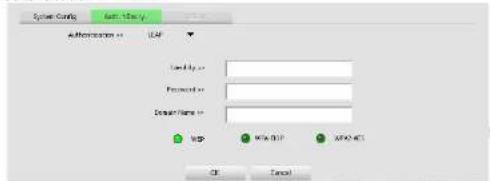
Authentication – Change authentication method.
Identity - Enter your identity for the LEAP authentication service.
Password – Enter your password for the LEAP authentication service.
Domain Name – Enter your domain name for the LEAP authentication service.
OK - Closes profile configuration and saves settings.
Cancel - Closes profile configuration without saving settings.
• Authentication: WPA and WPA2
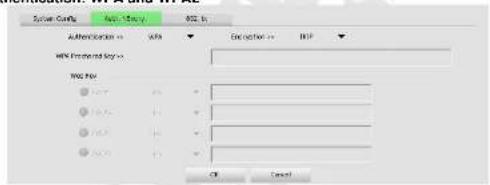
Authentication - Change authentication method.
Encryption – Select the encryption method to be used.
• AES (Advanced Encryption System) uses symmetrical 128-bit data block
encryption.
• TKIP (Temporal Key Integrity Protocol) uses stronger encryption algorithms and
MIC (Message Integrity Check) to provide security against hackers.
WPA and WPA2 use IEEE 802.1x protocol for authentication. After selecting encryption
method go to 8021X Tab, where 802.1x settings can be configured.
OK - Closes profile configuration and saves settings.
Cancel – Closes profile configuration without saving settings.
PENTAGRAM horNET P 6121-L5 / P 6132-07 / P 6133-10
• Authentication: WPA PSK and WPA2 PSK
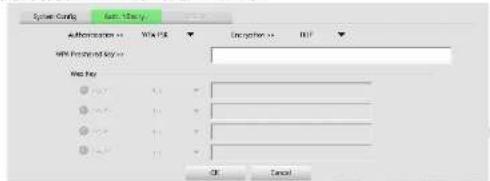
Authentication - Change authentication method.
Encryption - Select the encryption method to be used
- AES (Advanced Encryption System) uses symmetrical 128-bit data block encryption.
- TKIP (Temporal Key Integrity Protocol) uses stronger encryption algorithms and MIC (Message Integrity Check) to provide security against hackers.
WPA Preshared Key – Enter the WPA preshared key (WPA-PSK and WPA2 PSK only). The key should be 8 to 32 characters in length.
The key should be 6 to 52 characters in Michigan. OK - Gloves profile configuration and save set
OK – Closes profile configuration and saves settings. Cancel – Closes profile configuration without saving settings.
Profile configuration - 8021X Tab
Settings on this Tab allow configuring IEEE 802.1x protocol. All information can be obtained from wireless network administrator. Appearance of this Tab depends on options selected from EAP Method and Tunnel Authentication lists.
- PEAP - Protect Extensible Authentication Protocol. PEAP transport securely authentication data by using tunneling between PEAP clients and an authentication server. PEAP can authenticate wireless LAN clients using only server-side certificates, thus simplifying the implementation and administration of a secure wireless LAN.
- TLS/Smart Card – Transport Layer Security. Provides for certificate-based and mutual authentication of the client and the network. It relies on client-side and server-side certificates to perform authentication and can be used to dynamically generate user-based and session-based WEP keys to secure subsequent communications between the WLAN client and the access point.
-
TTLS – Tunneled Transport Layer Security. This security method provides for certificate-based, mutual authentication of the client and network through an encrypted channel. Unlike EAP-TLS, EAP-TTLS requires only server side certificates.
EAP-FAST – Flexible Authentication via Secure Tunneling. It was developed by Cisco. Instead of using a certificate, mutual authentication is achieved by means of a PAC (Protected Access Credential) which can be managed dynamically by the authentication server. The PAC can be provisioned (distributed one time) to the client either manually or automatically. Manual provisioning is delivery to the client via disk or a secured network distribution method. Automatic provisioning is an in-band, over the air. Distribution for tunnel authentication, only support "Generic Token Card" authentication now. -
-
-
-
-
-
-
-
-
-
-
-
-
-
-
-
-
-
-
-
-
-
-
-
-
-
-
-
-
-
-
-
-
-
-
-
-
-
-
-
-
-
-
-
-
-
-
-
-
-
-
-
-
-
-
-
-
-
-
-
-
-
-
-
-
-
-
-
-
-
-
-
-
-
-
-
-
-
-
-
-
-
-
-
-
-
-
-
-
-
-
-
-
-
-
-
-
- 99.
-
-
-
-
-
-
-
-
-
-
-
-
-
-
-
-
-
-
-
-
-
-
-
-
-
-
-
-
-
-
-
-
-
-
-
-
-
-
-
-
-
-
-
-
-
-
-
-
-
-
-
-
-
-
-
-
-
-
-
-
-
-
-
-
-
-
-
-
-
-
-
-
-
-
-
-
-
-
-
-
-
-
-
-
-
-
-
-
-
-
-
-
-
-
-
-
PENTAGRAM horNET P 6121-L5 / P 6132-07 / P 6133-10
• ID: PASSWORD Tab
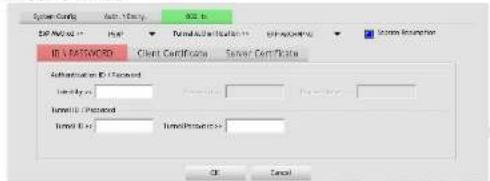
EAP Method - Change EAP authentication method.
Tunnel Authentication – Change tunnel authentication method.
Session Resumption – Enable / disable session resumption.
Authentication ID / Password - Identity, Password and Domain Name for server.
Only EAP-FAST authentication can key in domain name. Domain name can be keyed in
blank space.
Tunnel ID / Password:
- Identity – Identity for tunnel.
- Password – Password for tunnel.
OK - Closes profile configuration and saves settings.
Cancel – Closes profile configuration without saving settings.
- Client Certification Tab
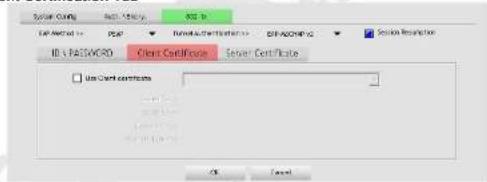
Use Client certificate - Enable this option to use Client certificate for server
authentication and then select certificate from drop-down list. You can find detailed
information on certificate below this list.
OK - Closes profile configuration and saves settings.
Cancel – Closes profile configuration without saving settings.
PENTAGRAM horNET P 6121-L5 / P 6132-07 / P 6139-10
• Server Certification Tab
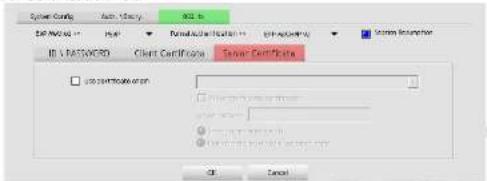
Use certificate chain – Enable this option, to enable the certification feature and select the certificate issuer.
Allow intermediate certificates - Select this option to allow the use of intermediate certificates. These certificates must be located on the certification chain between the server certificate and the server selected from list.
Server name - Enter the name of the authentication server. OK - Closes profile configuration and saves settings.
Cancel – Closes profile configuration without saving settings.
- EAP Fast Tab
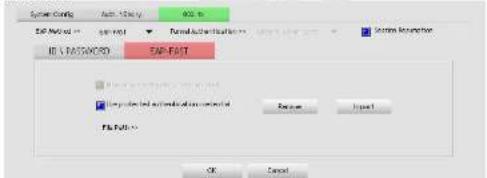
Allow unauthenticated provision mode - During the PAC can be provisioned (distributed one time) to the client automatically. It only supported Allow unauthenticated provision mode and use EAP-MSCHAP v2 authentication to authenticate now. It causes to continue with the establishment of the inner tunnel even though it is made with an unknown server.
Use protected authentication credential – During the PAC can be provisioned to the client manually via disk or a secured network distribution method. Click Import, to browse for PAC settings file or click Remove, to stop using current file.
File Path – Path, where PAC settings file is located. OK – Closes profile configuration and saves settings.
Cancel - Closes profile configuration without saving settings.
PENTAGRAM horNET P 6121-L5 / P 6132-07 / P 6139-10
Network Tab
This Tab enables searching for and connecting to active wireless networks.
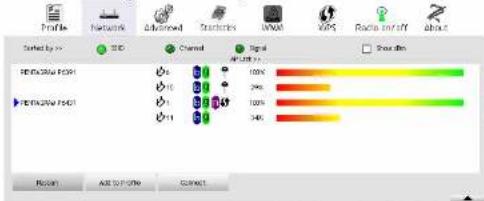
Icons on list means:
| Connection to this network established successfully | |
| Connection to this network not established | |
| Infrastructure type network | |
| Ad hoc type network | |
| CH1 | 802.11 standards supported by wireless station |
| Access Point supports WPS function and it's enabled | |
| Secured network |
Show dBm - Select this box, to show signal Strength on AP List as dBm instead of percentages. This also applies to Signal Strength and Noise Strength in secondary pane.
AP List - List of wireless networks in range. Columns contains as follows: SSID (hidden when SSID Broadcast on AP is disabled), network type icon (Infrastructure or Ad hoc) and used channel, supported 802.11 standards (i.e. 802.11g), security and signal strength. Double-click on network, to display Detailed network information in secondary pane.
Add to Profile - Click to create a profile for selected network. You can find detailed information on profile configuration in previous section.
Connect - Click to connect do selected network without creating a profile. Connection configuration will be displayed in secondary pane. Options correspond to options from profile configuration. You can find detailed information on profile configuration in previous section. If selected network doesn't broadcast SSID, after clicking Connect button you will be asked to enter SSID. Enter SSID in Please enter SSID field in secondary pane and click OK. To continue connection configuration.
PENTAGRAM horNET P 6121-L5 / P 6132-07 / P 6139-10
Detailed network information
- General Tab
General info on network and security.
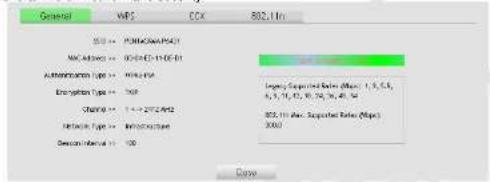
SSID – Network SSID or Hidden if AP doesn't broadcast SSID.
MAC Address - MAC address of AP.
Authentication Type – Authentication used by this network.
Encryption Type – Encryption used by this network.
Channel – Channel and frequency used by this network.
Network Type – Infrastructure or Ad hoc.
Beacon Interval – Interval for sending beacon to sustain connection.
Close - Close information.
• WPS Tab
Information on WPS (Wi-Fi Protected Setup).
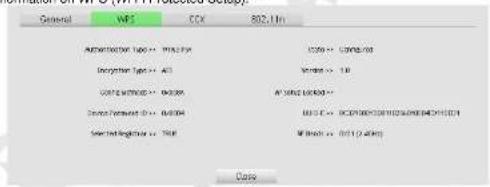
Authentication Type – There are three types of authentication modes supported by RaConfig. They are open, Shared, WPA-PSK and WPA system.
Encryption Type - For open and shared authentication mode, the selection of encryption type are None and WEP. For WPA, WPA2, WPA-PSK and WPA2-PSK authentication mode, the encryption type supports both TKIP and AES.
Config Methods – Correspond to the methods the AP supports as an Enrollee for adding external Registrars. (a bitwise OR of values)
PENTAGRAM horNET P 6121-L5 / P 6132-07 / P 6133-10
| 0x0010 | External | NFC | Token |
| 0x0020 | Integrated NFC Token | ||
| 0x0040 | NFC | Interface | |
| 0x0080 | Push | Button | |
| 0x0100 | Keypad | ||
Device Password ID - Indicate the method or identifies the specific password that the selected Registrar intends to use. AP in PBC mode must indicate 0x0004 within two-minute Walk Time.
| Value Description | |
| 0x0000 | Default |
| 0x0001 | User-specified |
| 0x0002 | Rekey |
| 0x0003 | Display |
| 0x0004 | PushButton |
| 0x0005 | Registrar-specified |
| 0x0006-0x000F | Reserved |
(PIN)
(PBC)
Selected Registrar – Indicate if the user has recently activated a Registrar to add an Enrollee. The values are TRUE and FALSE.
State - The current configuration state on AP. The values are Unconfigured and Configured.
Version - WPS specified version.
AP Setup Locked – Indicate if AP has entered a setup locked state.
UUID-E - The universally unique identifier (UUID) element generated by the Enrollee. There is a value. It is 16 bytes
RF Bands – Indicate all RF bands available on the AP. A dual-band AP must provide it.
The values are 2.4GHz and 5GHz.
Close - Close information.
- CCX Tab
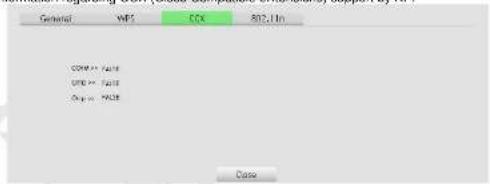
Information regarding CCX (Cisco Compatible eXtensions) support by AP.
PENTAGRAM horNET P 6121-L5 / P 6132-07 / P 6133-10
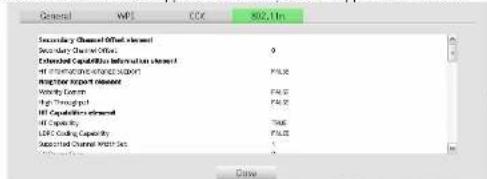
802.11n
Detailed information about APs support of 802.11n protocol and its functions. FALSE
value means function is not supported or disabled. TRUE - supported and enabled
Advanced Tab
This Tab can be used to change advanced wireless network adapter options.
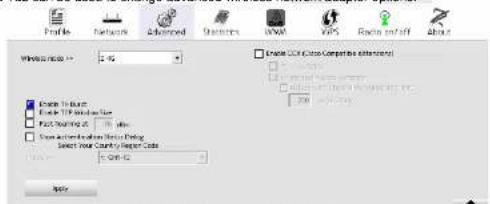
Wireless mode - Select wireless mode in which adapter will work.
Enable TX BURST - Selecting this mode may accelerate frame transmission.
Enable TCP Window Size - Selecting this feature may improve TCP performance on wireless connections.
Fast Roaming - Switchover between access points will occur when the current access point's minimum signal strength threshold set in this field is exceeded.
Show Authentication Status Dialog – When you connect AP with authentication, choose whether show Authentication Status Dialog or not. Authentication Status Dialog displays the process about 802.1x authentication.
Select Your Country Region Code – The item selected in this field determines the channels (frequencies) available. In some cases driver will select region based on regional settings of operating system – in those cases it's not possible to change this value.
Enable CCX (Cisco Compatible eXtensions) – This enables support for Cisco Compatible Extensions.:
- Turn on CCKM – Using LEAP allows taking advantage of CCKM (Cisco Centralized Key Management)
PENTAGRAM horNET P 6121-L5 / P 6132-07 / P 6139-10
Statistics Tab
This Tab shows Transmit and Receive statistics.
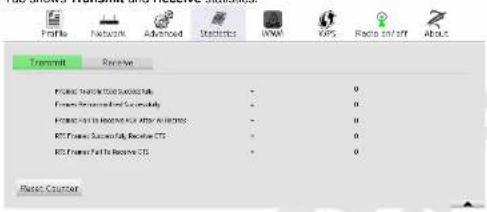
Frames Transmitted Successfully – shows the number of frames transmitted without errors. Frames Retransmitted Successfully – shows the number of frames transmitted successfully after retrying.
Frames Fail To Receive ACK After All Retries – shows the number of frames which did not receive acknowledgement after all retries.
RTS Frames Successfully Receive CTS – shows the number of RTS (Request To Send) frames which received responses in the form of CTS (Clear To Send) frames. RTS Frames Fail To Receive CTS – shows the number of RTS (Request To Send) frames which did not receive responses in the form of CTS (Clear To Send) frames.
Reset Counter - Click this button to reset all Transmit statistics.
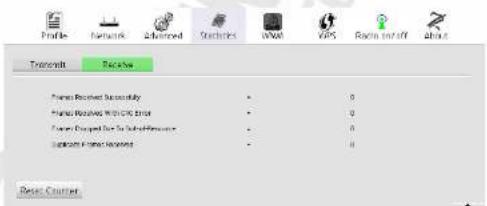
Frames Received Successfully – shows the number of frames received without errors. Frames Received with CRC Error – shows the number of frames received with CRC errors. Frames Dropped Due To Out-of-Resource – shows the number of frames dropped due to resource issue.
Duplication Frames Receive – shows the number of received duplicate frames. Reset Counter – Click this button to reset all Receive statistics.
PENTAGRAM horNET P 6121-L5 / P 6132-07 / P 6139-10
WMM Tab
This Tab contains settings for WMM (Wi-Fi Multimedia), which provide basic CoS (Quality of Service) for 802.11 networks. WMM prioritize traffic based on four Access Categories (AC): voice, video, best effort and background. WMM doesn't guarantee throughout for ACs and can be used for VoIP applications. To use WMM functions WMM must be also supported by AP.
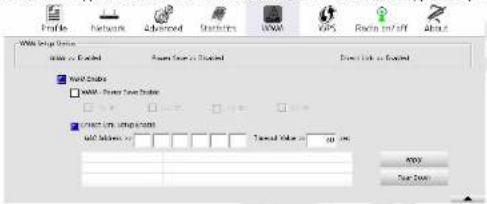
WMM Setup Status - Status of WMM options: Disabled or Enabled.
WMM Enable – Enable Wi-Fi Multi-Media.
WMM - Power Save Enable - Enable WMM Power Save and select ACs: AC_BK (background), AC_BE (best effort), AC_VI (video), AC_VO (voice).
Direct Link Setup Enabled – Enable DLS (Direct Link Setup). MAC Address - MAC Address of remote STA /must benign to two conditions: connect with
MAC Address = MAC Address of Remote STA (must conform to two conditions: connect with the same AP that support DLS features and have to enable DLS).
Timeout Value – represents that it disconnect automatically after some seconds. The value is integer. The integer must be between 0-55535. It represents that it always connects if the value is zero. Default value of Timeout Value is 60 seconds. Answer: Click to save DLG and add bits the list
Apply - Click, to save DLS and add it to the list. Tear Down - Select DLS from list and click this button. to remove it.
PENTAGRAM horNET P 6121-L5 / P 6132-07 / P 6139-10
WPS Tab
The primary goal of Wi-Fi Protected Setup (Wi-Fi Simple Configuration) is to simplify the security setup and management of Wi-Fi networks. Ralink STA as an Enrollee or external Registrar supports the configuration setup using PIN configuration method or PBC configuration method through an internal or external Registrar.
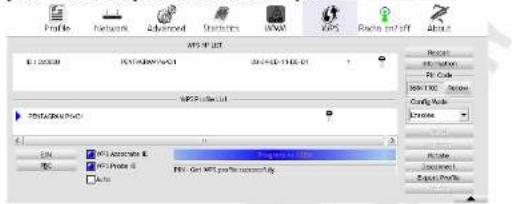
WPS AP List – Display the information of surrounding APs with WPS IE from last scan result. List information includes SSID, BSSID. Channel, ID (Device Password ID), Security-Enabled.
Rescan – Issue a rescan command to wireless NIC to update information on surrounding wireless network.
Information – Display the information about WPS IE on the selected network. List information includes Authentication Type, Encryption Type, Config Methods, Device Password ID, Selected Registrar, State, Version, AP Setup Locked, UUID-E and RF Bands. Details can be found in Detailed network information section.
PIN Code - B-digit numbers. It is required to enter PIN Code into Registrar using PIN method. When STA is Enrollee, you can use Renew button to re generate new PIN Code. Config Mode - Our station role-playing as an Enrollee or an external Registrar
WPS Profile List - Display all of credentials got from the Registrar. List information includes SSID, MAC Address, Authentication and Encryption Type. If STA Enrollee, credentials are created as soon as each WPS success. If STA Registrar, RaUI creates a new credential with WPA2-PSK/AES/64-Hex-Key and doesn't change until next switching to STA Registrar.
Detail – Displays Credential information in secondary pane.
Connect - Command to connect to the selected network inside credentials. The active selected credential is as like as the active selected Profile.
Rotate - Command to rotate to connect to the next network inside credentials.
Disconnect – Stop WPS action and disconnect this active link. And then select the last profile at the Profile Page of RaUI if exist. If there is an empty profile page, the driver will select any non-security AP.
Export Profile - Export all credentials to Profile.
Delete – Delete an existing credential. And then select the next credential if exist. If there is an empty credential, the driver will select any non-security AP.
PIN - Start to add to Registrar using PIN configuration method. If STA Registrar, remember
PENTAGRAM horNET P 6121-L5 / P 6132-07 / P 6133-10
WPS associate IE - Send the association request with WPS IE during WPS setup. It is optional for STA.
WPS probe IE - Send the probe request with WPS IE during WPS setup. It is optional for STA.
Progress Bar – Display rate of progress from Start to Connected status.
Status Bar = Display currently WPS Status. Automatically select the AP - Start to add to AP by using to select the AP automatically in
Credential information
Modification of these settings is possible only in Registrar mode.
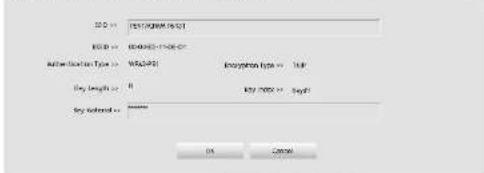
SSID – Network SSID in credential.
BSSID – Network BSSID in credential.
Authentication Type – Authentication used by network in credential.
Encryption Type - Encryption used Key Length - Encryption key length
Key Index - Encryption key index
Key Material – Encryption key.
OK – Closes credential information and saves settings.
Cancel – Closes credential information without saving settings.
PENTAGRAM horNET P 6121-L5 / P 6132-07 / P 6139-10
Radio On/Off Tab
Click this Tab to enable or disable radio transmission. Green icon - RF ON, red icon - RF off.
About Tab
The About Tab contains driver, application and network adapter information.
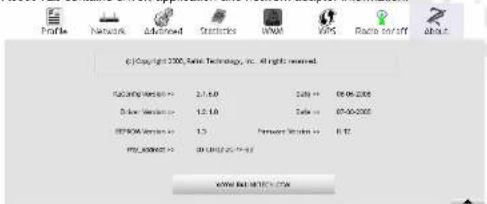
RaConfig Version - Shows the version of the RaConfig application.
Driver Version – Shows the current driver version.
Date - Shows the application/driver release date.
EEPROM Version – Shows the current EEPROM revision.
Firmware Version – Shows the current firmware revision.
Phy_Address - Shows the adapter's physical address (MAC)
Troubleshooting
This chapter provides solutions to problems that may occur during the installation and operation of the Wireless PCI/USB/Cardbus Adapter. Read the descriptions below to solve your problems.
1. The Wireless PCI/USB/Cardbus Adapter does not work properly.
- Reinsert the Wireless Adapter into your PC's PCI/USB/Cardbus slot (Remember to unplug PC from power outlet before installing or removing PCI adapter).
- Right click on My Computer and select Properties. Select the device manager and click on the Network Adapter. You will find the Adapter if it is installed successfully. If you see the yellow exclamation mark, the resources are conflicting. You will see the status of the Adapter. If there is a yellow question mark, please check the following:
- Make sure that your PC has a free IRQ (Interrupt Request, a hardware interrupt on a PC.)
- Make sure that you have inserted the right adapter and installed the proper driver. If the Adapter does not function after attempting the above steps, remove the adapter and do the following:
- Uninstall the driver software from your PC.
- Restart your PC and repeat the hardware and software installation as specified in this User Guide.
2. I cannot communicate with the other computers linked via Ethernet in the Infrastructure configuration.
- Make sure that the PC to which the Adapter is associated is powered on.
• Make sure that your Adapter is configured on the same channel and with the same
3. What should I do when the computer with the Adapter installed is unable to connect to the wireless network and/or the Internet?
- Check that the LED indicators for the broadband modem are indicating normal activity, if not, there may be a problem with the broadband connection.
- Check that the LED indicators on the wireless router or AP are functioning properly.
- Check that the IP address, subnet mask, gateway, and DNS settings are correctly entered for the network.
- In Infrastructure mode, make sure the same Service Set Identifier (SSID) is specified on the settings for the wireless clients and access points.
- In Ad-Hoc mode, both wireless clients will need to have the same SSID. Please note that it might be necessary to set up one client to establish a BSS (Basic Service Set) and wait briefly before setting up other clients. This prevents several clients from trying to establish a BSS at the same time, which can result in multiple singular BSSs being established, rather than a single BSS with multiple clients associated to
- Check that the Network Connection for the wireless client is configured properly.
- If Security is enabled, make sure that the correct encryption keys are entered on both the Adapter and the access point.
PENTAGRAM horNET P 6121-L5 / P 6132-07 / P 6139-10
Specifications
Chipset:
PCI/Cardbus: Ralink RT2760T
USB: Ralink RT2770R
Supported standards: IEEE 802.11b, IEEE 802.11g, IEEE 802.11n (Draft 2)
Modulation Type:
108/120/162/180/216/240/243/270/300 Mb/s - 40 MHz BW
Used frequencies (channels):
2412-1462 MHz (1-11)-North America
2412-2472 MHz (1-13)-Europe
2412-2484 MHz (11-14)-Japan
Security: WPA, WPA-PSK (TKIP/AES), WPA2, WEP 64/128/152bit,
WPA-EAP, WPA2-EAP, PEAP authentication
LED indicator: LNK/ACT
Interface: PCI/USB/Cardbus
Power: from PCI/USB/Cardbus port
Antenna:
PCI: two external 3dBi (RP-SMA connector)
USB/Cardbus: two internal 2dB
Range: up to 300 m
Temperature:
operation: 0^ C to 40^ C
storage: -20°C to 70°C
Humidity: operation: 10% to 95% without condensation
operation: 10% to 85%, without condensation
storage: 5% to 90%, without condensation
PENTAGRAM horNET P 6121-L5 / P 6132-07 / P 6139-10
- INDEX
- Introduction
- Package Contents
- Before you begin
- Installing drivers and utilities
- PENTAGRAM horNET P 6121-L5 / P 6132-07 / P 6139-10
- Installing the adapter
- PCI adapter
- USB adapter
- Cardbus adapter
- Wireless adapter configuration
- RaUI application
- PENTAGRAM horNET P 6121-L5 / P 6132-07 / P 6133-10
- Profile Tab
- Profile configuration – System Config Tab
- Profile configuration – Auth. \ Encry. Tab
- • Authentication: LEAP
- • Authentication: WPA and WPA2
- • Authentication: WPA PSK and WPA2 PSK
- Profile configuration - 8021X Tab
- • ID: PASSWORD Tab
- - Client Certification Tab
- • Server Certification Tab
- - EAP Fast Tab
- Network Tab
- Detailed network information
- - General Tab
- • WPS Tab
- - CCX Tab
- 802.11n
- Advanced Tab
- Statistics Tab
- WMM Tab
- WPS Tab
- Credential information
- Radio On/Off Tab
- About Tab
- Troubleshooting
- The Wireless PCI/USB/Cardbus Adapter does not work properly.
- I cannot communicate with the other computers linked via Ethernet in the Infrastructure configuration.
- What should I do when the computer with the Adapter installed is unable to connect to the wireless network and/or the Internet?
- Specifications
Brand : Pentagram
Model : P 6132-07
Category : Uncategorized