200-013 - Compressor Meec Tools - Free user manual and instructions
Find the device manual for free 200-013 Meec Tools in PDF.


| Product Type | Air Compressor |
| Brand | Meec Tools |
| Model | 200-013 |
| Rated Voltage | 230 V ~ 50 Hz |
| Motor Output | 3 hp |
| Speed | 2850 rpm |
| Operating Pressure | 8 bar |
| Pressure Tank Volume | 50 L |
| Stated Air Volume | 412 L/min |
| Sound Power Level (LwA) | 91.2 dB(A) |
| Guaranteed Sound Power Level | 97 dB(A) |
| Sound Pressure Level (LpA) | 71.2 dB(A), K=2 dB |
| Protection Rating | IP20 |
| Weight | 44 kg |
| Oil Type Recommended | SAE 15W/40 or equivalent |
| Oil Change Interval | First after 100 hours, then every 500 hours |
| Tank Corrosion Check Interval | Every 12 months (3 months in adverse conditions) |
| Minimum Tank Wall Thickness | 2 mm for shell and heads |
| Pressure Switch: Connection Pressure | 5 bar |
| Pressure Switch: Disconnection Pressure | 8 bar |
| Ambient Temperature Range | +5°C to +40°C |
Frequently Asked Questions - 200-013 Meec Tools
User questions about 200-013 Meec Tools
0 question about this device. Answer the ones you know or ask your own.
Ask a new question about this device
Download the instructions for your Compressor in PDF format for free! Find your manual 200-013 - Meec Tools and take your electronic device back in hand. On this page are published all the documents necessary for the use of your device. 200-013 by Meec Tools.
USER MANUAL 200-013 Meec Tools
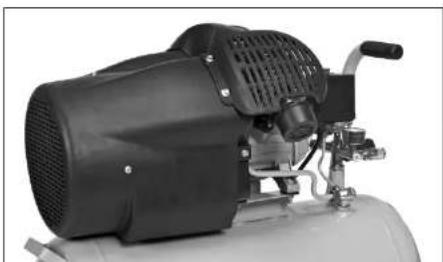
Operating instructions for Compressor 3 hp
200-013
natural_image
Close-up of a black industrial air compressor unit mounted on a cylindrical base (no visible text or symbols)SVENSKA 4
Symbols on the machine 23
Installation instructions.... 24
Safety instructions for work with compressed air and paint spraying 24
Follow the safety instructions when spray painting! 24
Use of pressure vessels in conformance with the pressure vessel safety act 25
Before starting....26
Fitting the wheels 26
Fitting the rubber buffer 26
Fitting the oil plug 26
Electrical connection 26
Condensation water 27
Pressure relief valve 27
Check the oil level regularly 27
Changing the oil 27
Cleaning the intake filter 27
Corrosion must be prevented 27
Pressure switch setting 28
Possible causes 28
SVENSKA
SÄKERHETSANVISNINGAR
natural_image
Mechanical assembly diagram showing internal components with numbered parts (8 and 9), no readable text or symbols present.SVENSKA
HANDHAVANDE
Före driftstart
Montera hjulen
natural_image
Technical line drawing of a mechanical assembly with a wheel, shaft, and housing (no text or symbols)Montera gummibuffert
natural_image
Technical line drawing of a mechanical assembly with a wheel, shaft, and housing (no text or symbols)Montere gummibuffer
Vermessere as liquid and as hydroxide and

NORSK
VEDLIKEHOLD
natural_image
Mechanical component diagram showing a cylindrical body with internal components and labeled point A (no text or symbols beyond label)KONSERWACJA
Read these instructions carefully before use!
NOTE! When using this compressor, the following basic precautions must be taken to protect against electric shock, risk of personal injury and fire hazards.
Read these instructions before using the compressor and follow them during use.
Symbols on the machine

Read the Operating Instructions.

Electric shock hazard!

Wear ear protection.

Warning for hot parts!
- Keep the work area tidy. Untidy work areas increase the risk of accidents and injuries.
- Take into account any surrounding factors that might affect the work. Do not expose the compressor to rain. Do not use the compressor in wet or damp places. Make sure the work area is well lit. Do not use the compressor near flammable liquids or gases.
- Protect against the risk of electric shock. Do not touch earthed or grounded surfaces such as pipes, radiators, cookers and refrigerators.
- Keep children away from the compressor! Do not allow other people to touch the compressor or the cable. Keep others away from your workplace.
- Store in a safe place. When the compressor is not in use, store it in a dry, enclosed space and out of the reach of children.
- Do not overload the compressor. It works better and safer when used within the specified capacity range.
- Wear proper work clothes. Do not wear loose-fitting clothing or jewellery. They can get caught in moving parts. Wear rubber gloves and non-slip shoes when working outdoors. Wear a hair net if
ENGLISH
- Check your compressor for damage. Before further use, carefully check that the safety equipment or slightly damaged parts are operating properly and as intended. Make sure that moving parts function correctly, do not jam and are not damaged. All parts must be correctly fitted and all conditions for the compressor must be met. Damaged safety equipment and parts must be repaired or replaced professionally at a service centre unless otherwise stated in the Operating Instructions. Damaged circuit-breakers must be replaced by a service centre. Do not use the tool if it cannot be switched on and off using the power switch.
NOTE! For your own safety, only use accessories and optional equipment specified in the Operating Instructions or that have been recommended or specified by the dealer. The use of tools or accessories other than those recommended in these Operating Instructions or in the catalogue can result in personal injury. - Repair work must be carried out by an electrician. Otherwise accidents can occur.
- Connect the vacuum cleaner device. If there is a connection unit for the vacuum cleaner device, this should be connected and used.
- Noise. The noise level at the workplace may exceed 85 dB(A). In this case, the user must wear ear protection.
Installation instructions
- Check the compressor for transport damage. Immediately report any damage to the dealer.
- Check the oil level in the compressor pump before starting.
- Stand the compressor close to the user.
- Avoid long air lines and long supply lines (extensions).
• Make sure the intake air is dry and free from dust. - Do not position the compressor in a damp or wet area.
- The compressor may only be used in suitable areas (adequate ventilation, ambient temperature +5°C/+40°C). The area must be free of dust, acids, steam, or explosive or flammable gases.
• The compressor is suitable for use in dry areas. - Do NOT use the compressor in areas where water jets are used.
Safety instructions for work with compressed air and paint spraying
• The compressor and lines reach high temperatures while operational. Contact results in burns.
- Gases or vapours drawn in by the compressor must be kept free from contamination that can result in fire or explosions in the compressor.
- Hold the coupling part firmly with your hand when you loosen the hose coupling to prevent injury due to the hose flying backwards.
- Wear eye protection when working with the blow sun. Foreign objects and parts that are blown
ENGLISH
Use of pressure vessels in conformance with the pressure vessel safety act
- Anyone using a pressure tank must keep it in perfect working order, use and monitor it properly, perform the necessary maintenance and repairs without delay and take precautions that circumstances dictate.
- The supervisory authorities can occasionally arrange the necessary supervisory measures.
- A pressure tank may not be used if it has deficiencies that may pose a risk to users or third parties.
- Regularly check the pressure tank for damage, e.g. rust. Contact the customer support centre if damage is found.
TECHNICAL DATA
| Rated voltage | 230 V ~ 50 Hz |
| Output | 3 hp |
| Speed | 2850 rpm |
| Operating pressure | 8 bar |
| Pressure tank volume | 50 l |
| Stated air volume | 412 l/min |
| Sound power level, LwA | 91.2 dB(A) |
| Guaranteed sound power level, LwA | 97 dB(A) |
| Sound pressure level, LpA | 71.2 dB(A). K=2 dB |
| Protection rating | IP20 |
| Weight | 44 kg |
Wear hearing protection!
The declared vibration value, which has been measured by a standardised test method, can be used to compare different tools with each other and for a preliminary assessment of exposure.
WARNING!
The actual vibration level when using power tools may differ from the specified maximum value, depending on how the tool is used. It is therefore necessary to determine which safety precautions are required to protect the user, based on an estimate of exposure in actual operating conditions (taking into account all stages of the work cycle, e.g. the time when the tool is switched off and when it is idling, in addition to the start-up time).
DESCRIPTION

ENGLISH
OPERATION
Before starting
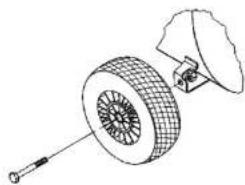
Fitting the wheels
Assemble the supplied wheels as shown in figure 1. Ensure the valve points outwards.
natural_image
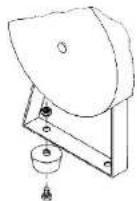
Technical line drawing of a mechanical assembly with a wheel, shaft, and housing (no text or symbols)Fitting the rubber buffer
Assemble the supplied rubber supports on the support feet as shown in figure 2.
Fitting the oil plug
Loosen the factory-fitted plug from the opening for oil filling with a screwdriver and fit the enclosed plug in the opening. NOTE: Check the oil level before use.
Electrical connection
The consensus is considered with a consensus

ENGLISH
MAINTENANCE
NOTE! The compressor must not be pressurised or connected to the mains supply when being cleaned or maintained.
Condensation water
The condensation water must be emptied after use by opening the drain valve (at the bottom of the pressure tank).
NOTE! Condensation water can contain small amounts of oil. Deposit the condensation water at a local authority recycling centre.
Pressure relief valve
The pressure relief valve is set to the highest permitted pressure for the pressure tank. Do NOT change the pressure relief valve setting or remove the seal. The pressure relief valve must be activated periodically for it to work correctly. Turn the knurled screw to the left until compressed air can be heard escaping. Now turn the knurled screw to the right until it stops and then tighten hard by hand.
Check the oil level regularly
The oil level must be visible between the red check level and the upper edge of the sight glass.
Changing the oil
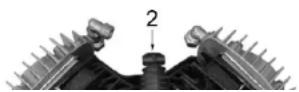
Recommended oil: SAE 15W/40 or equivalent. The first oil change should be performed after 100 hours of operation. The oil should then be drained and refilled after every 500 hours of operation. Switch off the motor and remove the plug from the wall socket. Once you have released any remaining air pressure, unscrew the oil drain plug on the compressor pump. Collect the oil by placing a container under the oil drain hole.
If all the oil does not drain out, we recommend that you tip the compressor slightly. Waste oil should be deposited at a recycling centre. When the oil has drained out, replace the oil drain plug/sight glass. Remove the cap on the oil fill plug with a screwdriver and fill with oil until it reaches the red level on the sight glass. Then refit the cap on the oil fill plug.
ENGLISH
During maintenance, every 12 months, the user or a Client Service expert must check the presence of internal corrosion and perform an external visual control. If the receiver is used with an oil-free compressor, or in surroundings that have a high level of humidity, or in adverse conditions (poor ventilation, corrosive agents,...) the inspections should be made every 3 months.
The actual wall thickness of the tank after corrosion should not be smaller than 2mm for the shell and 2 mm for the heads.
Pressure switch setting
The pressure switch has been set at the factory.
Connection pressure 5 bar Disconnection pressure 8 bar
TROUBLESHOOTING
Possible causes
Which lead to overloading of the motor whereby the overload protection trips:
- too high ambient air temperature and insufficient air supply
• defective compressor valves or leaking non-return valve - min. oil level, connecting rod bearing runs slowly
Switch on the AC motor again after a period of cooling. Avoid touching hot parts of the equipment and pipes.

EC DECLARATION OF CONFORMITY EG FÖRSÄKRAN OM ÖVERENSSTÄMMELSE EF SAMSVARSERKLÆRING DEKLARACJA ZGODNOŚCI WE

Jula AB, Box 363, SE-532 24 SKARA, SWEDEN
- SVENSKA 4
- SÄKERHETSANVISNINGAR
- HANDHAVANDE
- Före driftstart
- Montera hjulen
- Montera gummibuffert
- Montere gummibuffer
- VEDLIKEHOLD
- KONSERWACJA
- Read these instructions carefully before use!
- Symbols on the machine
- ENGLISH
- Installation instructions
- Safety instructions for work with compressed air and paint spraying
- Use of pressure vessels in conformance with the pressure vessel safety act
- Wear hearing protection!
- WARNING!
- OPERATION
- Before starting
- Fitting the wheels
- Fitting the rubber buffer
- Fitting the oil plug
- Electrical connection
- MAINTENANCE
- Condensation water
- Pressure relief valve
- Check the oil level regularly
- Changing the oil
- Pressure switch setting
- TROUBLESHOOTING
- Possible causes
Brand : Meec Tools
Model : 200-013
Category : Compressor