RBC-4500 - Bill counter Royal Sovereign - Free user manual and instructions
Find the device manual for free RBC-4500 Royal Sovereign in PDF.


| Product Type | Bill Counter |
| Model | RBC-4500 |
| Brand | Royal Sovereign |
| Power Supply | Single-phase 100-240V, 50/60Hz (±5%) |
| Power Consumption | <50W |
| Operating Temperature | 32-104°F (0-40°C) |
| Counting Speed | 900, 1200, 1400 bills per minute (selectable) |
| Note Size Range | 4.3" x 2.0" to 7.3" x 3.5" (110 x 50 to 185 x 90 mm) |
| Display | Full dot matrix LCD |
| Dimensions (W x D x H) | 10.4" x 9.5" x 9.6" (263 x 241 x 245 mm) |
| Net Weight | 10.1 lbs (4.6 kg) |
| Feeding System | Front loading with automatic or manual start |
| Counterfeit Detection | UV, Magnetic (MG), Dimension (DD), Double detection |
| Detection Sensitivity | Adjustable from 1 (low) to 5 (high) for UV, MG, DD, and Double |
| Counting Modes | Standard count, Batch (1-999), Add mode, Value counting (denomination and total value) |
| Printer Interface | Serial, baud rate selectable (4800-57600 bps), 8 data bits, 1 stop bit |
| Hopper Capacity | Approximately 200 bills (not specified, typical for such counters) |
| Stacker Capacity | Approximately 200 bills |
| Maintenance | Clean sensors with soft brush or compressed air; adjust thickness knob as needed |
| Safety Features | Auto self-test, error code display, automatic stop on counterfeit or jam |
| Included Accessories | Power cord, user manual |
| Warranty | Limited one year from date of original purchase |
| Country of Origin | Not specified, likely China (typical for Royal Sovereign) |
Frequently Asked Questions - RBC-4500 Royal Sovereign
User questions about RBC-4500 Royal Sovereign
0 question about this device. Answer the ones you know or ask your own.
Ask a new question about this device
Download the instructions for your Bill counter in PDF format for free! Find your manual RBC-4500 - Royal Sovereign and take your electronic device back in hand. On this page are published all the documents necessary for the use of your device. RBC-4500 by Royal Sovereign.
USER MANUAL RBC-4500 Royal Sovereign
With UV and Magnetic Counterfeit Detection
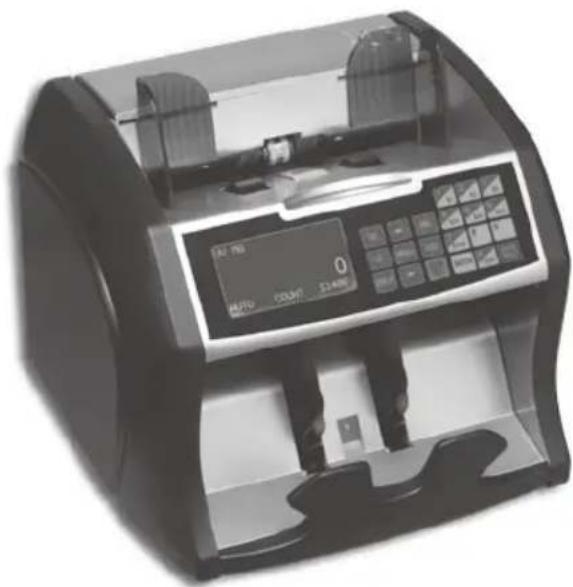
Please read and retain these instructions. To register your product, please go to www.royalsovereign.com USA-Customer Support Tab then Registration Tab.
www.royalsovereign.com
Royal Sovereign International, Inc.
2014.01
SAFETY INSTRUCTIONS
Warning
When using this machine follow these basic safety precautions to reduce risk of fire, electric shock or injury.
- Do not place the machine in area where it may be exposed to water or other liquids.
- Before cleaning the machine always unplug the machine from the wall. Do not use liquid or aerosol cleaners on the machine.
- To reduce the risk of electrical shock, do not take apart the machine. When service or repair work is needed bring it to a qualified service repair technician.
- Only use the power cord that comes with the machine. Using a different power cord may result in electric shock, fire or cause serious damage to machine.
- Do not use the machine in areas with high temperature or high humidity. This may result in the machine not working properly.
Caution
- When unplugging the power plug, grip the plug to pull it out. Pulling the cord may result in electric shock, fire or damage to the machine.
- Do not use the machine if the power cord is damaged. This may result in electric shock, fire or other hazards.
- Do not place objects on the power cord and do not bend it excessively. This may result in electric shock, fire or other hazards.
- When not using the machine for long periods of time, unplug the power cord from the outlet.
CONTENTS
Box Contents 4
Parts 4
Controls 5
Features 6\~7
Operation 8\~10
Specifications 10
Troubleshooting 10
Error Code Displays 11
Warranty 12
Contact Information 12
Bill Counter, Power Cord
PARTS
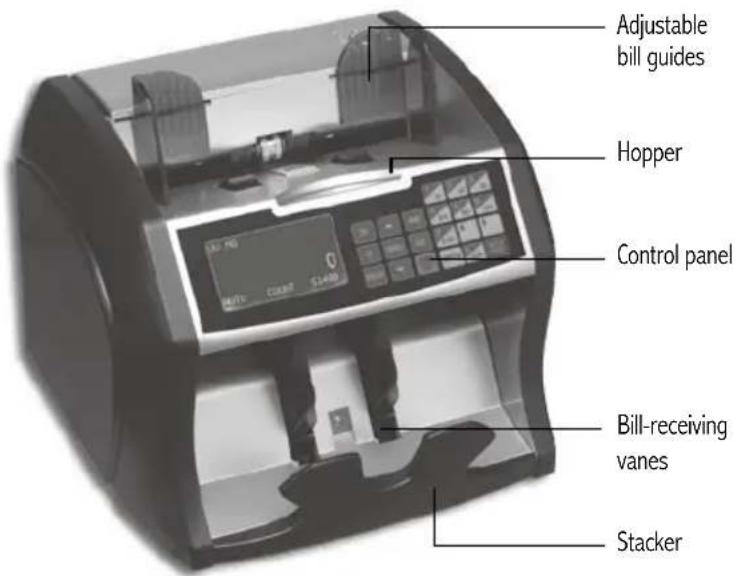
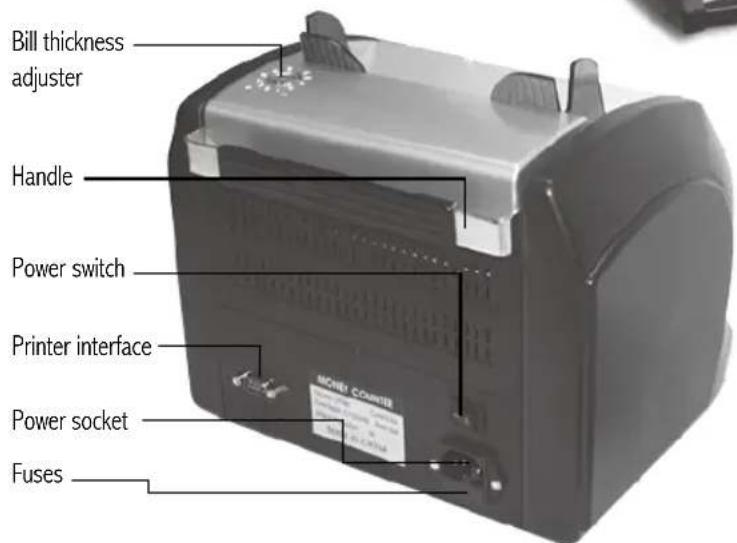
CONTROLS
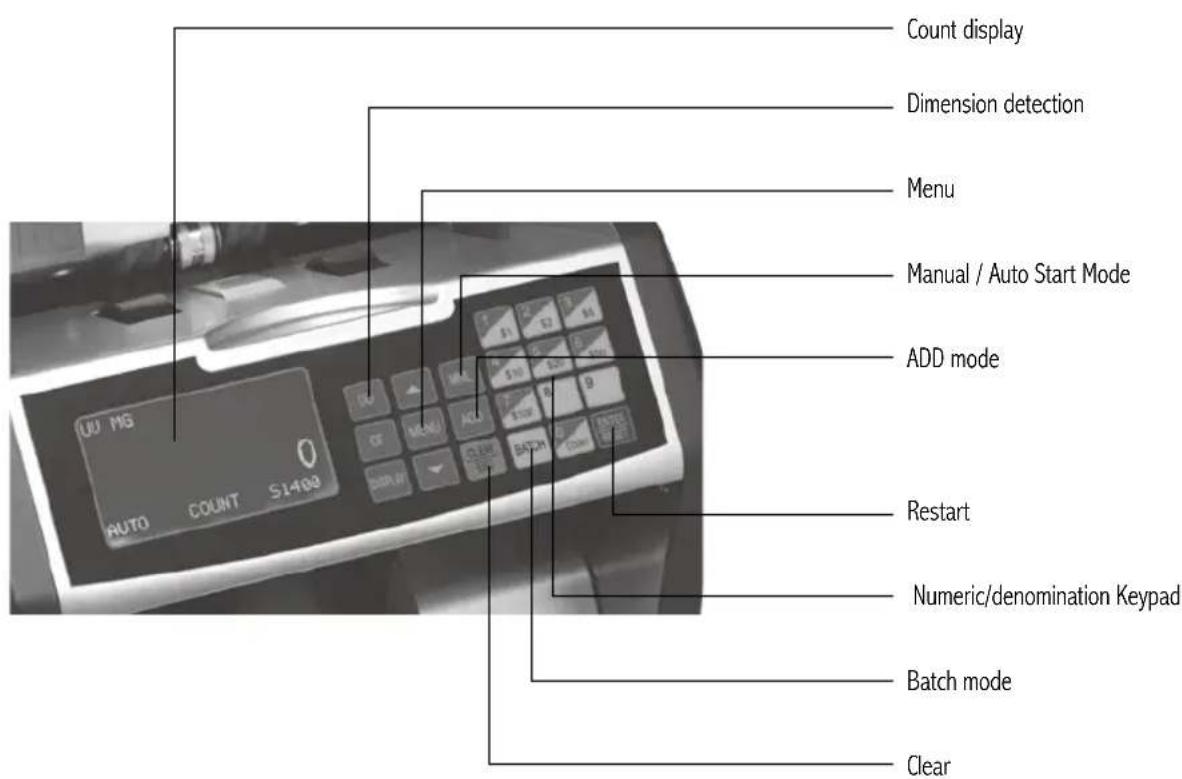
FEATURES
Front Loading
The sophisticated front loading system provides easy access to hopper, allows larger hopper capacity, and is more durable than a back loading system.
Automatic Self-Test
The machine will automatically perform a self-test when it is turned on. If there is a problem, the preset display will show an error code. (See ERROR CODE DISPLAYS.)
Auto and Manual Start Modes
The machine is preset to automatically start counting bills once placed into the hopper. To change to the manual start mode, press MNL, insert the bills into the hopper, and press Enter/Reset. Press MNL again to return to auto mode.
Magnetic Counterfeit Detection
If the magnetic detector does not find the presence of magnetic components that are standard in authentic bills, the machine will stop counting to allow removal of the counterfeit bill and display the error code on the preset display. To use magnetic counterfeit detection press menu key, 2 for Level, 2 for MG, then select number key 1-5, 1 for lowest, 5 for highest then press Enter/Reset.
UV Counterfeit Detection
Counterfeit bills often use white or bleached paper, which will glow under ultraviolet light. To use ultraviolet counterfeit detection press menu key, 2 for Level, 1 for UV, then select number key 1-5, 1 for lowest, 5 for highest then press Enter/Reset. When the UV detector finds a counterfeit bill, the machine will stop counting to allow removal of the counterfeit bill and display the error code on the preset display.
Dimension Detection
The dimension detector measures the width of the center of each bill by using infrared light. If the detector finds an odd sized bill, the machine will stop counting to allow removal of the bill and display the error code on the preset display. To use dimension counterfeit detection press menu key, 2 for Level, 3 for DD, then select number key 1-5, 1 for lowest, 5 for highest, then press Enter/Reset.
Double Set
The double set detector measures the thickness of each bill. If the detector finds an odd sized bill, the machine will stop counting to allow removal of the bill and display the error code on the preset display. To use double set counterfeit detection press menu key, 2 for Level, 4 for Double, then select number key 1-5, 1 for lowest, 5 for highest then press Enter/Reset.
Batch Counting Modes
The machine is preset to common counting mode, which automatically counts all bills placed into the hopper. To count bills in batches, press BATCH. Batching is preset to 100 bills. To change batch amount, use the keypad to enter a batch number between 1 and 999. Press Enter/Reset to save the setting. Press BATCH key again to clear.
Add Mode
The ADD mode displays cumulative total of all bills counted. To turn ADD mode on, press ADD. Press ADD key again to clear.
Value Counting
The machine will total the number of bills by denomination and total value by denomination as well as a grand total. Each denomination must be counted separately. To operate press ADD key. Then on the keypad press the denomination to be counted (\1 - \100). After denomination is counted press the next denomination to be counted and continue until all denominations needed to be counted is complete. Then press DISPLAY key and you can view total number of bills and values of each denomination along with a grand total.
Variable Speed
The machine has three speed settings. 900, 1200, 1400 bills per minute. Use lower speed settings for older or worn bills. To set the speed setting press menu key, 1 for Speed, then select number key 1-3.
Connect to printer
Plug printer cable into printer interface on back of unit and turn printer on. The interface communication format is 8 data bits, and white parity bit, one stop bit. Baud rate(optional): 4800bps, 9600bps, 14400bps, 19200bps, 28800bps, 57600bps. Factory defaults is 9600bps. Press “▼” for 2 seconds to print.
OPERATION
Operation preparation
- Plug in power cable and turn power switch on.
- Set applicable Menu settings. You can do any operation on the machine after finishing above preparation.
Menu Settings
Press "menu" key, you will see:
- SPEED SET 2. LEVEL SET 3. WARN COUNT SET 4. DATE&TIME 5. BEEP 6. PRINTER INTERFACE, press “▲, ▼” keys and select the item you need, then, press RESET·ENTER.
1. SPEED SET
Press RESET·ENTER key, there are three speeds: SPEED1, 900pcs/min, SPEED2, 1200pcs/min, SPEED3, 1400pcs/min. Press the number keys :1, 2, 3 or press “▲, ▼” key and select the speed, then press RESET·ENTER.
2. LEVEL SET
Press Enter/Reset. key and start the setting, it will show: 1. UV LEVEL, 2. MG LEVEL, 3. DD LEVEL, 4. DOUBLE LEVEL. Press “▲, ▼”key and select the item you need, then press RESET·ENTER Each setting sensitivity has 5 levels: (1.low, 3.middle and 5.high), press number key of 1-5 and select the sensitivity level, then press RESET·ENTER key.
3. WARN COUNT SET
Press RESET·ENTER key and enter setting, Press “▲, ▼” key and select the item you need (YES means the fake note is included in the amount; NO means the total amount doesn’t include the fake notes), press RESET·ENTER.
4. DATE&TIME
Press RESET·ENTER key and enter the contents, it displays "YYYY-MM-DD HH:MM:SS", press number keys and set the date and time, press "▲,▼" key and select the set item, then press RESET·ENTER key and quit.
5.BEEP
Press RESET·ENTER key and set, it display ①. KEY BEEP OFF ②. KEY BEEP ON ③. WARNING BEEP OFF ④. WARNING BEEP ON. press “▲,▼” key and select the set item, then press RESET·ENTER key and quit.
6.PRINTER INTERFACE
Press RESET·ENTER key and enter the contents, ①.4800bps ②.9600bps ③.14400bps ④.19200bps ⑤.28800bps ⑥.57600bps, press “▲,▼” key and select the set item, then press RESET·ENTER key and quit.
Test Run
Test the machine to set it to count your currency. Prepare at least five bills to test the machine. Place the bills on the hopper and run the machine. If the machine counts the bills and there are no errors, it is ready to accept your currency.
If: 1. The bills are deformed
- The machine is considerably slow
- Error message is lit frequently
The hopper tension is too tight. To loosen this tension, please turn the Bill Thickness Adjuster one notch to the right (+).
Place the bills back into the hopper to test the machine again. If errors occur, adjust as necessary.
If: 1. The bills are flying out
- The display shows a miscount
- Error message is lit frequently
The hopper tension is too loose. To tighten this tension, please turn the Bill Thickness Adjuster one notch to the left (-).
Place the bills back into the hopper to test the machine again. If errors occur, adjust as necessary. When the machine is running without any errors, it is ready to accept your currency. Insert bills into the hopper to begin counting.
Add Mode:
Press ADD key and "ADD" will show in display. The machine will accumulate all counting numbers. Pressing ADD key again will turn off this feature.
Batch Mode:
Press BATCH key and "100" will flash on display. Press the number you wish to batch. Batch number can be set between 1-999. Press BATCH key again to turn this feature off.
Value Counting:
Single denomination counting-
Select denomination to be counted from the Numeric/Denomination keypad
Place bills in hopper. Total number of bills and denomination value will show on display screen after bills are counted.
Multi-Denomination Value Counting-
Press ADD key.
Select denomination to be counted from the Numeric/Denomination keypad
Place bills in hopper.
Select next denomination and repeat process above.
After all denominations are have been counted hit the DISPLAY key and the number of bills and value for each denomination along with a grand total will show on the display screen.
Auto/Manual Start Mode:
The machine is preset to automatically start counting bills once placed into the hopper. To change to the manual start mode press the MNL key, insert bills into the hopper and press ENTER/RESET key.
SPECIFICATIONS
| Model RBC-4500 | |
| Power single-phase 100~240V 50/60Hz(±5%) | |
| Power consumption <50W | |
| Surroundings temperature of usage 32~104°F / 0~40°C | |
| Counting speed 900pcs/min, 1200pcs/min and 1400pcs/min. | |
| Note-feeding size 4.3" × 2.0" ~ 7.3" × 3.5" / 110 × 50~185 × 90(mm) | |
| Display Full dot matrix LCD | |
| Cubage 10.4" × 9.5" × 9.6" / 263 × 241 × 245(mm) | |
| Net Weight 10.1 lbs / 4.6kg | |
TROUBLE SHOOTING
| Issue Reason Trouble shooting | ||
| Display shows“ DOUBLE or CHAIN” | The tension adjustment is too loose | Adjust the note thickness counterclockwise( toward ‘-’) |
| Bills not feeding properly The tension adjustment is too tight | Adjust the note thickness clockwise (toward ‘+’) | |
| Main motor and/or vane motor don’t run | Hopper plate sensor is not working correctly | Clean out hopper with soft brush or compressed air to clear out dust. Otherwise unit may need to be serviced |
| Display shows “0” but is not counting bills | Counting sensor is not working correctly | Clean the counting sensor by blowing compressed air throughout stacker and vane area of unit. Otherwise unit may need to be serviced. |
ERROR CODE DISPLAY
After start, the machine will go on self-check automatically. If preset window show the following error code, generally speaking, it is because of dust on the surface or sensor blocked by notes. So please clear the dust on the surface of sensor with brush or soft cloth, or take the notes away. Then restart the machine.
| Error code Trouble position | |
| UV CHECK FAIL UV sensor | |
| NL CHECK FAIL Left counting sensor | |
| NR CHECK FAIL Right counting sensor | |
| IRL CHECK FAIL Left double-notes sensor | |
| IRR CHECK FAIL Right double-notes sensor | |
| STACK CHECK FAIL Note-receiving sensor | |
| HOPPER CHECK FAIL Note-feeding sensor | |
| ENCODE disc CHECK FAIL Width sensor |
During counting, if error code appears and the machine stops, please solve it referring to the following methods according to what displays.
| Error code | Reason and trouble shooting |
| HALF | Half sheet. Eliminate the note. Press “reset” and count continuously. |
| DOUBLE | Double-notes. Put the notes( from stacker) onto the note-feeding table again, press “reset” key to count again. If EA2 often appears, please adjust the position of adjustment knob referring to “Confirm the position of note thickness adjustment knob”. |
| CHAIN | Jointed notes. Put the notes from stacker onto note-feeding table again, press “reset” key to count again. |
| JAM | Jammed notes. Turn off the machine, turn the note-feeding wheel by hand, and take out the note from the machine. |
| UV, MG, DD | Fake note or questionable note. Eliminate this note, press “reset” and count continuously. |
LIMITED ONE YEAR WARRANTY
This warranty applies to repair or replacement of product found to be defective in material or workmanship for one year from the date of the original purchase. This warranty is extended only to the original purchaser.
This warranty does not apply to damage resulting from abuse, misuse, or improper maintenance of damage that is attributable to acts of nature. Royal Sovereign International, Inc. (and its affiliated companies) is not liable for incidental or consequential damages of any nature. This limitation would not apply if you live in those areas that do not permit the exclusion or limitation of incidental or consequential damages.
Defective products for warranty repair or replacement cannot be returned without a Return Authorization number. Please go to www.royalsovereign.com USA-Customer Support Tab to make a request for an Office Product Return Authorization.
Defective products must be returned to Royal Sovereign International Consumer Return Department, freight prepaid, with proof of purchase and Return Shipping and Handling payment (check or money order). Upon repair or replacement the product will be returned to the customer.
Return defective product to the following address with a detailed description of the problem. If possible, pack in original carton. Please prepay shipping charges.
For out of warranty service or frequently asked questions please go to www.royalsovereign.com USA- Customer Support Tab.
For sales of product, parts or accessories please visit us at www.royalsovereign.com.
For service or sales, please contact your local Royal Sovereign Office:
ROYAL SOVEREIGN INTERNATIONAL, INC. RS CANADA INC.
2 Volvo Drive Rockleigh, NJ 07647 USA
TEL: +1) 800-397-1025 FAX: +1) 201-750-1022
TF: +1) 866 961-6673
5610 Timberlea Blvd, Mississauga, L4W 4M6, CANADA
TEL: +1) 1-905-614-1370 FAX: 1-905-614-0597
www.royalsovereign.com
Español
www.royalsovereign.com
Royal Sovereign International, Inc.
2014.01
www.royalsovereign.com
- SAFETY INSTRUCTIONS
- Warning
- Caution
- CONTENTS
- PARTS
- CONTROLS
- FEATURES
- Front Loading
- Automatic Self-Test
- Auto and Manual Start Modes
- Magnetic Counterfeit Detection
- UV Counterfeit Detection
- Dimension Detection
- Double Set
- Batch Counting Modes
- Add Mode
- Value Counting
- Variable Speed
- Connect to printer
- OPERATION
- Operation preparation
- Menu Settings
- SPEED SET
- LEVEL SET
- WARN COUNT SET
- DATE&TIME
- 5.BEEP
- 6.PRINTER INTERFACE
- Test Run
- Add Mode:
- Batch Mode:
- Value Counting:
- Single denomination counting-
- Multi-Denomination Value Counting-
- Auto/Manual Start Mode:
- ERROR CODE DISPLAY
- LIMITED ONE YEAR WARRANTY
- ROYAL SOVEREIGN INTERNATIONAL, INC. RS CANADA INC.
Brand : Royal Sovereign
Model : RBC-4500
Category : Bill counter