
442-055 - Smoke detector Marquant - Free user manual and instructions
Find the device manual for free 442-055 Marquant in PDF.


| Product Type | Smoke detector (photoelectric) |
| Brand | Marquant |
| Model | 442-055 |
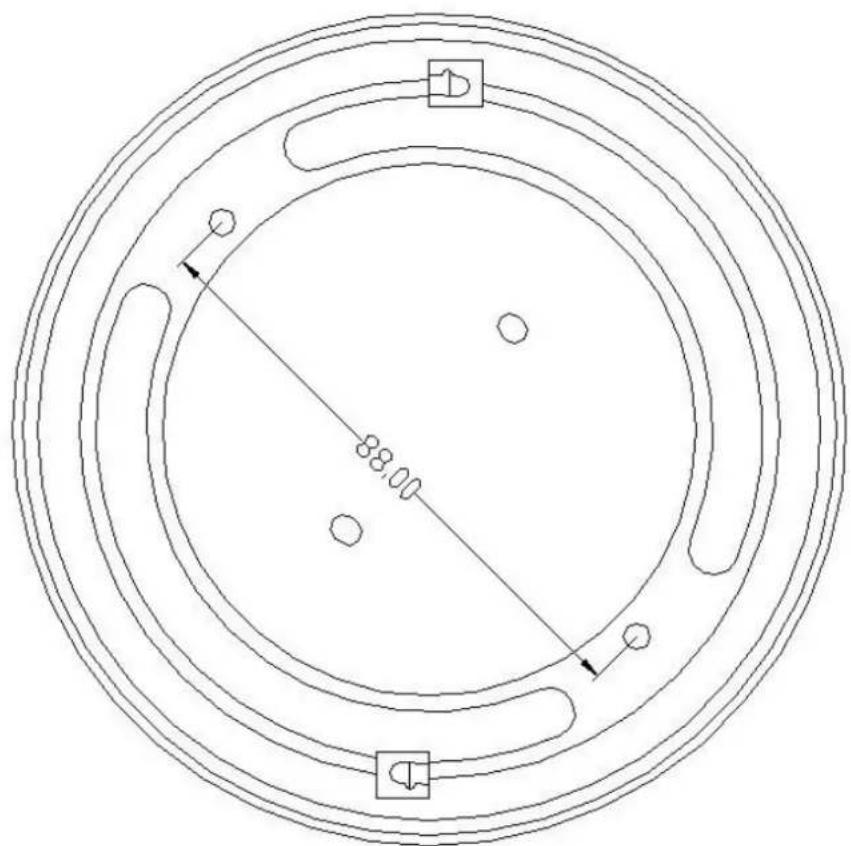
| Dimensions (Diameter x Height) | 88 mm x 49 mm |
| Weight | Approx. 200 g (with batteries) |
| Power Supply | 9 VDC (smoke detector) + 4.5 VDC (wireless transmitter, 3 x 1.5 V batteries) |
| Power Consumption (inactive) | Smoke detector: ≤ 10 µA; Wireless transmitter: ≤ 230 µA |
| Power Consumption (active) | Smoke detector: ≤ 20 µA; Wireless transmitter: ≤ 4 µA |
| Alarm Sound Level | ≥ 85 dB at 3 m |
| Wireless Frequency | 433.92 MHz |
| Transmitting Range (free field) | ≤ 60 m |
| Operating Temperature | -10 °C to 40 °C |
| Ambient Humidity | ≤ 95% RH (non-condensing) |
| Low Battery Indicator | Smoke detector: short beep every 43 s (battery < 7.35 V); Transmitter: short beep every 60 s (battery < 3.3 V) |
| Detection Principle | Photoelectric |
| Sensitivity | High |
| Connectivity | Wireless interconnection for unlimited number of units |
| Standards Compliance | EN 14604:2005/AC:2008 |
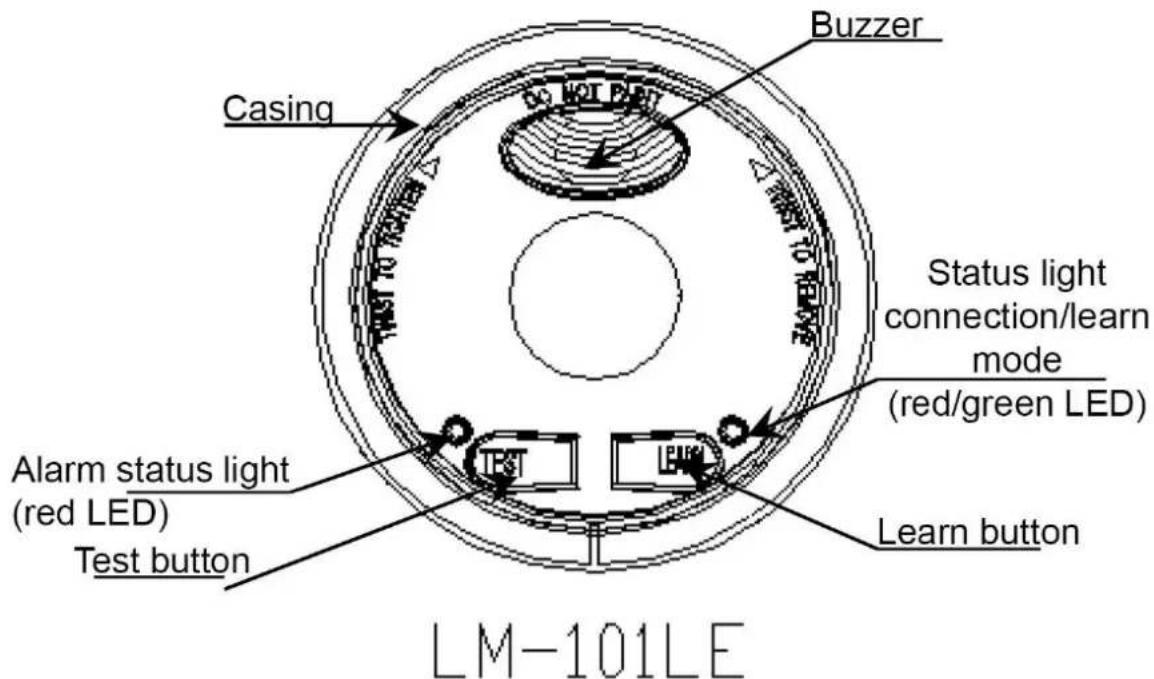
| Status Indicators | Red LED (alarm); Red/green LED (connection/learn mode) |
| Maintenance | Test weekly; Clean monthly (remove batteries before cleaning) |
| Recommended Installation | Ceiling mounting, avoid damp/hot/dusty areas; ensure clear light and sound path |
| Included in Package | Smoke detector, mounting plate, batteries, screws and plugs |
Frequently Asked Questions - 442-055 Marquant
User questions about 442-055 Marquant
0 question about this device. Answer the ones you know or ask your own.
Ask a new question about this device
Download the instructions for your Smoke detector in PDF format for free! Find your manual 442-055 - Marquant and take your electronic device back in hand. On this page are published all the documents necessary for the use of your device. 442-055 by Marquant.
USER MANUAL 442-055 Marquant
Operating Instructions for Smoke Detector
442-055

natural_image
Two identical white smokestacks with labeled buttons and ventilation grilles, shown from top and side views (no text or symbols on the covers)SV Bruksanvisning i original
NO Bruksanvisning i original
EN Installation instructions in original
SVENSKA 4
TEKNISKA DATA 4
BESKRIVNING 4
Mått 4
HANDHAVANDE 6
Testing/connecting/removing 29
Testing 29
Setting/connecting 30
Connected....30
Removing 30
Installation (see diagrams).... 30
MAINTENANCE 30
TROUBLESHOOTING 31
TEKNISKA DATA
natural_image
Technical line drawing of a cylindrical mechanical component with a flat top and base, dimensioned as 49.00 units (no text or symbols present)

natural_image
Circular diagram with concentric rings and marked points, no readable text or symbolsHANDHAVANDE
natural_image
Black-and-white photo of two batteries mounted on a circular wall, one with visible internal components and the other with battery packs (no text or symbols)Test/uppkoppling/borttagning
natural_image
Technical line drawing of a mechanical component with internal cavities and mounting holes (no text or symbols)UNDERHÅLL
natural_image
Technical line drawing of a mechanical component with a 49.00mm dimension label (no text or symbols on the diagram itself)

natural_image
Circular diagram with concentric rings and marked points, no readable text or symbolsBRUK
natural_image
Two cylindrical batteries with visible internal components, one with a 500μF power supply and the other with battery pack (no text or symbols on main body)natural_image
Technical line drawing of a mechanical component with internal cavities and mounting holes (no text or symbols)VEDLIKEHOLD
natural_image
Technical line drawing of a mechanical component with a 49.00mm dimension label (no text or symbols on the diagram itself)
natural_image
Circular diagram with concentric rings and marked points, no readable text or symbolsOBSŁUGA
natural_image
Black-and-white photo of two batteries with visible internal components, enclosed in a circular frame (no text or symbols)natural_image
Technical line drawing of a mechanical component with internal cavities and mounting holes (no text or symbols)KONSERWACJA
| Standard | EN 14604-2005 |
| Operating voltage | 9 VDC (for smoke detector)4.5 VDC (for wireless transmitter, 3 x 1.5 V batteries) |
| Power consumption in operation | Smoke detector, inactive: ≤ 10 μASmoke detector, active: ≤ 20 μAWireless transmitter, inactive: ≤ 230 μAWireless transmitter, active: ≤ 4 μA |
| Sound level for alarm | ≥ 85 dB/3 m |
| Status light, alarm | Red LED |
| Status light, connected/learn mode | Red/green LED |
| Frequency | 433.92 MHz |
| Transmitting range | Free field: ≤ 60 m |
| Operating temperature | -10 to 40°C |
| Ambient air humidity: | ≤ 95% RH (non-condensing) |
| Low battery level indicator: | Smoke detector: < 7.35 VA short audio prompt is given at 43 second intervalsWireless transmitter: < 3.3 VA short audio prompt is given at 60 second intervals |
DESCRIPTION
• Photoelectric smoke detection
• High sensitivity
- Low power consumption
- Can be connected to unlimited number of other units
Dimensions

natural_image
Technical line drawing of a cylindrical mechanical component with a flat top and base, showing dimension 49.00 (no text or symbols)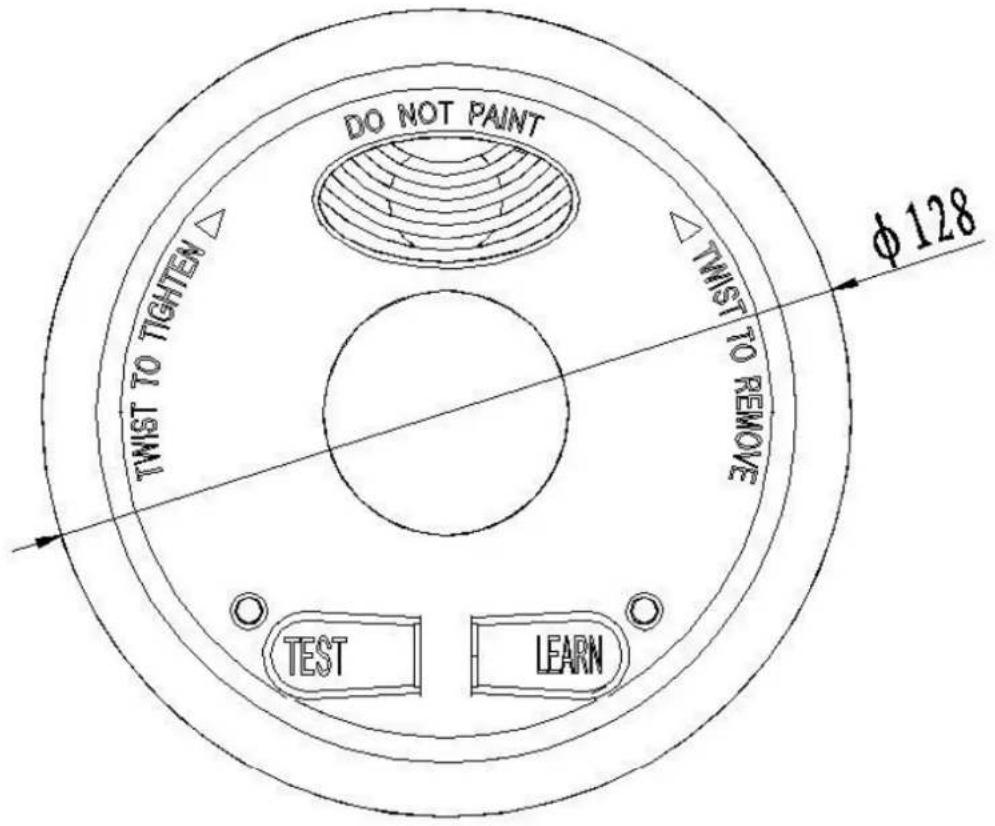

natural_image
Circular diagram with concentric rings and a central diagonal line labeled '88.00', featuring small circles and directional arrows (no text or symbols beyond the number)USE
Read the Operating Instructions carefully before use.
Save these instructions for future reference.
IMPORTANT:
• Do not install the product in damp, hot or dusty environments such as kitchens and bathrooms etc.
- Do not install the product so that light and sound are blocked.
• If several connected products are installed, make sure that no objects obstruct communication.
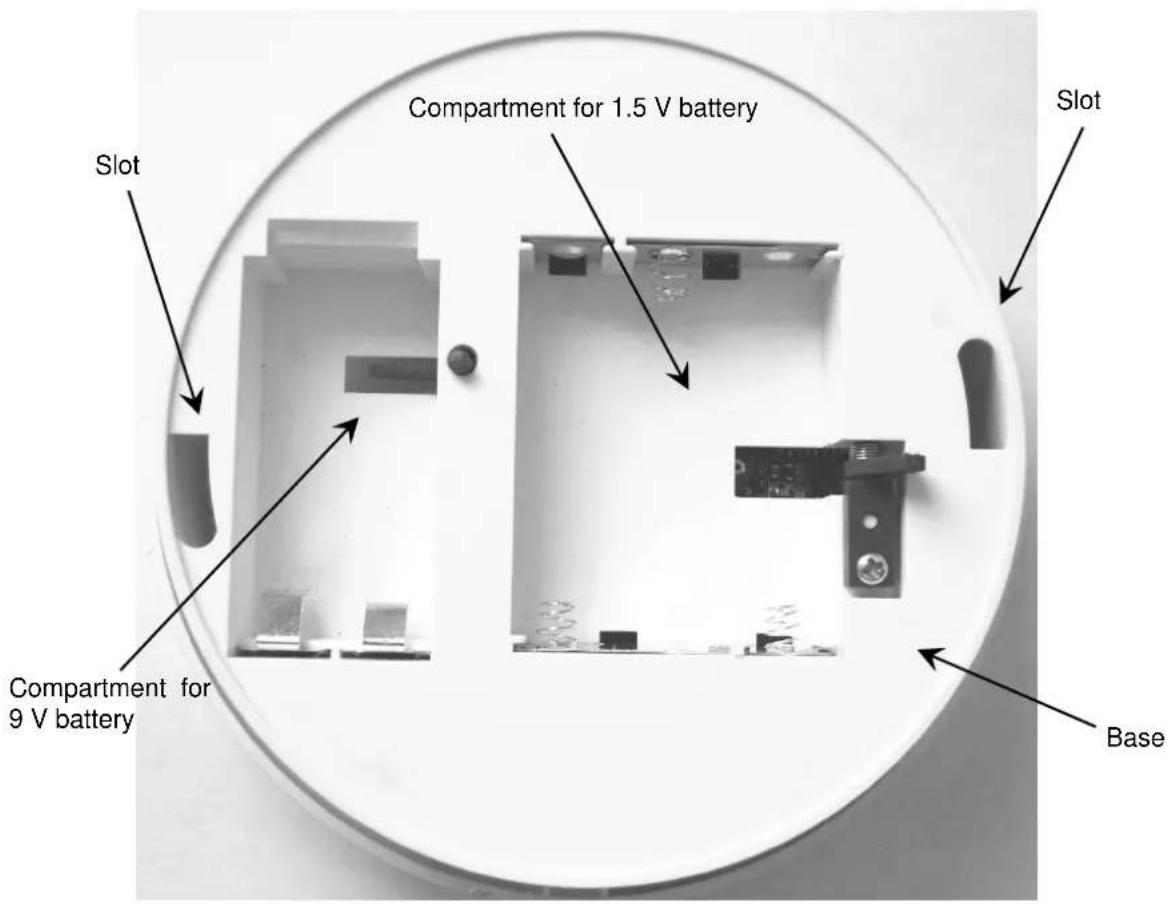

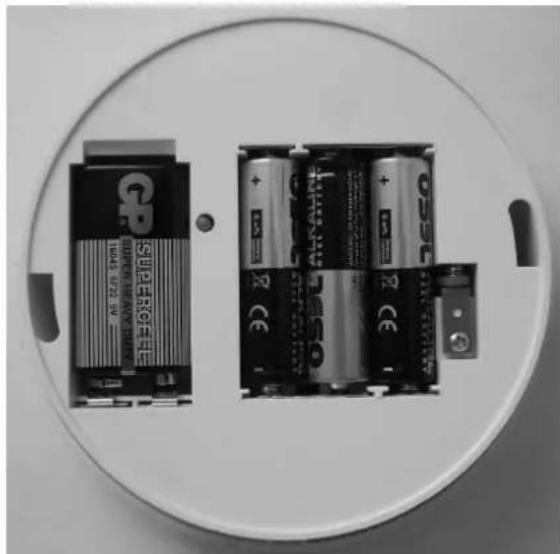
Inserting the batteries
- Unpack the product, turn the mounting plate anticlockwise and remove the batteries (9 V and 1.5 V). Remove the protective film from the batteries.
- Insert the 9 V battery with the polarity shown in the battery compartment.
- Turn the locking arm inward and insert the 1.5 V batteries with the polarity shown in the battery compartment.
- Align the two hooks on the mounting plate to the slots in the base and turn the plate clockwise so that the hooks slot in place.
natural_image
Black-and-white photo of two batteries with visible internal components, enclosed in a circular frame (no text or symbols)Testing/connecting/removing
When the product starts a red alarm status light flashes at 43 second intervals.
Testing
Press the test button. A loud audio prompt is heard and the red alarm status light starts flashing. The red/green status light for connecting/learning mode flashes and a wireless alarm signal is emitted at the
same time to all the connected products within range. This shows that the smoke detector is working properly. You can also do a test with artificial smoke.
Setting/connecting
Setting as host unit: When two or more products are connected, press the learn button once. The red/green status light changes colour once. Set host units to the mode for green status light. Setting as slave: Set slave units to the mode for red status light.
Connected
- When the correct setting is made, keep the test button on the host unit pressed until the red alarm status light and the red/green status light for connection/learn flash continuously and a wireless alarm signal is given.
- When a slave unit receives a signal from the host unit the status light for learn mode flashes continuously and an alarm is given at the same time by all the connected units. The red status lamp goes off.
- When the required units are connected, press the test button on one of the alarm units. The other connected products give an alarm and the status lights flash continuously.
Removing
Press the learn button on the unit to be removed, to put the unit in the mode for green status light. Press the test button to enable normal alarm mode. The red status light for alarm and the red/green status light for connection/learn flash continuously to show that the product has been removed.
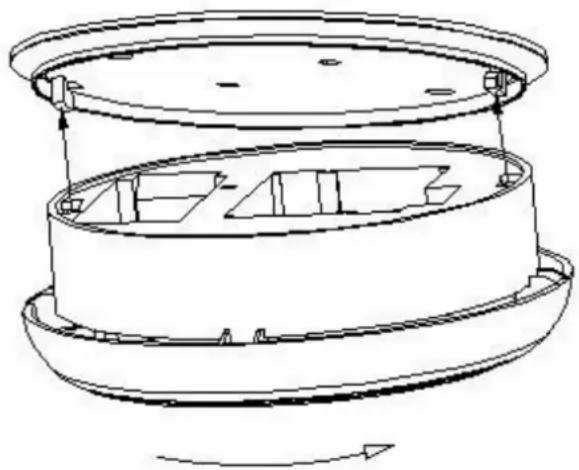
Installation (see diagrams)
- Choose a suitable place to install within range of the other units.
- Use the mounting plate as a template and mark out and drill holes in the ceiling. Insert plugs in the holes.
- Screw on the mounting plate.
- Align the two hooks on the mounting plate to the slots in the base. Turn the plate clockwise so that the hooks slot in place.
- Carry out a communication test after completing the installation.
natural_image
Technical line drawing of a mechanical component with internal cavities and mounting holes (no text or symbols)MAINTENANCE
- Test the product every week.
- Clean the appliance every month. Remove the batteries before cleaning. Check the connection with the test button after cleaning.
- If the product is not working properly, check the batteries.
- Replace the batteries with new batteries of the same type.
- Contact your dealer if you cannot rectify the problem by using the troubleshooting chart.
TROUBLESHOOTING
| Problem | Cause | Action |
| Nothing happens when the test button is pressed. | 9 V battery not properly inserted. | Insert the 9 V battery with the polarity shown in the battery compartment. |
| Nothing happens when the learn button is pressed. | 1.5 V batteries not properly inserted. | Insert 3 x 1.5 V batteries with the polarity shown in the battery compartment. |
| A short audio prompt is given at 43 second intervals | 9 V battery discharged. | Replace the 9 V battery. |
| A short audio prompt is given at 60 second intervals | 1.5 V batteries discharged. | Replace the 3 x 1.5 V batteries. |

NB0832
Jula AB, Box 363, SE-532 24 SKARA, SWEDEN
Item No. 442-055
DoP reference No. DOP442055, Can be downloaded from www.jula.com
EN 14604:2005/AC:2008
Smoke alarm device. Intended for Fire Safety and installed in buildings.
Essential Characteristic 1-8:pas.
Jula reserves the right to make changes. In the event of problems, please contact our service department. www.jula.com

Care for the environment!
Must not be discarded with household waste!
This product contains electrical or electronic
components that should be recycled.
Leave the product for recycling at the designated
station e.g. the local authority's recycling station.
- SVENSKA 4
- HANDHAVANDE
- Test/uppkoppling/borttagning
- UNDERHÅLL
- BRUK
- VEDLIKEHOLD
- OBSŁUGA
- KONSERWACJA
- DESCRIPTION
- Dimensions
- USE
- Read the Operating Instructions carefully before use.
- IMPORTANT:
- Inserting the batteries
- Testing/connecting/removing
- Testing
- Setting/connecting
- Connected
- Removing
- Installation (see diagrams)
- MAINTENANCE
- Care for the environment!
Brand : Marquant
Model : 442-055
Category : Smoke detector