
VFM836-54 - Digital photo frame VIEWSONIC - Free user manual and instructions
Find the device manual for free VFM836-54 VIEWSONIC in PDF.


| Product Type | Digital Photo Frame |
| Display Size | 8 inch (4:3 aspect ratio) |
| Display Resolution | 800 x 600 pixels |
| Dimensions | 225 x 185 x 24.2 mm (8.86 x 7.28 x 0.95 in) |
| Weight | 0.97 lbs (440 g) |
| Power Supply | DC 5V, 1A (AC adapter 100-240V ~50/60Hz) |
| Power Consumption | ≤5W |
| Supported Photo Formats | JPEG, JPG (baseline) |
| Max Photo Resolution | 30 megapixels |
| Supported Video Formats | MPEG4, MJPEG, AVI, MPG, MOV |
| Supported Music Formats | MP3 (32-320 kbps, 44.1 kHz) |
| E-book Support | TXT files (English only, max 10 MB) |
| Clock/Calendar/Alarm | Yes (with timer and alarm functions) |
| Memory Card Support | SD, SDHC, MMC (max 32 GB) |
| USB Port | USB 2.0 Host (flash drive or PC connection) |
| Remote Control | Included (CR2025 battery) |
| Slideshow Transition Effects | 13 effects (Random, Wipe, Blind, etc.) |
| Cleaning Instructions | Use soft, dry cloth; do not apply liquid directly |
| Safety Precautions | Indoor use only; unplug before cleaning; do not block vents |
| Warranty | 1 year labor (limited) |
Frequently Asked Questions - VFM836-54 VIEWSONIC
User questions about VFM836-54 VIEWSONIC
0 question about this device. Answer the ones you know or ask your own.
Ask a new question about this device
Download the instructions for your Digital photo frame in PDF format for free! Find your manual VFM836-54 - VIEWSONIC and take your electronic device back in hand. On this page are published all the documents necessary for the use of your device. VFM836-54 by VIEWSONIC.
USER MANUAL VFM836-54 VIEWSONIC
IMPORTANT: Please read this User Guide to obtain important information on installing and using your product in a safe manner, as well as registering your product for future service. Warranty information contained in this User Guide will describe your limited coverage from ViewSonic Corporation, which is also found on our web site at http://www.viewsonic.com in English, or in specific languages using the Regional selection box in the upper right corner of our website. "Antes de operar su equipo lea cuidadosamente las instrucciones en este manual"
ViewSonic®
Model No.: VS13951
Compliance Information
FCC Statement
This device complies with part 15 of FCC Rules. Operation is subject to the following two conditions: (1) this device may not cause harmful interference, and (2) this device must accept any interference received, including interference that may cause undesired operation.
This equipment has been tested and found to comply with the limits for a Class B digital device, pursuant to part 15 of the FCC Rules. These limits are designed to provide reasonable protection against harmful interference in a residential installation. This equipment generates, uses, and can radiate radio frequency energy, and if not installed and used in accordance with the instructions, may cause harmful interference to radio communications. However, there is no guarantee that interference will not occur in a particular installation. If this equipment does cause harmful interference to radio or television reception, which can be determined by turning the equipment off and on, the user is encouraged to try to correct the interference by one or more of the following measures:
- Reorient or relocate the receiving antenna.
- Increase the separation between the equipment and receiver.
- Connect the equipment into an outlet on a circuit different from that to which the receiver is connected.
- Consult the dealer or an experienced radio/TV technician for help.
Warning: You are cautioned that changes or modifications not expressly approved by the party responsible for compliance could void your authority to operate the equipment.
For Canada
CE Conformity for European Countries

The device complies with the EMC Directive 2004/108/EC and Low Voltage Directive 2006/95/EC.
Following information is only for EU-member states:
The mark is in compliance with the Waste Electrical and Electronic Equipment Directive 2002/96/EC (WEEE).
The mark indicates the requirement NOT to dispose the equipment including any spent or discarded batteries or accumulators as unsorted municipal waste, but use the return and collection systems available.
If the batteries, accumulators and button cells included with this equipment, display the chemical symbol Hg, Cd, or Pb, then it means that the battery has a heavy metal content of more than 0.0005% Mercury or more than, 0.002% Cadmium, or more than 0.004% Lead.

Declaration of RoHS Compliance
This product has been designed and manufactured in compliance with Directive 2002/95/EC of the European Parliament and the Council on restriction of the use of certain hazardous substances in electrical and electronic equipment (RoHS Directive) and is deemed to comply with the maximum concentration values issued by the European Technical Adaptation Committee (TAC) as shown below:
| Substance | Proposed Maximum Concentration | Actual Concentration |
| Lead (Pb) 0.1% < 0.1% | ||
| Mercury (Hg) 0.1% < 0.1% | ||
| Cadmium (Cd) 0.01% < 0.01% | ||
| Hexavalent Chromium ( Cr^6+ ) 0.1% < 0.1% | ||
| Polybrominated biphenyls (PBB) 0.1% < 0.1% | ||
| Polybrominated diphenyl ethers (PBDE) 0.1% < 0.1% |
Certain components of products as stated above are exempted under the Annex of the RoHS Directives as noted below:
Examples of exempted components are:
- Mercury in compact fluorescent lamps not exceeding 5 mg per lamp and in other lamps not specifically mentioned in the Annex of RoHS Directive.
- Lead in glass of cathode ray tubes, electronic components, fluorescent tubes, and electronic ceramic parts (e.g. piezoelectronic devices).
- Lead in high temperature type solders (i.e. lead-based alloys containing 85% by weight or more lead).
- Lead as an allotting element in steel containing up to 0.35% lead by weight, aluminium containing up to 0.4% lead by weight and as a cooper alloy containing up to 4% lead by weight.
Copyright Information
Copyright © ViewSonic® Corporation, 2011. All rights reserved.
ViewSonic, the three birds logo, OnView, ViewMatch, and ViewMeter are registered trademarks of ViewSonic Corporation.
Disclaimer: ViewSonic Corporation shall not be liable for technical or editorial errors or omissions contained herein; nor for incidental or consequential damages resulting from furnishing this material, or the performance or use of this product.
In the interest of continuing product improvement, ViewSonic Corporation reserves the right to change product specifications without notice. Information in this document may change without notice.
No part of this document may be copied, reproduced, or transmitted by any means, for any purpose without prior written permission from ViewSonic Corporation.
For Your Records
Product Name: VFM836
ViewSonic Digital Photo Frame
Model Number: VS13951
Document Number: VFM836_UG_ENG Rev. 1C 09-27-11
Serial Number:
Purchase Date:
Product disposal at end of product life
ViewSonic respects the environment and is committed to working and living green. Thank you for being part of Smarter, Greener Computing. Please visit ViewSonic website to learn more.
USA & Canada: http://www.viewsonic.com/company/green/recycle-program/
Europe: http://www.viewsoniceurope.com/uk/kbase/article.php?id=639
Taiwan: http://recycle.epa.gov.tw/recycle/index2.aspx
Important Safety Information
Always follow the basic safety precautions below when using your Digital Photo Frame. This will reduce the risk of fire, electric shock, and injury.
Warning: To reduce the risk of fire or shock hazard, do not expose this product to rain or moisture.
Warning: To prevent the risk, do not remove the cover, there are no spare parts inside, refer all product services to professional personnel.
• Digital Photo frame is for indoor use only.
- Unplug Digital Photo frame before performing care and maintenance.
- Do not block the ventilation holes on the back of Digital Photo Frame at any time.
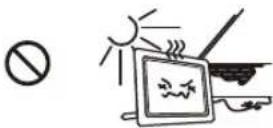
- Keep your Multimedia Digital Photo Frame out of direct sunlight and heat source.
- Protect the power cord. Route power cords appropriately to avoid trip over by someone else or pinched by items placed on or against it. Pay particular attention to the point where the cord attaches to Digital Photo Frame.
- Only use the AC adapter included with the Digital Photo Frame. Using any other power adapter will void your warranty.
- Unplug the power cord from the outlet when the unit is not in use.
Cleaning LCD Screen
Touch the screen gently. The screen is made of glass which can be scratched or damaged.
To clean fingerprints or dust from the LCD screen, we recommend using a soft / nonabrasive cloth such as a camera lens cloth to clean the LCD screen.
If you use a commercial LCD cleaning kit, do not apply the cleaning liquid directly to the LCD screen. Clean the LCD screen with a cleaning cloth moistened with the liquid.
Package Content
• Power adapter
• Digital Photo Frame
- Remote control
• USB cable(VFM836-54/74)
- USB cable
- User's manual
- Quick Start Guide
- Stand
1. Precautions

Warnings
Please read this manual carefully before operating and save it for future reference.
 Avoid exposing this device to water, moisture or high humidity. Do not place it near swimming pool, bathtub or sink where it may come in contact with water. Avoid exposing this device to water, moisture or high humidity. Do not place it near swimming pool, bathtub or sink where it may come in contact with water. |  Clean only with a dry soft cloth; do not use any chemical liquid for cleaning. Clean only with a dry soft cloth; do not use any chemical liquid for cleaning. |
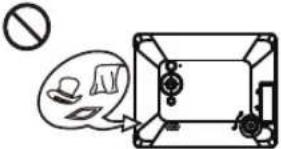 To ensure reliable operation of the device az from overheating, do not block any ventilation openings. To ensure reliable operation of the device az from overheating, do not block any ventilation openings. | 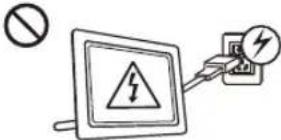 Only use accessories specified by the manufacturer. Only use accessories specified by the manufacturer. |
 Do not step on the power cable, plug or adapter to avoid electrical shock. Do not step on the power cable, plug or adapter to avoid electrical shock. | 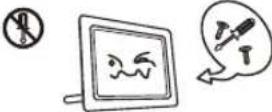 Do not attempt to service this device yourself. Opening or removing covers may expose you to electrical shock or other hazards. Refer all services to a qualified service personnel. Do not attempt to service this device yourself. Opening or removing covers may expose you to electrical shock or other hazards. Refer all services to a qualified service personnel. |
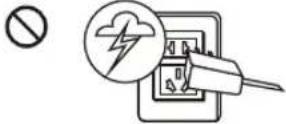 Please unplug this device during the thunderstorm or not in use for a long period. Please unplug this device during the thunderstorm or not in use for a long period. |  Do not apply force on the LCD screen during transport or usage. Avoid sharp objects. Do not apply force on the LCD screen during transport or usage. Avoid sharp objects. |
2. Product Information
2.1 Features
High quality 8 inch LCD: 800x600 high resolution.
Picture in JPG, JPEG formats with rotation and zooming supported.
▶ Picture slideshow with a variety of transition effects.
Music player (MP3) & background music in slideshow
▶ Video in MJPEG and MPEG-4 formats.
▶ Txt E-books reader.
▶ Clock & calendar & alarm functions.
3-in-1 Card reader (SD/SDHC/MMC).
2.2 Specifications
| LCD Screen | Panel size Aspect ratio | 8 inch 4:3 | |||
| Effective viewing area | 162.0 (W) x 121.5 (H) mm (6.4"W x 4.8"H) | ||||
| Resolution 800 | (W) x 600 (H) pixels | ||||
| Photo File | Image formats supported | JPG, JPEG(baseline coding) | |||
| Max. image resolution | 30 million pixels | ||||
| Video File | Video decoder M | PEG4, MJPEG, AVI | |||
| Video formats supported | MPG, MPEG, MOV | ||||
| Video specifications | MJPEG AVI: Max.320 x 240 | ||||
| MPEG4 | AVI | DIVX4/5/5.11/6:Max.720 x 576-5MBps | |||
| XVID: Max.720 x 576-5MBps | |||||
| MPEG4 (avi) Max.720 x 576-5MBps | |||||
| MOV Max.640 x 480 | |||||
| E-book | File format supported txt (English Only) | ||||
| Max. file size Max.10M | |||||
| Calendar | Clock, Calendar, Alarm | |||
| Music File | Music formats supported | Mp3(sampling rate 44.1kHz, bit rate 32k-320kbps), | ||
| Memory Medium | Memory Card supported | MMC, SD, SDHC (max 32GB) | ||
| USB USB flash drive | ||||
| File system FAT, FAT32 | ||||
| Electrical Specifications | Power input DC5V 1A- | |||
| Power consumption | ≤ 5W | |||
| Power adapter | Input AC 100-240V~50/60HZ | |||
| Output DC5V = 1A | ||||
| Dimensions | Dimensions 225 x 185 x 24.2 mm (8.6"W x 7.3"H x 1.0"D) | |||
| Weight 0.97 Ibs | ||||
| Operating mode | Buttons on panel and remote control | |||
| Environmental Requirements | Operating temperature 0°C~40°C (32F~104F) | |||
| Storage temperature -20°C~60°C (-4F~140F) | ||||
| Regulations CE, | BSMI, FCC, ICES003, LVD, Gost-R/Hygienic | |||
2.3 Navigation Buttons
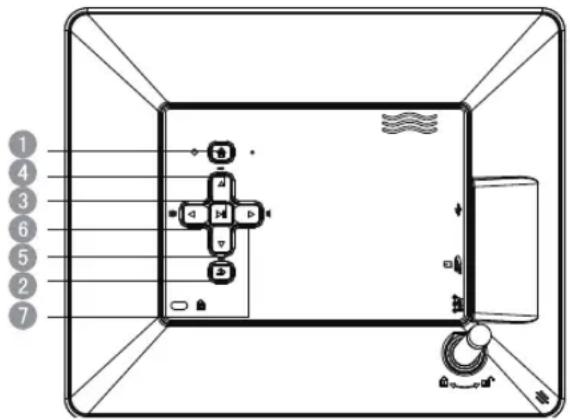
1 Power: a. Press & hold to turn on the device.
b. Press & hold to turn off the device.
c. Press briefly to turn to main menu when the device power is on.
2 Return: Exit.
3 Play: a. Confirm / Enter. b. Play/Pause.
c. Press & hold to pop-up the shortcut menu.
4 UP: a. Up; b. Previous; c. Rewind d. Adjust+.
5 DOWN: a. Down; b. Next; c. Fast forward d. Adjust-.
6 RIGHT: a. Right; b. Volume+.
7 LEFT: a. Left; b. Volume-.
2.4 Input Connections
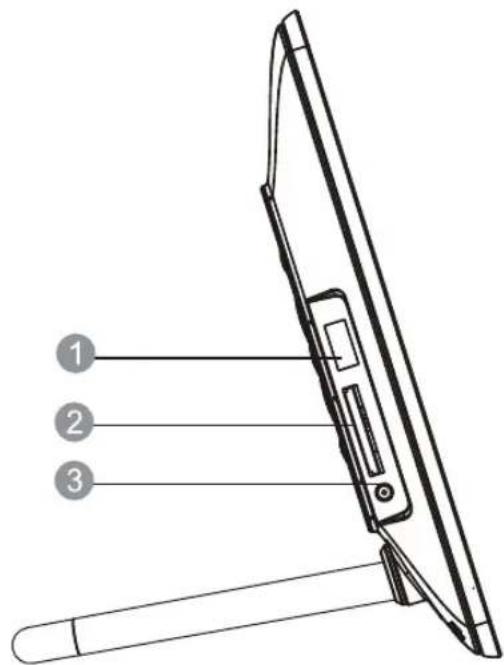
USB HOST: Connect to USB flash drive or PC
2 SD/SDHC/MMC card slot.
3 DC-IN: Power input 5V DC 1.0A
2.5 Remote Control Illustration
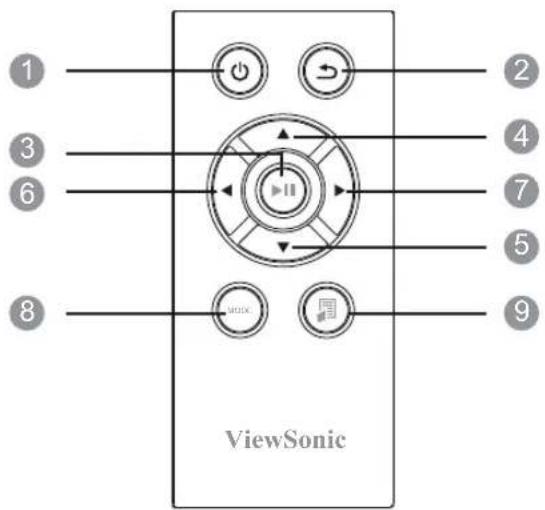
1 Power: a. Press & hold to turn on the device.
b. Press & hold to turn off the device.
c. Press briefly to turn to main menu when the device power is on.
2 Return: Exit.
3 Play: a. Confirm / Enter. b. Play/Pause.
c. Press & hold to pop-up the shortcut menu.
4 UP: a. Up; b. Previous; c. Rewind; d. Adjust+.
5 DOWN: a. Down; b. Next; c. Fast forward; d. Adjust-.
6 LEFT: a. Left; b. Volume- .
7 RIGHT: a. Right; b. Volume+.
8 MODE: a. Change display ratio;
b. Change text font color during E-book reading.
9 Shortcut Button: Press to display the shortcut menu.
3. Getting Started
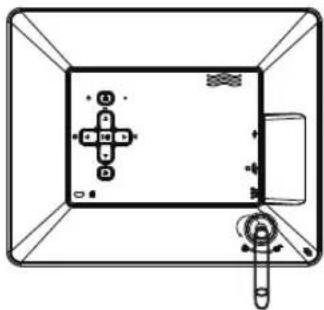
3.1 Attach a Stand
natural_image
Top-down schematic of a device layout with no visible text or symbolsTo attach the stand, screw in the stand clockwise until it is secure.
To remove the stand, unscrew the stand counter-clockwise until it is detached.
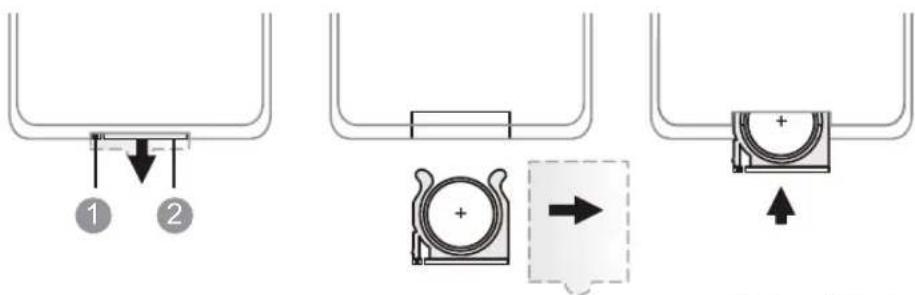
3.2 Battery Installation
Picture 3Picture 2Picture 1
- Place the remote control face down. Press the tab (number 1) in Picture 1 to the right and pull out the battery holder.
- Remove the plastic insulator. (Picture 2)
- Place the battery with the positive polarity face up on the battery holder and insert the battery holder into the remote control (Picture 3).
4. Operating Instructions
4.1 Turn on/off the Digital Photo Frame
Poweron
a: Connect the AC adapter from the digital photo frame DC-In jack to an electrical outlet.
b: Press and hold the [💡] on the remote or device, it will be turned on.
Poweroff
Press & hold the [ 🔊 ] on the remote control, the device will be turned off.
4.2 OSD Navigation
4.2.1 Main Menu
The Main Menu is shown below. Press the Left or Right button to select an icon, and then press [ ]
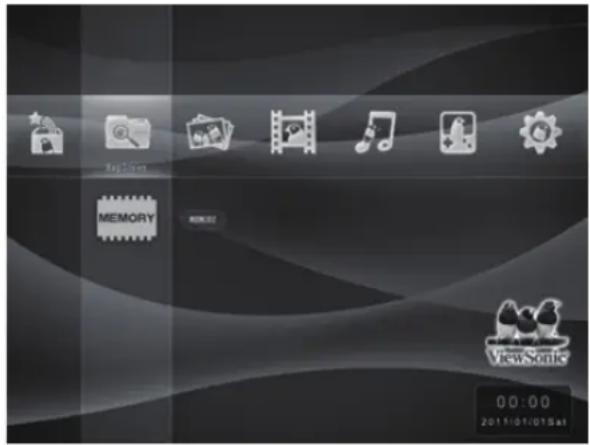
▶ Return to the Main Menu
Press briefly [ 🔊 ], the device will return to the Main Menu.
4.3 Favorite (VFM836-54/74)
You can copy favorite pictures and music from memory card or USB flash drive into a Favorite folder. To add a file to Favorite, enter "File Manage" on the Main Menu, select the file you want to add, press & hold [ ] on the remote control for the Storage Select menu, and select "Favorite" then press Enter. On the copy confirmation menu, select "Yes" (blue) and then press Enter.
4.4 File Management
Use [◀/▶] to select "File Manage" on the Main Menu, press Up or Down on the remote to select a memory source, and then press [▶II]. The File Manage will list all the files stored on the memory source media. Press and hold down the [▶] button to enter the File Manage sub menu. The following options are available:
Storage Select - switch memory source
Enter - playback the selected media
Delete - delete the selected media
Favorite - add the selected media to FavoriteBackground - use the selected image as a background
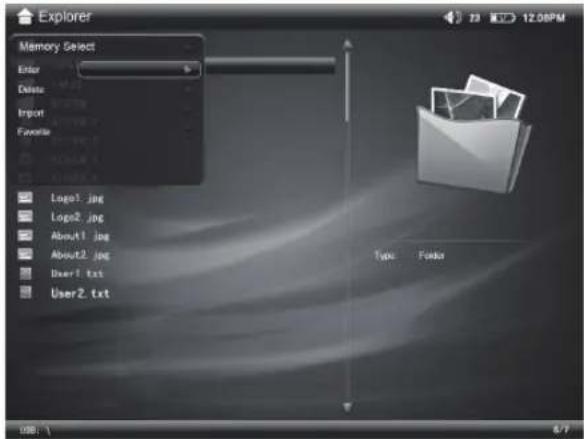
4.5 Viewing Photos
4.5.1 Slideshow
Use [◀/▶] to select "Photo" on the Main Menu, press Up or Down on the remote to select a memory source media that contains your picture(s), and then press [▶Ⅱ]. To exit slideshow, press the [◀button.
To start slideshow at a particularer photo, press either the [◀/▶] button and then press [▶].
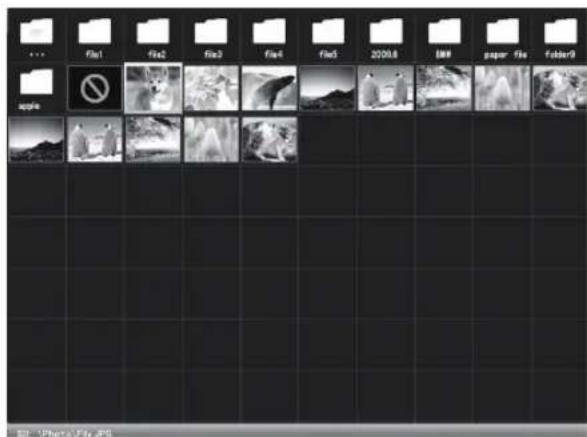
4.5.2 Slideshow Setup
During slideshow, either press the Shortcut button or press & hold [▶] to display the Slideshow setup menu, use [▲/▼] to select an option, press [▶] cycle through the available options. To exit the setup menu press [→]. The following Slideshow setup menu options are available as shown below:
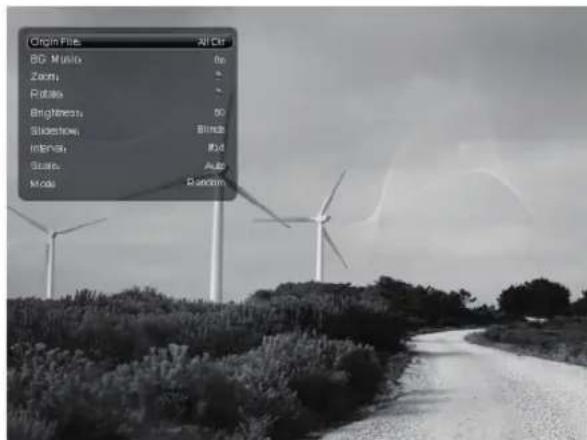
Origin File: display images from Current Directory or All Directory.
Background Music: turn on or off the background music.
Zoom: press [▶] repeatedly to zoom an image from 1 to 5 times. While in a zoomed mode, use the Up/Down/Left/Right buttons to scroll to areas of an image.
Rotate: press [▶] repeatedly to rotate an image by 0, 90, 180 or 270 degree.
Brightness: use [◀/▶] to change the brightness level, the default value is 10.
Slideshow: The following 13 transition effects are available: Random, Bottom to top, Top to bottom, Wipe left, Wipe right, Close, Open, Open from middle, Close from edge, Blind, Wipe top right, Wipe top left, None. [◀/▶] to select the transition effect.
Interval: use [◀/▶] to select among Fast, Middle, Slow and Self-defined.
Display: use [◀/▶] to select among Auto, Original, Crop and Stretch.
Mode: move [◀/▶] to switch among Random, Order.
4.6 Viewing Video
4.6.1 Video Playback
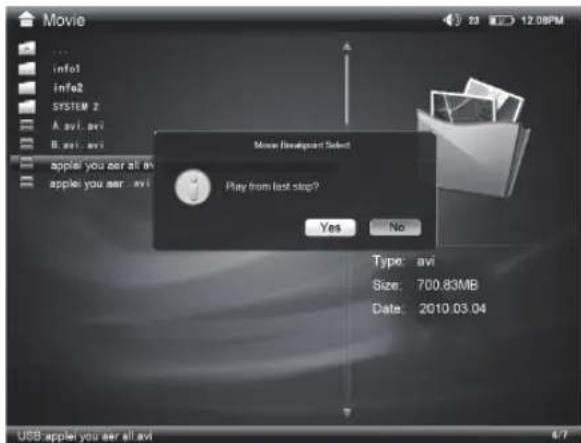
Press [◀/▶] to select "Video" on the Main Menu, select a memory source device on the pull-down menu, and press [▶] in the Video browser menu, select the video file you want to playback and press [▶] enable a full screen. The VFM836 supports playback from the last stop. If the selected video had been stop previously, select "Yes" (blue) on the Movie Breakpoint Select pop-up menu. During the playback, press [▶] pause, and the movie information will be shown on top of the screen. Press [▲/▼] to fast forward or rewind the playback.
4.6.2 Video Playback Setup
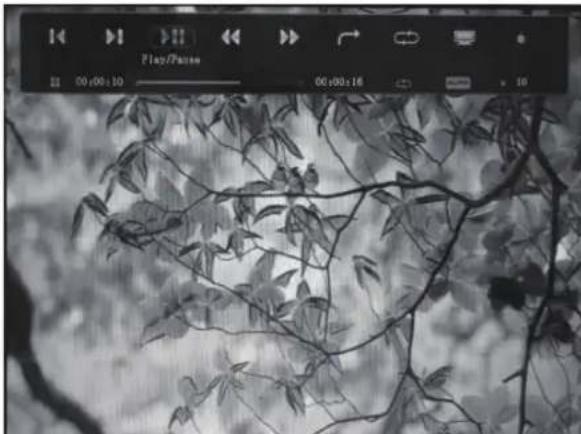
During the video playback, [ ] either press the Shortcut button or press & hold the [ ] for the Video playback sub-menu. The following options are available: Previous, Next, Play/Pause, Rewind, Fast forward, Skip, Repeat, Display video scaling, and Brightness.
natural_image
Black-and-white photo of tree branches with leaves, no visible text or symbolsPrevious: go to the previous video.
▶ Next: go to the next video.
▶ Play/Pause: pause or resume the current video playback.
Fast forward: fast forward the current video.
Rewind: rewind the current video.
Repeat: press [▶II] to select among Repeat All, Repeat One (repeat the selected video) Repeat Once and None.
Skip: skip to the specified time for playback. Select Skip, press [▶II] to pop up a timer input box on the left corner of the screen, and then press [▲/▼] to set an accurate time.
Display: press [▶II] to select among Original, Stretch, Crop, Auto and Actual.
Brightness: press [▶II] to pop up the brightness bar, and press [◀/▶] to adjust the brightness level.
4.7 Listen to Music
4.7.1 Music Playback
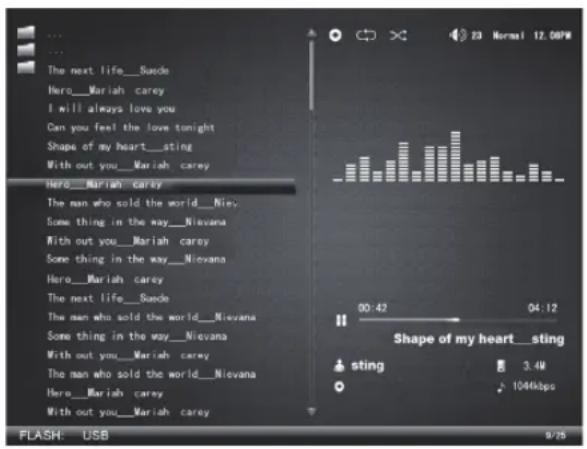
Use [◀/▶] to select "Music" on the Main Menu, select a memory source on the pull-down menu, and press [▶] to enter. On the Music Browser menu, select the music file you want to playback and press [▶] . The VFM836 supports playback from the last stop. If the selected music file had been stop previously, it will playback automatically. During music playback, press [▲/▼] to go back to the previous or advance to the next song. Adjust the volume by pressing [◀/▶], and pause by pressing [▶].
4.7.2 Music Playback Setup
During music playback, either press the Shortcut button or press & hold the [▶II] for the playback setup sub-menu; use [◀/▶] to select an option, press [▶II] to confirm; and press [☐] to exit. All available playback options are shown below.
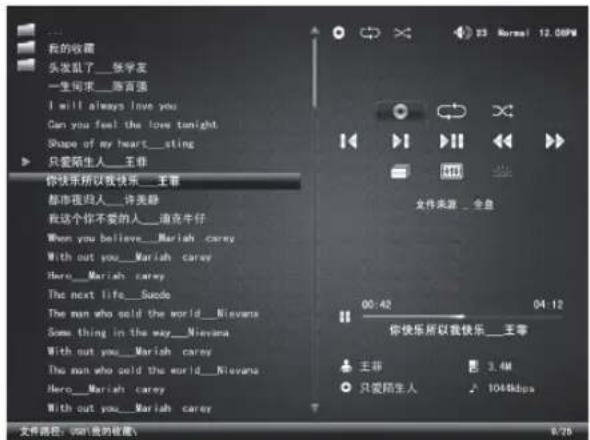
Origin file: press [▶II] to select All Directories (all folders) or Current Directory.
Repeat: press [ ]b select among Repeat All, Repeat One (repeat the selected music). Repeat Once and None.
Previous: go to the previous song.
▶ Next: go to the next song.
Play/Pause: pause or resume music playback.
Rewind: rewind a song.
Fast forward: fast forward a song.
Background: press [ ]b select your preferred background style.
Back Light: press [▶II] to select backlight power saving options: Never, 10s, 30s, 60s, and 90s.
4.8 Others Features
4.8.1 E-book Reader
4.8.1.1 E-book Browser
Use [◀/▶] to select "Others" on the Main Menu, select "E-book" on the pull-down menu, and press [▶]On the E-book Browser menu, use the Up/Down button to select a memory source media that contains your .txt file(s), and press [▶]Select the .txt file you want to read and press
[▶II]. Press [▲/▼] to flip the page or scroll down. Adjust the volume of background music by pressing [◀/▶].
4.8.1.2 E-book Browser Setup
During E-Book Browser either press the Shortcut button or press & hold [▶]tp pop-up submenu. The following options are available: Background Music, Auto Scroll, Font Color, Go to Page. Use [▲/▼] to select an option.
Press [◀/▶] to change a setting, press the [图标] to save your settings and exit.
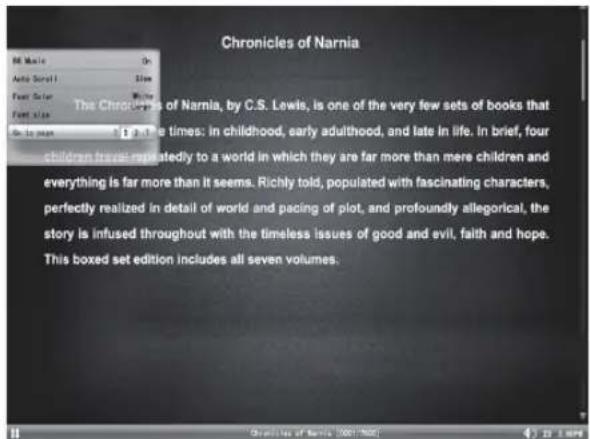
Background Music: turn on or off the background music.
Auto scroll: Selections are Fast, Middle, Slow and Off.
Font color: Use [◀/▶] to select among White, Black, Gray and Blue.
Go to Page: Press [▶] to select "Go to Page", use [▲/▼] to change the page number, and press [▶] to confirm.
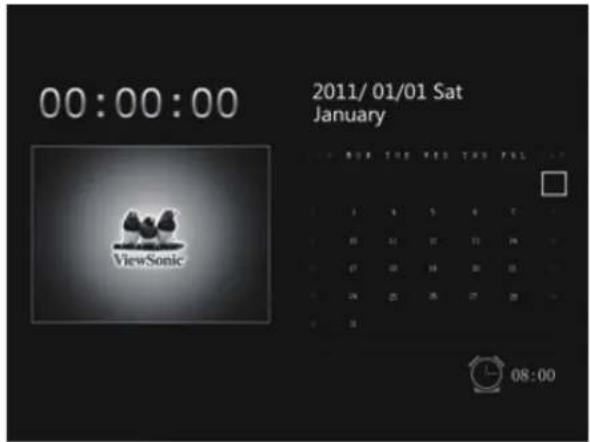
4.8.2 Calendar and Clock
Use [◀/▶] to select "Others" on the main menu. Use the Down button to select "Clock" on the pull-down menu, and press Enter.
4.9 Setup
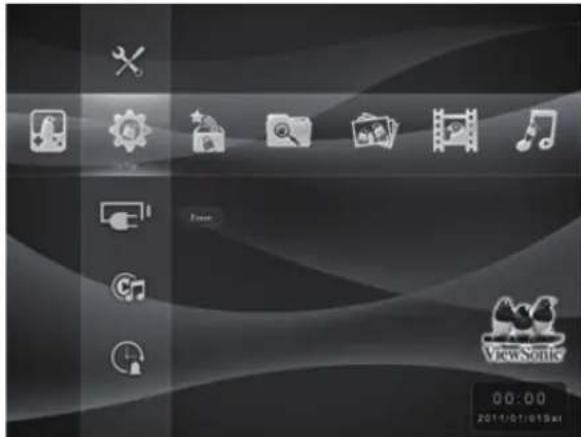
Use [◀/▶] to select "Setup" on the Main Menu. Available settings are Common, Power, Media and Time on the pull-down menu as shown below.
4.9.1. Common
Language: use [◀/▶] to select your language.
Background: use [◀/▶] to choose your favorite style.
USB Mode: select between USB (USB Flash drive) and PC.
Product Information: display firmware version and available internal memory.
Update: for firmware upgrade.
Factory Default: Press ENTER to restore settings to factory default. Select "Yes" (blue) and press ENTER again to confirm.
Boot Mode: use [◀/▶] to select a startup mode. Available startup modes are: Last Stop, Photo, Video, Music, E-Book, and Calendar.
4.9.2. Power
Backlight: set the backlight brightness level.
Backlight off: use [◀/▶] to set the timer to turn off the backlight automatically.
Available options are: Never, 10sec., 30sec., 60sec., and 90sec.
Power off: use [◀/▶] to set the timer to turn off the VFM836. Available options are: Never, 1min., 3min., 5min., and 10min.
4.9.3 Media
Video: there are Repeat and Display video scaling settings. Repeat options are: All, One, None, and Once. Display video scaling options are: Auto, Actual, Crop, Original, and Stretch. Use [◀/▶] to select options.
Photo: Copy Origin File, Background Music, Slideshow, Interval, and Display from section 4.5.2. use [◀/▶] to select options.
Music: there are Origin File :All Directories (all folders) or Current Directory, and Repeat : All, One (repeat selected file), None, and Once settings. Use [◀/▶] to select options.
Ebook: During E-Book Browser either press the Shortcut button or press & hold [▶]p pop-up submenu. The following options are available:
Background Music, Auto Scroll, Font Color, Go to Page. Use [▲/▼] to select an option. Press [◀/▶] to change a setting, press the [图标] to save your settings and exit.
4.9.4 Time
Date: use [◀/▶] to move among Year, Month and Date, and press [▲/▼] to change value.
Mode: select either 24Hour or 12Hour.
Time: use [◀/▶] to move between hour and minute, and press [▲/▼] to change value.
Adjust: The clock may be slow or fast after the unit has been operated for a long period. If the clock is slow or fast, press [◀/▶] to adjust the clock; Fast :[▶] Slow: [◀] Maximum "6" seconds; Minimum "-6"seconds
Timer:
Timer: Off is disable and On is enable.
Turn on: set the time for the VFM836 to power on automatically.
Turn off: set the time for the unit to power off automatically.
Frequency: how often you want the unit to use the timer after the timer is enable. Available options are: Everyday, Weekday, Weekend, and Once. Timer:
Alarm:
Alarm: Off is disable and On is enable.
Time: set the time for the VFM836 to sound an alarm after the alarm is enable
Frequency: how often you want the unit to use the timer after the timer is enable. Available options are: Everyday, Weekday, Weekend, and Once.
Ring: select a ring tone for an alarm. Available ring tones are: Ring 1, Ring 2, and Ring 3.
5. Troubleshooting
Problem & Solution
| Problem Solutions | |
| Can not power on, and nothing happens even if connected to an outlet. | Check whether the AC power adapter rating is correct, and it is securely plugged to an electrical outlet. |
| The screen is off Check whether the backlight is set to OFF. | |
| Screen freeze and does not respond to control anymore | Unplug & replug the photo frame. |
| Can not play video smoothly, and the message "media format not supported" occurs | Video resolution and data stream (frame) are not supported.Check the parameters (resolution, data stream and frame) of video files via players like Storm Player on PC, and covert the video files with a video converter if the parameters are beyond the supported range of the device. |
| No sound Make sure the volume is not set to 0. Check whether there is sound in the movie file. If that doesn't work, return the device to your dealer for service. | |
| The remote control is not responsive | The distance between remote control and the device is too long or the angle is more than 60'.Check whether the battery is poor contact or in low power. |
| Can not read the files Check the file path, the device cannot read files saved in a folder that is more over 5 levels deep. | |
| Cannot read USB Flash Drive | Check whether a USB flash drive is inserted properly. The Max Capacity of a USB flash drive is 32GB. |
| Cannot read SDHC card Check whether SDHC card is inserted properly. The notch should be facing down. Do not force the memory card in. The Max. Capacity of SDHC card is 32GB. An incompatible card is inserted. Please consult your dealer for compatible card types. | |
| The actual capacity is less than it is stated | The actual capacity is reduced as files for management and applications are included. |
| No files are displayed on the screen | File Allocation Table is damaged. Reboot the device. |
| Exit playing and back to the Main Menu automatically | Restart playing. (Note: This device has protection function against sudden system abnormality. |
Note: The LED panel is made up by millions of pixels with high technology. By chance, there will be some bright or dark pixels, but this situation will not affect the actual Digital Photo Frame function.
Customer Support
For technical support or product service, see the table below or contact your reseller.
Note : You will need the product serial number.
| Country/Region | Web Site | T=TelephoneF=Fax | |
| Australia/New Zealand | www.viewsonic.com.au | AUS=1800 880 818NZ=0800 008 822 | service@au.viewsonic.com |
| Canada www.viewsonic.com | T (Toll-Free)= 1-866-463-4775T (Toll)= 1-424-233-2533F= 1-909-468-3757 | service.ca@viewsonic.com | |
| Europe www.viewsoniceurope.com http://www.viewsoniceurope.com/uk/kbase/article.php?id=639/ | |||
| Hong Kong | www.hk.viewsonic.com | T= 852 3102 2900 | service@hk.viewsonic.com |
| India www.in.viewsonic.com T= 1800 266 0101 service@in.viewsonic.com | |||
| Ireland (Eire) | www.viewsoniceurope.com/uk/ | www.viewsoniceurope.com/uk/support/call-desk/ | service_ie@viewsoniceurope.com |
| Korea www.kr.viewsonic.com T= 080 333 2131 service@kr.viewsonic.com | |||
| Latin America (Argentina) | www.viewsonic.com/la/ T= 0800-4441185 soporte@viewsonic.com | ||
| Latin America (Chile) | www.viewsonic.com/la/ T=1230-020-7975 soporte@viewsonic.com | ||
| Latin America (Columbia) | www.viewsonic.com/la/ T= 0800-9-157235 soporte@viewsonic.com | ||
| Latin America (Mexico) | www.viewsonic.com/la/ T= 001-8882328722 soporte@viewsonic.com | ||
| Renta y Datos, 29 SUR 721, COL. LA PAZ, 72160 PUEBLA, PUE. Tel: 01.222.891.55.77 CON 10 LINEAS Electroser, Av Reforma No. 403Gx39 y 41, 97000 Merida, Yucatan. Tel: 01.999.925.19.16Other places please refer to http://www.viewsonic.com/la/soporte/index.htm#Mexico | |||
| Latin America (Peru) | www.viewsonic.com/la/ T= 0800-54565 soporte@viewsonic.com | ||
| Macau | www.hk.viewsonic.com | T= 853 2870 0303 | service@hk.viewsonic.com |
| Middle East | ap.viewsonic.com/me/ | Contact your reseller | service@ap.viewsonic.com |
| Puerto Rico & Virgin Islands | www.viewsonic.com | T= 1-800-688-6688 (English)T= 1-866-379-1304 (Spanish)F= 1-909-468-3757 | service.us@viewsonic.comsoporte@viewsonic.com |
| Singapore/Malaysia/Thailand | www.viewsonic.com.sg | T= 65 6461 6044 service@sg.viewsonic.com | |
| South Africa | ap.viewsonic.com/za/ | Contact your reseller | service@ap.viewsonic.com |
| United Kingdom | www.viewsoniceurope.com/uk/ | www.viewsoniceurope.com/uk/support/call-desk/ | service_gb@viewsoniceurope.com |
| United States | www.viewsonic.com | T (Toll-Free)= 1-800-688-6688T (Toll)= 1-424-233-2530F= 1-909-468-3757 | service.us@viewsonic.com |
Limited Warranty
VIEWSONIC Digital Photo Frame
What the warranty covers:
ViewSonic warrants its products to be free from defects in material and workmanship, under normal use, during the warranty period. If a product proves to be defective in material or workmanship during the warranty period, ViewSonic will, at its sole option, repair or replace the product with a like product. Replacement product or parts may include remanufactured or refurbished parts or components.
How long the warranty is effective:
ViewSonic Digital Photo Frame are warranted for 1 year for labor from the date of the first customer purchase.
Who the warranty protects:
This warranty is valid only for the first consumer purchaser.
What the warranty does not cover:
-
Any product on which the serial number has been defaced, modified or removed.
-
Damage, deterioration or malfunction resulting from:
a. Accident, misuse, neglect, fire, water, lightning, or other acts of nature, unauthorized product modification, or failure to follow instructions supplied with the product.
b. Repair or attempted repair by anyone not authorized by ViewSonic.
c. Causes external to the product, such as electric power fluctuations or failure.
d. Use of supplies or parts not meeting ViewSonic's specifications.
e. Normal wear and tear.
f. Any other cause which does not relate to a product defect.
-
Any product exhibiting a condition commonly known as “image burn-in” which results when a static image is displayed on the product for an extended period of time.
-
Removal, installation, one way transportation, insurance, and set-up service charges.
How to get service:
- For information about receiving service under warranty, contact ViewSonic Customer Support (please refer to Customer Support page). You will need to provide your product's serial number.
- To obtain warranted service, you will be required to provide (a) the original dated sales slip, (b) your name, (c) your address, (d) a description of the problem, and (e) the serial number of the product.
- Take or ship the product freight prepaid in the original container to an authorized ViewSonic service center or ViewSonic.
- For additional information or the name of the nearest ViewSonic service center, contact ViewSonic.
Limitation of implied warranties:
There are no warranties, express or implied, which extend beyond the description contained herein including the implied warranty of merchantability and fitness for a particular purpose.
Exclusion of damages:
ViewSonic's liability is limited to the cost of repair or replacement of the product. ViewSonic shall not be liable for:
- Damage to other property caused by any defects in the product, damages based upon inconvenience, loss of use of the product, loss of time, loss of profits, loss of business opportunity, loss of goodwill, interference with business relationships, or other commercial loss, even if advised of the possibility of such damages.
- Any other damages, whether incidental, consequential or otherwise.
- Any claim against the customer by any other party.
- Repair or attempted repair by anyone not authorized by ViewSonic.
4.3: ViewSonic DPF Warranty
DPF_LW01 Rev. 1A06-20-08
Mexico Limited Warranty
VIEWSONIC Digital Photo Frame
What the warranty covers:
ViewSonic warrants its products to be free from defects in material and workmanship, under normal use, during the warranty period. If a product proves to be defective in material or workmanship during the warranty period, ViewSonic will, at its sole option, repair or replace the product with a like product. Replacement product or parts may include remanufactured or refurbished parts or components.
How long the warranty is effective:
ViewSonic Digital Photo Frame are warranted for 1 year for labor from the date of the first customer purchase.
Who the warranty protects:
This warranty is valid only for the first consumer purchaser.
What the warranty does not cover:
-
Any product on which the serial number has been defaced, modified or removed.
-
Damage, deterioration or malfunction resulting from:
a. Accident, misuse, neglect, fire, water, lightning, or other acts of nature, unauthorized product modification, or failure to follow instructions supplied with the product.
b. Repair or attempted repair by anyone not authorized by ViewSonic.
c. Causes external to the product, such as electric power fluctuations or failure.
d. Use of supplies or parts not meeting ViewSonic's specifications.
e. Normal wear and tear.
f. Any other cause which does not relate to a product defect.
- Any product exhibiting a condition commonly known as “image burn-in” which results when a static image is displayed on the product for an extended period of time.
How to get service:
For information about receiving service under warranty, contact ViewSonic Customer Support (Please refer to the attached Customer Support page). You will need to provide your product's serial number, so please record the product information in the space provided below on your purchase for your future use. Please retain your receipt of proof of purchase to support your warranty claim.
For Your Records
Product Name: ____ Model Number: ____
Document Number: ____
Serial Number: ____ Purchase Date: ____
Extended Warranty Purchase? ____ (Y/N)
If so, what date does warranty expire?
-
To obtain warranty service, you will be required to provide (a) the original dated sales slip, (b) your name, (c) your address, (d) a description of the problem, and (e) the serial number of the product.
-
Take or ship the product in the original container packaging to an authorized ViewSonic service center.
-
Round trip transportation costs for in-warranty products will be paid by ViewSonic.
Limitation of implied warranties:
There are no warranties, express or implied, which extend beyond the description contained herein including the implied warranty of merchantability and fitness for a particular purpose.
Exclusion of damages:
ViewSonic's liability is limited to the cost of repair or replacement of the product. ViewSonic shall not be liable for:
- Damage to other property caused by any defects in the product, damages based upon inconvenience, loss of use of the product, loss of time, loss of profits, loss of business opportunity, loss of goodwill, interference with business relationships, or other commercial loss, even if advised of the possibility of such damages.
- Any other damages, whether incidental, consequential or otherwise.
- Any claim against the customer by any other party.
- Repair or attempted repair by anyone not authorized by ViewSonic.
| Contact Information for Sales & Authorized Service (Centro Autorizado de Servicio) within Mexico: | |
| Name, address, of manufacturer and importers:México, Av. de la Palma #8 Piso 2 Despacho 203, Corporativo Interpalmas,Col. San Fernando Huixquilucan, Estado de MéxicoTel: (55) 3605-1099 http://www.viewsonic.com/la/soporte/index.htm | |
| NÚMERO GRATIS DE ASISTENCIA TÉCNICA PARA TODO MÉXICO: 001.866.823.2004 | |
| Hermosillo:Distribuciones y Servicios Computacionales SA de CV.Calle Juarez 284 local 2Col. Bugambilas C.P: 83140Tel: 01-66-22-14-9005E-Mail: disc2@hmo.megared.net.mx | Villahermosa:Compumantenimietnos Garantizados, S.A. de C.V.AV. GREGORIO MENDEZ #1504COL, FLORIDA C.P. 86040Tel: 01 (993) 3 52 00 47 / 3522074 / 3 52 20 09E-Mail: compumantenimientos@prodigy.net.mx |
| Puebla, Pue. (Matriz):RENTA Y DATOS, S.A. DE C.V. Domicilio:29 SUR 721 COL. LA PAZ72160 PUEBLA, PUE.Tel: 01(52).222.891.55.77 CON 10 LINEASE-Mail: datos@puebla.megared.net.mx | Veracruz, Ver.:CONEXION Y DESARROLLO, S.A DE C.V. Av. Americas # 419ENTRE PINZÓN Y ALVARADOFracc. Reforma C.P. 91919Tel: 01-22-91-00-31-67E-Mail: gacosta@qplus.com.mx |
| ChihuahuaSoluciones Globales en ComputaciónC. Magisterio # 3321 Col. MagisterialChihuahua, Chih.Tel: 4136954E-Mail: Cefeo@soluglobales.com | CuernavacaCompusupport de Cuernavaca SA de CVFrancisco Leyva # 178 Col. Miguel HidalgoC.P. 62040, Cuernavaca MorelosTel: 01 777 3180579 / 01 777 3124014E-Mail: aquevedo@compusupportcva.com |
| Distrito Federal:QPLUS, S.A. de C.V.Av. Coyoacán 931Col. Del Valle 03100, México, D.F.Tel: 01(52)55-50-00-27-35E-Mail : gacosta@qplus.com.mx | Guadalajara, Jal.:SERVICRECE, S.A. de C.V.Av. Niños Héroes # 2281Col. Arcos Sur, Sector Juárcz44170, Guadalajara, JaliscoTel: 01(52)33-36-15-15-43E-Mail: mmiranda@servicrece.com |
| Guerrero AcapulcoGS Computación (Grupo Sesicomp)Progreso #6-A, Colo Centro39300 Acapulco, GuerreroTel: 744-48-32627 | Monterrey:Global Product ServicesMar Caribe # 1987, Esquina con Golfo PésicoFracc. Bernardo Reyes, CP 64280Monterrey N.L. MéxicoTel: 8129-5103E-Mail: aydeem@gps1.com.mx |
| MERIDA:ELECTROSERAv Reforma No. 403Gx39 y 41Mérida, Yucatán, México CP97000Tel: (52) 999-925-1916E-Mail: rrrb@sureste.com | Oaxaca, Oax.:CENTRO DE DISTRIBUCION YSERVICIO, S.A. de C.V.Murguía # 708 P.A., Col. Centro, 68000, OaxacaTel: 01(52)95-15-15-22-22Fax: 01(52)95-15-13-67-00E-Mail. gpotai2001@hotmail.com |
| Tijuana:STDAv Ferrocarril Sonora #3780 L-CCol 20 de NoviembreTijuana, Mexico | FOR USA SUPPORT:ViewSonic Corporation381 Brca Canyon Road, Walnut, CA. 91789 USATel: 800-688-6688 (English); 866-323-8056 (Spanish);Fax: 1-800-685-7276E-Mail: http://www.viewsonic.com |
4.3: ViewSonic Mexico Limited Warranty
DPF_LW03 Rev. 1A 06-25-07
- Compliance Information
- FCC Statement
- For Canada
- CE Conformity for European Countries
- Following information is only for EU-member states:
- Declaration of RoHS Compliance
- Copyright Information
- For Your Records
- Product disposal at end of product life
- Important Safety Information
- Cleaning LCD Screen
- Package Content
- Precautions
- Warnings
- Product Information
- Features
- Navigation Buttons
- Input Connections
- Remote Control Illustration
- Getting Started
- Attach a Stand
- Battery Installation
- Operating Instructions
- Turn on/off the Digital Photo Frame
- OSD Navigation
- Main Menu
- Favorite (VFM836-54/74)
- File Management
- Viewing Photos
- Slideshow
- Slideshow Setup
- Viewing Video
- Video Playback
- Video Playback Setup
- Listen to Music
- Music Playback
- Music Playback Setup
- Others Features
- E-book Reader
- E-book Browser
- E-book Browser Setup
- Calendar and Clock
- Setup
- Common
- Power
- Media
- Time
- Timer:
- Alarm:
- Troubleshooting
- Customer Support
- Limited Warranty
- VIEWSONIC Digital Photo Frame
- What the warranty covers:
- How long the warranty is effective:
- Who the warranty protects:
- What the warranty does not cover:
- How to get service:
- Limitation of implied warranties:
- Exclusion of damages:
- Mexico Limited Warranty
Brand : VIEWSONIC
Model : VFM836-54
Category : Digital photo frame