
VFM842-52 - Digital photo frame VIEWSONIC - Free user manual and instructions
Find the device manual for free VFM842-52 VIEWSONIC in PDF.


| Product Type | Digital Photo Frame |
| Brand | Viewsonic |
| Model | VFM842-52 |
| Display Size | 8 inches (diagonal) |
| Display Resolution | 800 x 600 pixels |
| Aspect Ratio | 4:3 |
| Supported Image Formats | JPEG, BMP, PNG |
| Supported Video Formats | Motion JPEG, AVI, MOV |
| Supported Audio Formats | MP3, WMA |
| Memory Card Slots | SD, SDHC, MMC, MS |
| USB Port | USB 2.0 (for PC connection) |
| Internal Memory | Yes (size varies) |
| Slideshow Modes | Multiple transition effects with adjustable timing |
| Clock and Calendar | Yes, with alarm function |
| Remote Control | Included |
| Power Supply | AC adapter (Input: 100-240V, Output: 5V, 1A) |
| Dimensions (L x W x H) | 8.3 x 6.3 x 1.0 inches (211 x 160 x 25 mm) |
| Weight | 0.8 lbs (363 g) |
| Cleaning | Use a soft, dry cloth; avoid liquids |
| Safety | Keep away from water and heat; do not disassemble |
| Spare Parts | Power adapter and remote control available separately |
| Repairability | Not user-serviceable; contact Viewsonic support |
| General Information | Compatible with Windows and Mac; supports multiple languages |
Frequently Asked Questions - VFM842-52 VIEWSONIC
User questions about VFM842-52 VIEWSONIC
0 question about this device. Answer the ones you know or ask your own.
Ask a new question about this device
Download the instructions for your Digital photo frame in PDF format for free! Find your manual VFM842-52 - VIEWSONIC and take your electronic device back in hand. On this page are published all the documents necessary for the use of your device. VFM842-52 by VIEWSONIC.
USER MANUAL VFM842-52 VIEWSONIC
IMPORTANT: Please read this User Guide to obtain important information on installing and using your product in a safe
manner, as well as registering your product for future service. Warranty information contained in this User Guide will describe your limited coverage from ViewSonic Corporation, which is also found on our web site at http://www.viewsonic.com in English, or in specific languages using the Regional selection box in the upper right corner of our website.
This device complies with part 15 of FCC Rules. Operation is subject to the following two conditions: (1) this device may not cause harmful interference, and (2) this device must accept any interference received, including interference that may cause undesired operation.
This equipment has been tested and found to comply with the limits for a Class B digital device, pursuant to part 15 of the FCC Rules. These limits are designed to provide reasonable protection against harmful interference in a residential installation. This equipment generates, uses, and can radiate radio frequency energy, and if not installed and used in accordance with the instructions, may cause harmful interference to radio communications. However, there is no guarantee that interference will not occur in a particular installation. If this equipment does cause harmful interference to radio or television reception, which can be determined by turning the equipment off and on, the user is encouraged to try to correct the interference by one or more of the following measures:
- Reorient or relocate the receiving antenna.
- Increase the separation between the equipment and receiver.
- Connect the equipment into an outlet on a circuit different from that to which the receiver is connected.
- Consult the dealer or an experienced radio/TV technician for help.
Warning: You are cautioned that changes or modifications not expressly approved by the party responsible for compliance could void your authority to operate the equipment.
For Canada
CE Conformity for European Countries

The device complies with the EMC Directive 2004/108/EC and Low Voltage Directive 2006/95/EC.
Following information is only for EU-member states:
The mark is in compliance with the Waste Electrical and Electronic Equipment Directive 2002/96/EC (WEEE). The mark indicates the requirement NOT to dispose the equipment including any spent or discarded batteries or accumulators as unsorted municipal waste, but use the return and collection systems available.
If the batteries, accumulators and button cells included with this equipment, display the chemical symbol Hg, Cd, or Pb, then it means that the battery has a heavy metal content of more than 0.0005% Mercury or more than, 0.002% Cadmium, or more than 0.004% Lead.


Declaration of RoHS Compliance
This product has been designed and manufactured in compliance with Directive 2002/95/EC of the European Parliament and the Council on restriction of the use of certain hazardous substances in electrical and electronic equipment (RoHS Directive) and is deemed to comply with the maximum concentration values issued by the European Technical Adaptation Committee (TAC) as shown below:
| Substance Proposed Maximum Concentration Actual Concentration | ||
| Lead (Pb) 0.1% < 0.1% | ||
| Mercury (Hg) 0.1% < 0.1% | ||
| Cadmium (Cd) 0.01% < 0.01% | ||
| Hexavalent Chromium ( Cr^6+ ) 0.1% < 0.1% | ||
| Polybrominated biphenyls (PBB) 0.1% < 0.1% | ||
| Polybrominated diphenyl ethers (PBDE) 0.1% < 0.1% | ||
Certain components of products as stated above are exempted under the Annex of the RoHS Directives as noted below: Examples of exempted components are:
- Mercury in compact fluorescent lamps not exceeding 5 mg per lamp and in other lamps not specifically mentioned in the Annex of RoHS Directive.
- Lead in glass of cathode ray tubes, electronic components, fluorescent tubes, and electronic ceramic parts (e.g. piezoelectronic devices).
- Lead in high temperature type solders (i.e. lead-based alloys containing 85% by weight or more lead).
- Lead as an allotting element in steel containing up to 0.35% lead by weight, aluminium containing up to 0.4% lead by weight and as a cooper alloy containing up to 4% lead by weight.
Copyright Information
Copyright© ViewSonic Corporation, 2010. All rights reserved.
ViewSonic, the three birds logo, OnView, ViewMatch, and ViewMeter are registered trademarks of ViewSonic Corporation.
Disclaimer:ViewSonic Corporation shall not be liable for technical or editorial errors or omissions contained herein; nor for incidental or consequential damages resulting from furnishing this material, or the performance or use of this product.
In the interest of continuing product improvement, ViewSonic Corporation reserves the right to change product specifications without notice. Information in this document may change without notice.
No part of this document may be copied, reproduced, or transmitted by any means, for any purpose without prior written permission from ViewSonic Corporation.
For Your Records
Product Name: VFM842/VFM1042
ViewSonic Digital Photo Frame
Model Number: VS13442/VS13444
Document Number: VFM842_VFM1042_UG_ENG Rev. 1B 04-09-10
Serial Number:
Purchase Date:
Product disposal at end of product life
ViewSonic is concerned about the preservation of our environment. Please dispose of this product properly at the end of its useful life. Your local waste disposal company may provide information about proper disposal.
The lamp in this product contains mercury. Please dispose of properly in accordance with environmental laws of your location.
ViewSonic
VFM842/VFM1042
TABLE OF CONTENTS
Introduction....1
Important Safety Precautions....2
Main Features ....4
Controls and Connections ....5
Remote Control....6
Battery installation for the Remote Control 7
Getting Started....8
Hanging the frame to a wall....8
Connecting to the power 9
Inserting Media....9
Copy files from computer 10
Main menu....11
Viewing Photos....13
Viewing thumbnails 13
Browsing a single photo 14
Playing a slideshow....14
Listening to Music....15
Watching Videos....16
Managing Files....17
Copying photos 18
Deleting photos 19
Displaying Clock/Calendar 20
Changing Frame Settings....21
Setting items....22
Frequently Asked Questions....24
Specification 26
Introduction
Thank you for purchasing this Digital Photo Frame.
This Digital Photo Frame is compatible with SD, MMC and MS memory card formats, which enables you to view digital photo directly from your camera's memory card.
This manual contains important safety information and operation instructions, so please read all the instructions carefully before using the Digital Photo Frame and keeps it for future reference.
We have done our best to produce a complete and accurate manual; however, we cannot ensure there are no errors or omissions. We also have no responsibility for damages or loss of data caused by improper operation.
The instruction manual is subject to change for improvement without notice.
Trademarks and trade names used in this user's manual are owned by their respective companies or organizations.
Important Safety Precautions
Always follow these basic safety precautions when using your Digital Photo Frame. This will reduce the risk of fire, electric shock, product damage and personal injury.
- Warning: Do not remove the cover or back to reduce the risk of electric shock. There are no user-serviceable parts inside. Refer servicing to qualified personnel.
• Warning: Do not expose the Digital Photo Frame to rain or moisture to prevent fire or electric shock hazard. - Warning: If you want to remove the wooden frame, please note that inside have Glass and take off the Glass cover before use.
- Do not expose the Digital Photo Frame to water (dripping or splashing) and no objects filled with liquids, such as vases, should be placed on the unit.
- Keep the Digital Photo Frame away from direct sunlight and heat source such as radiators or stoves.
- Do not block the ventilation openings. Slots and openings on the unit are provided for ventilation. The openings should never be blocked by placing your Digital Photo Frame on a cushion, sofa or other similar surface
- Do not place the Digital Photo Frame on unstable cart, stand, tripod, bracket or table. The unit may fall, resulting in possible damage or injury.
- Never place heavy or sharp objects on the LCD panel or frame.
• Only use the AC adapter included with Digital Photo Frame. Using any other adapter will void your warranty. - Protect the power cord from being walked on or pinched particularly at plugs, receptacles and the point where the cord attached to the Digital Photo Frame.
- Unplug the power from the outlet when the unit is not in use.
Cleaning
- Before cleaning the Digital Photo Frame make sure it is turned off.
- Never spray or pour liquid directly onto the screen or plastic casing.
- To clean the LCD screen, wipe the screen with a clean, soft, lint-free cloth. This removes dust and other particles. If it is still not clean, apply a small amount of non-ammonia, non-alcohol based glass cleaner on a clean, soft, lint-free cloth to clean the screen.
• To clean the plastic casing, use a soft, dry cloth. If it is still not clean, apply a small amount of non-ammonia, non-alcohol based, mildly non-abrasive detergent on a clean, soft, lint-free cloth to clean the surface. - To clean the frame, use a soft, dry cloth.
Disclaimer: Authorized Dealer does not recommend the use of any ammonia or alcohol-based cleaners on the LCD screen or plastic casing. Some chemical cleaners have been reported to damage the screen and/or display case. Authorized Dealer will not be liable for damage resulting from the use of any ammonia or alcohol-based cleaners.
Main Features
- 21.3cm/8.4"(VFM842) or 26.4cm/10.4"(VFM1042) Digital TFT LCD: 800*600 4:3
• Decorative appearance
• Displays digital photos (JPEG) - Slide show with background music and multiple transition effects
- Playback of music files
- Playback of video files
• Calendar and clock display - Alarm setting
- Compatible with SD/MMC/MS memory cards
• USB Host for connecting to the USB mass storage
• 2GB Internal memory built in
Controls and Connections
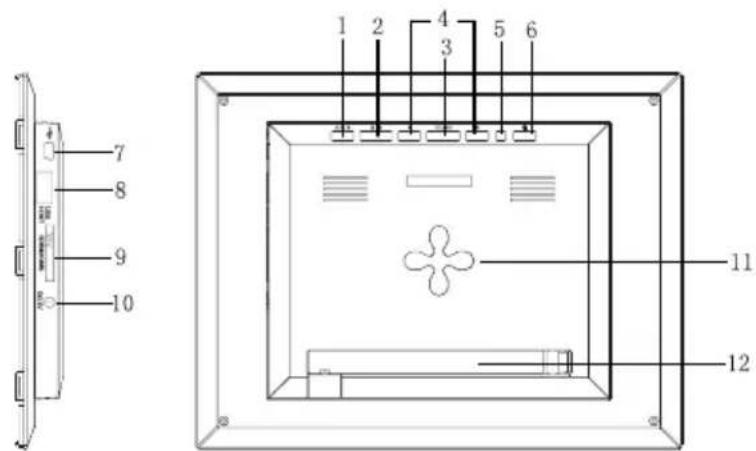
- MENU Press to enter main menu
- EXIT Exit button
- ENTER Play/Pause/Confirm button
- Navigation button
- Working indicator light
-
Hold to power on or off
-
Mini-USB connection
- USB HOST
- SD/MMC/MS card slot
- 5V 2A DC Input socket
- Wall hanger
- Adjustable stand
Remote Control
| 1 72 893 104 115 126 13141516 | 1 To zoom in the photo. | |
| 2 EXIT To return to the previous menu. | ||
| 3 To rotate the photo. | ||
| 4 To copy or delete files. | ||
| 5 To move the cursor left. | ||
| 6 To start slide show. | ||
| 7 SETUP To enter the setup menu. | ||
| 8 | To turn on/off the unit. | |
| 9 To play in mute. | ||
| 10 To increase the volume. | ||
| 11 | To move the cursor up. | |
| 12 To decrease the volume. | ||
| 13 | To move the cursor right. | |
| 14 ENTER | To confirm the selection; start or pause playback. | |
| 15 | To move the cursor down. | |
| 16 STOP | To stop music or video playing | |
Battery installation for the Remote Control
- Remove the insulating mylar strip from the battery if the battery is being used for the first time, it is located at the bottom back side of the remote control.
• If the remote control unit fails to work even when it is operated near the unit, replace the battery.
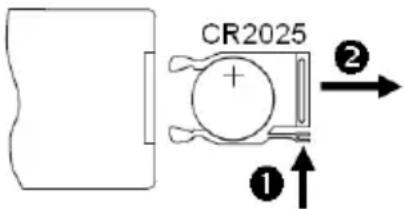
- Press and hold the battery release tab in the direction of arrow
- Pull out the battery holder completely in the direction of arrow the left.
- Remove the old battery, and place a new battery in the holder.
- Push the holder back into the remote control.
1.
② as shown in
Note: Use a 3V lithium battery (No. CR2025 or equivalent)
Caution: Be careful when you press the slot of the battery compartment with your fingernails only as this might break them.
Getting Started
Hanging the frame to a wall
The frame can also be mounted to a wall without the stand.
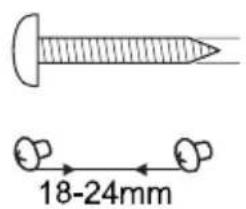
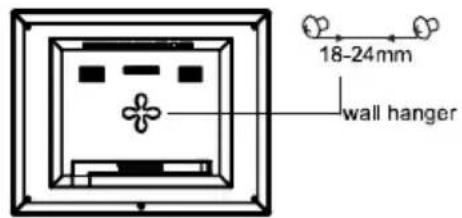
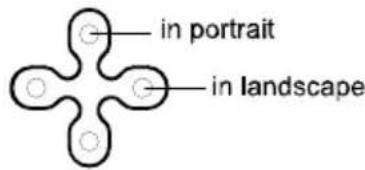
- Prepare screws(less than 6mm ) suitable for the screw holes on the rear panel.
- Screw the screws into the wall. The distance between screws in horizontal is about 18-24mm.
- Hang the photo frame on the wall with the wall hanger, you can set the device in the landscape orientation or in the portrait orientation.
Connecting to the power
natural_image
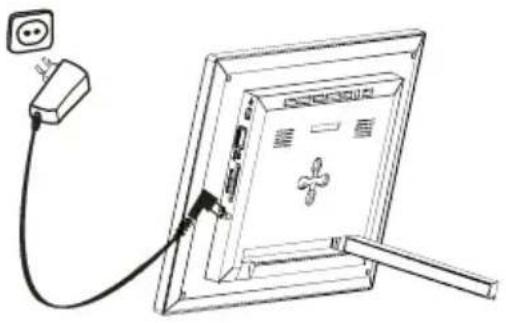
Line drawing of a cable being inserted into a screen with an outlet plug (no text or symbols)Plug one end of the power adaptor into the DC socket in the Digital Photo Frame, and the other into a wall outlet.
Note:
To turn on/off the Digital Photo Frame completely, hold the power button..
Inserting Media
In order to play photos from a card or a memory stick, insert the card into its respective card slot on the Digital Photo Frame or use the USB port.
This Digital Photo Frame is compatible with the following memory cards:
- Secure Digital Card (SD) • Multimedia Card (MMC) • Memory Stick (MS)
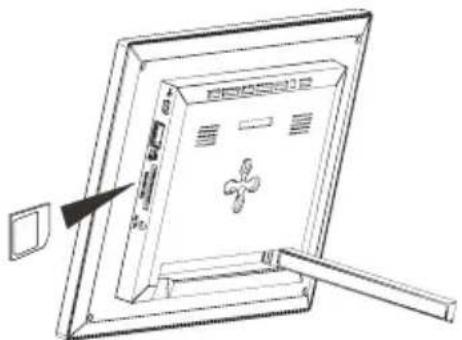
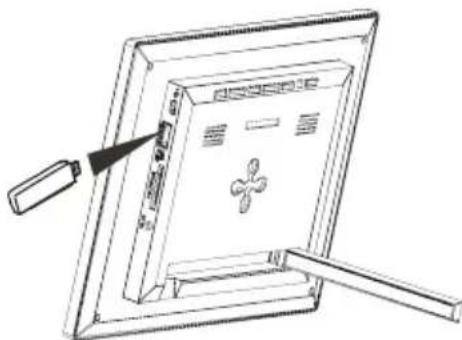
Following is the method of inserting a memory card or attaching a memory stick:
natural_image
Line drawing of a device with an arrow pointing to a screen (no text or symbols present)- Insert the SD/MMC/MS card into the 3-in-1 card slot with the metallic contacts facing towards the display.
natural_image
Line drawing of a device with a handle and control panel, no text or symbols present- Push a USB memory stick into the USB HOST slot.
Note:
• Do not use any force while inserting a memory card or attaching a memory stick.
• The 3-in-1 card slot only reads one memory card at a time. Do not insert more than one card into one memory card slot.
• To remove the cards or the USB memory stick, pull it out gently.
Copy files from computer
You can connect the digital photo frame to a computer copy files to the memory device connected to the digital photo frame or to the built-in memory (depends on the unit you purchase).
- Make sure that your computer has been started before you start.
- Connect the mini plug of the USB cable to the mini USB port on digital photo frame, and push the other end into a free
ViewSonic
VFM842/VFM1042
USB port on your computer.
- The computer system detects "New hardware" and starts to install the driver automatically. Wait for the system to finish the installation. When it has finished, several "Removable Disk", which indicate all drivers of the digital photo frame, will be created in "My computer".
- Drag and drop the files on your computer to the memory device connected to the digital photo frame or to the built-in memory.
- To disconnect the USB cable from the computer, double click the Safely Remove Hardware icon on the task bar. Click the USB Mass Storage Device, and then click OK.
Note:
• Make sure no USB storage device is connected with the Digital Photo Frame before connecting to your computer.
• The Digital Photo Frame must be plugged in and turned on before connecting to the computer.
- When connecting with a computer, the USB HOST driver is not available.
- Do not disconnect the USB cable or remove the card during files coping and transferring.
• System support: Windows® 2000/ XP/ Vista™.
Main menu
- When a memory device is inserted into the Digital Photo Frame, the corresponding icon appears on the main menu.
-
In the main menu, you can select connected source to view photos, listen to music, watch videos, display the calendar and clock, manage files or change frame settings.
-
Press the EXIT key on the remote as necessary to access the main menu. All connected source, photo, music, video, calendar, files and setup icons are displayed.
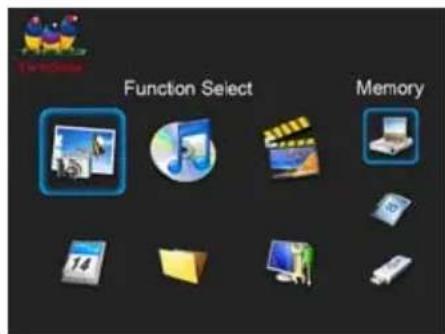
| Memory | Appears when you purchase a Frame with NAND flash memory. (only for model with internal memory) |
| SD/MMC/MS Appears | when you insert a SD, MMC or MS card. |
| USB Appears when you inserted a USB flash driver. | |
| Photo To view photos of the memory source. | |
| Music To play music. | |
| Video To play videos. | |
| Calender To display the Calendar/Clock on the screen. | |
| Files | To browse all the files of the memory source and copy or delete files. |
| Setup To customize the settings of Digital Photo Frame. | |
Note: If several memory devices are connected to the frame simultaneously, the Digital Photo Frame will read the memory source by the priority order as follows: USB, SD/MMC/MS.
- Use ▲ or ▼ key on the remote to select a memory source, and then press the ENTER key on the remote.
- Use ◀ or ▶ key on the remote to select the desired mode, and press ENTER key on the remote to confirm.
Viewing Photos
- Press the EXIT key on the remote as necessary to enter the function select interface.
- Use ▲ or ▼ key on the remote to select a memory source (e.g. USB, SD/MMC/MS) in the main menu and press the ENTER key.
- Use ◀ or ▶ key t on the remote o select Photo icon, and then press the ENTER key on the remote. The photos are displayed on the screen in thumbnails or in slideshow mode which can be adjusted in Setup mode.
Viewing thumbnails
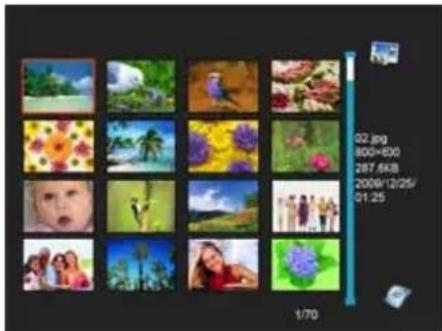
In Photo mode, the photos on the selected memory source can be displayed on the screen as thumbnails. Up to 16 photos are displayed at a time.
- While in slideshow, press EXIT key on the remote to go to thumbnail mode.
- To navigate through the thumbnails or move to the next or previous page of thumbnails, press the ▲▼◀ or ▶ key on the remote.
Browsing a single photo
You can select a single photo to display on the screen:
- Use ▲▼◀ or ▶ key on the remote to select a photo in the thumbnail view, and press the ENTER key on the remote. Or press ENTER key on the remote repeatedly to chage to single mode during slideshow. The selected photo is displayed on screen.
- To zoom in a photo, use ☑ key and press ENTER key on the remote repeatedly.
- To rotate a photo, use key and press ENTER key on the remote repeatedly.
- To return to the thumbnail view, press the EXIT key on the remote.
- To start slide show from the current photo, press the ENTER key on the remote.
Playing a slideshow
You have two ways to running a slideshow:
- In any mode, press the key on the remote to start a slideshow.
-
While browsing a single photo, press the ENTER key on the remote to start slide show from the current photo.
-
Press ENTER key on the remote repeatedly to toggle through Slide with music, Slide photo only and Single mode.
- Press the EXIT key or STOP key on the remote to exit the slideshow and view the photos in thumbnail.
Listening to Music
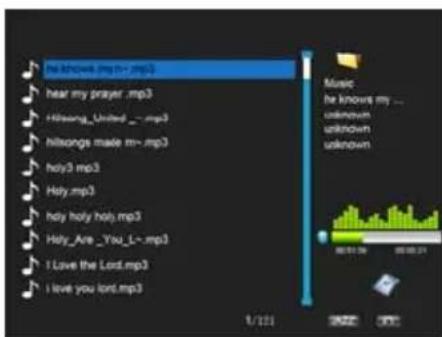
In Music mode, the music file lists on the selected memory source can be displayed on the screen as thumbnails.
- Press the EXIT key on the remote as necessary to enter the function select interface.
- Use ▲ or ▼ key t on the remote o select a memory source (e.g. USB, SD/MMC/MS) in the main menu and press the ENTER key on the remote.
- Use ◀ or ▶ key on the remote to select Music icon, and then press the ENTER key. The music file lists displayed on the screen
- Use ▲ or ▼ key on the remote to select a music file and press ENTER on the remote to play.
- Pause playback, press ENTER on the remote. To resume playback, press ENTER on the remote again.
- Press ☐+ or ☐- key on the remote to increase or decrease volume. Press ☐ key to play in mute.
- Press EXIT key on the remote to exit music playing.
Watching Videos
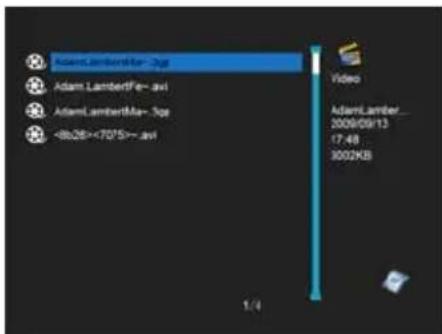
In Video mode, the video file lists on the selected memory source can be displayed on the screen as thumbnails.
-
Press the EXIT key on the remote as necessary to enter the function select interface.
-
Use ▲ or ▼ key on the remote to select a memory source (e.g. USB, SD/MMC/MS) in the main menu and press the ENTER key on the remote.
-
Use ◀ or ▶ key on the remote to select Video icon, and then press the ENTER key on the remote. The music file lists displayed on the screen
-
Use ▲ or ▼ key on the remote to select a video file and press ENTER on the remote to play.
-
Pause playback, press ENTER on the remote. To resume playback, press ENTER on the remote again.
-
Fast rewind or forward within a video, use ◀ or ▶key on the remote and then press ENTER on the remote.
-
Press ☐+ or ☐- key on the remote to increase or decrease volume. Press ☐ key to play in mute.
-
Press EXIT key on the remote to exit music playing.
Managing Files
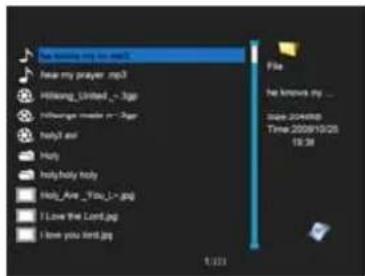
In the File mode, you can view all playable files and folders on the memory source. You also can copy or delete the files.
-
Press the EXIT key on the remote as necessary enter the function select interface.
-
Use ▲ or ▼key on the remote to select a memory source (e.g. USB, SD/MMC/MS) in the main menu and press the ENTER key on the remote.
-
Use ◀ or ▶ key on the remote to select Files icon, and then press the ENTER key on the remote. The file list appears.
-
Use theor key on the remote to navigate between files and folders.
- To open a folder, highlight it and press the ENTER key on the remote. To return to superior directory, press the EXIT key on the remote.
Copying photos
You can copy photos from memory card or USB to the internal memory. There are two methods:
Copy photos from the file manager
Use this method, you can only copy one file at a time, and you cannot resize the photo.
- Press the EXIT key on the remote as necessary to enter the function select interface.
- Use ◀ or ▶ key on the remote to select File icon, and then press ENTER on the remote to confirm.
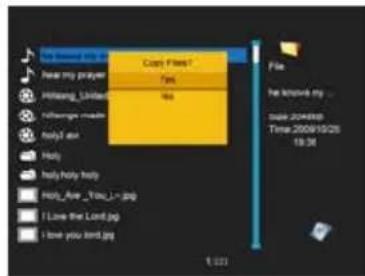
- Use ▲ or ▼ key on the remote to select the photo file (or music or video file), then press COPY/DEL key. The screen will pop up a window "Copy Files?Yes/No". Use ▲ or ▼ on the remote to choose the desired option and then press ENTER. The file has been copied.
Copy photos from the thumbnail mode
Use this method, you can copy all or selected photos, with the ability to resize the photo.
- Press the EXIT key on the remote as necessary to enter the function select interface.
- Use ▲ or ▼ key on the remote to select the memory device (memory card or USB), and then press ENTER.
- Use ◀ or ▶ key on the remote to select Photo icon and press ENTER to go to the thumbnail mode
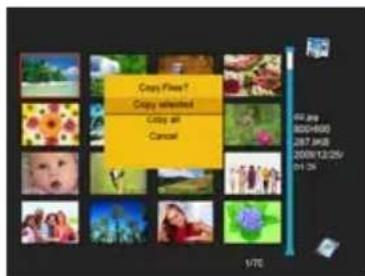
- Press COPY/DEL key to pop up a window "Copy Files? Copy selected, Copy all, Cancel". Use ▲ or ▼ to select the desired option, and then press ENTER.
- The thumbnails will be displayed with a small white square in the upper left corner of each. Use ▲▼ on key on the remote to select the photo to be copied. Then press ENTER to confirm with a tick mark for each photo you select. (If you choose "Copy all", all the white squares show a tick mark.)
- Press COPY/DEL key on the remote again to pop up a window "Copy Files? Yes/ No". Use ▲ or ▼ on the remote to
select "Yes", and then press ENTER.
- Use ▲ or ▼ on the remote to select the directory into which you want to copy the photos, then press ENTER.
- The screen will pop up a window asking you if you want to resize the photo.
- Use ▲ or ▼ key on the remote to select the desired option and confirm the choice by selecting "Confirm", and then press ENTER. Your photos are sized and copied to the internal memory.
Deleting photos
You can delete photos from internal memory. There are two methods:
Delete photos from the file manager
Use this method, you can only delete one file at a time.
- Press the EXIT key on the remote as necessary to enter the function select interface.
- Use ◀ or ▶ key on the remote to select File icon, and then press ENTER to confirm.
- Use ▲ or ▼ key on the remote to select the photo file (or music or video file), then press COPY/DEL key on the remote. The screen will pop up a window "Delete Files?Yes/No". Use ▲ or ▼ on the remote to choose the desired option and then press ENTER. The file has been deleted.
Delete photos from the thumbnail mode
Use this method, you can delete all or selected photos.
- Press the EXIT key on the remote as necessary to enter the function select interface.
-
Use ▲ or ▼ key on the remote to select the internal memory, and then press ENTER.
-
Use ◀ or ▶ key on the remote to select Photo icon and press ENTER to go to the thumbnail mode
- Press COPY/DEL key on the remote to pop up a window "Delete Files? Delete selected, Delete all, Cancel". Use ▲ or ▼ on the remote to select the desired option, and then press ENTER.
- The thumbnails will be displayed with a small white square in the upper left corner of each. Use ▲▼ on key on the remote to select the photo to be deleted. Then press ENTER to confirm with a tick mark for each photo you select. (If you choose "Delete all", all the white squares show a tick mark.)
- Press COPY/DEL key on the remote again to pop up a window "Delete Files? Yes/ No". Use ▲ or ▼ on the remote to select "Yes", and then press ENTER. Your photos are deleted from the internal memory.
Displaying Clock/Calendar
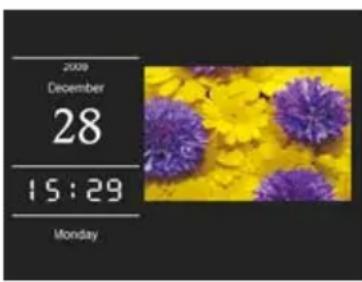
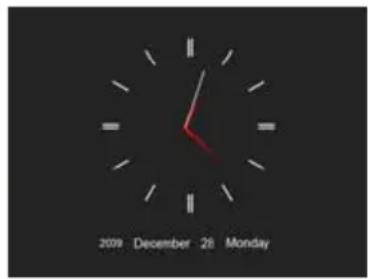
You can switch your Digital Photo Frame to Clock/Calendar mode that the current date and time is displayed on the screen with a slide show in thumbnail.
- Select the Calendar icon on the main menu and press the ENTER key.
The Calendar, Clock or Monthly Calendar is displayed on the screen and all photos in the memory source start slide show in thumbnail.
- Press the ENTER key to toggle through Calendar Clock or Monthly Calendar mode.
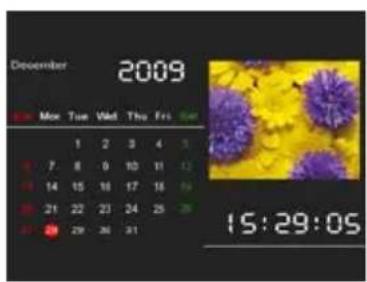
- Press the or key on the remote to skip to previous/next photo.
- To exit the Clock/Calendar mode, press the EXIT key.
Note:
- The date, time, date format and clock mode can be adjusted in Setup mode.
- You can choose the display mode(Calendar, Clock or Monthly Calendar) in Setup mode.
Changing Frame Settings
The system settings let you customize and configure your Digital Photo Frame.
ViewSonic
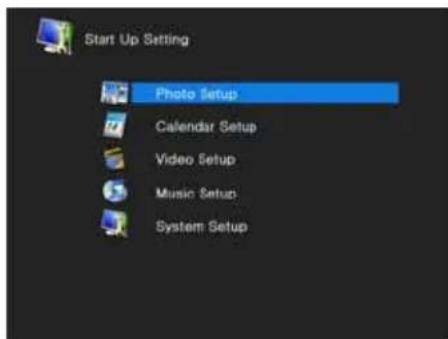
Press the EXIT key on the remote as necessary to enter the function select interface. Use ▲ or ▼ key on the remote to select the Setup icon. The Setup Menu appears on the screen.
- To select Photo Setup, Calendar Setup, Video setup, Music Setup or System Setup, use the ▲ or ▼ key on the remote and then press the ENTER key.
- To select a setting item, press the ◀ or ▶key on the remote.
- To change the value, press the ▲ or ▼ key on the remote..
- Press EXIT key on the remote to exit.
Setting items
| Items | Sub-Items | Value | Description |
| Photo Setup | Display Mode Slideshow | , Thumbnail or Single mode | |
| Display Ratio Fit to Screen | , Crop to fill or Full Screen | ||
| Slideshow Duration 5Sec | , 15 Sec, 30 Sec, 60 Sec, 5Min, 15Min. | ||
| Slideshow Repeat Once | , Repeat or Random. | ||
| Slideshow Effect Random | , Snake, Partition, Erase, Blinds, Random Lines, Grid, Cross,Spiral,Rect, Close | ||
| Magic Window On or Off | |||
| Clock On or Off | |||
| Resize On or off | |||
| Cut out when copy On or Off | |||
| Show tip when copy | On or Off | ||
| Calendar Setup | Display Mode Calendar | , Clock or Monthly Calendar | |
| Date Format | YYYY/MM/DD, MM/DD/YYYY or DD/MM/YYYY | ||
| Date | Adjust the date | ||
| Clock Mode | Adjust the date. | ||
| Clock Time | Adjust the time | ||
| Alarm Status | On or Off | ||
| Alarm Time | Set alarm time | ||
| Alarm Frequency | Once, Everyday, Mon to Fri or Weekend | ||
| etup | Display Mode Full Screen | en or Original Size | |
| Play Mode | Repeat or Once | ||
| Auto Play On or Off | |||
| Music Setup | Play Mode Repeat, Random, Once or Repeat One | ||
| Music Effect Normal, Rock, Pop, Classic, Soft, Jazz or DBB | |||
| Show Spectrum On or Off | |||
| Auto Play On or Off | |||
| SystemSetup | Language Set up the language of the OSD menu. | ||
| Brightness Adjust the brightness of the screen.The available options include: 1,2,3,4,5,6,7,8,9,10,11,12,13,14,15,16. | |||
| Contrast Adjust the contrast of the screen.The available options include: 1,2,3,4,5,6,7,8,9,10,11,12,13,14,15,16. | |||
| Saturation Adjust the saturation of the screen.The available options include: 1,2,3,4,5,6,7,8,9,10,11,12,13,14,15,16. | |||
| Tint Adjust the tint of the screen. | |||
| Power on On or Off | |||
| Auto Boot Time Set the Digital Photo Frame to turn on at the specified time | |||
| Power off On or Off | |||
| Auto Shut Time Set the Digital Photo Frame to turn off at the specified time | |||
| Auto-Power Frequency | Once, Everyday, Mon to Fri or Weekend | ||
| Reset Reset all settings to the default settings. | |||
| Version View the software version. | |||
Frequently Asked Questions
-
Why cannot the Digital Photo Frame display some files from my Flash card or USB device?
-
Some unpopular memory cards are not compatible with the device. Use a card which matches with the Digital Photo Frame.
-
The file formats on your card or USB device might not be supported (only JPEG photos are accessible). Provide files with the supported JPEG.
-
There is a memory card inserted in the Digital Photo Frame, but the device is not able to read the card. What can I do?
• First, make sure that you are using a memory card type that is supported by the Digital Photo Frame.
• Secondly, make sure that the memory card is inserted correctly.
- Thirdly, check if the file formats on your card are supported or not by the frame (only JPEG photos are accessible). Provide files with the supported JPEG.
Note: Some digital cameras save images into non-standard formats. Please refer to the operating manual of your camera for specifics.
- Why do some photos load faster than others?
- Higher resolution photos load slower. Use photos with lower resolution to speed up the loading time.
Note: The Digital Photo Frame supports up to 8000*8000 pixels photo display.
- Why does the screen not show anything?
- The device might not have been turned ON or the adapter is not well connected.
- Can I rotate a photo on the screen?
• YES. Press key on the remote while viewing a single photo.
- What is the best photo resolution displayed on the screen?
• The best resolution is 800*600 and the max photo resolution of this Digital Photo Frame is 8000*8000 pixels.
Specification
| Display | Digital LCDPanel size: VFM842: 21.3cm/8.4 inches, VFM1042: 26.4cm/10.4 inchesScreen aspect ratio: 4:3Resolution: 800*600 pixels |
| Power Supply | AC Adapter (Input: 100~240V AC, 50~60Hz; Output: DC 5V 2.0A) |
| USB port | USB Host 2.0Supports USB flash media |
| Supported peripheral devices | SDTM (Secure Digital Card), MMCTM (MultiMedia Card), MSTM(Memory Stick). |
| Supported photo format JPEG, | Maximum resolution: 8000*8000 pixels |
| Stroage condition Humidity | < 90%, -20~60°C |
| Working condition Humidity | < 80%, 0~45°C |
| Dimension | VFM842-12: 268.3 x 35.5 x 218.3 mmVFM842-52: 226 x 24.5 x 176 mmVFM1042-52: 306.8 x 36.5 x 253.8 mm |
Customer Support
For technical support or product service, see the table below or contact your reseller.
Note: You will need the product serial number.
| Country/Region Web | Site Telephone | |
| United States www.viewsonic.com | Toll-Free= 1-800-688-6688Toll: 1-424-233-2530Fax: 1-909-468-3757 | |
| Canada www.viewsonic.com | Toll-Free= 1-866-463-4775Toll: 1-424-233-2533Fax: 1-909-468-3757 | |
Limited Warranty
VIEWSONIC Digital Photo Frame
What the warranty covers:
ViewSonic warrants its products to be free from defects in material and workmanship, under normal use, during the warranty period. If a product proves to be defective in material or workmanship during the warranty period, ViewSonic will, at its sole option, repair or replace the product with a like product. Replacement product or parts may include remanufactured or refurbished parts or components.
How long the warranty is effective:
ViewSonic Digital Photo Frame are warranted for 1 year for labor from the date of the first customer purchase.
Who the warranty protects:
This warranty is valid only for the first consumer purchaser.
What the warranty does not cover:
-
Any product on which the serial number has been defaced, modified or removed.
-
Damage, deterioration or malfunction resulting from:
a. Accident, misuse, neglect, fire, water, lightning, or other acts of nature, unauthorized product modification, or failure to follow instructions supplied with the product.
b. Repair or attempted repair by anyone not authorized by ViewSonic.
c. Causes external to the product, such as electric power fluctuations or failure.
d. Use of supplies or parts not meeting ViewSonic's specifications.
e. Normal wear and tear.
f. Any other cause which does not relate to a product defect.
- Any product exhibiting a condition commonly known as "image burn-in" which results when a static image is displayed on the product for an extended period of time.
How to get service:
-
For information about receiving service under warranty, contact ViewSonic Customer Support (please refer to Customer Support page). You will need to provide your product's serial number.
-
To obtain warranted service, you will be required to provide (a) the original dated sales slip, (b) your name, (c) your address, (d) a description of the problem, and (e) the serial number of the product.
-
Take or ship the product freight prepaid in the original container to an authorized ViewSonic service center or ViewSonic.
-
For additional information or the name of the nearest ViewSonic service center, contact ViewSonic.
Limitation of implied warranties:
There are no warranties, express or implied, which extend beyond the description contained herein including the implied warranty of merchantability and fitness for a particular purpose.
Exclusion of damages:
ViewSonic's liability is limited to the cost of repair or replacement of the product. ViewSonic shall not be liable for:
-
Damage to other property caused by any defects in the product, damages based upon inconvenience, loss of use of the product, loss of time, loss of profits, loss of business opportunity, loss of goodwill, interference with business relationships, or other commercial loss, even if advised of the possibility of such damages.
-
Any other damages, whether incidental, consequential or otherwise.
-
Any claim against the customer by any other party.
4.3: ViewSonic DPF Warranty
ViewSonic
DPF_LW01 Rev. 1A 06-20-08
VFM842/VFM1042
Mexico Limited Warranty
VIEWSONIC Digital Photo Frame
What the warranty covers:
ViewSonic warrants its products to be free from defects in material and workmanship, under normal use, during the warranty period. If a product proves to be defective in material or workmanship during the warranty period, ViewSonic will, at its sole option, repair or replace the product with a like product. Replacement product or parts may include remanufactured or refurbished parts or components.
How long the warranty is effective:
ViewSonic Digital Photo Frame are warranted for 1 year for labor from the date of the first customer purchase.
Who the warranty protects:
This warranty is valid only for the first consumer purchaser.
What the warranty does not cover:
-
Any product on which the serial number has been defaced, modified or removed.
-
Damage, deterioration or malfunction resulting from: a. Accident, misuse, neglect, fire, water, lightning, or other acts of nature, unauthorized product modification, or failure to follow instructions supplied with the product.
b. Repair or attempted repair by anyone not authorized by ViewSonic.
c. Causes external to the product, such as electric power fluctuations or failure.
d. Use of supplies or parts not meeting ViewSonic's specifications.
e. Normal wear and tear.
f. Any other cause which does not relate to a product defect.
- Any product exhibiting a condition commonly known as "image burn-in" which results when a static image is displayed on the product for an extended period of time.
How to get service:
For information about receiving service under warranty, contact ViewSonic Customer Support (Please refer to the attached Customer Support page). You will need to provide your product's serial number, so please record the product information in the space provided below on your purchase for your future use. Please retain your receipt of proof of purchase to support your warranty claim.
For Your Records
Product Name: Model Number: Document Number: Serial Number: Purchase Date: Extended Warranty Purchase? (Y/N)
If so, what date does warranty expire?
1. To obtain warranty service, you will be required to provide (a) the original dated sales slip, (b) your name, (c) your address, (d) a description of the problem, and (e) the serial number of the product.
2. Take or ship the product in the original container packaging to an authorized ViewSonic service center.
3. Round trip transportation costs for in-warranty products will be paid by ViewSonic.
Limitation of implied warranties:
There are no warranties, express or implied, which extend beyond the description contained herein including the implied warranty of merchantability and fitness for a particular purpose.
Exclusion of damages:
ViewSonic's liability is limited to the cost of repair or replacement of the product. ViewSonic shall not be liable for:
-
Damage to other property caused by any defects in the product, damages based upon inconvenience, loss of use of the product, loss of time, loss of profits, loss of business opportunity, loss of goodwill, interference with business relationships, or other commercial loss, even if advised of the possibility of such damages.
-
Any other damages, whether incidental, consequential or otherwise.
-
Any claim against the customer by any other party.
-
Repair or attempted repair by anyone not authorized by ViewSonic.
ViewSonic
VFM842/VFM1042
| Contact Information for Sales & Authorized Service (Centro Autorizado de Servicio) within Mexico: | |
| Name, address, of manufacturer and importers:México, Av. de la Palma #8 Piso 2 Despacho 203, Corporativo Interpalmas,Col. San Fernando Huixquilucan, Estado de MéxicoTel: (55) 3605-1099 http://www.viewsonic.com/la/soporte/index.htm | |
| NÚMERO GRATIS DE ASISTENCIA TÉCNICA PARA TODO MÉXICO: 001.866.823.2004 | |
| Hermosillo:Distribuciones y Servicios Computacionales SA de CV.Calle Juarez 284 local 2Col. Bugambilias C.P: 83140Tel: 01-66-22-14-9005E-Mail: disc2@hmo.megared.net.mx | Villahermosa:Compumantenimietnos Garantizados, S.A. de C.V.AV. GREGORIO MENDEZ #1504COL, FLORIDA C.P. 86040Tel: 01 (993) 3 52 00 47 / 3522074 / 3 52 20 09E-Mail: compumantenimientos@prodigy.net.mx |
| Puebla, Pue. (Matriz):RENTA Y DATOS, S.A. DE C.V. Domicilio:29 SUR 721 COL. LA PAZ72160 PUEBLA, PUE.Tel: 01(52).222.891.55.77 CON 10 LINEASE-Mail: datos@puebla.megared.net.mx | Veracruz, Ver.:CONEXION Y DESARROLLO, S.A DE C.V. Av. Americas # 419ENTRE PINZÓN Y ALVARADOFracc, Reforma C.P. 91919Tel: 01-22-91-00-31-67E-Mail: gacosta@qplus.com.mx |
| ChihuahuaSoluciones Globales en ComputaciónC. Magisterio # 3321 Col. MagisterialChihuahua, Chih.Tel: 4136954E-Mail: Cefeo@soluglobales.com | CuernavacaCompusupport de Cuernavaca SA de CVFrancisco Leyva # 178 Col. Miguel HidalgoC.P. 62040, Cuernavaca MorelosTel: 01 777 3180579 / 01 777 3124014E-Mail: aquevedo@compusupportcva.com |
| Distrito Federal:QPLUS, S.A. de C.V.Av. Coyoacán 931Col. Del Valle 03100, México, D.F.Tel: 01(52)55-50-00-27-35E-Mail : gacosta@qplus.com.mx | Guadalajara, Jal.:SERVICRECE, S.A. de C.V.Av. Niños Héroes # 2281Col. Arcos Sur, Sector Juárez44170, Guadalajara, JaliscoTel: 01(52)33-36-15-15-43E-Mail: mmiranda@servicrece.com |
| Guerrero AcapulcoGS Computación (Grupo Sesicomp)Progreso #6-A, Colo Centro39300 Acapulco, GuerreroTel: 744-48-32627 | Monterrey:Global Product ServicesMar Caribe # 1987, Esquina con Golfo PésicoFracc. Bernardo Reyes, CP 64280Monterrey N.L. MéxicoTel: 8129-5103E-Mail: aydecm@gps1.com.mx |
| MERIDA:ELECTROSERAv Reforma No. 403Gx39 y 41Mérida, Yucatán, México CP97000Tel: (52) 999-925-1916E-Mail: rrrb@sureste.com | Oaxaca, Oax.:CENTRO DE DISTRIBUCION YSERVICIO, S.A. de C.V.Murguía # 708 P.A., Col. Centro, 68000, OaxacaTel: 01(52)95-15-15-22-22Fax: 01(52)95-15-13-67-00E-Mail. gpotai2001@hotmail.com |
| Tijuana:STDAv Ferrocarril Sonora #3780 L-CCol 20 de NoviembreTijuana, Mexico | FOR USA SUPPORT:ViewSonic Corporation381 Brea Canyon Road, Walnut, CA. 91789 USATel: 800-688-6688 (English); 866-323-8056 (Spanish);Fax: 1-800-685-7276E-Mail: http://www.viewsonic.com |
4.3: ViewSonic Mexico Limited Warranty
DPF_LW03 Rev. 1A06-25-07
ViewSonic™
- For Canada
- CE Conformity for European Countries
- Following information is only for EU-member states:
- Declaration of RoHS Compliance
- Copyright Information
- For Your Records
- Product disposal at end of product life
- TABLE OF CONTENTS
- Introduction
- Important Safety Precautions
- Cleaning
- Main Features
- Controls and Connections
- Remote Control
- Battery installation for the Remote Control
- Getting Started
- Hanging the frame to a wall
- Connecting to the power
- Note:
- Inserting Media
- Copy files from computer
- Main menu
- Viewing Photos
- Viewing thumbnails
- Browsing a single photo
- Playing a slideshow
- Listening to Music
- Watching Videos
- Managing Files
- Copying photos
- Copy photos from the file manager
- Copy photos from the thumbnail mode
- Deleting photos
- Delete photos from the file manager
- Delete photos from the thumbnail mode
- Displaying Clock/Calendar
- Changing Frame Settings
- Frequently Asked Questions
- Customer Support
- Limited Warranty
- VIEWSONIC Digital Photo Frame
- What the warranty covers:
- How long the warranty is effective:
- Who the warranty protects:
- What the warranty does not cover:
- How to get service:
- Limitation of implied warranties:
- Exclusion of damages:
- Mexico Limited Warranty
Brand : VIEWSONIC
Model : VFM842-52
Category : Digital photo frame