
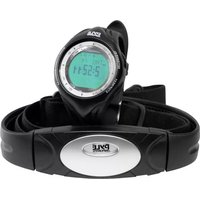
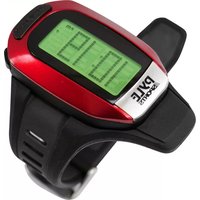
PGSPW1 - Heart rate monitor Pyle - Free user manual and instructions
Find the device manual for free PGSPW1 Pyle in PDF.


| Product Type | Heart Rate Monitor |
| Model | PGSPW1 |
| Brand | Pyle |
| Display Type | Digital LCD |
| Heart Rate Measurement | Wireless chest strap |
| Battery Type | CR2032 coin cell (for monitor) |
| Battery Life | Approximately 250 hours |
| Water Resistance | Splash proof (IPX4) |
| Transmission Frequency | 5.3 kHz analog |
| Operating Range | Up to 3 feet (1 meter) from receiver |
| Functions | Current heart rate, target zone alarm, average heart rate, stopwatch |
| Target Zone Setting | Adjustable upper and lower limits |
| Dimensions (Monitor) | 2.75 x 1.75 x 0.75 inches (70 x 45 x 19 mm) |
| Weight (Monitor) | 1.2 ounces (34 g) including battery |
| Chest Strap Material | Elastic fabric with adjustable strap |
| Included Accessories | Wrist receiver, chest strap, battery, user manual |
| Recommended Cleaning | Wipe with damp cloth, dry thoroughly; avoid submerging |
| Spare Parts Availability | Replacement chest straps and batteries available from Pyle |
| Safety Certifications | CE, FCC compliant |
Frequently Asked Questions - PGSPW1 Pyle
User questions about PGSPW1 Pyle
0 question about this device. Answer the ones you know or ask your own.
Ask a new question about this device
Download the instructions for your Heart rate monitor in PDF format for free! Find your manual PGSPW1 - Pyle and take your electronic device back in hand. On this page are published all the documents necessary for the use of your device. PGSPW1 by Pyle.
USER MANUAL PGSPW1 Pyle

RANGE OF APPLICATION
The GPS device is a navigation system. By using the 24 satellite network circling the earth, the position of user can be determined. This is possible at any time and everywhere in the world.
- The GPS device is designed for use as a global positioning system.
- The GPS device serves mainly for the measurement of distances, speed, altitude and navigation by using the US-American 24 satellite network.
- The device is not usable for demanding applications such as paragliding, sky diving or soaring.
• The GPS device is designed for private use and not suitable for commercial use.
A use different other than described in this instruction manual is not advisable and can lead to damage or injury. We assume no liability for damages resulting from improper use. Further directions and explanations can be found in the instruction manual.
GPS Reception
To use the GPS function of your GPS device optimally, it is imperative that the following instructions are followed.
The GPS device is a global positioning system (=GPS), which mainly serves for the
measurement of distances, speed, altitude and navigation by using the US-American 24 satellite network.
The United States of America operates this 24 satellite network and is responsible for its accuracy and maintenance.
Only during clear weather (clear sky) and suitable reception area - open area and clear view of the sky – can a faultless satellite reception be ensured.
Since satellite signals react very sensitively to outside influences, bad weather conditions (such as strong snowfall) as well as a disturbed reception area (GPS device is covered by clothing or other objects, high buildings or narrow valleys and gorges prevent reception) can seriously impair the performance and accuracy of the GPS device.
The GPS reception in buildings is very reduced or impossible. Near windows, as well as in rooms with large windows and free sight of the sky, the position can be determined in certain circumstances, depending on the current position of the satellites. In closed rooms and in cellars the GPS reception is practically always impossible.
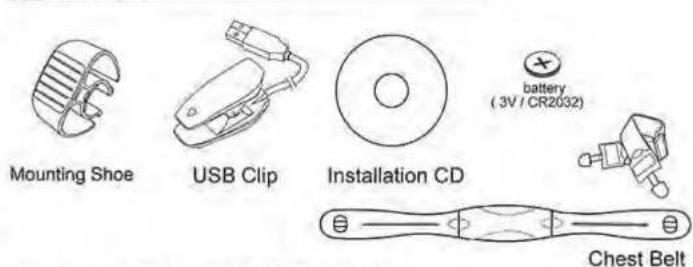
ACCESSORIES
FUNCTION BUTTONS OF THE GPS DEVICE

CLEANING AND MAINTENANCE
- Clean the GPS device only with a soft, moist, lint free cloth.
- Do not use solvents, acidic or gaseous cleaning agents.
- Take care not to leave any water drops on the display of the GPS device. Water can cause permanent discolorations.
- Do not expose the display to bright sunlight nor to ultraviolet radiation.
- On the display of the GPS device is a transparent protective film. You can remove this or leave it on the display to protect it from scratching.
Please take care that the GPS device has a clear view of the sky to ensure a faultless reception of the signals. Otherwise limitation of the performance and the accuracy could result. Take care that the GPS device is not covered by clothing... The reception could be distinctly reduced by this. You can read more about GPS reception in item "GPS Reception"
Recharging the watch
At the back of the watch there are four contacts. Clip the connecting cable (As shown in fig.1) to the watch case with the four pins on the cable matching the four contact on the case back. Plug the cable to the computer Charging time is about 3 hours.

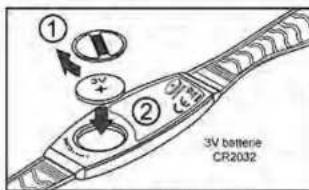
Transmitter Belt
Remove the battery cover from the bottom of the belt using a small coin. Install the 3V battery with the positive(+) pole facing the battery cover and replace the cover.
Do not disposed off batteries with the household waste
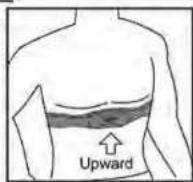
WEARING THE TRANSMITTER BELT
Adjust the elastic belt so that it fits lightly around your chest just below the pectoral muscles. Moisten the transmitter's conductive pads with saliva or ECG-gel (available at your local chemist's) in order to ensure a good contact with the skin at all times.

natural_image
Line drawing of hands tying a knot with ropes (no text or symbols)Positioning the Transmitter Belt upward as per diagram.

GPS RECEPTION
Tip:
Hold the GPS still for a few minutes in an open area before you start your journey or drive in an open area with free sight of the sky and switch it on, press and hold the SATELLITE ON/OFF for about 3 seconds.
Switch on the GPS device:
Hold the SATELLITE ON/OFF for about 3 seconds.
Switch off the GPS device:
Hold the SATELLITE ON / OFF for about 3 seconds.
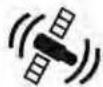
The GPS device automatically starts to search for a GPS signal, visible by the blinking satellite symbol in the top left of the display.
Please note that it can take up to 15 minutes from the first start in new surroundings until the first satellite reception occurs. Then the satellite symbol appears permanently on the display. The more "waves" are displayed around the satellite symbol, the better the reception:

Weak
reception

Good
reception
Very good reception
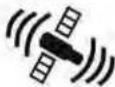
Best possible reception
If the GPS device has not received a Satellite signal in 30 minutes, GPS automatically switches off. By holding the SATELLITE ON/OFF button for 3 seconds, the search for GPS signal start again.
TO TURN ON AND DISPLAY DIFFERENT MODE
- Press and hold SATELLITE ON / OFF button for 3 seconds to turn on the GPS device.
- Press MODE button to switch between different mode.

flowchart
graph TD
    A["SPEED Mode"] --> B["68.2 km/h"]
    B --> C["DSH 86.55"]
    D["HEART RATE Mode"] --> E["40 196"]
    E --> F["78 40%"]
    F --> G["TW 06:25:36"]
    H["TIME MODE"] --> I["12"]
    I --> J["SAT 2:23.06"]
    J --> K["18 OCT"]
    L["STOPWATCH MODE"] --> M["00:00'00.00"]
    M --> N["00:00'00.00"]
    N --> O["CWS 16.5"]
    P["COMPASS MODE"] --> Q["N"]
    Q --> R["S"]
    R --> S["E"]
    S --> T["S"]
TIME MODE
Time setting
After the watch is fully charged, remove the USB connector. The watch enters into time mode.
During satellite reception (see item GPS Reception) time and date are set automatically.
Setting the time manually is not possible.
Notice: Please note that the GPS signal sends Greenwich
Mean Time (GMT), and it may be necessary to set a different
time zone.
To set a different time zone, please follow.
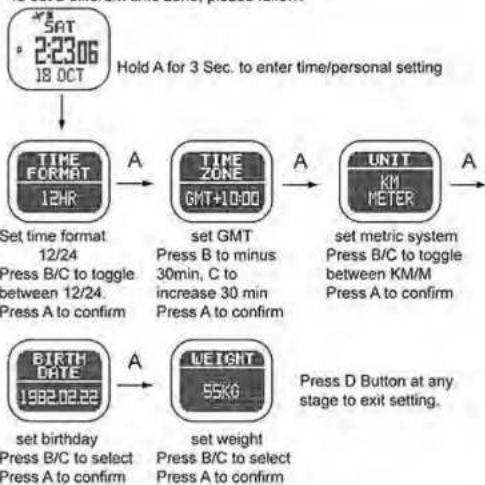
flowchart
graph TD
    A["5AT 2:2306 18 OCT"] --> B["Time FORMAT 12HR"]
    B --> C["Set time format 12/24 Press B/C to toggle between 12/24. Press A to confirm"]
    C --> D["TIME ZONE GMT+10:00"]
    D --> E["set GMT Press B to minus 30min, C to increase 30 min Press A to confirm"]
    E --> F["UNIT KM METER"]
    F --> G["set metric system Press B/C to toggle between KM/M Press A to confirm"]
    G --> H["BIRTH DATE 1982.02.22"]
    H --> I["set birthday Press B/C to select Press A to confirm"]
    I --> J["WEIGHT 55KG"]
    J --> K["set weight Press B/C to select Press A to confirm"]
    K --> L["Press D Button at any stage to exit setting"]
    style A fill:#f9f,stroke:#333
    style L fill:#f9f,stroke:#333
HOURLY CHIME

Toggle between Date/Year Display

Alarm Setting


Press B to decrease digit by 1
Press C to increase digit by 1
Press A to confirm
Press D to save and leave alarm
setting
TURN ALARM ON/OFF

SPEED MODE
Press the MODE button until you are in the speed mode, as shown in the following readout (graphics on the left).
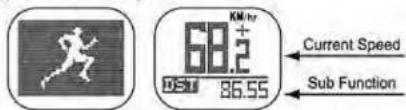
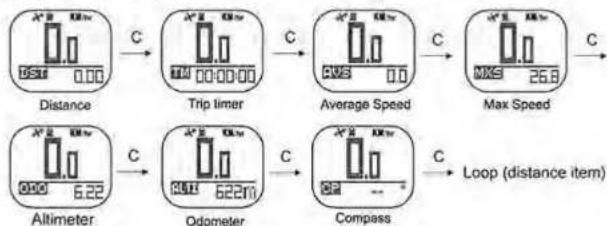
By pressing the SELECT button, you can change the readout in the lower part of the display as follows:
flowchart
graph LR
    A["Distance 0.00"] -->|C| B["Trip timer 0.00-0.00"]
    B -->|C| C["Average Speed 0.0"]
    C -->|C| D["Max Speed 26.8"]
    D -->|C| E["Loop (distance item)"]
    F["Altimeter 6.22"] -->|C| G["Odometer 622m"]
    G -->|C| H["Compass"]
    H -->|C| I["Loop (distance item)"]
- DST = Distance Hold A to reset 0
- TM = Training time (displays the time moving, i.e. during standstill the time is stopped, if the movement continues, the time continues as well.
GPS reception provided!) Hold A to reset 0
• AVS = Average speed Hold A to reset 0 - MXS = Maximum speed Hold A to reset 0
• ODO = Total distance Hold A to reset 0
• ALTI = Current Altitude - CP = Compass (an arrow shows the direction (N, E, W or S) in which you are moving) N = North E = East W = West S = South
HEART RATE MODE
Press the MODE button until you are in the heart rate mode, as shown in the following readout(graphics on the left).
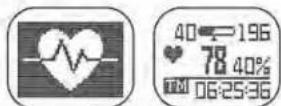
By pressing the SELECT button, you can change the readout in the lower part of the display as follows:
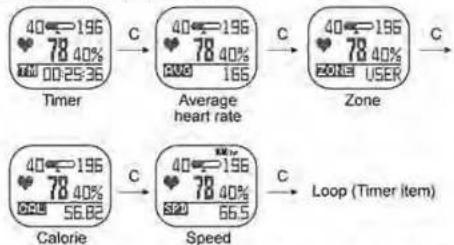
flowchart
graph TD
    A["Timer 40=196\n78 40%\n002536"] -->|C| B["Average heart rate 40=196\n78 40%\n000 166"]
    B -->|C| C["Zone 40=196\n78 40%\nZONE USER"]
    D["Calorie 40=196\n78 40%\n000 56.82"] -->|C| E["Speed 40=196\n78 40%\n000 66.5"]
    E -->|C| F["Loop (Timer item)"]
- TM = Training time (displays the time training with chest belt)
Hold A to reset 0
• AVG = Average heart rate Hold A to reset
• ZONE = Exercise zone
• CAL = Calorie Burnt Hold A to reset 0 - SPD = Current Speed
HEART RATE SUBMODE(TIMER)
By pressing the RECALL button(B) you can change the readout in the lower part of the display as follows:

flowchart
graph TD
    A["40-196\n78 40%\n00:25:36"] -->|B| B["40-196\n78 40%\n00:26:55"]
    B -->|B| C["40-196\n78 40%\n00:00:55"]
    D["Above Zone\nTimer\n78 40%\n00:02:39"] -->|C| E["AVG"]
    E --> F["• = In Zone Timer\n• = Below Zone Timer\n• = Above Zone Timer\nTimer starts when pulse signal received"]
HEART RATE SUBMODE (AVG)

flowchart
graph TD
    A["40 196\n78 40%\n80% 165"] -->|B| B["40 196\n78 40%\n80% 196"]
    B -->|B| C["40 196\n78 40%\n80% 86"]
    C -->|C| D["Zone User"]
    E["Average Heart Rate"] --> A
    E --> B
    E --> C
Hold button A to reset data
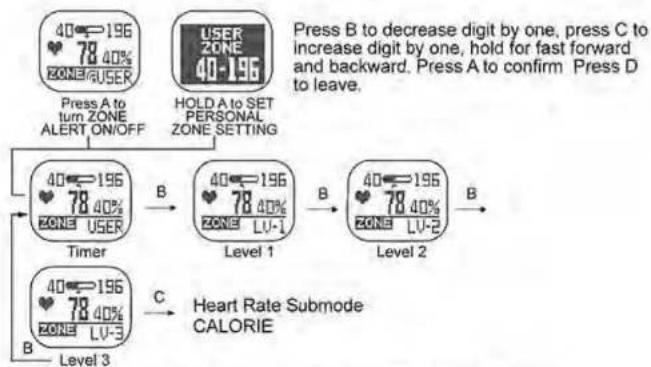
HEART RATE SUBMODE ZONE
By pressing button B you can change the readout in the lower part of the display as follows:
flowchart
graph TD
    A["40-196\n78 40%\nZONE/USER"] -->|Press A to turn ZONE\nALERT ON/OFF| B["40-196\n78 40%\nZONE USER"]
    C["USER\nZONE\n40-196"] -->|Press B to decrease digit by one, press C to increase digit by one, hold for fast forward and backward. Press A to confirm Press D to leave.| D["40-196\n78 40%\nZONE LV-1"]
    E["Level 1"] -->|B| F["40-196\n78 40%\nZONE LV-1"]
    G["Level 2"] -->|B| H["40-196\n78 40%\nZONE LV-2"]
    I["Heart Rate Submode\nCALORIE"] -->|C| J["40-196\n78 40%\nZONE LV-3"]
    B --> K["Timer"]
    D --> K
    H --> K
    J --> K
    K --> L["Level 3"]
KNOW YOUR LIMITS AND DETERMINE YOUR PERSONAL EXERCISE ZONE
Exercise zones are established by setting Upper and Lower Heart Rate Limits. These limits constitute a certain percentage of your Maximum Heart Rate (MHR).
MHR = 220-(Your age) e.g. Age : 20
MHR : 220 - 20 = 200 For instance, the current heart rate is 150, then 75% will be shown.
You may already know your MHR if you are an avid athlete or if you have already taken a Max. HeartRate test. If not, the following formula will help you to make an educated guess:
HEART RATE SUBMODE (CALORIE/FAT BURNT)
By pressing the RECALL button(B) you can change the readout in the lower part of the display as follows:

HEART RATE SUBMODE (SPEED MODE)
By pressing the RECALL button(B) you can change the readout in the lower part of the display as follows:

Speed and Distance only works when GPS signal is received.
Training Time
Press the C button in the heart rate mode until TIMER is shown.
The training time is shown in the lower segment of the display, in the middle the heart rate.
The display of the training time is activated automatically when a heart rate signal is received. The training time shows the total time you have worn the chest belt and the heart rate was received by the heart rate monitor watch, even if you switch to another mode from the heart rate mode.
If you press the A button shortly, you can choose between the following displays: TIMER= The total training time
( )=The time while you were within the chosen training zone
(▲)=The time while you were outside of the chosen training zone
(▼)=The time while you were below the chosen training zone
STOPWATCH MODE
Press the D button until you are in the stopwatch mode, as shown by the following readout:


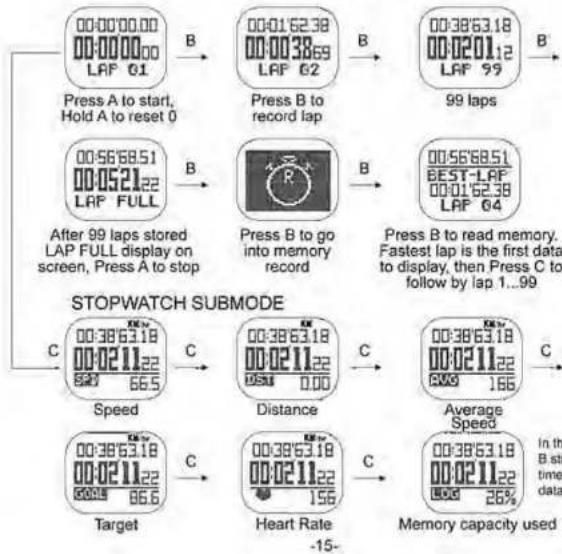
flowchart
graph TD
    A["Press A to start, Hold A to reset 0"] --> B["Press B to record lap"]
    B --> C["99 laps"]
    C --> D["After 99 laps stored LAP FULL display on screen, Press A to stop"]
    D --> E["Press B to go into memory record"]
    E --> F["Press B to read memory. Fastest lap is the first data to display, then Press C to follow by lap 1...99"]
    F --> G["STOPWATCH SUBMODE"]
    G --> H["Speed"]
    H --> I["Distance"]
    I --> J["Average Speed"]
    J --> K["Memory capacity used"]
    K --> L["Target"]
    L --> M["Heart Rate -15-"]
    M --> N["In the B still time data"]
SETTING TARGET
If the stop watch is running, press A to stop stopwatch to set target.

flowchart
graph TD
    A["GOAL 0.0"] -->|B| B["GOAL SPEED 0.0"]
    B -->|C| C["GOAL DISTANCE 0.00"]
    C -->|C| D["GOAL TIME 00:00"]
    D -->|C| E["GOAL DISTANCE 1.20"]
    E -->|B| F["GOAL DISTANCE 0.00"]
    F -->|A| G["GOAL DISTANCE 1.20 *3"]
    G -->|D| H["GOAL DISTANCE 1.20 *3"]
    H --> I["GOAL DISTANCE 0.00"]
    I --> J["GOAL DISTANCE 0.00"]
    J --> K["GOAL DISTANCE 0.00"]
    K --> L["GOAL DISTANCE 0.00"]
    L --> M["GOAL DISTANCE 0.00"]
    M --> N["GOAL DISTANCE 0.00"]
    N --> O["GOAL DISTANCE 0.00"]
    O --> P["GOAL DISTANCE 0.00"]
    P --> Q["GOAL DISTANCE 0.00"]
    Q --> R["GOAL DISTANCE 0.00"]
    R --> S["GOAL DISTANCE 0.00"]
    S --> T["GOAL DISTANCE 0.00"]
    T --> U["GOAL DISTANCE 0.00"]
    U --> V["GOAL DISTANCE 0.00"]
    V --> W["GOAL DISTANCE 0.00"]
    W --> X["GOAL DISTANCE 0.00"]
    X --> Y["GOAL DISTANCE 0.00"]
    Y --> Z["GOAL DISTANCE 0.00"]
    Z --> AA["GOAL DISTANCE 0.00"]
    AA --> AB["GOAL DISTANCE 0.00"]
    AB --> AC["GOAL DISTANCE 0.00"]
    AC --> AD["GOAL DISTANCE 0.00"]
    AD --> AE["GOAL DISTANCE 0.00"]
    AE --> AF["GOAL DISTANCE 0.00"]
    AF --> AG["GOAL DISTANCE 0.00"]
    AG --> AH["GOAL DISTANCE 0.00"]
    AH --> AI["GOAL DISTANCE 0.00"]
    AI --> AJ["GOAL DISTANCE 0.00"]
    AJ --> AK["GOAL DISTANCE 0.00"]
    AK --> AL["GOAL DISTANCE 0.00"]
    AL --> AM["GOAL DISTANCE 0.00"]
    AM --> AN["GOAL DISTANCE 0.00"]
    AN --> AO["GOAL DISTANCE 0.00"]
    AO --> AP["GOAL DISTANCE 0.00"]
    AP --> AQ["GOAL DISTANCE 0.00"]
    AQ --> AR["GOAL DISTANCE 0.00"]
    AR --> AS["GOAL DISTANCE 0.00"]
Recording Data
Notice:
Please note that the GPS and pulse data are saved in the GPS device only during on going timekeeping.
You can change to all modes during timekeeping, the recording of GPS and pulse data continues until you stop the timekeeping in the stopwatch mode or the memory is full.
- Press the ST/SP/SET button to start timekeeping. During ongoing timekeeping the GPS and pulse data are recorded.
Maximum memory: 350 hours. - To stop the timekeeping and also the recording of GPS and pulse data.
press the ST/SP/SET button again. - To continue the timekeeping and therefore also the recording of GPS and pulse data, press the ST/SP/SET button again, to stop again the ST/SP/SET button.
- To reset the timekeeping and save the recording of the GPS and pulse data, press the SELECT button for about 3 seconds during stopped timekeeping. Your run or ride is now saved as one recording in the GPS device.
- If you start the timekeeping again with the ST/SP/SET button again, a second recording is started, etc..
Deleting the Memory:
If the timekeeping is at zero, press the ST/SP/SET button for about 5 seconds.
CLEAR ALL STORE DATA IN WATCH

In Stopwatch memory screen, Hold SET for 5 seconds, clears all memory
To download the saved recordings follow item Transfer of GPS data to a Computer.
Compass Mode (Function only with Satellite Signal)
Press the MODE button until you are in the compass mode, as shown in the following readout:

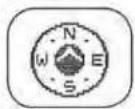

GPS Compass
C

Way Point Navigation
C
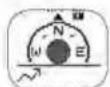
Route Navigation
C

Current location
GPS Compass
The watch shows user's travelling direction

Middle arrow shows Home direction

Way Point Navigation
The watch can memorize 16 point of interest(1 home location and 15 way points) To set way point:

At the point of interest, go to current location screen. Hold A to save as way point. Press B or C to select which icon to set Flag 1... Flag 15 or home. Then Press A to confirm. It is not necessary to set point of interest from 1 to 15, the user can choose to set in any orders,
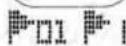
5 Flag 01...Flag 15

Home
Compass Mode (Functions only with Satellite Signal)
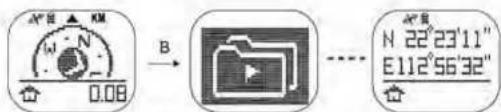
Navigating through way point:
In way point navigation mode, press B to show way point data, press C to choose the desired way point.
After selection, press B to go back to way point navigation mode. The arrow in the middle
shows the direction of destination, lower digit shows the distance from the destination
REMARK:
In the beginning or when the user is not moving, the arrow points forward. When user starts to move, the arrow will point to the direction of the point of interest
ROUTE NAVIGATION

Download route from computer
(Please see appendix how to download route).
At the starting point of the route, turn GPS on.
Middle arrow shows the direction on next way point, below digit shows the distance remaining to the route destination.
RETURN HOME
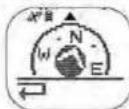
Before your journey, Start the stopwatch to start recording. When you want to turn back, use Return Home function. Press B, then press C to show home location hold A to go back to the Return Home function and start navigation. Follow the arrow to go back.
Download route from computer works on Route Navigation mode only Route record by watch can only use for return home function
If you want to use the route recorded by the watch in route navigation mode, you need to first download the route to the computer and re-install the route into the watch.
Display of Position:
When the GPS device is connected to the satellites, the latitude and longitude for every position is displayed. An N is added to the latitude (north of the equator) or S (south of the equator).
A W is added to the longitude (west of the prime meridian) or
E (east of the prime meridian).
N = North = North northern latitude
S = South = South southern latitude
E = East = East eastern longitude
W = West = West western longitude
The position is displayed in the common format degrees - minutes ' seconds "
1 degree is subdivided into 60 minutes, one minute is 60 seconds.
Example:
N 48° 8' 41.4"
E 14°0'45.0"
= 48 degrees 8 minutes 41.4 seconds northern latitude
14 degrees 0 minutes 45.0 seconds eastern longitude
Note: During Route Navigation or Return Home, You must stay in Route
Navigation Submode otherwise the GPS device will not keep you tracking along the route.
LIGHT FUNCTION
By pressing the SATELLITE button, the display is illuminated for about 3 seconds. Please note constant illumination of the display consumes more battery, which results in a shorter lifespan of the battery.
A battery charge is necessary. If the display gets weaker or it fades totally. If the battery is weak, the low battery symbol is displayed.

FAQ/TROUBLESHOOTING
No Satellite Reception
We recommend placing the GPS sport computer in an open area with free view of the sky some minutes before you start your training. Please see notes as stated in "GPS Reception".
TECHNICAL DATA
Memory for GPS data: 350 hours Accuracy GPS: 5 metres
The indication of the accuracy is derived from the so called 50% CEP (Circular Error Probability). This means that 50% of all measurements during very good satellite reception are within the stated radius of 5m. However this also means that half of the measured points are outside this radius.
In this case 95% of all measured points a within a circle of twice the stated radius. This means that during very good satellite reception almost all points are within a circle of 10m radius. The determined position is in the worst case practically always accurate to about 10m.

pie
| Category | Percentage (%) | | :--- | :--- | | 95% of all measuring points | 95 | | 50% of all measuring points | 50 | | 5m | 5m | | 10m | 10m |Accuracy of Positioning
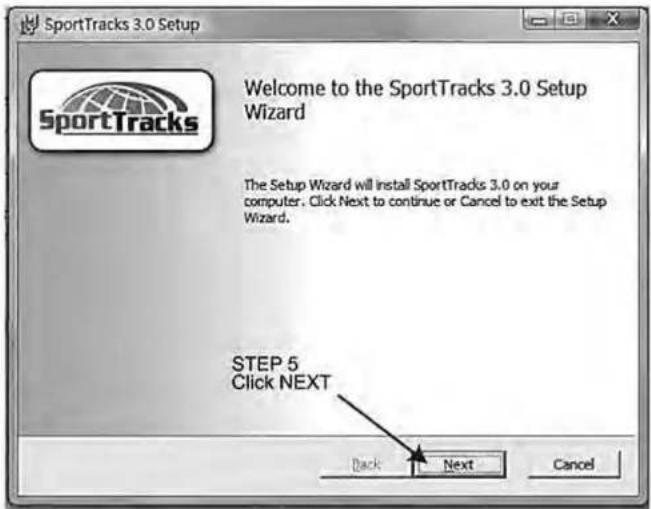
Procedure to install the sporttrack software.
(1)
Downloading the Sport Tracks Step-1 go to site http://www.zonefivesoftware.com/SportTracks/


Features
- GPS engine (from an electric field) - Oil pump (GPS) with oil, base & a power mass - Draft within the body of ice - Drip gas, erosion, and solar dioxide groups - Concrete, soil lime, atmosphere and heat source
Tech Specs
- System with Windows 7.0s - Network 4278 applications - Network 4278 application - Network 4278 applications and 3658 applications
What's New in STJ
a. Physical church in schools may be a member of the school. b. Public sector funding. c. Uncommitted public funds have been held. d. Public Annals' College London, UK, 2014. e. 2015 The public for the US: 2015 A-21781 local
(3)

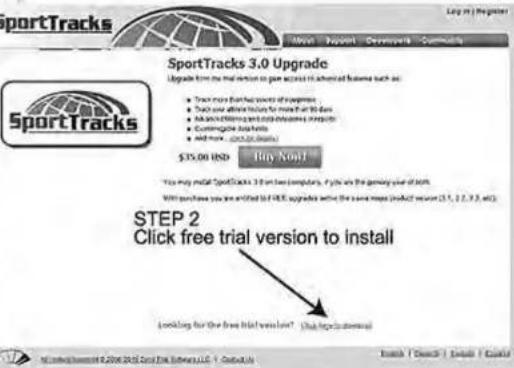
SportTracks 3.0 Product Comparison
STEP 3
Click trial version download


| Track worked details such as time, distance, colors, tops, location and route | √ | √ |
| View detailed interactive charts for pace, speed, elevation, heart rate, cadence & power data | √ | √ |
| Explore and with your GPS model at availability of map types | √ | √ |
| Analyze heart rate, cadence and power data by customizable zones | √ | √ |
| Create and organize commonly used routes | √ | √ |
| Chart your progress over time to monitor and help achieve your fitness goal's | √ | √ |
| Quickly find workouts and create reports with line best searching | √ | √ |
| Create customized saved targets | √Limited to 1200 | √ |
| • Guide access reports stored by date, post-categories equipment, location, and more | ||
| Summate report data by spot category, location, time of day and workout time | √ | √ |
| Record any custom data fields you offer for workouts, equipment and office info | √ | √ |
| Track your goal's maintenance history | √Limited to 2 items | √ |
| • Automatically court time & distance used and predia when items need to be replaced | ||
| Record and chart athlete focus improvements over time | √Limited to 30 days | √ |
| • Weight tool fat injuries, trauma, plus duty courses consumed and more | √ | √ |
| Access powerful advanced features created by our plugin developer community | √Limited to 2 plugins | √ |
| • Over 20 purchases enhance SportTracks more being developed every day | ||
| FREE | $35.00 USD |
(2)
(4)

(6)
(5)
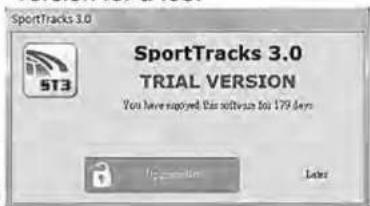
Trial version of SportTrack 3.0 has no time limited. You may enjoy the trial version for as long as you like. Press Later to enter into the software. If you want to use the full version, please press Upgrade. Now, you can enjoy the full version for a fee.
Installation of software, driver and plugin, Please follow the follow procedure to install driver.
Install software, driver and plugin.
Insert the diskette into the disk drive to install the driver and plugin.

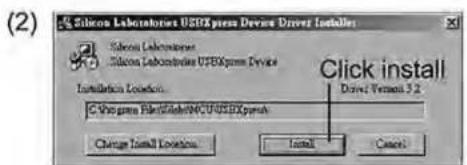

• The required drivers are installed now.
- Now you can unplug the docking station with the GPS device and remove the installation CD from the drive.
Every time you connect the USB cable to the computer, the operating system will automatically recognize your GPS device.
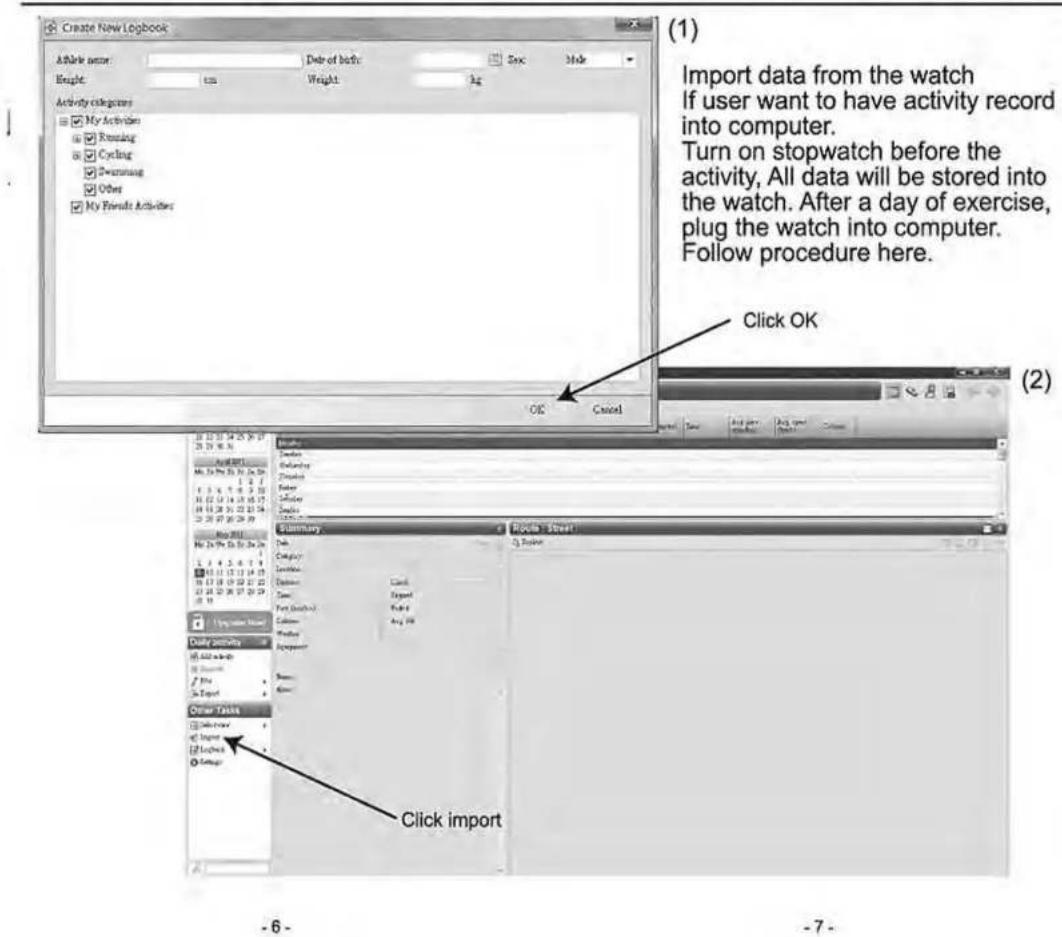
SPORTTRACKS APPLICATION (Import GPS and Pulse date from GPS device)
(3)
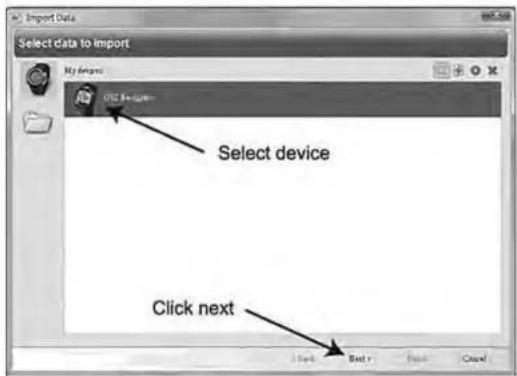
(6)
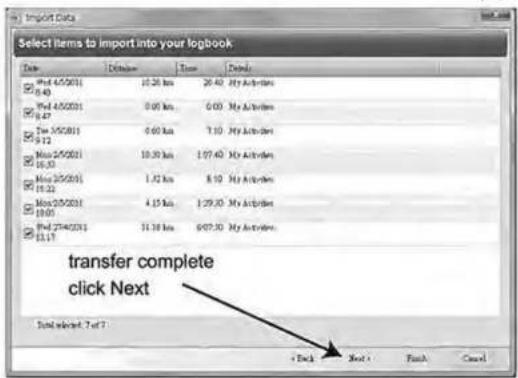
Choose GPS navigator
Make sure the watch is connected to the computer
(5)


(9)


natural_image
Grayscale aerial or satellite view of a rugged landscape with no visible text, numbers, or symbols.


(12)

(13)

(14)
(16)


line
| Time (minutes) | Pace Value | | -------------- | ---------- | | 0 | 0.5 | | 10 | 0.7 | | 20 | 0.9 | | 30 | 1.1 | | 40 | 1.3 | | 50 | 1.5 | | 60 | 1.7 | | 70 | 1.9 | | 80 | 2.1 | | 90 | 2.3 | | 100 | 2.5 | | 110 | 2.7 | | 120 | 2.9 | | 130 | 3.1 | | 140 | 3.3 | | 150 | 3.5 | | 160 | 3.7 | | 170 | 3.9 | | 180 | 4.1 | | 190 | 4.3 | | 200 | 4.5 | | 210 | 4.7 | | 220 | 4.9 | | 230 | 5.1 | | 240 | 5.3 | | 250 | 5.5 | | 260 | 5.7 | | 270 | 5.9 | | 280 | 6.1 | | 290 | 6.3 | | 300 | 6.5 | | 310 | 6.7 | | 320 | 6.9 | | 330 | 7.1 | | 340 | 7.3 | | 350 | 7.5 | | 360 | 7.7 | | 370 | 7.9 | | 380 | 8.1 | | 390 | 8.3 | | 400 | 8.5 | | 410 | 8.7 | | 420 | 8.9 | | 430 | 9.1 | | 440 | 9.3 | | 450 | 9.5 | | 460 | 9.7 | | 470 | 9.9 | | 480 | 10.1 | | 490 | 10.3 | | 500 | 10.5 | | 510 | 10.7 | | 520 | 10.9 | | 530 | 11.1 | | 540 | 11.3 | | 550 | 11.5 | | 560 | 11.7 | | 570 | 11.9 | | 580 | 12.1 | | 590 | 12.3 | | 600 | 12.5 | | 610 | 12.7 | | 620 | 12.9 | | 630 | 13.1 | | 640 | 13.3 | | 650 | 13.5 | | 660 | 13.7 | | 670 | 13.9 | | 680 | 14.1 | | 690 | 14.3 | | 700 | 14.5 | | 710 | 14.7 | | 720 | 14.9 | | 730 | 15.1 | | 740 | 15.3 | | 750 | 15.5 | | 760 | 15.7 | | 770 | 15.9 | | 780 | 16.1 | | 790 | 16.3 | | 800 | 16.5 | | 810 | 16.7 | | 820 | 16.9 | | 830 | 17.1 | | 840 | 17.3 | | 850 | 17.5 | | 860 | 17.7 | | 870 | 17.9 | | 880 | 18.1 | | 890 | 18.3 | | 900 | 18.5 | | 910 | 18.7 | | 920 | 18.9 | | 930 | 19.1 | | 940 | 19.3 | | 950 | 19.5 | | 960 | 19.7 | | 970 | 19.9 | | 980 | 20.1 | | 990 | 20.3 | | 1000 | 20.5 |-21-
(19)
SPORTTRACKS APPLICATION (Export Route to GPS DEVICE)


Move the mouse pointer to the starting position, click the left button, the starting point is marked. Move the pointer to the next turn, a straight line will be created, click the left button on the turning point, then follow the same procedure to reach your destination.
To finish the setting of the route, click explore

(6)
Then Click GPS Navigator Export. Make sure your GPS watch is connected to the Computer thorough the USB cable Clip.
When Arriving at the starting point. Turn GPS on to Acquire GPS signal. The watch will guide you to the destination that was preset.

- Route created on sporttrack and export to watch can only be as navigation from starting point to destination.
- Route recorded in the watch can only be use as return home, navigation from current location back to starting point.
• To use route record by the watch for navigation, first import the route to the computer then export the route back to the watch, this route will be the same as route created on sporttrack.

- RANGE OF APPLICATION
- GPS Reception
- CLEANING AND MAINTENANCE
- Recharging the watch
- WEARING THE TRANSMITTER BELT
- TO TURN ON AND DISPLAY DIFFERENT MODE
- TIME MODE
- SPEED MODE
- HEART RATE MODE
- HEART RATE SUBMODE(TIMER)
- HEART RATE SUBMODE ZONE
- KNOW YOUR LIMITS AND DETERMINE YOUR PERSONAL EXERCISE ZONE
- HEART RATE SUBMODE (CALORIE/FAT BURNT)
- HEART RATE SUBMODE (SPEED MODE)
- Speed and Distance only works when GPS signal is received.
- Training Time
- Recording Data
- Notice:
- Deleting the Memory:
- CLEAR ALL STORE DATA IN WATCH
- Compass Mode (Function only with Satellite Signal)
- GPS Compass
- Compass Mode (Functions only with Satellite Signal)
- REMARK:
- RETURN HOME
- Display of Position:
- LIGHT FUNCTION
- FAQ/TROUBLESHOOTING
- TECHNICAL DATA
- Procedure to install the sporttrack software.
- Features
- Tech Specs
- What's New in STJ
- STEP 3
- Click trial version download
- SPORTTRACKS APPLICATION (Import GPS and Pulse date from GPS device)
- SPORTTRACKS APPLICATION (Export Route to GPS DEVICE)
Brand : Pyle
Model : PGSPW1
Category : Heart rate monitor