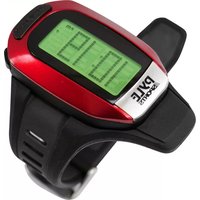
PHRM24 - Heart rate monitor Pyle - Free user manual and instructions
Find the device manual for free PHRM24 Pyle in PDF.


| Product Type | Heart Rate Monitor |
| Brand | Pyle |
| Model | PHRM24 |
| Display | LCD |
| Heart Rate Measurement | Yes (via chest strap) |
| Transmission Type | 5.3 kHz analog |
| Water Resistance | IPX4 (splash proof) |
| Battery | CR2032 (chest strap) |
| Battery Life | Approximately 200 hours |
| Chest Strap Material | Soft fabric |
| Compatible Devices | Smartphones, tablets, fitness equipment |
| Strap Size | Adjustable up to 52 inches |
| Weight | 50 g (sensor + strap) |
| Sensor Dimensions | 2.5 x 1.5 x 0.5 inches |
| Color | Black |
| Cleaning | Wipe with damp cloth and mild soap |
| Safety | Consult doctor before exercise; stop if discomfort |
| Transmission Range | Up to 3 feet (1 meter) |
| Replacement Parts | Battery and strap available |
| Warranty | 1 year limited |
Frequently Asked Questions - PHRM24 Pyle
User questions about PHRM24 Pyle
0 question about this device. Answer the ones you know or ask your own.
Ask a new question about this device
Download the instructions for your Heart rate monitor in PDF format for free! Find your manual PHRM24 - Pyle and take your electronic device back in hand. On this page are published all the documents necessary for the use of your device. PHRM24 by Pyle.
USER MANUAL PHRM24 Pyle
Latest 3D Technology for Speed + Distance & Heart Rate In - Built USB ConneFWRU


natural_image
Technical line drawing of a symmetrical mechanical component with central circular feature and flanges (no text or symbols)HEART RATE BELT
This unit is operated by three keys:
- MODE/SET
- START/LAP/RESET (Hold this key for 3 seconds to fast forward the value)
- SUB/EL
Features:
- Time & Date
- Daily Alarm
- Jumbo Digit LCD
- Dual Purpose 3D Sensor From Germany (Walking or Running)
- Intelligent Step Filter Function
- Chronograph with 30 Laps Memory Record
- Current / Average Heart Rate
- Target Heart Rate Zone Alert Alarm
- Target Time Alert Alarm
- Current / Average Speed
- Step Counting
- Total Distance
- Calories & Fat Burnt
- Calibration Function
- Memory Data Recall
- EL Backlight
- Low Battery Detection
- Key Tone
- Energy Saving Function
- USB PC-Link Upload & Download with Interface Program (Plug & Play)
- Maximum / Minimum Heart Rate on Interface Program
- Maximum Speed on Interface Program
3D SENSOR FROM GERMANY-MEASURES YOUR MOVEMENT ACCURATELY
-The 3D technology in the accelerator is an accelerometer Sensor to measure acceleration in walking or running.
-3D Sensor has intelligent step filter function-steps only count when the unit detects
-3D Sensor allows users to customize to their specific body type for Walking/Running style
The Complete Training System
Thank you for choosing ANYRUN The Complete Training System as your personal trainer. In order to be able to make the best use of this device, please read the instruction manual carefully. Do not discard keep the manual for future reference.
Wear the Heart Rate Belt on your chest with the sensor over your heart for detection of the heart rate.

natural_image
Line drawing of a human torso wearing a gait and a full-body bandage (no text or symbols)
natural_image
Line drawing of hands holding a tool with an arrow indicating direction (no text or symbols)You will notice that there are two noticeably different patches on the inside of the Heart Rate Belt. These are the sensor for detecting your Heart Rate. Before you wear the Heart Rate Belt, wet these two patches lightly so that the sensor can detect your heart rate more easily. faster and with increased accuracy.

natural_image
Illustration of three different hygiene-related water tap behaviors: faucet, hand, and wrench (no text or symbols)
natural_image
Illustration of a hand using a pipette to lift water from a faucet, with another hand holding a tool partially visible (no text or symbols)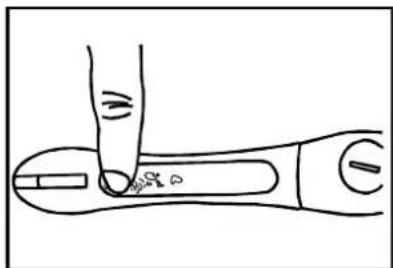
natural_image
Line drawing of a hand pressing down on a tool, showing motion lines and a small object inside (no text or symbols)Important: Please note that the Heart Rate Monitor is NOT a medical device and is not to be used as such.
TIPS:
The position of the chest belt affects its performance .Move the chest belt along strap so that it falls above your heart.
Avoid areas with dense chest hair.
In dry, cold climates, it may take several minutes for the chest belt to function steadily.
This is normal and should improve with several minutes of exercise.
The chest belt is splash proof and should not be worn for underwater activities.
WARNING: Signal interference can be caused in the environment due to electromagnetic disturbances. These may occur near high voltage power lines, traffic lights, overhead lines of electric railways, electric bus lines or trams, televisions, computers, car motor, bike computer, some motor driven exercise equipment, cellular phones or when you walk through electric security gates.
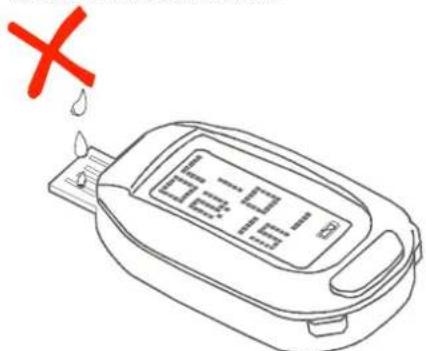
The USB connector must not come in contact with the water as this will oxidize the metal contact points and will damage the connection between the USB and the computer.
CONTENTS
Getting Start....2
Wearing the chest belt and Watch 2
Using the watch function....3
Symbol on LCD 4
Mode Flow Chart....5
Time / Date Setting.... 5
Alarm Mode....6
Alarm Setting....6
Chronograph Mode 7
Calibration Mode.... 11
Calibration Setting Mode.... 12
Target Time and Heart Rate Setting Mode.... 12
Memory Recall Mode.... 14
Download/Installing PC-Link Program.... 15
PC - Link Upload....15
Installing the Battery.... 16
Specification....18
Caution....18
USING THE WATCH FUNCTIONS
IMPORTANT!
- Before the units are transported, the watches are switched off for energy saving purposes. The user will need to turn it on by pressing the MODE key when they have purchased the product
- Again for energy saving purposes, the watch unit will automatically switch off at midnight every night and the step count may return to zero as it saves the day's data into memory. To turn it on again, press the MODE key. The pedometer mode will also be off during transportation for energy saving purposes.
NORMAL WALKING AND CHRONOGRAPH RUNNING
-There are two-step counting features, one is for the daily walking mode and the other is the chronograph running mode. For each individual modes of step counting, calibration of stride length is required separately for both
-The watch may take a bit of time before it starts to sense that you are walking. During that time, it will not display a step count. Once the watch determines that you are walking it will display your entire step count from the beginning of your walk, including the steps you took while the watch was not displaying a step count.
NOTE
- When you walk or run for around 10 seconds, the unit sensor will pick this up and a display showing current pace for the walk or run will appear. However, if there is no activity for around 10 seconds, the current pace for walk or run on the display will be stopped and it will return to the time mode
- When in the pedometer mode and there is no activity for around 1 minute, it will automatically return to time mode
- If you wish to have the most accurate fitness index calculated by the unit, the user must use the calibration feature for both walking and running. They will also need to input their personal user settings
In order to maximize the accuracy of the step counting feature of the watch, please wear the watch properly as shown in the diagram (strap of the watch must fasten tightly around the wrist and it must not be loose; display must also be perpendicular to the forearm and wrist; the watch must only be worn on the left wrist and not the right to maximize the accuracy of step counting) The design and accuracy of the watch for step counting is based on the positioning of the watch.
The 3D sensor of the watch will automatically sense the walk or run of the user and count the steps. By wearing the watch correctly, the steps counted during the daily walk and, or run will be more accurate.
Please take off the strap from your wrist before you take out the watch unit.


natural_image
Hand holding a wristwatch with a red checkmark indicating a detail (no text or symbols present)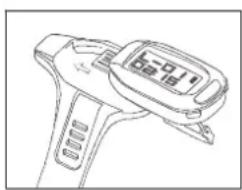
natural_image
Line drawing of a handheld electronic device with a digital display (no text or symbols)AVG - Average
KM/h - Kilometers per hour
Mi/h - Miles per hour
Kcal - Unit of Calories Burnt
AM - Time from 0:00.00 to 11:59.59
PM - Time from 12:00.00 to 23:59.59
/ MIN - Heart beat per minute
STEP - Step you have walked
KM - Kilometer
Mi - Miles
- Alarm
gFAT - Unit of Fat Burnt

TIME/DATE MODE – ALARM MODE – CHRONOGRAPH MODE – CALIBRATION MODE – MEMORY RECALL MODE
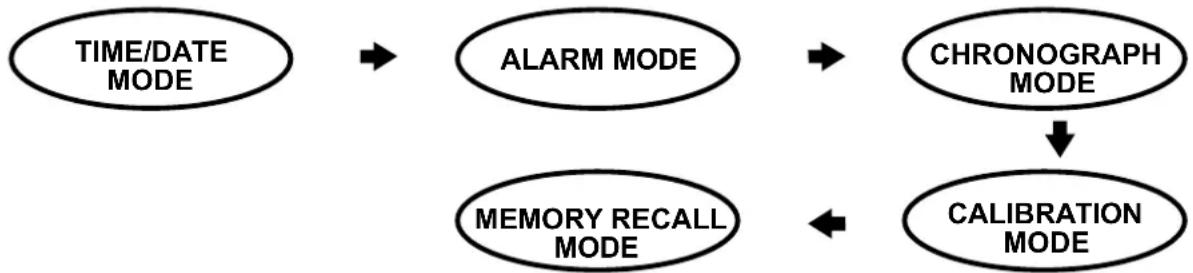
flowchart
graph TD
    A["TIME/DATE MODE"] --> B["ALARM MODE"]
    B --> C["CHRONOGRAPH MODE"]
    C --> D["CALIBRATION MODE"]
    D --> E["MEMORY RECALL MODE"]
Time and Date Setting Mode
- Press MODE/SET button until you have reached the clock mode displaying the time.
- Press and hold the MODE/SET key for 3 seconds and the minutes' digits should flash.
- To increment the value, press the START/LAP/RESET button or hold the START/LAP/RESET button to fast forward the value until you have reached your desired minute.
- Press the MODE/SET button for confirmation and press the START/LAP/RESET button or hold the START/LAP/RESET button to fast forward the value until you have reached your desired hour.
- Press MÖDE/SET key for confirmation and continue to set the year.
- Press the START/LAP/RESET button or hold the START/LAP/RESET button to fast forward the value until you have reached your the correct year.
- Press the MODE/SET key to confirm and to continue to set the month.
- Press the START/LAP/RESET button or hold the START/LAP/RESET button to fast forward the value until you have reached your desired month.
- To confirm, press the MODE/SET key and press the START/LAP/RESET button or hold the START/LAP/RESET button to fast forward the value until you have reached your desired date.
- Press MODE/SET key to confirm and select the 12 hour or 24 hour format. Do this by pressing the START/LAP/RESET button to toggle between the two options.
- To exit settings, press and hold the MODE/SET button or alternatively, do not press or hold any buttons for 60 seconds and the unit will return to its default time mode.


Note:
- At anytime to exit the time and date setting mode, press and hold MODE/SET button for 3 seconds.
Alarm Mode
- Press the MODE/SET button until you have reached the alarm mode which should show 'AL' in the bottom half of the screen indicating alarm.
- To turn the alarm on or off, press the START/LAP/RESET to toggle between the two options.

Note: To exit the alarm mode and return to the default time mode, press the MODE/SET button until you have reached the time mode which should display time.
Setting the Alarm
- Press the MODE/SET button until you have reached the alarm mode which should show 'AL' in the bottom half of the screen indicating alarm.
- Press and hold the MODE/SET button to enter into alarm setting mode and the minutes' digits should start flashing.
- Press the START/LAP/RESET button to increment the minutes' value until you have reached your desired minute. To fast forward this process, press and hold the START/LAP/RESET key.
- Press the MODE/SET button to confirm and continue to set the hours' digits.
- Press the START/LAP/RESET button to increment the hours' value until you have reached your desired hour. To fast forward this process, press and hold the START/LAP/RESET key.
-
Press the MODE/SET button for confirmation.
-
The next step will be to toggle the alarm status on or off, select on or off by pressing the START/LAP/RESET button.
- To exit settings, press and hold the MODE/SET button or alternatively, do not press or hold any buttons for 60 seconds and the unit will return to its default time mode.

flowchart
graph TD
    A["6:00 AM AL"] --> B["6:00 AM AL"]
    B --> C["6:00 AM AL"]
    D["ON AL"] --> E["OFF AL"]
    E --> C
Note:
- Any changes made in the alarm mode will automatically enable the alarm.
- At anytime to exit the alarm setting mode, press and hold MODE/SET button for 3 seconds.
Chronograph
- Press the MODE/SET key until you have reached the chronograph mode.
- After 3 seconds, the heart rate reception will be enabled or when the chest belt is worn.
- To start the exercise session, press the START/LAP/RESET button. If the target time is enabled, the timer will begin counting down after 5 seconds reserved for your preparation. If target time is disabled, the stopwatch will replace the timer instead to time the exercise session.
- During the exercise session, you may scroll through the data being measured: current speed, distance, steps and heart rate by pressing the SUB/EL key. For the timer disabled option, you may data by laps, once you have completed and you wish to restart the timer for the next lap, press the START/LAP/RESET button key.
- At the end of the exercise session, press and hold the START/LAP/RESET button for 3 seconds. This session's exercise record is saved automatically.

Target time disabled
or
Target time enabled

or


Target time disabled
or
or

Target time enabled
Calibration
- Press the MODE/SET button until you have reached the calibration mode which should display "CAL".
- To begin calibration, press the START/LAP/RESET key and the square unit should be descending vertically in loop to indicate calibration is in progress.
- To end the calibration, press the START/LAP/RESET key again and the success or failure will be displayed.
- After 4 seconds or by pressing the MODE/SET button, the unit will return to the calibration mode.

flowchart
graph TD
    A["CAL"] --> B["CAL"]
    B --> C["CAL"]
    C --> D["CAL"]
    D --> E["CAL"]
    E --> F["CAL"]
    F --> G["FAIL"]
    style A fill:#000,stroke:#000
    style B fill:#000,stroke:#000
    style C fill:#000,stroke:#000
    style D fill:#000,stroke:#000
    style E fill:#000,stroke:#000
    style F fill:#000,stroke:#000
    style G fill:#000,stroke:#000
Note:
- During the process of calibration, press and hold the MODE/SET button to quit calibration which will be indicated by 2 vibrations accompanied by beeps and return to the default time and date mode.
- Stride length is limited to a range of 20 - 180cm for both walking and running. If the calibrated result is beyond this range then the previous stride length will be used.
- If stride calibration has not been performed before, the stride value will be set based on the height. But once the stride has been calibrated, this will automatically replace the stride length calculated based on the user's height.
Calibration Setting Mode
- Press the MODE/SET button until you have reached the calibration mode which should display "CAL".
- Press and hold the MODE/SET button for 3 seconds to enter calibration setting mode.
- Select either the run or walk stride length to be calibrated by pressing the START/LAP/RESET key.
- Confirm by pressing the MODE/SET button to continue to the next stage of the setting.
- The next step is to set the calibration distance, press the START/LAP/RESET button or hold the START/LAP/RESET button to fast forward the calibration distance until you have reached your desired calibration distance.
- To finalise all the settings, press the MODE/SET button.
- To exit the calibration setting mode, press and hold the MODE/SET button for 3 seconds.
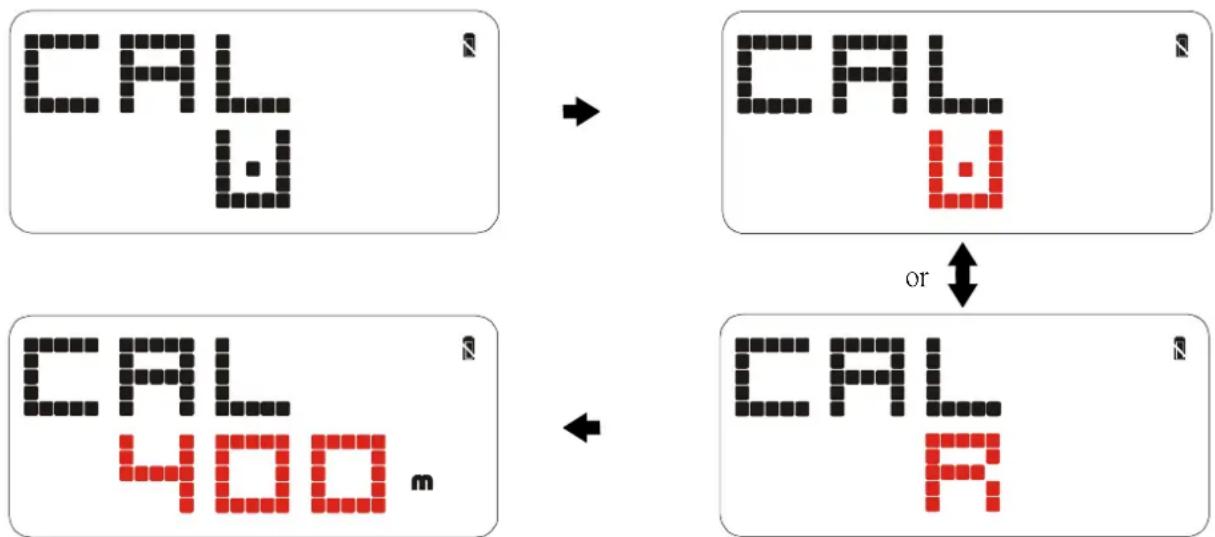
flowchart
graph TD
    A["CAL W"] --> B["CAL W"]
    C["CAL 400"] --> D["CAL R"]
    style A fill:#f9f,stroke:#333
    style B fill:#ccf,stroke:#333
    style C fill:#cfc,stroke:#333
    style D fill:#fcc,stroke:#333
Note: During the calibration setting mode, if no keys are pressed or held for 60 seconds, the unit will automatically return to the default calibration display.
Target Time and Heart Rate Setting Mode
- Press the MODE/SET button until you have reached the chronograph mode or any of the chronograph displays.
- Press and hold the MODE/SET button for 3 seconds to enter target and heart rate setting mode.
- Increment the target minute by pressing or holding the START/LAP/RESET button.
- Press the MODE/SET button for confirmation and set the target hour.
- Increment the target hour by pressing or holding the START/LAP/RESET button.
- Confirm the target hour by pressing the MODE/SET button.
-
Turn the target time on or off by pressing the START/LAP/RESET button.
-
Press MODE/SET button to confirm your option and continue to set the zonal operation alert.
- Toggle between on and off using the START/LAP/RESET button before pressing MODE/SET key for confirmation.
- Then set the upper limit of the heart rate zonal alert by pressing the START/LAP/RESET button or hold the START/LAP/RESET button to fast forward the upper limit value of the heart rate zonal alert.
- Press the MODE/SET key for confirmation and repeat step 10 for setting the lower limit of the heart rate zonal alert.
- Press MODE/SET key for confirmation and to exit the target heart rate setting mode, press and hold the MODE/SET key for 3 seconds.

flowchart
graph TD
    A["00:00 /min"] --> B[":00 TAR"]
    C["ON TAR"] --> D[":00 TAR"]
    E["OFF TAR"] --> F["AL:00"]
    G["H160 /min"] --> H["AL:0F"]
    I["L60 /min"] --> J["End"]
Note:
- Any changes or alterations made to target hour and minute will automatically enable the target time alert function.
- If no keys are pressed or held for 60 seconds during the target time and heart rate setting mode, the unit will automatically return to the chronograph mode and all previous data will be kept.
- At anytime, to exit the target time and heart rate setting mode, press and hold the MODE/SET key for 3 seconds.
- If you set the target time value to be 0 hour and 0 minute, this will automatically trigger the target time function to be disabled.

Memory Recall Mode
- Press the MODE/SET button until you have reached the memory recall mode which is represented by 'MEM'.
- After 3 seconds, another display should appear displaying the lap number. To review data from a specific lap, press or hold the START/LAP/RESET button to increment the lap number.
- Once you have reached your desired lap, press the MODE/SET to confirm and review the data for that particular lap.
- To scroll through the data, press the SUB/EL button.

flowchart
graph TD
    A["NEN"] --> B["LAP"]
    B --> C["82.15 Avg Km/h"]
    C --> D["46.7 Kcal"]
    A --> E["184 Km AVG /min"]
    E --> F["2597 Steps"]
Note:
- At anytime, press and hold the MODE/SET key to quit the memory record mode immediately and return to the time and date mode.
- When you are reviewing data from a particular lap, to continue to view the next lap, press the START/LAP/RESET button.
- Default stride setting formula before stride calibration:
WALK
Male - Height x 0.415
Female - Height x 0.400
RUN
Male - Height x 0.705
Female - Height x 0.685
- The stride length range is limited to 20 \~ 180cm (8" to 5' 11") for both run and walk. If the calibration result is outside this range, the previous stride length is used.
- During stride length calibration is performing, pressing and holding MODE/SET key will terminate the calibration process, the “calibration fail” screen will be displayed for indication.
- If stride calibration is not performed before, the stride value will be set based on Height formula. Once the stride is calibrated, it will replace the default stride value calculated based on Height value.
Downloading/Installing PC-Link Program
Please visit our website at http://www.anyrun.com to download the interface program.
Note: Windows Vista may not allow the download of the program due to its security protection software therefore we advise you to download the program using D drive.
PC- Link Upload
- Install the PC-Link interface program.
- Plug the USB into the computer.
- Within the interface program, locate the upload button and click on it.
- The unit should display 'PC' and square boxes should appear horizontally to indicate that the data is being uploaded.
- Once PC upload is completed, after 3 seconds, the unit will automatically return to the previous display.
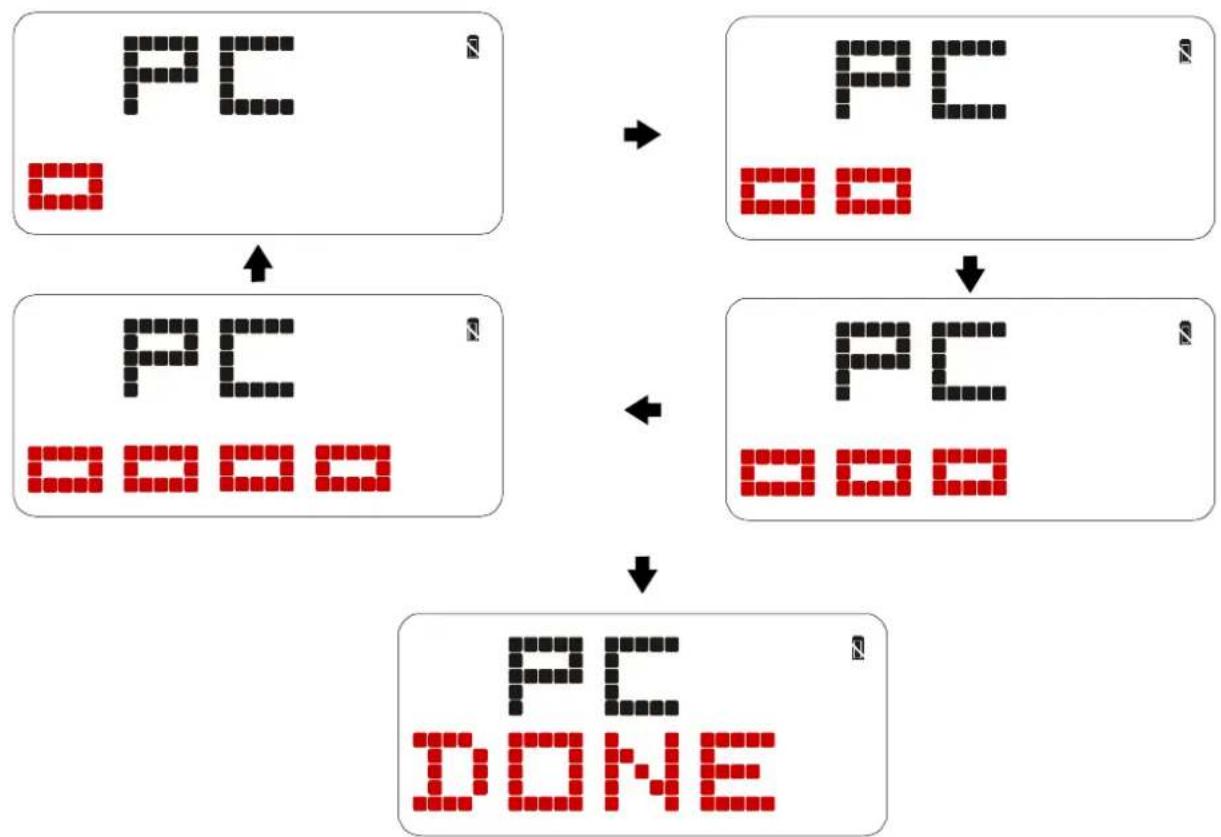
flowchart
graph TD
    A["PC\n□"] --> B["PC\n□□□"]
    B --> C["PC\n□□□□"]
    C --> D["PC\n□□□"]
    D --> E["PC\nDONE"]
    style A fill:#000,stroke:#000
    style B fill:#000,stroke:#000
    style C fill:#000,stroke:#000
    style D fill:#000,stroke:#000
    style E fill:#000,stroke:#000
INSTALLING THE BATTERY
The Watch uses 2 pieces CR 2032 batteries (one each for watch and heart rate belt). Use only the recommended batteries.
NOTE : Changing the battery will erase the data in the watch previously input into the device and you can then/will need to re-set the watch all over again.
Watch
- The battery compartments located at the back of the watch.
- To install/replace the battery, unscrew the battery compartment with the screw driver and simply slide out afterwards.
- Take out the old battery and dispose of properly.
- Gently place a new battery into the battery slot of the battery compartment, making sure that the poles are correctly placed.
- Screw back the battery compartment, when finished as in the diagram below

natural_image
Technical line drawing of a mechanical component with three views: top view showing circular components, middle view showing a central hole, and bottom view showing internal structure (no text or symbols)Heart Rate Belt
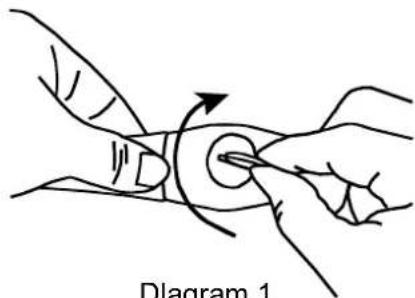
Hold the Heart Rate Belt firmly. Insert a coin into the slit of the compartment lid and turn it clockwise. The lid should come off easily. (Remove used battery CR2032) (Diagram 1) Gently place the battery into the battery slot of the battery compartment. (Diagram 2) Put the compartment lid back into place and tighten it firmly by turning it anti-clockwise with the help of coin.
natural_image
Illustration of a hand holding a finger with an arrow indicating motion or force direction (no text or symbols)Diagram 1
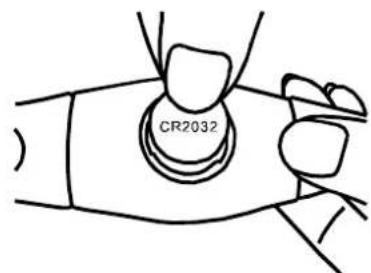
Diagram 2
IMPORTANT BATTERY INFORMATION
- Battery installation and removal should be performed by an adult
• Use only batteries recommended in this instruction sheet - Be sure to install the batteries with the correct polarity, as indicated
- Remove all batteries when replacing
- Only batteries of the same and equivalent type as recommended are to be used
• Do not short-circuit the supply terminals
• Exhausted batteries should be removed from the product
• Non-rechargeable batteries are not to be recharges
● Rechargeable batteries are to be removed from the product before being charged
● Rechargeable batteries are only to be charged under adult supervision - Different types of batteries or new and used batteries are not to be mixed.
SPECIFICATIONS
| Time Format | : | Year, month, date, day, hour, minute, second, am/pm |
| : | 12/24 hours | |
| Calendar System | : | Full Auto-calendar pre-programmed from 2000 to 2099 |
| Features | : | Current / average Speed, Step counting, calories consumption, fat burnt, Exercise time, Current/max/min & average heart rate. |
| Measurement Range | : | Calories Consumption : 0 - 99999.9 kcal |
| Fat Burnt : 0 - 99999.9 | ||
| Number of step : 0 - 999999 | ||
| Distance : 0 - 9999.99 km | ||
| Exercise Time : 0 - 23 hr 59 m 59s 99 | ||
| Memory Data | : | 7 Chrono Memory Record in Chrono Mode |
| 7 days Exercise Summary | ||
| Chronograph | : | Measuring Unit : 1/100 second |
| Measuring Capacity : 23 hr 59 m 59s 99 |
CAUTION
Should you encounter any problems with the Speed & Distance Heart Rate System (e.g. malfunctioning of a parameter, static electricity, interferences within the product or the need to re-set the device), please press four buttons at the same time to reset the watch (the watch should not connect with computer). All data previously input into the device will be erased and you can then/will need to re-set the watch all over again. Should this fail to correct the situation, remove the batteries and then put them back into the battery compartment.
Then follow all the steps mentioned above in order to input the necessary data once more. The content of this manual is subject in order to change without further notice. Due to printing limitation, the displays shown in this manual may differ from the actual display. The manufacturer and its suppliers hold no responsibility to you or any other persons for any damage expenses, lost-profits, or any other claims arisen by using this product. The contents of this manual may not be reproduced without the permission of the manufacturer.
3D sensor for steps counting
Produced in Europe, the 3D sensor is of very high quality which has shown great accuracy in detecting and counting steps from walking, jogging and running. In order to maximize the accuracy of the step counting feature, this sensor is able to filter movements that do not belong to the categories of walking, jogging and running. The daily pedometer step count can be switched off if the user does not wish to count or view his daily step count which will help the unit to save energy. However, the chronograph feature with step counting cannot be switched off.
If at any time of the day you wish to count the number of steps for a particular walking/jogging/running event, you may restart the daily pedometer to 0 and switch the daily pedometer feature off once the walking/jogging/running event is over and the number of steps recorded for that particular event will be automatically saved to the memory of the watch.


- HEART RATE BELT
- Features:
- 3D SENSOR FROM GERMANY-MEASURES YOUR MOVEMENT ACCURATELY
- The Complete Training System
- CONTENTS
- Getting Start....2
- USING THE WATCH FUNCTIONS
- IMPORTANT!
- NORMAL WALKING AND CHRONOGRAPH RUNNING
- NOTE
- Time and Date Setting Mode
- Note:
- Alarm Mode
- Setting the Alarm
- Chronograph
- Calibration
- Calibration Setting Mode
- Target Time and Heart Rate Setting Mode
- Memory Recall Mode
- WALK
- RUN
- Downloading/Installing PC-Link Program
- PC- Link Upload
- INSTALLING THE BATTERY
- Watch
- IMPORTANT BATTERY INFORMATION
- CAUTION
- 3D sensor for steps counting
Brand : Pyle
Model : PHRM24
Category : Heart rate monitor