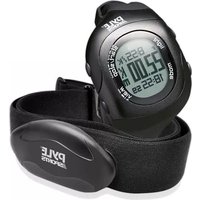
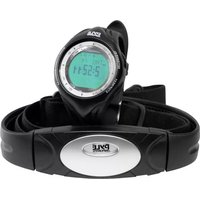
PSBTHR70BK - Heart rate monitor Pyle - Free user manual and instructions
Find the device manual for free PSBTHR70BK Pyle in PDF.


| Product Type | Heart Rate Monitor |
| Brand | Pyle |
| Model | PSBTHR70BK |
| Display | Digital LCD |
| Heart Rate Sensor | Chest strap with electrode sensors |
| Wireless Transmission | 5.3 kHz analog |
| Functions | Heart rate, time, alarm, stopwatch |
| Battery Type | CR2032 (watch and chest strap) |
| Battery Life | Approx. 12 months (typical use) |
| Water Resistance | Splash proof (not for swimming) |
| Dimensions (Watch) | 50 x 40 x 15 mm |
| Weight (Watch) | 50 g |
| Chest Strap Length | Up to 130 cm adjustable |
| Operating Range | Up to 80 cm from watch |
| Cleaning | Wipe with damp cloth; dry strap after use |
| Safety | Keep away from pacemakers; consult physician if uncertain |
| Spare Parts | Batteries (CR2032) and replacement straps available |
| Repair | Contact Pyle support or authorized service center |
| Included Accessories | Watch, chest strap, user manual |
Frequently Asked Questions - PSBTHR70BK Pyle
User questions about PSBTHR70BK Pyle
0 question about this device. Answer the ones you know or ask your own.
Ask a new question about this device
Download the instructions for your Heart rate monitor in PDF format for free! Find your manual PSBTHR70BK - Pyle and take your electronic device back in hand. On this page are published all the documents necessary for the use of your device. PSBTHR70BK by Pyle.
USER MANUAL PSBTHR70BK Pyle
APN ref. no : A98029
Date: 31-08-2013
Vendor ref :
no. of color : 1C(BLACK)+1C(BLACK)
B&W artwork attached :
Presentation
□
Testing
□
Production/Shipment
□
*P.P.= PAD PRINTING S.P.= SILK SCREEN PRINTING
| Prepared by : |
| Verified by : |
| Approved by : |

OUTSIDE

1.0 Introduction
Thank you for purchasing this Watch.
This Watch provides Timekeeping, Timer, Pedometer and Heart Rate Functions. It is compatible with Bluetooth ^® smart and Bluetooth ^® smart ready devices. With the bluetooth chest strap, users can view their heart rate data on the watch. Users can also sync the workout data to their phone for reference.
In additional to general heart rate functions, this watch specially includes Heart Rate Zone Alert Functions.
WARNING: Consult a doctor or trainer for setting the zone prior to undergo an serious Cardo-fitness training.
To get the most of your purchase, be sure to read this manual carefully and keep it on hand for later reference when necessary. It is advisable to use this Watch in conformity with the below notes:
- Avoid exposing the Watch to the extreme conditions.
- Avoid rough uses or severe impacts to the Watch.
- Do not open the Watch case unless performed a certified service agency.
- Clean the Watch occasionally with a soft and moistened cloth.
- Store the Watch in a dry place when it is not in use for a long time.
1.1 Button and its Function
[E/V] EL / View Button
• To turn on the EL backlight for about 3 seconds except Workout Mode and Recall Mode.
- Hold down to turn on the backlight for 3 seconds in Workout Mode and Recall Mode.
• To select different sub-functional displays in the Workout Mode.
[M] Mode Button
• To select among function modes: Home Time, Workout, Recall, Sync Workout, Daily Alarm, Timer and Dual Time.
- Hold down to select/exit setting display in the following modes: Home Time, Workout, Daily Alarm, Timer and Dual Time.
- To select among different setting items in setting mode.

[S/S] Start / Stop Button
• To start and stop the counting in Workout Mode and Timer Mode.
• To increase the setting value during setting display.
• To start the synchronization of the watch and a phone in Sync Workout Mode.
[L/R] Lap / Reset Button
• To take lap records when workout is running.
• To reset counting in Workout Mode and Timer Mode.
• To select among different information display in Recall Mode.
• To decrease the setting value during setting display.
2.0 Major Function Modes

flowchart
graph LR
    A["12:59:00 FEB 12"] -->|M["M"]| B["30.00 mi St 8888"]
    B --> C["Work 10 12:59:00 FEB 12"]
    C -->|M| D["Sync Workout"]
Home Time Mode Workout Mode Recall Mode Sync Workout Mode
flowchart
graph LR
    A["Dual Time 12:59000 8:12:00"] -->|M| B["Timer 1:0000 8:12:00"]
    B -->|M| C["Fiarm 12:00 ON"]
    C -->|M| D["Output"]
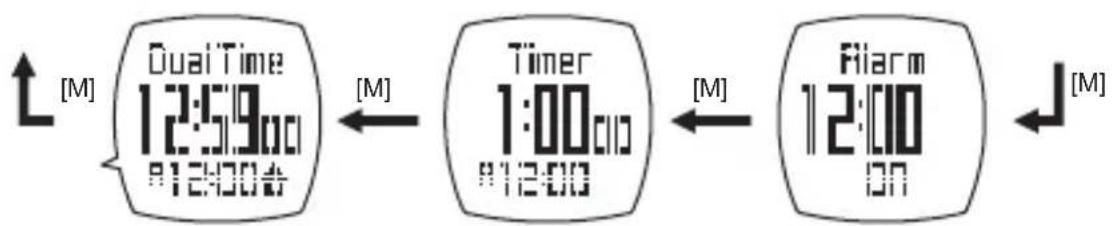
Dual Time Mode Countdown Timer Mode Daily Alarm Mode
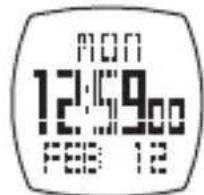
3.0 Home Time Mode

Home Time Display
- The day of week of the home time is shown on the 1st row of the display.
- The current time (hour, minute and second) is shown on the 2nd row of the display.
- The month and date are shown on the 3rd row of the display.
4.0 Time Set Mode

flowchart
graph TD
    A["Home Time Mode"] --> B["Second"]
    A --> C["Chime"]
    A --> D["Beep"]
    A --> E["Contrast"]
    B --> F["Minute"]
    B --> G["Hour"]
    B --> H["Year"]
    C --> I["Time Format"]
    C --> J["Day"]
    C --> K["Month"]
    D --> L["Gender"]
    D --> M["Birth"]
    D --> N["Unit"]
    E --> O["BMI"]
    E --> P["Weight"]
    E --> Q["Height"]
5.0 Workout Mode - Precautions / Tips for Heart Rate Measurement

Heart Rate Features
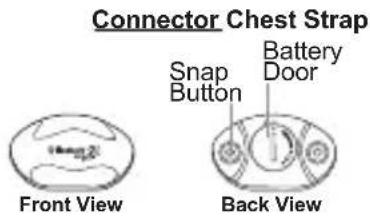
- This Watch includes a Chest Strap with connector, thus the Watch can provide a continuous supply of heart rate data like current heart rate, average heart rate and maximum heart rate to user for guiding them to achieve their fitness goal.
Precautions / Tips
- The electrode areas on the Chest Strap use to detect heart rate. They must be firmly contacted with the user's skin during measurement.
- DO NOT take heart rate measurement when diving or under water.
- Rinse the strap under running water after every use and hang to dry. Clean the strap gently with mild soap and water solution when needed.
- Do not stretch the strap or bend the electrode areas sharply.
• DO NOT use hand cream; it will insulate the signal between the skin and the electrode areas. - Clean your skin with soap and water for better signal transmission.
- For those with extremely dry skin, apply some conductive gel or water may help.
- Adjust the Chest Strap with the buckles until it holds on your chest firmly to avoid it loosen when doing exercise.
- Avoid doing any awkward motion during measurement, otherwise error may be resulted.
5.1 Introduction:
CARE
MAINTENANCE
This heart rate sensor is a high-tech instrument that should be handled with care. Follow the caring instructions to ensure reliable measurement and to maximize the life span of the heart rate sensor. It is advisable to use the unit and the chest strap in conformity with the following instructions:
Connector: Detach the connector from the strap after every use and dry it with a soft towel. Clean the connector with a mild soap and water solution when needed. Never use alcohol or any abrasive material such as steel wool or cleaning chemicals.
Strap: Rinse the strap under running water after every use and hang to dry. Clean the strap gently with a mild soap and water solution when needed. Do not use moisturising soaps as they can leave reside on the strap. Do not soak, iron, dry clean or bleach the strap. Do not stretch the strap or bend the electrode areas sharply.
Dry and store the strap and the connector separately to maximize the heart rate sensor battery lifetime. Keep the heart rate sensor in a cool and dry place. Do not store the heart rate sensor wet in non-breathing material, such as a sports bag, to prevent snap oxidation. Do not expose the heart rate sensor to direct sunlight for extended periods.
Remove the battery from the battery case when the unit or the chest strap WILL NOT be used for a long time.
5.2 Workout Mode - Wearing the Chest Strap
1
2

3

4
natural_image
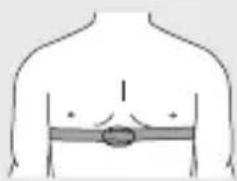
Human torso diagram showing a horizontal bar with a circular mark on the chest (no text or symbols)How to Wear the Chest Strap
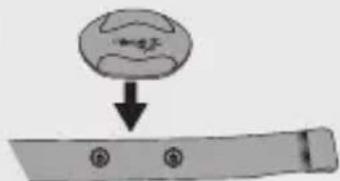
- Refer to the steps below to wear the Chest Strap on one's chest:
1) Attach the connector to the strap with the snap buttons
2) Adjust the strap length to fit tightly but comfortably.
3) Tie the strap around the chest just below the chest muscles, and attach the hook to the other end of the strap..
4) Check that the electrode areas are firmly against your skin and that the logo of the connector is in a central and upright position.
• To pair up the Chest Strap with the watch please refer to Chapter 5.10.4
IMPORTANT: DO NOT wear the Chest Strap over your clothes, otherwise it CANNOT get the heart rate signal.
NOTE: In dry seasons, wetting the contacts with some water can make the signal transmission better.
5.3 Setting Up:
Getting Started:
The heart rate sensor is compatible with Bluetooth ^® smart, Bluetooth ^® smart ready and 5.3kHz (if applicable) devices. It may require a separate application to view heart rate data on the receiving device, such as a watch or a mobile phone.
Pair the heart rate sensor with the receiving device when using it for the first time.
Keep the receiving device in front of you to ensure sufficient transmission range from the heart rate sensor to your device, such as in a front pocket or fixed on a belt.
DO NOT wear the receiving device on your back, such as in a back pocket or backpack.
5.4 Setting Up:
Batteries:
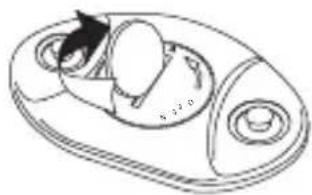
All connectors have user changeable batteries. To change the battery yourself, follow the instructions below, and see the markings on the connector.
1 Turn the cover counterclockwise with a coin gently until it pops out.

natural_image
Mechanical component diagram showing a rotating knob with a curved arrow indicating rotation (no text or symbols)3 Press the cover back into the connector.

natural_image
Mechanical component diagram showing a central circular feature with two flanged ends and a downward arrow indicating direction (no text or symbols)2 Remove the exhausted battery and insert a new one (CR2032) with (-) side against the metal contact.

4 Turn the cover clockwise with the coin again until the little arrow pointed to the dot.
natural_image
Technical line drawing of a mechanical component with no visible text or symbolsMake sure the battery is placed under the golden slot.
2a

2b
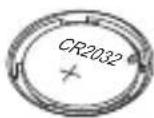
NOTE: Keep batteries away from children. If swallowed, contact a doctor immediately.
CAUTION: Risk of explosion if battery is replaced by an incorrect type.
5.5 Workout Mode - Healthier Lifestyle and Pedometer

Tips to achieve a Healthier Lifestyle
• The below are the general guide for achieving a healthier lifestyle:
• Take enough sleep,
• Make social connection,
- Do more exercise,
• Take a daily walk, and
- Eat balanced diet.
How to Increase Walking Time
- It is suggested that walking could make contribution to health. Some tips which would increase your walking time:
- Walk to your office by getting off the bus earlier or park your car farther away from your office.
- Establish a walking habit every day.
- Walk with some soft music or friends.
- Set up a goal (How many km within a week) for your walking.
5.6 Workout Mode - What is Pedometer
Step/
Distance/
Calorie expenditure

Pedometer Features
- This Watch provides some advance pedometer features to guide user to achieve his/her fitness goals.
• The information includes distance, speed, duration and calorie consumption for walking or running. The data can be read instantly or saved into a record to recall later.
5.7 Workout Mode

flowchart
graph TD
    A["80.00 mi"] -->|1st line| B["Distance View"]
    A -->|3rd line| C["HRM View Duration View"]
    B --> D["12:00"]
    C --> E["Lar 100"]
    style A fill:#f9f,stroke:#333
    style B fill:#ccf,stroke:#333
    style C fill:#cfc,stroke:#333
Workout Mode
Under Workout Mode, users can select the following sub-functions by pressing [E/V] button:
- Distance view
- HRM view
- Duration view
The 1st and 3rd line display can be customised by user, refer to chapter 5.10.1 for the selection.
5.8 Workout Mode - Operation
flowchart
graph TD
    A["Start: Workout ON"] --> B["Run Lap Time"]
    B --> C["Display: Lap No. 1, Split Time, Lap Time"]
    B --> D["Stop: 900000 Lap"]
    B --> E["Press [S/S"]]
    B --> F["Press [S/S"]]
    B --> G["Press [L/R"]]
    G --> H["10 Seconds"]

flowchart
graph LR
    A["Start Workout"] --> B["Split Time 1"]
    B --> C["Split Time 2"]
    C --> D["Split Time 3"]
    D --> E["Lap 1 Time"]
    E --> F["Lap 2 Lap 3"]
    F --> G["Lap 3 Lap 2"]
    G --> H["Stop Workout"]
    style A fill:#f9f,stroke:#333
    style H fill:#f9f,stroke:#333
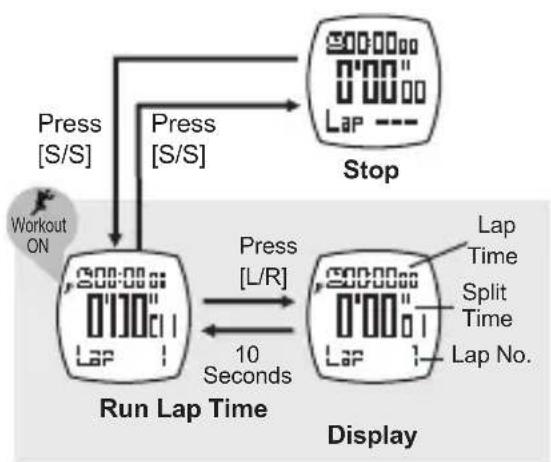
How to Turn ON/OFF the Workout Function
- Five seconds after Workout Mode is selected, the Heart Rate function will start automatically even the workout function has not been turned ON yet.
- Press [S/S] to turn on the workout function.
- When workout function is turned ON, workout data will be updated.
- Press [L/R] can make a lap record.
- When workout is finished, press [S/S] to turn off the workout. Hold [L/R] to reset the current workout and saved into recall mode.
NOTE:
1) The Chest Strap/Watch MUST be worn on the user's chest/wrist properly before having heart rate/pedometer measurement.
2) User can use the Watch without the Chest Strap, then NO heart rate data will be recorded for that workout session.
3) When workout data or lap memory is not available, the oldest workout data will be deleted automatically to spare memory.
5.9 Workout Mode - Heart Rate Alert

WARNING: Consult a doctor or trainer to decide the range prior to undergo a professional Cardio-fitness training.
- The Heart Rate Alert is a supplementary feature of the Heart Rate Measurement function. This feature can be set up by defining an objective heart rate range, and hence, the Watch will alert the user when he/she gets a heart rate measurement out of range.
- In order to hear an audible alert for the above and below zones, zone alert option shall be turned on. (refer to 5.10.1)
How to Acquire the Objective Heart Rate Range
- The objective heart rate range is the region binds by the upper and lower heart rate limits. These limits must be set according to different application and on one's own health condition.
• These limits can be obtained by the following:
1) Get these two limits by consulting a doctor or trainer.
2) Get these two limits by %EMHR
5.10.1 Workout Mode - Setting Sequence

flowchart
graph TD
    A["Workout Mode"] --> B["Distance View 1st Line"]
    B --> C["Distance View 3rd Line"]
    C --> D["HRM View 1st Line"]
    D --> E["HRM View 3rd Line"]
    E --> F["Duration View 1st Line"]
    F --> G["Duration View 3rd Line"]
    G --> H["My Zone Upper Limit"]
    H --> I["Speed Unit"]
    I --> J["Calibrate Walk Distance"]
    J --> K["Walk stride"]
    K --> L["Calibrate Run Distance"]
    L --> M["Run stride"]
    M --> N["Pairing HR Chest Strap"]
    N --> O["Hold [M"]]
    O --> P["Hold [M"]]
    P --> Q["Distance View 1st Line"]
    Q --> R["Distance View 3rd Line"]
    R --> S["HRM View 1st Line"]
    S --> T["HRM View 3rd Line"]
    T --> U["Above Zone ON/OFF"]
    U --> V["HR Zone Select"]
    V --> W["Duration View 3rd Line"]
    W --> X["My Zone Lower Limit"]
    X --> Y["Below Zone ON/OFF"]
    Y --> Z["My Zone Upper Limit"]
    Z --> AA["Speed Unit"]
    AA --> AB["Calibrate Walk Distance"]
5.10.2 Workout Mode - Setting Sequence
| Lap No.DurationLap TimeSpeed ORPace Speed - Average ORPace - Average DistanceStepHRHR - AverageCalorieTime | 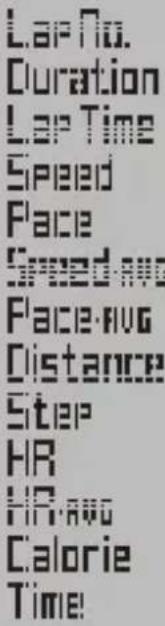 | 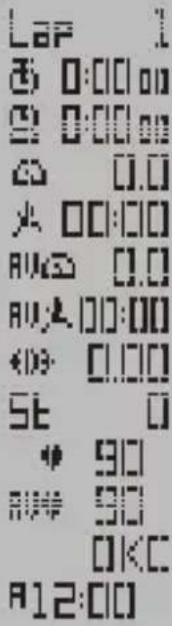 |
To Set the Workout Mode
- Press and hold the [M] button under Workout Mode to select the setting display.
The Setting Sequence
- If one of the settings is flashing, press the [S/S] or [L/R] button to change the value (hold the button to change the value at a faster pace).
- To calibrate 'Walk' and 'Run' stride, see next chapter for details.
- The adjacent figure shows the selections available for the 1st and 3rd line of the display.
5.10.3 Workout Mode - Setting Walk and Run Stride

flowchart
graph TD
    A["Walk"] --> B["Calibrate Walk"]
    B --> C["Set the walk stride calibrate distance ([L/R"])]
    C --> D["Walk the distance"]
    D --> E["Calibrating"]
    E --> F["Walk Stride"]
    F --> G["[M"]]
    E --> H["[M"] or["L/R"] or["S/S"]]
Walk and Run Stride
- To get the accurate walking and running speed and distance calculation, users need to enter their personal walk and run stride.
- User can enter their personal walk and run stride by selecting automatic or manual calculation.
To set the Walk and Run Stride automatically
- Select 'Calibrate walk/run distance' setting under workout setting mode.
- Input the known distance by pressing [L/R].
- Press [S/S] to start calibrating.
- User start to walk or run for the specific distance.
- When the user reaches, press any key to finish calibration.
- The watch will automatically calculate the walk/run stride.
To set the Walk and Run Stride manually
- Select 'Calibrate walk/run stride' setting under workout setting mode.
- Press [M] to enter 'Walk Stride' or 'Run Stride' display
- When the digit is flashing, press [L/R] or [S/S] to enter the value of the stride.
5.10.4 Workout Mode - Pairing up with the Chest Strap
![Heart Rate Pair [S/S]](/content/2026/05/1141967/images/553119bd6f5d038445765ec3a23a0e6a5e723723151760aaa5e6e33467fa2c95.jpg)

Pairing up with the Chest Strap
• Make sure the Chest Strap is worn as described in Chapter 5.5 before you start to link it with the watch.
- Select 'Heart Rate Pair' setting under workout setting mode.
- Press [S/S] to start searching for the chest strap signals.
- If the Pairing is successful, "Success!" will appear on the display.
- If the Pairing is not successful, "Fail!" will be appear on the display. Check the chest strap positioning and try again.
- The symbol “♥” will appear on the top of the display when the heart rate function is ON.
5.11 Workout Mode Potential Causes for NO Heart Rate Reading or Long Response Time
1) Cause: Dry Skin.
Solution: Apply conductive gel or saliva thoroughly on chest area. Even water will help if conductive gel is not available.
2) Cause: Chest strap is not placed firmly over the chest.
Solution: Make sure the Chest Strap is placed firmly over the chest by adjusting the buckles.
3) Cause: Muscle tremors caused by holding the Chest strap too hard on your chest.
Solution: The electrode areas must make firm contacts (but NOT too hard) with the user's skin during measurement. This will ensure good and consistent readings even during walking or jogging with arms swinging naturally.
4) Cause: Dead skin on chest.
Solution: Usually rubbing your skin with a towel will help.
5) Cause: A thin layer of body grease insulate the ECG signal which prevents the Chest Strap or Watch from picking up one's ECG.
Solution: Wipe chest and the back of the Chest Strap with a tissue or soft towel.
6) Cause: Hairy skin.
Solution: Apply conductive gel to chest area or wrist.
7) Cause: Irregular heartbeats.
Solution: N/A. It is difficult to consistently pick up a reading for those with irregular heartbeats. Inconsistent response times are expected for those with arrhythmia.
8) Cause: Low Battery.
Solution: It might be due to low battery level in the Chest Strap / watch. Replace the battery and try again.
9) Cause: Interference of other RF devices (Chest-Strap Measurement)
Solution: Stay away from the place where RF source potentially exist.
6.0 Recall Mode - Summary Display

flowchart
graph TD
    A["Work 3\n12:59:00\nFEB 12"] --> B["Time/Date Stamp"]
    B --> C["Duration"]
    C --> D["Total Lap No."]
    D --> E["Distance"]
    E --> F["Step"]
    F --> G["Calorie"]
    G --> H["Average HR"]
    H --> I["Average Speed/Average Pace"]
    I --> J["Odometer"]
    K["Workout Data 3"] --> L["Workout Data 2"]
    L --> M["Workout Data 1"]
    N["Hold [M"]Hold["M"]] --> L
    O["L/R"] --> B
    P["L/R"] --> G
    Q["L/R"] --> H
    R["L/R"] --> I
    S["E/V"] --> L
Recall Mode
- User can review the Workout Session in details here.
• It can store up to 10 Workout Sessions with 100 Lap Records.
• Each workout data contains Summary and Lap Record displays.
Summary Display
- Users can review their workout summary of different Workout Sessions.
- Press [E/V] to select the Workout Session.
- Press [L/R] to review the summary information as the adjacent diagram.
- Press [S/S] to enter the Lap Record Display.
- Hold [M] to enter the Odometer.
6.1 Recall Mode - Lap Record Display

flowchart
graph TD
    A["Summary Display"] --> B["Split time"]
    B --> C["Lap Distance"]
    C --> D["Average HR"]
    D --> E["Average Speed/Average Pace"]
    E --> F["Lap no."]
    F --> G["Split time"]
    G --> H["Lap no."]
    H --> I["0:23:00:00"]
    I --> J["S/S*"]
    J --> K["[E/V"]]
    K --> L["12:55:00"]
    L --> M["Split time"]
    M --> N["Lap no."]
    N --> O["0:23:00:00"]
    O --> P["Split time"]
    P --> Q["Lap no."]
    Q --> R["0:23:00:00"]
    R --> S["Split time"]
    S --> T["Lap no."]
    T --> U["0:23:00:00"]
    U --> V["Split time"]
    V --> W["Lap no."]
    W --> X["0:23:00:00"]
    X --> Y["Split time"]
    Y --> Z["Lap no."]
    Z --> AA["0:23:00:00"]
    AA --> AB["Split time"]
    AB --> AC["Lap no."]
    AC --> AD["0:23:00:00"]
    AD --> AE["Split time"]
    AE --> AF["Lap no."]
    AF --> AG["0:23:00:00"]
    AG --> AH["Split time"]
    AH --> AI["Lap no."]
    AI --> AJ["0:23:00:00"]
    AJ --> AK["Split time"]
    AK --> AL["Lap no."]
    AL --> AM["0:23:00:00"]
    AM --> AN["Split time"]
    AN --> AO["Lap no."]
    AO --> AP["0:23:00:00"]
    AP --> AQ["Split time"]
    AQ --> AR["Lap no."]
    AR --> AS["0:23:00:00"]
    AS --> AT["Split time"]
    AT --> AU["Lap no."]
    AU --> AV["0:23:00:00"]
    AV --> AW["Split time"]
    AW --> AX["Lap no."]
    AX --> AY["0:23:00:00"]
    AY --> AZ["Split time"]
    AZ --> BA["Lap no."]
    BA --> BB["0:23:00:00"]
    BB --> BC["Split time"]
    BC --> BD["Lap no."]
    BD --> BE["0:23:00:00"]
    BE --> BF["Split time"]
    BF --> BG["Lap no."]
    BG --> BH["0:23:00:00"]
    BH --> BI["Split time"]
    BI --> BJ["Lap no."]
*Hold [S/S] to move backwards.
Lap Record Display
- User can review the information of each lap.
- Press [S/S] to select the lap record. After the last lap is selected, press [S/S] will return to the summary display.
- Hold [S/S] to move backwards.
- Press [L/R] to review the lap information as adjacent diagram.
- Press [E/V] to return to Summary Display.
6.2 Recall Mode - Clear Odometer

flowchart
graph TD
    A["Summary Display"] --> B["Odometer View"]
    B --> C["Reset"]
    C --> D["Clear memory"]
    B -->|Hold["M"] Hold["M"]| E["Hold 1 Second [L/R"]]
    C -->|Hold_5_Seconds["L/R"]| F["Hold 5 Second [L/R"]]
- Odometer is used to count the travelled distance until it is reset.
- Hold [M] under Summary Display to select the Odometer Session.
- Hold [L/R], display will show "Reset" and keep holding [L/R] button for more 5 seconds to confirm reset.
- Odometer Session will be cleared to zero.
7.0 Sync Workout Mode
![Semic Workout. [S/S] Semic Workout [Upload]](/content/2026/05/1141967/images/87d0b2af81ee666511c75fa005303541ddc7ae77d5a2bd7e506826def2afcdee.jpg)
Sync Workout Mode
- This watch is compatible with Bluetooth ^® smart and Bluetooth ^® smart ready devices. Users can upload the workout data to a phone for later review through smart phone apps.
- Make sure the bluetooth function on your receiving device is turned on and search for the watch.
- Use the designated apps on your device to connect to the watch. For details, please refer to the manual of the apps.
- Press [S/S] to start connecting the watch to the phone. Workout data will be uploaded to the phone automatically once the connection is successful.
- If the upload is successful, "Done!" will appear on the display.
- If the upload is not successful, "Fail!" will appear on the display. Check the connection and try again.
- The symbol “ ✕” will appear when the bluetooth function is ON.
Time Sync
- During the upload, the current time of the phone will also sync to the watch.
8.0 Alarm Mode

flowchart
graph TD
    A["Alarm Mode"] -->|Hold["M"] Hold["M"]| B["Hours Setting Minutes Setting"]
    B --> C["Increase / Decrease the value"]
    B --> D["Scroll the setting faster"]
    style A fill:#f9f,stroke:#333
    style B fill:#ccf,stroke:#333
    style C fill:#dfd,stroke:#333
    style D fill:#dfd,stroke:#333
Daily Alarm Display
- In the Daily Alarm Display, Alarm Time (hours, minutes) appears on the 2nd line of the display.
Daily Alarm ON and OFF
- When the Daily Alarm Indicator 'appears (which means the daily alarm is ON), the watch starts beeping at the alarm time.
Daily Alarm Sound
- The alarm beeps for 30 seconds when the daily alarm function is turned ON. - You can stop the beeping by pressing any button.
Note:
Alarm will be turned on automatically if any changes has been made to the setting
9.0 Timer Mode - Setting Countdown Target
flowchart
graph TD
    A["Timer 1:00:00 012:00"] --> B["Timer Mode"]
    B --> C["Hour"]
    C --> D["Minute"]
    D --> E["Second"]
    E --> F["Count-down Target Setting Sequence"]
    F --> G["Increase / Decrease the value"]
    F --> H["Scroll the setting faster"]
    C --> I["[M"]] [M]
    D --> J["[M"]] [M]
    E --> K["[M"]] [M]
    F --> L["[S/S"] or["L/R"]]
    H --> M["[S/S"] or["L/R"]]
    style A fill:#f9f,stroke:#333
    style B fill:#ccf,stroke:#333
    style C fill:#cfc,stroke:#333
    style D fill:#fcc,stroke:#333
    style E fill:#cff,stroke:#333
    style F fill:#ffc,stroke:#333
    style G fill:#fcc,stroke:#333
    style H fill:#fcc,stroke:#333
    style I fill:#fff,stroke:#333
    style J fill:#fff,stroke:#333
    style K fill:#fff,stroke:#333
    style L fill:#fff,stroke:#333
How to Set Count-down Target
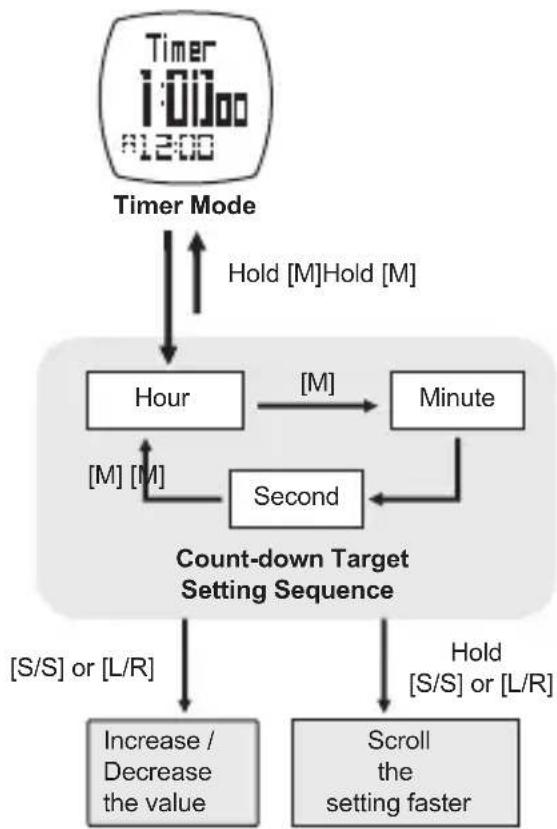
- In the Timer Mode, hold [M] to enter the Count-down Target setting display:
- Press [M] to select 'hour', 'minute', or 'second' setting (flashing).
- Press [S/S] or [L/R] to change the setting value (Hold [S/S] or [L/R] to change the setting value at a faster speed).
- When the setting is completed, hold [M] to exit the setting display and return to the Timer Mode.
9.1 Timer Mode - Using the Countdown Timer

flowchart
graph TD
    A["Current Time"] -->|[S/S]| B["Count-down target"]
    B --> C["Counting Display"]
    C -->|[S/S]| D["Stop-Counting Display"]
    D -->|[S/S]| E["Auto Reset"]
    E --> F["Count down to zero"]
    F --> G["Beep!"]
    H["Timer 12:00"] --> I["Initial Display"]
    J["Timer 12:00"] --> K["Count-down target"]
    L["Timer 12:00"] --> M["Counting down"]
    N["Timer 12:00"] --> O["Stop-Counting Display"]
    P["Timer 12:00"] --> Q["Auto Reset"]
How to use Countdown timer
- Press [S/S] to start counting when the timer is stopped. Press [S/S] again to stop counting when the timer is running.
• The timer beeps once per minute at the last 10 minutes. - It beeps once per 10 seconds at the last minute.
- It beeps every second when counting down to the last 5 seconds.
- When the timer reaches zero, it beeps for 30 seconds. After that, it will reset to initial count-down target automatically.
- Press any key to turn off the beeping sound.
- When the timer is stopped, hold [L/R] for 2 seconds to reset the timer to the initial count-down target.
10.0 Dual Time Mode

flowchart
graph TD
    A["Current Time"] --> B["Dual Time Mode"]
    B --> C["Hour Minute"]
    C --> D["[M"]]
    D --> E[" HOLD [M"] Hold["M"]]
    E --> F["Dual time Setting Sequence"]
    F --> G["[S/S"] or["L/R"]]
    G --> H[" scroll the setting faster"]
    H --> I[" Increase / Decrease setting value "]
To Set the Dual time Mode
- To set the dual time, press and hold the [M] button under Dual Time Mode (the 'Hour' digits will start flashing)
The Setting Sequence
- When the 'Hour' digits start to flash, press the [M] button to move the flash following the sequence of the adjacent diagram.
- When one of the settings (hour, minute) is flashing, press the [S/S] or [L/R] button to scroll through the setting (hold down the button to scroll the setting at a faster pace).
- Press and hold the [M] button to exit the setting sequence.
11.0 Power Saving Mode
Home Time Mode
![for 5 seconds Any buttonHold [L/R]](/content/2026/05/1141967/images/81cafc3fe76eaa2d52d68bb2814d53c02e33f4b49af3c56d0cc8e6d720f15f48.jpg)

Power Saving Mode (LCD display turned off)
Power Saving Mode
- This Watch has a Power Saving Function which can turn off the LCD display so that the battery can last longer.
- While in the Power Saving Mode, the watch function is still working normally. (i.e. The timekeeping function is still running during Power Saving Mode.)
How to enter/exit the Power Saving Mode
- To enter the Power Saving Mode, hold down the [L/R] button in Home Time Mode for about 5 seconds and the LCD display will be turned off.
- Press any key under Power Saving Mode will exit the mode and resume the LCD display.
12.0 Battery - Battery Low Indication and Battery Replacement

Low Battery Detection
- When the low battery indicator ' □ appears on the display, it means that the capacity of the battery is low.
- However, if the low battery indicator appears because of using the Watch under very cold condition, the indicator will disappear when normal temperature returns.
NOTE: It is recommended to replace the battery by a certified service agency, because this Watch contains precise electronic sensors and components.
IMPORTANT: If the battery has been replaced, all memory will be cleared.
13.0 Specifications
Time Mode
• Time System: am, pm, hour, minute, second
• Time Format: 12-hour or 24-hour format
• Calendar Range: 2000\~2099
Alarm Mode
• Daily alarm and hourly chime
• Alarm Sound: 30 seconds
Workout Mode
• Heart rate measuring range: 30 to 240 bpm.
• Heart Rate Alert Zone: 3 Pre-defined and 1 user defined.
- Auto-calibration or manual input of stride length.
- Above / below heart rate zone alert
• Workout Timer: Max 23H59M59S
• Distance: 99.99 km / 63.13 mile
- Step: Max 99,999
• Calorie: Max 9,999 kcal
Recall Mode
- Store up to 10 workout data and up to 100 lap records
• Each workout data summary contains: time/date stamp, duration, total lap no., distance, steps, average speed/pace, average HR and calorie consumption
• Each Lap Record contains: split time, lap time, distance, average HR and average speed/pace within the lap
- Odometer function
Sync Workout Mode (via Bluetooth)
• Transfer Workout Data to smartphone
- Sync the time from smartphone
Timer Mode
• Resolution: 1 second
• Measuring range: 23H59M59S
Others
- Backlight Type: Electro-Luminescent (EL) backlight
• 10 LCD level contrasts adjustable
• Metric / Imperial unit selectable - 5 ATM water resistance
- Operating temperature: -10^ to +50^
- This product is compliant with Directives 1999/5/EC.
14.0 Battery Safety Information
CAUTION:
- Exhausted batteries are to be removed
- Do not dispose of product or batteries in fire; batteries may explode or leak
- If this product will not be used for an extended period of time, remove the batteries from the product
- The supply terminals are not to be short-circuited
- Batteries are to be inserted with correct polarity
- Clean the battery contacts and also those of the product prior to battery installation
- As always, dispose of batteries in an eco-friendly manner
15.0 FCC Compliance Statement
- This device complies with Part 15 of the FCC Rules. Operation is subject to the following two conditions: (1) This device may not cause harmful interference, and (2) This device must accept any interference received, including interference that may cause undesirable operation.
WARNING: Changes or modifications to this watch not expressly approved by the party responsible for compliance could void the user's right to operate the equipment.
NOTE: This equipment has been tested and found to comply with the limits for a class B digital device, pursuant to Part 15 of the FCC Rules. These limits are designed to provide reasonable protection against harmful interference in a residential installation. This equipment generates, uses and radiates radio frequency energy. If it is not installed and used in accordance with the instructions, it may cause harmful interference to radio communications.
- However, there is no guarantee that interference will not occur in a particular installation. If this equipment does cause harmful interference to radio or television reception, which can be determined by turning the equipment off and on, the user is recommended to reduce the interference by one or more of the following measures:
- Reorient or relocate the receiving antenna.
- Increase the separation space between the watch and the receiver.
- Connect the equipment into an outlet on a circuit different from that to which the receiver is connected.
- Consult the dealer or an experienced radio/TV technician for help.
16.0 IC Statement (For Canada)
This equipment is portable device. The output power of this device is less than 20mW. The SAR test is not required.
This device complies with Industry Canada licence-exempt RSS standard(s). Operation is subject to the following two conditions: (1) this device may not cause interference, and (2) this device must accept any interference, including interference that may cause undesired operation of the device.
This device complies with Part 15 of the FCC Rules and with RSS-210 of Industry Canada. Operation is subject to the following two conditions:
(1) This device may not cause harmful interference, and (2) this device must accept any interference received, including interference that may cause undesired operation.
This Class B digital apparatus complies with Canadian ICES-003.
WATCH QD ID: B021226
CHEST STRAP QD ID: B019950

natural_image
Empty white image with four corner markers (no text or symbols)
natural_image
Empty white image with four corner markers (no text or symbols)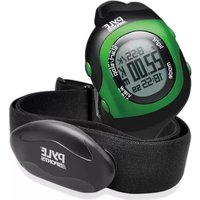


- Introduction
- Button and its Function
- [E/V] EL / View Button
- [M] Mode Button
- [S/S] Start / Stop Button
- [L/R] Lap / Reset Button
- Major Function Modes
- Home Time Mode
- Home Time Display
- Time Set Mode
- Workout Mode - Precautions / Tips for Heart Rate Measurement
- Heart Rate Features
- Precautions / Tips
- Introduction:
- CARE
- MAINTENANCE
- Workout Mode - Wearing the Chest Strap
- How to Wear the Chest Strap
- Setting Up:
- Getting Started:
- Setting Up:
- Batteries:
- Workout Mode - Healthier Lifestyle and Pedometer
- Tips to achieve a Healthier Lifestyle
- How to Increase Walking Time
- Workout Mode - What is Pedometer
- Pedometer Features
- Workout Mode
- Workout Mode
- Workout Mode - Operation
- How to Turn ON/OFF the Workout Function
- NOTE:
- Workout Mode - Heart Rate Alert
- How to Acquire the Objective Heart Rate Range
- Workout Mode - Setting Sequence
- To Set the Workout Mode
- The Setting Sequence
- Workout Mode - Setting Walk and Run Stride
- Walk and Run Stride
- To set the Walk and Run Stride automatically
- To set the Walk and Run Stride manually
- Workout Mode - Pairing up with the Chest Strap
- Pairing up with the Chest Strap
- Workout Mode Potential Causes for NO Heart Rate Reading or Long Response Time
- Recall Mode - Summary Display
- Recall Mode
- Summary Display
- Recall Mode - Lap Record Display
- Lap Record Display
- Recall Mode - Clear Odometer
- Sync Workout Mode
- Sync Workout Mode
- Time Sync
- Alarm Mode
- Daily Alarm Display
- Daily Alarm ON and OFF
- Daily Alarm Sound
- Timer Mode - Setting Countdown Target
- How to Set Count-down Target
- Timer Mode - Using the Countdown Timer
- How to use Countdown timer
- Dual Time Mode
- To Set the Dual time Mode
- Power Saving Mode
- Power Saving Mode
- How to enter/exit the Power Saving Mode
- Battery - Battery Low Indication and Battery Replacement
- Low Battery Detection
- Specifications
- Time Mode
- Alarm Mode
- Sync Workout Mode (via Bluetooth)
- Timer Mode
- Others
- Battery Safety Information
- CAUTION:
- FCC Compliance Statement
- IC Statement (For Canada)
Brand : Pyle
Model : PSBTHR70BK
Category : Heart rate monitor