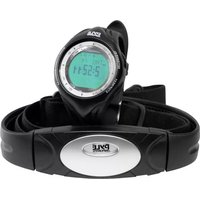
PHRM30 - Heart rate monitor Pyle - Free user manual and instructions
Find the device manual for free PHRM30 Pyle in PDF.


| Product Type | Heart Rate Monitor Watch |
| Brand | Pyle |
| Model | PHRM30 |
| Battery Type | 2 x CR2032 lithium batteries |
| Power Supply | Watch: CR2032; Belt: CR2032 (coin cell) |
| Display | Digital LCD |
| Heart Rate Detection | Chest strap with conductive pads |
| Pulse Range | 40-220 BPM |
| Target Zone Range | 30-220 BPM |
| Time Functions | Real-time clock, day of week, date, 12/24h format |
| Alarm Functions | Daily alarm, hourly chime, key tone |
| Chronograph | Max 24 hours |
| Countdown Timer | Up to 24 hours |
| Exercise Data Memory | Up to 40 records |
| User Settings | Age, sex, weight, height, BMI, VO2max, calorie/fat tracking |
| Zone Settings | 3 zones: low (50-60% MHR), mid (60-70% MHR), high (70-85% MHR) |
| Auto Return | Returns to previous mode after 3-4 minutes of inactivity |
| Energy Saving | Manual or automatic display off at 12:00 AM |
| Water Resistance | Not specified; avoid submersion |
| Maintenance | Clean belt with damp cloth; replace batteries as needed |
| Safety Warnings | Not a medical device; keep away from children; proper battery disposal |
Frequently Asked Questions - PHRM30 Pyle
User questions about PHRM30 Pyle
0 question about this device. Answer the ones you know or ask your own.
Ask a new question about this device
Download the instructions for your Heart rate monitor in PDF format for free! Find your manual PHRM30 - Pyle and take your electronic device back in hand. On this page are published all the documents necessary for the use of your device. PHRM30 by Pyle.
USER MANUAL PHRM30 Pyle
KEYS AND THEIR FUNCTIONS
SET/SAVE/ELMODE

HEART RATE BELT
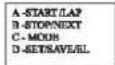
Operated by 4 keys.
SET/SAVE/EL
STOP/NEXT
MODE
START/LAP
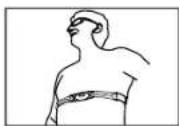
Thank you for choosing the Pulse Sonic – Heart Rate monitor Watch as your personal trainer. In order to be able to make the best use of this device, please read the instruction manual carefully. Do not discard keep the manual for future reference Wear the Heart Rate Belt on your chest with the sensor over your heart for detection of the heart rate.

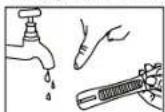
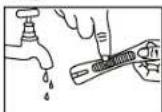
You will notice that there are two noticeably different patches on the inside of the Heart Rate Belt. These are the sensors for detecting your Heart Rate. Before you put the Heart Rate Belt, wet these two patches lightly so that the sensors can detect your heart rate more easily, faster and more accurately.

Important: Please note that the Heart Rate Monitor is NOT a medical device and is not to be used as such.
FEATURES
Time Function
Daily Alarm Function
Energy Saving Function
■Chronograph & Timer Function
■User Setting and Zone Setting.
■Data Function
■Auto Return Function
MODE FLOW CHART
Press the MODE key to change between the following modes.

flowchart
graph TD
    A["A -START/LAP"] --> B["TIME"]
    C["B -STOP/Next"] --> D["EXER"]
    E["C -MODE"] --> F["DATA"]
    G["D -SET/SAVE/EL"] --> H["ALARM"]
    B --> I["SET"]
    D --> I
    F --> I
    H --> I
    I --> J["Gray"]
    style A fill:#f9f,stroke:#333
    style C fill:#f9f,stroke:#333
    style E fill:#f9f,stroke:#333
    style G fill:#f9f,stroke:#333
    style I fill:#ccf,stroke:#333
A. TIME MODE
-Date-Time display: Day of week, Day, Hour, Minute, Second.

(No Heart rate pulse is detected)

(Heart rate pulse is detected)
- shows the instantaneous heart rate.
-Press STOP/NEXT to start heart rate measurement.
-Press and hold SET/SAVE/EL until the hour digits flash to enter the Time Setting mode.
-Press START/LAP to increment the setting item.
-Press STOP/NEXT to decrement the setting item. -Press MODE to select the setting item in the following sequence:
Hour → Minute → Second → Month → Day → Year → 12/24 Hr

-Press SET/SAVE/EL to exit the Real Time setting.
B. EXERCISE MODE
- Initial Display:
Count Up Timer (Chronograph)
Count Down Timer

- Press START/LAP key to start counting. If the Chronograph is selected and is running, press START/LAP key to take up. - Press STOP/NEXT key to stop counting. Press and hold STOP/NEXT key will enable/disable the zone alarm beep and icon. - Press MODE key any time can exit the Exercise mode to the Data Mode. - Press and hold SET/SAVE/EL key to Save or Clear the displayed EXERCISE if it is in stop state. - If the Exercise mode is in reset state, press and hold SET/SAVE/EL key to enter exercise setting mode. - Different type of exercise can be selected: - AEROBIC, EX BIKE, STEPPER, TREADM., JOG, WALK, BIKE, OTHER. - Press and hold SET/SAVE/EL for 2 second change the exercise type by pressing START/LAP or STOP/NEXT Press MODE accordingly to confirm exercise type, count up and count down timer and high / low zone Press SET/SAVE/EL to confirm the data and finally press START/LAP to start the exercise - Target zone selection. - Press START/LAP or STOP/NEXT to select zone - Press MODE to choose Count Up / Count Down timer to record exercise. - Count Up (Chronograph) or Count Down timer can be selected. Count Down Timer time can be set up to 24 hours (if the time is set to 9:00'00). Count Up (Chronograph) counts up to 24:00'00 and stops automatic
- Chronograph/Count Down Timer
-Record exercise time in Hour, Minute, Second, average / maximum / minimum / ending heart rate, Below/In/Above zonetime and percentage, calorie and fat consumption.

-Selected Target zone icon: User can select among 3 target zones to check the instantaneous heart rate is in the target zone or not.


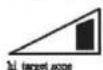
If low / mid / hi target zone is selected and zone alarm is enabled, zone alarm beep will be given if instantaneous heart rate is out of
-In zone icon: Only displayed if low / mid/ hi target zone is selected. It shows the instantaneous heart rate is in the target zone or not.


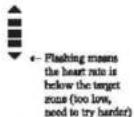
-The Below/In/Above zonetime and percentage will be recorded to reflect the efficiency of training.
-In case no heart rate pulse is detected (for a time out of about 10 seconds after the last heart pulse), the heart rate reading will show "—"
-In case no heart rate pulse is detected (for a time out of about 60 seconds after the last heart pulse), the heart rate reading will be blank. No in zone icon will be shown. User needs to press SET/SAVE/EL key to turn on the receiver to start heart rate
measurement again.
- During the exercise running, heart rate is kept on measuring. If heart rate is out of the target zone, zone alarm beep will be given out. Zone alarm beep:
Above zone alarm: beep .. beep .. beep (every 4 seconds)
Below zone alarm: been — (every 4 seconds).
-During the exercise running, the display will cycle exercise time, average heart rate, calorie and fat consumption. Average heart rate will only be shown if heart rate pulse is measured. Calorie and fat consumption will only be shown if calorie measurement is selected to be on.

-The In Zone icon will flash the corresponding point to indicate the heart rate is in or out zone. If either the or is flashing user should adjust his exercise intensity to let the heart rate fall back to the range.
-Taking Laps:
-If Chronograph is running, press START/LAP key to take lap. The display will freeze to show the split time for 5 seconds.
-Manual Step
-Press STOP/NEXT Key when the exercise is running to stop. Press START/LAP key in stop state can start again. Even the exercise has stopped, the display will cycle the exercise time, average heart rate, calorie and fat consumption in sequence.
-Enable/Disable of Zone alarm:
-Press and hold STOP/NEXT key will toggle the zone alarm beep and icon.
-Store Up / Reset a Exercise:
-Press and hold SET/SAVE/EL key until beep when the exercise is in stop state to close the current EXERCISE and start a new exercise. User can select to save or clear (not save).

flowchart
graph TD
    A["EX01 SAVE?"] -->|A/3 key| B["EX01 CLEAR?"]
    B -->|A/3 key| C["EX01 SAVE!"]
    C -->|3 sec| D["Return to EXER mode preset/reset state (previous selection)"]
    E["C key to short saving record."] --> F["Exercise Mode (in stop state)"]
    G["C key to short saving record."] --> H["Exercise Mode (in stop state)"]
    I["C key to short saving record."] --> J["Exercise Mode (in stop state)"]
    K["A-START/LAP"] --> C
    L["B-STOP/NEXT"] --> C
    M["C-MODE"] --> C
    N["D-SET/SAVE/EL"] --> C
-Counting finish
-If Count Down timer time counts to 0:00'00, 5 seconds beep will sound. The timer cannot start again. Press START/LAP key
will display "FINISH!"
-If Count Up (Chronograph) counts to 24:00'00, it will stop automatically and cannot start again. Press START/LAP key will
display "FINISH".
-Data Memory full
Maximum 40 Exercise data records can be stored. Press and hold the SET/SAVE/EL key if the 41st records is stop, only "CLEAR?"
can be selected.
C. DATA MODE
Reviews the records taken in Exercise mode. Max. 40 exercise records can be stored.

flowchart
graph TD
    A["DATA"] --> B["TOTAL 08:15'23"]
    B --> C["A key"]
    C --> D["TOTAL = 132"]
    D --> E["A key"]
    E --> F["TOT FAT 0g"]
    F --> G["A key"]
    G --> H["CLR HOLD"]
    H --> I["CLR ALL HOLD"]
    I --> J["NO DATA"]
    J --> K["Data EX-01"]
    K --> L["Data EX-04"]
    L --> M["Data EX-05"]
    M --> N["Output"]
    style A fill:#f9f,stroke:#333
    style N fill:#f9f,stroke:#333
For Total Data
-Go to MODE and choose Data as to show the total data.
-Press START/LAP to show the data total calorie and total fat.
-Hold SET/SAVE/EL to clear the total data for 2 second data is cleared to zero.

flowchart
graph TD
    A["EX-02"] --> B["Display: 0.11 cm"]
    B --> C{Color: 62%}
    C -->|Yes| D["Brown 00:11:20 25°C"]
    C -->|No| E["Black 00:33:12 73°C"]
    D --> F["EX-02"] --> G{Temperature: 64°C}
    G -->|Yes| H["Black 00:45:38 2°C"]
    G -->|No| I["Black 00:01:36 2°C"]
    H --> J["EX-02"] --> K{Temperature: 79%}
    K -->|Yes| L["Black 00:52:38 71°C"]
    K -->|No| M["Black 00:55:38 75°C"]
    L --> N["EX-02"] --> O{Temperature: 80-130°C}
    O -->|Yes| P["Black 00:75:38 75°C"]
    O -->|No| Q["Black 00:173cm"]
-Skip Above Zone / In Zone / Below Zone / Zone Limit display if "no zone" is selected.
-Press and hold SET/SAVE/EL key to erase the displaying exercise (only under EX-## is displaying). Only a closed exercise can
be erased. Keep on pressing SET/SAVE/EL key to erase all the data records.
-Press and hold SET/SAVE/EL key when displaying total time or calorie/fat to erase the total.
-Press MODE key to exit DATA mode to enter Daily Alarm mode.
D. DAILY ALARM MODE
-Press START/LAP key to enable/disable the daily alarm.
-Press STOP/NEXT key to select chime and key tone function.
-Alarm beeps output for 30s or stopped by any key pressing when alarm time reached.
-Hourly chime will be given if chime is enabled.
-Display:

-Setting Daily Alarm time:
Press and hold SET/SAVE/EL key D to enter Daily Alarm Setting. Press START/LAP key to increment to item.
Press STOP/NEXT key to decrement the item. Press MODE key to select different setting item in the following sequence:
Hour → Minute
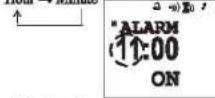
Press SET/SAVE/EL key to confirm the setting.
E. USER SETTING MODE
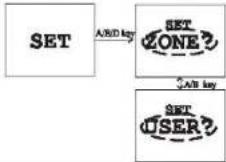
1 Zone Setting
-Zone 1 (low) default: 50\~60% of MHR.
-Zone 2 (mid) default: 60\~70% of MHR
-Zone 3 (high) default: 70-85% of MHR.

flowchart
graph TD
    A["SET ZONE?"] -->|D key| B["ZONE 1 (80-96 PPM)"]
    B -->|C key| C["ZONE 2 (96-112 PPM)"]
    C -->|C key| D["ZONE 3 (112-144 PPM)"]
    D -->|C key| E["ZONE 3 (112-144 PPM)"]
    E -->|C key| F["Exit and return to SET display"]
Press A/B Key to
increment/decrement of
the zone digit
2.User Setting (Personal Data)
-Body weight unit selection (KG/LB selectable).
-Body weight setting (20-200KG, 40-400LB).
-Body height unit selection (cm/ft-in selectable).
-Body height setting (100\~250cm, 3ft 0in \~ 8ft 0in).
-BMI. Body mass index for display only.
-V02max strina (10\~95)
-MHR (default): 220 - age = MHR
-Age setting (5\~99).
-Male/Female selection.
-Calorie / Fat burnt calculation on/off selectable.

flowchart
graph TD
    A["ON"] --> B["ON"]
    B --> C["MALE"]
    C --> D["MALE"]
    D --> E["AGE"]
    E --> F["AGE"]
    F --> G["VOCINE 45"]
    G --> H["20.3"]
    H --> I["5 ft/10 ft"]
    I --> J["8 ft/10 ft"]
    J --> K["75 kg"]
    K --> L["7 kg"]
    L --> M["8 kg"]
    M --> N["8 kg"]
    N --> O["8 kg"]
    O --> P["8 kg"]
    P --> Q["8 kg"]
    Q --> R["8 kg"]
    R --> S["8 kg"]
    S --> T["8 kg"]
    T --> U["8 kg"]
    U --> V["8 kg"]
    V --> W["8 kg"]
    W --> X["8 kg"]
    X --> Y["8 kg"]
    Y --> Z["8 kg"]
    Z --> AA["8 kg"]
A -START/LAP
B -STOP/NEXT
C-MODE
D-SET/SAVE/EL
F. AUTO RETURN FUNCTION
In any setting mode, if no keys are pressed in 3 to 4 minutes, it will return to the previous mode before setting.
Q. ENERGY SAVE FUNCTION - DISPLAY OFF
-If the chronograph / timer is in stop state, in any non-setting mode, press and hold Key MODE key for 3 seconds will enter Display Off mode. Press MODE key to turn on display and enter Time mode.
H. ENERGY SAVE FUNCTION - AUTO DISPLAY OFF
-If the chronograph / timer is in stop state, in any non setting mode, the time reaches 12:00am will enter Display Off mode. Press MODE key to turn on display and enter Time mode.
I. RESET THE WATCH
-Press and hold 4 keys simultaneously for about 6 seconds will reset the unit.
J. SPECIFICATION
- Operation Mode :Time Mode, Exercise Mode, Data Mode, Communication Mode, Daily Alarm Mode, User Setting Mode
- Real Time Clock :De of week Da , Hour, Minute & Second display
- Chronograph :Max 24:00:00
- Countdown Timer :To 23:59:59
- Weight :40lb - 400lb
20kg-200kg
-Height :100cm-250cm
3ft0in-8ft0in
-VO2MAX :10-95
-Age :5-99
-Sex :Male / Female
-Pulse Range :40-220 BPM
-Zone Range :30-220 RPM
K. INSTALLING THE BATTERY
The Heart Rate Monitor uses 2 x lithium batteries. Use only the recommended batteries.
Heart Rate Watch
- The battery compartments located at the back of the watch.
- To install/replace the battery, unscrew the battery compartment with the screw driver
and simply slide out afterwards. - Take out the old battery and dispose of properly.
- Gently place a new battery into the battery slot of the battery compartment, making
sure that the poles are correctly placed. - Screw back the battery compartment, when finished as in the diagram below

Heart Rate Belt
- Hold the Heart Rate Belt firmly. Insert a coin into the slit of the compartment lid and turn it clockwise. The lid should come off easily.
(Remove used battery CR2032)(Diagram 2) - Gently place the battery into the battery slot of the battery compartment.(Diagram 3)
- Put the compartment lid back into place and tighten it firmly by turning it
anti-clockwise with the help of coin.
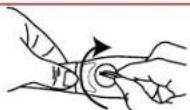
Diagram 2

Diagram 3
IMPORTANT BATTERY INFORMATION
●Battery installation and removal should be performed by an adult
● Use only batteries recommended in this instruction sheet
- Be sure to install the batteries with the correct polarity, as indicated
- Remove all batteries when replacing
●Only batteries of the same and equivalent type as recommended are to be used
●Do not short-circuit the supply terminals
●Exhausted batteries should be removed from the product
●Non-rechargeable batteries are not to be recharged.
●Rechargeable batteries are to be removed from the product before being charged
● Rechargeable batteries are only to be charged under adult supervision.
● Rechargeable batteries are only to be charged under adult supervision ● Different types of batteries or new and used batteries are not to be mixed
Noted:
It allows few seconds for changing battery; however data will be lost and need to reset the data. CAUTION
Should you encounter any problems with the Pulse Sonic (e.g. malfunctioning of a parameter, static electricity, interferences within the product or the need to re-set the device), please reset the watch. All data previously input into the device would be deleted and you can then/will need to re-set the Pulse Sonic all over again. If the Pulse sonic should on the rare occasion fail to function, press and hold the "Set" button in order to clear all data, after which you can input all necessary data again. Should this fail to correct the situation, remove the batteries and then put them back into the battery compartment. Turn on the device by pressing the "Mode" button, and then follow all the steps mentioned above in order to input the necessary data once more. The content of this manual is subject to change without further notice. Due to printing limitation, the displays shown in this manual may differ from the actual display. The manufacturer and its suppliers hold no responsibility to you or any other person for any damage expenses, lost-profits, or any other claim arose by using this product. The contents of this manual may not be reproduced without permission of the manufacturer.
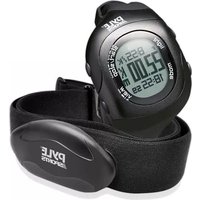
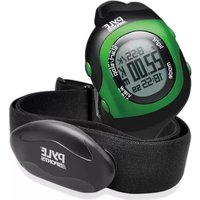

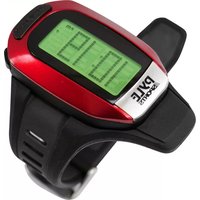

Brand : Pyle
Model : PHRM30
Category : Heart rate monitor