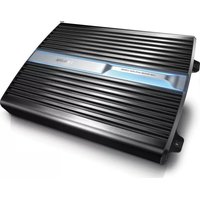
CMP400 - Receiver PHILIPS - Free user manual and instructions
Find the device manual for free CMP400 PHILIPS in PDF.


| Product Type | Stereo Receiver |
| Brand | Philips |
| Model | CMP400 |
| Dimensions (W x H x D) | 430 x 140 x 360 mm |
| Weight | 8.2 kg |
| Power Supply | AC 230V, 50/60 Hz |
| Power Consumption (Standby) | < 0.5 W |
| Power Output (RMS) | 2 x 100 W (8 Ω, 20 Hz - 20 kHz, THD 0.7%) |
| Speaker Impedance | 6 Ω - 16 Ω |
| Audio Inputs | 3x RCA, 1x Optical, 1x Coaxial |
| Audio Outputs | 1x Speaker (binding posts), 1x Subwoofer Pre-out |
| FM Tuner | FM with 30 presets |
| Bluetooth | Yes, version 5.0 |
| USB Playback | Yes, MP3/WMA |
| Remote Control | Included |
| Display | LCD with dimmer |
| Preset EQ | Rock, Jazz, Pop, Flat |
| Sleep Timer | Yes, up to 90 min |
| Cleaning | Wipe with dry cloth; avoid solvents |
| Safety | Class I, IEC 60065 |
| Repairability Index | 8.5 / 10 |
Frequently Asked Questions - CMP400 PHILIPS
User questions about CMP400 PHILIPS
0 question about this device. Answer the ones you know or ask your own.
Ask a new question about this device
Download the instructions for your Receiver in PDF format for free! Find your manual CMP400 - PHILIPS and take your electronic device back in hand. On this page are published all the documents necessary for the use of your device. CMP400 by PHILIPS.
USER MANUAL CMP400 PHILIPS
Register your product and get support at
www.philips.com/welcome

EN User manual
Contents
1 Important 4
Safety 4
Notice 4
2 Your car power amplifier 5
Introduction 5
What's in the box 5
Overview of the main unit 5
3 Installation 7
Installation 7
Connect speakers 7
Connect car audio 8
Connect power 9
4 Use your power amplifier 10
Select crossover frequency mode 10
Adjust frequency 10
Adjust input level 10
Adjust bass boost 10
About the protector indicator 10
Replace fuse 11
5 Product information 12
6 Troubleshooting 13
1 Important
Safety
Read and understand all instructions • before you use the apparatus. If damage is caused by failure to follow instructions, the warranty does not apply. This unit is designed for negative ground • (earth) 12 V DC operation only. Use only the supplied mounting hardware • for a safe and secure installation. Do not connect any active speakers (with • built-in amplifier) to the speaker terminals of the unit. Doing so may damage the active speakers. To ensure safe driving, adjust the volume • to a safe and comfortable level. To avoid short circuit, do not expose the • apparatus, remote control or remote control batteries to rain or water. Never expose the apparatus to direct • sunlight, naked flames or heat. Clean the apparatus with soft, damp • cloth. Never use substances such as alcohol, chemicals or household cleaners on the apparatus.
Notice
Environmental information
All unnecessary packaging has been omitted. We have tried to make the packaging easy to separate into three materials: cardboard (box), polystyrene foam (buffer) and polyethylene (bags, protective foam sheet.) Your system consists of materials which can be recycled and reused if disassembled by a specialized company. Please observe the local regulations regarding the disposal of packaging materials, exhausted batteries and old equipment.
Any changes or modifications made to this device that are not expressly approved by Philips Consumer Lifestyle may void the user's authority to operate the equipment.
2009 © Koninklijke Philips Electronics N.V. All rights reserved. Specifications are subject to change without notice. Trademarks are the property of Koninklijke Philips Electronics N.V. or their respective owners. Philips reserves the right to change products at any time without being obliged to adjust earlier supplies accordingly.
2 Your car power amplifier
Congratulations on your purchase, and welcome to Philips! To fully benefit from the support that Philips offers, register your product at www.philips.com/welcome.
Introduction
With the amplifier, you can enjoy high quality sound performance with powerful bass and beats.
What's in the box
Check and identify the contents of your package:
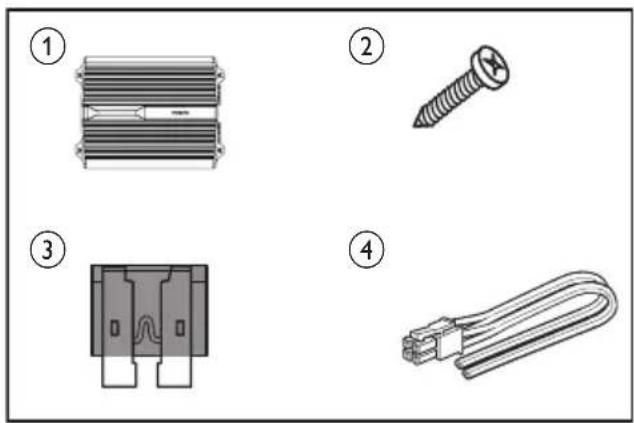
① Amplifier
② Screw_4x25mm (x4)
③ Fuse (×2)
④ Hi input connector
Overview of the main unit


① OUTPUT L/R
Connect additional amplifier for • additional speakers.
② FRONT INPUT L/R
Connect car audio with RCA cable.
③ FRONT INPUT L/R
Adjust input level (0.3V to 6V).
④ HI INPUT
Connect car audio with the supplied • high input connector.
⑤ FRONT FREQ
Adjust frequency of HPF or LPF from 30Hz to 400Hz.
⑥ FRONT HPF/OFF/LPF
Select High-pass-filter (HPF), Low-pass-filter(LPF) or OFF (flat) mode.
⑦ PROTECT
Lights in red when the PROTECTOR • is activated.
⑧ POWER
Light in blue when power is turned on.
⑨ BASS BOOST
Boost the frequencies at around • 45Hz to a maximum of 12dB.
⑩ REAR HPF/OFF/LPF
Select High-pass-filter (HPF), Low-pass-filter(LPF) or OFF (flat) mode.
⑪ REAR FREQ
Adjust frequency of HPF or LPF from 30Hz to 400Hz.
⑫ REAR INPUT LEVEL
Adjust input level (0.3V to 6V).
⑬ REAR INPUT L/R
Connect car audio with RCA cable.
⑭ POWER (GND/REM/+12V)
Connect +12V DC power cable, • ground wire and remote wire..
⑮ Fuse: 20A x 2
⑯ SPEAKER OUTPUT
Connect to speakers or subwoofers.
3 Installation
Installation
You can mount the amplifier either under a seat or on the rear tray.

Note
To avoid interference, do not place the amplifier too close to the car audio or antenna.
•The supplied mounting screws are 25mm long. Make sure that the mounting board is thicker than 25mm.
1 Place the unit on the location for installation.
2 Mark the positions of the four screw holes.
3 Drill the holes with driller of approximately 4mm in diameter.
4 Mount the unit with the supplied screws.

natural_image
Technical diagram of a heat exchanger or cooling unit with screw fasteners and mounting base (no text or symbols)Connect speakers

Note
Use speakers with an impedance of 2 to 8 ohm (4 to 8 ohm when used as a bridged amplifier).
- Match the "left", "right", "+" and "-" terminals correctly. Revised polarity may degrade sound quality.
Option 1: Mono bridged mode: connect 2 speaker

Option 2: Stereo mode: connect 4 speakers

Option 3: Tri-mode: connect 6 speakers

Connect car audio
Option 1: High level input connection
Connect the amplifier to your car audio with the supplied High level input connector.

flowchart
graph TD
    A["Left speaker"] --> B["Car audio unit"]
    C["Right speaker"] --> B
    B --> D["Left speaker"]
    B --> E["Right speaker"]
    F["HI INPUT"] --> G["rey/Black"]
    G --> H["Green/Black R-"]
    G --> I["Grey/White L+"]
    G --> J["Blue/Purple Black R+"]
    G --> K["White/Black L-"]
    G --> L["White/Black R-"]
    M["Central Interface"] --> N["Car audio unit"]
    N --> O["Left speaker"]
    N --> P["Right speaker"]
Option 2: Line input connection
Connect the amplifier to the car audio with an RCA cable (not supplied)

Option 3: Line output connection
Connect the amplifier to another amplifier.

Connect power
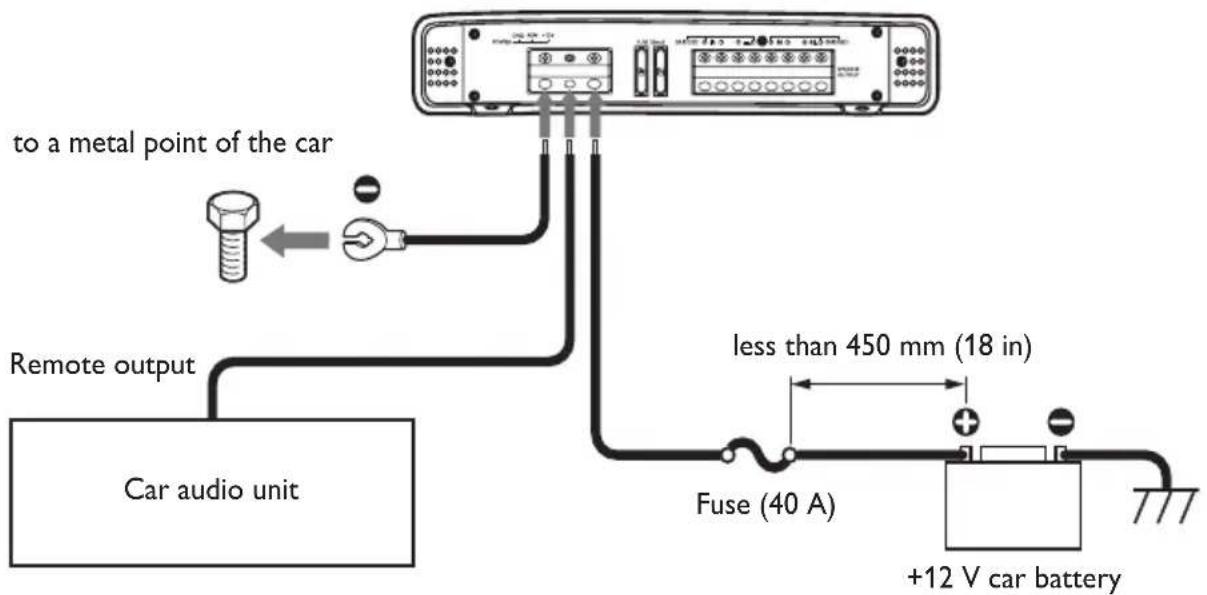
1 Make the power connection as illustrated below:
- Connect the ground wire from the car to the GND socket.
- Connect the remote wire from the car audio to the REM socket.
√ With this connection, you can turn on/off the amplifier with the car udio. - Connect the power wire from the car battery to the +12V socket.

Tip
- If your car audio does not have remote output, connect the remote input terminal (REM) to the accessory power supply.
4 Use your power amplifier
Select crossover frequency mode
You can select crossover frequency mode as below:
| HPF(high-pass-filter) mode | Select this mode when mid-range speakers and tweeters are connected for high frequency output. |
| LPF (Low-pass-filter) mode | Select this mode when woofer and subwoofer is connected for low frequency output. |
| OFF (flat) mode | Select this mode when tri-mode speaker connection is used. |
1 Slide HPF/OFF/LPF to the selected positon.

Adjust frequency
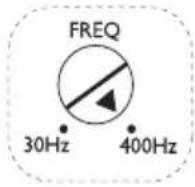
You can adjust frequency of HPF or LPF from 30HZ to 400Hz.

Note
- When the HPF/OFF/LPF switch is set at OFF position, the frequency adjustment does not work.
1 Rotate FREQ to select frequency.
Adjust input level
You can adjust the input voltage from 0.3V to 6V.
1 Rotate INPUT LEVEL to adjust input voltage.

Adjust bass boost
You can punch extra bass for 0 to 12dB.
1 Rotate BASS BOOST to punch for extra bass.

About the protector indicator
The amplifier has a built-in protection circuit to protect the transistors and speakers when:
The unit is overheated. Or• A DC current is generated. Or• The battery voltage is over low or • over high. Or
The speaker terminals are short • circuited.
When the PROTECT indicator lights up in red, the unit shuts down automatically. If this happens, please:

1 Take out the disc or tape and turn off the car audio.
2 Check the cause of the malfunction (see above).
3 If the amplifier has overheated, wait until the unit cools down before use.
Replace fuse
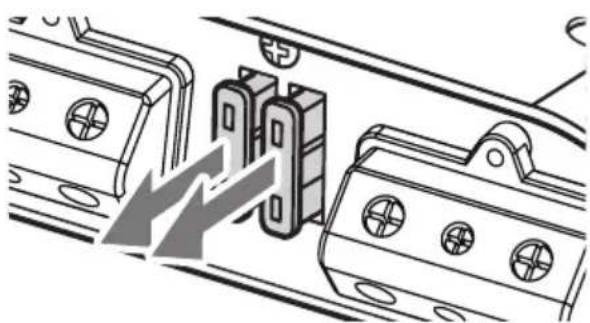
If there is no power, the fuse may be damaged and need to be replaced.
1 Pull out the damaged fuse.
2 Replace the fuse with the supplied fuses or to buy two fuses that matches the voltage of the damaged fuse (20A × 2).
natural_image
Technical diagram showing a mechanical assembly with two components and a lightning bolt symbol indicating a lightning bolt (no text or labels present)If the fuse gets damaged immediately after it has been replaced, there may be an internal malfunction. In such case, consult your Philips dealer.
5 Product information

Note
Product information is subject to change without prior notice.
| Power output (RMS) | |
| - 4 ohm | 50W × 4 |
| - 4 ohm (bridged) | 150W × 2 |
| - 2 ohm | 80W × 4 |
| Total harmonic distortion 0.016% | |
| Signal to noise ratio 106dB | |
| Channel separation 50dB | |
| Frequency response 5-100kHz | |
| Input sensitivity 300mV - 6V | |
| Input impedance 22k ohm | |
| Fuse rating 20A × 2 | |
| Dimensions (DxWxH) 54.4 × 336.5 × 240.2mm | |
6 Troubleshooting
To keep the warranty valid, never try to repair the system yourself.
If you encounter problems when using this apparatus, check the following points before requesting service. If the problem remains unsolved, go to the Philips web site (www.philips.com/welcome). When you contact Philips, ensure that the apparatus is nearby and the model number and serial number are available.
Power indicator does not light up
The connected car audio is not turned on.
The fuse is blown. Replace the fuse with a new one.
The sound is too low.
The input level is not set correctly (see "ADjust input level").
The sound is interrupted or stopped suddenly.
The thermal protector is activated. Reduce the volume.
The ventilation outlet is blocked. Remove any obstructions from the outlet.
Alternate noise is heard.
The power connecting wires are installed too close to the RCA pin cords.
The ground wire is not securely connected to a metal point of the car.
Negative speaker wires touch the car chassis.
The protector indicator lights up in red.
• The speaker terminals are short circuited. Check the speaker connections.
• The amplifier is overheated. Cool down the amplifier before use.
• The amplifier is overloaded.
The unit becomes abnormally hot.
- Place the amplifier in a well ventilated location.
• Use speakers with suitable impedance: 2-8 ohm (stereo), 4-8 ohm (bridged).

- Contents
- Important 4
- Your car power amplifier 5
- Installation 7
- Use your power amplifier 10
- Product information 12
- Troubleshooting 13
- Important
- Safety
- Notice
- Environmental information
- Your car power amplifier
- Introduction
- What's in the box
- Installation
- Installation
- Note
- Connect speakers
- Connect car audio
- Option 1: High level input connection
- Option 2: Line input connection
- Option 3: Line output connection
- Connect power
- Make the power connection as illustrated below:
- Tip
- Use your power amplifier
- Select crossover frequency mode
- Adjust frequency
- Adjust input level
- Adjust bass boost
- About the protector indicator
- Replace fuse
- Product information
- Troubleshooting
- Power indicator does not light up
- The sound is too low.
- The sound is interrupted or stopped suddenly.
- Alternate noise is heard.
- The protector indicator lights up in red.
- The unit becomes abnormally hot.
Brand : PHILIPS
Model : CMP400
Category : Receiver