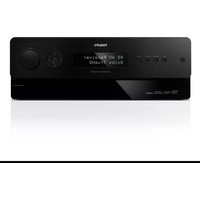
AVR9900 - Receiver PHILIPS - Free user manual and instructions
Find the device manual for free AVR9900 PHILIPS in PDF.


| Product Type | AV Receiver |
| Brand | Philips |
| Model | AVR9900 |
| Dimensions (W x H x D) | 435 x 165 x 400 mm |
| Weight | 10.5 kg |
| Power Supply | 230V AC, 50 Hz |
| Power Consumption | 650 W (max), <0.5 W (standby) |
| Audio Output Power | 7 x 150 W (1 kHz, 0.1% THD) |
| Supported Audio Formats | Dolby TrueHD, DTS-HD Master Audio, PCM |
| Video Inputs | 4 x HDMI, 2 x Component, 2 x Composite |
| Video Outputs | 1 x HDMI, 1 x Component, 1 x Composite |
| Audio Inputs | 5 x Analog, 2 x Optical, 1 x Coaxial |
| Radio Tuner | FM/AM with RDS |
| Bluetooth | Yes, version 4.0 |
| Remote Control | Included (RC-100) |
| Maintenance | Wipe with dry soft cloth; do not use solvents. |
| Safety Warnings | Do not expose to rain or moisture. Unplug during storms. |
| Spare Parts & Repairability | For service, contact an authorized Philips service center. |
Frequently Asked Questions - AVR9900 PHILIPS
User questions about AVR9900 PHILIPS
0 question about this device. Answer the ones you know or ask your own.
Ask a new question about this device
Download the instructions for your Receiver in PDF format for free! Find your manual AVR9900 - PHILIPS and take your electronic device back in hand. On this page are published all the documents necessary for the use of your device. AVR9900 by PHILIPS.
USER MANUAL AVR9900 PHILIPS
EN User Manual 3
FR Mode d'emploi 3
Safety and important notice 4
Recycle notice 4
Trademark notice 5
2 Your product 6
Product overview 6
Remote control 6
Front panel 8
Rear panel 9
3 Connect 14
Place the High Definition A/V Receiver 14
Connect speakers and subwoofer 15
Connect radio antennas 15
Connect power cord 15
4 Setup 16
Subwoofer setup 16
Speaker setup (SmartEQ) 17
Navigate through the menu 18
Setting up listening modes 18
Listening mode setup 19
Additional Information 21
5 Enjoy 24
Select a play source 24
SOURCE input table 24
Listen to radio 25
Select the radio 25
Tune to a radio station 25
Store a radio preset 25
Choose the tuner mode 25
Name a radio preset 26
View Radio Data System (RDS) 26
6 Adjust settings 27
Settings menu 27
Source setup 27
Speaker setup 29
Trigger setup 32
Listening Mode setup 32
Video setup 34
Language setup 35
7 Troubleshooting 36
Main unit 36
Sound 36
8 Specifications 37
1 Important
Safety and important notice

Warning!
- Risk of overheating! Never install the High Definition A/V Receiver in a confined space. Always leave a space of at least 4 inches around the High Defi nition A/V Receiver for ventilation. Ensure curtains or other objects never cover the ventilation slots on the High Defi nition A/V Receiver.
- Never place the High Defi nition A/V Receiver, remote control or batteries near naked fl ames or other heat sources, including direct sunlight.
- Only use this High Definition A/V Receiver indoors. Keep this High Definition A/V Receiver away from water, moisture and liquid-filled objects.
- Never place this High Definition A/V Receiver on or under other electrical equipment.
- Never stack the Blu-ray disc player with the High Definition AV receiver to prevent overheat or product malfunction occurs.
- Keep away from this High Definition A/V Receiver during lightning storms.
Where the mains plug or an appliance coupler is • used as the disconnect device, the disconnect device shall remain readily operable.

This product complies with the radio interference requirements of the European Community. This product complies with the requirements of the following directives and guidelines: 2004/108/EC, 2006/95/EC.
Recycle notice

Your product is designed and manufactu with high quality materials and components, which can be recycled and reused.
When you see the crossed-out wheeled bin symbol attached to a product, it means the product is covered by the European Directive 2002/96/EC:


Never dispose of your product with other household waste. Please inform yourself about the local rules on the separate collection of electrical and electronic products. The correct disposal of your old product helps prevent potentially negative consequences for the environment and human health.

Your product contains batteries covered by the European Directive 2006/66/EC, which cannot be disposed of with normal household waste.
Please inform yourself about the local rules on the separate collection of batteries. The correct disposal of batteries helps prevent potentially negative consequences for the environment and human health.
Mains fuse (UK only)
This High Definition A/V Receiver is fitted with an approved moulded plug. Should it become necessary to replace the mains fuse, this must be replaced with a fuse of the same value as indicated on the plug (example 10A).
1 Remove fuse cover and fuse.
2 The replacement fuse must comply with BS 1362 and have the ASTA approval mark. If the fuse is lost, contact your dealer in order to verify the correct type.
3 Refi t the fuse cover.
In order to maintain conformity to the EMC directive, the mains plug on this product must not be detached from the mains cord cable.
Trademark notice
dts-hd Master Audio
Manufactured under license under U.S. Patent #'s: 5,451,942; 5,956,674; 5,974,380; 5,978,762; 6,226,616; 6,487,535; 7,392,195; 7,272,567; 7,333,929; 7,212,872 & other U.S. and worldwide patents issued & pending. DTS is a registered trademark and the DTS logos, Symbol, DTS-HD and HTS-HD Master Audio are trademarks of DTS, Inc. © 1996-2008 DTS, Inc. All Rights Reserved.


Manufactured under license from Dolby Laboratories. Dolby and the double-D symbol are trademarks of Dolby Laboratories.

HDMI, and HDMI logo and High-Definition Multimedia Interface are trademarks or registered trademarks of HDMI licensing LLC.
2 Your product
Product overview
Remote control

① RECEIVER ⏻
Turns on the High Definition A/V • Receiver or turns it off to standby mode.
② BLU-PLAYER ⏻
Turns on or turns off Philips Blu-Ray • player to standby mode.
③ SOURCE
Press this button for direct access to • different source inputs selections.
④ TUNER FM/AM
Selects FM or AM band.
⑤ INFO
Displays the source information.
⑥ Philips Blu-Ray player control
▶: Starts playback.
■: Stops playback.
II: Pauses playback temporarily.
◀◀ / ▶▶ : Fast reverse/forward search.
⑦ TUNER PRESET + / -
Press • + or — to step up or down between stored radio tuner presets.
⑧ (mute)
Switches off the sound temporarily.
- Press again to restore sound or press VOL +.
⑨ Numeric buttons
- Press to enter the number(s) for the radio preset.
⑩ TONE
Toggle to select different tone control: • activate or deactivate tone control, bass tone or treble tone.
Turns on or off tone control circuits or • selects bass or treble tone.
⑪ TEST TONE
Press this button for the test tone of • each speaker only when in "Speaker Levels" option under "Speaker Setup" menu.
⑫ SETUP / MENU
Accesses or exits the Main menu • options.
⑬ OK
Confirms an entry or selection.
⑭ Cursor buttons (▲ ▼ ◀ ▶)
Selects an item in a menu.
In radio mode, press • ▲▼ to tune the radio frequency up/down or press ◀▶ to select a preset number.
⑮ BACK
Returns to the previous display menu.
⑯ VOL + / -
- Adjusts the volume level.
⑰ SURROUND.
- Toggle to select desired listening or surround mode.
⑱ Tuner control
- MEMORY/PROGRAM: Saves current station into preset memory. Press and hold to start auto search.
• CLEAR: Deletes radio preset. - FM MODE : Switches between FM stereo and FM mono.
SOURCE input table
| Source | Audio Input | Video Input | Video Output |
| Source 1 (BLU-PLAYER) | Blu-ray IN/Audio 1 IN | Blu-ray 1 IN | HDMI Monitor OUT |
| Source 2 (TV) | Coaxial TV/Audio 2 IN | Component Video 2 IN | Component Video OUT |
| Source 3 | HDMI 2 IN/Audio 3 IN | HDMI 2 IN | HDMI Monitor OUT |
| Source 4 | Optical 1 IN/Audio 4 IN | S-Video 4 IN | S-Video Monitor OUT |
| Source 5 | Optical 2 IN/Audio 5 IN | S-Video 3 IN | Video Monitor OUT |
| Source 6 | Coaxial AUX/Audio 6 IN | Video 4 (composite) | Video Monitor OUT |
| Source 7 (Multi) | 7.1 Input | Component Video 3 IN | Component Video OUT |
| Source 8 (Front) | Optical Front Input/Audio Front Input | S-Video Front IN | S-Video Monitor OUT |
Front panel

① ⏻
Turns on the High Definition A/V • Receiver or turn off to standby mode.
② SETUP / MENU
Accesses or exits the Main menu • options.
③ SURROUND
Toggle to select through the various • listening mode options. Depending on the format of the currently selected input (digital or analogue, stereo or multichannel).
④ BACK/EXIT
Returns to previous screen or exits the • Settings menu.
⑤ SOURCE
Toggle through the input selections. • See "SOURCE input table" for more information.
⑥ Display Panel
Provides visual information on all • important modes and settings of the High Definition A/V Receiver.
⑦ Remote control sensor
Point the remote control at the remote • control sensor.
⑧ Cursor buttons (▲▼◀▶)
Selects an item in a menu. • In radio mode, press • ▲▼ to tune the radio frequency up/down or press ◀▶ to select a preset number.
OK
Confirms an entry or selection.
⑨ VOLUME
- Adjusts the volume level of the main speakers.
⑩ HEADPHONES / SETUP MIC socket
- Use this socket to connect a standard headphone and/or a supplied microphone used for speaker auto calibration. See 'Setup' > 'Speaker setup (Smart EQ)'.
⑪ AV socket (AUDIO L/R, VIDEO IN, S-VIDEO, OPTICAL)
- Use these convenience sockets for occasional sources such as a camcorder, video game console, any analogue audio or optical digital audio and composite video or S-video sources.
Rear panel

① COAXIAL IN-TV / IN-AUX OPTICAL IN-1 / IN-2
Connect to the corresponding optical or coaxial S/PDIF-format digital output of sources such as CD or DVD players, HDTV or satellite tuners and other devices.

Note
For Philips TV, connect it to the COAXIAL IN-TV.
COAXIAL OUT OPTICAL OUT
Connect to the corresponding S/PDIF • digital (coaxial/optical) input of a compatible device such as CD recorders, receivers, computer soundcard or other digital processors.
② MONITOR OUT (S-VIDEO, VIDEO)
Connect to video input of the monitor/ • television using quality dual-composite and/or S-Video cables designed for video signals. S-Video produces sharper images than composite video, and should be used if your TV/monitor provides the corresponding input.
③ HDMI 1 (Blu-ray) -2-3-4 IN
Connect HDMI inputs to the HDMI • OUT connectors of source devices such as DVD player / HDTV satellite / cable box / Blu Ray Disc player / gaming device.

Note
For Philips Bllu-Ray Disc player, connect it to the • HDMI 1 IN.
④ HDMI MONITOR OUT
Connect the HDMI OUT to a HDTV • or projector with HDMI input. HDMI connection provides the best video quality.
⑤ COMPONENT VIDEO IN 1-2-3, COMPONENT MONITOR OUT
Connect the Component video inputs • to Component Video outputs from compatible source devices, typically a DVD player and terrestrial or satellite HDTV tuner.
Connect the Component video output • to the Component Video input of a compatible video monitor/TV. Be sure to observe consistency in connecting the Y/Pb/Pr sockets to the corresponding sources/inputs. The routing of the component video inputs is fully confi gurable via the Settings menu.
The High Definition A/V Receiver's component video inputs and outputs are fully wideband and compatible with allowable HDTV formats.
⑥ MULTI INPUT
Connect to the corresponding analogue • audio output ports of multichannel source devices such as a DVD-Audio or multichannel-SACD player or external multichannel decoder (disc copy protected formats only allow analogue signal transfer). Typically, these sources will produce 5.1-channel output, in which case the Surround Back sockets are left unconnected.
There is no bass-management or other processing (other than master volume control) available to this 7.1 Channel Input. While the multichannel audio outputs of a DVD-Video player can be connected to these sockets, using the High Definition A/V Receiver's own Dolby Digital and DTS decoding and digital-analogue converters via a digital connection will usually produce superior results.
⑦ ANTENNA FM, AM
Connect the supplied lead-type FM • antenna to the FM antenna input. Extend the lead. Experiment freely with your antenna placement and orientation until you get the clearest sound and lowest background noise. Fix the antenna in the desired position by using thumb tacks, push pins or any suitable means.
The AM loop antenna supplied with the • High Definition A/V Receiver (or a suitable replacement) is required for AM reception. Open the clip terminal lever, insert the wire making sure to match the colour-coded (white and black) ends of the wire to that of the terminal and close the lever ensuring that the lever locks the wire in place. Testing different positions for the antenna may improve reception, vertical orientation will usually produce the best results. Antenna proximity to large metal objects (appliances, radiators) may impair reception, as will attempts to lengthen the wire to the loop.
⑧ PRE-OUT
Connect the SW output to powered • subwoofer.
The PRE-OUT makes it possible to use the High Definition A/V Receiver as a pre-amplifi er to external power amplifi ers for some or all channels. Connect FRONT L, FRONT R, CENTER, SURR R, SURR L, SURR-BL, SURR-BR and SUBW to the respective channel input of a power amplifi er or an amplifi er driving the applicable speakers. Unlike the full range channels, there is no power amplifi er built-into the High Definition A/V Receiver for a subwoofer.
⑨ UPLOAD (MCU, HDMI), RESET
The MCU, HDMI and RESET switches • are meant for product service purposes. In the unlikely event that your High Definition A/V Receiver hangs up, you can press RESET to restore your High Definition A/V Receiver to normal adjust settings.
⑩ IR IN
These mini-sockets accept and output • remote-controlled codes in electrical format, using industry-standard protocols, for use with “IR-repeater” and multi-room systems and related technologies.
This input is connected to the output of an IR (infrared) repeater (Xantech or similar) or the IR output of another device to allow control of the High Definition A/V Receiver from a remote location.
IR OUT 1-2
Both IR OUT 1 and IR OUT 2 have • dual-features – they can act as an infrared command repeater or stand alone as IR OUT. Connect the High Definition A/V Receiver's IR IN to the IR OUT of ancillary device. Connect also the High Definition A/V Receiver's IR OUT 1 (or IR OUT 2) to another device with IR IN feature. With this setup, the High Definition A/V Receiver acts as an "IR-repeater" allowing the device connected to the High Definition A/V Receiver's IR IN control or command of the other device linked to the High Definition A/V Receiver's IR OUT 1 (or IR OUT 2).
As a stand alone IR OUT, connect IR • OUT 1 (or IR OUT 2) to the IR IN of an ancillary device. Direct the ancillary device's own remote control to the High Definition A/V Receiver's infrared receiver to command or control the linked unit.
⑪ +12V TRIGGER OUT
The +12V TRIGGER OUT is used for controlling external device that is equipped with a +12V trigger input. This output will be 12V when the High Definition A/V Receiver is ON and 0V when the unit is either OFF or in standby. This output can drive a load up to 150mA at 12V. (see 'Adjust settings' > 'Settings menu' > [Trigger setup])
⑫ VIDEO-AUDIO IN 1, VIDEO-AUDIO OUT 1
Connect VIDEO-AUDIO IN 1 to the • analogue audio/video output port of a recording device such as a video cassette recorder, DVD recorder or to an outboard audio/video processor.
Connect VIDEO-AUDIO OUT 1 to the recording device's corresponding analogue audio/video input port.
The signal present at VIDEO-AUDIO • OUT 1 port is dependent upon the current active SOURCE. There will be no output when VIDEO 1/AUDIO 1 is the selected source input. This prevents feedback through the recording device thereby preventing possible damage to your speakers.
⑬ VIDEO-AUDIO 2-3-4
These •
comprise the High Definition A/V Receiver other principal inputs.
Connect these S-Video, composite video, and analogue stereo audio input ports to the corresponding output ports of source devices.
⑭ AUDIO 5-6 IN, AUDIO 5 OUT
Input for additional line level input • signals such as CD player, MP player or a tape recorder. Connect AUDIO 5 OUT to the analogue audio input of a recording device such as a docking system, DVD recorder or to an outboard audio/video processor.
Connect the AUDIO 5 IN socket to • the device's corresponding output. AUDIO 6 IN is advisable to connect to a dedicated analogue output of line-level audio sources like a CD player or Stereo tuner.
⑮ RS-232C
The RS-232C is meant for product • service purposes.
Connect the respective speaker's • FRONT L, FRONT R, CENTER, SURROUND R, SURROUND L, SURROUND BACK L and SURROUND BACK R channels to their corresponding loudspeakers. Make sure the “+” (red) terminal and “-” (black) terminal are connected to the corresponding “+” and “-” terminals of the loudspeaker. Use extra care to ensure that no stray wires or strands cross between posts or terminals at either end. The High Definition A/V Receiver is designed to produce optimum sound quality when connected to speakers with impedances within its operating range. Please make sure that all the speakers are rated 8 ohms minimum per speaker.
⑰ SWITCHED AC OUTLET
This convenience outlet can supply • switched power to another device or accessory. It is powered ON and OFF by the front panel 2 button or the RECEIVER 2 button on the remote control. The total draw of all devices connected to this outlet must not exceed 100 watts.
⑱ AC INPUT
The High Defi nition A/V Receiver • comes supplied with a separate AC Mains cable. Before connecting the cable to a live wall socket, ensure that it is fi rmly connected to the High Defi nition A/V Receiver's AC Mains input socket fi rst. Connect only to the prescribed AC Outlet, i.e. 230V 50 Hz. Always disconnect the AC Mains cable plug from the live wall socket fi rst, before disconnecting the cable from the High Defi nition A/V Receiver's Mains input socket.
3 Connect
Make the following connections to use your High Definition A/V Receiver.
Connect this High Definition A/V Receiver:
Speakers and subwoofer (only included for • HTR9900)
Radio antenna•
Power•
Connect other devices:
Different types of connectors may be used to connect this product to your TV and other audio/video devices (for example, cable box, recorder, blu-ray disc player) depending on availability and your needs.

Note
Refer to the type plate at the back or bottom of the product for identification and supply ratings.
- Before you make or change any connections, ensure that all the devices are disconnected from the power outlet.
Place the High Definition A/V Receiver
Place the High Definition A/V Receiver • where it cannot be pushed, pulled over or knocked down. Do not place it in an enclosed cabinet.
Be sure that you have full access to the • power cord for easy disconnection from the power supply.
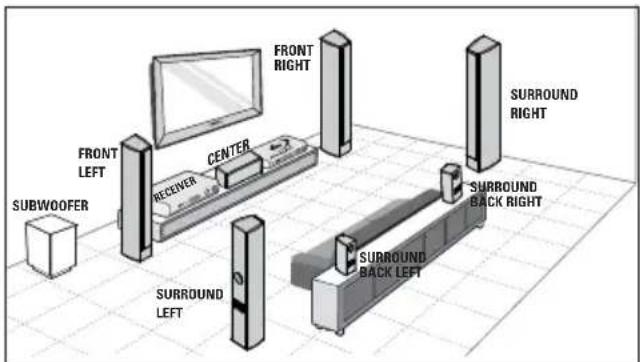
1 Place this High Definition A/V Receiver near the TV.
Do not place any other devices on top • or below the High Definition A/V Receiver, or leave a space of about 5 cm. Allow adequate ventilation space around.
2 Place the speakers system at normal listening ear-level and directly parallel to the listening area.
3 Place the subwoofer at the corner of the room or at least 1 metre away from the TV.

Tip
To avoid magnetic interference or unwanted noise, never place this High Definition A/V Receiver too close to any radiation devices.
Connect speakers and subwoofer

Speakers and subwoofer are supplied with • HTR9900 only
1 Connect the speakers and subwoofer to the matching sockets on this High Definition A/V Receiver.
Connect radio antennas

Assemble the loop antenna
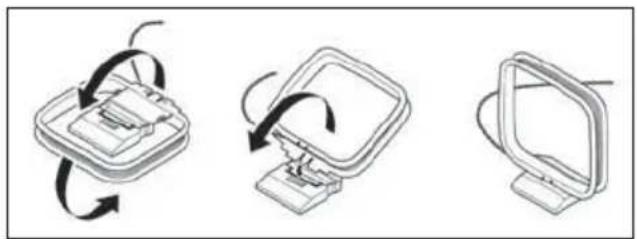
1 Rotate the outer frame of the antenna.
2 Insert the bottom edge of the outer frame into the groove on the stand.
3 Extend the AM loop antenna cord and connect to the AM socket on this High Definition A/V Receiver.
Place the AM loop antenna on a shelf • or attach it to a stand or wall.
4 Connect the FM antenna to the FM 75 Ω socket on this High Definition A/V Receiver.
Extend the FM antenna and fi x its ends • to the wall.
Connect power cord

Warning!
Risk of product damage! Ensure that the power • supply voltage corresponds to the voltage printed on the back of the underside of this unit.
1 Connect the power cord to the power outlet when all the required connections are done.
This High Definition A/V Receiver is now ready to be set up for use.
4 Setup
Subwoofer setup
(For HTR9900 only)
Fine-tune the subwoofer setting based on your listening preferences.
1 Tum the subwoofer on with the POWER switch,
2 Play music with bass content.
3 Turn the OUTPUT LEVEL switch clockwise until you begin to hear the source. Adjust the volume output to a comfortable listening level.
4 Switch the PHASE switch to '-180°'. This will let you determine if the bass sounds louder in your seating position. The more bass-heavy setting is where the output of the subwoofer and the main speakers are most in phase. Use whatever position is louder at your seating location. However, if you do not notice any difference when changing the setting, it only means there are no issues in your room and all is fine.
5 With the overall level at a reasonable volume, walk around the room. Listen for the balance between the subwoofer and the speakers. If there is too much low frequency sound, turn the FREQUENCY switch counter-clockwise towards "80 Hz" If more bass is needed, turn the FREQUENCY switch towards "160 Hz". Adjust for a good even balance.

Note
For HTR9900, the default frequency is 80 Hz.

① POWER switch
Use this switch to turn off the • subwoofer. The subwoofer is turned on when the power switch is switched to ON position. It is not automatically turned on when powered up. Ensure that the switch is at the correct position
② LINE INPUT socket
Connect to the subwoofer input socket • on the receiver.
③ PHASE switch
This switch changes the polarity of the • input to the subwoofer. Adjust this switch for most Bass.
④ FREQUENCY switch
This switch changes the crossover point • for the subwoofer and speakers.
⑤ OUTPUT LEVEL switch
This switch adjusts the amount of • subwoofer level in the acoustic mix. Turn the knob clockwise for more bass, counter-clockwise for less Bass.
Speaker setup (SmartEQ)
The SmartEQ feature uses a microphone, along with sophisticated digital electronics built into your High Definition A/V Receiver, to automatically setup and calibrate the High Definition A/V Receiver to the exact speakers and speaker placement of your own unique Home Theatre.
Setup is normally done once. In case the speakers are moved or changed, calibration should be performed again.
1 Tum on the High Definition A/V Receiver. Place the speakers at the correct • location. If the subwoofer is connected, ensure proper volume adjustment.
2 Turn on your TV to the correct viewing channel for this High Definition A/V Receiver.
3 Connect the supplied microphone to the HEADPHONES / SETUP MIC socket.

4 Position the microphone in the main listening position at ear height. Make sure there are no obstacles • between the speakers and the microphone.
SmartEQ
Please Connect the measurement microphone to the 9900
Position the microphone in the main listening position at ear height.
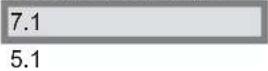
5 Select either 7.1 or 5.1 setup, depending on the availability of speakers.
Auto calibration starts. The following parametres are automatically measured and adjusted accordingly.
[Checking Noise Level]• – Checks noise level relative to each speaker and subwoofer.
[Checking Number of Speakers]•
– Speaker configuration is detected including number of surround speakers and whether a subwoofer and centre channel is connected.
[Speaker Distance]• – Sets the appropriate distance of each speaker position accurately as well as the subwoofer with respect to the microphone position.
[Checking Speaker Level and Size]•
High Definition A/V Receiver crossover is set based on each channel's signal handling capability and the subwoofer crossover is automatically set. SPL (Sound Pressure Level) of each speaker is matched with respect to the microphone position.
A special test tone is sent to each speaker and the data is stored by the High Definition A/V Receiver. The duration of setup may take some time depending on the number of speakers.
After the measurements, the High Definition A/V Receiver calculates the ideal system response for your particular room and speaker setup. If some inconsistencies or discrepancies are detected during the setup, the process maybe interrupted or the problem is shown in the particular setup window. A notice screen is correspondingly displayed. After following and undertaking the displayed instructions, re-start the Auto Calibration setup again. When the measurements are finalised, the High Definition A/V Receiver calculates the ideal system response for your particular room and speaker setup.

Note
The test tone emitted during measurement is loud. This maybe bothersome for you and may affect as well your other household members and even your neighbour.
Navigate through the menu
To navigate through the on-screen menu options, please do the following using the remote control or corresponding front panel buttons:
1 Press ▶ to select a menu item. Use ▲▼ buttons to move up or down the Menu selections. Repeatedly press ▶ to advance or go further into the sub-menu of a desired menu item.
2 When you are at a menu item and you want to set or change the parametre value (setting), press ▶ again until “^v” is displayed on the extreme right of the menu item. Use ▲▼ buttons to move up or down the menu options.
3 Press OK to save the settings or changes done on the current menu or sub-menu.
4 Press BACK/EXIT to exit from a particular menu and return to the previous menu.
Setting up listening modes
Press SETUP / MENU button of the remote control or front panel to display the High Definition A/V Receiver's Main menu on your video monitor/TV. If the on-screen menu does not appear, check your MONITOR OUT or HDMI OUT connections.
The Main Menu contains the menu options:
[Listening mode]•
[Audio synchs]•
[Tone controls] •
[Settings menu]•
| Listening mode | Source setup |
| Audio synchs | Speaker setup |
| Tone controls | Trigger setup |
| Settings menu | Listening Mode setup |
| Video setup | |
| Language setup | |
1 On the Main Menu, use ▲▼ buttons to navigate through the menu and select [Settings menu], then press ▶.
| Settings menu | |
| Source setup | Listening Mode |
| Speaker setup | Dolby Setup |
| Trigger setup | DTS Setup |
| Listening Mode setup | |
| Video setup | |
| Language setup | |
2 On the [Settings menu], use ▲▼ buttons to navigate through the menu and select [Listening Mode setup], then press ▶.
Listening mode setup
The High Definition A/V Receiver has various listening mode options and is mostly confi gurable. These are provided to reproduce a variety of sound effects depending upon the content of the source to be played. Use a combination of ▶ and ▲▼ buttons to configure the following settings.
The Listening Mode setup menu contains the following options:
[Listening Mode]•
[Dolby Setup]•
[DTS Setup] •
[Listening Mode]
The audio format as detected by the selected Source can be automatically configured and processed through the following options:
[Dolby Digital]•
[DTS]•
[Other]•
Listening Mode
Dolby Digital
2 Channel : PLIIx Music
Surround : PLIIx Movie
DTS : Neo:6
Other
Digital : None
Analog Audio : None
[Dolby Digital]•
Dolby Digital is the multi-channel digital signal format developed in the Dolby laboratories. Discs bearing the double-D symbol were recorded with up to 5.1 channels of digital signals, reproducing a much better sound quality, with dynamic and spatial sound sensations that are much better than in the previous Dolby Surround. A Dolby Digital audio input can be configured relative to its format.
- [2 Channel] – If the detected audio is a 2 Channel Dolby Digital signal, you can default it to one of the following settings – [PLIIx Movie], [PLIIx Music] or [None].
- [Surround] – If the detected audio is a Surround Dolby Digital signal, you can default it to one of the following settings – [Dolby Digital EX], [PLIIx Movie], [PLIIx Music], [Stereo Downmix] or [None].
![PHILIPS AVR9900 - [Dolby Digital]• - 1](/content/2026/06/1255305/images/26e7c8a401863bd1a85301e7f8c977def0b34efb8a2582f4ec7c565f3b21c6da.jpg)
Note
- If [None] is selected, the DTS signal will follow the [Digital] setting set forth at [Other] option under this menu section. See explanation on [Other] on the following page.
Music
[DTS]•
The Digital Theatre System Digital Surround (simply called DTS) is a multichannel digital signal format that can process higher data rates than with Dolby Digital. Although both Dolby Digital and DTS are 5.1 channel media formats, discs bearing the “DTS” symbol are thought to provide better sound quality due to the lower audio compression required. It also offers a broader dynamic, producing magnifi cent sound quality.
A DTS input can be defaulted to one of the following options: [DTS+NEO:6 Music], [Neo:6 Cinema], [Neo:6 Music], [Stereo Downmix] or [None].
[Other]•
If [None] is selected above for any of the Dolby Digital 2 Channel, Dolby Digital Surround and DTS options or if the audio input is an analogue signal, this [Other] section will manage the default audio format as per the [Digital] or [Analog Audio] settings.
[Digital]1. – The detected digital input can be configured by way of one of the following options – [7 ch Stereo], [Neo:6 Music], [Neo:6 Cinema], [PLIIx Music], [PLIIx Movie] or [None].
[Analog Audio]2. – If the audio input is an analog signal, the following are the surround modes the input can be defaulted. – [7 ch Stereo], [Neo:6 Music], [Neo:6 Cinema], [PLIIx Music], [PLIIx Movie] or [None].
![PHILIPS AVR9900 - [Other]• - 1](/content/2026/06/1255305/images/1a286857fd4649fc584b38e20201c8d5c15044ee39efa0ef5a81d188d1ee8879.jpg)
Note
All these Listening Modes for [Dolby Digital], [DTS] and [Other] can be directly changed by pressing the SURROUND button on the front panel or through the [Listening Mode] option at the [Main Menu] window.
- The chosen audio format will be reflected back to the appropriate setting at the [Listening mode setup].
[Dolby Setup]
Under this menu, the Dolby Digital's Dynamic Range Control can be adjusted as well as the settings for Dolby Digital Pro Logic IIx Music.
Dolby Setup
Dolby Digital
Dyn Range Ctrl : 100%
Dolby Pro Logic IIx Music
Dimensions : 0
Center Width : 3
Panorama : Off
[Dyn Range Ctrl]•
- (Dynamic
Control): You can select the effective dynamic range (subjective range from soft to loud) for playback of Dolby Digital soundtracks. For fully cinematic effect, always select 100%, the default. Settings of 75%, 50%, and 25% progressively reduce dynamic range, making soft sounds comparatively louder while limiting the peak loudness of loud ones. The 25% setting will yield the least dynamic range and is best for late night sessions or other times when you wish to retain maximum dialogue intelligibility while minimizing overall volume levels.
- [Dolby Pro Logic IIx Music] – Please refer to 'Adjust settings' > 'Listening mode setup' > 'Listening mode' > 'PLIIx Music' for more information.
[DTS Setup]
Under this menu, the Centre Gain settings of DTS Neo:6 Music can be adjusted.
DTS Setup
DTS : Neo:6 Music
Center Gain : 0.2
[Center gain (0 to 0.5)] • – Adjust for better centre image in relation to the surround sound channels.
Additional Information
Dolby Digital Surround Modes
The following are further descriptions about the Dolby Digital surround modes.
[Dolby Digital Plus]• – Dolby Digital Plus is the next-generation audio technology for all high-definition programming and media. It combines the efficiency to meet future broadcast demands with the power and flexibility to realise the full audio potential expected in the upcoming high-definition era. Built on Dolby Digital, the multi-channel audio standard for DVD and HD broadcasts worldwide, Dolby Digital Plus was designed for the next-generation A/V receivers but remains fully compatible with all current A/V receivers.
Dolby Digital Plus delivers multi-channel audio programs of up to 7.1 channels and supports multiple programmes in a single encoded bitstream with the maximum bit rate potential of up to 6 Mbps and the maximum bit rate performance of up to 3 Mbps on HD DVD and 1.7 Mbps on Blu-ray Disc. It outputs Dolby Digital bitstreams for playback on existing Dolby Digital systems.
Dolby Digital Plus can accurately reproduce the sound originally intended by directors and producers.
It also features multi-channel sound with discrete channel output, interactive mixing and streaming capability in advanced systems. Supported by High-Definition Media Interface (HDMI), a single-cable digital connection is possible for high-definition audio and video.
[Dolby TrueHD] • – Dolby TrueHD is a lossless encoding technology developed for high-defi nition optical discs in the upcoming era. Dolby TrueHD delivers tantalising sound that is bit-for-bit identical to the studio master, unlocking the true high-defi nition entertainment experience on high-defi nition optical discs in the next generation. When coupled with high-defi nition video, Dolby TrueHD offers an unprecedented home theatre experience with stunning sound and high-defi nition picture. It supports bit rates of up to 18 Mbps and records up to 8 full-range channels individually with 24-bit/96 kHz audio. It also features extensive metadata including dialogue normalisation and dynamic range control. Supported by High-Defi nition Media Interface (HDMI), a single-cable digital connection is possible for high-defi nition audio and video. HD DVD and Blu-ray Disc standards currently limit their maximum number of audio channels to eight, whereas Dolby Digital Plus and Dolby TrueHD support more than eight audio channels. Note that the High Defi nition A/V Receiver only supports 7.1 channel.
[Dolby Digital EX] •
- Using a
decoder, this method creates the back channel (sometimes also called the “surround centre”) by means of signals on the left and right surround channels recorded in Dolby Digital 5.1, reproduction being provided in Surround 6.1. This method should be selected with sources bearing the (double-D symbol)-EX,
recorded in Dolby Digital Surround EX. With this additional channel you will experience improved dynamics and a better sensation of movement within the sound fi eld. If media sources recorded in Dolby Digital EX are decoded with a Digital EX decoder, the format is detected automatically, and the Dolby Digital EX mode is selected. However, some media sources recorded in Dolby Digital EX can be detected as simple Dolby Digital media sources. In this case Dolby Digital EX should be selected manually.
DTS Digital Surround Modes
The following are further descriptions about the DTS surround modes.
[DTS-HD Master Audio]• – DTS-HD
Master Audio is a technology that delivers master audio sources recorded in a professional studio to listeners without any loss of data, preserving audio quality. DTS-HD Master Audio adopts variable data transfer rates, facilitating data transfer to the maximum rate of 24.5 Mbps in the Blu-ray disc format, 18.0 Mbps in the HD-DVD format, which by far exceeds that of a standard DVD. These high data transfer rates enable lossless transmission of 96 kHz/24-bit 7.1-channel audio sources without deteriorating the quality of the original sound. DTS-HD Master Audio is an irreplaceable technology that can reproduce sound faithfully as intended by the creator of music or movies.
[DTS-ES™ (Expanded Surround)] •
is a new multi-channel digital format which greatly improves the 360° spatial sensation of the Surround impression thanks to the greater space expansion of the surround signals, providing high compatibility with the conventional DTS format. In addition to the 5.1 channels, the expanded DTS-ES Surround also offers the back surround (also sometimes called the
“surround centre”) in reproduction, providing a total of 6.1 channels. The expanded DTS-ES Surround includes two formats, with two different methods of surround signal recording, as follows:
[DTS-ES™ Discrete 6.1] • – Since the signals of the 6.1 Surround channels (including the back channel) are completely independent, it is possible to achieve the sensation that the acoustic image is moving about freely among the background sounds, 360 degrees surrounding the listener.
Although maximum quality is achieved with sound tracks recorded using this system and reproduced using the DTS-ES decoder, the back surround channel is automatically downmixed in the surround right and surround left channels of the surround system, in such a way that none of the signal components are lost.
[DTS-ES™ Matrix 6.1] • – In this format, the additional signals of the back channel receive a matrix encoding and are inputted into the right and left surround channels. During reproduction they are decoded to the right, left and back surround channels. Since this bit-stream format is 100% compatible with conventional DTS signals, the DTS-ES Matrix 6.1 format effect can also be achieved from sources with DTS-ES 5.1 signals.
Naturally, it is also possible to reproduce from a DTS 5.1 channel decoder, signals recorded in DTS-ES 6.1. When a DTS-ES decoder processes a discrete DTS-ES 6.1 or in Matrix 6.1, these formats are automatically detected and the Optimum Surround mode is selected. However, some DTS-ES Matrix 6.1 sources may be detected as DTS. In this case the DTS-ES Matrix mode should be selected manually in order to reproduce them.
[DTS+Neo:6™ Surround] - •
applies the conventional 2-channel signals such as digital PCM or analogue stereo signals to the high precision digital matrix decoder used for DTS-ES Matrix 6.1 to achieve 6.1-channel surround playback. DTS Neo:6 surround includes two modes for selecting the optimum decoding of the signal sources:
[Neo:6 Cinema]1. – This method is ideal for the reproduction of movies. The decoding takes place by emphasising the separation in order to achieve the same atmosphere with 2-channel, as with 6.1-channel sources.
[Neo:6 Music]2. – Mainly recommended for music reproduction. The right and left front channels do not pass through the decoder and are reproduced directly so there is no loss in sound quality, and the effects of the right surround, left surround, central and back surround channels add a natural sensation of expansion of the sound field.
This
5 Enjoy
Select a play source
Route the audio from other devices to this High Definition A/V Receiver to enjoy the audio play with multi-channel surround capabilities. You can choose to connect to analogue or digital input socket depending on the device capabilities.
1 Press the respective SOURCE button on the remote control to select the input signal corresponds with the connected device. Double press to select the bottom row.
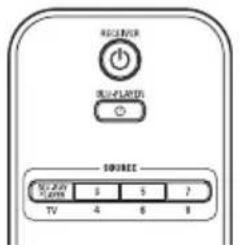
or
1 Press SOURCE on the front panel repeatedly to cycle through the input selection.

SOURCE input table
| Source Audio Input | Video Input | Video Output | |
| Source 1 (BLU-PLAYER) | Blu-ray IN/Audio 1 IN | Blu-ray IN HDMI Monitor OUT | |
| Source 2 (TV) | Coaxial TV/Audio 2 IN | Component Video 2 IN | Component Video OUT |
| Source 3 | HDMI 2 IN /Audio 3 IN | HDMI 2 IN HDMI Monitor OUT | |
| Source 4 | Optical 1 IN /Audio 4 IN | S-Video 4 IN S-Video Monitor OUT | |
| Source 5 | Optical 2 IN /Audio 5 IN | S-Video 3 IN | Video Monitor OUT |
| Source 6 | Coaxial AUX /Audio 6 IN | Video 4 (composite) | Video Monitor OUT |
| Source 7 (Multi) | 7.1 Input Component Video 3 IN | Component Video OUT | |
| Source 8 (Front) | Optical Front Input/Audio Front Input | S-Video Front IN | S-Video Monitor OUT |

Tip
To modify the above default settings and • for a better understanding of source setting and combinations (see 'Adjust settings' > 'Settings menu' > 'Source setup').
- Audio Input settings show both digital and analogue audio input. Digital input will always take precedence over analogue audio input even if both are present.
Listen to radio
The High Definition A/V Receiver's internal AM/FM tuner offers very high quality sound from radio broadcasts.
The reception and sound quality will always be dependent to a degree however on the type of antenna(s) used as well as proximity to the broadcast origin, geography and weather conditions.
Select the radio
1 Press TUNER AM/FM button repeatedly to select AM, FM radio mode.
Tune to a radio station
1 Press ▲▼ repeatedly to step up or down between frequencies.
2 Press and hold ▲▼ for more than 2 seconds to search up or down.
→ The High Definition A/V Receiver's tuner stops at the next sufficiently strong signal it encounters.
Pressing the • ▲▼ during the search process will stop the search.
Store a radio preset
The High Definition A/V Receiver can store up to 50 FM or AM stations for immediate recall.
1 To store a radio preset, first tune the desired frequency (see above), then press MEMORY/PROGRAM button.
2 Press ◀▶ to select a preset number to be assigned.
3 Then, press the MEMORY/PROGRAM button once again to save the station.
→ "P__" is displayed (the two blank spaces correspond to the preset stored number that could be from "01" to the maximum of "30", depending upon the current band).
4 Press ◀▶ to step up or down between presets.
Press and hold • ◀▶ to “scroll” continuously up or down. The remote control's TUNER PRESET +/− buttons work similarly.
Choose the tuner mode
1 Press FM MODE repeatedly to switch between FM Stereo mode and FM Mono. In the normal position, “FM STEREO • ON”, only the stations with a strong signal can be listened to, and the noise between stations is muted. In (“FM STEREO OFF”), distant and • potentially noisy stations to be received. Noise is reduced if the FM station signal level is less than the FM Stereo threshold (since mono FM is inherently less noise-prone) though at the sacrifice of the stereo effect.

Note
One can store the same channel in two preset • locations - one with "FM STEREO ON" and another with "FM STEREO OFF".
Name a radio preset
You can assign an eight character 'User Name' to each radio preset, which will show in the front-panel readout whenever that preset is recalled.
1 Recall the desired radio preset.
2 Then, press and hold INFO until the display shows a fl ashing cursor point.
3 Use the front panel ▲▼ buttons to select the first character of the name ('N' from the alphabetical list).
4 Press front panel ▶ button to select the character and correspondingly move forward to the next position. (Press ◀ to go back to the previous character). Repeat this process for each character in sequence.
5 Press the MEMORY/PROGRAM button again to store the name and exit the text entry mode.
View Radio Data System (RDS)
The Radio Data System (RDS) permits sending small amounts of digital information using conventional FM radio broadcasts. The High Definition A/V Receiver supports two RDS modes, station-name (PS mode) and radio-text (RT mode). Not every FM station incorporates RDS in its broadcast signal. In most areas you will find from one to several RDS-enabled stations, but it is by no means impossible that your favorite stations will not be broadcasting RDS data.
View RDS texts
When an RDS-enabled FM broadcast is tuned, after a brief delay the 'RDS' symbol will illuminate in the High Definition A/V Receiver's front-panel readout and the readout's character section will show its station-name (PS) text: 'ROCK101', for example.
Press the INFO button on the remote control to toggle the readout between this and the station's radio-text (RT) readout, if any, which might scroll song- or artist name, or any other text of the station's choosing.
6 Adjust settings
Settings menu
The Settings menu allows one to customise the High Definition A/V Receiver to the ancillary device used in one's specific AV system. Unless your system exactly matches the factory defaults, you will need to use the Settings menu to configure the inputs of the High Definition A/V Receiver.
At Settings menu, the following are configurable:
[Source setup]•
[Speaker setup]•
[Trigger setup]•
[Listening Mode setup]•
[Video setup]•
[Language setup]•
| Settings menu | |
| Source setup | |
| Speaker setup | |
| Trigger setup | |
| Listening Mode setup | |
| Video setup | |
| Language setup | |
Source setup
| Settings menu | |
| Source setup | Source setup |
| Speaker setup | |
| Trigger setup | |
| Listening Mode setup | |
| Video setup | |
| Language setup | |
From Settings menu, pressing ▶ will direct you to the Source setup menu wherein you could adjust allocate or change the settings of the following
[Source Setup (Normal View)]
The Source Setup (Normal View) makes it possible to set, allocate or change the following settings.
| Source setup (Normal View) | |
| Source | : 3 |
| Name | : Source 3 |
| Analog Audio | : Audio 3 |
| Gain | : 0dB |
| Digital Audio | : HDMI 2 |
| Video | : HDMI 2 |
| Trigger Out | : Yes |
- [Source]
The High Definition A/V Receiver is equipped with ten confi gurable Sources (Source 1 - 8). The settings for each Source are dependent on the confi gurations set forth in the parametres for that particular Source window. Use ▼▲ buttons to toggle through the Sources.
[Name] •
A new Name maybe assigned to a Source label. For example, if your DVD player is attached to "Source 3", it is possible to rename "Source 3" to 'DVD Player'.
1) In order to rename the Source label, scroll to "Name", press ▶ and then
▲▼ to pick and select through the alphanumeric selections.
2) Press ◀▶ to move to the next character and at the same time save the changes done on the current character. The name can be as long as eight characters.
3) The new Name will be shown in the display panel as well as on the on-screen display.
[Analog Audio] •
The High Definition A/V Receiver has 8 analogue audio inputs including Multi Input. These analogue inputs can be variably assigned to each Source:
[Audio 1/2/3/4/5/6/7.1 Input/Audio Front]
Scroll to [Analog Audio] and then press ▶ to select and assign an analogue audio input to the particular Source. If [Off] is selected, no incoming analogue audio signal is selected by the particular Source.
![PHILIPS AVR9900 - [Audio 1/2/3/4/5/6/7.1 Input/Audio Front] - 1](/content/2026/06/1255305/images/28e2b9ac5672246df1e897d9cdc1df5c0b69fc5ba09f621a77542bf5c8ffe9b5.jpg)
Note
Priority is given to an incoming digital signal present • at the assigned digital input over the assigned analogue audio input, even if both are present. To maintain the analogue audio input for the particular Source, select [Off] at the [Digital Audio] setting of the same [Source] menu.
[Gain]•
Gain adjustment allows all sources to play back at the same volume so you don't need to adjust the volume every time a new source is selected. It is generally preferable to reduce the level of the loudest source rather than making louder the softer sources.
Scroll to [Gain], press ▶ and then ▲▼ to step through the desired level from -12dB to 12dB.
[Digital Audio] •
To take advantage of the High Definition A/V Receiver's high performance surround and digital audio circuitry, it is advisable that its Digital Audio inputs are selected.
There are ten Digital Audio inputs selectable for the High Definition A/V Receiver. They are the following: [HDMI Blu-ray Player/2/3/4] > [Optical 1/2] > [Optical Front] > [Coaxial TV] > [Coaxial AUX].
If [Off] is selected, no incoming digital audio signal is selected by the particular Source.
![PHILIPS AVR9900 - [Digital Audio] • - 1](/content/2026/06/1255305/images/a0d0aec4e0045dc309013fe1ec63592f7f46e940cbe9f8241c3e75b72d6cd6de.jpg)
Note
Priority is given to an incoming digital signal present • at the assigned digital input over the assigned analogue audio input, even if both are present. To maintain the analogue audio input for the particular Source, select [Off] at the [Digital Audio] setting of the same [Source] menu.
[Video] •
A specific video input can be assigned a particular Source. The following are the assignable Video inputs:
[HDMI Blu-ray Player/2/3/4] >
[Component 1/2/3] > [S-Video 1/2/3/4] >
[S-Video Front] > [Composite 1/2/3/4] >
[Composite Front]
If [Off] is selected, no video input signal is selected by the particular Source.
[Trigger Out]•
The Trigger Out for a particular Source is dependent on the configurations done in a separate menu on Trigger Setup (See [Trigger setup] below). If Trigger output is assigned to [Source setup] in the separate [Trigger setup] menu window, +12V will be available at +12V TRIGGER OUT port whenever a Source with [Trigger Out] set to [Yes] is recalled.
Another option is [None] whereby the particular Source is not assigned any Trigger Out.
Speaker setup
After connecting all ancillary sources and other combinations, the Speaker setup menu will guide you on how to manage and setup your speakers in order to achieve optimum sound acoustics in your listening environment.
| Settings menu | |
| Source setup | SmartEQ |
| Speaker setup | Speaker Configuration |
| Trigger setup | Speaker Levels |
| Listening Mode setup | Speaker Distance |
| Video setup | |
| Language setup | |
[SmartEQ]
Adjusts the tonal quality (bass/treble level) for each speaker. This applies to all sound fi elds and for each speaker.
Please refer to 'Setup'>'Speaker setup (SmartEQ)' for more information.
[Speaker Configuration]
Speaker Configuration
| Front | : | S | 80Hz |
| Center | : | S | 80Hz |
| Surround | : | S | 80Hz |
| Back | : | S | 80Hz |
| Subwoofer | : | On |
Every surround-sound system requires "bass-management" to direct low frequency content from any or all channels to the speakers best able to reproduce it. For this function to operate correctly, it is important that you correctly identify your speakers' capabilities. We use the terms [S] (small), [L] (large) and [Off], but note that physical size may be irrelevant.
[S]• speaker is any model, regardless of physical size, that lacks signifi cant deep-bass response, that is, at about 50 Hz to 160 Hz.
[L]• speaker is any full-range model, that is, one with deep-bass response
- [Off] speaker is one that is not present in your system. For example, you might not have any surround-back speakers installed; in that case, you would set the [Back] setup item to [Off].
![PHILIPS AVR9900 - [Speaker Configuration] - 1](/content/2026/06/1255305/images/237b088ea63d9f696a7cc347c016daaa852c9941e168839e23f9ce9bb8e1b5cd.jpg)
Note
- The default frequency setting for each speaker is 80 Hz.
Speaker Conf i guration can be managed and adjusted by pressing a combination of ▶ and then ▲▼ buttons.
- Set [Front], [Center], [Surround] and [Back] to [L] (large), [S] (small) or [Off] along with their corresponding crossover frequency settings (available at Small setting from 50 Hz up to 160 Hz) as your sub-system's speakers require.
- Set [Subwoofer] to [On] or [Off], selecting [On] only if you have a subwoofer connected to the SW output socket.
[Speaker Levels]
| Speaker Levels | ||
| Front Left | : 0dB | |
| Center | : | 0dB |
| Front Right | : 0dB | |
| Surround Right | : 0dB | |
| Back Right | : 0dB | |
| Back Left | : 0dB | |
| Surround Left | : 0dB | |
| Subwoofer | : | 0dB |
Adjusting the relative balance of your system's loudspeakers ensures that surround-sound recordings, whether music or fi lm, will present the balance of effects, music, and dialogue that the artists intended. Additionally, if your system incorporates a subwoofer it establishes a correct relationship between the volume of the subwoofer and the other speakers, and thus of low-frequencies (bass) to other sonic elements.
Setting speaker levels at test mode
While at [Speaker Levels] menu, press the TEST TONE button activating the High Definition A/V Receiver's Speaker Levels balancing test signal. You will hear a "surf" sound as you continue testing your speakers beginning with the Front Left. To test each channel, use the ▲▼ buttons to move up or down the speaker channels. If you do not hear the test signal, check your speaker connections or your [Speaker Setup] menu settings.
Use the ▲▼ buttons to adjust the loudness of the noise output from the currently playing channel to the required level (it's usually simplest to begin with the Front Left). As you cycle the test signal around the speakers, the on-screen display will highlight the currently playing channel. The “level offset” reading on the right will change by 1 dB increments; ±12 dB adjustment is available. After adjusting a channel, press ▶ to effect the change in level. Press ▲▼ to go to the next channel.

Note
If you are balancing levels "by ear", choose one speaker—usually the centre—as a reference and adjust each of the others in turn to "sound as loud" as the reference. Be sure that you remain in the primary listening position while balancing all channels.
- All speakers must be in their final locations before level-setting.
- Due to the effects of room acoustics, matched-pair speakers (front; surround; back) will not always calibrate to exactly the same level offset readings.
You can exit "Test" mode at any time by pressing the BACK/EXIT button, bringing you back to [Speaker setup] menu.
[Speaker Distance]
Speaker Distance
| Front Left : 0.0 m | ||
| Center : 0.0 m | ||
| Front Right : 0.0 m | ||
| Surround Right : 0.0 m | ||
| Back Right : 0.0 m | ||
| Back Left : 0.0 m | ||
| Surround Left : 0.0 m |
Your system's speaker distance settings are a subtle but important refinement of your setup. Informing the High Definition A/V Receiver of the loudspeaker to listener dimensions of each speaker automatically imposes the correct delays, optimising imaging, intelligibility and surround-sound ambience. Enter your dimensions with precision within about 30 cm.
Setting speaker distance
While at [Speaker Distance] menu, use the
▲▼ buttons to individually set the following: [Front Left] > [Center] > [Front Right] > [Surround Right] > [Back] > [Surround Left] > [Subwoofer] to the distance measuring from your principal listening position to the front surface of their corresponding loudspeakers. Distance can be set up to 9 metres.
Trigger setup
| Settings menu | |
| Source setup | Trigger out : Main |
| Speaker setup | Delay : 0s |
| Trigger setup | |
| Listening Mode setup | |
| Video setup | |
| Language setup | |
The High Definition A/V Receiver features a confi gurable +12V DC Trigger Output that can be used to activate a device or system it is fed into.
[Trigger out]
Triggers are low voltage signals used to turn on/off other compliant devices. There are two choices where +12V DC output can be assigned and these are – Main and Source Setup.
[Main]• - +12V DC is available at the assigned Trigger Out when the High Definition A/V Receiver is at powered state.
[Source setup]• – If Trigger Output is linked to “Source setup”, +12V DC is available at Trigger Out whenever the particularly assigned Source is selected.
[Delay]
The availability of +12V DC at Trigger OUT can be regulated. If it is desired that +12V DC is available without delay the moment Trigger OUT is linked to its assigned setting, set Delay to 0s. Otherwise, one can select through a delay time of 1s to 15s.
Listening Mode setup
| Settings menu | |
| Source setup | Listening Mode |
| Speaker setup | Dolby Setup |
| Trigger setup | DTS Setup |
| Listening Mode setup | |
| Video setup | |
| Language setup | |
Please refer to 'Setup'> 'Setting up listening modes'> 'Listening Mode Setup' for more information.
Adjust listening modes
The High Definition A/V Receiver's listening modes have several variations and parametres that you can modify to suit your personal preferences. Use a combination of ▶ and ▲▼ buttons to configure the following settings.
On the Main Menu, use ▲▼ buttons to navigate through the menu and select [Listening mode], and then press ▶.
| Listening mode | Mode : PLIIx Music |
| Audio synchs | Center Width : 3 |
| Tone controls | Dimensions : 0 |
| Settings menu | Panorama : Off |
[Listening Mode]
The following options can be selected from [Listening Mode] under [Mode] option. (This option is for a two-channel input only.)
• [Stereo]
• [PLIIx Music]
• [PLIIx Movie]
[Stereo]• - All output is directed to the front left/right channels. Low frequencies are directed by default to the subwoofer if one is present in the Speaker settings. Select "Stereo" when you wish to listen to a stereo (or monaural) production, such as music CD or FM broadcast, without surround enhancement. Stereo recordings whether in PCM/digital or analogue form and whether surround encoded or not encoded, are reproduced as recorded. Multi-channel digital recordings (Dolby Digital and DTS) are reproduced in "Stereo Downmix" mode via the front left/right channels only as Lt/Rt (left/right-total) signals.
[PLIIx Movie] - • Provides more stable imaging and full bandwidth sound to the rear channels offering sound that is more similar to Dolby Digital decoding.
[PLIIx Music] - • For two channel signals, PLIIx Music features three additional user controls - Dimension, Centre Width, and Panorama.
[Center Width (0 to 7)] 1. – Modify the "hard-centeredness" of the centre image, by gradually mixing mono centre content to the Front left/right speakers as well. A setting of 0 retains the centre-channel-only default while a setting of 7 yields a fully phantom centre channel.
[Dimension (-3 to +3)] 2. – Adjust front-rear emphasis of the surround effect independently from the relative channel levels.
[Panorama (On/Off)] 3.
around" effect by extending some stereo content into the surround channels.
![PHILIPS AVR9900 - [Listening Mode] - 1](/content/2026/06/1255305/images/17a142519b746b6c87d2cf04f3fff79fc2f2380efc468c25036a4c3c589ffdde.jpg)
Note
- PLIIx Movie or PLIIx Music modes belongs to Dolby Pro Logic IIx that processes both stereo and 5.1 signals into a 6.1 or 7.1 channel output.
- Pro Logic IIx mode will decode as Pro Logic II mode when the [Back] surround speakers are set to [Off] from [Speaker Configuration] menu. (See 'Adjust settings' > 'Settings menu' > 'Speaker setup' > [Speaker Configuration]).
The following chart shows the channels available assuming they are enabled in the "Speaker Configuration" menu.
| Listening ModeTwo-Channel Sources | Active Decoded Output Channels | |
| 5.1 Speaker System | 7.1 Speaker System | |
| Dolby ProLogic IlxMusicDolby ProLogic IlxMovie | Front: (left & right), Centre, Surround(left & right),Back:Surround,Subwoofer | Front (left & right), Centre, Surround (left & right) and Back Surround(left and right) and subwoofer |
[Audio synchs]
| Listening mode | Lip Sync Delay : 200ms |
| Audio synchs | |
| Tone controls | |
| Settings menu | |
| Add a “wrap | |
Audio synchs has the feature [Lip Sync Delay] whose function is to match any delay that may occur in the picture relative to the audio.
By varying [Lip Sync Delay] from 0ms to 200ms, one can delay the audio output in order to synchronise it with the video image.
[Tone controls]
| Listening mode | Pure tone : Off |
| Audio synchs | Treble : 0dB |
| Tone controls | Bass : 0dB |
| Settings menu | |
Pure Tone allows you vary or completely bypass the tone control section of the High Definition A/V Receiver.
If • [Off] is selected, the Tone Control circuits are active. Select [On] to bypass the Tone Controls effectively defeating the effect of the tone control circuits.
The High Definition A/V Receiver has two Tone Control levels - [Treble] and [Bass]. Bass and Treble controls only affect the • low bass and high treble leaving the critical midrange frequencies free of colouration.
These controls allow one to tweak on-the-fl y, the frequency response of the source. Use the ▲▼ buttons to adjust Treble and Bass within the range ± 10 dB
Video setup
| Settings menu | |
| Source setup | Picture setup |
| Speaker setup | |
| Trigger setup | |
| Listening Mode setup | |
| Video setup | |
| Language setup | |
[Picture setup]
| Picture setup | |
| Video modes | : Custom |
| Brightness | : 50 |
| Contrast | : 50 |
| Color | |
| MPEG Noise reduction | : Off |
| Cross Color suppressor | : Off |
| Film Mode detection | : Off |
Picture setup can be defaulted to [Normal] or [Custom]. While at [Video modes] menu item, select [Normal] to retain the default picture setup settings. If you would like to further improve the picture settings or adjust the parametres according to your preference, set [Video modes] to [Custom]. The following parametres can be adjusted.
- [Brightness] – Adjust overall brightness of the picture.
- [Contrast] – Adjust bright areas (white level) of the picture.
- [Color] – If brightness and contrast levels are set optimally, adjust the colour control to the level of your preference.
- [MPEG Noise reduction] – This setting is designed to address two specific types of video distortion - mosquito noise and blocking artifacts. Set the level to High, Medium or Low.
[Cross Color suppressor]• – Remove cross colour artifacts that can occur when high-frequency luminance (brightness) signals are misinterpreted as chroma (colour) signals. This can cause unwanted flickering, flashing colours or rainbow patterns. Select [On] to turn on this feature; otherwise, select [Off].
[Film Mode detection]• – Turn on this setting to compensate for authoring errors that may have occurred during the process of converting fi lm programmes to video.
Language setup
| Settings menu | |
| Source setup | English |
| Speaker setup | |
| Trigger setup | |
| Listening Mode setup | |
| Video setup | |
| Language setup | |
This menu allows you to set the menu display language of the High Definition A/V Receiver.
7 Troubleshooting

Warning!
Risk of electric shock. Never remove the casing of this player.
To keep the warranty valid, never try to repair the system yourself.
If you encounter problems when using this player, check the following points before requesting service. If the problem remains unsolved, register your High Definition A/V Receiver and get support at www.philips.com/welcome.
If you contact Philips, you will be asked for the model and serial number of your High Definition A/V Receiver. The model number and serial number are on the back or bottom of this player. Write the numbers here:
Model No. ____ Serial No. ____
Main unit
High Definition A/V Receiver does not respond to remote control commands.
Check batteries.
Check IR windows and ensure clear Line of • Sight from remote to High Definition A/V Receiver.
Reduce sunlight/room lighting.
Restore all the settings to its factory defaults.
Press • TUNER FM/AM to switch to FM mode, then press and hold SURROUND on the front panel until the "FACTORY RESET" appears on the display panel.
Sound
No sound from all channels.
Check AC cable connection and outlet.
No sound from some channels.
Check speaker cables.
Check "Speaker Configuration" menu.
No sound from surround channels.
Select appropriate listening mode.
Correct •
[Speakers setup] or [Speaker
Levels] settings.
No sound from subwoofer.
- Power-up subwoofer, check Sub's AC outlet or check connections.
- Correct [Speaker Configuration] or [Speaker Levels] settings.
- It is recommended to adjust the 'Output Level' knob of the subwoofer only to a reasonable loudness.
No sound from centre channel.
- Play a known 5.1-channel recording or select Dolby Pro Logic IIx Music mode.
- Correct [Speaker Configuration] or [Speaker Levels] settings.
No Dolby Digital/ DTS.
- Check connections.
- Check source device setup.
While watching video, lip movements and sound are not synched up.
- 1) Press SETUP or MENU. 2) Select [Audio synchs] > [Lip Sync Delay]. 3) Press ▲▼ to set the audio delay value until the lip movements and sound match.
8 Specifications

Note
- Specification and design are subject to change without notice.
- This High Definition A/V Receiver does not support Philips EasyLink.
Accessories supplied
1 AM loop antenna•
1 FM antenna cable•
1 AC power cord (detachable for receiver's power • cord)
1 remote control with 2 AA batteries•
1 microphone (for automatic calibration of speaker • system)
Speakers and subwoofer (for HTR9900 only)•
Quick Start Guide•
Amplifi er
Power output • (ref. 0.08 % THD, 8 Ω):
Stereo mode: 2 x 115 W•
Surround mode: 7 × 60 W•
• Total harmonic distortion at rated power: 0.08 %
• IM distortion at rated power: 0.08 %
• Damping factor, 8 Ω: > 60
• Input sensitivity and impedance: 300 mV/47 kΩ
• Frequency response: ±0.5 dB (ref. 20Hz - 20 kHz)
• Signal/noise ratio, A-weighted:
• > 100 dB (ref. rated power 8Ω)
• > 90 dB (ref. 1W 8Ω)
• Trigger out DC voltage: 12V / 150mA
Tuner (AM Band)
• Tuning range: 522 kHz - 1620 kHz
Usable sensitivity: 60 dBu
• Signal/noise ratio: 40 dB
• Total Harmonic Distortion: 1.5 %
Tuner (FM Band)
• Tuning range: 87.5 MHz – 108 MHz
• Usable sensitivity, Mono: 10 dBμ
• Signal/noise ratio, Mono: 70 dB
• Signal/noise ratio, Stereo: 65 dB
• Total Harmonic Distortion, Mono: 0.3 %
• Total Harmonic Distortion, Stereo: 0.5 %
• Channel Separation: 40 dB°
• RDS decode sensitivity: 0.2 %
Main Unit
• Unit Dimensions (W × H × D): 435 × 167 × 394 mm
- Net Weight: 13.3 kg
Shipping Weight: 16.2 kg
• Standby power consumption: <1.8W
Power (Subwoofer)
• Power supply: 220\~240 V, 50 Hz
• Power consumption: 200 W
• System: Bass Reflex System
- Impedance: 4 ohm
Speaker drivers: 165 mm (8") woofer
• Frequency response: 50 Hz - 160 Hz (Adjustable)
• Dimensions (WxHxD): 336 × 424.5 × 366 (mm)
• Weight: 12.7 kg
Speakers
System: full range satellite•
• Speaker impedance: 8 ohm
- Speaker drivers:
• Centre: 2 × 4" woofer + 1 × 1" tweeter
- Front: 2x 4" woofer + 1x 1.5" tweeter
• Surround: 2x 4" woofer + 1x 1.5" tweeter
• Surround Back: 2× 4" woofer + 1× 1.5" tweeter
• Frequency response: 70 Hz - 20 kHz Dimensions (WxHxD): •
• Centre: 435.4 × 103.8 × 95.4 (mm)
• Front/Surround: 275 × 1117.8 × 288 (mm)
• Surround back: 275 × 1117.8 × 288 (mm)
• Weight:
- Centre: 1.54 kg
• Front/Surround: 7.14 kg
• Surround back: 6.32 kg

- 2 YOUR PRODUCT 6
- 3 CONNECT 14
- 4 SETUP 16
- 5 ENJOY 24
- 6 ADJUST SETTINGS 27
- 7 TROUBLESHOOTING 36
- 8 SPECIFICATIONS 37
- 1 IMPORTANT
- SAFETY AND IMPORTANT NOTICE
- WARNING
- RECYCLE NOTICE
- MAINS FUSE (UK ONLY)
- TRADEMARK NOTICE
- DTS-HD MASTER AUDIO
- 2 YOUR PRODUCT
- PRODUCT OVERVIEW
- ① RECEIVER ⏻
- ② BLU-PLAYER ⏻
- ③ SOURCE
- ④ TUNER FM/AM
- ⑤ INFO
- ⑥ PHILIPS BLU-RAY PLAYER CONTROL
- ⑦ TUNER PRESET
- ⑧ (MUTE)
- ⑨ NUMERIC BUTTONS
- ⑩ TONE
- ⑪ TEST TONE
- ⑫ SETUP / MENU
- ⑬ OK
- ⑭ CURSOR BUTTONS (▲ ▼ ◀ ▶)
- ⑮ BACK
- ⑯ VOL
- ⑰ SURROUND
- ⑱ TUNER CONTROL
- FRONT PANEL
- OK
- REAR PANEL
- ① COAXIAL IN-TV / IN-AUX OPTICAL IN-1 / IN-2
- NOTE
- COAXIAL OUT OPTICAL OUT
- ② MONITOR OUT (S-VIDEO, VIDEO)
- ③ HDMI 1 (BLU-RAY) -2-3-4 IN
- ④ HDMI MONITOR OUT
- ⑤ COMPONENT VIDEO IN 1-2-3, COMPONENT MONITOR OUT
- ⑥ MULTI INPUT
- ⑦ ANTENNA FM, AM
- ⑧ PRE-OUT
- ⑨ UPLOAD (MCU, HDMI), RESET
- ⑩ IR IN
- IR OUT 1-2
- ⑪ +12V TRIGGER OUT
- ⑫ VIDEO-AUDIO IN 1, VIDEO-AUDIO OUT 1
- ⑬ VIDEO-AUDIO 2-3-4
- ⑭ AUDIO 5-6 IN, AUDIO 5 OUT
- ⑮ RS-232C
- ⑰ SWITCHED AC OUTLET
- ⑱ AC INPUT
- 3 CONNECT
- CONNECT THIS HIGH DEFINITION A/V RECEIVER
- CONNECT OTHER DEVICES
- PLACE THE HIGH DEFINITION A/V RECEIVER
- TIP
- CONNECT SPEAKERS AND SUBWOOFER
- CONNECT RADIO ANTENNAS
- ASSEMBLE THE LOOP ANTENNA
- CONNECT POWER CORD
- 4 SETUP
- SUBWOOFER SETUP
- SPEAKER SETUP (SMARTEQ)
- SMARTEQ
- NAVIGATE THROUGH THE MENU
- SETTING UP LISTENING MODES
- LISTENING MODE SETUP
- [LISTENING MODE]
- [DOLBY DIGITAL]
- MUSIC
- [DTS]
- [OTHER]
- [DOLBY SETUP]
- DOLBY SETUP
- [DYN RANGE CTRL]
- [DTS SETUP]
- DTS SETUP
- ADDITIONAL INFORMATION
- DOLBY DIGITAL SURROUND MODES
- [DOLBY DIGITAL EX]
- DTS DIGITAL SURROUND MODES
- [DTS-HD MASTER AUDIO]• – DTS-HD
- [DTS-ES™ (EXPANDED SURROUND)]
- [DTS+NEO:6™ SURROUND]
- 5 ENJOY
- SELECT A PLAY SOURCE
- LISTEN TO RADIO
- SELECT THE RADIO
- TUNE TO A RADIO STATION
- STORE A RADIO PRESET
- CHOOSE THE TUNER MODE
- NAME A RADIO PRESET
- VIEW RADIO DATA SYSTEM (RDS)
- VIEW RDS TEXTS
- 6 ADJUST SETTINGS
- SETTINGS MENU
- SOURCE SETUP
- [SOURCE SETUP (NORMAL VIEW)]
- [SOURCE]
- [NAME]
- [ANALOG AUDIO]
- [AUDIO 1/2/3/4/5/6/7.1 INPUT/AUDIO FRONT]
- [GAIN]
- [DIGITAL AUDIO]
- [VIDEO]
- [TRIGGER OUT]
- SPEAKER SETUP
- [SMARTEQ]
- [SPEAKER CONFIGURATION]
- [SPEAKER LEVELS]
- SETTING SPEAKER LEVELS AT TEST MODE
- [SPEAKER DISTANCE]
- SETTING SPEAKER DISTANCE
- TRIGGER SETUP
- [DELAY]
- ADJUST LISTENING MODES
- [AUDIO SYNCHS]
- [TONE CONTROLS]
- VIDEO SETUP
- [PICTURE SETUP]
- 7 TROUBLESHOOTING
- MAIN UNIT
- SOUND
- 8 SPECIFICATIONS
- ACCESSORIES SUPPLIED
- AMPLIFI ER
- TUNER (AM BAND)
- TUNER (FM BAND)
- POWER (SUBWOOFER)
- SPEAKERS
Brand : PHILIPS
Model : AVR9900
Category : Receiver